Installing a block patio correctly comes down to what happens before you ever lay a single block. Get the excavation depth right, compact the base properly, and set your blocks on a level sand bed, and the surface will stay flat and solid for decades. Rush those steps and you'll be lifting blocks and re-doing the whole thing within a couple of seasons. Here's exactly how to do it from start to finish.
How to Install Block Patio: Step-by-Step DIY Guide

Clara Farrell
4 May 2026
Choosing and planning your patio block layout
Before you order anything, decide on your block type and your pattern. Standard concrete patio blocks and interlocking pavers are the two most common choices for DIYers. Standard blocks (typically 12x12 or 16x16 inches) are affordable and easy to handle alone. Interlocking pavers come in smaller sizes and interlock at the edges, which gives a tighter, more finished look but requires more cutting around the perimeter. If you're thinking about building raised sections or steps alongside your patio, you'll want to look at options like retaining wall blocks and cinder block steps as companion projects.
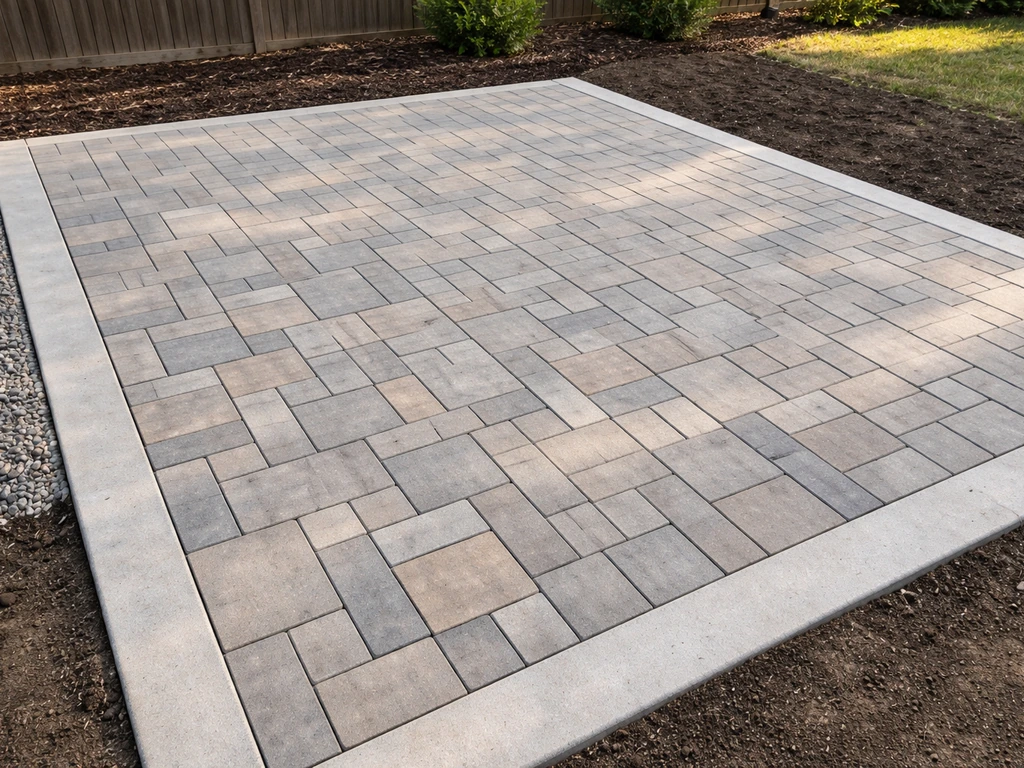
For the layout pattern, the most beginner-friendly options are a simple grid (blocks all running the same direction), a running bond (like brickwork, with staggered joints), or a herringbone at 45 or 90 degrees. A 45-degree herringbone looks great but generates a lot of cuts at the edges, so save that for your second patio. Running bond is the sweet spot for most first-timers: it's strong, it looks good, and the cuts are manageable.
Measure your patio area carefully and sketch it on graph paper. Calculate the square footage (length x width), then add 10% for cuts and breakage when ordering blocks. Mark the patio boundary on the ground with spray paint or mason's line stretched between stakes. At this stage, also check for underground utilities by blank" rel="noopener noreferrer">calling 811 before you dig. In the United States, 811 is the national FCC-designated number that connects you to your local one-call center so a locator can mark the approximate location of underground utility lines at your dig site blank" rel="noopener noreferrer">calling 811 before you dig.
Slope is critical and needs to be built into your plan right now, not corrected later. You need a minimum slope of 1 inch per 8 feet (roughly 1%) away from any structure, including your house. That slope keeps water from pooling on the surface and draining toward your foundation. Use a level and a tape measure, or a long straightedge with a line level, to map out your fall before you excavate.
Site prep: removing sod, setting base depth, and compacting
This is where most DIY patios either succeed or fail, and the step people most commonly underestimate. Plan to spend more time here than anywhere else.
How deep to dig
For a typical residential patio in a non-frost-prone climate, plan to excavate about 7 to 8 inches below finished grade. That gives you 4 to 6 inches of compacted gravel base, 1 inch of bedding sand, and your block thickness (usually 2 to 2.5 inches for standard pavers). In cold climates where the ground freezes, go deeper on the gravel base, 6 to 8 inches minimum, because it's the base depth that prevents frost heave from lifting your blocks. If you're not sure about your local frost depth, check with your county extension office or a local landscaper.
Removing sod and topsoil
Strip the sod first with a flat spade or a sod cutter rental if the area is large. Remove all organic material, including roots and loose topsoil, down to your required depth. Do not leave any topsoil in place and try to build over it. Organic matter compresses and rots over time, and that's exactly what causes patios to sink and go uneven.
Compacting the subgrade
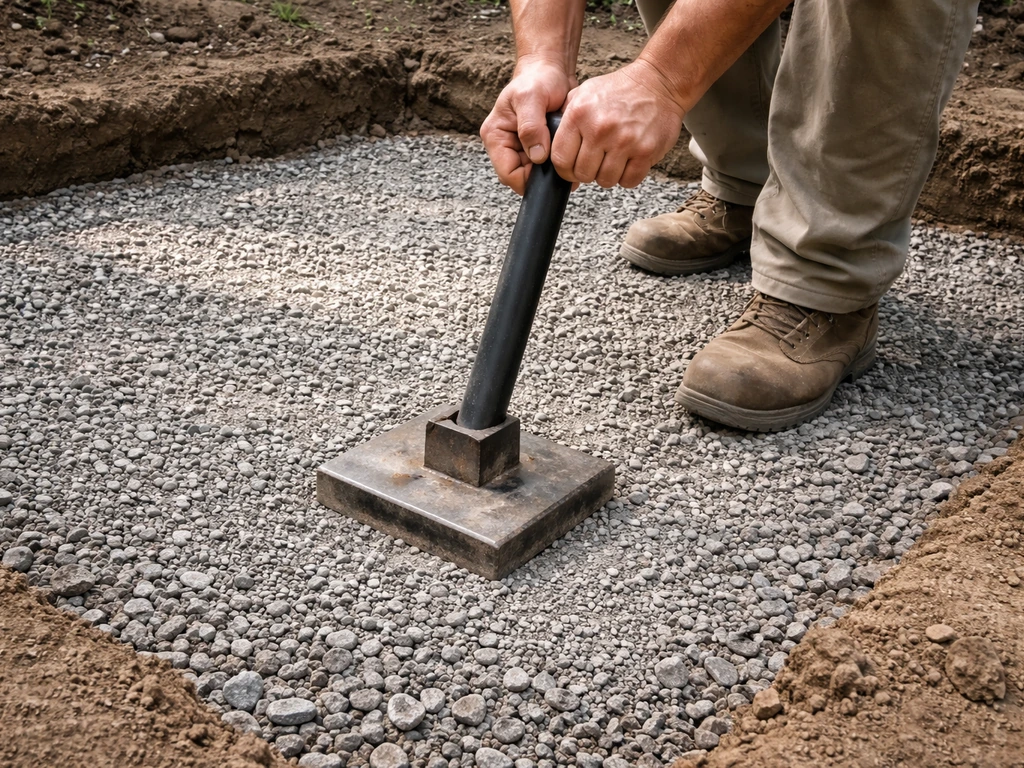
Once you've excavated, compact the exposed soil with a plate compactor. You can rent one from any equipment rental yard for around $50 to $100 per day, and it's non-negotiable. Make two or three passes in different directions across the entire area. If you hit soft or wet spots that don't firm up, dig them out and fill with gravel before compacting again. A firm, solid subgrade is the real foundation of your patio.
Installing edging and building the gravel and sand base
Setting the edging first
Install your perimeter edging before you add any base material. Plastic paver edging (the kind with spikes) is the standard choice for block patios. Stake it at the outer boundary of your patio, following the line you laid out earlier. Edging keeps your base layers and blocks contained and prevents edge blocks from spreading outward over time. Without it, the whole perimeter gradually migrates and the patio loses its shape. For a cleaner look, some people use metal edging, which holds a sharper line and is worth the small extra cost.
Adding and compacting the gravel base
Fill the excavated area with crushed stone or gravel, typically called 'processed gravel,' 'road base,' or 'crusher run' depending on your region. Avoid round river gravel because it doesn't compact well. Add the gravel in 2 to 3 inch lifts, compacting each layer separately before adding more. Trying to compact 6 inches all at once doesn't work. Each lift needs to be compacted until it feels firm underfoot and the plate compactor stops bouncing on it. Check your slope as you build up the base, because the finished base surface should mirror the same 1-inch-per-8-foot slope you planned for drainage.
Spreading the bedding sand layer
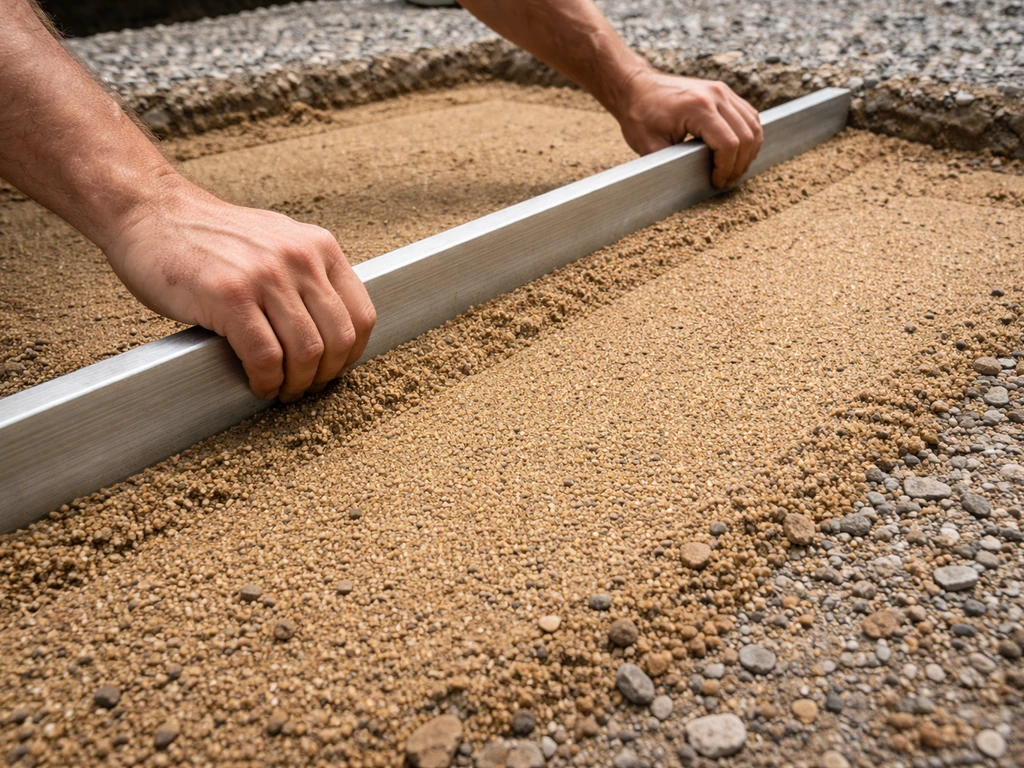
Once the gravel base is compacted and at the right height, add a 1-inch-thick layer of coarse, sharp sand directly on top. This is your bedding layer, and its job is to give you a fine, adjustable surface to set blocks into. Use two 1-inch-diameter pipes or conduit laid parallel across the base as screed guides, then drag a straight 2x4 across them to pull the sand perfectly level at exactly 1 inch deep. Do not compact the sand before setting blocks. Remove the screed pipes carefully and fill those channels with loose sand before you start laying blocks.
Setting patio blocks: leveling, spacing, and cutting
Starting and staying aligned
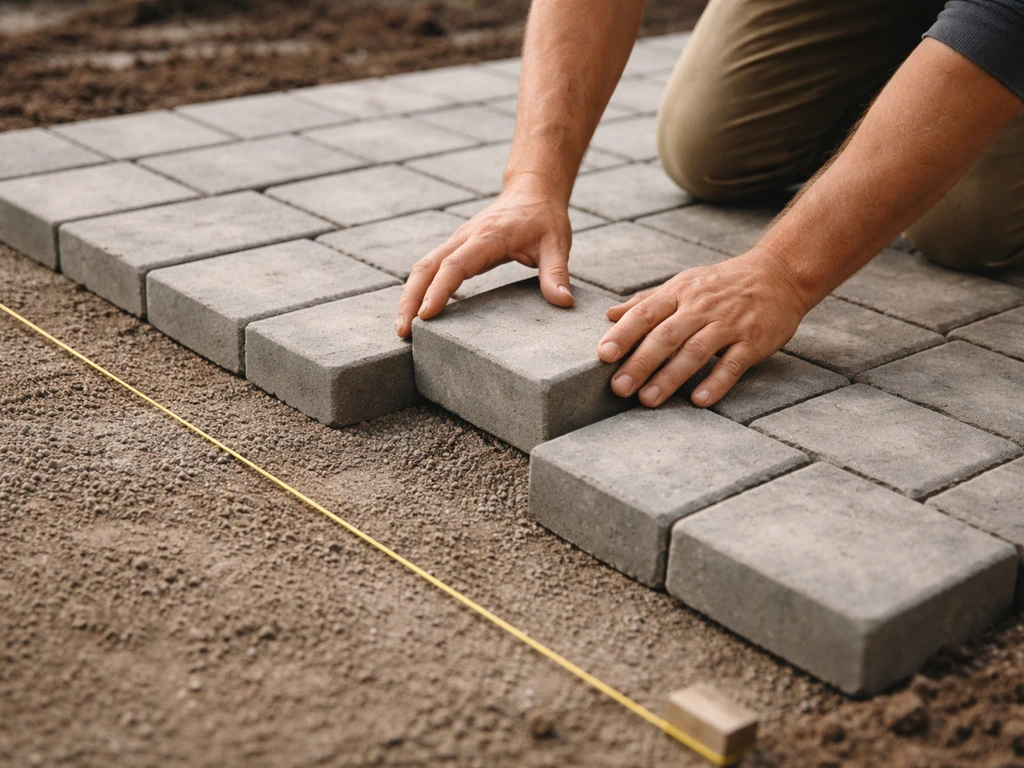
Start laying blocks from one straight edge or corner, working outward. Set each block gently into the sand, don't push or slide them around because that disturbs the screed bed and creates uneven spots. Place each block as close as possible to the last one, aiming for a consistent 1/8-inch gap (about 3mm) between blocks for the joint. That small, consistent gap is important: it lets jointing sand lock everything together while still allowing slight movement that prevents cracking.
Check every few blocks with a rubber mallet and a level. Tap high spots down gently. If a block is sitting too low, lift it and add a pinch of sand underneath. Periodically lay a long straightedge or 4-foot level across multiple blocks to catch any high or low spots early. It's much easier to correct a problem when you've set 20 blocks than when you've set 200.
Cutting blocks to fit
You'll almost certainly need to cut blocks to fill the edges. The right tool is an angle grinder with a diamond blade or a wet saw (also available to rent). Measure the gap, mark the block with chalk or a pencil, and cut carefully. For a small number of cuts, a circular saw with a masonry blade works too, but it produces a lot of dust, so wear a respirator. For straight cuts, you can also rent a splitter, which snaps blocks cleanly without power tools, though the edge is more rustic-looking.
Jointing, finishing, and optional sealing
Compacting the surface once blocks are set
Before you add any jointing material, run the plate compactor over the entire paved surface. Put a piece of carpet or rubber pad on the plate to protect the block faces from scratching. This step beds the blocks firmly into the sand and levels out any remaining minor height differences. Make two passes in different directions, then check the surface once more with your level.
Filling the joints

For most block patios, polymeric sand is the best jointing material. It's a blend of fine sand and polymer binders that hardens when wet, locking the blocks together, resisting washout, and discouraging weed growth. Regular dry sand works but washes out over time and needs periodic re-topping. Polymeric sand is worth the extra cost for any patio you want to last.
Pour polymeric sand over the dry surface and sweep it into the joints with a stiff push broom. Make multiple passes in different directions until the joints are full but not overfilled, the sand should sit just below the chamfered edge of the block, not piled above it. Blow off any excess sand from the block faces with a leaf blower on a low setting, because leftover sand on the surface will haze once you wet it. Then mist the entire surface gently with a garden hose on a fine spray setting. Don't blast it. Follow the manufacturer's timing instructions for wetting, usually two passes about 15 minutes apart. Let it cure for 24 hours before walking on it.
Sealing (optional but worth considering)
Sealing isn't required, but it protects the block surface from stains, enhances the color, and can extend the life of your polymeric sand joints. If you want to seal, wait at least 30 days after installation to let everything cure fully. Use a paver-specific sealer, either a wet-look formula for a slight sheen or a natural-look formula for a matte finish. Apply with a pump sprayer or roller on a dry day when temperatures are between 50 and 90 degrees Fahrenheit, and plan to re-seal every 3 to 5 years.
Cleanup
Once the jointing sand has cured, sweep the surface clean and inspect the perimeter edging to make sure all the stakes are driven flush. Backfill around the outside of the edging with topsoil or sod and tamp it down so there's no gap between the patio edge and the surrounding grade. That gap is a trip hazard and a channel for water to undercut the edge.
Common mistakes and how to fix them
Even with good preparation, things go wrong. Here are the problems I see most often and what to do about them.
| Problem | Likely Cause | Fix |
|---|---|---|
| Blocks rocking or uneven surface | Inconsistent sand bed depth or sand disturbed during laying | Lift affected blocks, re-screed the sand, reset and re-level |
| Patio sinking in spots | Inadequate compaction of subgrade or base gravel, or organic material left in ground | Remove sunken blocks, excavate the area, remove organics, recompact, and rebuild the base |
| Edge blocks spreading outward | Missing or improperly staked perimeter edging | Install or re-stake edging; reset displaced edge blocks |
| Water pooling on surface | Insufficient slope or slope running the wrong direction | Lift the low area and re-grade the base to correct the fall before re-setting blocks |
| Joints washing out after rain | Used regular sand instead of polymeric, or polymeric sand applied on a wet surface | Remove old sand, dry the surface, re-apply polymeric sand correctly |
| Weeds growing in joints | Joints not filled fully, or non-polymeric sand used | Clean out joints, re-apply polymeric sand, and consider sealing |
When the fix is bigger than the blocks
If large sections of your patio are sinking or shifting, it's usually a base problem, not a surface problem. Pulling up and resetting individual blocks while leaving a bad base will just give you the same issue again in a year. The honest fix is to remove the blocks in the affected area, dig out the base, correct whatever caused the failure (usually inadequate compaction or organic matter in the fill), rebuild the base properly, and relay the blocks. It's more work, but it's the only repair that actually lasts.
If you're dealing with significant slopes, soft clay soil, or you want to add steps or a raised section to your patio, those are slightly different projects that build on the same core skills. If you plan patio block steps, treat the base and slope planning as seriously as you would for the main patio so everything stays level and secure steps alongside your patio. Working with patio blocks on steps or combining your flat patio with retaining wall block structures are natural next steps once you've got the basic installation under your belt. Work with patio blocks on steps or combine a flat patio with retaining wall block structures as a natural next step, or see how to build a patio with patio blocks for the full start-to-finish walkthrough build on the same core skills. If you are building a raised patio, you can use retaining wall block techniques to control the grade shift and keep the base stable behind the patio surface retaining wall block structures. If you’re adding patio cinder block steps, the same base-building and leveling principles apply, but you’ll also want to plan for risers and drainage at each step.
Quick material and tool checklist
- Patio blocks or pavers (square footage + 10%)
- Crushed gravel or road base (enough for 4 to 6 inches, or more in cold climates)
- Coarse bedding sand (for a 1-inch screeded layer)
- Polymeric jointing sand
- Plastic paver edging with spikes
- Plate compactor (rental)
- Flat spade and sod cutter (or sod cutter rental)
- Screed pipes (1-inch diameter conduit works well)
- Long straightedge or 2x4 for screeding
- 4-foot level and rubber mallet
- Angle grinder with diamond blade or wet saw (rental) for cuts
- Stiff push broom and leaf blower
- Garden hose with fine spray nozzle
- Chalk line and spray paint for layout
- Safety glasses, work gloves, and dust respirator for cutting
FAQ
Can I install a block patio over existing concrete or pavers?
Yes, but only if you treat it like a failure point. If you install blocks directly over old patio material or compacted but unknown layers, you risk inheriting unevenness and weak spots. The reliable approach is to remove everything down to the depth you planned for, then rebuild with the same gravel base plus bedding sand layers, compacting each stage.
Do I need to water polymeric sand right away after sweeping it in?
Don’t wet the joint sand until the blocks are fully set and the surface has been compacted once. If you mist too early, polymeric sand can harden in a way that traps fines and leaves joints underfilled. Also, stop spraying if you see sand wash out of the joints, then let the surface dry and re-sweep and re-wet according to the product’s timing.
What should I do if the patio surface is not level after compacting?
Check the gaps and the level after compacting, not just during installation. A high or low section often becomes obvious after the plate compactor beds the blocks. If you discover an out-of-level area, lift only the affected blocks, add or remove sand, and re-screed that strip, then re-lay and re-compact before jointing sand.
What weather conditions are safest for installing and wetting polymeric sand?
For polymeric joints, you generally want the patio to be dry before jointing and avoid rain for the manufacturer’s recommended window. Wet conditions during installation can cause premature activation and washout. If temperatures are very low or very high, adjust timing and curing, since polymeric sand performance depends on proper moisture and curing.
How do I keep block joints consistent when cutting lots of edge pieces?
Use a consistent joint width plan and match it across the whole layout, then keep cuts to maintain that rhythm at the edges. If you end up with joints that vary widely, the polymeric sand may not lock properly, leading to gaps or movement. When dry-fitting edge pieces, dry-run the final row before cutting so you can shift layout slightly to preserve joint size.
How can I prevent water pooling at the patio corners or near the house?
Plan for drainage continuity and don’t rely on sweeping water off the surface alone. The 1-inch per 8-foot slope is away from structures, so also confirm you have a clear “outflow” path, like to a lawn away from foundations or to an approved drainage area. If the patio borders a downspout, consider routing the splash and avoiding pooling at the corner of the slab.
Can I combine a flat block patio with steps or a raised section on the same day?
Yes, but the edging and base continuity matter more than the pattern. If your patio transitions to a raised area, steps, or a retaining structure, you still need a stable, compacted base under every surface, and the slope and jointing line must match at the transition. Build the base and grade control layers for the raised portion first, then connect the flat patio to it.
Why does the guide tell me not to compact the bedding sand before laying blocks?
Not recommended. The bedding sand is meant to be loose and adjustable so blocks can be set to the right height. Compacting the sand before installing blocks can create a hard, uneven layer that prevents minor leveling corrections and increases the chance of rocking blocks after jointing.
If my patio starts shifting, how do I know whether it’s the sand layer or the gravel base?
Start by verifying the base. Lift a small test area and check whether the gravel base was compacted in lifts, whether organic material remains, or whether the base depth matches the plan. If the base is sound, you may be able to correct by resetting blocks and redoing joints. If the base is failing, spot patching usually repeats the problem within a season.
Is sealing worth it if I used polymeric joint sand, and can it affect joint performance?
Yes. Sealing can reduce staining, but it can also change how polymeric sand handles moisture, especially if you seal too early or use the wrong product. Wait the full cure time from the installation schedule you followed, then use a paver-specific sealer (not masonry paint or generic clear coat). Do a small test area first to confirm the sheen level you want.