Installing patio bricks is a project most homeowners can tackle themselves in a weekend or two, as long as the prep work is done right. You dig down, build a blank" rel="noopener noreferrer">compacted gravel base, screed a 1-inch bedding layer of coarse sand, lay the bricks in your chosen pattern with edge restraints holding them in, cut any pieces that need fitting around edges or obstacles, and lock everything together with joint sand. That's the whole process. The part that trips people up almost every time isn't the laying, it's the base. Get the excavation depth, compaction, and slope right and your patio will stay level and drain properly for years. Rush those steps and you'll be releveling bricks before the second summer.
How to Install Patio Bricks: Step-by-Step DIY Guide

Clara Farrell
29 Apr 2026
Planning and measuring your patio layout

Before you touch a shovel, spend time on layout. Mark out the full footprint of your patio using stakes and string lines. Measure twice and take note of anything that complicates the shape: house foundation, existing steps, garden beds, trees, or utility lines. A simple rectangle is the easiest to work with, but don't be afraid to incorporate a curve or an angle if it fits your yard better. Just know that more complex shapes mean more cuts.
Once you have the perimeter marked, calculate your square footage (length multiplied by width for a rectangle). Order about 10% extra brick to cover cuts and breakage. Write down the exact dimensions of the brick pavers you're planning to use before you buy, because you'll need that number when you figure out how your pattern will run and how many cuts you'll need along the edges. For a standard running bond, a 4x8-inch paver works cleanly across most widths with minimal waste.
Check your local utility lines before excavating. Most areas have a free call-before-you-dig service that will mark buried gas, water, and electrical lines. It's a quick call and it can save your life. Also check whether your project needs a permit. Most backyard patios at grade don't require one, but rules vary by municipality.
Choosing materials and tools
You don't need an overwhelming supply list, but you do need the right materials for each layer. Here's what goes into a standard sand-set brick patio from bottom to top. If you want a complete step-by-step on how to build a patio with bricks and cement, follow the workflow here from excavation to jointing.
| Layer | Material | Thickness |
|---|---|---|
| Subgrade | Compacted native soil | Already there, just compact it |
| Aggregate base | Crushed stone or road-base gravel | 4–6 inches for a patio |
| Bedding course | Coarse sand (like ASTM C33) or HPB chip stone | 1 inch |
| Pavers | Brick or concrete brick pavers | Typically 2 3/8 inches thick |
| Edge restraints | Plastic or aluminum paver edging with spikes | Along all unrestrained edges |
| Joint sand | Coarse sand or polymeric sand | Swept into joints, ~1/8 in below surface |
For the aggregate base, use crushed stone or road-base gravel, not pea gravel or topsoil. You need angular, compactable material. For the bedding layer, coarse sand (sometimes called concrete sand or ASTM C33 washed sand) or a chip stone like High Performance Bedding (HPB) are both solid choices. Avoid fine play sand, which shifts too easily under foot traffic.
For joint sand, you have two options: regular coarse sand or polymeric sand. Polymeric sand binds together when wet, which resists weed growth and won't wash out with rain as easily. It does require careful application on completely dry pavers, but for most DIYers it's worth the extra attention. More on that in the jointing section.
Tools you'll need
- Spade and flat-blade shovel
- Wheelbarrow
- Plate compactor (rent one, don't skip this)
- Rubber mallet
- Long straightedge or screed board
- Stakes and string line with line level or laser level
- Tape measure and marking chalk
- Angle grinder with diamond blade or a masonry saw for cuts
- Push broom and leaf blower
- Garden hose with shower nozzle (for polymeric sand activation)
Site prep and excavation with proper slope and drainage
This is where most DIY patios succeed or fail. Excavation depth matters because you need enough room for the gravel base, the bedding sand, and the paver itself, all sitting at the right finished height. A standard sand-set brick patio requires excavating a minimum of 7 inches below your intended finished paver surface. That accounts for roughly 4 to 6 inches of compacted gravel base plus 1 inch of bedding sand plus the thickness of your brick (usually about 2 3/8 inches for a standard concrete brick paver). Check your specific paver's thickness and do the math before you dig.
Slope is non-negotiable. Your finished patio surface needs to drain away from your house at a minimum 2% grade, which works out to about 1/4 inch drop per linear foot. Set your string lines to reflect this slope before you start excavating and keep checking them throughout the build. It sounds like a small number but it makes a real difference in whether water pools next to your foundation or runs off cleanly.
Excavate 6 inches beyond your planned paver edge on all sides. That extra width gives you room to properly compact the base and install your edge restraints without them sitting on disturbed or loose soil at the very perimeter.
Dealing with clay soil and sloped ground
Clay soil is the most common problem I hear about from homeowners. Clay holds water and can heave with freeze-thaw cycles, which eventually pushes bricks up unevenly. If you're digging into heavy clay, add 2 extra inches of aggregate base compared to normal, compact it thoroughly in thin lifts, and strongly consider laying a geotextile fabric separator between the subgrade and your gravel base. The fabric prevents clay from migrating up into the stone over time, which would compromise your base. Compact the subgrade itself before placing any fabric or base material.
Sloped sites aren't impossible, but they do require more careful string line setup and potentially some additional drainage planning. If your yard drops more than a few inches across the patio area, you may need to step the base down in sections or add a drainage channel at the low edge. This same approach to stepped base planning applies when you build DIY brick patio steps on a sloped site. For anything steeper than about a 5% natural grade, take extra time mapping out how water will travel across and around your patio before you dig.
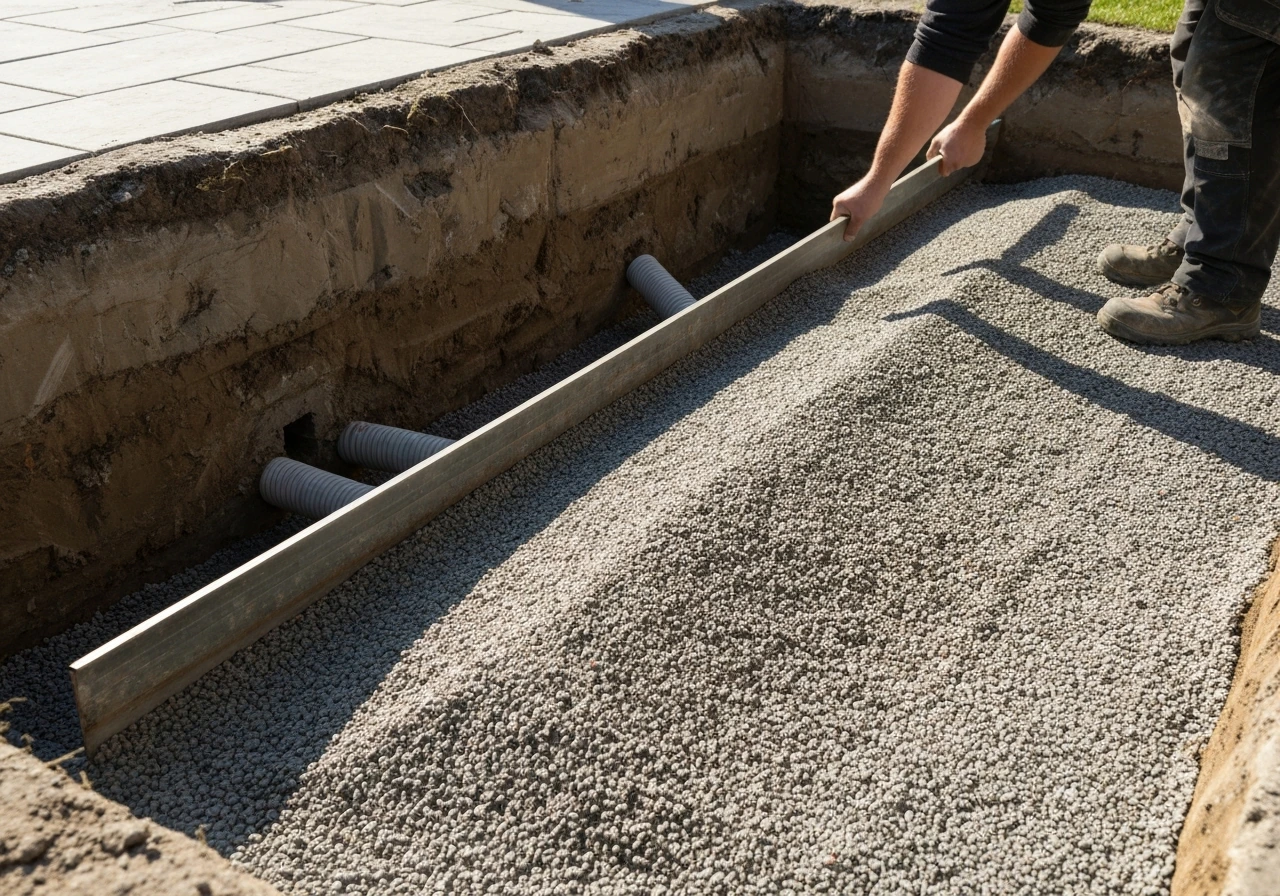
Building the base and getting compaction right
Once you've excavated to depth, compact the exposed subgrade with your plate compactor before adding anything on top of it. This settles any loose soil and gives you a firm foundation to build from. If your soil is very loose, wet, or clay-heavy, you may notice it staying spongy even after compaction. In that case, go ahead and lay your geotextile fabric now before filling with gravel.
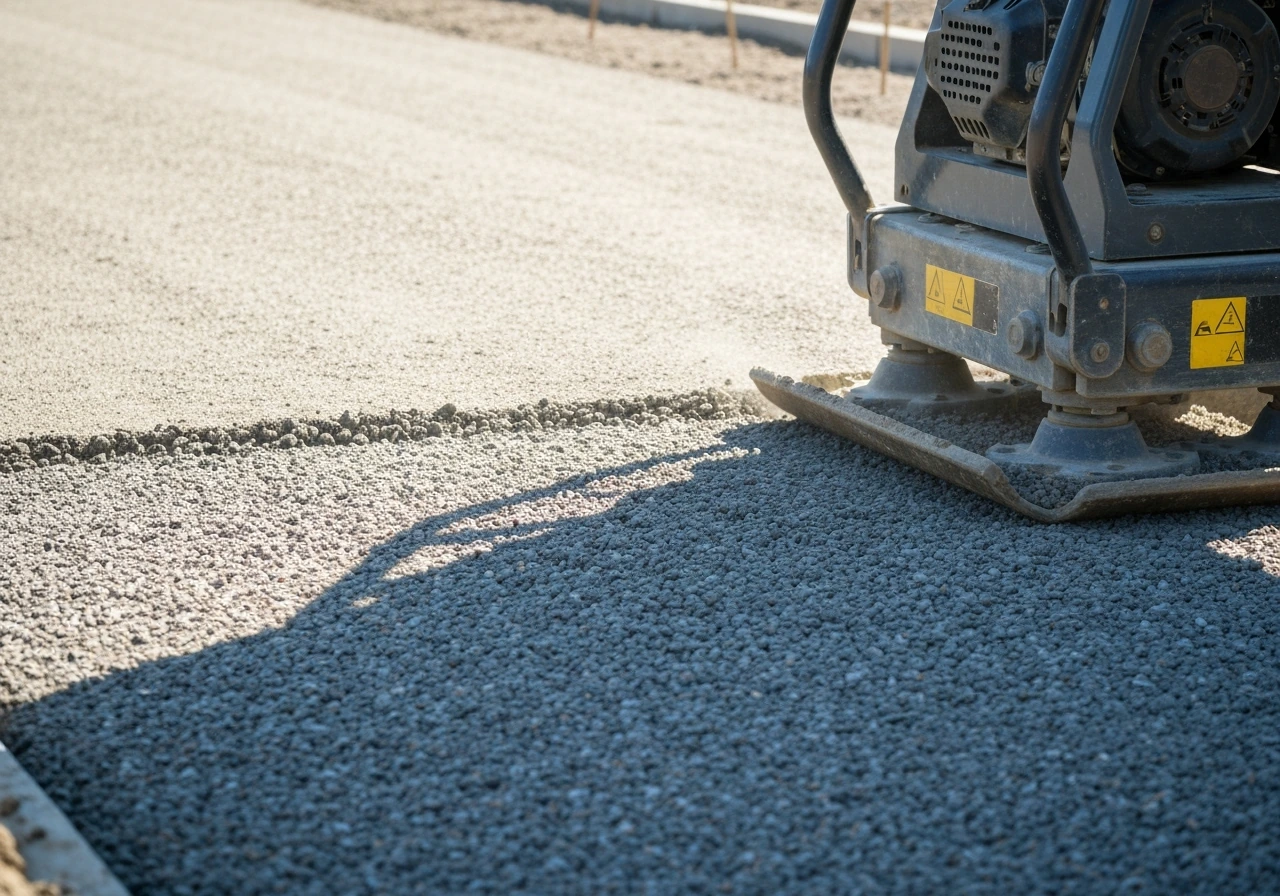
Add your crushed stone or road-base gravel in lifts no thicker than 3 to 4 inches at a time. Dumping 6 inches all at once and running the compactor over it once won't give you adequate density. Instead, add 3 to 4 inches, make at least three passes with the plate compactor, then add the next lift and repeat. Target a total compacted aggregate base depth of 4 to 6 inches for a patio. Once you've reached depth, screed and rake the gravel surface following your string lines so the slope you planned (that 1.5 to 2% grade) is baked into the base layer itself.
Now add your 1-inch bedding layer of coarse sand or chip stone. Screed it smooth and level. Here's a point where people often go wrong: do not compact the bedding layer before you lay bricks. Compacting it makes it uneven and disturbs the surface you just carefully screeded. Leave it loose and level. The final compaction step after all bricks are set is what seats everything.
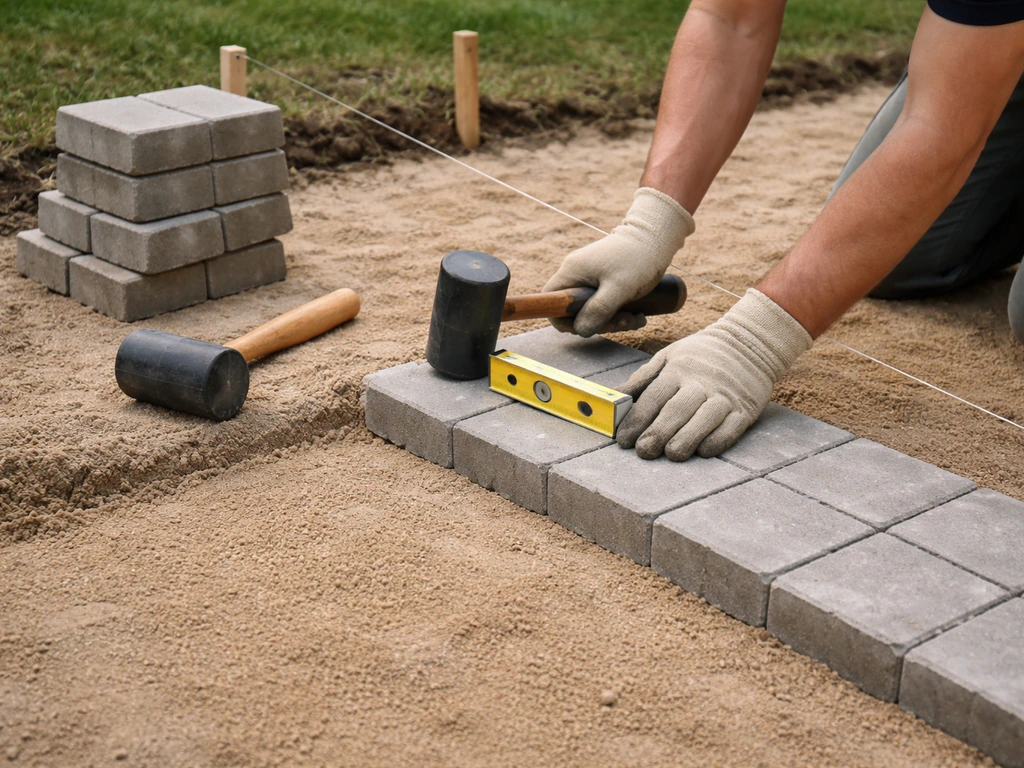
Setting brick pavers: patterns, leveling, and edge restraints
Start laying bricks from a fixed edge, usually the house foundation or a corner that's most visible. Once your brick patio is built and leveled, you can incorporate a fire pit into the layout and plan the safest foundation and clearance for it how to build a fire pit on brick patio. Work outward from there so any cut pieces end up at the far edges where they're less noticeable. Set each brick down gently onto the bedding sand, don't slide it, and tap it into place with a rubber mallet. Use a long straightedge frequently to check that your surface is staying level and on grade.
Pattern options
- Running bond: offset rows, very classic look, easiest pattern for beginners with minimal cuts
- Herringbone (45 or 90 degree): stronger interlocking, great for high-traffic areas, requires more cuts
- Basketweave: pairs of bricks alternating direction, attractive but needs square starting corner
- Stacked bond: bricks lined up in grid, looks clean but joints align and offer less structural strength
Keep your joints consistent. Most brick pavers have small spacer lugs molded into the sides to help with this, but if yours don't, use plastic spacers or a scrap piece of 1/4-inch plywood as a quick gap guide.
Installing edge restraints
Edge restraints are required along every edge that isn't against a fixed structure like your house foundation or a retaining wall. Without them, the bricks at the perimeter have nothing holding them in place laterally and they will slowly migrate outward over time, opening up gaps in the interior. Install plastic or aluminum paver edging against the last row of bricks, spike it down into the base material with the provided spikes (usually 10 to 12 inches long), and make sure the edging is sitting on the same compacted base material as the rest of the installation. Don't let it float on loose backfill.
Cutting bricks and fitting corners and obstacles
Unless your patio perfectly divides into whole brick dimensions (which almost never happens), you'll need to cut some pieces. Save all your cuts for the end. Lay the full bricks first across the entire field, then go back and measure and cut the pieces that fill the gaps around the perimeter and around any obstacles like post bases or utility covers.
For straight cuts, an angle grinder with a diamond blade works well and is cheaper to rent than a full masonry wet saw. For volume cuts or if you're doing a lot of angles, a masonry saw is faster and cleaner. Mark your cut line clearly with chalk or a pencil, score the line first with a light pass, then cut through fully. Always wear eye protection and a dust mask when cutting brick.
At inside and outside corners, the key is accurate measurement. Measure from the last full brick to the edge, subtract your joint width, and cut to that dimension. For curved edges, you can use a template made from cardboard to trace irregular shapes before transferring to the brick. Don't try to eyeball curves. Take your time on cuts because a poorly fitted cut piece will catch your eye every time you look at the patio.
Jointing with sand and final leveling
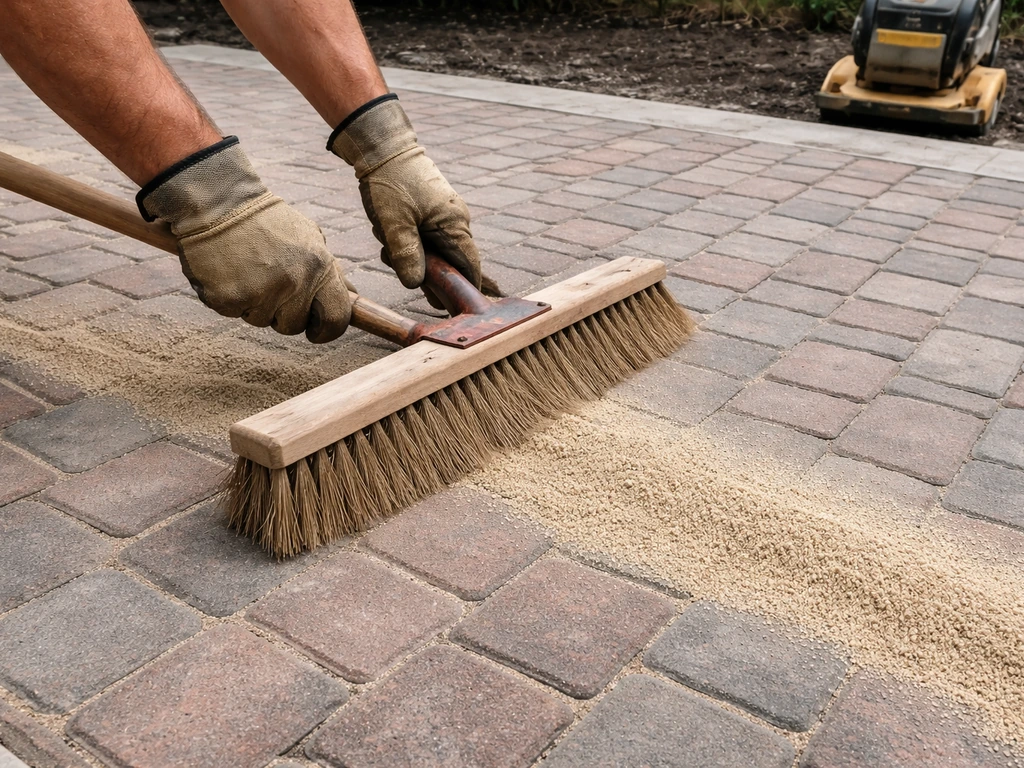
Once all your bricks are set and cut pieces are in place, it's time for final compaction and jointing. First, run the plate compactor over the entire surface to seat the bricks down into the bedding layer. Use a polyurethane pad on the bottom of the plate compactor to protect the brick surface from scratching. Stay at least 6 feet away from any unrestrained edges while compacting, as the vibration can shift edge bricks outward. Install your edge restraints on those sections before compacting near them.
After compaction, pour joint sand over the surface and sweep it diagonally across the joints with a stiff push broom. Work it in multiple passes until the joints are filled to about 1/8 inch below the paver surface (or 1/8 inch below the beveled edge on pavers that have one). Sweep off any excess so there's no loose sand sitting on the brick faces.
Using polymeric sand
If you're using polymeric sand, the process is the same up until activation. Sweep it in dry, make sure the surface is completely dry before you start, and don't apply it if rain is forecast within 24 hours. Once joints are filled, use a leaf blower to blow off every bit of excess from the brick surfaces. Any polymeric sand left on the face of the brick will haze when wet and is difficult to remove. Then activate with a garden hose set to shower mode, wetting about 200 square feet at a time for roughly 30 seconds, let it soak in, and repeat once more. The polymer binders activate and lock the sand as it dries.
Common mistakes and troubleshooting for tricky ground conditions
Most patio problems that show up a year or two after installation trace back to one of a handful of mistakes made during the build. Here are the ones I see most often and how to avoid them or fix them if you're already dealing with the aftermath.
| Mistake | What happens | Fix or prevention |
|---|---|---|
| Not enough base depth | Bricks sink and become uneven after rain or frost | Excavate to full depth (7 in minimum below finished surface) before building up |
| Skipping or undercompacting the base | Surface develops dips and soft spots under traffic | Compact in 3–4 in lifts with at least 3 passes each; rent a proper plate compactor |
| Compacting the bedding sand before laying bricks | Uneven bedding causes bricks to rock and sit at different heights | Screed bedding loose and level; only compact after all bricks are laid |
| No edge restraints or poorly spiked edging | Perimeter bricks migrate outward, gaps open up inside | Install edging on compacted base and spike every 6–12 inches |
| Wrong slope or no slope | Water pools on surface or drains toward house | Set string lines to 2% grade (1/4 in per foot) before excavating and maintain slope through every layer |
| Using fine sand in joints | Sand washes out quickly, weeds establish fast | Use coarse jointing sand or polymeric sand meeting ASTM specs |
| Polymeric sand applied on damp bricks | Haze or dark staining on surface | Only apply to bone-dry bricks; blow off all excess before wetting |
| No geotextile on clay subgrade | Base material migrates into clay over time, base loses depth | Lay geotextile fabric between compacted subgrade and gravel base in clay soils |
If you're already seeing sunken or rocking bricks on an existing installation, the fix usually involves pulling up the affected area, adding base material, re-compacting, and resetting. If you want a visual walkthrough, search YouTube for guidance on how to build a brick patio sand-set brick patio. It's tedious but straightforward since sand-set patios are fully reversible. That's actually one of the best things about this method: you're never really stuck with a problem the way you would be with a concrete pour.
When to call in a pro
Most backyard patios at grade are genuinely manageable as a DIY project. Where I'd say consider calling a professional: if your site has significant drainage problems like seasonal standing water, if you're working on a slope greater than about 5%, or if you're planning a very large or complex project like a patio deck with bricks built up off the ground or a project incorporating brick walls or columns. If you plan to add brick columns to your patio, it helps to follow a similar build-up approach for the base, alignment, and drainage so the columns stay solid over time brick walls or columns. If your plan includes building a brick patio wall, make sure you account for footing, drainage, and structural stability before you start laying blocks. To build a patio deck with bricks, start by planning the deck framing and support structure before you install any brick paving materials. Those situations involve structural considerations that go beyond a basic sand-set install. For a straightforward at-grade patio, though, take your time on the base and you'll be absolutely fine.
After the build: finishing touches and long-term care
Give polymeric sand at least 24 hours to cure before heavy foot traffic. For regular sand joints, give it a day or two and then top off the joints if any sand has settled. Sweep in more sand and compact again lightly. Over the first season, you may need to refill joints once or twice as the sand settles in. That's completely normal and not a sign anything went wrong.
Sealing your patio is optional but worth considering after the first year once the installation has fully settled. A penetrating paver sealer can help lock in joint sand, reduce staining from leaves and oils, and bring out the color of the brick. Make sure the patio is clean and fully dry before applying any sealer and follow the manufacturer's directions on reapplication frequency.
Every spring, do a quick walkover of the patio surface. Look for rocking bricks, sunken sections, or wide joints where sand has washed out. Catching these early and fixing them takes minutes compared to dealing with a larger settled area later. A sand-set brick patio can easily last 20 to 30 years with that kind of simple annual attention.
FAQ
Can I install patio bricks over existing concrete or a previous patio?
Yes, but only if the surface has enough structural stability and you still rebuild the drainage and slope. For an existing slab or walkway, you typically cannot just lay pavers on top of the old surface and expect them to stay level, because water can’t drain through. In most cases you need to remove material down to a depth that allows a compacted gravel base plus bedding, or build a properly engineered raised system. If you’re thinking of installing over concrete, confirm the finish height you need and whether you can meet the planned drainage grade without creating a raised lip at doors or steps.
Should I compact the bedding sand before laying the bricks?
Not if you want a stable, long-lasting patio. The 1-inch bedding layer should stay loose and level so the bricks can seat evenly during the final plate compaction. If the bedding layer is compacted beforehand, it usually becomes uneven and you end up with rocking bricks after installation. The correct sequence is compact the subgrade, compact the gravel base in lifts, screed the bedding smooth without compacting it, lay bricks, then compact once using a pad to protect the pavers.
How can I tell if my gravel base is compacted enough?
Most patios fail from poor base density, not from laying mistakes, so don’t guess. Use the specified lift thickness (3 to 4 inches per lift) and make multiple compactor passes until the surface looks uniformly firm and you cannot see significant rebound. If you’re unsure about density, do a small test section and check for firmness, then adjust lift thickness and passes. Also keep bedding thickness and finished height consistent, because small height errors become visible after edging and joint filling.
What slope do I need for drainage, and how do I keep it consistent while building?
For best results, plan for a minimum slope of 2% away from the house, about 1/4 inch per linear foot. Don’t rely on eye-balling because the water path will show up later as pooled areas or staining near the foundation. Use string lines set to the correct grade from day one, then verify during excavation and base screeding. If you’re on a sloped property, you may need stepped base sections or a drainage channel at the low edge to keep water from running across the patio surface.
What should I do differently if I have clay soil?
It depends on your local climate and subgrade, but clay adds risk. If you’re digging into heavy clay, the article suggests increasing aggregate base depth by about 2 inches, compacting in thin lifts thoroughly, and strongly considering a geotextile fabric separator to stop clay from migrating into the stone. Also compact the native subgrade before adding any fabric or base, since putting fabric over soft, loose clay doesn’t fix the instability below it.
How do I use polymeric joint sand correctly (especially timing and activation)?
Don’t start jointing with polymeric sand until the pavers are seated and the entire field has been vibrated flat with the plate compactor. Polymeric sand requires a completely dry surface, and you should not apply it if rain is forecast within 24 hours. During activation, wet about 200 square feet at a time (roughly 30 seconds), allow it to soak in, then repeat once more. If you leave polymeric sand residue on the face of the brick, it can haze when wet and is hard to remove.
Are edge restraints required on every side, and what happens if I skip them?
Treat edge restraints as a structural requirement, not an accessory. If your patio edge is not against a fixed structure (like a house foundation or a wall), install edging along every free perimeter and spike it into the same compacted base material. If the edging is sitting on loose backfill or floating above disturbed soil, it can allow outward movement that opens gaps across the patio interior later.
My bricks are rocking or sunken, what’s the best way to fix it?
If a section is sunken or rocking, the usual fix is to remove the affected pavers, correct the base/subbase, re-compact, add the right bedding thickness, then reset the bricks. Since sand-set installs are reversible, you’re not forced into demolishing the entire patio. Keep an eye on whether the failure is localized (a small soft spot) versus widespread (base depth or slope issues), because widespread problems may require reworking larger areas to restore drainage.
How long should I wait before using the patio after jointing?
For curing guidance, polymeric sand needs at least 24 hours before heavy foot traffic. For regular sand joints, give them a day or two, then top off any joints that settle. Over the first season, it’s normal to refill joints once or twice as sand works down, especially if foot traffic or weather is heavy. If you see repeated rapid loss of joint sand, the underlying issue is often washed-out joints from insufficient slope control or incomplete edge restraint.
Should I seal patio bricks, and when is the right time to do it?
Sealing is optional and timing matters. A penetrating paver sealer is typically best after the patio has fully settled, which is usually after the first year. Apply only when the patio is clean and fully dry, and follow reapplication schedules in the product instructions. Also note that sealing is mainly about staining resistance and color enhancement, it does not replace proper base compaction and drainage.
What maintenance should I do each year after installing patio bricks?
A simple annual check can prevent small issues from becoming major repairs. Look for rocking bricks, sunken spots, and joints that have widened or washed out, then address them early by lifting affected pavers, adding base where needed, and re-screeding bedding if required. Because sand-set patios can last decades, the goal is quick correction during early settlement rather than waiting until the pattern looks noticeably uneven.