You lay a brick patio by excavating the area to the right depth, compacting the subgrade, laying a crushed stone sub-base, screeding a sand bedding layer, setting the bricks in your chosen pattern, cutting edges to fit, installing edge restraints, and filling the joints with kiln-dried or polymeric sand. If you want a practical UK walkthrough, focus on getting the base, slope, and bedding right before you start laying your brick patio. If you want the full, step-by-step method for how to lay red brick patio, follow the process from digging and drainage through to joint filling. Do it in that order and the patio stays level and locked in place for decades. Skip or rush any of those steps and you'll be relaying sections within a few years.
How to Lay a Brick Patio: Step-by-Step Guide

Clara Farrell
30 Apr 2026
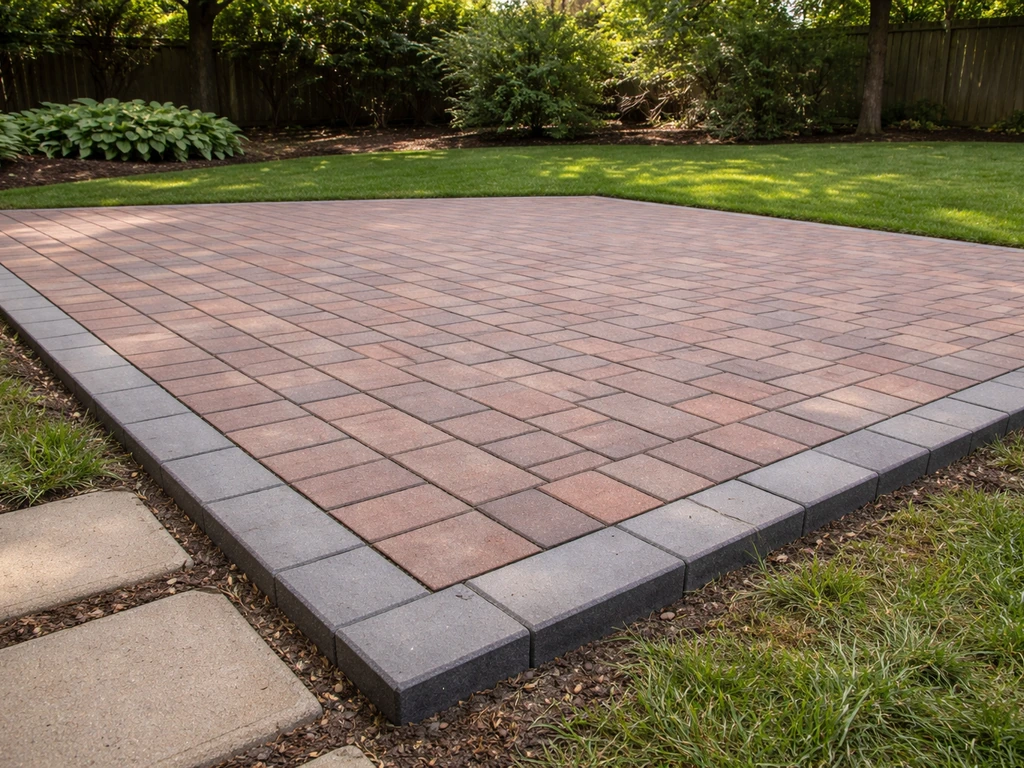
I've seen plenty of first-time patios lift, sink, and shift, and it almost never comes down to bad bricks. It comes down to a weak base or a slope that sends water the wrong way. This guide walks you through the full process, from picking your materials to sweeping in the last bag of jointing sand, with honest notes on where things go wrong and how to avoid them.
Choosing the right bricks, pavers, and layout pattern
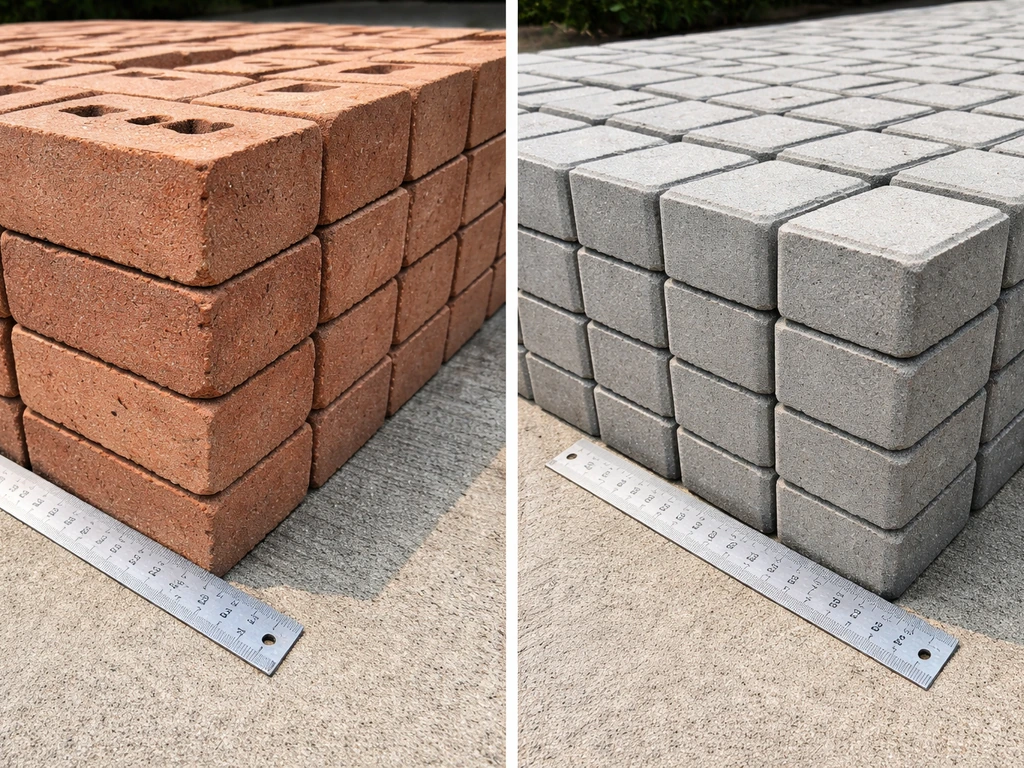
Bricks vs. concrete pavers: what's actually different
For a patio, you can use traditional clay bricks or concrete interlocking pavers. Both work well if you pick the right product. The key difference is in durability ratings. In the US, look for concrete pavers that meet ASTM C936, which sets requirements for compressive strength, water absorption, and freeze-thaw resistance. Don't just grab whatever masonry bricks are cheap at the builders yard. Standard wall bricks aren't designed to take foot traffic, freeze-thaw cycles, and constant ground moisture. In the UK, look for clay paving bricks with a frost resistance class of F2 and water absorption below about 4.5%, which means they're rated for fully exposed outdoor use while saturated. Ketley and similar manufacturers publish these specs on their technical data sheets, so it takes two minutes to check.
Concrete pavers are generally more uniform in size and easier to cut, which speeds up installation. Clay bricks have a warmer, more traditional look and tend to age nicely. If you're going for a reclaimed or red brick aesthetic, those are separate topics worth exploring on their own. For most people doing their first patio, concrete pavers are the more forgiving choice.
Layout patterns and which one to start with
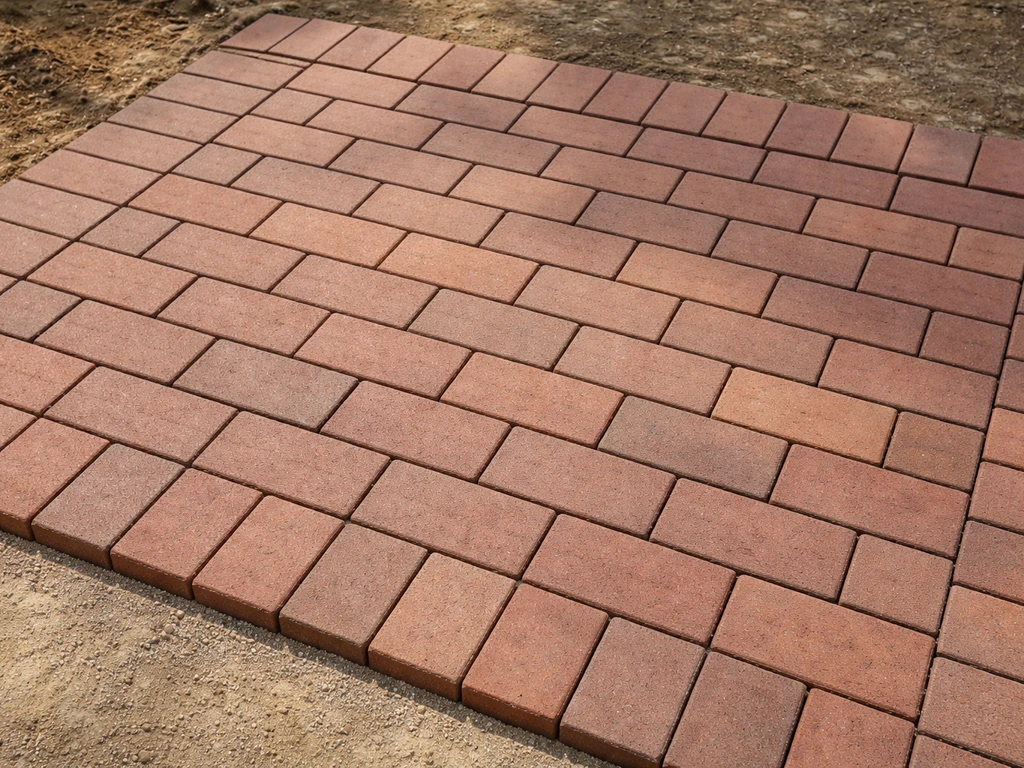
The pattern you choose affects how much cutting you'll need to do and how structurally interlocked the surface is. Running bond (also called stretcher bond or half bond) is the best starting point for most DIYers. Each unit is offset by half its width from the one below, which is simple to lay, looks clean, and creates good interlock across the surface. Herringbone (45-degree or 90-degree) gives a stronger interlocked finish and is worth considering for areas that get vehicle traffic, though it involves significantly more cutting at the edges. Basketweave is another option that's easy to visualize but requires your bricks to be genuinely square in pairs. If a circular or specialty layout is on your mind, that's a more involved project that deserves its own planning process. For specific guidance on circular layouts, see our step-by-step instructions on how to lay patio circle a circular or specialty layout. If you’re aiming for a circular brick patio, the layout needs extra measuring and careful edge planning before you start cutting bricks circular or specialty layout.
| Pattern | Difficulty | Cutting required | Best for |
|---|---|---|---|
| Running bond | Easy | Low (edges only) | First-time projects, rectangular patios |
| Herringbone 90° | Medium | Medium (diagonal edges) | High-traffic areas, driveways |
| Herringbone 45° | Medium-Hard | High (all edges at angle) | Decorative focus, experienced DIYers |
| Basketweave | Easy-Medium | Low (if bricks are square) | Traditional garden patios |
| Circular / fan | Hard | Very high | Feature focal points, specialist install |
How many bricks do you need
Measure your area in square metres (or square feet) and check the manufacturer's coverage figure for the specific brick or paver you're buying. Most standard UK pavers run around 38 to 50 units per square metre depending on size. Add 10% for cuts and breakages. Order everything at once from the same batch to avoid colour variation.
Measuring, marking, and planning your drainage slope
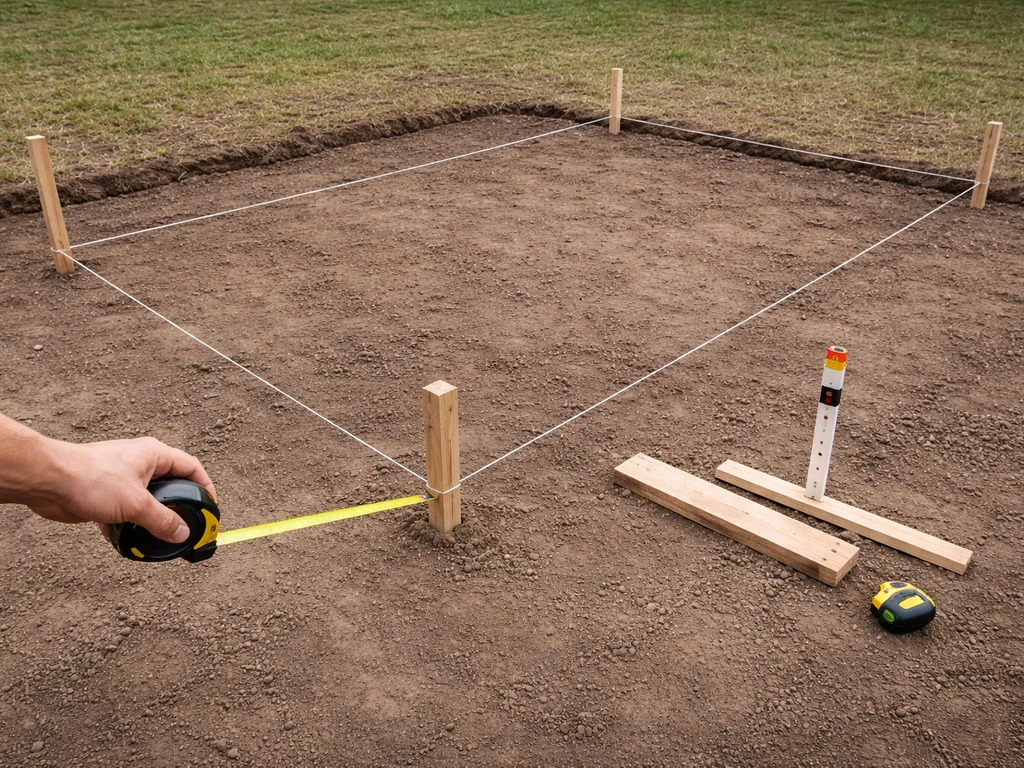
Before you dig a single shovelful, mark out the exact footprint of the patio using pegs and string lines. Measure diagonals to check the layout is square, then adjust. This is also the moment to think hard about where water goes, because getting the slope wrong is one of the most common and most expensive mistakes in a DIY patio.
Getting the slope right
The finished surface needs to fall away from the house (or towards a drain or planted area) so water doesn't pool. For a typical residential patio, a fall of around 1:60 is the practical target, meaning 1 unit of drop for every 60 units of horizontal distance. That works out to roughly 17mm of drop per metre. The NHBC sets a minimum of 1:80 for external paving, and Pavingexpert notes that 1:60 is normally adequate for small private areas without being steep enough to feel uncomfortable underfoot. A 2-metre-wide patio, for example, needs about 33mm of drop across its width at 1:60. Mark your slope on the string lines before you dig so your excavation follows the finished grade from the start.
Set grade stakes at regular intervals across the excavation area and check them periodically as you work. It's easy for the slope to drift slightly as you're digging, especially on larger areas. Getting the grade right at the subgrade level makes every layer above it easier to control.
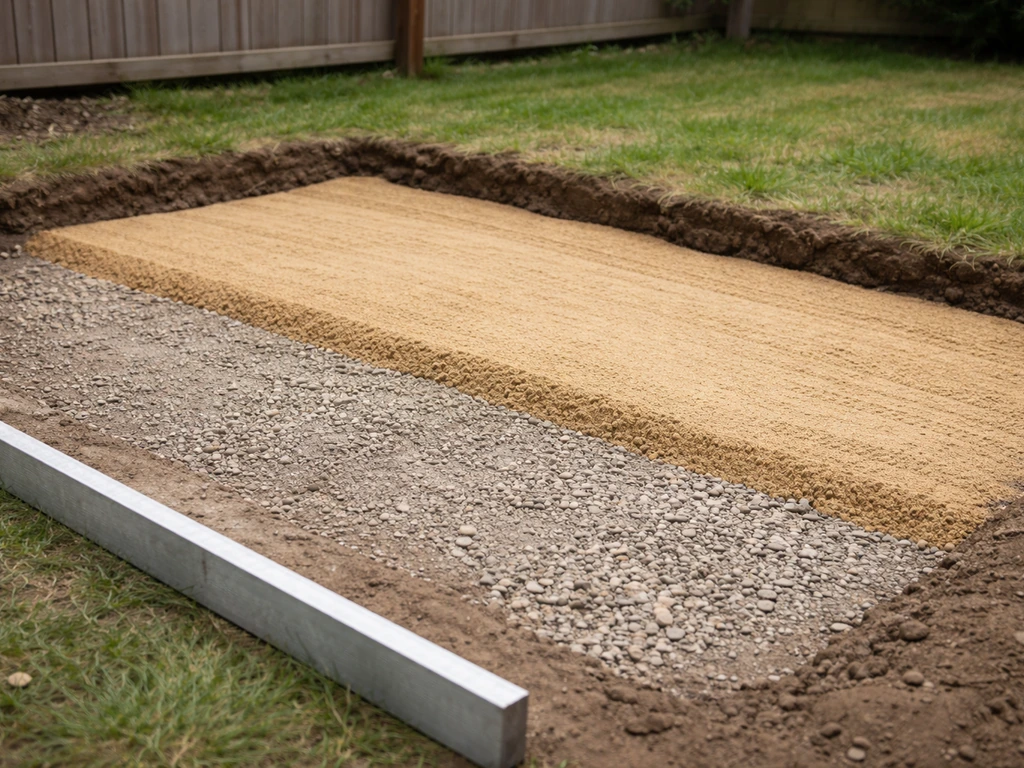
Preparing the base: excavation, compaction, and bedding
The base is everything. A beautifully laid surface on a weak base will move, sink, and crack. I've fixed enough patios to say this with complete confidence: spend more time on the base than on the laying itself.
How deep to dig
For a standard foot-traffic patio on average soils, your total build-up typically looks like this: 100mm compacted crushed stone sub-base (Type 1 MOT in the UK), plus 25–30mm of bedding sand, plus the thickness of your brick or paver (typically 50–65mm for a paving-grade unit). That puts your total excavation depth at roughly 175–195mm below finished surface level. On weaker soils or in areas prone to frost heave, increase the sub-base to 150mm.
- Mark out the patio area with pegs and string lines, including your fall direction.
- Excavate to the required depth, following your slope angle from the start.
- Remove all topsoil, roots, and organic material — none of this can stay in the base.
- Compact the exposed subgrade soil with a plate compactor. Don't skip this step.
- Lay Type 1 MOT (crushed stone) in layers no thicker than 75–100mm and compact each layer thoroughly. Don't dump it all in at once and try to compact it in one pass.
- Check your grade stakes regularly as you build up each layer.
- Blind the sub-base surface with 25mm of sharp sand (or use it as your bedding layer).
Screeding the bedding layer
The bedding sand layer sits between the compacted sub-base and the underside of your bricks. In the UK, 25–30mm of sharp sand is the standard. In US ICPI guidance, bedding sand is typically screeded to about 25mm (1 inch), which compacts down to roughly 19–31mm depending on conditions. To screed accurately, set two metal rails (or screed pipes) within the sand, level them against your string line at the correct fall angle, then drag a straight board across them to create a smooth, consistent surface. Don't walk on the screeded sand before laying bricks. Any footprints create high and low spots that show up in the finished surface.
Installing the bricks: setting, leveling, and cutting
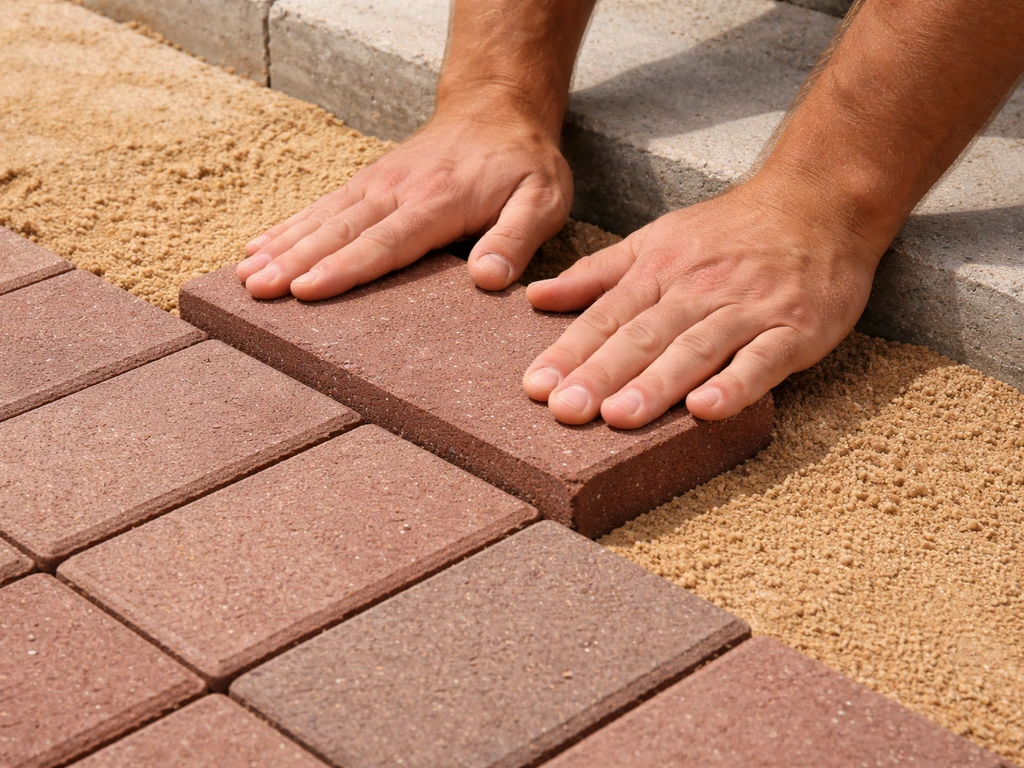
Start laying from a fixed straight edge, usually a wall or a pre-installed edge restraint. Work across the patio, setting each brick by pressing it firmly into the bedding sand without sliding it. Sliding disturbs the sand and creates inconsistencies. Use a rubber mallet to tap each unit down level with its neighbours.
Keeping courses straight and level
Use a taut string line at finished surface height, moved course by course as you progress. Check level across multiple units with a long spirit level or straight edge. Any unit that's high or low should come out, the sand adjusted, and the unit reset. Never try to tap a high brick down after others around it are already locked in, because you'll just disturb everything nearby. Leave joint gaps of around 2–5mm between units. Avoid butting bricks tight against each other (zero gap), which makes straight lines harder to maintain and can cause spalling on the brick edges over time.
Cutting bricks to fit
You'll need to cut bricks for the edges and any obstacles like inspection covers or steps. An angle grinder with a diamond blade works for occasional cuts. For a larger patio, hire or buy a brick splitter or a wet-cut tile saw, which gives cleaner, more accurate cuts and is much safer than freehand angle grinding. Measure each cut individually rather than assuming the gap is consistent all the way along an edge. Walls and fixed structures are rarely perfectly straight.
Edging, jointing, and finishing the surface
Installing edge restraints
Edge restraints lock the perimeter of the patio and stop the whole surface from spreading outward over time. For an unbound sand-set installation, plastic paver edging secured with long galvanized spikes is the most practical option. You can also use soldier-course bricks set in a mortar haunching at the perimeter, which looks great against a garden bed. Install edges before you do the final joint-filling. Brick edging options are a whole sub-topic worth reading about separately if you want the finished look to be a real feature of the design. If you want a cleaner perimeter, learn how to lay brick edging for a patio step by step and lock it in with the right restraints Brick edging options.
Filling the joints
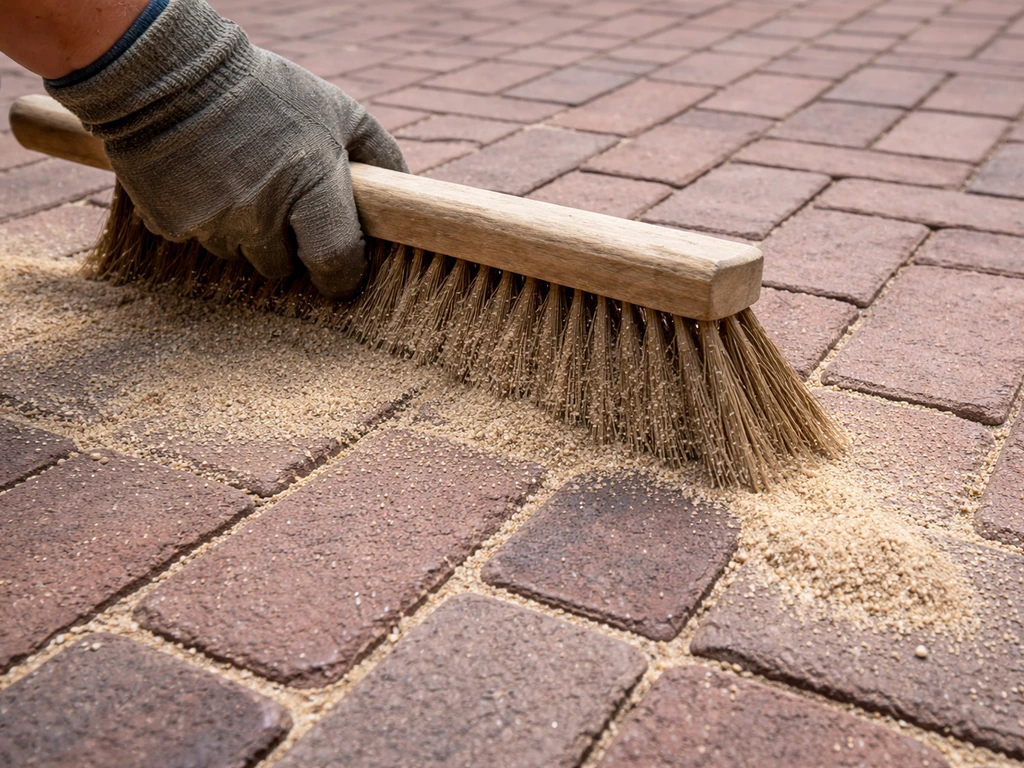
Once all the bricks are laid and edging is in place, run a plate compactor over the entire surface to bed everything down firmly. Then sweep dry kiln-dried jointing sand across the surface, working it into the joints with a stiff brush. Run the plate compactor over again, then sweep more sand in. Repeat until the joints are consistently filled. Don't overfill: the sand should sit slightly recessed from the surface, not flush or proud.
If you're using polymeric sand instead of plain kiln-dried sand, the process has a few extra steps that matter a lot. Polymeric sand contains a binder that activates when wet and hardens the joint, resisting weed growth and ant damage better than plain sand. After applying polymeric sand, r/DIYUK notes that blank" rel="noopener noreferrer">rain is a hard stop and recommends keeping the joints at least about 24 hours dry so the joint cures properly. Techniseal’s joint sand specification sheet notes curing time guidance, recommending a minimum of 24 to 48 hours in dry conditions depending on temperature and humidity blank" rel="noopener noreferrer">minimum 24 to 48 hours in dry conditions depending on temperature and humidity. Follow these steps carefully:
- Make sure the surface and joints are completely dry before you start. Wait at least 24 hours after any significant rainfall.
- Sweep the polymeric sand into all joints until they're fully filled but slightly recessed from the top.
- Compact the surface with a plate compactor to seat the sand deeper into the joints.
- Sweep again to fill any gaps, then remove all sand residue from the brick faces before activating. This is critical — any residue left on the surface will haze and bond there.
- Activate by watering the surface with a hose on a gentle shower setting. Wet the area thoroughly, wait a few seconds, then wet again. Don't blast it with a hard jet.
- Allow to cure for at least 24 hours without rain. Temperature must stay above 0°C (32°F) for at least 48 hours for the binder to set properly.
Dealing with tricky site conditions
Sloped ground
A gentle slope is actually your friend for drainage, but a steep slope requires more thought. If the ground drops significantly across your patio area, you have two main options: step the patio into the slope as a series of terraced levels, or excavate more deeply at the low end to create a flat formation level to build up from. The second approach requires more material but keeps the patio as a single level. Either way, the compacted formation level needs to follow your designed fall direction, not the natural slope of the ground.
Clay soil
Clay soil is the most challenging base condition for a patio. It moves with moisture changes, expands when wet, and shrinks and cracks when dry, all of which translates to patio movement. On clay, increase your sub-base depth to at least 150mm and consider using a geotextile membrane between the subgrade and the sub-base to prevent clay migrating up into the stone over time. Compact the subgrade soil thoroughly even before laying the membrane. If you're in an area with significant clay and a cold winter, the frost heave risk is real, so don't scrimp on the sub-base depth.
Existing surfaces and odd edges
If you're laying a new brick patio adjacent to an existing hard surface, the finished levels need to marry up properly. Check whether the existing surface has a good fall in the right direction, because your new patio will need to match or continue that fall. Avoid laying new bricks over an existing concrete slab unless you've checked it for cracks, settlement, and drainage, and the slab is structurally sound. Adding a sand-set brick layer on top of a failing slab just hides the problem temporarily. Where the new patio meets a house wall in the UK, the finished patio surface must sit at least 150mm below the damp proof course.
Common mistakes and how to avoid them
These are the issues I see most often on DIY brick patios, and most of them are entirely avoidable with a bit of extra care upfront.
- Uneven base: The most common cause of a wobbly, shifting patio. Compact the subgrade properly and screed the bedding sand carefully. Don't try to correct for a lumpy sub-base by varying the sand thickness across the area.
- Wrong slope or no slope: Water that has nowhere to go will pond, weaken the base, and eventually lift bricks. Set your grade stakes before you dig and check the fall all the way through each layer.
- Sliding bricks into position: Always press down, never slide. Sliding disturbs the screeded sand bed and creates ripples in the surface.
- Skipping edge restraints: Without edges, the perimeter bricks migrate outward over time and the whole surface gradually unlocks and spreads.
- Overfilling joints with polymeric sand: Sand level above the brick face will bond to the surface and leave a permanent haze. Keep joints slightly recessed.
- Laying in wet or freezing conditions: Bedding sand in wet weather becomes impossible to screed consistently. Polymeric sand needs dry conditions and temperatures above freezing for 48 hours to cure correctly.
- Not ordering enough material: Running out mid-project and trying to match from a different batch often results in colour variation. Order with a 10% surplus from the start.
Maintenance once it's down
A well-laid brick patio needs very little maintenance. Sweep regularly to stop organic debris from building up in joints. Top up jointing sand if it washes or blows out over time, particularly after a hard winter. If weeds appear, they're growing in the joint material, not through the bricks, so re-treating the joints with polymeric sand solves it long-term. If individual bricks sink or rock, lift them, adjust the sand underneath, and reset them. Catching a small settlement issue early is always a ten-minute job. Leaving it for a season makes it a much bigger one.
Your next steps to get started
If you're ready to move forward, here's the practical sequence to get from planning to laying:
- Mark out your patio area and measure the square footage or square metres.
- Confirm your drainage plan: where will water exit, and what fall (aim for 1:60) do you need across the surface?
- Choose your brick or paver, confirm it's rated for exterior paving use (ASTM C936 in the US, F2 frost resistance and low water absorption in the UK), and order with a 10% overage.
- Hire a plate compactor for at least two days. You'll use it on the subgrade, after laying the sub-base, and again after jointing.
- Order Type 1 MOT (crushed stone) for the sub-base and sharp sand for the bedding layer.
- Excavate, compact, lay sub-base in layers, compact each layer, screed bedding sand.
- Lay bricks from a fixed straight edge, checking level constantly and keeping 2–5mm joints.
- Cut edge units, install edge restraints, compact the finished surface, and fill joints with kiln-dried or polymeric sand.
- Allow polymeric sand to cure fully before using the patio.
The whole project is completely within reach for a first-time DIYer if the prep work gets the attention it deserves. The laying itself is satisfying and relatively quick once the base is solid. If you want a reclaimed-brick look, use the same base and drainage principles, but plan for sorting bricks, matching thicknesses, and filling more varied joints how to lay a reclaimed brick patio. Get that right, and the rest follows.
FAQ
How do I work out the exact excavation depth for my brick patio?
Use the thickness of the paving unit plus your bedding and sub-base to set excavation depth so the finished surface lands at the right height. A common mistake is excavating to the “brick thickness plus sand” only, which leaves you short once you add the correct sub-base depth, then you end up with an incorrectly low or high patio edge.
What joint gap should I leave between bricks, and what happens if it’s too small or too big?
Plan for a consistent joint gap from the start, usually 2 to 5mm. If you accidentally create wider gaps, they can open up further after compaction and rain. If you go too tight (near zero), you can trap sand where it cannot distribute, making spalling or cracking at brick edges more likely over time.
Can I lay a brick patio directly on top of an existing concrete slab?
Yes, but only if the existing slab is stable and drains correctly. Check for cracking that indicates movement, signs of settlement (uneven surface), and evidence of water ponding after rain. If you do not confirm those points, a sand-set layer over a failing slab often becomes a short-term cosmetic fix that needs rework.
What’s the best way to keep the patio level as I lay bricks?
Don’t rely on the string lines alone once you start bedding. Use a long straightedge across multiple laid units to spot high and low spots early, then lift the outliers and rework the sand. Tapping down a high unit after neighboring bricks are locked typically shifts nearby units and creates a ripple you cannot correct later.
How can I confirm the patio slope will drain water the right way?
Use whatever your area requires for the grade and the surface drainage direction, but keep the fall uniform. If the patio falls toward a wall or foundation instead of away from it, you risk damp and pooling. A quick check is to visualize the water path across the whole patio, including where it meets drains, lawn edges, or planting.
How do I handle height changes where my patio meets a door, step, or house wall?
If you need a patio to cross a step, threshold, or doorway, do the level match before you excavate and set the outer grade. Remember that the finished surface must sit below the damp proof course at house-wall junctions in the UK, so buying bricks early is not enough, you also need to confirm heights against the house detail.
How do I know if my sub-base is compacted enough before laying bricks?
Start with a compaction check: plate compact the sub-base properly, then re-screed bedding and only walk where necessary on prepared areas. If your base moves under foot during bedding, it will move under the bricks later. For quality, compact the sub-base in passes and verify it is firm and even before adding sand.
What extra precautions do I need when using polymeric sand for the joints?
If you plan to use polymeric sand, still bed the pavers/bricks the same way, but keep the surface drier during and immediately after jointing. The binder activates when wet, so avoid washing or heavy rain exposure right after installation, and do small, controlled water applications if the product requires it.
Weeds are growing in my patio joints, should I pull weeds or fix something underneath?
If weeds appear between bricks, they are usually coming from joint material movement or incomplete joint filling, not from gaps under the brick. Lift only the affected area, rework the sand bed, and refill joints properly. Re-treating the joint sand works best when you fix the root cause, loose joints or gaps.
How do I avoid ending up with uneven edge cuts along walls or borders?
Cut bricks one at a time along the edge and test-fit a few pieces before committing to the final spacing. Walls and fixed structures are rarely perfectly straight, so repeating an “assumed” cut size usually makes the gaps drift. Dry laying the edge row can save you from ending with a too-large sliver on one end.
Do I need geotextile on clay soil, and does it replace deeper sub-base?
Use geotextile on clay mainly to slow up migration of fines into the stone, but do not replace good sub-base depth and compaction. You still need a thicker stone layer for frost-heave risk, and the formation level must follow your designed fall direction, not the natural ground.
What should I do if my patio water collects near a drain or at a low corner?
If your patio must meet a drainage channel, slope it so runoff reaches the drainage point without concentrating water at the perimeter. For small areas, matching the fall across the whole footprint is usually safer than relying on “edge seepage.” If water repeatedly collects at the lowest corner, the grading is wrong and jointing sand can only mask the symptom.
Why can’t I just use ordinary wall bricks for a patio?
Standard wall bricks are not intended for freeze-thaw exposure and foot traffic. Even if they look right initially, poor durability ratings can lead to chipping, spalling, or early failure. For outdoors, choose paving-grade products with the right frost and absorption performance for your climate.
How full should the joints be after compaction and final sweeping of sand?
For a stable result, allow your patio joints to stay slightly recessed after compaction, not flush and not proud. Overfilling pushes sand up during compaction and can wash out faster, leaving voids. If you end up proud, remove excess and top up after the next compaction pass once you see the joint level settle.