Laying patio blocks is a project most homeowners can absolutely do themselves, and when you do it right, the finished patio will stay flat, drain properly, and last for decades without cracking or rocking. The key is spending most of your effort on what goes underneath the blocks, not on the blocks themselves. Get the base right, establish your slope early, and the actual block-laying part almost takes care of itself.
How to Lay Patio Block: Step by Step Concrete Patio Guide

Clara Farrell
3 May 2026
Choosing patio blocks and planning the layout
Before you dig anything, spend time choosing your blocks and sketching your layout on paper. Concrete patio blocks come in a wide range of sizes, but the most common DIY-friendly options are 16x16 inch squares, 12x12 squares, and rectangular interlocking styles roughly 4x8 or 6x9 inches. Larger format blocks are easier to lay quickly but harder to cut. Smaller interlocking blocks give you more pattern flexibility and lock together more tightly once compacted.
Measure your patio area carefully and sketch it out to scale. Work out how many blocks you need, then add 10% for cuts and breakages. Think about where the patio edges will land relative to your house, lawn, or fence, because this affects your edging and drainage plan. Ideally, lay your blocks so you have whole blocks running away from the house and only cuts at the outer edges, which looks cleaner and saves a lot of cutting time.
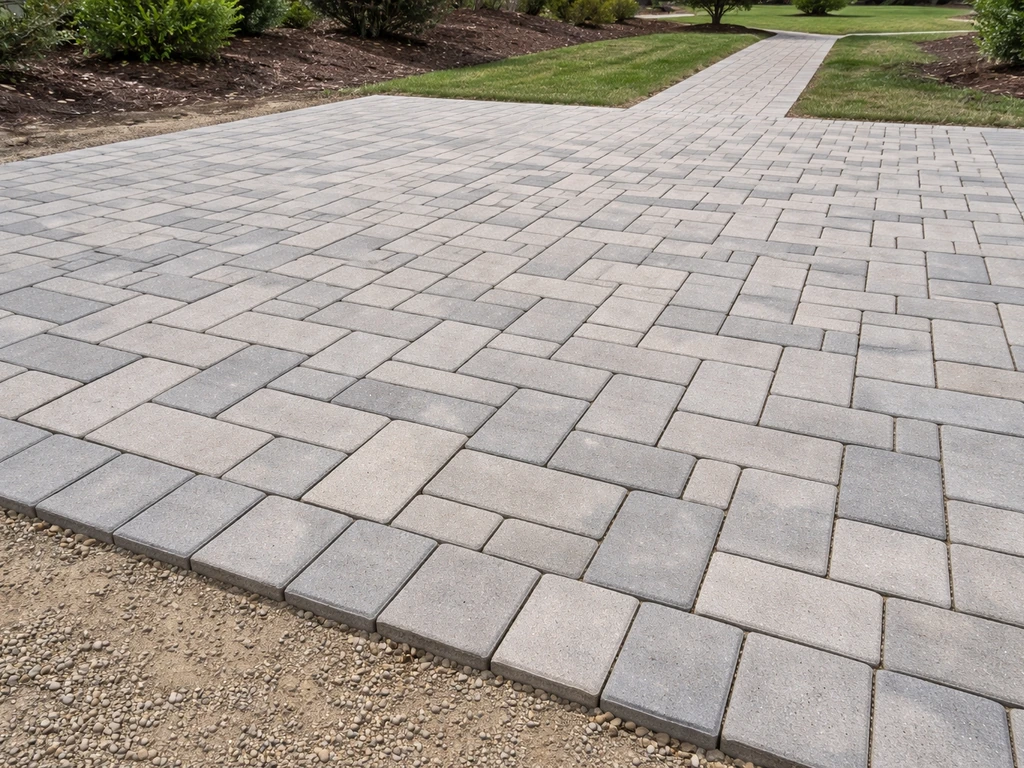
If you want a classic look, a running bond or herringbone pattern gives great interlock and hides minor alignment errors better than a straight grid. A simple straight grid (blocks in rows and columns) looks clean but is much less forgiving of slight variations in block size. For a first project, a running bond is a great middle ground.
One planning step most beginners skip is deciding where water will drain before anything is installed. Every patio needs a slope away from any building or fence. Plan on a fall of at least 1:80 (roughly 1.5 to 2% gradient), which works out to about 1/8 to 1/4 inch drop per foot of patio. On a 10-foot-wide patio, that is a 1.25 to 2.5 inch total drop from the high side to the low side. Mark this on your sketch now, because you will build this slope into your sub-base, not into the sand bed on top.
Tools, materials, and safety for installing patio blocks
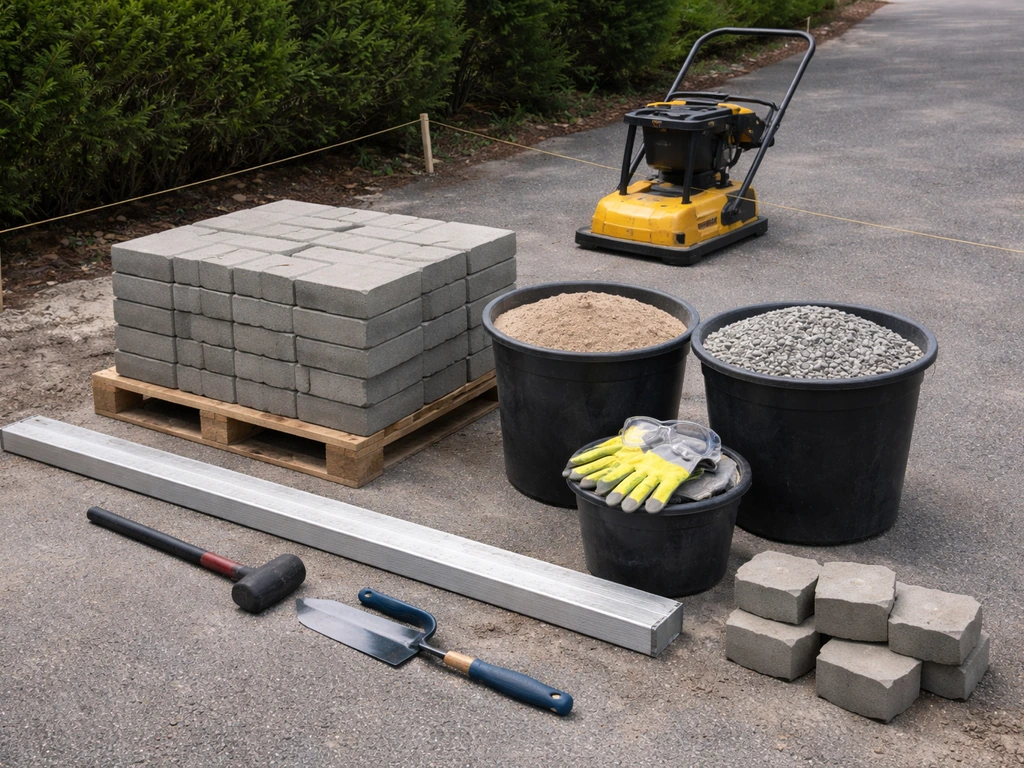
Getting everything on site before you start saves a lot of frustration. Here is what you will need for a standard concrete patio block installation.
- Concrete patio blocks (plus 10% extra)
- Compactable gravel sub-base: MOT Type 1 or crushed stone, roughly 4 to 6 inches compacted depth for a pedestrian patio
- Coarse bedding sand (sharp sand or concrete sand), enough for a 1 to 1.5 inch (25 to 40 mm) compacted layer
- Jointing sand: kiln-dried silica sand or polymeric sand
- Rigid edge restraints (plastic or aluminium paving edging with stakes)
- String lines and line pins
- Tape measure, carpenter's square, and spirit level
- Screed rails or straight lengths of 1-inch pipe for screeding
- Long straight-edge (a 6 to 8-foot aluminium level works perfectly)
- Rubber mallet
- Plate compactor (rent one, do not skip this)
- Angle grinder or circular saw with a diamond blade, for cutting blocks
- Spade, shovel, and wheelbarrow
- Stiff broom and soft brush
Safety is worth taking seriously here, especially when cutting. Cutting concrete blocks creates silica dust, which causes serious long-term lung damage. Always use a P100 or FFP3 respirator (not a basic dust mask), work outdoors, and where possible use a saw with water suppression or vacuum extraction to keep dust levels down. Eye protection and gloves are non-negotiable too. When using the plate compactor, wear steel-capped boots and do not run it over loose sand without blocks on top.
Site prep: remove the existing surface, set levels, and establish slope
This is the stage where most DIY patios either succeed or fail before a single block goes down. Good site prep is everything.
Start by marking out the full patio area with string lines or marking paint. Then remove all vegetation, turf, and topsoil. Topsoil is soft, organic, and will compress unevenly under a patio, so it all has to come out. For a typical pedestrian patio you are looking at excavating 6 to 8 inches below your finished surface level to allow for the sub-base, sand bed, and block thickness. Dig deeper if the ground is soft or if you have clay soil underneath.
Clay soil deserves a special mention. If you hit clay, compact it firmly but also consider laying a geotextile membrane over it before adding your sub-base. Clay holds water, swells, and shrinks with the seasons, which can push blocks out of level over time. The membrane stops sub-base aggregate from sinking into the clay and keeps the layers separate and stable.
Once you have excavated, look at what you have at the bottom of the hole. It should be firm, undisturbed subsoil. Any soft spots or areas where the ground feels springy need to be dug out further and filled with compacted hardcore before you proceed. A weak subgrade is the single biggest cause of sunken, rocking blocks years down the line.
Now set your string lines at finished surface level and use them to work out where the sub-base formation level sits, accounting for your layers. This is also where you build in your drainage slope. Remember: the slope goes into the sub-base. Rake your excavated formation to the correct gradient using a long level and your string lines as reference. Get this right now and every layer above it will follow naturally.
Build the base: subgrade, hardcore, bedding layer, and compaction
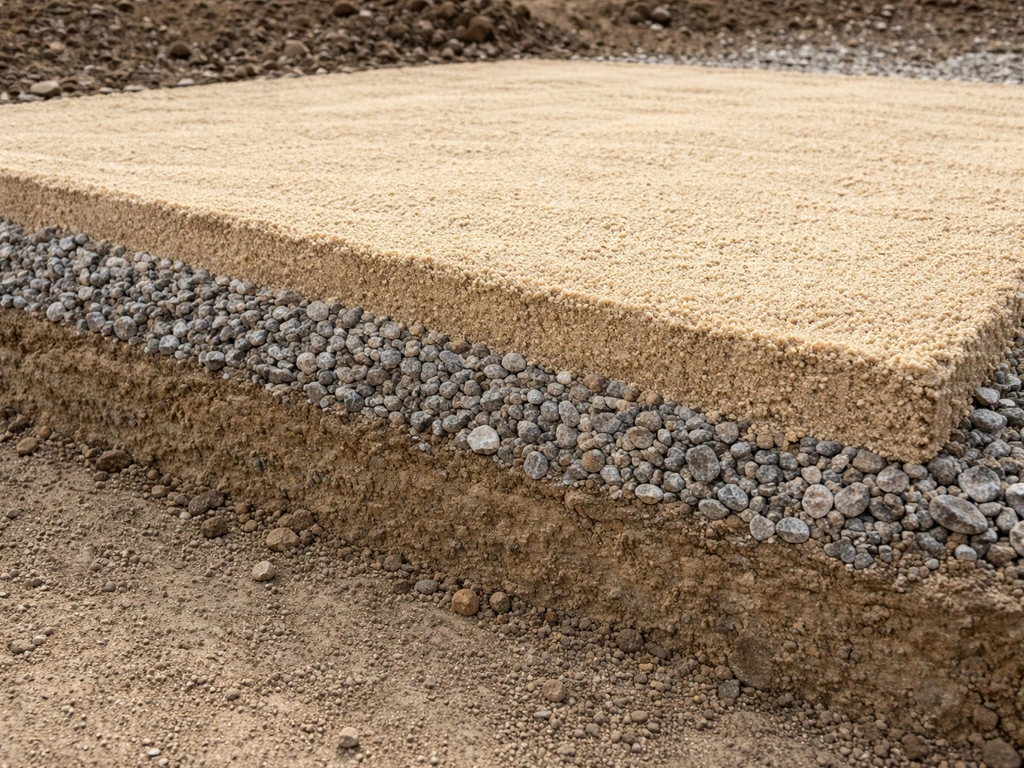
A properly built base is what separates a patio that lasts 20 years from one that looks wobbly after two winters. Think of it as three distinct layers: the compacted subgrade at the bottom, the crushed stone sub-base in the middle, and the sand bedding layer on top.
The sub-base layer
Spread your compactable gravel (MOT Type 1 crushed stone is ideal because the mix of fine and coarse particles compacts tightly) in layers no more than 4 inches thick. Compact each layer with the plate compactor before adding more. For a typical garden patio, you want a compacted sub-base depth of about 4 to 6 inches. Compact in overlapping passes, moving the plate compactor slowly and methodically. After compaction, check your gradient with a long level and string lines. The sub-base surface should mirror your intended finished slope.
The bedding sand layer
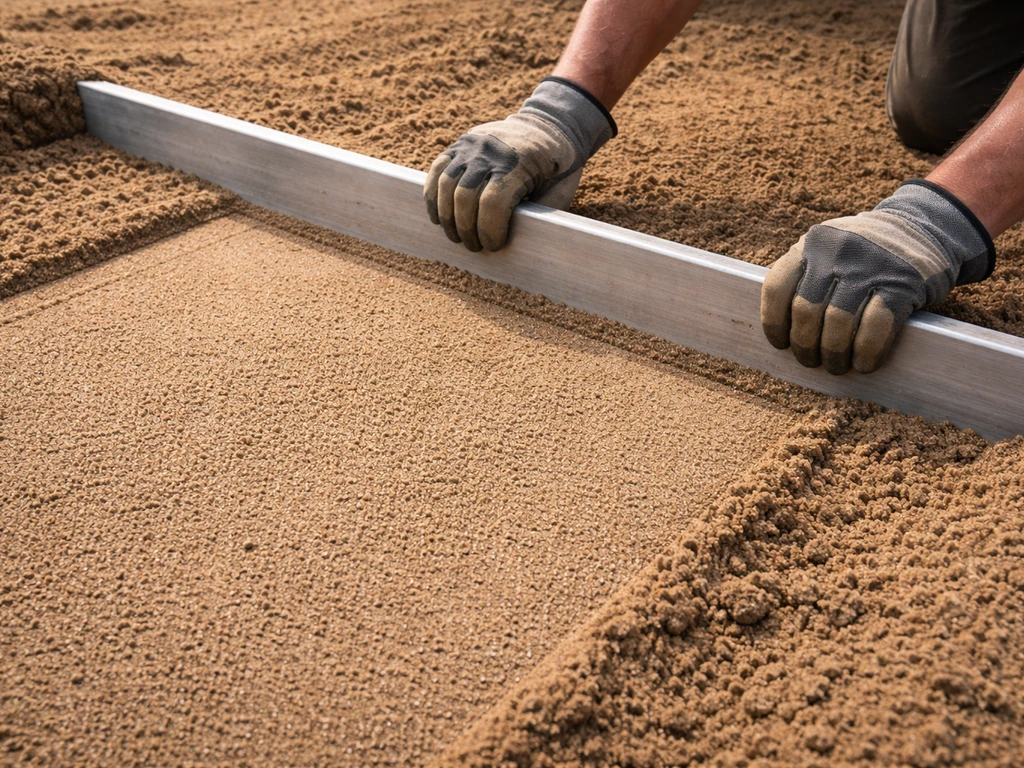
The bedding sand layer goes on top of the compacted sub-base. Spread sharp sand (coarse concrete sand, not fine builder's sand) to a depth of about 40 to 50 mm before screeding, because it will compact down to roughly 25 to 40 mm once blocks are laid and compacted. Use screed rails or 1-inch pipes set at the right height to guide your screed board across the surface. Pull the straight-edge across the rails to create a smooth, even bed at a consistent depth. Do not walk on the screeded sand after this, or you will leave depressions that create uneven spots under the blocks.
The sand bed is purely for seating the blocks at a precise, consistent level. It is not structural, and it does not compensate for a poorly built sub-base. If you find yourself trying to fix a low spot by piling extra sand in one area, stop and fix the sub-base underneath instead.
Edging and setting the first course
Edge restraints are what hold your entire patio together. Without them, the outer blocks gradually creep outward under foot traffic, joints widen, and the whole surface becomes unstable. Install your edging before you lay any blocks on the main field of the patio. If you are ready to move on to the actual installation, follow a step-by-step guide on how to put patio blocks down.
Fix rigid plastic or aluminium edging along your perimeter string lines. Drive the stakes firmly into the sub-base or into the ground beyond the sand bed. The top of the edging should sit just below your intended finished block surface so it is not visible once the patio is done. Where you have a permanent structure like a wall or step, the blocks can butt up directly against it, but on open edges the restraint is essential.
Start laying blocks from a corner or from a straight edge, such as the side of the house. Set your first block carefully, pressing it firmly into the sand bed without twisting it (twisting disturbs the sand bed underneath). Check it for level and for correct height relative to your string line. This first block sets the standard for every block that follows, so take the time to get it exactly right. Use a rubber mallet to tap blocks gently into the sand, not a hammer.
Keep consistent joint spacing as you go. For concrete block paving, joints should be between 2 and 5 mm wide. Joints narrower than 2 mm make it hard to get jointing sand in; joints wider than 5 or 6 mm will not lock up properly and will allow blocks to shift. Many concrete blocks have small nibs or spacers moulded into the sides to automatically maintain the right gap, but if yours do not, use thin tile spacers or just keep a close eye on the gaps as you work.
Laying concrete patio blocks: patterns, cutting, and spacing
Work across the patio from your established first course, keeping your string lines in place as a height and alignment reference. Lay blocks in your chosen pattern, working in a diagonal direction if you are doing herringbone, or in rows for running bond. Check alignment frequently with your straight-edge across multiple blocks, not just between adjacent pairs.
Every few rows, lay your long straight-edge diagonally across the surface to check for high or low blocks. A block that sits high is easy to fix: lift it, remove a little sand, and re-lay it. A block that is low means you need to add a little sand underneath. Do these corrections as you go, not after the whole patio is down. Once the plate compactor has run over the surface, minor corrections are much harder.
Cutting blocks to fit
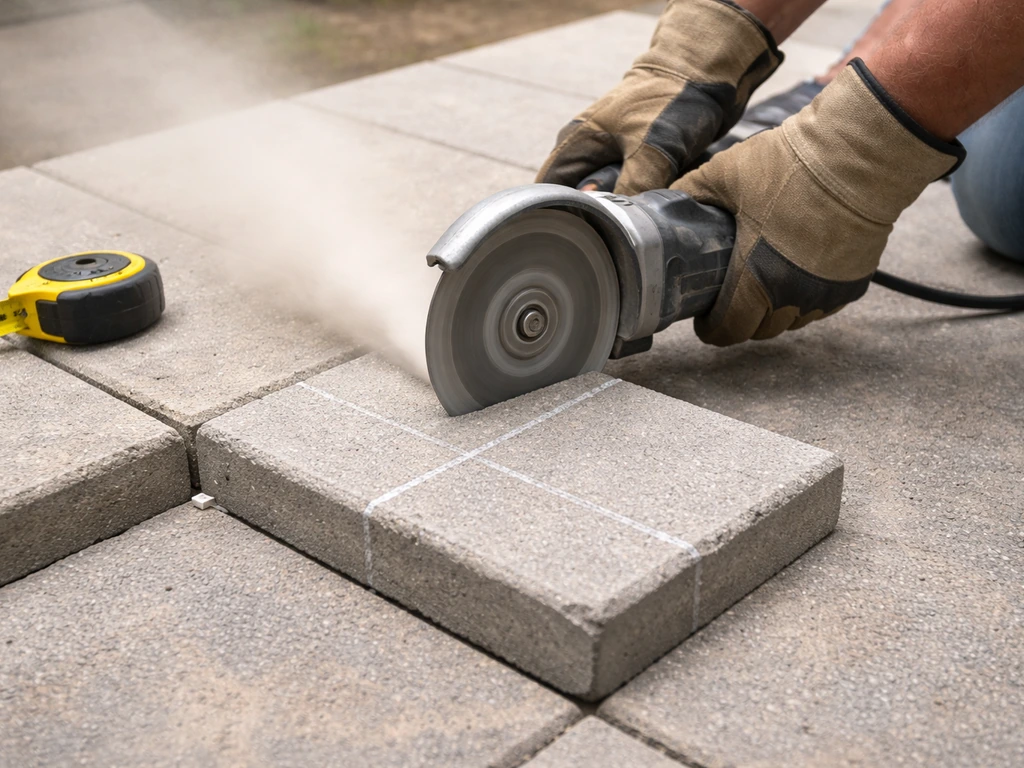
Save all your cuts for the end, once the main field of full blocks is laid. This way you can measure each cut individually against the actual gap, which is always more accurate than measuring from a plan. Mark the cut line on the block with a pencil or chalk.
For straight cuts, an angle grinder or circular saw with a diamond blade is the most practical tool for most DIYers. For thicker or harder blocks, a rented block splitter (guillotine) makes clean straight cuts quickly and with less dust. For curved cuts around obstacles like downpipes or tree roots, an angle grinder gives you the control you need. Always cut outside or in a well-ventilated space, keep the blade cool, and wear your respirator. Silica dust from cutting concrete is genuinely dangerous, and the risk is easy to underestimate.
Lay cut pieces with the cut edge facing the perimeter, so the factory edge faces inward and the join with adjacent blocks looks tidy. If a cut piece comes out smaller than about a third of a full block, it will be prone to rocking. Adjust your layout slightly to avoid these very small slivers if you can.
Finishing: jointing, compaction, cleanup, and sealing
Compaction
Once all the blocks are laid, including cuts, run the plate compactor over the entire surface. Fit a rubber or polyurethane mat to the base of the compactor plate to prevent scratching or scuffing the block surface. Make at least two passes in different directions, overlapping each run by about half the plate width. This compaction seats the blocks firmly into the sand bed and locks the whole surface together. After compaction, re-check your surface with the long straight-edge and fix any blocks that are still noticeably high or low.
Jointing
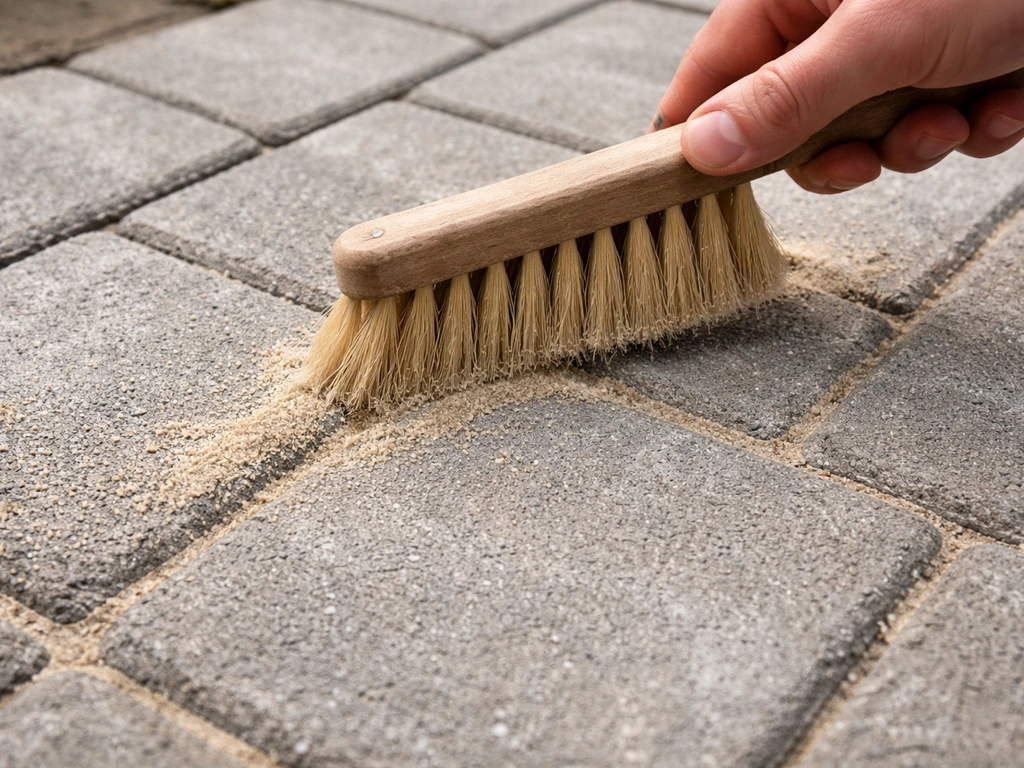
Jointing sand fills the gaps between blocks and is what makes the whole surface lock up into a rigid, stable unit. You have two main options: kiln-dried silica sand or polymeric sand.
| Jointing sand type | How it works | Best for | Key watch-out |
|---|---|---|---|
| Kiln-dried silica sand | Fine dry sand brushed into joints, relying on compaction for lock-up | Sheltered patios, low-traffic areas | Can wash out in heavy rain over time; may need topping up |
| Polymeric sand | Sand with a binder that hardens when activated with water | Exposed patios, high-traffic areas, weed resistance | Must follow activation steps exactly; overwatering washes out binder |
For either type, the process starts the same way. Make sure the block surface is completely dry, then pour jointing sand over the patio and sweep it across the surface with a stiff broom, working it into the joints. Make sure the sand is pressing down into the joints, not just sitting on top. Run the plate compactor (with rubber mat) over the surface again to vibrate the sand down into the joints. Then sweep again and compact again. Repeat until the joints are consistently filled to within about 3 to 5 mm of the surface.
If you are using polymeric sand, follow the manufacturer's activation instructions carefully. With most products you mist the surface with water after sweeping, which activates the binder. Sakrete PermaSand technical data sheet cautions that polymeric jointing sand should not be applied on wet or damp surfaces and highlights moisture-related application requirements for proper bonding mist the surface with water after sweeping. The key tip here: stop watering once the sand has been activated to about 75% of its joint depth. Overwatering flushes the binder out of the joints and you end up with soft, crumbly jointing that will not hold. Let the surface cure completely before walking on it, which typically takes 24 hours in dry conditions.
Cleanup and sealing
Once jointing is complete, brush off any remaining sand from the block surface using a soft brush. A leaf blower is useful here for clearing fine particles from textured blocks. Rinse the surface gently if needed, but avoid directing water directly into freshly filled joints.
Sealing is optional for most concrete block patios but it does extend the life of the surface and makes cleaning easier. A penetrating concrete sealer protects the blocks from staining, reduces efflorescence (the white salt bloom that appears on new concrete), and helps the jointing sand stay in place. Apply sealer with a roller or low-pressure sprayer on a dry day, following the product's recommended coverage rate. Wait at least 4 weeks after installation before sealing to allow any efflorescence to work its way out first.
Quick troubleshooting if something looks off
Even when you follow every step carefully, you might hit a snag. Here are the most common issues and what to do about them.
- Blocks rocking after compaction: one or more blocks have too much or too little sand underneath. Lift the block, adjust the sand bed, and re-lay it. If multiple blocks in the same area are rocking, the sub-base has a soft spot that needs to be addressed before re-laying.
- Water pooling on the surface: your slope is insufficient or inconsistent. Check the gradient with a long level. If the issue is localised, you may be able to lift and re-lay a section with corrected bedding depths to improve the fall.
- Wide or uneven joints: this usually means blocks were laid with inconsistent spacing. For joints over 5 to 6 mm, you may need to relay the affected section. In the meantime, extra jointing sand helps reduce weed ingrowth.
- Sand washing out of joints repeatedly: switch from kiln-dried sand to polymeric sand, which is specifically designed to resist washout.
- White staining (efflorescence) on block surface: this is normal on new concrete and will usually fade with weathering. Speed it up by scrubbing with a diluted white vinegar solution and rinsing. Sealing after it clears will reduce recurrence.
- Edge restraints moving or popping out: re-drive stakes more deeply and ensure they go into firm ground, not loose sand. In soft ground, set edge restraints in a small concrete haunch for permanent fixing.
Your installation checklist before you call it done
- All vegetation and topsoil removed; soft spots dug out and filled with compacted hardcore
- Formation level set to correct gradient (at least 1: 80 slope, roughly 1.5 to 2% fall away from the building)
- Sub-base compacted in layers to correct depth (4 to 6 inches compacted for pedestrian patio)
- Geotextile membrane laid if clay or soft soil is present beneath sub-base
- Bedding sand screeded to 25 to 40 mm compacted depth, following gradient of sub-base
- Edge restraints installed and secured along all open perimeter edges
- Blocks laid from a fixed straight edge or corner, with consistent 2 to 5 mm joint spacing
- Surface checked regularly with long straight-edge for high and low spots during laying
- All cuts made and placed with cut edges facing outward toward the perimeter
- Plate compactor (with rubber mat) run over full surface in two directions after all blocks are laid
- Jointing sand brushed in and compacted; joints filled to within 3 to 5 mm of surface
- Polymeric sand activated per manufacturer instructions (if used), surface left to cure
- Surface cleaned, inspected for rocking blocks, wide joints, or drainage issues
- Sealer applied (optional, but recommended) after 4-week curing period
Laying patio blocks on a standard flat or gently sloped garden is well within reach for a first-time DIYer if you follow the sequence and resist the urge to rush the base preparation. The variations that make the job harder, like laying blocks directly on grass or bare dirt, over soft clay, or on steeply sloped ground, each need a slightly adjusted approach to the base build and drainage design, but the core principles stay the same.
If you are laying patio blocks on grass, focus on removing all turf, building a firm sub-base, and adding the right drainage slope so the blocks do not shift over time laying blocks directly on grass. Get the sub-base right, screed the sand bed accurately, keep your joints tight and consistent, and finish with proper compaction. Do those four things and you will end up with a patio you are genuinely proud of.
FAQ
Can I lay patio blocks on a slight slope, and how do I keep drainage working?
Yes, but only if the sub-base is still built correctly and you maintain the drainage fall. Plan the slope before you start, then use the string lines to set the sub-base gradient. Avoid “fixing” the slope by adding extra sand, because the sand bed is for leveling the blocks, not compensating for an uneven or weak base.
What should I do if I find a high or low block while I’m still building the patio?
You should only cut back jointing sand and rework blocks before you compact and joint. If you notice a low spot after laying a few rows, lift that block, adjust the sand bedding, and reset it immediately. Once the plate compactor has run over the whole area, minor corrections get much harder because blocks have seated into the bedding.
How deep should patio edging restraints be installed?
Don’t bury the edging stakes into just the sand bed. Drive restraints into the sub-base (or into firm ground just beyond the sand layer) so they resist outward movement under foot traffic. If the edging is only held by sand, it can shift, causing joint widening and loss of stability over time.
What joint width should I aim for, and what’s the risk of going too narrow or too wide?
It depends on the block size and how tightly you want the pattern to lock up, but for typical concrete block paving joints of 2 to 5 mm are the practical target. If your spacers or molded nibs prevent getting consistent gaps, use thin tile spacers and keep checking with a straight edge as you go so you do not end up with uneven joint widths.
Do I need geotextile under patio blocks on clay soil, and does it replace the gravel base?
You can lay blocks over a geotextile on clay, but only after you’ve compacted or stabilized the clay and you still build a proper crushed-stone sub-base on top. The membrane is a separation tool, it is not a substitute for compacted aggregate, and it should prevent fines migration that can destabilize the layers.
Why does it matter if I walk on the screeded sand before laying blocks?
Avoid walking on the screeded sand bed after you create it. If you must access the area, step only on temporary boards laid across the bed so you do not create depressions that transfer through to the block surface.
What are the safest ways to cut concrete patio blocks as a DIYer?
For cutting dust control, plan to use a saw with water suppression or vacuum extraction when possible, and wear at least a P100 or FFP3 respirator (a basic paper mask is not enough for silica). Also cut with the area well ventilated, and consider working in smaller batches to reduce how long you’re exposed.
My jointing sand isn’t filling the joints. What troubleshooting steps should I try first?
If joints stay empty or you see sand not filling properly, it’s usually because the patio surface is not completely dry before jointing, the brooming did not push sand into the gaps, or the compaction pass was skipped or too light. Re-sweep to pack sand into joints, run compaction again, and avoid leaving the surface wet during installation of jointing sand.
How do I avoid ruining polymeric joint sand during activation?
Do not mist or water repeatedly if you are using polymeric sand. Follow the activation instructions, and stop once the activation has reached about 75% of the joint depth. Overwatering can wash out the binder, leaving crumbly joints that do not lock up properly.
When is the right time to seal a new block patio, and what could go wrong if I seal too early?
It’s best to wait before sealing because concrete can show efflorescence as salts migrate out. Plan to wait at least 4 weeks in typical conditions, on a dry day, and use a penetrating sealer applied at the product’s coverage rate, then re-check for remaining surface dust and let it fully cure.
Should I run the plate compactor before or after edge restraints and jointing?
Avoid compacting before you have both the edging installed and the blocks fully seated. If you run the compactor too early or on loose material, you can disturb the sand bed and create settlement points. After blocks are laid, compact in at least two directions with overlapping passes, using a rubber or polyurethane mat to protect block faces.
What changes if I’m laying patio blocks directly where grass is currently growing?
Yes, and you should treat it as a design change: you will need edging or restraints and a drainage-aware base so water does not pool and the blocks do not migrate. The fix is to remove turf completely, build a firm sub-base with the right fall, screed bedding at consistent depth, then keep joints consistent and compact the blocks properly.