To level an uneven patio, you need to lift any loose or sunken pavers, blocks, or tiles, correct the bedding layer underneath, and reset everything at the right height and slope. The target drainage slope is between 1/4 inch and 1/2 inch per foot, falling away from your house. For most DIYers tackling a patio that has settled, shifted, or pooled water after a few seasons, this is absolutely doable by hand over a weekend or two. The specific method depends on your surface type and how badly things have moved, but the core process is always the same: lift, fix the base, relay, check your slope.
How to Level a Patio: Step-by-Step for Uneven Surfaces

Clara Farrell
5 May 2026
Why a level patio isn't just about looks
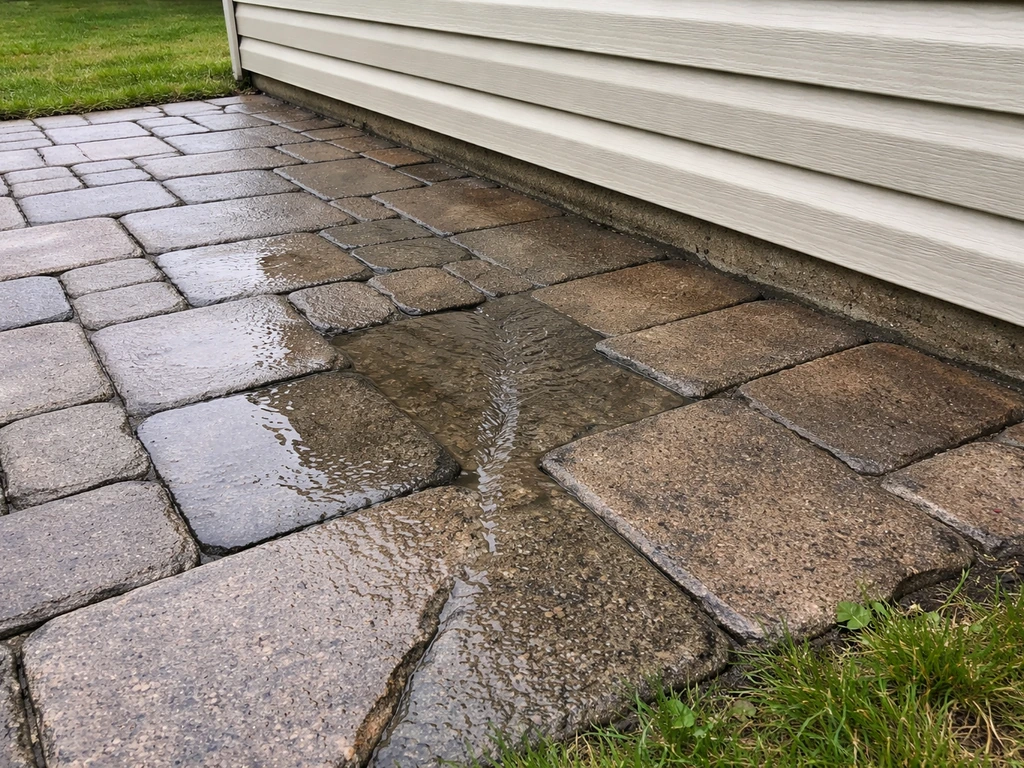
A patio that's even slightly out of level causes real problems fast. The most obvious one is water pooling. If your slope runs toward the house instead of away from it, every rainstorm pushes water against your foundation. Over time, that leads to damp walls, potential basement issues, and erosion right at the base of your home. Even a patio that drains toward the garden can cause problems if it funnels water into a low spot that just sits there.
Beyond drainage, an uneven surface creates trip hazards. A paver that's only a quarter inch higher than its neighbor is easy to catch your toe on, especially at dusk or in wet conditions. And structurally, once one area starts to shift, the movement tends to spread. Water gets under the base, freeze-thaw cycles lift individual units, and what started as one wobbly slab becomes a rippling mess across the whole patio. Fixing it early, when it's still a localized problem, is always cheaper and faster than waiting.
How to assess what's actually wrong with your patio
Before you move a single paver, spend 20 minutes reading the surface. This saves you from guessing, which is where most DIY releveling jobs go wrong. You're trying to answer three questions: where is the water going, where are the high and low spots, and is this a surface problem or a base problem?
Check the slope and drainage direction
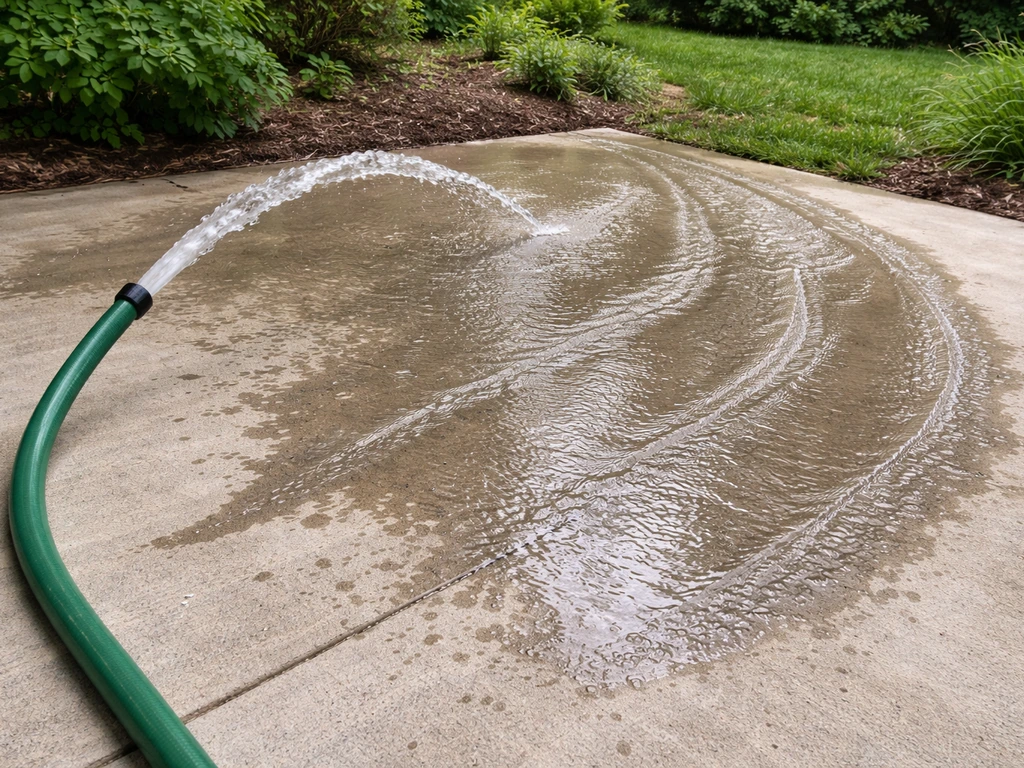
Run a garden hose across different sections and watch where the water flows. It should consistently move away from the house. If it pools or runs back toward the building, you have a drainage problem that needs fixing as part of the relevel. You can also use a long spirit level (at least 4 feet) and a tape measure to check how much fall you have. The target is between 1/4 inch and 1/2 inch of drop per foot of run away from the house. If you're getting less than that in sections, those areas will pond.
Identify high spots, low spots, and base failure
Walk the whole patio slowly, pressing down on each unit with your foot. Any wobble or hollow sound (on tiles especially) tells you the bedding underneath has failed. Low spots that collect water are usually a sign that the sand or gravel base has compressed or washed out. High spots, where individual units are sitting proud of their neighbors, are often caused by frost heave, tree root pressure, or base material that wasn't compacted properly when the patio was first built. If you see a whole section has dropped uniformly by an inch or two, that's a base settlement issue, which takes a bit more work to fix than individual sunken units.
Check your existing materials
Look at what you're working with. Concrete pavers and brick or block can almost always be lifted, base-corrected, and reset. Natural stone like slate or flagstone is heavier and more fragile but still manageable. Mortar-bedded tile or cemented surfaces are trickier because you're either chasing the damage section by section or considering a resurfacing approach. Make note of your joint type too: dry-jointed sand-filled paving is the easiest to relevel by far, while grouted surfaces require breaking out and regrouting after any lift-and-reset.
Tools and materials you'll need
You don't need a lot of specialist gear to level a patio by hand. Most of this is standard DIY kit, and you can rent the plate compactor if you don't own one.
- Long spirit level (4-foot minimum, 6-foot ideal) for checking fall across the whole surface
- Rubber mallet for tapping pavers or blocks into position without cracking them
- Bolster chisel and club hammer for lifting stubborn mortared units
- Stiff-bristled brush for sweeping out old jointing sand and debris
- Flat shovel and pointing trowel for adjusting the bedding layer
- Screeding rails or timber battens to create a consistent bedding depth
- Plate compactor (rentable) or hand tamper for compacting the base if you're going deeper
- Coarse sharp sand or grit sand for re-bedding pavers and blocks
- Dry sharp sand or kiln-dried sand for re-jointing after relaying
- Leveling compound (for tile/slate on a mortar base) if you're not lifting the surface
- Tape measure and string line for checking levels across longer runs
For re-bedding pavers and block paving, stick with blank" rel="noopener noreferrer">coarse sharp sand rather than builder's sand. Getting the bedding sand right is a big part of how to level sand for patio blocks, because depth consistency and proper screeding affect the final slope coarse sharp sand. Builder's sand is too fine and compresses unevenly over time. Spread the bedding sand at a minimum of 1 inch deep across the prepared base material, and use screeding rails to keep the depth consistent. If you're working with tile or slate in a mortar bed, a sharp sand and cement mix (roughly 4 parts sand to 1 part cement, used dry and semi-dry) gives you better control when fine-tuning individual unit heights.
Step-by-step: how to relevel an existing patio
Step 1: Clear and clean the area
Sweep the entire patio thoroughly and remove any furniture, planters, or edging that might be in the way. If you have joint sand, brush out a few inches of it around the problem areas so the units can lift cleanly. This sounds basic but skipping it means you're constantly working around obstacles or accidentally cracking units you didn't intend to disturb.
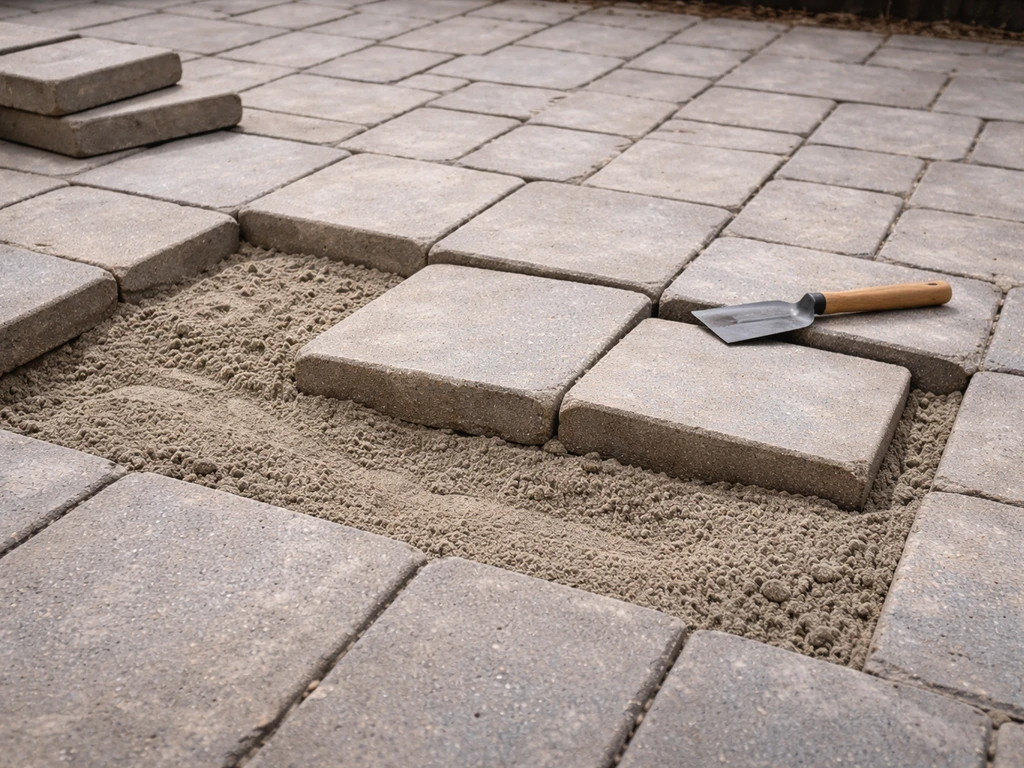
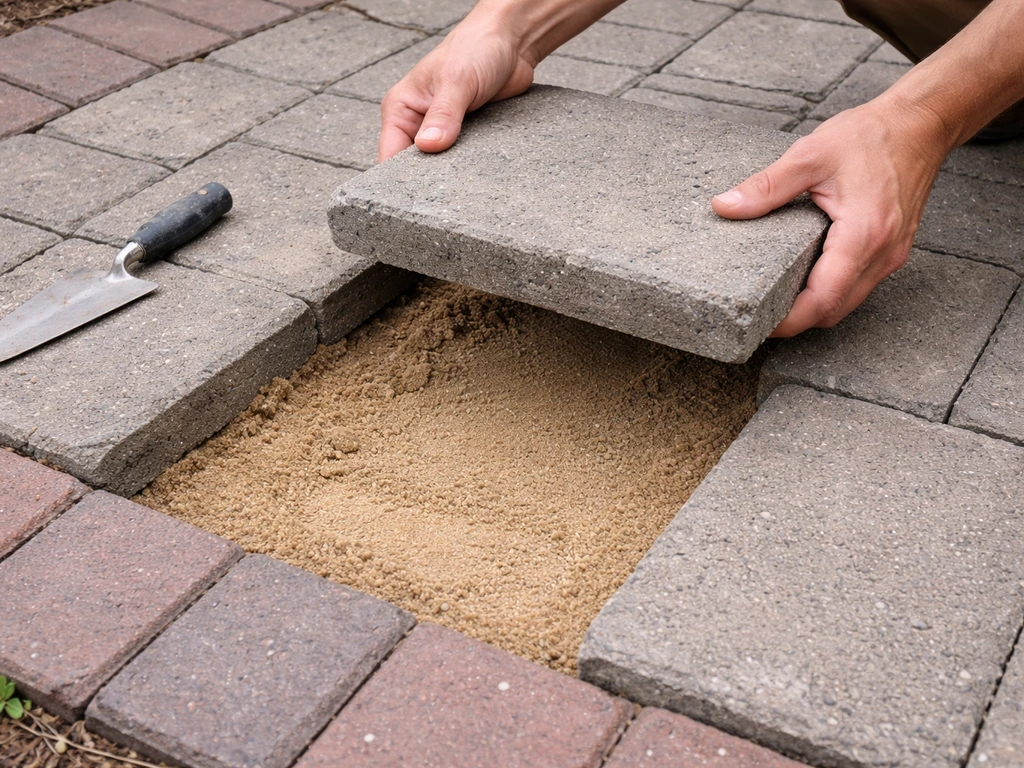
Step 2: Lift the affected units
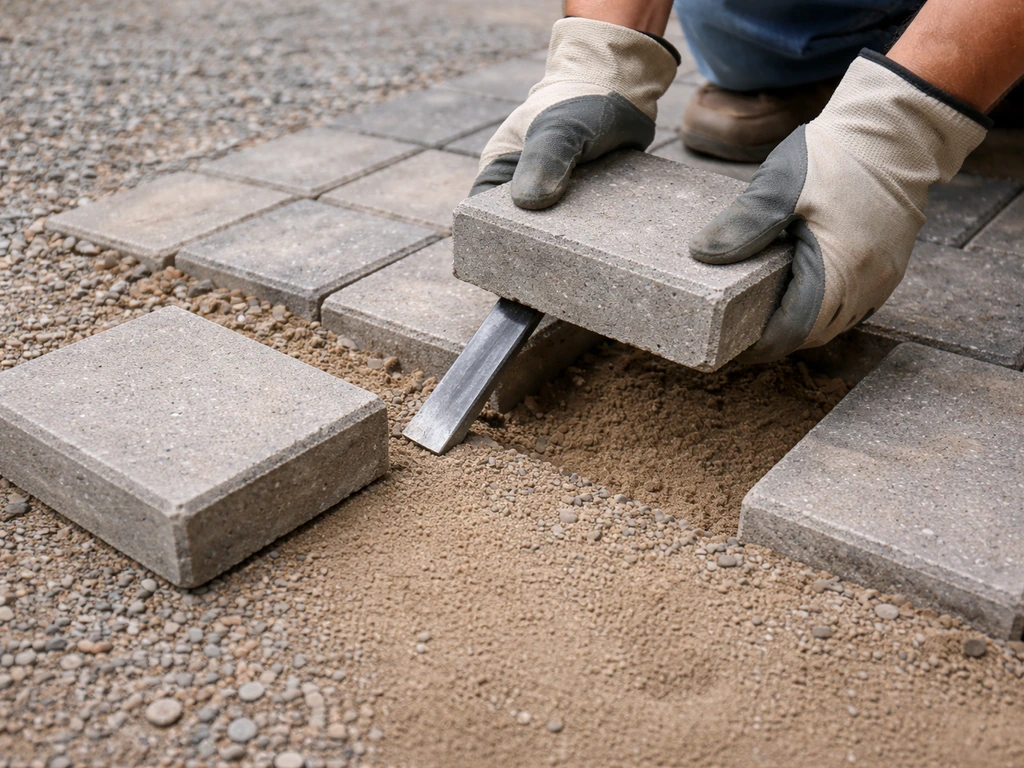
For sand-bedded pavers or blocks, slide a bolster chisel into the joint and lever upward, then get your fingers under the edge to lift the unit clear. Stack them face-up nearby in the order you removed them if you're working in a pattern. For mortar-bedded tile or stone, you'll need to break out the joint with a chisel first, then carefully lever the unit up. Expect some breakage with older mortar beds, especially on thin tiles, so it's worth having a few spare units on hand if possible.
Step 3: Fix the base
Once the units are out, look at what you've exposed. If the bedding sand looks compressed, disturbed, or washed out, scrape it all back and start fresh. If you can see the sub-base (the gravel layer below the sand), check that it's firm and hasn't sunk. A properly built patio base under a typical residential patio on average soils needs at least 6 to 8 inches of compacted granular material below the bedding layer. On clay or silty soils, go toward the upper end of that range. If the sub-base has dropped, you'll need to add material, compact it down (using a plate compactor or a heavy hand tamper in smaller areas), then re-spread your bedding sand on top.
Step 4: Set the right slope and screed your bedding sand
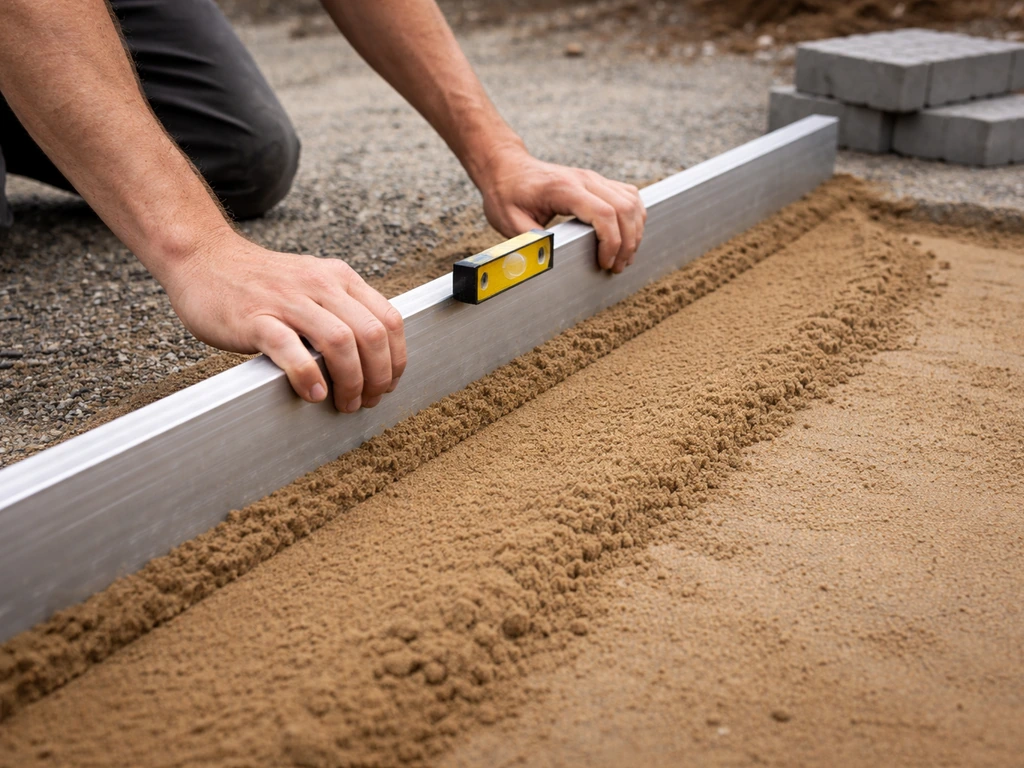
This is the most important step. If you want a detailed walkthrough, follow the same lift-fix-relay steps and set the correct drainage slope before you lay any units down set the right slope. Before you lay any units back down, set your screeding rails or timber battens at the correct height to give you a consistent 1/4 inch to 1/2 inch drop per foot away from the house.
A good rule of thumb is to create consistent fall away from the house, then level the bedding layer so your pavers sit at the right height. If you want to know how to level ground for a patio, use the same height and drop targets when setting your screeding rails. Pull a screed board across the rails to create a smooth, even sand surface at exactly the right depth. Don't guess the slope by eye.
Use your spirit level and tape measure, or set a string line at the correct gradient across the section. The minimum recommended slope for a patio surface is 1%, which works out to roughly 3/16 inch per foot. Most guides recommend aiming closer to 1. 5%, which is about 3/16 to 1/4 inch per foot, to give yourself a buffer.
I always aim for 1/4 inch per foot as the minimum because 1% just barely does the job.
Step 5: Relay the units and check as you go
Lower each unit back into place carefully, avoiding any downward jabbing movement that will disturb your screeded sand. Tap each unit firmly down with a rubber mallet, then check it against its neighbors with a spirit level. Any unit that's high gets tapped down; any that's low needs to come back up and have a little extra sand added under it. Work in small sections and check your slope every few units rather than laying everything down and then finding out you're off. Don't walk on your freshly screeded sand before units are laid, because footprints create low spots that throw off the level.
Step 6: Compact and re-joint
Once all the units are relaid, run a plate compactor over the surface (with a rubber mat or old carpet under the plate if you're working on natural stone or textured pavers). This beds everything down firmly and evenly. Then brush dry jointing sand into all the gaps, compact again, add more sand, and repeat until the joints are full to within about 3mm of the top surface. Techniseal’s polymeric sand technical documentation describes the sand’s intended use in paver joints and its role in resisting joint washout. For block paving, kiln-dried sand is easiest. For larger joints in natural stone, a dry-mixed mortar brushed in and lightly misted with water gives a more durable finish.
Releveling by surface type
| Surface Type | Best Approach | Watch Out For |
|---|---|---|
| Concrete pavers (sand-bedded) | Lift and reset with fresh bedding sand; compact in place | Don't disturb more sand than needed when lifting units |
| Brick or block paving | Same as pavers; lift, correct base or sand, relay and compact | Brick can chip if levered too aggressively; use wide chisel |
| Natural stone / flagstone | Lift carefully (heavy units), re-bed in semi-dry mortar mix | Stone can crack under plate compactor; use rubber mat |
| Slate or thin tile | Best lifted section by section; re-mortar individually | High breakage risk; have spare tiles ready |
| Grouted tile (cemented) | Grind out grout, lift, re-bed, regrout; or use leveling compound for minor dips | Can't compact; must hand-tamp carefully |
Pavers and block paving
These are the most forgiving surfaces to relevel because you can lift individual units without damaging them, adjust the sand underneath, and relay everything in the same session. The key is getting your bedding sand depth consistent at 1 inch across the whole section before you start laying. If you try to compensate for slope variations by adding different amounts of sand under individual units rather than correcting the base and screeding properly, you'll get localized wobble again within a season or two.
Brick and natural stone
The process is essentially the same as for concrete pavers, but handle the units more carefully. Old brick especially can have softer edges that chip or flake if you're aggressive with the chisel. For natural stone flagging, the weight of larger pieces means two people makes the job much safer and faster. Re-bed flagstone in a semi-dry mortar mix (4:1 sharp sand to cement) rather than loose sand for better long-term stability, especially for irregularly shaped pieces that don't interlock.
Tile and slate
Lifting and releveling cemented or mortar-bedded tile and slate is the most time-intensive approach. For minor low spots of under about 5mm across a small area, a floor-leveling compound poured over the surface before re-tiling is a reasonable option. For sunken sections or poor overall drainage, you really do need to lift the affected tiles, chip off the old mortar, re-lay on a fresh mortar bed at the correct height, allow to cure (usually 24 hours before walking on it), and then regrout. Rushing the cure is where most people mess this up.
How to stop your patio from going uneven again
The reason most patios settle and shift in the first place comes down to three things: not enough base depth, poor compaction, and inadequate drainage. If you fix those on the relevel, you shouldn't be back out here doing the same job in three years.
- Use at least 6 inches of compacted granular sub-base on sandy or gravelly soils, and 8 inches on clay or silty soils. Clay holds water and moves more with freeze-thaw, so it needs more depth to stay stable.
- Compact in layers. Add sub-base material in 3-to-4 inch layers and compact each one before adding the next. Dumping it all in at once and compacting the top doesn't give you uniform density through the depth.
- Keep your drainage slope at a minimum of 1/4 inch per foot (roughly 2%) away from the house for the entire surface. Build this into the sub-base grade, not just the surface, so the whole system drains correctly.
- Spread bedding sand at exactly 1 inch deep. Thicker sand compresses unevenly and creates future settlement. Thinner sand gives you less tolerance to work with.
- Re-fill joints properly after any relevel and top them up each season. Empty joints let water in and sand wash out, which starts the whole cycle again.
- Keep heavy planters and garden features off sections with thinner base depth. Concentrated loads accelerate settlement in areas that aren't built for them.
It's also worth thinking about surface water management around the patio edges. If you have solid edging restraints that are holding water in, or if the surrounding ground level is higher than the patio surface, you'll keep getting water problems regardless of how well you level the patio itself. Make sure there's a clear path for water to leave the surface at the low end, whether that's into a lawn, a planted border, or a drain.
When it's time to call a professional
Most patio releveling is genuinely DIY-friendly, but there are situations where the problem is bigger than a bedding-layer correction and a weekend of work. Here's how to know when you're in that territory.
- The whole patio has dropped uniformly by more than a couple of inches, especially close to the house. This can signal foundation movement, drainage failure at a deeper level, or significant soil subsidence, none of which you can fix from the surface.
- You see cracking in the patio surface that follows a pattern (long diagonal cracks, cracks radiating from one point) rather than isolated joint failure. Patterned cracking usually means the base or the ground beneath it is moving in a way that needs professional investigation.
- The ground under the patio is soft or spongy even after dry weather. This suggests you have ongoing groundwater issues, possibly a broken pipe or a high water table, that will undermine any leveling work you do.
- The area is larger than roughly 30 to 40 square meters (around 300-400 sq ft). At that scale, getting consistent slope across the whole surface by hand becomes genuinely difficult, and hiring someone with laser leveling equipment is often faster and more accurate.
- You're working near a retaining wall or on a slope where the patio is load-bearing in any way. Getting this wrong can cause structural failure that's both dangerous and expensive.
For everything else, which honestly covers the vast majority of settled, sunken, or sloped-the-wrong-way residential patios, you can do this yourself. Take your time with the base prep, get your slope right before you start laying, and check your work with a level at every stage. To avoid repeating the problem, follow the same slope and base-depth targets each time you relevel a patio base. The difference between a patio that stays flat for 20 years and one that needs releveling every three seasons is almost always in how carefully that foundation work was done.
FAQ
What should I check if I relevel the patio but it still pools water?
If your patio is already close to the right height but water still pools, the issue is often outside the patio itself (edge restraints, a raised lawn edge, or missing outlet). Walk the perimeter with a level, confirm the ground at the patio edge slopes away from the house too, and make sure there is a continuous drainage path where the surface water can go.
Can I fix small low spots without lifting all the pavers or tiles?
Yes, but only for small, isolated tile or grout failures. If the surrounding slope is wrong, a patch will create a new low or high point. A reliable rule is, if multiple units across a section are out by more than a few millimeters, lift-and-reset with corrected bedding and slope is usually the durable fix.
How often should I check level and drainage while I’m working?
Treat releveling as a stop-and-check process. After every few units, recheck level against the neighbors and recheck fall with your 4-foot (or longer) level plus tape or string line. If you wait until the end, you may have to lift a larger area because correcting a bad slope later disturbs already-set units.
Why does the patio sometimes become uneven again even after releveling?
Don’t rely on sand volume alone. If you keep adding sand under one area to “make it look right,” the base is still uneven and will settle again. The article’s approach is to fix washed-out or compressed bedding, reset with screeding rails at the correct fall, then relay units so the final height comes from the base, not random sand bumps.
Can I power wash the patio before I start releveling?
Pressure washing right before re-bedding is a bad idea because it can drive fines into the gaps and destabilize the bedding. If the surface is dirty, use a controlled wash and allow full drying, then remove joint sand and scrape bedding back to a stable, clean layer before you screed and relay.
Is builder’s sand okay for patio bedding?
For sand-bedded pavers, coarse sharp sand is the safer bedding choice because it locks in more consistently. Builder’s sand can compact unevenly over time and create micro-waves, which show up as wobble or slight rocking after a season.
What if the sand keeps washing out or the base feels soft when I lift units?
If you have to set your fall but your base won’t “hold” (screeding rails move, sub-base is soft, or you see pumping water), stop and rebuild the base rather than fighting it with extra bedding sand. The minimum base depth guideline in the article (about 6 to 8 inches compacted granular material, more for clay or silty soils) exists to prevent exactly this failure mode.
How do I approach a patio with mortar joints or grouted tiles?
On grouted surfaces, you should plan for break-out and regrouting after any lift. Also account for the additional thickness you may remove or add when you chip out mortar, because it can change your final finish height and slope.
Is it safe to use a plate compactor on natural stone or textured pavers?
Yes, but avoid compacting directly on fragile natural stone without protection. Use a rubber mat or old carpet under the plate compactor as mentioned in the article, and run compaction in light passes to bed the surface without shifting units.
How long should I wait before walking and grouting after relaying mortar-bedded tile?
For tile and slate, the key “edge case” is cure time. After resetting with mortar, allow about 24 hours before walking on it, and don’t regrout immediately if the bed is still green. Rushing cure is a common reason for renewed movement and cracking.
What causes frost-heaved pavers, and how do I prevent it when leveling?
If units are high in a frost-heave pattern, don’t just tap them down. Frost heave usually means the base or drainage is letting water remain under the patio. Correct the sub-base, ensure proper fall away from the house, and keep edge water from building up so water cannot freeze under the surface.
What’s the right way to fix a patio that is sloped toward the house?
If there’s no consistent drop away from the house (for example you have flat or inward fall), correct the slope by resetting the bedding with screeding rails or a string line, not by adjusting individual units one at a time. Establish the target drainage fall first, then make every unit conform to that plane.