
You can build a solid, good-looking sidewalk with patio blocks in a single weekend using basic tools, a rented plate compactor, and roughly 4 inches of compacted crushed stone beneath a 1-inch sand bed. The key is in the ground preparation, not the block laying itself. Get the base right, slope the finished surface at least 1/4 inch per foot away from any structure, lock in your edges with restraints, and fill the joints with polymeric sand, and that sidewalk will stay flat and drain cleanly for decades.
How to Make a Sidewalk with Patio Blocks: DIY Guide Step-by-Step

Clara Farrell
18 Jul 2026
What this guide covers and who it's for
This is a complete, start-to-finish guide for homeowners and DIYers who want to build a residential sidewalk using patio blocks (also called segmental concrete pavers or concrete paving slabs). It covers every stage: deciding whether patio blocks are right for your situation, planning and measuring, excavating and building a proper base, establishing drainage slope, laying and cutting blocks, edge restraints, compaction, jointing, and sealing. I've also included sections on working with slopes and clay soil, building steps and transitions where your sidewalk meets a porch or patio block deck, and a brief look at making your own concrete blocks when you can't find the size you need. If you hit a problem during or after installation, the troubleshooting section near the end addresses the most common issues: soft spots, frost heave, uneven settling, and poor drainage.
If you've never done this before, you're in exactly the right place. The process is more physical than technical, and every step is learnable. The sections below are sequenced the way the actual work flows, so you can read through once before you start and then use the headings as checkpoints on the day of the job.
Should you use patio blocks, a poured slab, or a deck?
Patio blocks are not always the best choice. Before you order materials, run through this checklist. It will save you from choosing the wrong method for your site.
| Situation | Best choice | Why |
|---|---|---|
| Straight residential sidewalk, pedestrian only | Patio blocks | Easy to repair individual units, no forms or curing, DIY-friendly |
| Long driveway apron or vehicle crossing | Poured concrete or thick paver section (6 in. base) | Vehicle loads require a reinforced slab or engineered paver section |
| Yard with heavy clay soil and poor drainage | Patio blocks with geotextile and open-graded base | Blocks allow easier drainage management; slab cracks on heaving clay |
| Raised walkway or grade change of 2+ feet | Patio block deck or treated-lumber deck | Block-on-grade doesn't work for raised structures; see the guide on how to build a patio block deck |
| Sloped grade needing steps | Patio blocks with integrally built block steps | Steps can be built with the same block material; transitions are clean |
| Budget is very tight, appearance secondary | DIY poured slab or gravel path | Concrete is cheaper per sq ft if you pour it yourself; blocks cost more up front |
| Frequent need to access underground utilities | Patio blocks | Individual units can be lifted and re-laid without breaking up the surface |
| Rental property, need minimal maintenance | Patio blocks with polymeric sand | Sand joints resist weeds and ants; surface is repairable without a contractor |
If your situation involves a raised structure or a grade change that goes beyond a step or two, a patio block deck or a dedicated set of patio block steps will connect to your sidewalk. Those are more involved builds that each deserve their own guide, but this article will cover the transition details so your sidewalk ties in cleanly.
Everything you need to buy or rent
Here's the honest split: buy consumables and materials, rent the heavy equipment. Owning a plate compactor makes no sense for a single sidewalk project. Same with a wet-cut saw if you're only making one or two cuts. Most tool rental shops stock both for reasonable daily rates.
Materials to buy
- Concrete patio blocks (pavers): 2 3/8 in. thick units are standard for pedestrian residential sidewalks; order 5-10% extra for cuts and breakage
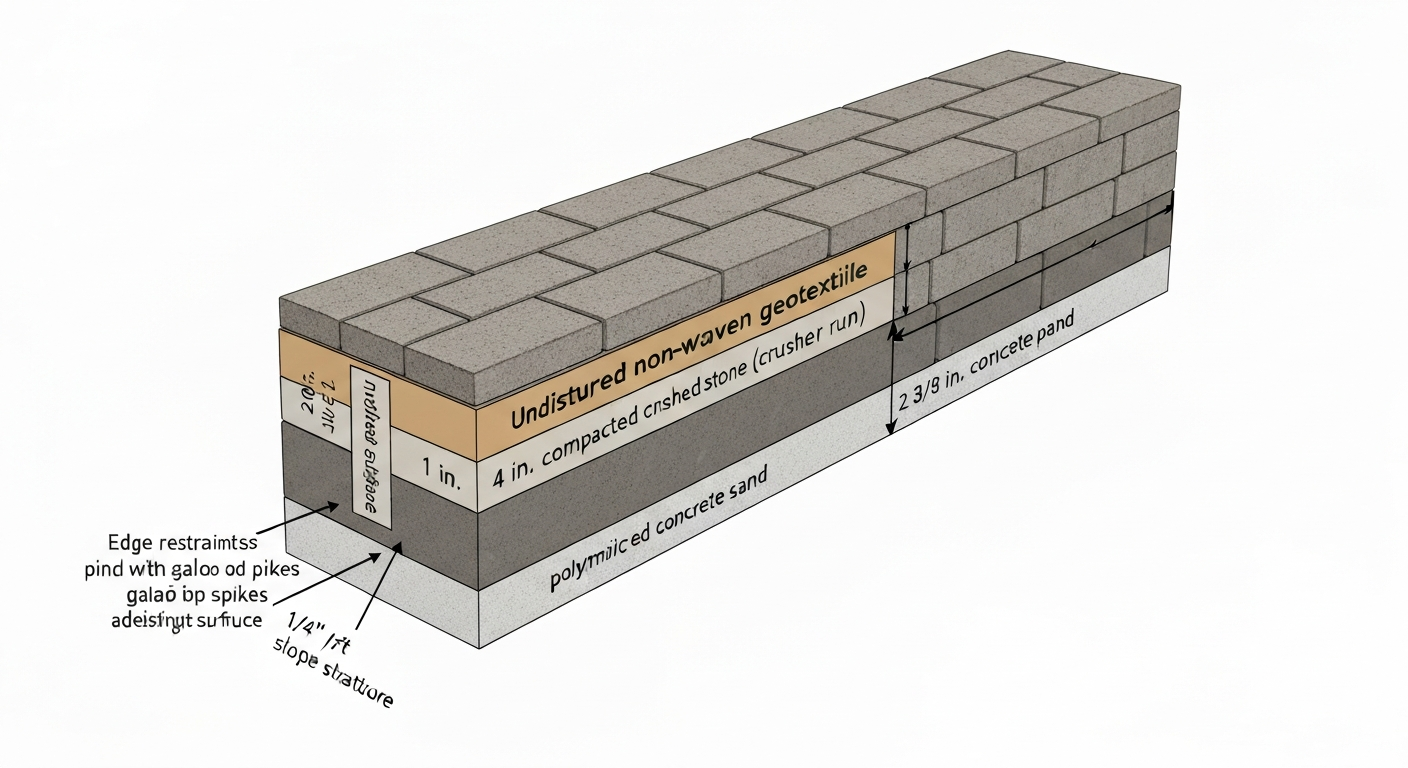
- Crushed aggregate base: dense-graded 3/4-inch minus (crusher run) is the most common compactable base; 4 inches deep compacted is the standard residential pedestrian depth
- ASTM C33 washed concrete sand: for the 1-inch screeded bedding layer only; do not use play sand or mason sand
- Non-woven needle-punched geotextile fabric: place between subgrade and base aggregate, especially on clay or silty soils (look for AASHTO M288-compliant products)
- Edge restraints: plastic spike-in restraints for pedestrian sidewalks on dense-graded base; aluminum or steel channel restraints if you're using a permeable/open-graded base or in a hard-freeze climate
- Galvanized spikes (10-in. or 12-in.): for pinning plastic edge restraints
- Polymeric joint sand: the upgrade over plain sand — binds when wet, resists weeds and insects; buy enough for full coverage
- Gravel or marking paint: for layout lines
- String line and stakes
- Optional: paver sealer (penetrating or film-forming depending on finish preference)
Tools to buy
- Tape measure (at least 25 ft)
- Carpenter's level (4 ft minimum) and a long straightedge or screed board
- Line level or water level
- Rubber mallet
- Steel rake and flat shovel
- Wheelbarrow
- Screed pipes or 1-inch diameter conduit (2 sections for screeding sand)
- Broom for sweeping joint sand
- Knee pads (you will thank yourself)
- Safety glasses and hearing protection
- Dust mask rated N95 or better for any dry cutting or sand work
Equipment to rent
- Plate compactor (a 5,000 lbf / 22 kN unit is appropriate for compacting the paver field; use a heavier unit around 13,500 lbf / 65 kN for subbase lifts if your base is deeper than 4 inches)
- Wet-cut diamond blade saw (table or walk-behind): the cleanest cut for concrete pavers with the least silica dust; rent for the day when you're ready to cut
- Sod cutter (optional but faster than hand-digging for large areas)
- Hand tamper (backup for spots too tight for the plate compactor)
Time, cost, and job size planning
A straightforward sidewalk, say 3 feet wide by 20 feet long (60 sq ft), is a solid one-day project for two people if the ground is relatively flat and the soil isn't too difficult. Add half a day for excavation on clay or rocky ground. A longer run of 40-50 feet will stretch to a full weekend: excavation and base on day one, laying, cutting, and jointing on day two.
| Project size | Estimated time (2 people) | Rough material cost (mid-range block) |
|---|---|---|
| 3 ft x 20 ft (60 sq ft) | 1 day | $300–$500 |
| 3 ft x 40 ft (120 sq ft) | 1.5–2 days | $600–$1,000 |
| 4 ft x 50 ft (200 sq ft) | 2–3 days | $1,000–$1,700 |
| Large walk + landing (300+ sq ft) | 3–4 days | $1,500–$2,500+ |
These numbers cover materials only and assume mid-grade concrete patio blocks at $2.50-$4.50 per square foot. Add $50-$100 for tool rentals (plate compactor plus wet saw for a day). Block prices vary widely by region and style, so get a local quote before budgeting. Premium tumbled or natural-look blocks can run $6-$10 per square foot. The base materials (gravel, sand, geotextile, edge restraints) typically add $1.00-$1.50 per square foot on top of the block cost.
One thing that catches first-timers off guard: disposal of excavated material. A 3x20 ft sidewalk at a 6-inch excavation depth generates roughly half a cubic yard of soil. If you can spread it in a low spot in your yard, great. If not, factor in a dump run or a half-load fee from a hauling service.
Permits, codes, safety, and site considerations
Most residential sidewalk replacements or additions don't require a permit, but there are exceptions. If your sidewalk crosses a public right-of-way (between your property line and the street curb), the municipality almost always has jurisdiction and may require a permit plus inspection. Call your local building department before you dig. It's a 10-minute call that can prevent a very expensive headache.
- Call 811 (in the US) or your local utility locate service at least 3 business days before any digging. This is free and legally required in most states. Buried gas, electric, water, and telecom lines can be within 12-18 inches of the surface.
- Check HOA rules if applicable: some associations regulate paving materials, colors, or coverage limits for impervious surfaces.
- ADA slope rules apply to public paths: if your sidewalk connects to a public right-of-way and serves as a pedestrian access route, maximum running slope is 5% (1:20) and maximum cross slope is 2%. For a private residential walk, these are guidelines rather than requirements, but they're good targets.
- Impervious coverage limits: some municipalities cap the percentage of your lot that can be paved. Permeable interlocking pavers (PICP) may be counted differently or exempt.
- Silica dust hazard: concrete cutting generates respirable silica. Always use a wet saw or wet-cutting attachment and wear an N95 dust mask minimum. Dry grinding or dry cutting is not recommended.
- Compactor safety: plate compactors are heavy and can roll unexpectedly on slopes. Keep bystanders back, wear steel-toed boots, and never operate on a grade steeper than the manufacturer's rated limit.
Planning, measuring, and marking your layout
Before you move a shovelful of dirt, spend time on paper. Sketch your sidewalk to scale and figure out your block count, your starting point, and where your cuts will fall. This step alone will save you half a day of rework.
Measure and calculate
Measure the total length and desired width of the sidewalk. Standard concrete patio blocks come in common sizes: 4x8 in., 6x6 in., 6x9 in., and 12x12 in. are the most widely available. Design your width to minimize cuts by fitting a whole number of blocks across. For example, using 4x8 blocks in a running bond, a 36-inch-wide path fits exactly 4.5 blocks across in a 4-inch direction, but 3 blocks across in the 8-inch direction with no cuts. Working out this math before you order saves material and cutting time.
To calculate how many blocks you need: multiply the finished square footage by 1.05 to 1.10 (adds 5-10% for cuts and breakage). Check with your supplier how many blocks come per square foot for your chosen unit size.
Mark the layout on the ground
- Drive stakes at each corner of the planned sidewalk and run string lines along both edges. Use a framing square or the 3-4-5 triangle method to confirm the lines are square to your house or driveway.
- Verify width at several points along the length, not just at the ends.
- Mark the outside edges with marking paint or flour so you have a clear excavation guide once the strings come down.
- Note any obstructions: tree roots, utility covers, grade changes, downspout outlets, and existing steps or curbs. Plan transitions now rather than discovering them mid-project.
- If your sidewalk will connect to patio block steps or a landing, mark out those footprints too. The base needs to be continuous through the transition zone.
Transitions and connections
Where your sidewalk meets an existing driveway, porch, or structure, plan a clean transition. The finished paver surface should sit at or slightly below an adjacent hard surface so water drains away, not into a structure. If the walk connects to patio block steps, the top riser should be flush with the sidewalk surface and the step base should be built on the same compacted base layer, not on top of it. Steps are a separate project with their own riser and tread requirements, but the key connection point is that shared base.
Choosing a laying pattern
The laying pattern affects both how the sidewalk looks and how well the blocks interlock under foot traffic. For a residential pedestrian sidewalk, you have four practical options:
| Pattern | Interlock strength | Difficulty | Best for |
|---|---|---|---|
| Running bond (offset rows) | Good | Easy | Straight, narrow sidewalks; clean modern look |
| Herringbone (45° or 90°) | Highest | Moderate | Any walk; required for vehicle crossings; very stable |
| Basketweave (pairs of 2) | Moderate | Easy | Square blocks, traditional look; wider paths |
| Stack bond (grid) | Lowest | Very easy | Purely decorative applications; not recommended for long-term pedestrian use |
For most sidewalks, running bond is the go-to. It's forgiving to lay, looks sharp, and provides enough lateral interlock for pedestrian use. If your sidewalk crosses a driveway apron where a vehicle will occasionally roll over it, switch to 90-degree herringbone for that section. ICPI/CMHA tech spec PAV‑TEC‑019 specifies herringbone (45° or 90°) as the preferred, and required for vehicular service, pattern because it provides the highest lateral interlock ICPI/CMHA tech spec PAV‑TEC‑019 specifies herringbone (45° or 90°) as the preferred—and required for vehicular service—pattern because it provides the highest lateral interlock.. Herringbone provides the highest lateral interlock because no joint runs continuously across the full width of the path, which means individual blocks can't slide under point loads.
Borders are a visual upgrade that also serve a practical purpose: a soldier-course border (blocks laid end-to-end or perpendicular to the field pattern) helps visually define the edge and can simplify your edge restraint placement. Plan borders as part of your original layout so you're not improvising at the last minute.
Getting the slope right for drainage
This is the part most DIYers either skip or get wrong, and it causes more long-term problems than any other single mistake. Water sitting on or under your sidewalk is the enemy. It softens the base, causes frost heave in cold climates, and erodes the sand bedding layer over time.
How much slope
The target is 1/4 inch of drop per foot of run (about 2%) away from any structure, across the full width of the walk. The absolute minimum for positive drainage is 1/8 inch per foot (1%). If you go flatter than 1%, water will pond during heavy rain. If you go steeper than 3-4% the surface starts to feel noticeably tilted underfoot. The 2% target is the sweet spot for residential sidewalks.
Practical examples
On a short 10-foot run: at 2% slope you need 10 x 0.25 = 2.5 inches of total drop across the length. On a longer 40-foot run: 40 x 0.25 = 10 inches of total drop. That's significant and is worth checking against your existing grade before you start. If the natural ground already slopes in the right direction at roughly 2%, you're in good shape; just follow the natural slope when you set your screed. If the ground is flat or slopes the wrong way, you'll need to engineer the slope into your base during excavation.
For a sidewalk that runs alongside a house, slope the surface away from the foundation, not toward it. Even 1/8 inch per foot cross-slope on a 3-foot-wide walk means the outside edge sits 3/8 inch lower than the house-side edge. Set your string lines to reflect this before excavating.
How to measure and set slope with string lines
- Set one string line at your desired finished elevation at the high end of the sidewalk (typically the house end or uphill end).
- At the low end or far edge, drop the string by the calculated amount. Example: for 20 feet at 2% slope, the far end string should be 5 inches lower (20 x 0.25 in.).
- Use a line level or water level to confirm both strings are set correctly relative to each other.
- Check the slope with a tape measure at multiple points, not just the ends.
- Once strings are set, your excavation depth and your screed setting will both follow these same reference lines.
Excavation: digging down to a good base
Add up your layers from the bottom: subgrade (undisturbed or compacted soil), then 4 inches of compacted base aggregate, then 1 inch of screeded sand, then the paver thickness (2 3/8 inches for standard residential units). That totals roughly 7.5 inches of excavation below finished grade. Round up to 8 inches to give yourself room to work. Mark this depth on a stake and use it as your guide as you dig.
Remove all sod, roots, and organic material. Organic matter compresses over time and causes the whole surface to sink. If you hit soft, spongy soil even after removing organics, dig out another 2-3 inches and fill it with compacted aggregate. Do not try to compact soft, wet clay as-is and hope for the best. It won't work.
On clay soil specifically: clay holds water and expands when wet and frozen. The geotextile fabric between the clay and your base aggregate is not optional here. Without it, fine clay particles will migrate upward into your base over time (a process called pumping), and your base will lose its structural integrity. Use a non-woven, needle-punched fabric that meets AASHTO M288 requirements.
Building the base layer
The base is where the project is won or lost. A patio block surface is only as stable as what's underneath it. This step takes the most physical effort and deserves the most attention.
Lay the geotextile
Once the subgrade is excavated and the soil surface is reasonably smooth and compacted, roll out the non-woven geotextile across the full excavated area. Lap seams by at least 12 inches. Fold the fabric up the sides of the excavation temporarily so it doesn't get buried short of the edge when you add base material. The fabric goes between the soil and the aggregate, not between the aggregate and the sand.
Add and compact the aggregate base
Dump and spread your dense-graded 3/4-inch minus crushed stone. For a standard 4-inch compacted depth, you'll need to add approximately 5-6 inches of loose material because compaction reduces volume by about 15-20%. Authoritative technical notes (see Construction of Interlocking Concrete Pavements (CMHA PAV‑TEC‑002)) commonly call for at least 95%–98% of standard Proctor (ASTM D698) compaction for subgrade/base in pedestrian/residential paver work; specifications for vehicular pavements may require 98% or use modified Proctor (ASTM D1557), confirm the spec for your project and test by a compaction lab when in doubt. If you have more than 4 inches of base to build (for example, on soft ground where you dug extra deep), place it in layers (lifts) of no more than 4-6 inches loose depth and compact each lift before adding the next. Do not dump 10 inches of loose gravel and run a plate compactor over it once. The bottom lifts won't compact properly.
Make at least 2-3 overlapping passes with the plate compactor in perpendicular directions. The goal is a firm, unyielding surface that doesn't deflect when you walk on it. A good test: step on it with your full weight. If it moves, compact more. After compaction, check your grade reference with a straightedge or string line. The compacted base surface should mirror your planned finished slope, since the sand layer above it is a uniform 1 inch thick.
Install edge restraints before the sand
Edge restraints need to be spiked into the base, not the sand, so install them now, before you screed the bedding layer. Position the inside face of the restraint at your finished edge line. Drive 10-inch or 12-inch galvanized spikes through the restraint flanges and into the base at the spacing recommended by the manufacturer (typically every 12 inches on straight runs, closer on curves). For curves, use a flexible plastic restraint and cut relief notches if needed. On straight sections, aluminum channel restraints are more rigid and hold their line better.
Screed the bedding sand
Lay two sections of 1-inch diameter conduit or screed rails parallel along the base, spaced to match your screed board length. Dump ASTM C33 washed concrete sand over the base and drag a straight 2x4 screed board across the rails to create a perfectly smooth, 1-inch-deep sand layer. The rails set the depth: 1 inch is the target, 1.5 inches is the absolute maximum. More sand than that leads to differential settlement. Do not compact the sand after screeding. It needs to remain loose enough for the pavers to settle into during final compaction. Carefully remove the screed rails as you go and fill the voids with sand by hand.
Laying the blocks
Start laying blocks from one corner or from a fixed edge, working outward across the screeded sand. Do not walk or kneel on the screeded sand surface. Lay a kneeling board across already-placed blocks and work from there, keeping your weight off the unset sand.
- Place each block snugly against its neighbor, maintaining consistent joint gaps of about 1/16 to 3/16 inch. Most concrete pavers have small spacer lugs molded on the sides to set the gap automatically.
- Work in a diagonal line across the area (especially in herringbone) or row by row (in running bond), checking for consistent alignment every few rows.
- Do not twist or slide blocks into position across the sand; set them straight down and tap level with a rubber mallet.
- Use a string line periodically to check that your rows are running straight and haven't drifted.
- Save all edge cuts for last. Lay all the full blocks first, then measure and cut the partial units to fill around the perimeter.
Cutting blocks cleanly and safely
The cleanest, safest way to cut concrete patio blocks is with a wet-cut diamond blade saw. The water cools the blade and suppresses the fine silica dust that dry cutting generates. Concrete dust contains respirable crystalline silica, which is a real lung hazard, not a minor nuisance. Rent a wet-cut table saw for your cutting day. Mark each cut with a pencil or chalk line, double-check the measurement against the actual gap in your sidewalk, and make the cut in one steady pass.
For small jobs with just a few cuts, an angle grinder with a dry-cut diamond blade works if you use it outdoors with a respirator rated N95 or better and keep bystanders away. Manual paver splitters (available to rent) work well for straight cuts on standard-thickness units and produce no dust at all, though the cut edge is less precise than a saw. Avoid dry-cutting with an abrasive blade: it's slow, burns through blades, and generates a huge amount of silica dust.
Final compaction
Once all full blocks are laid (before filling cut units at the edges), make 2-3 passes over the entire paver field with the plate compactor. This sets the blocks into the sand bedding and brings the surface to final grade. Use a rubber pad or paver protection mat under the compactor plate to avoid chipping or cracking the block faces. Start at the edges and work toward the center in parallel overlapping passes.
After the first compaction pass, check the surface with a long straightedge. Any block that sits high or low by more than 3/8 inch over a 10-foot span should be pulled and the sand adjusted beneath it, then relaid and recompacted. Getting this tolerance right now prevents trip hazards and uneven pooling later.
Filling joints: polymeric sand vs. regular sand
Jointing sand fills the gaps between blocks, locks them together, and keeps weeds and insects from taking up residence in your sidewalk. You have two options.
| Property | Plain dry sand | Polymeric joint sand |
|---|---|---|
| Weed resistance | Low (seeds germinate easily) | High (binder discourages germination) |
| Ant resistance | Low | Moderate to high |
| Joint stability | Good initially, erodes over time | Excellent; sets semi-rigid when activated |
| Cost | $ | $$ |
| DIY ease | Very easy | Easy; must follow activation steps precisely |
| Repairability | Easy to add more | Need to remove and redo if done wrong |
| Best for | Low-traffic, garden paths | Sidewalks, high-traffic areas, freeze-thaw climates |
For a residential sidewalk, I recommend polymeric sand without hesitation. The extra cost is small, the performance difference is significant, and you'll avoid re-sanding every couple of years. Sweep the dry polymeric sand across the paver surface, working it into the joints with a push broom. Make multiple passes until every joint is filled to within 1/8 inch of the surface. Then compact again lightly to seat the sand, sweep off all excess from the block faces, and activate with water according to the product's specific instructions. Usually this means a fine mist to avoid washing sand out of joints, not a hard spray.
Sealing: optional but worthwhile
Sealing is not required for patio blocks to function, but it does three things: it enhances color, reduces efflorescence (the white mineral deposits that appear on concrete surfaces as water moves through them), and makes the surface easier to clean. Wait at least 90 days after installation before sealing to allow any residual efflorescence to work its way out and the polymeric sand to fully cure.
Choose a penetrating silane-siloxane sealer for a natural, non-film look, or an acrylic wet-look sealer if you want enhanced color. Apply only to a clean, dry surface. Follow the manufacturer's coverage rate; applying too thick a coat traps moisture and peels. Reapply every 3-5 years as needed.
Working on slopes, clay soil, and difficult conditions
Sloped sites
A sidewalk on a grade steeper than about 5% (roughly 1:20) starts to need special attention. The blocks themselves don't slide on a well-compacted base, but the base can migrate downhill over time on steep grades without a geogrid or geotextile to stabilize it. On grades steeper than 8-10%, seriously consider steps instead of a continuous sloped walk. A running slope steeper than 5% is also approaching the ADA limit for ramp-like surfaces and will feel uncomfortably steep for anyone with mobility issues. If steps are the right answer, the guide on building patio block steps covers riser heights, tread depths, and structural requirements.
Clay soil
Clay is the most common problem soil for patio block installations. It holds water, expands and contracts with moisture changes, and doesn't compact into a stable base the way granular soils do. The geotextile fabric is essential on clay: it acts as a physical separation layer that keeps fine clay particles from migrating into your base aggregate over time. Some installers also add a layer of No. 57 open-graded stone below the dense-graded base to improve drainage in very wet clay conditions. On extreme clay sites, increasing base depth from 4 to 6 inches adds a meaningful margin of stability.
Freeze-thaw climates
In climates where the ground freezes, a well-drained base is the single best defense against frost heave. Water expands about 9% when it freezes, and saturated base material can literally jack individual blocks upward. The 4-inch compacted base and the drainage slope you've built work together to keep water from sitting in the base. In very cold climates, some installers extend base depth to 6 inches and use free-draining crushed stone rather than dense-graded material. Metal or aluminum edge restraints outperform plastic spike-in versions in repeated freeze-thaw cycles.
Building steps and transitions
Where your sidewalk meets a change in elevation (a porch, a grade step, or an existing hard surface), a set of patio block steps creates a safe and visually integrated transition. For detailed instructions on riser heights, tread depths, and structural requirements, see the patio slab steps guide. The key structural principle is that each step must rest on a foundation that is as solid as the sidewalk base, not cantilevered off the step below it. For most residential applications, a concrete footing below frost depth or a compacted gravel pad extending to frost depth supports the bottom riser.
Standard comfortable step dimensions are a riser height of 6-7 inches and a tread depth of 12-14 inches. Stacking two courses of standard 3.5-inch or 4-inch patio blocks gives you a riser in the comfortable range. The top tread should sit flush with or just slightly below the finished sidewalk level so there's no abrupt ledge. For complete details on building these steps correctly, the guide on how to build patio block steps goes through the process step by step.
Can you make your own concrete patio blocks?
Yes, but with realistic expectations. DIY concrete blocks work well as a cost-saving measure for accent pavers, garden edging, or stepping stones in a low-traffic path. They're less consistent in strength and thickness than manufactured blocks, which affects their performance in a structural sidewalk. If you want to try it, here's what matters most:
- Use a concrete mix with a minimum compressive strength of 3,500 psi (standard 4,000 psi bagged mix is fine). Do not use mortar mix; it lacks the aggregate strength needed.
- Build or buy a form from melamine-coated wood or purchased plastic molds. A 12x12x2.5 inch form is a common starting size. Coat forms with release oil before pouring.
- Vibrate or tap the forms after pouring to remove air pockets, especially in the corners.
- Cover with plastic and cure for at least 7 days before unmolding; wait 28 days for full strength before use under foot traffic.
- Cast blocks will have thickness variation of 1/8 inch or more between batches, which means more leveling work during installation.
- Do not use DIY blocks at a vehicle crossing or on steps where structural loads matter.
For a full sidewalk, buying manufactured blocks is the practical choice. They're uniform in thickness (critical for screeding) and tested to consistent strength standards. Homemade blocks are a satisfying add-on for decorative sections, not the foundation of a functional walkway. If you want step-by-step instructions on casting and curing, see the section on how to make your own patio blocks for practical tips and mixing ratios.
Learning from video resources
Video guides are genuinely useful for this project, particularly for understanding compaction technique, screeding motion, and how to handle the plate compactor safely on your first run. When watching installation videos, keep an eye out for a few things that separate good advice from shortcuts: does the installer use a geotextile? Are they laying 4 inches of base or just an inch of sand directly on soil? Are they using a plate compactor or just a hand tamper? Are they screeding sand to exactly 1 inch or dumping a 3-inch layer? The steps that get skipped on camera are usually the ones that matter most. For a visual walkthrough that covers the full process shown here, the how-to install patio blocks video guide on this site covers each stage with demonstrations.
Common mistakes and how to fix them
| Problem | Likely cause | Fix |
|---|---|---|
| Soft spots underfoot | Insufficient compaction or organic material left in subgrade | Pull blocks, excavate the soft area, add compacted aggregate, re-lay |
| Blocks sinking in one area | Too much bedding sand (over 1.5 in.) or localized subgrade failure | Remove and re-screed to uniform 1-inch depth; address subgrade if needed |
| Water pooling on surface | Insufficient slope or low spots in the field | Carefully pull affected blocks, adjust sand layer, relay to correct grade |
| Frost heave (blocks pushing up in winter) | Water trapped in base; inadequate drainage slope | Improve perimeter drainage; ensure 2% surface slope; consider extending base depth |
| Joint sand washing out | Used regular sand in a high-wash area, or polymeric sand not activated correctly | Remove old sand, re-fill with polymeric sand, activate properly |
| Weeds growing in joints | Regular sand joints not maintained | Apply polymeric sand; kill existing weeds with targeted herbicide first |
| Edge blocks creeping outward | Edge restraints missing or poorly spiked | Install restraints with longer spikes; tap migrated blocks back and re-compact |
| White staining on block surface (efflorescence) | Mineral salts migrating through block with water | Clean with efflorescence remover; allow to dry fully before sealing |
Maintenance over the long term
A well-built patio block sidewalk is genuinely low-maintenance, but not zero-maintenance. Once a year, walk the full length and look for blocks that have settled or heaved, joints that have lost sand, and any edge restraints that have shifted. Catching a problem early, especially before a freeze-thaw cycle, is much easier than repairing it after a full winter's worth of water infiltration.
- Re-apply joint sand (or polymeric sand) to any joints that have lost material to erosion or heavy rainfall.
- Pull and re-seat any block that has dropped more than 3/8 inch below adjacent units, which creates a trip hazard.
- Clean the surface with a garden hose or low-pressure wash annually; avoid high-pressure washing that blasts joint sand out.
- If you sealed the surface, plan to reapply sealer every 3-5 years when water stops beading on the surface.
- Keep downspout extensions and drainage channels clear so water is still directed away from the walk edge.
When to hire a professional
Most homeowners can handle a straight residential sidewalk with the steps in this guide. But there are situations where bringing in a contractor is the smarter call. If your sidewalk crosses a right-of-way and needs a permit inspection, a licensed contractor knows the local code requirements and can navigate the inspection process faster. If you have severely expansive clay, a high water table, or a site that floods regularly, the drainage engineering goes beyond what this guide covers. Same with a walk longer than 60 feet on complex grade: getting the slope right across that kind of run benefits from laser level equipment and experienced eyes. And if you're connecting to a patio block deck structure (raised framing, footings, ledger connections), that's a scope of work that blends carpentry and masonry in ways that multiply the margin for error on a first project.
For everything in between (a typical 20-50 foot walk on reasonably cooperative soil), you've got this. The steps in this guide follow the same sequence that professional installers use. The difference is mostly speed and physical conditioning, not secret knowledge. Take your time on the base, get the slope right, and the block laying itself will go smoothly.
FAQ
When should I use patio blocks for a sidewalk instead of poured concrete slabs or a deck?
Use patio blocks when you want a durable, attractive, and relatively low‑cost pedestrian walkway that’s easy to repair or replace. Choose blocks if surface drainage can be managed, the route is primarily foot traffic (no regular vehicles), and you want flexibility for patterns and aesthetics. Use poured concrete slabs when you need a continuous surface, tighter tolerances, or steep driveways; choose a deck when you need elevation over grade, persistent moisture clearance from the house, or a structure with railing/insulation considerations. Consider soil type, frost, and slope: blocks are better on moderate slopes and where freeze‑thaw movement is expected because individual units can move and be reset.
What materials and tools do I need to build a sidewalk with patio blocks?
Materials: patio blocks/pavers (plus 5–10% extra for cuts/waste), edge restraints (plastic/aluminum/steel or poured curb), compactible base aggregate (No.57 or 3/4"‑minus crusher run depending on design), clean screeding/bedding sand (ASTM C33, ~1 in. screed), polymeric joint sand or dry joint sand, geotextile fabric if subgrade has fines or for separation, concrete for poured edge or steps, sealant (optional). Tools: tape measure, stakes/string/line level, carpenter’s level, marking paint, shovel, wheelbarrow, plate compactor, rake and screed board, rubber mallet, angle grinder or wet saw with diamond blade for cuts, broom, plate vibrator for pavers (optional), safety gear (glasses, gloves, hearing protection, dust mask/wet cutting to limit silica). Optional: hand tamper, pry bar, masonry saw table or walk‑behind wet saw.
How do I estimate quantities, time and cost?
Calculate sidewalk area (length × width) and add 5–10% for waste. Estimate base depth per design: pedestrian residential commonly uses 4 in. compacted aggregate over prepared subgrade (ICPI guidance); bedding sand ~1 in.; paver thickness typically 2 3/8 in. Time: a simple straight 50 ft × 3 ft path by two DIYers can take 1–3 days (planning + excavation + base + laying + jointing); more complex jobs, slopes, steps or cutting add days. Cost factors: paver unit price, base aggregate cost/delivery, rentals (plate compactor, saw), edge restraint type, ground conditions (rock/clay increases labor), permits and disposal. For budgeting, calculate materials cost (pavers + sand + aggregate + edge) and rental/labor; expect low hundreds for small runs to thousands for longer or complex installations.
How do I plan, measure and set the slope for drainage?
Plan the path line, width and any transitions to structures. Use stakes and string to establish finished elevations. Provide positive drainage away from structures: minimum 1% slope (1/8 in. per ft) is absolute minimum; prefer 1.5–2% (about 1/4 in. per ft) when possible to avoid ponding. Slope toward a yard or channel drains, not toward building foundations. For sidewalks that run parallel to foundations, give an extra shoulder or flap to shed water away. Check local codes for required clearances at door thresholds.
What is the correct excavation depth and base construction?
Excavate to remove organic topsoil and reach stable subgrade. For typical residential pedestrian pavers: allow for compacted base (~4 in.), bedding sand (~1 in.), and paver thickness (~2 3/8 in.), plus some working room — remove ~8–9 in. total from finished grade. For weaker soils or vehicular service, use thicker base (6 in. or more) in lifts. Place geotextile if needed. Install base aggregate in 2–3 in. loose lifts, compact each lift to target density (95–98% Proctor guidance), then finish with a screedable layer of coarse sand: screed to a uniform 1 in. bedding thickness before laying pavers.
Do I need geotextile fabric? When and which type?
Use a non‑woven, needle‑punched geotextile (AASHTO M288 compliant) when subgrade contains fines, organic material, or when you want to separate the base from poor soils to reduce contamination and settlement. It’s also useful in permeable systems to act as filtration. Don’t rely on fabric alone to compensate for very weak subgrades — consider additional base thickness, geogrid reinforcement, or engineer recommendations for very poor soils.