You put in a brick patio by excavating the area to the right depth, compacting a gravel base, screeding a sand bedding layer, setting the bricks in your chosen pattern, cutting edge pieces to fit, locking everything in with edge restraints, and sweeping polymeric sand into the joints. Done right, the whole project is very much in DIY territory, it just takes patience, a little muscle, and following the steps in the right order.
How to Put in a Brick Patio: Step by Step DIY Guide

Clara Farrell
1 May 2026
I've seen plenty of brick patios fail not because the homeowner picked the wrong brick or the wrong pattern, but because they rushed the base prep or skipped the slope. So before we get into setting a single brick, let's build this thing from the ground up, literally.
Planning and layout for a brick patio

Start with a sketch on paper. Measure the space, decide on the shape (rectangular is easiest for a first project), and figure out your square footage, length times width. Add about 10% to your brick order to account for cuts, breakage, and the odd mis-step. A 12x16 foot patio, for example, is 192 square feet, so you'd order material for roughly 210 square feet.
The most critical planning decision is drainage slope. Water must flow away from your house (or any other structure), and the accepted target is 1/4 inch of drop for every foot of run. For a 12-foot-wide patio running away from the house, that's 3 inches of total drop across the width. Some flexibility exists, anywhere from 1/8 inch to 1/4 inch per foot will provide adequate runoff, but don't go flatter than that or you'll end up with puddles.
To lay out the slope with stakes and string, drive two stakes at the high end (near the house) and two at the low end. Attach string between the stakes at each end and use a line level to get the string level. Then lower the far string the correct amount, for a 12-foot run at 1/4 inch per foot, drop it 3 inches. That string now represents your finished patio surface slope. Keep it as your reference throughout the project.
Also think now about patterns. Running bond (bricks offset like a brick wall on its side) is the easiest to cut for and the most forgiving for beginners. Herringbone looks incredible and locks together better structurally, but requires more cuts. A simple grid (stacked bond) is the easiest to lay but the least stable over time. Pick your pattern before you order materials, because herringbone and some basket-weave patterns can increase waste by 15% or more.
Materials and tools you'll need
Choosing your bricks

Not all bricks are suitable for patio use. Standard clay pavers and concrete pavers are both solid choices. If you're using reclaimed or salvaged bricks, make sure they're rated for paving (not just wall construction), soft wall bricks will chip and erode under foot traffic and freeze-thaw cycles. For most DIY projects, concrete pavers in a brick size (roughly 4x8 inches) are affordable, consistent in thickness (which makes leveling easier), and widely available.
Base and bedding materials
- Crushed gravel (compactible gravel base, also called road base or Class II base): forms the structural foundation, typically 4 inches deep for foot traffic, 6 inches for areas that see vehicle weight
- Coarse sand (concrete sand or bedding sand): the 1-inch screeded layer the bricks sit directly on — do not use fine play sand
- Geotextile landscape fabric: optional but helpful between subgrade and gravel in clay-heavy or unstable soils to prevent mixing
- Polymeric jointing sand: swept into joints after bricks are set; activates with water to harden and resist ants, weeds, and washout
Edge restraints
Edge restraints hold your entire patio together. Without them, the outer bricks gradually migrate outward and the whole surface loosens. Plastic paver edging spiked into the ground works well for most residential projects. Concrete curbs or soldier-course bricks set in mortar give a more formal look but require more skill. Whatever you choose, install the restraints before you fill joints, the edging locks in from the outside while the jointing sand locks in from above.
Tools checklist
- Tape measure and marking paint or chalk line
- Shovel, flat spade, and wheelbarrow
- Plate compactor (rent one — do not skip this)
- Screed rails and a straight 2x4 or screed board
- Rubber mallet
- Level (4-foot is ideal) and a line level
- Stakes and string line
- Brick splitter (rented) or angle grinder with a diamond blade for cuts
- Broom for sweeping in jointing sand
- Garden hose or watering can for activating polymeric sand
Preparing the ground
This step is where most DIY patios succeed or fail. Good ground prep takes more time than setting the bricks, and that's completely normal.
Excavation depth
Calculate your excavation depth by adding up your layer thicknesses: 4 inches of compacted gravel base, plus 1 inch of bedding sand, plus the thickness of your brick (typically 2. A common residential setup described by Inch Calculator uses a compacted 4 to 6 inch gravel base with a 1 inch bedding sand layer above it for typical paver patios 4 inches of compacted gravel base, plus 1 inch of bedding sand. 25 to 2.375 inches for a standard paver). That's roughly 7.25 to 7.5 inches below your intended finished surface. Mark that depth on your stakes and excavate the entire area, keeping the bottom of the dig as flat and even as you can.
Remove all grass, roots, and organic material. Organic material compresses and decomposes over time, which causes settling. If you hit soft, spongy soil at the bottom of the excavation, you need to compact it or, in extreme cases, dig deeper and replace it with gravel. Clay soil is notoriously bad at draining and compressing, if you're working in clay, consider installing the landscape fabric at the bottom before adding gravel.
Grading and drainage
Your excavated base needs to reflect your finished surface slope, so the drainage direction is built into every layer. Use your string lines as a guide while you dig, check frequently that the excavated bottom maintains the slope you planned. If your yard is uneven or there's a noticeable grade change across the patio area, you may need to take more material from the high side or build up slightly with gravel on the low side.
Working on significantly sloped ground or dealing with a problem site? The approach is similar to what's needed when building a brick patio on a slope, where managing grade changes becomes its own focus. The same care matters on a slope, since incorrect grading is what causes uneven settling and poor drainage under brick patios building a brick patio on a slope.
Building the base and bedding layer
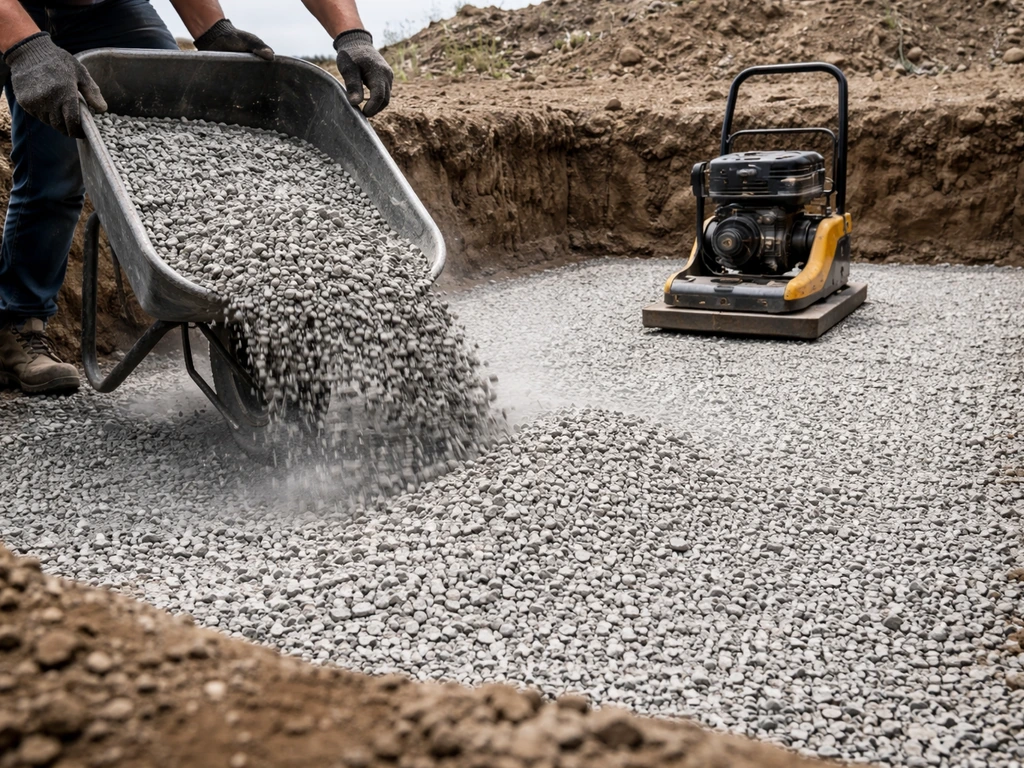
The gravel base
Spread your compactible gravel in 2-inch layers and compact each layer with the plate compactor before adding more. Don't dump in all 4 inches and compact once, thin lifts compact properly, thick ones don't. After the first pass, the gravel should feel firm and not shift underfoot. Check your slope with the level and string line and adjust if needed. The finished gravel surface should mirror the slope of your finished patio.
The bedding sand layer
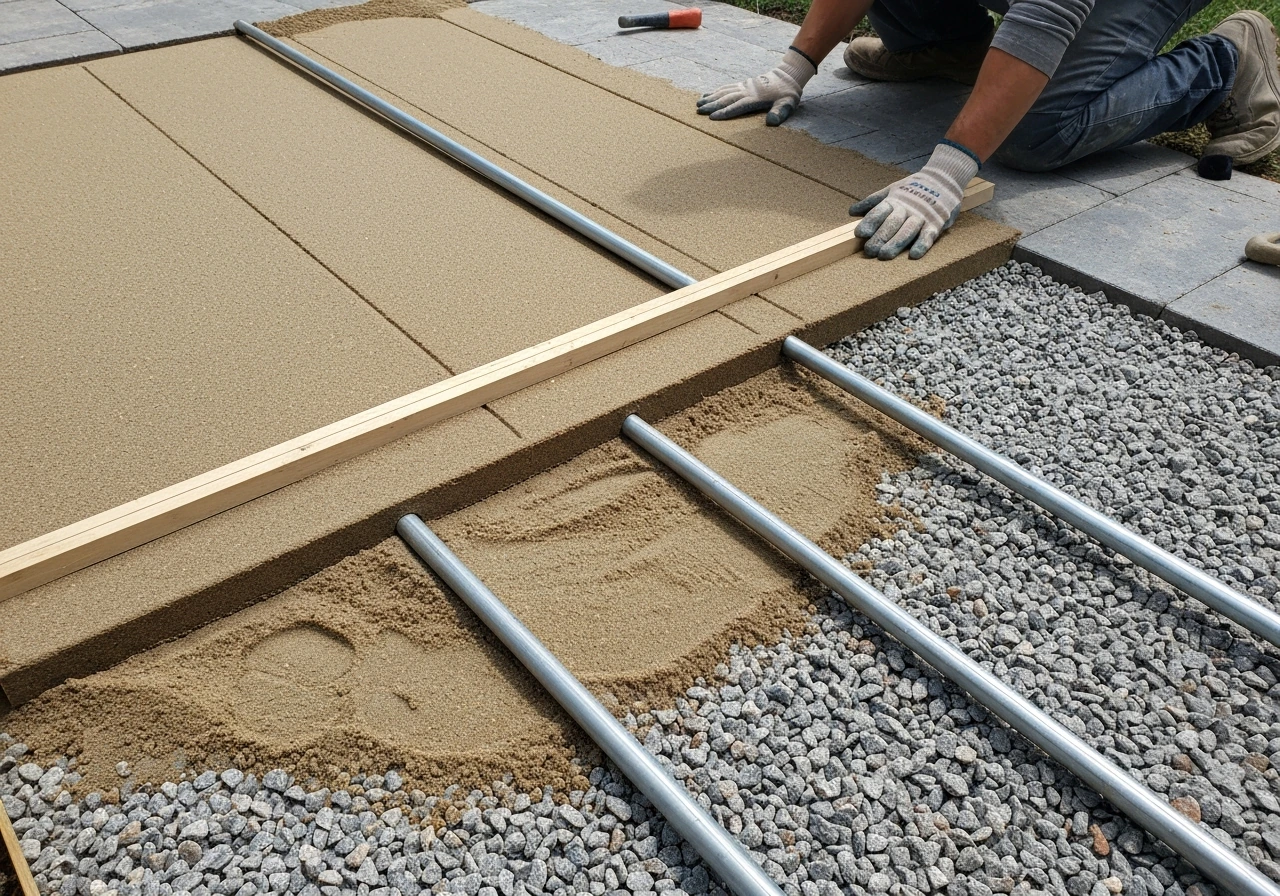
Spread a roughly 1-inch layer of coarse sand over the compacted gravel. Set two screed rails (metal pipes work well, 1-inch conduit is a common choice) on the gravel surface spaced a few feet apart to act as depth guides. Drag your screed board across the rails to create a smooth, consistent 1-inch layer. Once screeded, do not walk on this layer or disturb it before setting bricks. Footprints in the sand will throw off your leveling and are really annoying to fix once you've started setting brick.
Do not compact the bedding sand before setting bricks. The purpose of this layer is to give you fine adjustability as you set each brick. The compaction comes after all bricks are placed.
How to set the patio bricks
Start in the right corner
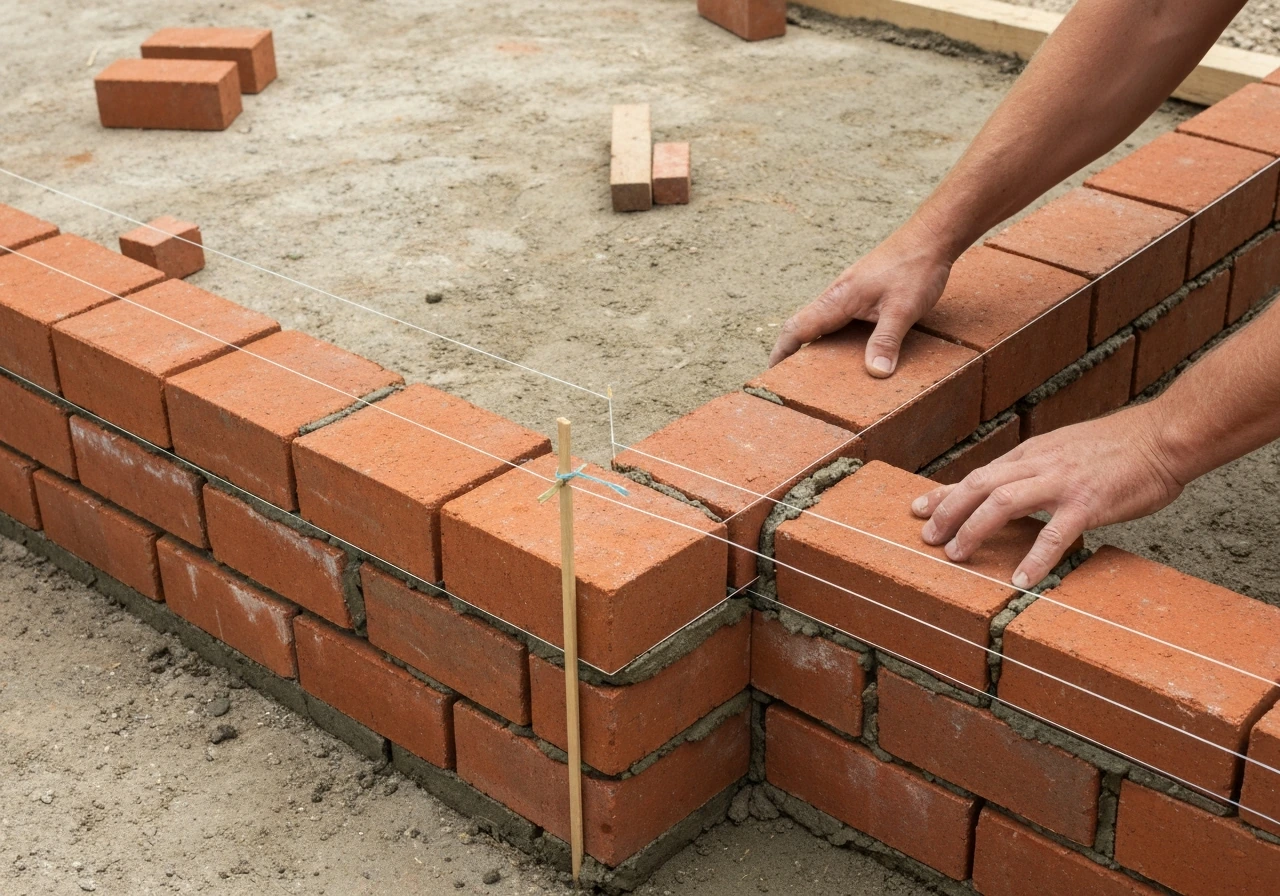
Begin at the corner that will be most visible, typically the corner closest to your home or the entry point. Set your first brick in the corner and work outward in both directions. Never start in the middle of a field and work outward, as this makes it much harder to maintain a straight layout.
Keeping lines straight
Run a string line about 3 inches above your setting bed along the edge of each new row. This gives you a consistent reference line to align bricks as you work. A string line lying on the sand surface gets buried; running it slightly above means you can sight down it easily while placing bricks. Check your layout line every 4 to 5 rows by measuring diagonally (corner to corner) across a section, if the diagonals match, your rows are square.
Setting each brick
- Place the brick on the sand — do not slide it into position, as this disturbs the sand bed
- Press it down gently by hand first
- Tap it firmly with a rubber mallet to fully seat it
- Check it against your string line for alignment and use your 4-foot level across multiple bricks to confirm the surface is consistent
- If a brick sits too high, lift it and remove a little sand; if too low, add a pinch of sand and reset
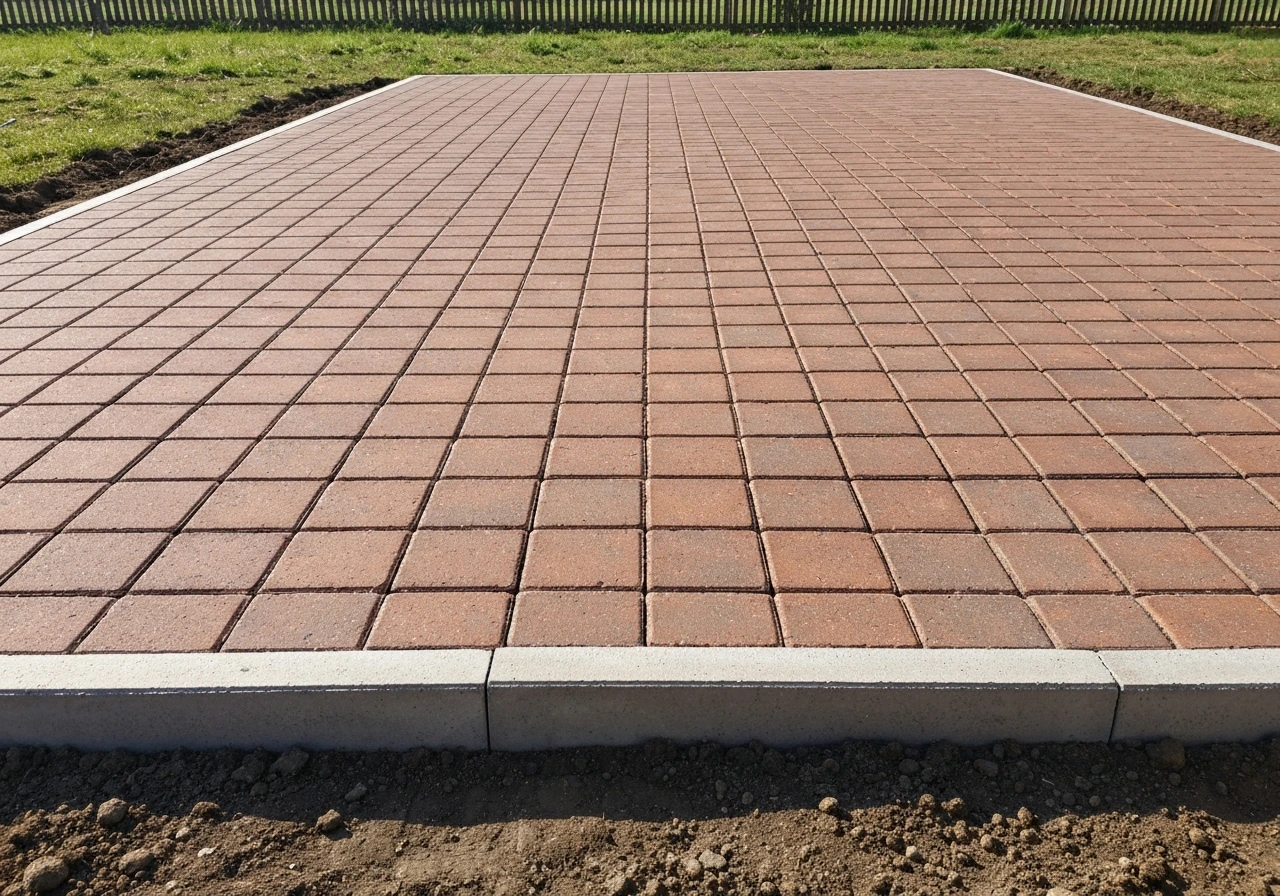
Maintain consistent spacing between bricks, 1/8 to 3/16 inch is standard for a tight, professional look. Plastic paver spacers make this easy and consistent. Once a section is set, lay your level across it frequently to catch any high or low spots before they compound.
Note: if you're working on grass or native soil rather than an excavated and gravel-based area, the preparation approach changes significantly. Laying a brick patio directly on grass or bare dirt is a different process that requires its own considerations around soil stability. If you are wondering how to lay a brick patio on dirt, you still need solid base prep and proper drainage so the pavers stay level over time Laying a brick patio directly on grass or bare dirt. Laying a brick patio directly on sand follows many of the same layout and leveling principles, but it changes how you prep and support the base lay a brick patio on sand.
Cutting bricks, installing edging, and filling joints
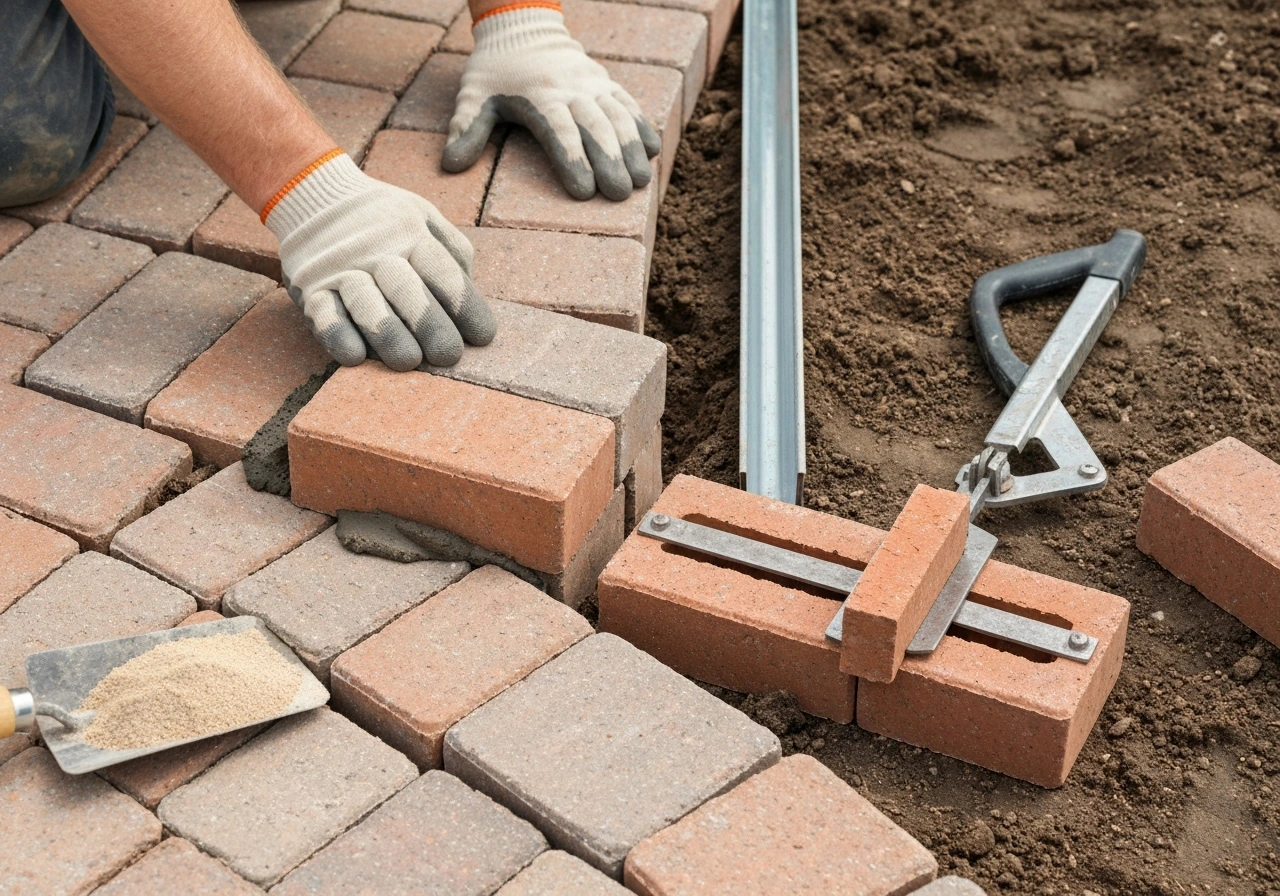
Cutting bricks to fit
You'll inevitably need to cut bricks along the border. Measure and mark the cut with a pencil or chalk. A rented brick splitter (also called a guillotine cutter) is fast and works well for straight cuts. For curves or precise angles, use an angle grinder fitted with a diamond masonry blade. Always wear eye protection and a dust mask when cutting. Cut all your border pieces before installing edge restraints so you can confirm the fit.
Installing edge restraints
Once all the bricks are set, install plastic paver edging along every exposed perimeter edge. The top of the edging should sit flush with or just slightly below the top of the bricks. Drive the spikes through the edging into the compacted gravel base, they need to be in the gravel, not just the sand. Space spikes about 12 inches apart along straight runs and closer together on curves. This restraint prevents the edge bricks from kicking out over time, which is the most common reason older DIY patios go loose and wobbly.
Compacting and filling joints
Before filling joints, run the plate compactor over the entire patio surface to fully seat all the bricks into the bedding sand. Use a protective rubber pad on the compactor plate if working with clay pavers that might chip. After compacting, pour polymeric sand over the surface and sweep it into the joints with a stiff broom. Make multiple passes, sweeping from different directions to fully fill every joint. Blow or brush off any excess from the brick faces, then mist the surface with water to activate the polymeric binder. Let it cure for at least 24 hours before using the patio.
If you prefer a more traditional approach and want to avoid polymeric sand, regular jointing sand is an option, but it will need to be topped up more frequently as it washes out. Some projects use a dry mortar mix instead for a more permanent joint, that's essentially the technique used when laying a brick patio with mortar, which is a different skill set but worth knowing about. If you want to lay a brick patio without cement, stick to a dry build-up with a gravel base, bedding sand, and jointing sand instead mortar. Laying a brick patio with mortar uses a different technique than polymeric sand, with careful mixing, spreading, and setting so the joints are bonded and stable.
Sealing, maintenance, and fixing common problems
Should you seal a brick patio?
Sealing is optional, but it's worth doing if you want to protect the color, reduce staining from leaves and oils, and harden the jointing sand further. Use a penetrating paver sealer (not a film-forming topcoat, which can peel). Apply it to a clean, dry surface at least 30 days after installation so the polymeric sand has fully cured. Reapply every 3 to 5 years depending on traffic and weather exposure. In areas with harsh freeze-thaw winters, sealing can help reduce water infiltration into the joints.
Ongoing maintenance
- Sweep regularly to prevent debris buildup and organic material breaking down in the joints
- Top up jointing sand every year or two — even polymeric sand erodes slightly over time
- Remove weeds promptly before roots work their way under bricks
- Rinse the surface with a garden hose; avoid high-pressure washing that blasts out joint sand
- Inspect edging spikes in spring and re-drive any that have worked loose over winter
Troubleshooting the most common problems
| Problem | Most Likely Cause | Fix |
|---|---|---|
| Bricks sinking or settling unevenly | Inadequate base compaction or organic material left in subgrade | Pull up affected bricks, add compacted gravel, re-screed sand, reset bricks |
| Puddles forming on the surface | Insufficient drainage slope or low spot in layout | Lift section, re-grade base to correct slope, reset bricks |
| Edge bricks shifting outward | No edge restraints or spikes not reaching gravel | Install or re-spike edging into gravel base, not just sand |
| Weeds growing in joints | Regular sand washing out, leaving voids | Remove weeds, refill joints with polymeric sand and activate with water |
| Bricks cracking or chipping | Using wall bricks instead of paving-rated bricks, or freeze-thaw damage in soft brick | Replace damaged bricks with proper paver-grade units; seal to reduce water infiltration |
| Joints washing out after rain | Polymeric sand not fully activated, or applied too thin | Clean joints, reapply polymeric sand, activate properly with a fine mist |
When to call a professional
A standard rectangular patio on reasonably flat ground with good soil is well within DIY reach for most homeowners. Where things get trickier: if your yard has significant slope changes that need to be terraced, if you have very soft or waterlogged soil that requires engineered drainage solutions, or if the patio area is large enough that renting equipment and doing the work alone isn't practical. There's no shame in calling in a contractor for site-specific challenges, getting the base wrong is the most expensive mistake to fix after the fact.
Take the project one step at a time, don't rush the base prep, keep your slope consistent throughout, and you'll end up with a patio that looks great and lasts for decades. The process is genuinely satisfying, and once you've done it, you'll understand exactly why every step matters.
FAQ
How do I know if I need to dig deeper than about 7.5 inches below the finished surface?
If your subsoil is soft, pumping water, or you can visibly dent it with a boot, you generally need either deeper excavation or a thicker engineered base using more gravel and additional compaction passes. A simple check is to compact a test area at your planned depth, then re-check firmness after a light hose test. If it loosens or muds up, adjust the base before laying bedding sand.
What if my patio area is not perfectly square, can I still build it?
Yes, but you must commit to a consistent layout method. Use diagonals to confirm squareness in each section you lay, and if the overall footprint is irregular, treat it as multiple rectangles or use straight control lines to keep rows straight. If diagonals never match, don’t force the pattern, instead re-derive the layout lines based on the intended border points.
Should I install landscape fabric under the gravel in most yards?
Only use it when you have a soil problem like lots of fine material migrating upward or a clay base that you want to isolate. In well-draining, stable soil, fabric can trap moisture and reduce permeability if water can’t move freely through. A practical compromise is to use it when the excavation bottom has clay fines or you keep seeing soil particles in your compacted gravel.
How do I handle low spots or dips I discover after compacting the gravel base?
Don’t try to correct dips with thicker bedding sand after you spread it. Instead, remove the affected area back to gravel, add compactible gravel in thin lifts, re-compact, and re-screed your sand layer. Your goal is for the bedding sand to only provide fine leveling, not structural correction.
Can I lay brick directly on top of gravel without the 1-inch sand bedding layer?
It’s not recommended. The sand bedding layer gives you the adjustability needed to seat each unit for consistent height and slope, without relying on how uneven the gravel becomes after compaction. Skipping sand usually leads to rocking bricks, lippage, and gaps that are harder to fill properly.
What should I use to level individual bricks when my rows look a little off?
Use a rubber mallet and adjust by lifting and removing or adding small amounts of bedding sand under the brick. Avoid adding sand on top of already compacted areas, it won’t lock in evenly. Also check the slope frequently, changing height locally can create unintended puddling if it disrupts the drainage line.
How tight should the brick spacing be, and what happens if my joints are too narrow or too wide?
A typical target is about 1/8 to 3/16 inch, consistent across the whole job. Too narrow means insufficient room for sand to fill and lock, too wide means more sand movement and joint erosion, and uneven joint widths make the surface look wavy even if heights are correct.
Do I need to compact after setting the bricks, and why?
Yes, after all bricks are laid, compacting seats them into the bedding sand so they don’t shift underfoot. Skipping compaction can leave hollow spots that later cause rocking and joint instability when you sweep polymeric sand into the gaps.
What if polymeric sand washes out or doesn’t bind after misting?
Most failures come from under-filling joints, not sweeping excess from the brick faces, or not using enough water or the correct misting technique. Make sure joints are fully packed before misting, and mist lightly but thoroughly. If you see the surface sand not turning firm, let it dry and evaluate whether joints were too open, then re-sweep and re-mist according to the product behavior.
Is it okay to use regular jointing sand instead of polymeric sand in freeze-thaw areas?
It can work, but you should expect more maintenance. Freeze-thaw increases joint washout risk, so regular sand often needs topping up after heavy rain or seasonal cycles. Polymerically bound sand generally holds better, but either way, correct slope and drainage are still the biggest drivers of longevity.
How long should I wait before using the patio, and when is it safe to put furniture on it?
Plan on at least 24 hours after jointing for initial curing and avoid heavy traffic immediately. For furniture placement, wait until the binder has fully set and the surface feels firm and non-sandy when you step on it. If your weather is cold or very humid, curing can take longer, so extend the wait time.
What’s the best way to edge a patio that has curves or odd shapes?
Use edge restraints along every exposed perimeter and place spikes more closely on curves, about every 8 to 12 inches depending on curvature. Dry-fit and cut border bricks first, because a perfect-looking curve depends on both the border pieces and the restraint line. If the edging is uneven, the outer row will gradually kick out even with good jointing sand.
When should I cut bricks, before or after I install edge restraints?
Cut border pieces before installing the restraints so you can confirm the fit with the actual edge line. Installing restraints first can lock you into a spacing that leaves hard-to-fix gaps or forces sloppy coping cuts. Dry test the border layout dry, then reset pieces and install restraints once you’re satisfied.
Should I seal the patio right away, and can sealing trap moisture?
Don’t seal immediately after polymeric sand installation, wait at least 30 days so the joints and paver system can off-gas and cure. Sealing too early can trap residual moisture and reduce proper polymer performance. Choose a penetrating sealer intended for pavers, not a film-forming coating that can peel or look patchy.
What brick or paver choice is safest for DIY if I’m unsure about materials?
If you want the most consistent installation, use pavers with uniform thickness, such as common concrete paver sizes, because leveling becomes more predictable. If you choose reclaimed clay bricks, verify they are rated for paving and suitable for freeze-thaw, then expect more chipping on cuts and more variation in surface texture.