You cut patio blocks by measuring and marking your cut line, then choosing one of three main methods: score-and-snap for thinner blocks (under 2 inches), an angle grinder with a diamond blade for tight spots and curved trimming, or a wet saw for clean straight cuts on thicker blocks. Each method works, but picking the right one for your block thickness and cut type saves you a lot of cracked, wasted material.
How to Cut Patio Block: DIY Methods for Clean Fits

Clara Farrell
15 May 2026
Choose the right cutting method and tools
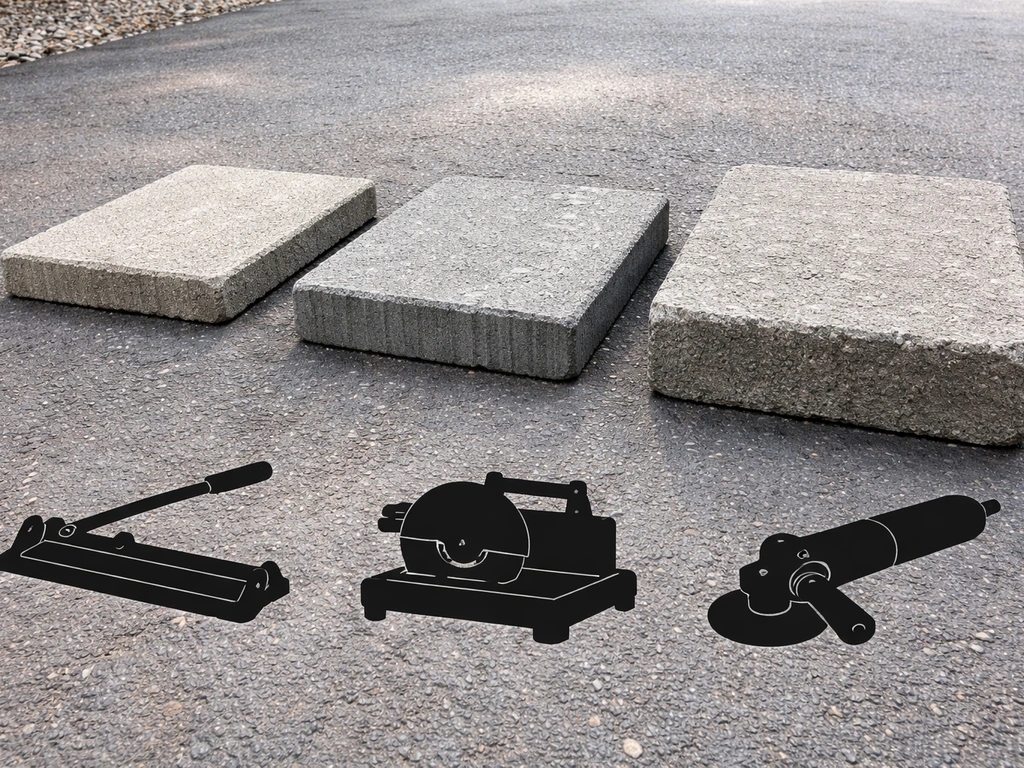
The biggest decision before you pick up any tool is matching the method to your block. Concrete patio blocks vary a lot in thickness and density, and what works brilliantly on a thin 1.5-inch block can shatter a 3-inch one. Here is a quick breakdown of your realistic options as a DIYer.
| Method | Best for | Block thickness | Cut quality | Dust level | Cost to hire/buy |
|---|---|---|---|---|---|
| Score and snap (bolster chisel or splitter) | Simple straight cuts, softer concrete blocks | Up to 2 inches | Rougher edge | Low | Very low (just a chisel) |
| Angle grinder + diamond blade | Curved trims, notches, tight gaps, on-site adjustments | Up to 3 inches (in passes) | Good with care | Very high (dry) | Low (most DIYers own one) |
| Wet saw (table masonry saw) | Straight cuts, border trimming, high volume of cuts | 2 to 4+ inches | Clean and precise | Low (water suppression) | Medium (hire for a day) |
| Manual masonry splitter | High volume of straight cuts, softer blocks | Up to 3 inches | Moderate | Very low | Medium (hire) |
For most DIY patios, you will end up using two of these methods: a wet saw or angle grinder for the main border cuts, and a bolster chisel for the occasional quick snap. If you are cutting more than 20 or 30 blocks, hiring a wet saw for a day is genuinely worth it. The cuts are cleaner, there is far less dust, and your finished patio will look noticeably better around the edges.
Blade and bit selection
For an angle grinder, you need a segmented diamond blade rated for concrete or masonry. A 4.5-inch or 5-inch blade is standard for most grinders. Do not use a standard abrasive cutting disc on concrete blocks because they wear down fast, overheat, and produce terrible cuts. For a wet saw, use a continuous-rim diamond blade for the cleanest edge, or a segmented blade if you are cutting harder block. Check the blade's RPM rating matches your saw before starting.
Measure, mark, and plan cuts for patio layout
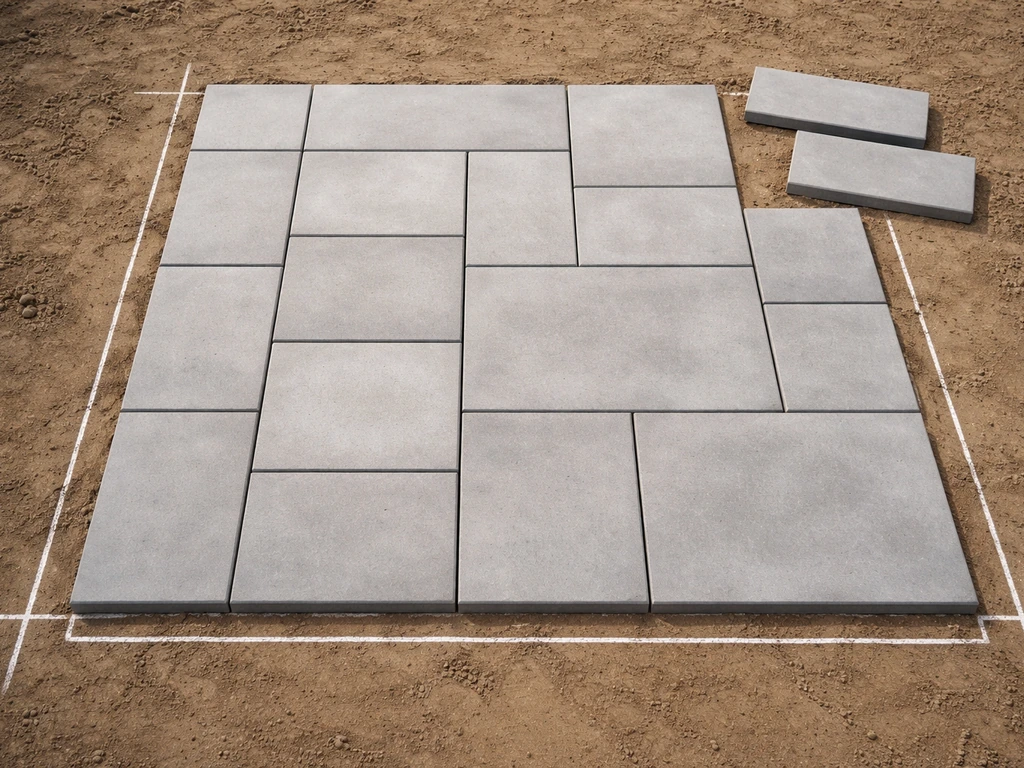
Accurate marking is where most DIY cuts go wrong before the tool even comes out. If you measure loosely, you compound the error through every block along a border, and by the time you reach the corner you have a gap you cannot hide. Take your time here.
- Lay out the full patio first without mortar or adhesive, placing all full blocks in position so you can see exactly which ones need cutting.
- For each block that needs trimming, place it directly on top of the last full block in the row, aligned perfectly. Then slide it until the opposite edge touches the border, wall, or obstacle. Mark the cut line on the top face using the edge of the previous full block as your guide.
- Add a 2 to 3mm gap allowance if you are pointing the joints later. If you are butting blocks tight, cut to the exact line.
- Use a straight edge and a pencil or chalk line to extend the mark cleanly across the full width of the block face.
- Transfer the line down both sides of the block using a square so you have a guide for all faces, especially important when cutting thicker blocks with an angle grinder.
- Double-check the measurement before cutting. Once cut, a block that is too short cannot be made longer.
For border cuts along a curved edge or shaped bed, make a cardboard template first. Cut the template to shape, check the fit, adjust as needed, then trace the template onto the block. This takes five extra minutes but it saves blocks and your sanity, especially around curves or where blocks meet a post or step.
Safety, dust control, and prep for cutting
This is the part people skip, and it is genuinely important. Cutting concrete blocks produces respirable crystalline silica dust, which is the fine dust that penetrates deep into your lungs and cannot be cleared by your body. OSHA’s construction standard applies to all occupational exposures to respirable crystalline silica in construction unless exposure remains below 25 µg/m³ as an 8-hour TWA under foreseeable conditions Cutting concrete blocks produces respirable crystalline silica dust. The UK's HSE and OSHA both identify cutting paving blocks as one of the highest-risk silica dust tasks in construction. Short-term exposure feels like nothing. The damage builds up over time without any immediate warning sign, which is exactly why it is easy to dismiss.
At minimum, wear a half-face respirator with a P100 or FFP3 filter rated for fine dust and RCS. A basic paper dust mask does not cut it here. OSHA's Table 1 and HSE guidance both recommend respiratory protective equipment with an assigned protection factor of at least 20 for cutting tasks like this. Wear safety glasses or a full face shield, ear protection, gloves, and long sleeves.
- Set up your cutting station outdoors and downwind of anyone nearby.
- If using an angle grinder dry, keep cuts short and step away between passes to let dust settle. Better still, use water suppression: a helper can trickle water onto the cut line while you work.
- A wet saw suppresses dust effectively because water continuously feeds the blade throughout the cut. This is the preferred method under both OSHA and HSE engineering control guidance.
- Never cut indoors without extraction equipment. Even with a wet saw, fine dust particles remain in the air.
- Have a bucket of water and a brush nearby to wet down block surfaces before scoring or cutting dry.
- Keep bystanders and children well away from the cutting area.
For your work surface, set the block on a stable, flat base at a comfortable working height. A piece of old plywood on a pair of sawhorses works well. Make sure the block cannot shift during the cut. A shifting block mid-cut is how blades bind, kick back, or leave a crooked line.
How to cut patio blocks: step-by-step by tool
Score and snap (bolster chisel method)

This works on thinner concrete blocks up to about 50mm (2 inches) and gives a rougher edge, which is fine for cuts that will be hidden by edging or soil. It is the fastest method when you only need a few cuts and have softer blocks.
- Mark your cut line clearly on all four faces of the block using a pencil and square.
- Place the block on a firm surface, ideally on a piece of sand or a rubber mat to absorb the blow.
- Hold a wide bolster chisel (at least 50mm wide) vertically on the cut line. Use a club hammer to tap a score groove along the line, working around all four faces.
- Deepen the score with two or three firm passes per face until you have a visible groove approximately 5mm deep.
- Place the block with the score line over the edge of a hard straight surface (a timber batten works well).
- Strike the overhanging section firmly with the club hammer. The block should split cleanly along the score line.
- Clean up any rough protrusions with the corner of the bolster or a rubbing stone.
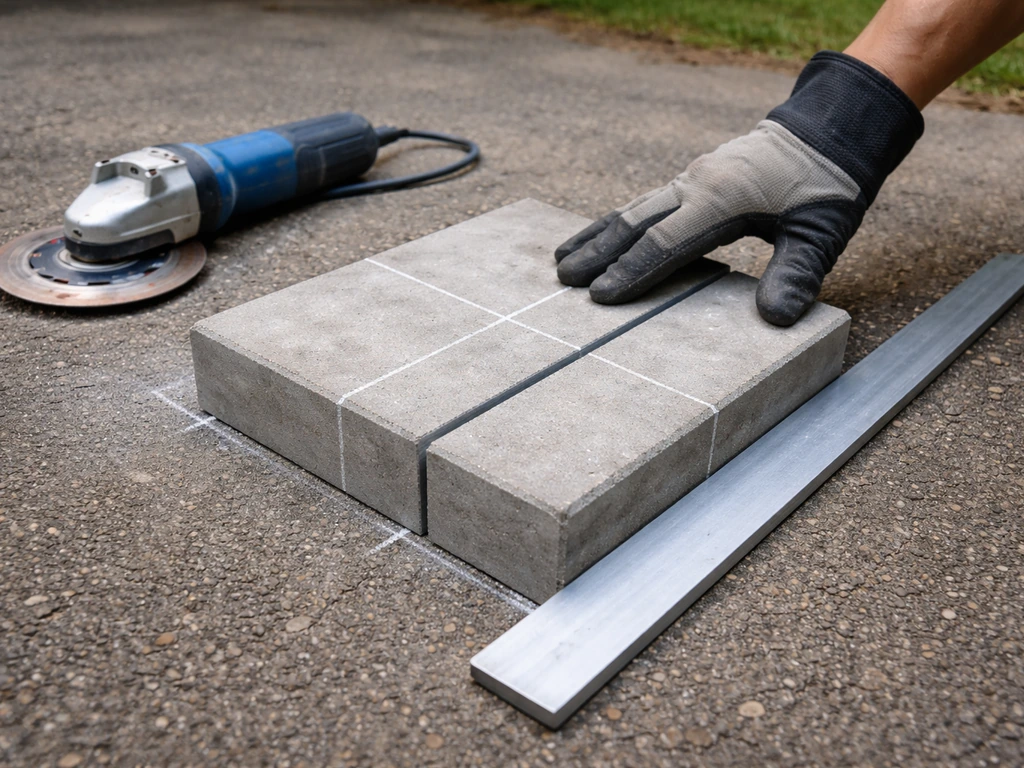
Angle grinder with diamond blade
An angle grinder is the most versatile tool for on-site cuts, especially for notches, curves, and awkward shapes. Do not try to cut all the way through in one pass. Use multiple shallow passes, increasing depth each time. If you want to use a circular saw, pair it with the right masonry blade and follow the same measure, mark, and multi-pass approach to avoid cracking. This prevents blade binding, overheating, and the jagged blowout you get on the underside of a block when forcing a single deep cut.
- Fit your segmented diamond blade rated for concrete. Check the blade guard is properly in place.
- Clamp or firmly hold the block on your work surface. The offcut end must be supported so it does not drop and crack the block at the end of the cut.
- Put on your respirator, eye protection, and ear defenders.
- Score the cut line lightly with a first pass at about 5mm depth. Let the blade do the work; do not force it.
- Make a second pass at 10 to 15mm depth, following the same line.
- Continue in passes of 5 to 10mm deeper each time until you cut through. For a 75mm block this is typically 4 to 6 passes.
- If dust builds up, use a light trickle of water on the cut line between passes, or have a helper do this continuously.
- For a cleaner cut, clamp a straight piece of timber alongside your cut line and use it as a fence to guide the grinder.
Wet saw (table masonry saw)
A wet saw gives you the cleanest, most consistent straight cuts, especially useful when you are trimming a full row of border blocks to the same width. The water feed suppresses dust effectively and keeps the blade cool, extending blade life significantly.
- Fill the water reservoir and check the water feed is flowing onto the blade before you start. Do not run the blade dry even for a test cut.
- Set the fence (rip guide) to your required cut width and lock it firmly.
- Start the saw and let the blade reach full speed before feeding the block.
- Hold the block firmly on the table, flat face down, and push it into the blade at a slow, steady pace. Let the blade cut, do not push hard.
- Keep both hands well clear of the blade path. Use a push stick for any cut that brings your fingers close to the blade.
- At the end of the cut, push the block through fully before releasing it. Do not pull the block back through a spinning blade.
- After cutting, rinse off the block and allow it to dry before placing it to check the fit.
Making different cut types
Straight border trims
Straight cuts along a border are the most common type and the easiest. Use the wet saw with the rip fence set to a consistent width for a whole row. Measure and check the first cut, confirm the fit in place, then run the remaining blocks without re-measuring each time. This way your border stays consistent even if your eye wants to second-guess every block.
Tight-fit cuts around posts, pipes, and corners
For blocks that need to fit around a post or tight corner, you usually need two cuts: one to reduce the block width and one to notch the corner. Make the notch by cutting two lines with an angle grinder to the required depth and width, then chisel out the waste material between them. Go slowly on the second cut and keep checking the fit in place before removing more material. It is much easier to take a little more off than to deal with a block that is too short.
Curved layout adjustments
Curved patios or circular features require blocks that are trimmed to a gentle taper or arc shape. Mark the curve using your cardboard template, then make the cut with an angle grinder, working around the curve in short, controlled arcs rather than trying to follow the curve in one continuous pass. A wet saw can handle gentle curves too if you rotate the block slowly as you feed it, though this takes practice. For tight curves, use the angle grinder and clean up the edge with a rubbing stone afterwards.
Angled and mitre cuts
If you need a 45-degree mitre for a corner detail or a slight angle to fit a non-square boundary, a wet saw with an adjustable table or fence is the cleanest option. Set the fence or table angle, confirm the angle with a sliding bevel before cutting, and make a test cut on a spare block first. Angle grinders can also manage angled cuts using the same multi-pass technique, but keeping a consistent angle by hand over a longer cut takes some patience.
Finishing, cleanup, and fitting the cut blocks
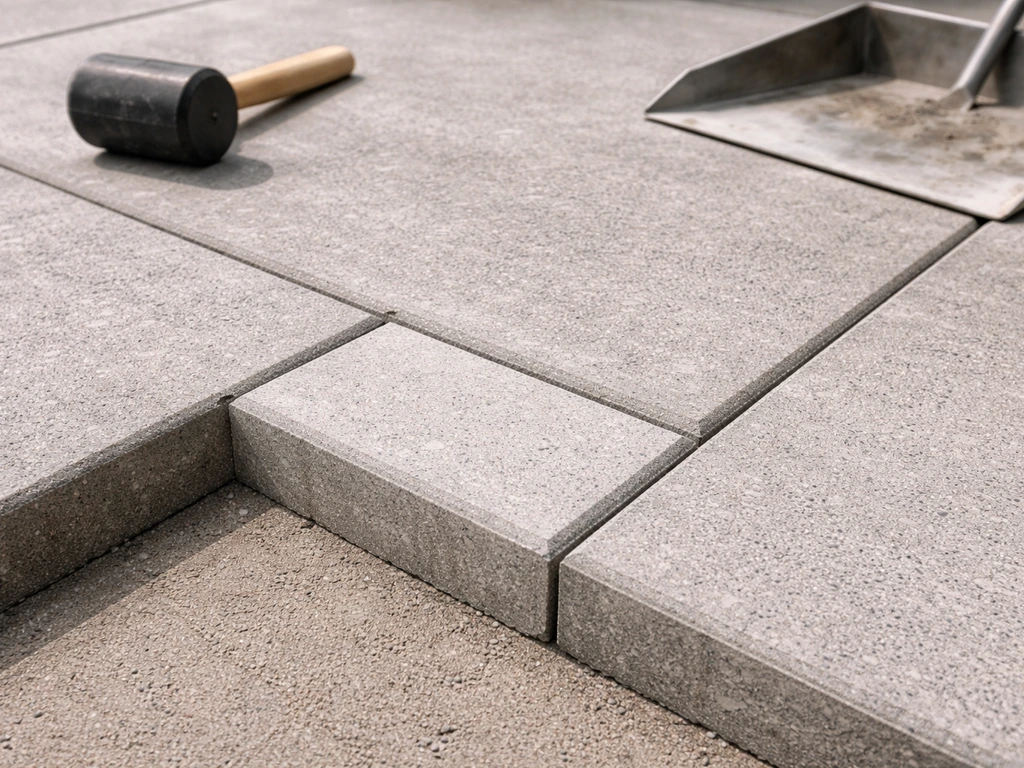
A freshly cut edge on a concrete patio block is often quite sharp and can look noticeably different from the factory-finished edges of the surrounding blocks. Before you place the cut block, run a rubbing stone or a coarse abrasive block along the cut edge to smooth and slightly soften it. This takes under a minute and makes the finished patio look far more intentional and professional.
Dry-fit every cut block before it goes into its final position. Place it in the gap, check the fit on all sides, and look for any points where it is catching or slightly too wide. Mark those points and trim back carefully. Once you are happy with the fit, set the block in the same way as your full blocks, whether that is on a sand bed, mortar, or adhesive, and compact or tap it level with the surrounding surface.
- If a cut edge will be visible at the patio perimeter, orient the factory edge outward and the cut edge toward the body of the patio where it will be less obvious.
- For cut edges that sit against a wall or edging, a thin line of mortar or jointing compound can seal the gap and tidy the finish.
- Sweep or brush off all cut dust and debris before pointing or grouting joints. Residual fine dust can affect how jointing compound bonds.
- Rinse down the cutting area and dispose of any slurry from wet cutting according to your local waste disposal guidelines. Wet concrete slurry is alkaline and should not go directly into drains or waterways.
If you have cut a significant number of blocks, it is worth doing a final walk-around of the patio before pointing to check that all cut pieces are seated flat and level. A cut block that is fractionally thicker on one side than the other can sit proud and become a trip hazard. Tap it down or adjust the bed beneath it as needed before the pointing sets.
Common mistakes and troubleshooting
Most problems with cutting patio blocks come down to a few repeat mistakes. Here is what goes wrong most often and how to fix it or avoid it in the first place.
| Problem | Likely cause | Fix or prevention |
|---|---|---|
| Block chips or shatters during cutting | Forcing the cut too fast, or trying to cut through in one pass with an angle grinder | Use multiple shallow passes; support both sides of the block so the offcut does not drop |
| Uneven or drifting cut line | No guide fence being used, or the block shifted mid-cut | Clamp the block firmly; use a timber fence clamped to the block as a guide for grinder cuts |
| Blade overheating and glazing over | Running the blade dry, cutting too fast, or wrong blade for the material | Use water suppression; let the blade cool between cuts; check blade is rated for concrete |
| Cut block does not fit the gap | Measurement error or not accounting for joint width | Dry-fit before final placement; re-measure using the block-over-block method rather than a tape alone |
| Rough or crumbling cut edge | Score-and-snap used on too thick or too hard a block | Use an angle grinder or wet saw for blocks over 50mm; clean rough edges with a rubbing stone |
| Block cracks along an unintended line during snapping | Score groove not deep enough before snapping, or inconsistent scoring | Score all four faces to at least 5mm depth; use a bed of sand under the block to cushion the snap |
| Excessive dust obscuring the cut line | Dry cutting with no suppression | Use water suppression; cut in shorter passes and brush away debris between each one |
One mistake worth calling out specifically is skipping the dry-fit step when you are in a hurry. It feels like a time-saver but it almost always costs more time in the end, either because a block has to come back out and be re-cut, or because a slightly wrong fit becomes permanent once the mortar or adhesive sets. Dry-fit every single cut block. It takes seconds.
If you find yourself consistently getting cracked blocks at the end of an angle grinder cut, it is nearly always because the offcut piece has no support and drops under its own weight just as the blade finishes the cut. Place a piece of timber under both sides of the cut line so the offcut is held up throughout the full cut. This one change makes a noticeable difference to how cleanly blocks finish.
Once you have got your cutting technique dialled in, the rest of the patio install follows naturally. If you are working on the edges and borders of your patio specifically, the way you cut blocks ties directly into how your edging system goes together, whether you are using block edging, timber sleepers, or another border method.
Once your cuts are right, follow the spacing and alignment tips in our guide on how to lay patio edging for a clean, even finish edging system goes together. Once your cut blocks fit correctly, you can lay patio edging blocks by placing them in a straight line along the border, using sand or mortar as recommended, and checking alignment as you compact or tap them level.
Getting the cuts right means your edging sits flush and your patio looks finished rather than patched together.
FAQ
How do I keep patio blocks from chipping at the cut line, especially along visible edges?
Mark the line with a fine-tip marker and run a straight guide line first, then make a light “scoring” pass at the start of grinding or saw cutting before you reach full depth. For grinder work, keep the blade moving and do not twist into the cut, and support the offcut so it does not drop at the finish. For wet saw work, confirm the block is fully supported across its entire length so the cut does not flex and chip.
What blade and RPM should I verify before cutting with an angle grinder or wet saw?
For an angle grinder, use a segmented diamond blade specifically rated for concrete or masonry, and confirm the blade diameter fits your grinder’s guard clearance. For either tool, check the blade’s max safe RPM and make sure your grinder’s no-load RPM is within the manufacturer’s range, not just “in the same ballpark.” If your saw or grinder speed is higher than the blade rating, you can overheat the bond and get rapid wear or rough edges.
Is it better to cut patio blocks with a wet saw or an angle grinder for a small project?
If you only need a few border cuts, an angle grinder with the right diamond blade is usually the quickest and most flexible option for notches, curves, and tight spaces. If you are trimming an entire row to the same width, a wet saw typically gives more consistent straight edges and far less dust, which makes the finish look cleaner with less touch-up.
How do I deal with blocks that are thicker than expected, or vary in size across the pallet?
Measure thickness on several blocks before you plan your widths, because variation can be enough to create small gaps or rocking. When cutting a border row, confirm the first block’s fit, then measure the next few against the actual installed space, not just your plan. If you must, adjust the template width slightly rather than forcing one size across the whole border.
Can I use a regular masonry blade or wood blade instead of a diamond blade?
No. Patio blocks are dense concrete, and non-diamond blades usually overheat quickly, wear out fast, and can cause aggressive chipping or binding. If you use a circular saw, keep it paired with the correct masonry or concrete-rated blade type, and still use multi-pass cuts to avoid underside blowout.
How many shallow passes should I make when using an angle grinder to avoid cracking?
Use several passes, starting with a shallow depth that just defines the line, then step down gradually until you reach full depth. The exact number depends on block thickness and blade behavior, but the key is avoiding one deep “finish” cut that forces the blade through. If you feel the blade binding or hear the sound change abruptly, back off and reduce depth rather than pushing.
What should I put under the block so the offcut does not fall and ruin the last part of the cut?
Support both sides of the cut line with stable timber so the offcut is held up until the blade fully exits. The goal is to prevent any section from dropping when the cut completes, because that moment is when chips and fractures often start. Make sure the support cannot slide while you cut, and keep your hands clear of the cut path.
How do I smooth the cut edge without making the block too thin or uneven?
Use a rubbing stone or coarse abrasive lightly along the freshly cut edge, keeping pressure consistent and only removing the sharpness and micro-roughness. Do not grind across faces that must remain to a tight width, and stop frequently to re-check the dry fit in place. If the fit is already snug, focus on softening only the edge that is catching.
Do I need to re-measure after cutting a block for a border row?
Yes, at least for the first few. Confirm the first cut block’s width and corner alignment in its position, then run the rest without re-measuring every time as long as conditions stay the same. If the ground level changes, spacings vary, or you are transitioning around a post, re-check those blocks before you commit the rest.
What is the safest way to dry-fit cut blocks when using sand, mortar, or adhesive?
Dry-fit every cut block in the empty gap, then mark any tight or catching points and trim minimally. If you are installing on sand, remove and replace the block to re-check level and seating, because sand depth differences can make a block sit proud. If you are installing on mortar or adhesive, do not “make it fit” by forcing a mis-sized block, trim it instead so the set material does not lock in an incorrect gap.
How can I avoid trip hazards if a cut block sits slightly higher than the rest?
Before pointing or finishing, walk the patio and check for rocking or high spots. If one cut block sits fractionally proud, tap it down and adjust the bed underneath, then re-check level with your hand or a straight edge. Once the bedding and pointing set, correcting height differences usually requires removal, so it is best done immediately.