Laying a patio with slabs is absolutely something you can do yourself, and when it's done right it'll last decades without shifting, cracking, or pooling water. The best method is to dig out and compact a proper MOT Type 1 sub-base of at least 150mm, blind it with sharp sand, bed your slabs on a 30–40mm mortar bed, set them to a fall of around 1:80 away from the house, and finish with an appropriate jointing material.
How to Lay a Patio With Slabs: Step-by-Step Guide

Clara Farrell
23 May 2026
That's the process in a sentence. The sections below walk you through each stage in the order you'd actually do them on site. If you want a quick refresher on how to install patio slabs end to end, follow the stages in order, starting with sub-base and levels.
Planning the patio layout and materials
Before you lift a single turf, spend real time on the plan. Rushing the design stage is the single biggest cause of wasted materials and rework. Start by measuring the area carefully and drawing it out to scale on paper or a free garden planning app. Think about how the patio connects to the house, where the main access points are, and whether you want a simple rectangle or something with more character.
Slab choice matters more than most people realise. Concrete slabs (600x600mm and 600x900mm formats are most common) are the most forgiving for a first-time layer and are easy to cut with a disc cutter. Natural stone like sandstone or limestone looks fantastic but is more variable in thickness, which means more work with the mortar bed. Porcelain paving has exploded in popularity and it's extremely durable, but it needs a rigid, very flat base and the cutting is more demanding. If this is your first patio, concrete or natural sandstone is the most forgiving starting point.
When it comes to quantities, measure your area in square metres and add 10% for cuts and wastage (15% if you're running slabs at 45 degrees or using a pattern with lots of different sizes). Factor in the slab thickness when you're working out how deep to dig: a typical 20–22mm slab plus 35mm mortar bed plus 150mm compacted sub-base means you're excavating roughly 210–220mm below your finished level.
One thing worth deciding early is whether you want slabs of a single size or a mixed-size pattern. A random or coursed mix of, say, 600x900, 600x600, and 300x600 slabs looks great but requires more thought during setting out. If you're going down that route, it's worth reading up specifically on laying large format slabs too, since those behave differently under foot traffic and need especially good full-bed mortar contact. If you’re working with large format slabs, be sure to focus on getting full-bed mortar contact and an especially rigid, very flat base laying large format slabs.
Materials checklist
- Paving slabs (plus 10–15% extra for cuts/wastage)
- MOT Type 1 crushed hardcore for sub-base
- Sharp sand (for blinding and mortar)
- Cement (for bedding mortar, typically a 4: 1 or 5:1 sharp sand:cement mix)
- Kiln-dried jointing sand or a polymeric jointing compound
- Timber pegs and string lines for setting out
- Spirit level (1.2m is ideal for patio work)
- Rubber mallet
- Bolster chisel and lump hammer, plus a disc/angle grinder with diamond blade for cutting
- Plate compactor (wacker plate) — hire this, don't buy
- Tape measure, marker pen, safety goggles, dust mask rated P3 or FFP3
Site prep and groundworks for patios
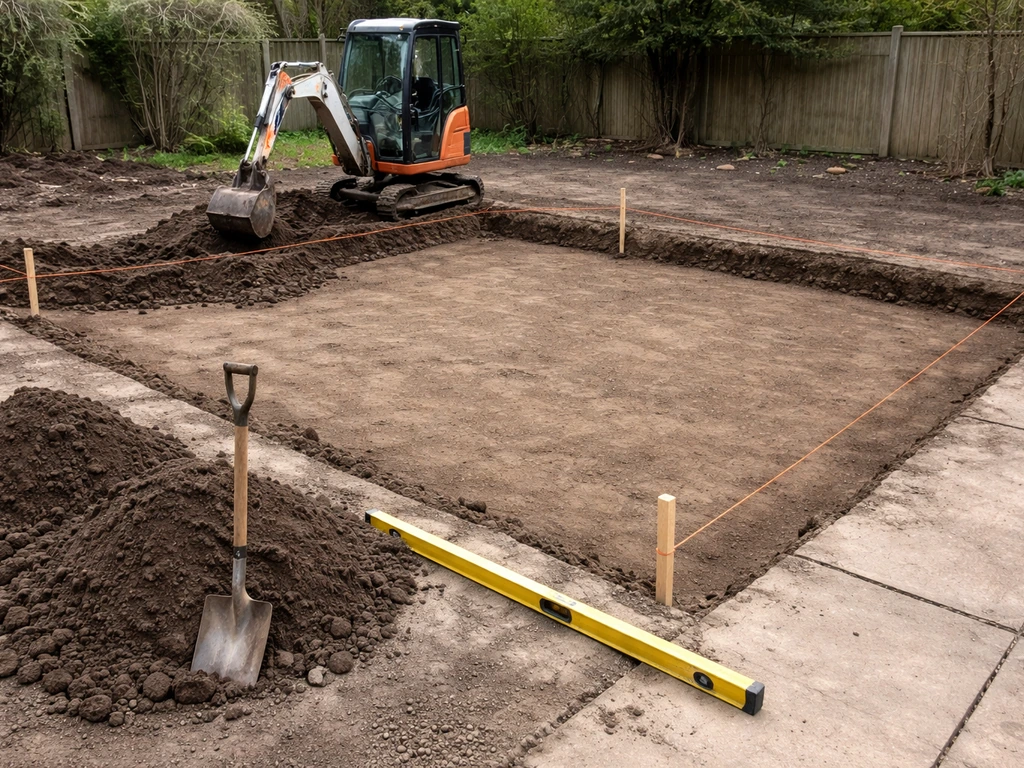
Good groundworks are the difference between a patio that lasts 20 years and one that starts rocking and sinking after the first winter. I can't stress this enough. This stage is unglamorous and tiring, but it's where the real work happens.
First, mark out your patio area using pegs and string lines, then strip all turf and topsoil. Topsoil is organic, it compresses and rots, and it has no place under a patio. Dig down to firm subgrade, which is typically around 200–230mm below your intended finished slab level (accounting for sub-base, blinding, mortar bed, and slab thickness). On clay-heavy soil, go deeper if it feels soft and springy underfoot, because clay shrinks and swells with moisture and can cause movement if not dealt with properly.
If the ground is particularly soft or you've hit a layer of made-ground (old rubble, demolished walls, backfill), compact what's there with the plate compactor before adding your sub-base material. Any voids or soft spots at this stage will telegraph straight through to your finished surface. On sloped ground, you may need to step the formation level rather than trying to build up a wedge of sub-base that gets very thick at one end. If the slope is significant, it's worth considering whether retaining elements are needed at the edges.
One critical rule near the house: blank" rel="noopener noreferrer">your finished patio surface must sit at least 150mm below the damp proof course (DPC). The DPC is that thin line of engineering brick or felt-like strip you'll see in the mortar joint near the base of most brick walls. Bridging it by building your patio too high is a very common DIY mistake that can cause damp to travel into the wall. Measure from the DPC down, and use that to set your target finished level before you even start digging.
Base layers, levels, and falls (drainage)
Once you've excavated to firm ground, it's time to build your sub-base. This is the layer that does the heavy lifting, distributing weight and preventing settlement. The material to use is MOT Type 1 crushed limestone or granite (sometimes called hardcore or road planings). Aim for a compacted depth of at least 150mm. Do not just tip it all in and compact it once: compact it in lifts of 75–100mm at a time. So tip in roughly 100mm loose (it'll compact down), run the plate compactor over it thoroughly, then add the next layer. This layered approach produces a far denser, more stable result than trying to compact a thick single layer.
After compacting your Type 1, add a layer of sharp sand blinding, roughly 25mm, and lightly rake and tamp it level. This fills the voids in the surface of the hardcore and gives a cleaner surface to work your mortar bed from. Some installers skip this on dense Type 1, but I'd always do it as it makes setting out and levelling much easier.
Now for falls. Every patio needs to slope away from the house so rainwater drains off rather than pooling or running toward your walls. The standard fall is 1:80 away from the building, which works out at about 12–13mm of drop per metre of patio. On textured or rough-surface slabs, 1:60 (17mm per metre) gives better runoff.
To set this practically, knock in timber pegs along the line of the house and along the outer edge of the patio. Use a string line between them and a tape measure to set the height difference: if your patio is 3m deep and you're using 1:80, the outer edge string line should sit about 37–40mm lower than the house edge string line. Use these string lines as your guide throughout.
Think about where the water goes once it drains off the edge of the patio. If it runs onto a lawn, that's usually fine. If it runs toward a neighbour's property or a structure, you may need a channel drain at the patio edge. It's much easier to plan this now than to retrofit it later.
Setting out, spacing, and laying different slab sizes
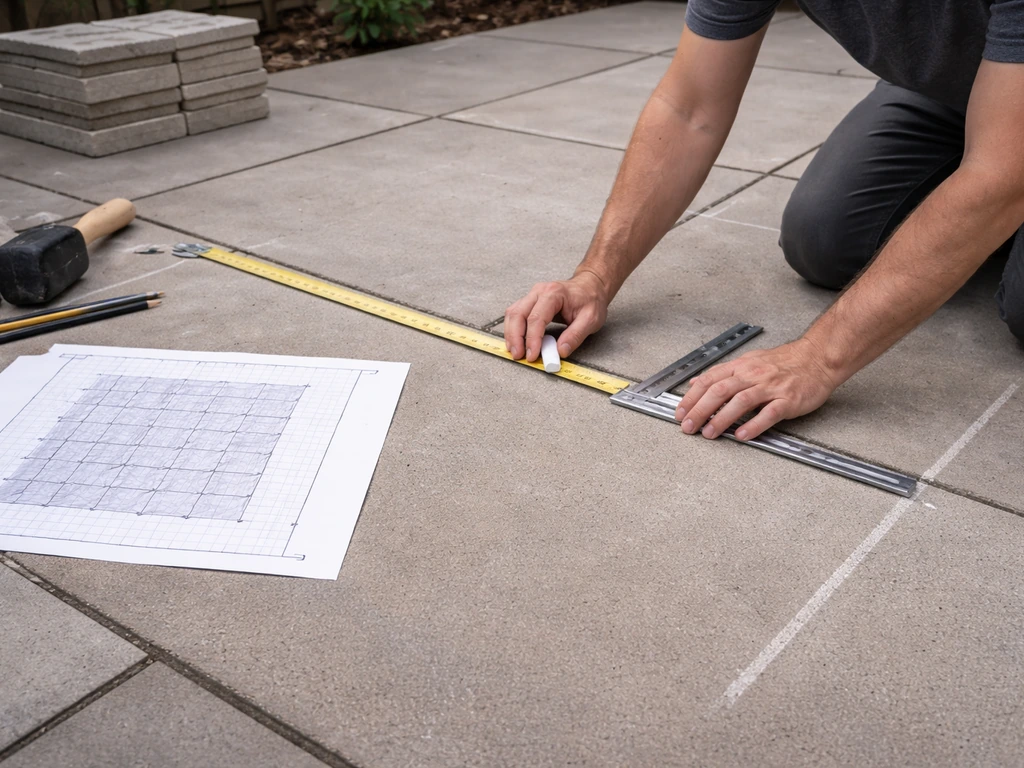
Setting out properly is what separates a professional-looking patio from one that looks slightly off. The key is establishing a perfectly square starting point relative to the house, and working consistently from that reference. Use the 3-4-5 triangle method to get a true right angle: measure 3 units along one baseline and 4 units along the perpendicular, and the diagonal between those two end points should measure exactly 5 units. For a garden patio, use 3m, 4m, and 5m as your measurements. Adjust until the diagonal is spot on, then lock your string lines in place.
Start laying from the most visible corner, usually the corner nearest the back door or the most viewed angle from the house. Lay a full run of whole slabs first before worrying about cuts. Mix your mortar to a firm but workable consistency (roughly 4 parts sharp sand to 1 part cement, or 5:1 for natural stone).
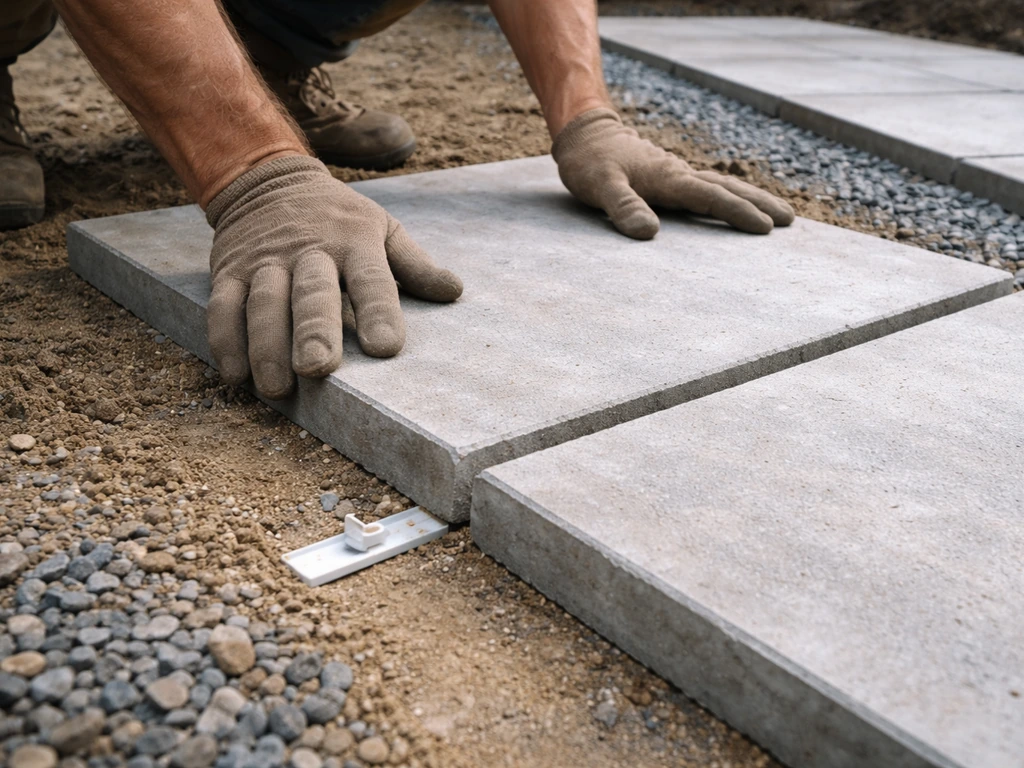
If you want a true cement patio slab build, get the mix right and keep the mortar bed consistent under every slab mix your mortar. Apply the mortar as a full bed rather than five blobs: a full contact bed prevents hollow spots that crack under load. Aim for a bed thickness of 30–40mm, and use your rubber mallet and spirit level to tap each slab down to your string line heights.
For joint width, 10mm is the most common and practical gap for standard patio slabs. It's wide enough to allow for minor size variation in the slabs (especially natural stone, which can vary), and gives you room to point neatly. If you're laying porcelain, the manufacturer will often specify a minimum joint of 3–5mm and the slabs are manufactured to very tight tolerances, so you can go tighter. Use plastic tile spacers to keep gaps consistent while the mortar goes off.
If you're mixing slab sizes (say 600x900, 600x600, and 300x600 in a random pattern), sketch out your pattern in advance and lay it out dry on the ground before you start bedding. The goal is to avoid four corners meeting at a single point (called a cross joint), which is structurally weak and looks amateurish. Stagger your joints as much as possible. Working with different size slabs is genuinely more complex, so take your time and don't commit a slab to mortar until you're sure of the sequence.
Cutting techniques and edging details

At some point you'll need to cut slabs to fit around edges, corners, or obstacles like drain covers and soil pipes. If you also need to drill a patio slab for an anchor point or fixture, the safe method and correct tools matter how to drill patio slab. Cutting is one of the most hazardous parts of the job, so treat it seriously.
The main risk is respirable crystalline silica dust, which is generated in enormous quantities when cutting paving materials. Uncontrolled cutting with a disc cutter is one of the highest-risk activities on a construction site, according to HSE guidance. The control measure is wet cutting: always use a diamond blade fitted to a disc cutter with a water suppression system (a small pump that feeds water onto the blade). This dramatically reduces airborne dust, cools the blade, and extends blade life. Even with wet cutting, wear a P3 or FFP3 dust mask, safety glasses, ear defenders, and gloves. Never cut dry if you can help it.
For straight cuts on concrete slabs, you can score deeply with an angle grinder and then split cleanly with a bolster chisel and lump hammer. For natural stone, the same method works well. For porcelain and vitrified paving, a diamond blade with water is the only reliable method. Porcelain is brittle and unforgiving: a bolster chisel will shatter it rather than split it. Take your time, mark your cut line clearly with a pencil or chalk, and make the cut in a single smooth pass.
Edging is often overlooked but makes a huge difference to how the finished patio looks and how it holds up over time. The edges of your patio are the most vulnerable point: without restraint, the outermost slabs can gradually creep outward as the mortar deteriorates. The best approach is to haunch (back-fill with concrete) the outside edges of the border slabs after laying. Alternatively, use a proprietary edge restraint system or a row of setts set in concrete as a defined border. Either way, a neat edge is worth the extra hour it takes.
Leveling, jointing, compaction, and finishing
Once all slabs are down and the mortar has cured for at least 24 hours (48 hours in cold or wet weather), you can move on to jointing. Don't walk heavily on newly laid slabs before the mortar has gone off, and avoid laying in temperatures below 5°C without protecting the work with frost cloth.
For most patio slabs with joints of around 8–15mm, a pointing mortar (a dry or semi-dry mix brushed in and then finished with a pointing iron) gives the most durable result. Mix it fairly dry (dry enough that a squeezed handful just holds shape), brush it into the joints with a stiff brush, then finish each joint by running a pointing iron or the handle of a trowel along it to compact and shape it. Avoid pointing in direct sunlight or when rain is forecast, as the mortar can dry too fast or wash out.
For tighter joints (3–5mm, typical for porcelain), kiln-dried jointing sand is the go-to material. It's designed to flow into narrow joints under its own weight and then stabilise once dry. Simply tip a bag over the surface and brush it across the slabs, working it into every joint. Sweep off the excess and leave it. Some polymeric jointing compounds (brush-in resin-bonded systems) work on a similar principle but set harder and resist weed growth better. If you go the polymeric route, follow the manufacturer's instructions precisely: many specify not using a plate compactor over the slabs after application, as vibration can disturb the compound before it cures.
After jointing, give the whole patio a final check with your spirit level across multiple slabs in both directions and diagonally. Check that the fall is consistent by pouring a small amount of water and watching where it goes. Any slab that rocks or feels hollow when you stand on it needs to be lifted and re-bedded now, before everything fully cures. It's a pain, but it's far less work than lifting a fully cured and pointed slab six months down the line.
Common mistakes to avoid
- Leaving topsoil under the sub-base: it will rot and compress, causing sinking slabs
- Compacting the full sub-base depth in one go: always compact in 75–100mm lifts
- Forgetting the fall or getting it wrong: water pooling near the house causes damp problems
- Laying slabs too close to or above the DPC: keep the finished surface at least 150mm below the DPC line
- Using five-point (spot) bedding instead of a full mortar bed: spot bedding leads to cracked slabs, especially on large formats
- Cutting dry without water suppression: the silica dust risk is serious and genuinely dangerous
- Skipping edge haunching: unrestrained edges work loose surprisingly quickly
- Jointing too soon before mortar has cured, or in rain: pointing mortar washes straight out
A quick comparison: laying methods and when to use them
| Method | Best for | Key advantage | Watch out for |
|---|---|---|---|
| Full mortar bed (rigid) | All slab types, near buildings | Maximum stability, best for large or heavy slabs | Requires accurate levels before laying; harder to adjust once set |
| Loose-lay / sand bed (flexible) | Some block paving and dry-laid stone | Easier to lift and relay; forgiving on minor movement | Not suitable for smooth-base porcelain; can shift under heavy loads |
| Porcelain adhesive system | Porcelain over existing concrete | Very flat finish, minimal build-up depth | Needs a structurally sound existing base; more expensive materials |
For most residential DIY patios, the full mortar bed over a compacted Type 1 sub-base is the right approach. It's what the other methods are measured against. If you're specifically interested in laying without cement or laying large-format slabs, those processes have some important differences worth exploring separately before you start. If you're specifically interested in laying without cement, that typically means choosing a dry-bed or sand-based system instead of a mortar joint, so the base and bedding steps need adapting.
Treat the first day or two after finishing as a resting period for the whole patio: keep foot traffic to a minimum, keep it covered if rain or frost is forecast, and resist the urge to put furniture on it until the mortar has fully cured (typically 3–5 days in normal conditions). After that, you've got a patio built the right way, one that should give you years of trouble-free use.
FAQ
How do I prevent patio slabs from moving at the edges or creeping outward?
Most patios fail at the edges because restraint is missing or the base is too soft there. After you lay border slabs, haunch the outside edge with concrete (or install a proprietary edge restraint) and make sure the haunch reaches down into the hardcore, not just a thin wedge at slab level. This locks the slabs against lateral creep over time.
Can I lay a slab patio on sloped ground, and what changes?
Yes, but only if you can keep a true fall and a flat, rigid base. On slopes, avoid building a thick wedge of sub-base, instead “step” the formation level in tiers and compact each tier properly. If the drop is significant, plan retaining or an engineered edge because vibration during compaction can cause settlement if unsupported.
What’s the best way to avoid the patio looking wonky or not square later?
Before you set any slabs in mortar, do a quick “dry fit” with your planned joint gaps and spacers, then re-check the diagonals at least once more after you’ve made any cut allowances. The 3-4-5 method should be checked back to your string reference, not just at the start, because one small slip early on shows up as visible lippage near the far edge.
What should I do if a slab rocks or feels hollow after it’s set?
If a slab feels hollow or rocks, lift it immediately while the mortar is still workable, scrape off the bedding, re-spread a full bed, then re-set to the string line. Trying to “top up” from above usually leaves the void in place, so the slab will crack or settle later.
When is it safe to walk on the patio and put weight on it?
Use temporary foot access while you work, but avoid heavy standing and dragging loads on fresh bedding. Mortar beds continue to firm up for at least 24 hours, then gain strength over the following days. Keep the patio clear of furniture, wheelbarrows, and sharp impacts until the pointing mortar has cured and temperatures are not near freezing.
How can I confirm the drainage fall is right, and what if water pools?
Check fall twice: once at setting-out (string heights) and again after bedding. Pour a small amount of water on different points to confirm it always runs to the correct edge drain direction. If water pools anywhere, that indicates a local low spot or uneven mortar bed that must be corrected before pointing.
Do joint widths and jointing materials differ between concrete, natural stone, and porcelain?
For concrete and natural stone, keep joints around 8 to 15 mm, you can point in a durable way once cured. For porcelain, many systems require much tighter joints (commonly 3 to 5 mm) and a kiln-dried jointing sand designed to stabilize narrow gaps. Don’t assume you can use the same jointing product across slab types.
How do I handle the damp proof course requirement near doors, thresholds, or steps?
If the patio is near a wall or door threshold, the DPC rule is still critical, plus you must also consider door clearance and step heights. Measure the DPC down to your target finished level at the outset, and include the slab plus full mortar bed in your calculation so you do not end up trapping moisture behind the higher edge.
What weather issues should I watch for during bedding and jointing?
Plan for curing and weather. Pointing mortar can wash out if it rains soon after application, and joint sand can be disturbed if the work is vibrated or walked on too early. If rain or frost is likely, cover the patio and slow down your work so you can complete bedding and jointing in safe conditions.
Where should I drill for anchors, and what common mistakes should I avoid?
If you need anchors, fittings, or rail posts, drill after the slabs are set but before extensive pointing, and use the correct bit and dust control method. Many failures come from drilling too close to slab edges or trying to anchor into mortar joints rather than the slab material itself, so plan the exact anchor positions during setting out.
What’s the safest way to cut slabs of different materials, especially porcelain?
Choose a cutting method by slab type. Concrete and many natural stones can often be cut with score-and-snap methods, but porcelain and vitrified paving require a diamond blade with water to avoid chipping and blade overheating. Also, wet cutting plus correct PPE matters because silica dust can be extremely hazardous.
Do I really need sharp sand blinding over the Type 1 hardcore?
A sand blinding layer helps, even when you think your Type 1 is smooth enough. It fills micro-voids so you get more consistent mortar contact and easier levelling when you place slabs. Skipping blinding can make it harder to achieve a flat finish and increases the chance of local hollows.
What’s the biggest mistake when laying mixed-size slab patterns?
Yes, you can lay a pattern, but you must avoid cross joints (four corners meeting). Sketch and dry-lay first, then start with whole slabs from the most visible corner. When mixing sizes, think through where the smallest pieces land at edges, because cramped cuts near a border can force awkward joint lines and weaken the look.
If I want to lay slabs without cement, will my sub-base and drainage steps still be the same?
If you want minimal cement, the base and bedding approach changes, usually moving away from a full mortar bed. However, the rigid, well-compacted, flat base requirement still remains, especially for large-format and heavy-use areas. If you switch systems, confirm you still meet drainage and jointing requirements for your exact slab type.