To level ground for a patio, you excavate to the right depth, compact the subgrade, build up a graded aggregate base in layers, then screed a 1-inch bedding sand layer to a consistent plane before laying your surface material. The whole job slopes gently away from your house at 1/8 to 1/4 inch per foot so water drains off instead of pooling. Do that sequence correctly and your patio will stay flat and stable for years. Skip any step, especially compaction or drainage slope, and you'll be pulling up pavers within a season.
How to Level Ground for a Patio: Step-by-Step Guide

Clara Farrell
7 May 2026
Start here: soil or existing surface?

Before you grab a shovel, figure out what you're actually leveling. There are two completely different scenarios, and the work for each is very different. The first is bare ground, where you're starting from scratch on soil, a lawn, or a sloped yard. The second is an existing patio surface that's become uneven or has settled over time. This article is mainly focused on the first scenario, building from the ground up, but the leveling principles for the base and bedding layer apply to both.
If you're working on an existing patio that has sunken or rocked pavers, that's a different job where you lift and reset individual units rather than re-grading the whole area. If you're leveling bare soil or a sloped backyard before construction, you're in the right place. And if what you want is guidance on the final surface layer specifically, the screeding process covered in the floor leveling section below is what you need. Understanding which problem you're solving saves you a lot of wasted effort.
Plan your grade and drainage before you dig anything
The single most important measurement in this whole project is your drainage slope, and you set it before you move a single wheelbarrow of dirt. The target is a fall of 1/8 to 1/4 inch for every foot of patio running away from your house. Most professionals aim for 1/4 inch per foot, which works out to a 1-inch drop over 4 feet. That sounds tiny, and it is. You won't even notice it when you're sitting on the finished patio. But water absolutely notices it, and that gentle slope is the difference between a patio that stays dry and one that turns into a shallow lake every time it rains.
To plan your grade, first establish your high point, which is almost always the edge closest to the house. Measure out from the house wall to the far edge of the patio. Multiply that distance in feet by 0.25 inches to get your total required drop. So for a 12-foot-deep patio, you need a 3-inch fall from the house-side edge to the outer edge. Mark your high and low points with stakes and a string line so you have a visual reference throughout the dig. A line level or builder's level clipped to the string gives you an accurate read on your actual slope as you work.
On a sloped yard the planning gets a bit more involved. If the ground already falls away from the house, you may need to do very little cutting. If it slopes toward the house, or if it slopes sideways, you'll need to cut and fill or step down the base in terraced sections. Either way, your target grade for the finished surface stays the same: 1/8 to 1/4 inch per foot away from the building.
Tools, materials, and site prep
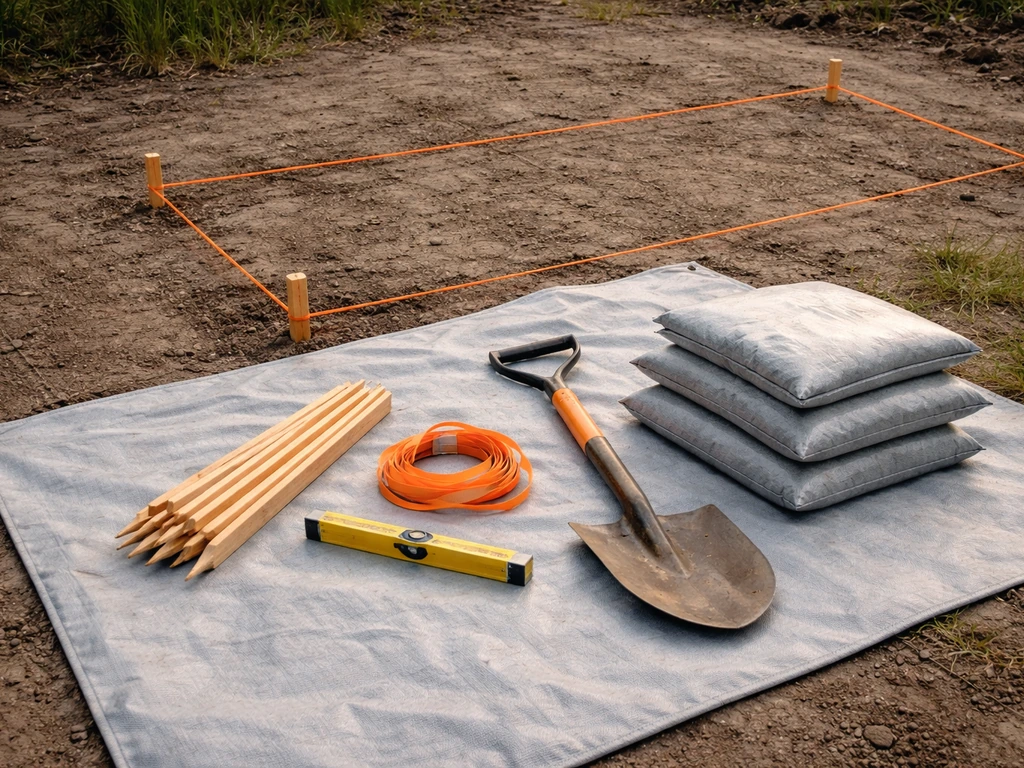
Get these sorted before you start. Running to the hardware store mid-dig because you forgot a line level is the kind of thing that turns a weekend project into a three-week ordeal.
- Stakes and string line (for marking the perimeter and grade)
- Line level or builder's level
- Tape measure and marking spray paint
- Spade, mattock, or flat-head shovel for excavating
- Wheelbarrow for moving spoil
- Plate compactor (rent one, don't skip it)
- Hand tamper for edges and tight corners
- Screed board (a straight 2x4 works fine)
- Two lengths of 3/4-inch rigid electrical conduit for screed rails
- Crushed stone or compactable gravel for base (3/4-inch crusher run or similar)
- Coarse bedding sand (not fine play sand)
- Straight edge or long spirit level (10-foot preferred)
For site prep, start by marking out the full patio footprint with spray paint and stakes. Add about 6 inches beyond your finished edge on all sides so you have room to work and set edge restraints. Remove all vegetation, roots, and topsoil. Topsoil is organic, it compresses and rots, so it has no place under a patio. Keep digging until you hit firm, stable mineral soil. If you hit soft, clay-heavy, or waterlogged ground, you may need to dig deeper and bring in a compactable fill to replace it. If water appears on the base surface during compaction, the material is too wet and should be allowed to dry, according to Belgard’s Product Installation Guide.
Leveling uneven or sloped ground step by step
This is the part most people underestimate. Getting the subgrade (the bare soil at the bottom of your excavation) level and graded correctly is what everything else sits on. If this is wrong, no amount of sand fiddling will fix it later.
- Set your reference string lines at the finished patio height, with the correct 1/4-inch-per-foot slope built in. These strings are your guide for every measurement from here on.
- Calculate your total excavation depth by adding up: your paving surface thickness (typically 2.5 to 3.5 inches for standard pavers), plus 1 inch for bedding sand, plus 4 to 6 inches for compacted base aggregate. That total, often 8 to 11 inches, is how deep you dig from your finished grade string.
- Excavate across the whole area to that depth. On a sloped site, this means you'll be cutting more from the high end and less from the low end, but your subgrade floor should match the same drainage slope as your finished surface.
- Once excavated, rake the subgrade as flat as you can manage within a target of plus or minus 3/8 inch across any 10-foot span. This is the industry tolerance for base surface flatness and it matters.
- Compact the subgrade soil thoroughly with a plate compactor. Make at least two passes in perpendicular directions. For a residential pedestrian patio, you're aiming for 98% standard Proctor density (per ASTM D698), which in practice means you compact until the plate compactor stops sinking the surface noticeably.
- On sloped ground where one end is significantly lower, you may need to build up the low side with compactable fill material added in 3 to 4 inch layers, compacting each layer before adding the next. Never add uncompacted fill all at once.
- Check your grade again with the string line after compaction. Soil will drop a little as it compacts, so re-check and re-grade as needed before moving on.
On significantly sloped yards where a single flat patio area would require more than 6 to 8 inches of fill on the low side, consider stepping the patio down in terraced sections instead. Each section is leveled independently and the steps between them are built as part of the design. It's more work upfront but avoids the instability that comes with very deep fill areas.
Building a stable, level patio base
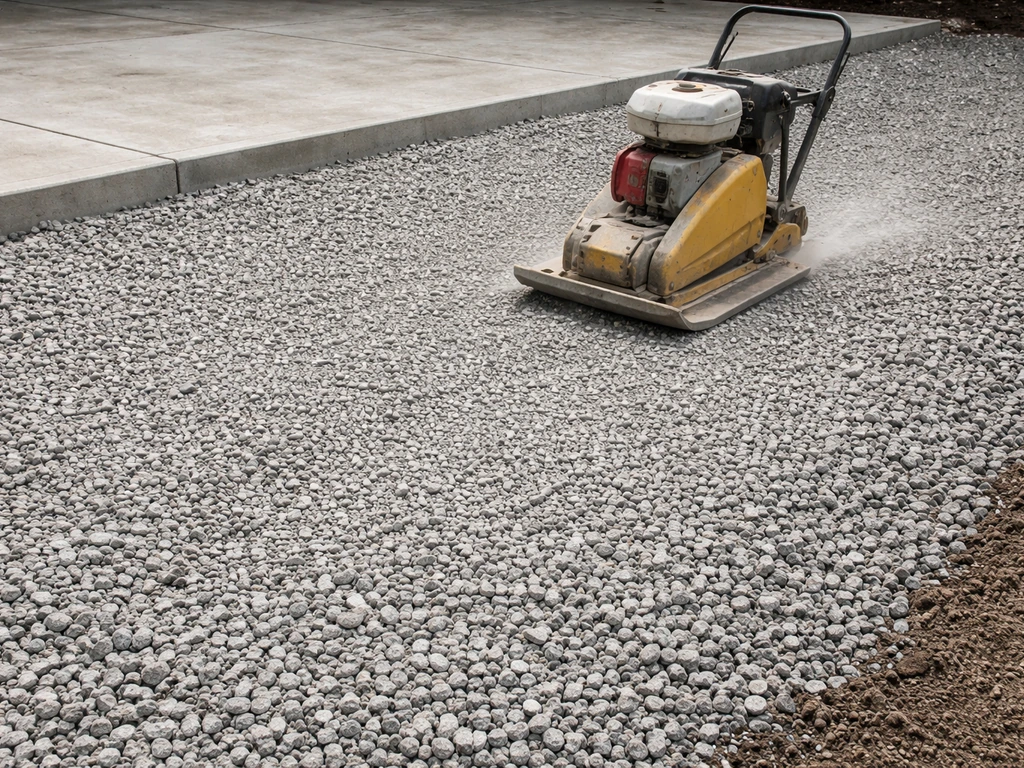
The base layer is crushed stone aggregate, usually referred to as 3/4-inch crusher run, compactable gravel, or road base depending on your region. It's the structural layer of your patio, so don't cut corners on depth or compaction here.
- Spread your first layer of crushed stone to a loose depth of about 3 to 4 inches. It will compact down significantly, so don't be surprised when it settles.
- Compact thoroughly with the plate compactor, again using two perpendicular passes. The base should feel and sound solid under the machine, not spongy.
- Add a second layer and compact again. For most residential patios, a finished compacted base of 4 to 6 inches is adequate. For heavier use areas or softer soil conditions, go to 6 to 8 inches.
- Check flatness with your 10-foot straight edge after each compaction pass. The surface should not deviate more than 3/8 inch under that straight edge at any point.
- Confirm your drainage slope is still correct after compaction. The base surface should mirror the 1/4-inch-per-foot slope of your finished surface, as Belgard and Rochester Concrete Products both emphasize. If the base slope is wrong, the finished surface slope will be wrong too.
- Use your string lines to verify the top of the compacted base is consistently at the right depth below your finished grade strings, which should be 1 inch plus the paver/slab thickness above the base.
The base and the bedding sand layer do two different jobs. The base provides structural support and drainage through the profile. The bedding sand is a thin leveling layer that lets you fine-tune the surface. A common mistake is using thick bedding sand to compensate for a rough base, but sand doesn't compact and support the way aggregate does. Keep the bedding sand to 1 inch and make the base do the heavy lifting.
Leveling the final patio surface (screeding the bedding layer)
Once your compacted base is solid and at the right elevation, it's time to screed the 1-inch bedding sand layer that pavers or slabs will sit directly on. This is where your finished surface takes shape, and the conduit rail method makes it much easier to get it right.
- Lay two lengths of 3/4-inch rigid electrical conduit on top of the compacted base, running parallel to each other about 3 to 4 feet apart. The outside diameter of 3/4-inch conduit is just about 1 inch, which sets your bedding sand depth perfectly.
- Set the conduit so it follows your planned drainage slope, not dead level. Use your string lines to position them at the right elevation at each end.
- Pour coarse bedding sand between and around the conduit rails and roughly rake it level, slightly overfilling.
- Pull a straight 2x4 screed board across the two conduit rails using a back-and-forth sawing motion, dragging it along the rails so it shaves off the excess sand. The rails act as guides, so the sand surface ends up at a consistent 1-inch depth.
- Fill any voids or low spots left behind and screed again until the sand surface is smooth and consistent.
- Carefully pull the conduit pieces out and fill the channels with sand, smoothing gently without disturbing the screeded surface.
- Do not walk on the screeded sand. Lay your pavers or slabs directly onto it working from a fixed starting edge, placing a kneeling board on top of already-laid pavers to distribute your weight.
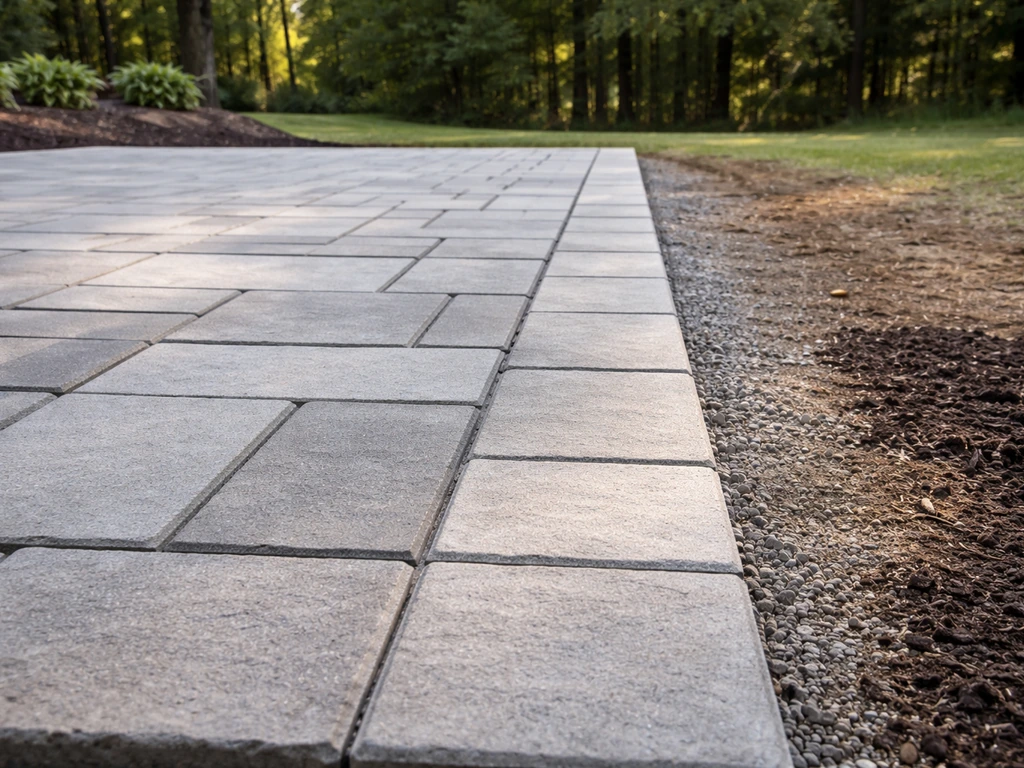
The industry tolerance for the finished paver surface is that it should not deviate more than 3/8 inch from the bottom edge of a 10-foot straight edge, and finished elevation should be within 1/4 inch of your planned grade. Paver-to-paver lippage (where one paver sits higher than its neighbor) should not exceed 1/8 inch. These aren't just numbers for contractors. They're what separates a patio that feels smooth to walk on from one that catches your toe every few steps. After laying, check frequently with your straight edge and adjust individual units by adding or removing a pinch of sand underneath before compacting.
After all pavers are down, run the plate compactor over the whole surface (with a rubber pad fitted to protect the paver faces) to seat them into the bedding sand. This typically drops the surface by about 1/8 to 1/4 inch, which is normal and is already accounted for in the specifications.
Common mistakes and how to fix them
Most patio failures come down to a short list of recurring errors. Here's what goes wrong and what you can do about it.
| Problem | Likely Cause | Fix |
|---|---|---|
| Water pooling on the surface | Insufficient or backward drainage slope | Re-grade: surface must slope 1/8–1/4 inch per foot away from the house. If slope runs toward the house, the base needs to be re-graded. |
| Rocking or wobbly pavers | Uneven bedding sand or base, or too-thick sand layer | Lift affected pavers, remove or add sand underneath to correct the level, reset and re-compact. |
| Pavers sinking over time | Uncompacted subgrade or base; organic material left in subgrade | This usually means a full lift-and-reset with proper base compaction. Spot fixes won't hold if the base is soft. |
| Uneven steps between pavers (lippage) | Bedding sand not screeded flat; pavers not checked with straight edge during laying | Lift and re-bed individual units. Check with straight edge every few rows as you lay. |
| Base shifting or heaving | No edge restraints installed; water undermining the base | Install edge restraints and check/improve perimeter drainage. On clay soils, a deeper base or perforated drain pipe at the base perimeter helps. |
| Dips or humps across the surface | Base surface was not within the 3/8-inch tolerance before bedding sand was added | Lift the surface in the affected area, pull back the sand, and re-grade and re-compact the base. |
When to start over instead of patching
If more than about 20 to 25 percent of your patio surface is affected by sinking, rocking, or drainage problems, a full lift-and-reset is usually more efficient than patching. The signs that point to a start-over are widespread sinking across the whole area (base failure), water running toward the house at any point (grade is backward and affects the whole slope), or significant frost heave damage that has disturbed the base profile. Spot repairs work well for isolated wobbly pavers or minor lippage, but they won't hold if the base underneath is compromised.
When to call a professional
Most homeowners can handle this project on a reasonably flat or gently sloped yard. Consider bringing in a professional if your yard has a slope greater than about 2 feet of elevation change across the patio area, if you have persistently wet or waterlogged soil that suggests a drainage problem beyond the patio itself, or if you're working right up against a house foundation where grading mistakes can direct water into the building. Those situations involve more engineering than a typical DIY patio project, and getting them wrong is expensive to fix.
Your immediate next steps
If you're ready to start, here's the order of work in plain terms: mark your area and drainage slope, excavate to depth, compact the subgrade, build up your base aggregate in compacted layers, verify your grade, screed the 1-inch bedding sand layer using conduit rails, lay your surface material checking with a straight edge as you go, compact the finished surface, and fill joints. If you want a full walkthrough that ties these checks together into how to lay a level patio, follow the detailed steps next. The leveling work happens at every single one of those stages, not just the last one. If you’re specifically working with patio blocks, the same drainage and bedding-leveling steps will help you get an even, stable finish level patio blocks. Get the subgrade right, build the base right, and the final screeding step becomes straightforward. Try to shortcut the early stages and no amount of fiddling with the sand layer will save you.
If you want to go deeper on any specific part of this process, the soil leveling prep work, the base construction, the screeding technique for the sand layer, or the final surface leveling for different paving materials all deserve their own focused attention. If you're wondering how to level soil for a patio, that section walks you through choosing the right grade and avoiding common mistakes soil leveling prep work. Each stage has its own tolerances and techniques that can make or break the result.
FAQ
What should I use as my measuring reference for the drainage slope, string line or laser level?
Use the same reference all the way through the dig. A laser is easiest for long runs and windy days, but a string line tied to stakes works well if it stays taut and you verify the string height at multiple points with a level. Avoid measuring from the uneven ground surface, instead measure from a fixed benchmark you can keep checking as you add or remove fill.
How do I tell if my base is truly level or just looks level on top?
Check level at multiple intervals after compacting, then check elevation at several “grid” points across the footprint. If you only check the perimeter or a couple spots, you can miss low areas that will cause rocking later. A straightedge pulled across the base plus spot elevation checks with a tape measure or level is the quickest way to catch unevenness before sand goes in.
Can I fix a slightly low area after laying bedding sand?
Yes, but do it by adjusting the sand locally, not by digging the base out under the whole zone. Lift off or rake back sand in the problem area, add or remove sand, then re-screed and re-check that you still end up with about a 1-inch bedding depth. Once pavers are set, removing and re-screeding bedding sand is much harder than correcting sand before placement.
Is it okay to use a thicker bedding sand layer to save time if my base is uneven?
It’s one of the most common mistakes. Bedding sand can help you fine-tune the finished plane, but it won’t provide structural support like compacted aggregate. If your base elevation is off, fix the base grade and compaction first, then keep the bedding layer thin and consistent.
How much should I compact the subgrade and the base, and what’s the sign I’m done?
Compact until the surface resists indentation under your weight and doesn’t “bounce back” when you press with your foot. For the base, compact in lifts so each lift is manageable for your plate compactor. If you can leave visible tracks with light pressure, you likely need more compaction or an adjusted fill approach before you add bedding sand.
Do I need geotextile fabric under the base, and will it affect leveling?
In many backyard builds, geotextile can help separate soil from aggregate and reduce long-term contamination, but it doesn’t replace correct drainage and compaction. If you use fabric, keep it smooth with seams overlapped, and don’t rely on it to correct low spots. Your leveling target still comes from the excavation, base thickness, and measured elevations.
What if my yard slope is larger than the patio can practically be flattened, should I still try to fill?
If you’d need very deep fill on the low side, consider stepping down in terraced sections rather than trying to build one huge pad. Deep fill can settle and create future rocking or drainage reversal. Terracing keeps each section’s base thickness and compaction more controlled and reduces the risk of uneven performance over time.
How should I account for paver or slab thickness when planning the final grade?
Plan for the total height stack from subgrade upward: subgrade, base aggregate, bedding sand, then the paver or slab thickness, plus expected settlement during compaction of the finished surface. Before you dig, measure the actual paver thickness and set your target finished elevation so the final grade matches your planned drainage line after the patio is seated.
After I compact the finished pavers, should I recheck slope and straightness, and what’s normal movement?
Yes, recheck while joints are still open and before you close everything up with joint sand. It’s normal for compaction to drop the surface slightly, the key is that the drop happens fairly evenly and the drainage still falls away from the house. If you see a new hump or reversed pitch after compaction, the base or bedding was uneven, and that needs attention.
When do spot repairs make sense versus a full lift-and-reset?
Spot repairs are most appropriate when the problem is limited to a few units and the surrounding base remains firm and correctly graded. If sinking or water behavior affects a large portion of the patio, or if water consistently runs toward the house anywhere, that points to base or global grade failure, and lifting and resetting is usually the efficient solution.
How do I prevent frost heave issues during leveling if I live in a cold climate?
The leveling process only works if the base profile stays stable over freeze-thaw cycles. Remove topsoil and any waterlogged material before building the base, keep drainage slope correct, and avoid leaving voids under the base. If you already see significant heave disruption, the safest fix is usually resetting to the correct base profile rather than just re-leveling the top layer.