You set patio blocks by excavating the area to the right depth, compacting the soil subgrade, laying a gravel base, screeding a sand setting layer, then placing your blocks in your chosen pattern on top. The real secret to a patio that stays level for years isn't the blocks themselves, it's everything that goes underneath them. Get the base right and the rest is straightforward.
How to Set Patio Blocks Step-by-Step DIY Guide

Clara Farrell
6 May 2026
Choosing the right patio block type and pattern
Before you dig a single shovel of dirt, pick your block. The most common options for a DIY patio are concrete interlocking pavers, solid concrete patio blocks (like the classic 12x12 or 16x16 squares), natural stone, and clay brick pavers. Each has trade-offs.
| Block Type | Best For | DIY Difficulty | Durability |
|---|---|---|---|
| Concrete interlocking pavers | Driveways, patios, high-traffic areas | Moderate | Excellent — meet ASTM C936 standards |
| Solid concrete patio blocks (12x12, 16x16) | Simple patios, pathways, first-time projects | Easy | Good for light foot traffic |
| Clay brick pavers | Traditional or cottage-style patios | Moderate | Very good, especially in freeze-thaw climates |
| Natural stone (bluestone, flagstone) | Irregular, organic-looking patios | Hard — irregular shapes need more cutting | Excellent, but expensive |
For a first-time project, concrete interlocking pavers or solid concrete blocks are the easiest to work with because they're uniform in thickness and size. If you're specifically working with 16x16 blocks or laying blocks directly on grass or dirt, there are some important extra steps worth knowing about before you start. If you're working with 16x16 patio blocks, pay extra attention to how you support the base and lay the blocks so the larger units stay even as the sand bed settles 16x16 blocks. When you lay patio blocks directly on dirt, you still need the same basic sequence: remove organic material, compact the subgrade, and build a gravel and sand bedding so the blocks do not sink or shift laying blocks directly on grass or dirt. If you are laying patio blocks on grass, remove all turf first and build the right base and sand bed so the blocks do not sink or shift laying blocks directly on grass or dirt.
Once you've picked your block, choose a pattern. The pattern affects both how the patio looks and how structurally sound it is. Interlocking patterns distribute load better than simple grid layouts.
- Running bond (bricks offset by half): easy to lay, looks clean, great for rectangular spaces
- Herringbone (45° or 90°): the strongest interlocking pattern, best for high-traffic areas, requires more cutting at edges
- Basketweave: classic, suits square pavers, low cutting required
- Ashlar/random: works well with natural stone or mixed-size pavers, more planning needed
- Simple grid: fast to install with square blocks, but offers the least structural interlocking
Planning layout, base thickness, and drainage
This is the step most DIYers rush, and it's why so many patios end up with puddles in the middle or sunken sections after a wet winter. Spend time here and you'll save yourself a lot of grief later.
Slope for drainage
Your patio needs to drain water away from your house. A slope of 1 to 2 percent away from any structure is the standard guideline, that works out to about 1/8 inch to 1/4 inch of drop per foot of patio. For a 10-foot-wide patio, you're looking at roughly 1.25 to 2.5 inches of total fall from the house edge to the outer edge. Build this slope into your screeded sand bed, not just the surface. Unilock recommends targeting 1.5 to 2 percent for the screeded base slope, and that's a solid number to work from.
Base thickness
For a typical residential patio with foot traffic only, here's what you're aiming for from the bottom up:
- Compacted soil subgrade — the native ground you're building on
- Optional geotextile fabric — highly recommended on clay or sandy soils to stop fines from migrating up into your gravel base
- 4 inches of compacted crushed stone or gravel base (6 inches on clay-heavy or soft soils)
- 1 inch of coarse bedding sand (screeded smooth)
- Patio blocks (typically 2 to 3 inches thick for concrete pavers)
Total excavation depth for most patios lands between 7 and 10 inches below your finished surface level. Mark this out with stakes and string before you dig so you hit your target consistently across the whole area.
Sketch it out first
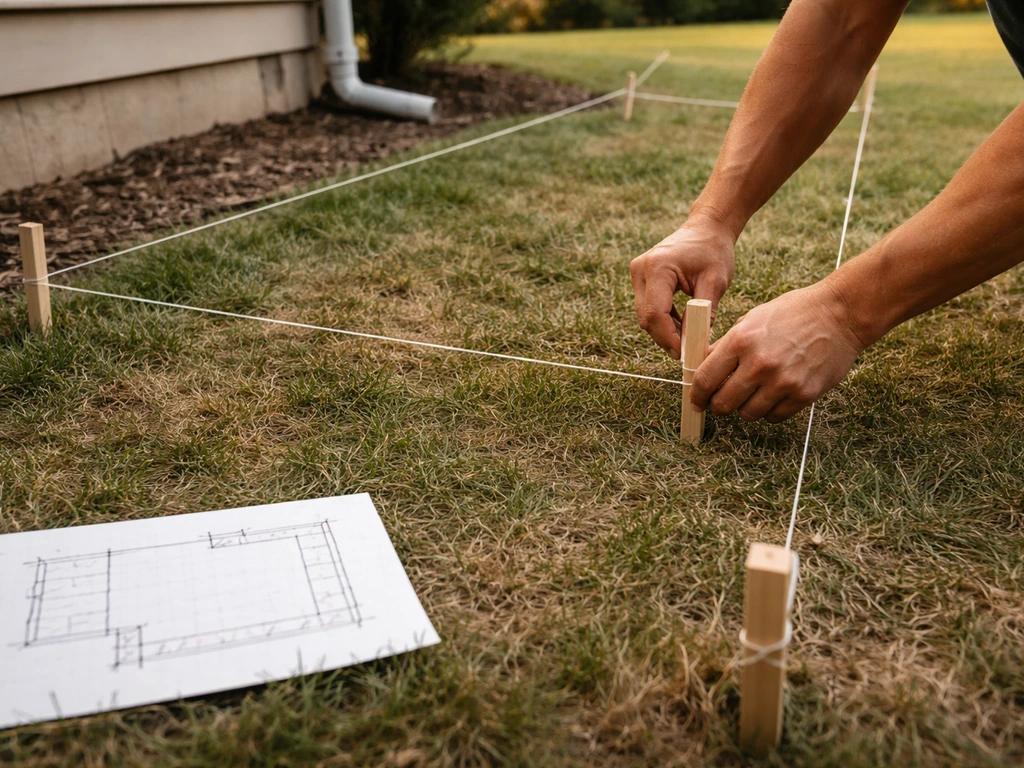
Draw your patio to scale on paper. Mark the house edge, the outer boundary, any obstacles like downspouts or trees, and the direction of slope. Count how many blocks you need by calculating the square footage and adding 10 percent for cuts and breakage. Order a little extra, you'll almost certainly need it.
Preparing the ground and building the sub-base
This is where the real work happens. A weak sub-base is the number one reason patios sink, shift, and crack. There are no shortcuts here.
Excavation
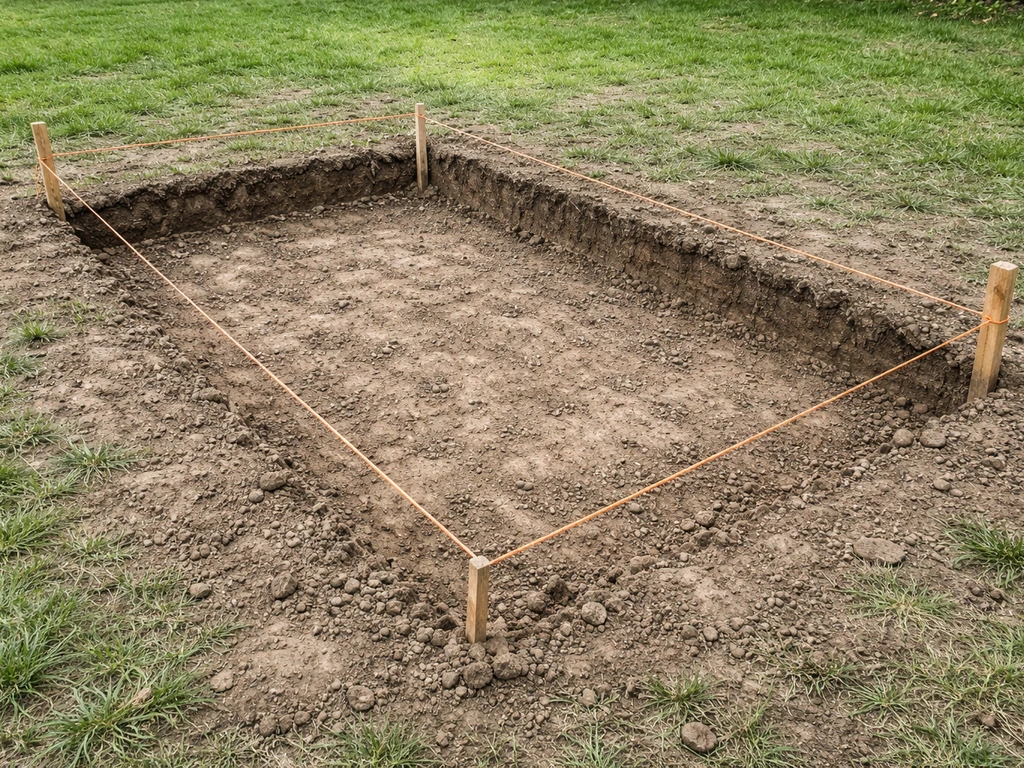
Mark out your patio area with stakes and string lines. Add about 6 inches beyond your finished patio edge on all sides to give yourself room for edging. Dig down to your required depth, typically 7 to 10 inches below the finished surface. Remove all grass, roots, and organic material. Organic matter compresses and rots over time, which leads directly to settling.
Compacting the subgrade
Once you've excavated, compact the exposed soil with a plate compactor. Don't skip this. The CMHA specifically calls out subgrade compaction as critical to the long-term performance of any interlocking concrete pavement. If your soil is very soft, wet, or clay-heavy and doesn't compact firm, you may need to bring in a few inches of compactable fill before laying your gravel base. A plate compactor rental runs about $50 to $100 per day, worth every cent.
Laying the geotextile fabric (optional but smart)
On clay soils or anywhere the ground stays wet, lay a layer of geotextile fabric directly on the compacted subgrade before adding gravel. This fabric acts as a separator, it lets water pass through but stops soil particles from migrating up into your gravel base under saturated conditions. Without it, clay fines can pump up into the base over time and cause rutting or sinking. It costs almost nothing and takes five minutes to roll out.
Building the gravel base
Add your crushed stone or road base gravel in layers of no more than 3 to 4 inches at a time. Compact each layer with the plate compactor before adding the next. For a standard patio, two passes of compacted gravel at about 2 inches each will get you to your 4-inch target. On soft or clay ground, go to 6 inches total. Use compactable gravel (crusher run or dense-graded aggregate), not pea gravel or rounded stone, which won't compact properly.
Installing edging and setting the patio blocks
Install edging restraints first
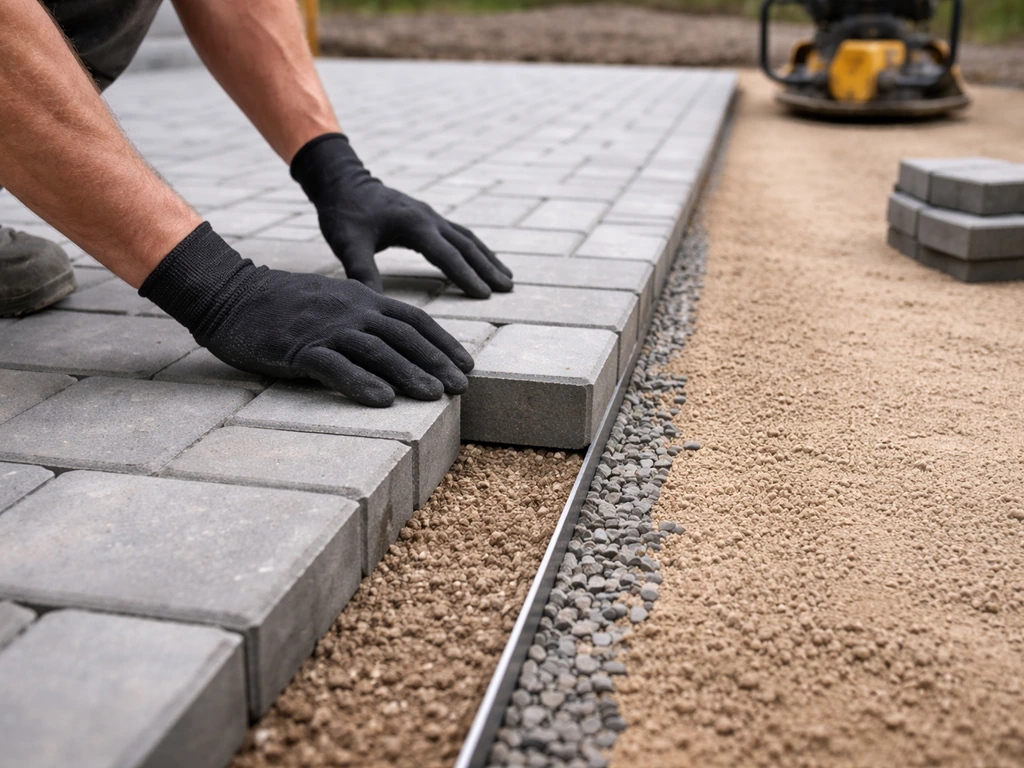
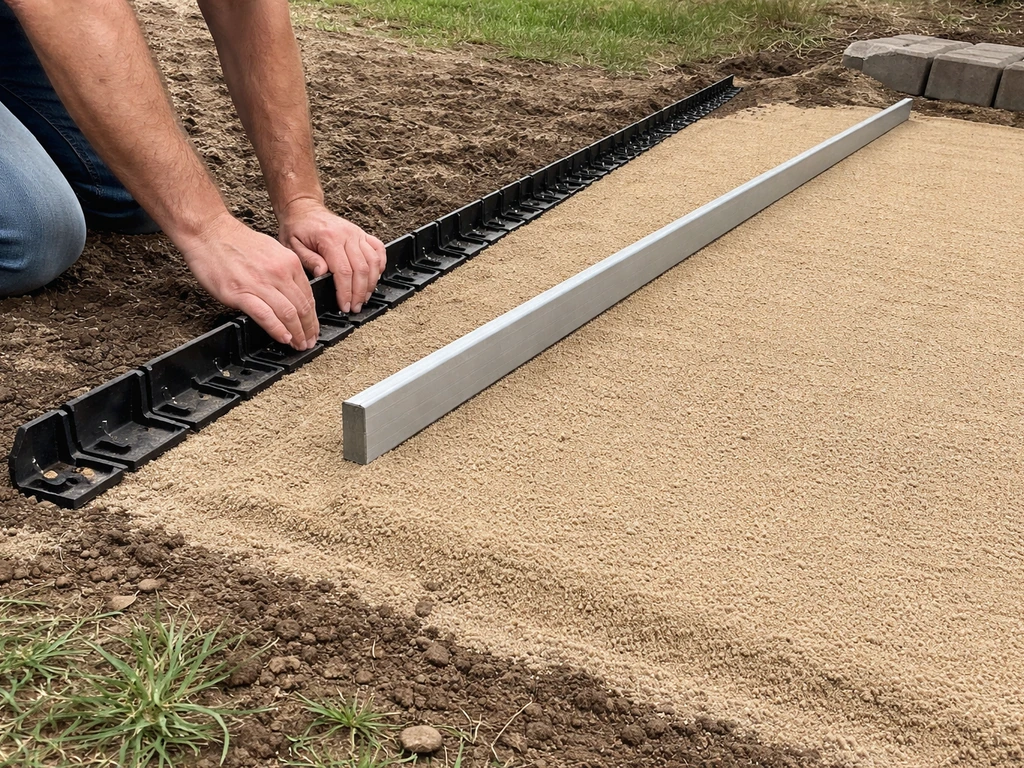
Edging restraints keep your patio from spreading outward over time. Without them, the blocks at the edges will slowly migrate, leaving gaps and wobbly sections. Use plastic paver edging (the kind that spikes into the ground with 10-inch spikes) or aluminum edging for straight runs. For curves, plastic edging is easier to bend to shape. Install the edging after laying your gravel base but before screeding your sand, it gives you a frame to screed inside of. Drive spikes every 12 inches for solid holding power.
Screeding the sand bed
Spread coarse bedding sand (also called concrete sand, not play sand or mason sand) over your compacted gravel base to a depth of about 1 inch. Use two screed rails or lengths of 1-inch conduit pipe set at your target height to guide a straightboard across the surface. Pull the board toward you to level the sand, filling in low spots and smoothing out humps. Build in your 1.5 to 2 percent slope toward the drainage direction as you screed. Once screeded, don't walk on the sand bed, any footprint will throw off your level.
Placing the blocks
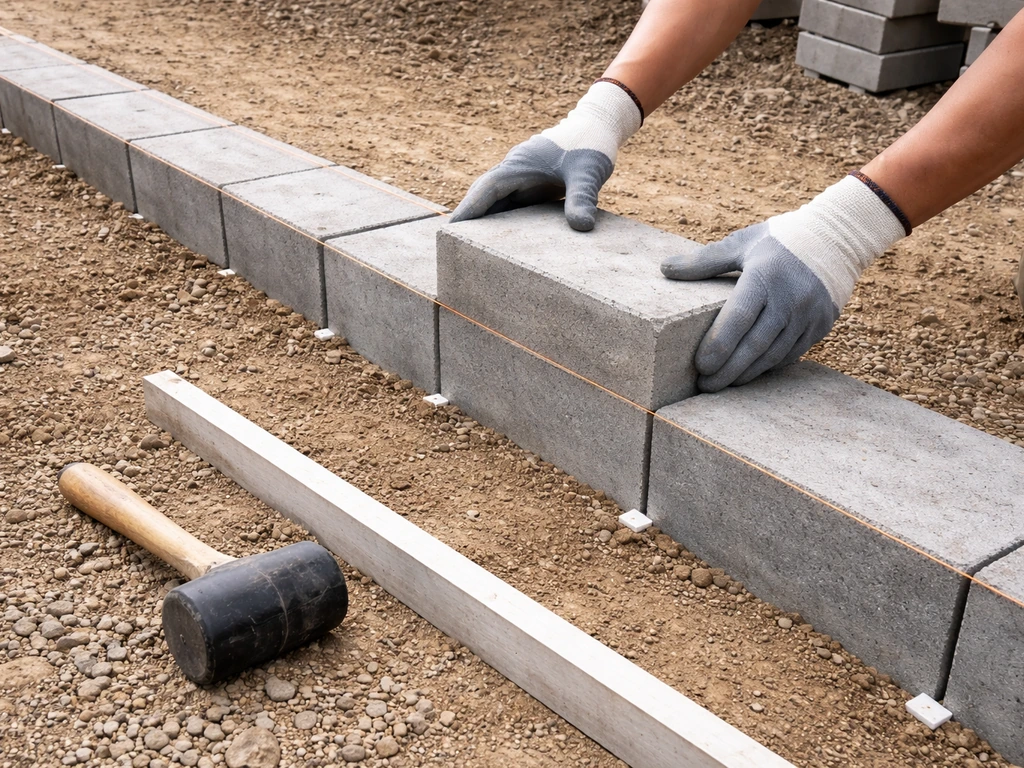
Start laying blocks from a straight edge, usually the house side or a chalk line you've snapped across the area. Set each block firmly down onto the sand bed without sliding it into place, which disturbs the screeded surface. Once you have the right base and drainage plan, you can lay patio blocks with confidence by following the steps for screeding sand, setting each unit firmly, and checking level as you go. Use a rubber mallet to tap each block level with its neighbors. Check your level frequently, every three or four blocks, with a long straightedge or a level. Keep joint spacing consistent (typically 1/8 inch for concrete pavers). Step on the already-laid blocks as you work forward, never on the screeded sand.
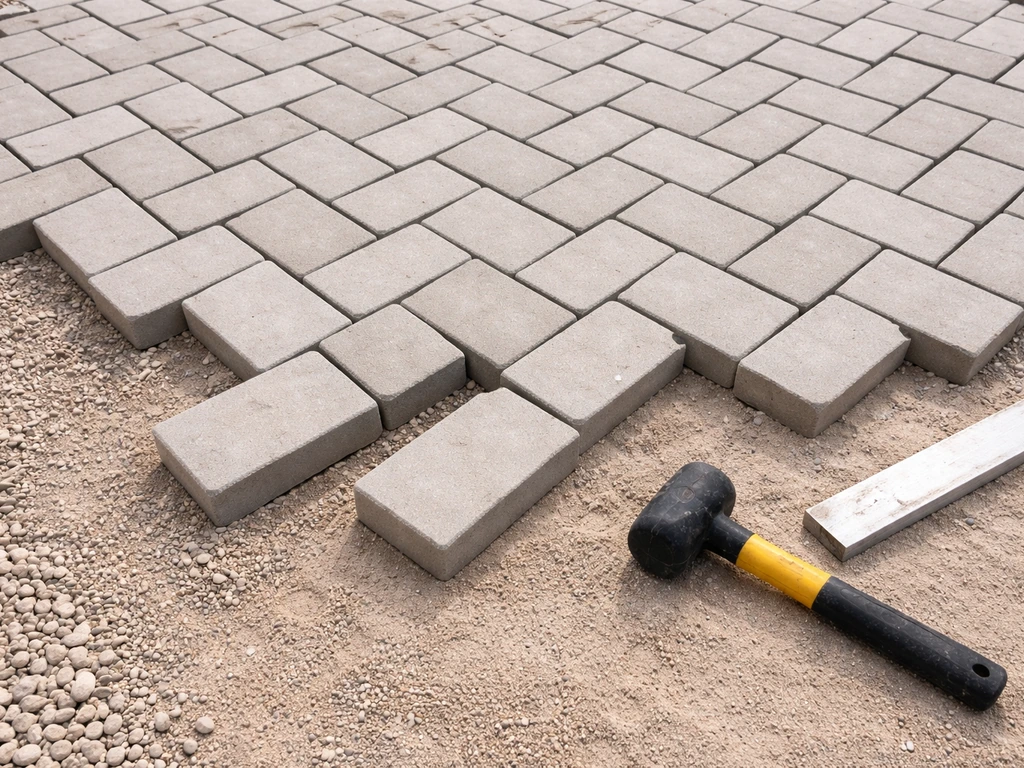
Cutting, leveling, and finishing the joints
Cutting blocks to fit
Lay all the full blocks first, then come back to cut the border pieces. Measure each gap individually, don't assume they're all the same width, especially around curves or obstacles. Mark your cut line with a pencil or chalk. For clean cuts on concrete pavers or blocks, use an angle grinder with a diamond blade or rent a paver saw (also called a masonry wet saw). A chisel and hammer works for rough cuts on thinner blocks but won't give you a clean edge. Safety glasses and gloves are non-negotiable, paver cutting throws sharp fragments.
Checking and correcting level
Before you compact, do a final check with a long straightedge across the entire surface. Blocks that sit too high can be tapped down with a rubber mallet. Blocks that sit too low need to come up, scrape out a little sand underneath, add a pinch more, re-set the block, and check again. Getting this right before compaction is much easier than trying to fix it after.
Filling the joints
Once your blocks are all placed and level, sweep polymeric sand into the joints. Polymeric sand contains a binder that activates with water and locks the blocks together, resisting ant infiltration and weed growth. Sweep it in dry, working it into the joints in multiple passes. Blow off any excess from the block surfaces with a leaf blower before wetting, if polymeric sand dries on top of the blocks, it can haze or stain them. Hardscape Magazine also emphasizes blowing off polymeric dust or residue before misting and activating it with water Blow off any excess from the block surfaces with a leaf blower before wetting. Then lightly mist the whole surface with water to activate the binder.
Compacting, sealing (if needed), and final cleanup
Final compaction
Run the plate compactor over the entire paved surface after placing all blocks but before wetting the polymeric sand (if you're using a compactor after sand installation, check the manufacturer's instructions, some recommend compacting before sweeping in the sand, others after). Use a rubber pad attachment on the compactor plate to avoid scratching or chipping the block faces. Make two or three passes in different directions. This final compaction beds the blocks firmly into the sand and locks them into the pattern.
To seal or not to seal
Sealing is optional but worth considering. A good paver sealer protects the surface from staining, enhances color, and can help lock polymeric sand in place. It's most useful on light-colored concrete pavers that show oil and dirt easily, or on any patio in a climate with hard freeze-thaw cycles. Wait at least 90 days after installation before sealing to allow any efflorescence (white mineral haze) to work its way out naturally. Apply sealer on a dry day with a roller or pump sprayer, following the manufacturer's dilution and coverage instructions.
Cleanup and finishing touches
Sweep off any excess sand or debris. Check the edges, make sure all edging spikes are flush and no restraint is sticking up above block level. Backfill around the outside of the edging with soil or mulch to protect it and give the patio a tidy look. Give the patio 24 hours before heavy furniture or foot traffic to let the polymeric sand cure fully.
Common mistakes and how to fix them
- Skipping subgrade compaction: the most common cause of settling. Fix by pulling up the affected section, re-compacting the soil, and re-laying the base.
- Using play sand instead of coarse concrete sand: play sand shifts too easily and doesn't hold the screed. Swap it out — it's worth the extra trip to the supplier.
- Not sloping for drainage: puddles will form and accelerate freeze-thaw damage. If the patio is already installed, you may be able to regrade the surface slightly by lifting sections and adjusting the sand bed.
- Forgetting edging restraints: blocks will migrate outward within a season or two. Install restraints before it gets worse.
- Compacting with too-thick gravel lifts: adding 6 inches of gravel at once and compacting once leaves loose material in the middle. Always compact in layers of 3 to 4 inches maximum.
- Getting polymeric sand wet too soon or leaving it on the surface: always blow excess off block faces before activating with water.
Your next steps right now
If you're ready to get started, here's the practical order of operations for this week: measure and sketch your patio, check your local dig-safe requirements (call 811 in the US before any excavation), calculate your materials, and order gravel, sand, and blocks with at least 10 percent extra for cuts. Rent a plate compactor for the day you're ready to build the base, you won't regret it. Once your sub-base is compacted and your sand is screeded, the block-setting itself goes quickly and is genuinely satisfying. The hard work is in the ground preparation. Get that right and your patio will still look level and tight ten years from now.
FAQ
Can I set patio blocks directly on grass or dirt to save time?
Yes, but only if you treat it like a proper base build. Remove all turf and organic material, compact the exposed soil, then add geotextile (especially if the soil is clay or stays wet) plus compacted gravel to the required thickness, followed by a screeded sand bed. Don’t set blocks directly on existing dirt, even if it looks firm.
What gravel should I use under patio blocks, and is pea gravel OK?
Use crushed stone or dense-graded aggregate (often called crusher run or road base) because it compacts and locks together. Pea gravel and rounded stone look good but won’t interlock properly, so blocks will settle unevenly and can develop rocking or gaps over time.
Should I step on the sand bed while setting patio blocks?
Don’t. The sand bed needs to be screeded to the designed height and slope, then blocks should be set into that leveled sand without walking on it. If you crush sand down with footprints or disturb it while setting, you’ll lose your level and your patio will show waves.
Why do my border gaps keep getting wider or narrower even when my measurements were right?
Expect a bigger issue in two cases: if you’re cutting many border pieces, or if the patio shape forces varying joint sizes. The fix is to measure each cut gap individually and keep a consistent joint width for full units, then adjust cut piece widths as needed rather than assuming every border gap matches.
What’s the best way to correct a patio block that sits too high or too low?
If you have to change block height after setting, lift the block, scrape out a little sand, add a pinch more sand (or remove a thin layer), then re-set and re-check with a straightedge. Avoid repeatedly sliding blocks once they’re seated, because that disturbs the screeded profile beneath neighboring units.
Can I compact after polymeric sand, and will it still lock the patio joints?
Avoid it. Polymeric sand is intended to be swept into joints when the blocks are properly leveled and aligned. If you compact too aggressively early or disturb the joints, you can create voids that prevent the binder from fully locking the pattern together.
When is it safe to seal a new patio, and should I seal if I used polymeric sand?
Only apply sealer after the patio has cured long enough for efflorescence to finish naturally (the article suggests at least 90 days). Also plan to seal on a dry day when the surface is clean and fully dry, because applying sealer on damp joints or on haze that hasn’t cleared can trap discoloration.
How often should I check for level and slope while I’m laying the blocks?
Check level every few blocks using a long straightedge, then confirm the patio still has the designed slope after you finish each section. One missed low spot can collect water, so it’s worth rechecking slope direction near downspouts, steps, and any transitions.
What causes patio edging to fail and lead to wavy or open joints at the perimeter?
Drive edging spikes consistently and keep edging frames firm during screeding and block setting. If the restraint is loose or some spikes are higher than the block tops, the edges can spread, leaving open joints that are hard to fix without lifting and re-bedding the border courses.
Do I need to seal concrete or brick patio blocks, or is polymeric sand enough?
If the patio is for hard freeze-thaw areas or you see oil and dirt transfer, sealing can help. The article notes sealer is especially useful on light-colored concrete blocks that stain visibly, but you should still wait the recommended cure time before sealing to reduce risk of trapping haze.