
Laying a patio yourself is absolutely doable, even on your first attempt, but the work that happens below ground matters far more than the surface you eventually see. Get the excavation depth right, compact your base in proper lifts, nail a 1–2% drainage fall away from the house, and your patio will stay flat and solid for decades. Rush those steps and you will be re-laying slabs within a few seasons. This guide walks you through every stage in order, from reading your soil to sealing the joints, with honest notes on where things tend to go wrong and when it genuinely makes sense to bring in a professional.
Laying a Patio Step by Step: Complete DIY Guide & Checklist

Clara Farrell
29 Jul 2026
What this guide covers and who it's for
This is a complete, stage-by-stage installation guide aimed at homeowners and DIYers tackling a ground-level patio for the first time, or upgrading a previous attempt. It covers all the main surface materials: brick pavers, concrete block, porcelain tiles, natural slate, and simple gravel or stepping-stone paths. Each section builds on the last, so if you read it front to back you will arrive at the laying stage with a clear picture of what you need, why each step exists, and what to do when conditions are not ideal. If your ground slopes, if you are dealing with heavy clay, or if you are laying over an existing surface, there are specific notes for each of those situations.
Quick project overview
A standard 20–30 sq ft patio on reasonably flat, well-drained ground is a weekend project for two people with basic DIY skills. A larger 200–300 sq ft area with tricky soil, a slope, or a premium material like natural stone can run to a full week of work. Difficulty sits at a solid intermediate level: it does not require specialist trade skills, but it does demand physical effort, patience with levels and stringlines, and the discipline not to skip the compaction stages.
Call a professional if: the site has a significant slope that requires retaining walls or engineered drainage; the ground is badly waterlogged or showing signs of subsidence; you need to work within 500 mm of a drain or sewer; or the finished patio will be elevated more than 18 inches above adjacent grade, which triggers building permit requirements in many jurisdictions. For anything else, this is well within reach of a motivated homeowner.
Where to start: site assessment and choosing your patio type
Before you order a single slab, spend an hour on the ground. For a quick primer on where to start laying a patio, see the step-by-step checklist in this guide. Walk the area after rain and note where water pools or drains slowly: those spots tell you about soil drainage and will directly affect your base design. If you want a more precise read, use the USDA NRCS Web Soil Survey (free online) or do a simple field ribbon test: take a moist handful of soil and try to roll it into a ribbon between your fingers. If it forms a long, smooth ribbon over 5 cm, you have clay, and you will need a deeper, more robust sub-base. Silty or loamy soils sit in the middle, and sandy soils drain quickly and compact more easily.
Once you understand your soil, you can choose the right patio type. Sand-set interlocking pavers or concrete block work well on most soils. Porcelain and natural stone generally require a mortar or full-bed setting. Gravel or stepping-stone paths are the lightest-touch option and suit narrow routes or casual garden areas. If your site is on a slope, the patio design needs to account for drainage from the outset, which is covered in the design section below. A note for those planning a patio path: the principles here apply directly, though path-specific layout considerations are worth exploring separately. For detailed, step-by-step advice on narrower walkways and layout specifics, see our guide on how to lay a patio path.
Planning, permissions, and permits
Most ground-level, permeable patios do not require a building permit, but there are exceptions you must check before you dig. In many jurisdictions, a permit is triggered when a structure is elevated more than 18 inches above the adjacent grade, when work involves drainage regrading, retaining walls, or changes to utilities. Always check with your local building department before starting work, because the rules vary significantly by county and municipality.
The single most important pre-dig step is calling 811, the national one-call utility notification number in the United States. By law you must call at least 48–72 business hours before any excavation. The service is free, and utility companies will come to your site and mark buried lines (gas, electric, water, telecoms) with paint or flags. Striking a buried line is not just expensive, it is potentially fatal. Do not skip this step even for shallow excavations.
Also check: whether your patio falls within a boundary setback distance from a fence or property line; whether there are existing drains, soakaways, or inspection covers in the area; and whether your local authority has stormwater or SuDS (sustainable urban drainage) requirements. Many municipalities now require new hardstanding areas to incorporate permeable paving or directed drainage so runoff does not increase. If your patio is large and abuts the house, you may also need to ensure you do not bridge the damp-proof course.
Design basics: size, slope, drainage, and patterns
Size the patio to its intended use. A dining area for four people needs a minimum of around 10 ft x 12 ft (roughly 3 m x 3.6 m) to feel comfortable. Add 2–3 ft around any furniture. Measure in whole or half units of your chosen paver to minimise cuts, which saves time and reduces waste.
The most important design decision after size is the drainage fall. Every patio surface needs a slope of at least 1%, and 2% is a safer target (20 mm fall per metre of run). This fall should always direct water away from the house, toward a garden, lawn, channel drain, or soakaway. Without it, water sits on the surface, finds its way under the pavers, and begins the freeze-thaw cycle that causes slabs to lift and tip. Set your fall using a stringline and a spirit level or a laser level, and check it at every stage.
Laying pattern affects both appearance and structural performance. A running bond (each row offset by half a paver) or herringbone pattern locks the pavers together and resists spreading better than a simple grid. For natural stone and larger tiles, a random or ashlar pattern is common. If you plan to add a patio path leading off the main area, think about how the pattern will transition at the junction.
Tools and materials checklist
Print or photograph this list before your first supply run. Tick off items you already own and note what needs to be rented or purchased. Rental costs in 2026 are roughly $50–$175 per day for a plate compactor and $30–$60 per day for a 10–12 inch wet tile saw, depending on your local rental branch.
- Tape measure (at least 10 m / 33 ft)
- Builder's line and stakes (for setting out and stringlines)
- Spray paint or chalk line (for marking excavation edges)
- Spade and mattock (for hand excavation)
- Wheelbarrow (at least one, ideally two)
- Long-handled level or 2 m spirit level
- Laser level or line level (highly recommended for large areas)
- Plate compactor (rent: $50–$175/day)
- Wet tile saw or angle grinder with diamond blade (rent saw: $30–$60/day)
- Rubber mallet
- Screeding rails and straight-edge screed board
- Broom and stiff brush (for jointing)
- Safety glasses, gloves, knee pads, and steel-capped boots
- Dense-graded aggregate (road base / MOT Type 1 or equivalent) for sub-base
- Coarse concrete sand conforming to ASTM C33 or BS EN 12620 for bedding
- Your chosen surface pavers, slabs, or tiles (order 5–10% extra for cuts and waste)
- Edge restraints (heavy-duty plastic, steel, or concrete haunching mix)
- Polymeric joint sand or standard jointing sand (or mortar for fixed-bed materials)
- Geotextile membrane (for gravel paths or permeable systems)
- Pegs and timber battens (for edge forms if haunching with concrete)
Which material is right for your project?
Each surface material has a different installation method, cost band, and suitability profile. The table below summarises the main options side by side. As a general recommendation: concrete block pavers are the most forgiving first-timer choice because they are lightweight, easy to cut, and simple to relay if you make a mistake. Porcelain and natural stone look premium but require more precise bedding and are unforgiving of base movement.
| Material | Best Used For | Setting Method | Pros | Cons |
|---|---|---|---|---|
| Brick / clay paver | Traditional patios, paths, driveways | Sand-set or mortar bed | Durable, classic look, repairable, ages well | Heavier to handle, colour variation, can be slippery when mossy |
| Concrete block paver | Most residential patios and paths | Sand-set (standard or permeable) | Affordable, consistent size, easy to cut and replace, wide colour range | Less premium appearance, can fade over time |
| Porcelain tile | Contemporary patios, outdoor rooms | Full mortar bed on concrete sub-base | Excellent durability, low maintenance, large-format options | Requires rigid base, slippery when wet unless textured, heavy, difficult to cut without wet saw |
| Natural stone (slate, sandstone, limestone) | Premium patios, feature areas | Mortar bed or sand-set for thicker pieces | Unique appearance, long lifespan, adds property value | Expensive, variable thickness needs careful bedding, some types stain or are slippery |
| Gravel / stepping stones (patio path) | Informal paths, low-traffic areas, budget projects | Compacted sub-base with geotextile, loose fill | Very affordable, permeable, easy DIY, natural look | Requires edging to contain gravel, not suitable for main patio areas, weeds can establish |
Sub-base and bedding depths by material and soil type
Getting the depths right is non-negotiable. Too shallow and the base flexes under load and frost, leading to cracking and sinking. The table below gives recommended sub-base and bedding thicknesses for the most common patio materials across the main soil types you are likely to encounter. All depths are for compacted thickness, not loose-tipped depth (add roughly 20–25% to loose depths to account for compaction). In freezing climates, increase sub-base depth to match or exceed your local frost penetration depth, and always use free-draining granular fill to limit frost heave.
| Surface Material | Well-Drained / Sandy Soil | Loam / Average Soil | Heavy Clay / Poor Drainage | Bedding Layer | Notes |
|---|---|---|---|---|---|
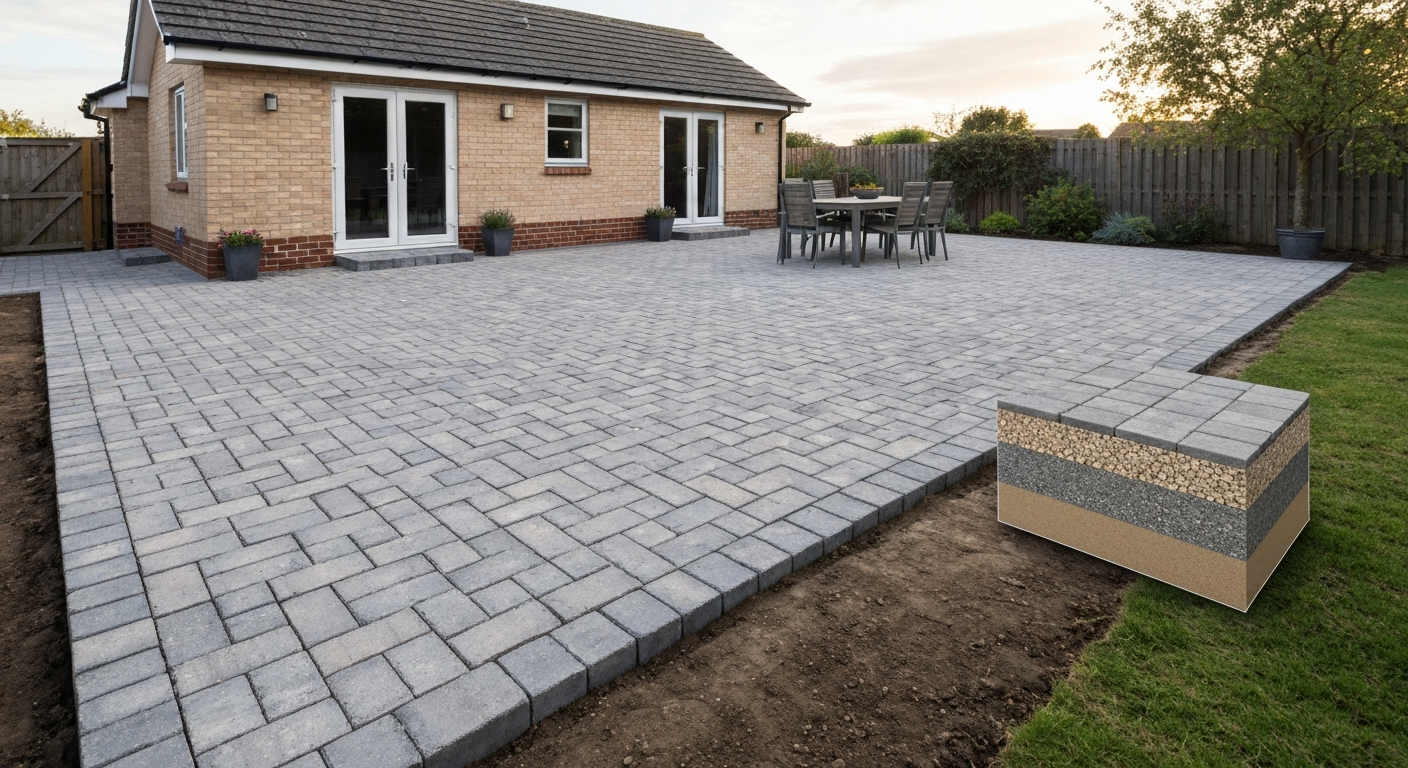
| Concrete block / brick paver (sand-set) | 4 in. (100 mm) dense-graded aggregate base | 4–6 in. (100–150 mm) | 6–8 in. (150–200 mm) + consider geotextile separation | 1 in. (25 mm) screeded ASTM C33 concrete sand | Classic ICPI cross-section: paver + 1 in. sand + 4 in. base minimum |
| Porcelain tile (mortar-set) | 4 in. (100 mm) compacted base + 100 mm concrete slab | 4–6 in. base + 100 mm slab | 6 in. base + 100–150 mm reinforced slab | 10–15 mm flexible adhesive mortar | Tiles need a rigid slab substrate; no sand-set method |
| Natural stone (mortar-set) | 4 in. (100 mm) compacted base + concrete slab | 4–6 in. base + concrete slab | 6–8 in. base + 100–150 mm slab | 25–50 mm semi-dry mortar bed (stone thickness varies) | Variable stone thickness requires individual adjustment of mortar bed depth |
| Natural stone (sand-set, thick pieces >50 mm) | 4 in. (100 mm) dense-graded base | 4–6 in. | 6–8 in. | 25–40 mm coarse grit/sand bed | Only suitable for thick, robust pieces; still needs firm base |
| Gravel path | 2–3 in. (50–75 mm) compacted crushed stone | 3–4 in. (75–100 mm) | 4–6 in. with geotextile liner beneath | 50 mm loose decorative gravel on top | Geotextile prevents mixing of gravel with soil; edge restraint essential |
Edge restraint guidance
Edge restraints are structural, not decorative. Without them, pavers gradually migrate outward under foot traffic and the joint pattern opens up. Acceptable options include a cast-in-place concrete haunch (the most robust choice), a precast concrete or natural stone kerb, heavy steel edging, or heavy-duty composite plastic edging. Whatever you use, it must be fixed to the compacted base (not just the sand layer) and must contain at least half the depth of the paver. Spike-fixed plastic edging needs spikes driven every 300–450 mm (12–18 in.) to prevent lifting. If your patio meets an existing concrete path or driveway, run the haunch right to the edge of the existing surface and separate the two base systems to avoid differential settlement causing a trip hazard.
The installation workflow, step by step
Step 1: Set out the area
Mark out the full perimeter of the patio using stakes and builder's line. For a concise checklist of the full steps to laying a patio, see the linked guide titled “steps to laying a patio.”. Check for square by measuring both diagonals: they should be equal. Use spray paint to mark the ground along the line, then remove the stakes. Add 150–300 mm (6–12 in.) beyond the finished patio edge on all sides to give yourself working room for edge forms and compaction equipment.
Step 2: Excavate to depth
Calculate total excavation depth by adding: your sub-base depth (from the table above) + your bedding layer depth + your paver or slab thickness, then subtract your intended finished surface height above existing ground (usually 15–20 mm to allow for a slight proud edge). Dig systematically, removing all topsoil and organic material. Topsoil and roots will compress unevenly and must not be left under the base. If you hit soft, wet, or silty pockets deeper down, dig them out and backfill with compacted crushed stone.
Step 3: Prepare and compact the subgrade
Once excavated to depth, compact the exposed natural soil (the subgrade) with your plate compactor before adding any base material. Work the plate compactor in overlapping passes. The industry acceptance standard for residential work is achieving around 95% Standard Proctor density (ASTM D698) at the subgrade level, though you will not be testing this on a DIY project. In practice, compact until the plate compactor no longer causes visible movement in the soil. On clay, this may require several passes. On sandy soil, it comes quickly.
Step 4: Lay and compact the sub-base in lifts
Spread dense-graded aggregate (road base, Type 1, or crushed stone) in layers no deeper than 4–6 inches loose before compacting. Never dump the full depth and try to compact it in one pass: the plate compactor cannot effectively compact material deeper than about 6 inches loose, and the bottom portion will remain loose and become a problem later. Compact each lift thoroughly with overlapping passes, then add the next lift. For a 6-inch compacted base, this means two lifts. Check your falls at each lift using your level and stringlines: it is far easier to adjust now than after laying the bedding layer.
Step 5: Install edge restraints
Install your edge restraints before screeding the bedding layer. For concrete haunching, set timber forms along your layout lines, fill with a stiff concrete mix (a 4:1 ballast-to-cement ratio works well), and allow it to cure for at least 24 hours before proceeding. For plastic or steel edging, spike it firmly into the compacted base. The inside face of the restraint should sit at the finished paver height minus the paver thickness minus the bedding depth, so when you screed your sand and lay the pavers, the surface finishes flush with or just above the restraint.
Step 6: Screed the bedding sand
For sand-set pavers, lay screeding rails (lengths of square steel tube or conduit) at the correct height across the compacted base. Tip washed concrete sand (ASTM C33 or equivalent) between the rails and drag a straight-edge screed board across them to produce a uniform, flat 1-inch (25 mm) layer. Do not compact the sand or walk on it after screeding: you want it undisturbed so the pavers bed into it uniformly. Work in sections, removing the rails and filling the voids with sand as you go. For mortar-set tiles or stone, skip this step and instead mix a semi-dry mortar bed (or use adhesive mortar on a concrete slab, depending on the specification for your chosen material).
Step 7: Lay the pavers or slabs
Start from a fixed edge or corner (a house wall or existing hard surface) and work outward. Place pavers down without sliding them (sliding disturbs the sand bed and creates uneven bedding). Tap each paver level with a rubber mallet and check with your level every few rows. Maintain your intended joint width using tile spacers or by eye for a more informal look. Lay full pavers first across the whole area, then measure and cut the infill pieces at the edges. For large areas, snap chalk lines to keep your rows running true.
Step 8: Cut pavers to fit
A hired wet tile saw gives clean, accurate cuts on all materials including porcelain, natural stone, and thick concrete pavers. An angle grinder with a diamond blade works for straight cuts on brick and thinner slabs but is more physical and less precise. Always wear safety glasses and gloves when cutting, and use the wet saw's water supply to control dust. Mark cuts with a pencil or chalk line, not a felt-tip pen which can bleed into porous stone.
Step 9: Compact the finished surface
Once all pavers are laid, run the plate compactor across the entire surface to seat the pavers firmly and evenly into the bedding sand. Use a rubber or polyurethane pad under the plate to avoid scuffing or cracking the paver faces, especially on porcelain or natural stone (check manufacturer instructions before compacting tiles, as some specifically advise against plate compaction). Work in overlapping passes and check that no pavers have rocked or risen. Any high spots need the paver lifted, sand adjusted, and the paver re-laid before final compaction.
Step 10: Joint the surface
Sweep joint sand into the gaps between pavers. For standard applications, dry jointing sand works and is simple to apply. Polymeric (binding) joint sand is a better long-term choice: it resists wash-out, deters weeds, and reduces ant activity. Polymeric sand requires dry pavers and dry weather, typically above 4°C (39°F), and needs to be activated with water after brooming to cure. Follow the manufacturer's instructions exactly. For mortar-set natural stone, use an appropriate pointing mortar or grout in the joints, removing excess before it stains the surface.
Dealing with difficult site conditions
Sloped ground
A gentle slope actually helps drainage, but it complicates laying because you need to step or slope your sub-base to maintain a consistent paver depth. Use a laser level to set your stringlines and check every row against them. On steeper slopes, consider a terraced design with step risers between levels: this keeps individual patio sections manageable and prevents water from sheeting across the whole surface. If the slope is significant (over about 1:10), cut and fill may be needed, which can require additional soil engineering and possibly retaining walls. That is a job for a professional unless you have confidence in earthworks.
Clay soil
Clay shrinks in summer and swells in winter, which means any patio on clay soil will eventually crack or lift if the base is not deep and free-draining enough. Increase your sub-base depth to at least 6–8 inches of compacted dense-graded aggregate. Lay a geotextile separation layer between the clay subgrade and the aggregate base to prevent the clay from migrating up into the base over time (this is sometimes called a separation geotextile). If the site is very wet, consider installing a perforated land drain around the perimeter of the excavation before backfilling, leading to a soakaway or drain point.
Laying over an existing concrete or asphalt surface
If the existing surface is sound (no major cracking or subsidence), you can lay new pavers or tiles directly over it, which saves significant excavation time. Check the falls first: adding the thickness of a new paver plus adhesive can raise the surface level by 50–80 mm, which may affect door thresholds, drain grate heights, and damp-proof courses. For mortar-set tiles on an existing slab, the slab must be clean, structurally sound, and have no more than 5 mm of deflection. If you are butting new pavers against an existing surface, extend your edge restraint to meet the existing pavement and pack any gap between the two base systems to prevent edge erosion.
Common mistakes and how to avoid them
- Skipping sub-base compaction in lifts: dumping all the aggregate and compacting once leaves the lower half loose. Always compact in 4–6 inch loose lifts.
- Not checking falls until the end: by the time all pavers are laid, correcting a fall problem means lifting everything. Set your falls with stringlines before screeding and re-check at the sub-base, bedding, and laying stages.
- Using building sand instead of concrete (ASTM C33) sand for bedding: building sand is too fine and compressible. Use only washed concrete sand for paver bedding.
- Underestimating material quantities: always order at least 5% extra for cuts and breakages; order 10% for complex patterns or natural stone with variable sizes.
- Installing edge restraints in the sand layer rather than on the compacted base: sand shifts; restraints must be fixed to the aggregate base or haunched in concrete to hold.
- Applying polymeric joint sand in damp weather or without activating it properly: the sand will not cure and will wash out. Wait for a dry forecast and follow the product's activation instructions.
- Forgetting to account for drain and inspection cover heights: plan around these from the outset so covers finish flush with the new surface level.
Finishing and long-term maintenance
Once jointing is complete, avoid heavy foot traffic for 24–48 hours to let polymeric sand cure. After that, the patio is ready to use. For natural stone (particularly sandstone and limestone), apply a penetrating stone sealer to protect against staining and moisture ingress. Porcelain generally does not need sealing. Re-apply sealer every 3–5 years depending on use and exposure.
Annual maintenance is minimal: sweep away leaf debris before it breaks down into moss-friendly organic matter, re-sand any joints that have washed out (this is very common in the first winter), and check the falls have not shifted. If individual pavers crack or lift, sand-set systems are easy to repair: lift the affected paver, re-level the sand underneath, and re-lay. This is one of the biggest practical advantages of sand-set over mortar-fixed systems.
Realistic time and cost estimates
Costs vary enormously by material choice, ground conditions, and your location. The figures below are broad estimates for a typical 150–200 sq ft (14–18 sq m) residential patio in the U.S. in 2026, covering materials and equipment rental only (not professional labour). Labour significantly increases costs if you hire out any stages.
| Cost / Time Category | Typical Range (DIY) | Notes |
|---|---|---|
| Concrete block pavers (materials only) | $3–$8 per sq ft | Widest availability, most cost-effective for large areas |
| Brick / clay pavers (materials only) | $5–$12 per sq ft | Price varies with quality and source; reclaimed brick costs more |
| Porcelain tiles (materials only) | $6–$20 per sq ft | Large-format tiles at the higher end; adhesive and grout add cost |
| Natural stone (materials only) | $10–$30+ per sq ft | Slate, sandstone, limestone; significant variation by type and origin |
| Dense-graded aggregate sub-base | $20–$50 per ton delivered | A 4 in. base under 200 sq ft needs roughly 1.5–2 tons |
| Plate compactor rental | $50–$175 per day | Rent from Home Depot, United Rentals, or Sunbelt |
| Wet tile saw rental | $30–$60 per day | Essential for porcelain or natural stone cuts |
| Total DIY project (concrete block, 150 sq ft) | $600–$1,400 all-in | Includes sub-base, edging, sand, pavers, and rental |
| Time: excavation and base (two people) | 1–2 days | Longer on clay or with deep excavation |
| Time: screeding, laying, jointing | 1–2 days | Varies with pattern complexity and material |
| Total elapsed time (weekend project) | 2–4 days | Add extra days for mortar curing if using fixed-bed system |
Safety notes worth repeating
- Call 811 at least 48–72 business hours before digging. This is a legal requirement in most U.S. states and takes 5 minutes online or by phone.
- Wear safety glasses whenever cutting pavers, and a dust mask rated for silica dust (N95 or P2) when dry-cutting any stone or concrete material.
- Steel-capped boots are strongly recommended when moving full pallets of block or stone.
- Rent a mechanical plate compactor rather than attempting to compact by hand: hand tamping does not achieve sufficient density for a durable base.
- If you rent a petrol-powered plate compactor, do not run it in an enclosed space or near open windows. Electric or battery models are suitable for confined areas.
- Large-format slabs (600 mm x 600 mm and above) are heavy: get a second person or use a slab lifter to move them. Back injuries are the most common patio DIY injury.
FAQ
What initial site assessment information is required before starting a patio project?
Collect site dimensions and orientation, slope/grades (existing high/low points), soil type (use USDA NRCS Web Soil Survey or simple hand-texture ribbon test), existing surface conditions (grass, concrete, asphalt), drainage patterns and nearby downspouts, underground utilities (call 811 at least 48–72 business hours before digging), and local permit/land‑disturbance rules. Record frost depth for your area if applicable and note proximity to structures (door thresholds, foundations) to set correct finished levels and falls.
Which technical specs and design parameters must the guide specify?
Specify finished surface fall for drainage (typically 1%–2% away from structures), subgrade and base compaction acceptance (e.g., ≥95% Standard Proctor for subgrade, ≥98% for aggregate base per practice), recommended base and bedding depths by material and use (see material table), jointing type options (polymeric sand, mortar, open joints), edge restraint requirements (structural restraint containing at least half the paver depth), and permeable vs. impermeable design differences (reservoir base and geotextile for PICP). Also cover frost‑depth adjustments and lift/compaction layer thicknesses (<=4–6 in. loose).
What material choices and typical layer depths should be included (table-ready)?
Provide a comparative table listing common surfacing (concrete pavers, clay brick, natural stone/slate, porcelain tile, simple gravel paths), recommended paver thickness, standard bedding (washed ASTM C33 sand, ~1 in. screeded), compacted aggregate base depth (typical residential: 4 in. for well‑drained pedestrian patios; increase to 6–8+ in. for poor soils or occasional vehicular use), geotextile/weed membrane where needed, and jointing options. For permeable systems list open‑graded reservoir depths governed by rainfall/infiltration and local SuDS rules. Note manufacturer-specific recommendations may supersede general guidance.
What tools and equipment checklist should be provided?
List: tape measure, batter boards/strings and line level, marking paint, shovel and spade, heavy-duty rake, wheelbarrow, plate compactor (reversible/vibratory), spirit level and straightedge (2–3 m), rubber mallet, paver/stone saw or angle grinder with diamond blade for cutting, 1 in. screed rails/boards, jointing broom, polymeric sand blower or squeegee, edging materials and fixing stakes, geotextile, protective gear (gloves, eye/ear protection, knee pads), tamping/compaction tools for tight spots, and optional: soil probe and hand auger for soil checks.
What is the staged installation workflow the article must describe in detail?
Provide step-by-step stages with checklists: 1) Mark layout, set levels and fall; 2) Remove turf/topsoil to required depth; 3) Test and prepare subgrade (excavate to firm material, scarify and compact to target density); 4) Install geotextile if needed; 5) Install and compact aggregate base in lifts, checking thickness and densities; 6) Install edge restraints (concrete haunch, kerb, steel or heavy-duty plastic); 7) Screed 1 in. bedding sand to level rails; 8) Lay pavers/stone in chosen pattern, maintain joint spacing; 9) Cut perimeter pieces for fit; 10) Compact surface with plate compactor using protective pad for softer stones; 11) Joint with polymeric sand, mortar, or open joints per material; 12) Clean, final compaction, check levels and drainage; 13) Finish edges and install adjacent transitions/drains. Include timing for drying/activation where relevant (e.g., polymeric sand curing requirements).
Which technical tolerances and testing steps should be documented?
State tolerances for finished levels (±5–10 mm over short distances), slope accuracy (maintain 1%–2% fall), compacted layer lift thickness (≤4–6 in. loose), and compaction acceptance criteria (≥95%/≥98% Standard Proctor equivalents). Describe simple field checks: lightweight plate compactor pass counts, straightedge checks every few metres, and how to arrange nuclear or plate load testing if stricter acceptance is required.