Start by deciding where the patio goes and how big it needs to be, then assess the ground conditions, plan your levels and drainage fall, excavate to the correct depth, compact a solid sub-base, install edging, and only then begin laying your first paver. If you are also interested in the sequence itself, follow the guide on laying a patio step by step to make sure every stage is in the right order laying your first paver. That order matters more than anything else. Get it right and your patio will look great and last for decades. Skip or rush any of those early steps and you are setting yourself up for cracking, sinking, and standing water.
Where to Start Laying a Patio: Step-by-Step Guide

Clara Farrell
28 Jun 2026
I know it feels tempting to just buy the slabs and get cracking, but every patio problem I have ever seen, whether it is a sunken corner, a puddle that will not drain, or slabs that have started to rock, comes back to something that went wrong before the first paver was even touched. So let's go through the whole process in the right order, from that first decision right through to sweeping the joints.
Decide patio layout, size, and location
Before you order a single slab, spend proper time figuring out where the patio is going and how big it needs to be. Most people underestimate the size they need. A standard garden table and four chairs needs at least 3m x 3m just to sit comfortably, and that is before you add space to walk around the furniture. If you plan to entertain regularly, 4m x 4m is a more realistic starting point.
Think about which direction the space faces, how much sun it gets at different times of day, and how it connects to the house. A patio that sits directly outside the back door will get far more use than one tucked away in the corner of the garden. Also think about privacy, views, and any overhead obstacles like trees that could drop debris and cause staining.
Once you have a rough location in mind, sketch out the shape on paper and measure it up. Work in whole numbers where possible so your slab layout fits neatly without excessive cutting. An off-square or awkwardly sized patio forces you into fiddly cuts at every edge, and as Lowe's rightly points out, a layout that is not square from the start makes fitting pavers difficult and leads to shifting over time. Mark it out on the ground with canes and string so you can stand back and see how it actually looks before you commit.
Choose the patio material and finish
The material you choose affects every other decision: the sub-base depth, the mortar mix, the jointing method, and how much cutting work you will face. Here is a quick comparison of the most common options for domestic patios.
| Material | Typical Thickness | Sub-base Needed | Jointing Method | Best For |
|---|---|---|---|---|
| Concrete paving slabs | 35–50mm | 100mm MOT Type 1 + 30–40mm mortar bed | Kiln-dried sand or brush-in grout | General garden patios, good value |
| Natural stone (sandstone/limestone) | 22–30mm | 100mm MOT Type 1 + 30–40mm mortar bed | Pointing mortar or resin | Premium finish, long-lasting |
| Porcelain tiles | 18–20mm | 100mm MOT Type 1 + flexible adhesive bed | Grout or pointing mortar | Sleek, low-maintenance, contemporary |
| Brick/block paving | 60–80mm | 100mm MOT Type 1 + 30–50mm sharp sand bed | Kiln-dried jointing sand | Driveways, paths, classic look |
| Slate | 20–30mm | 100mm MOT Type 1 + 30–40mm mortar bed | Flexible pointing mortar | Contemporary look, shade-tolerant areas |
For a first patio, concrete paving slabs or natural sandstone on a standard mortar bed are the most forgiving to lay and give a great result. Porcelain is popular right now but it is harder to cut and needs a flexible adhesive rather than a standard mortar bed, so factor that in if you are a beginner. Brick and block paving uses a dry sand bed rather than mortar, which actually makes it more forgiving to adjust during laying, but the compaction stage at the end is critical.
Site assessment: ground conditions and existing surfaces
Before you dig a single spade, you need to understand what you are working with. The two biggest variables are soil type and what is already on the surface.
Soil type
Clay soil is the enemy of patios. It expands when wet and shrinks when dry, which causes the ground beneath your patio to move with the seasons. If you have clay, you need to be thorough about your sub-base depth and compaction, and you may want to add a layer of geotextile membrane between the soil and your hardcore to prevent clay migrating up into the sub-base over time. Sandy or free-draining soil is much more cooperative, though it can shift if not properly compacted. Do a quick squeeze test with a handful of soil: if it holds its shape and feels sticky when wet, you are on clay.
Sloped ground
A sloped garden does not have to be a problem, but it does require more planning. You have two choices: step the patio into the slope in tiers with retaining edges, or excavate more deeply on the high side to create a level surface. The second option is simpler for smaller patios. Either way, a sloped site means your excavation depth will vary across the area, so mark the finished patio level with string lines before you dig so you know exactly how much to remove at each point.
Laying over an existing surface
If you are working over an existing concrete base that is sound, you can sometimes lay directly on top with a flexible adhesive, but only if the finished level will not cause problems at door thresholds or damp-proof courses. If the old surface is cracked, uneven, or showing signs of movement, remove it. Laying over a bad base just buries the problem. If you are starting over grass or bare soil, strip the turf first and dispose of it before you start any measuring or setting out.
Plan levels and drainage (fall, edging, and sub-base depth)
This is the step that separates a professional-quality patio from one that will give you trouble. Every patio must slope slightly away from the house so rainwater runs off rather than pooling or, worse, tracking back toward the building. The standard fall for a domestic patio is 1:60, meaning for every 60cm of patio width, the surface drops 1cm.
Pavingexpert explains that gradient notation works this way: a gradient of 1:60 means 1 unit of fall for every 60 units of patio width or length The standard fall for a domestic patio is 1:60. So a patio that is 3m deep will fall 5cm from the house wall to the outer edge.
That sounds tiny, but it is enough to drain water effectively without feeling like you are sitting on a slope.
Plan where that water will actually go once it reaches the edge of the patio. If it is just going onto a lawn, that is usually fine. If it is running toward a fence, a neighbour's garden, or a low spot that already gets waterlogged, you need to install a channel drain at the outer edge or redirect the fall to a side where drainage is better. Getting drainage right at the planning stage costs you almost nothing. Sorting it out after the patio is laid is expensive and disruptive.
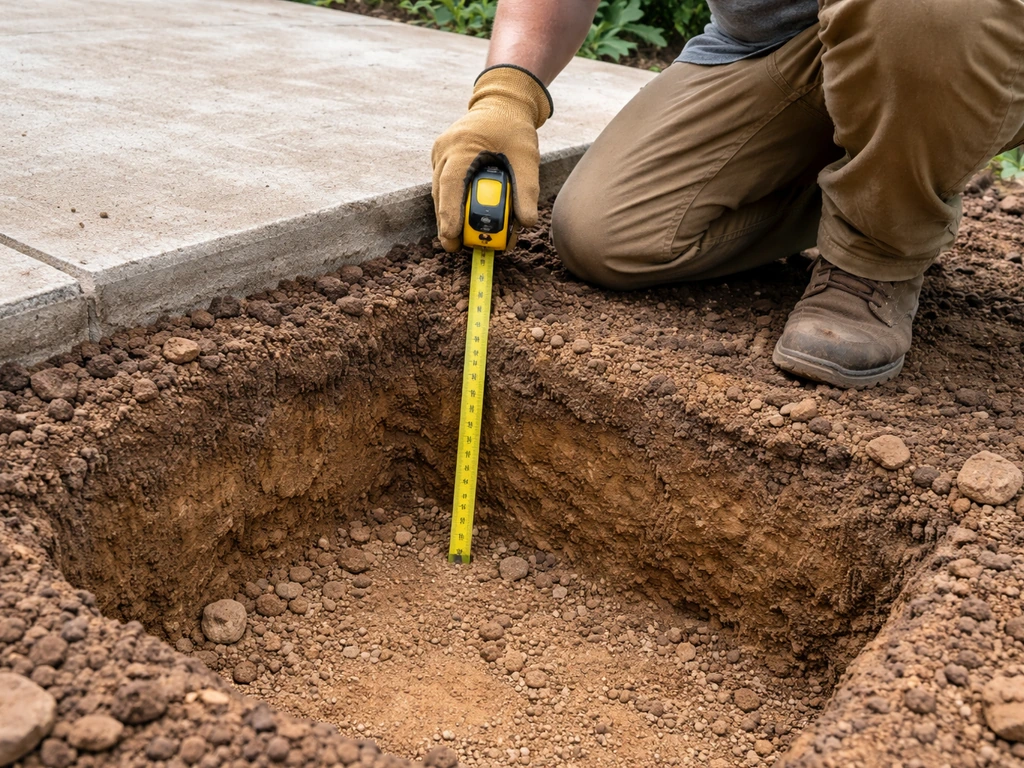
For sub-base depth, the standard for a domestic patio is 100mm of compacted MOT Type 1 (crushed hardcore), plus a 30 to 40mm mortar bed, plus the thickness of your chosen slab. If your slabs are 40mm thick, you are looking at a total excavation depth of around 170 to 180mm below finished patio level. Mark this depth clearly on your profile boards or string lines so you can check it as you dig.
Set out the area and build proper foundations (excavation, hardcore, compacting)
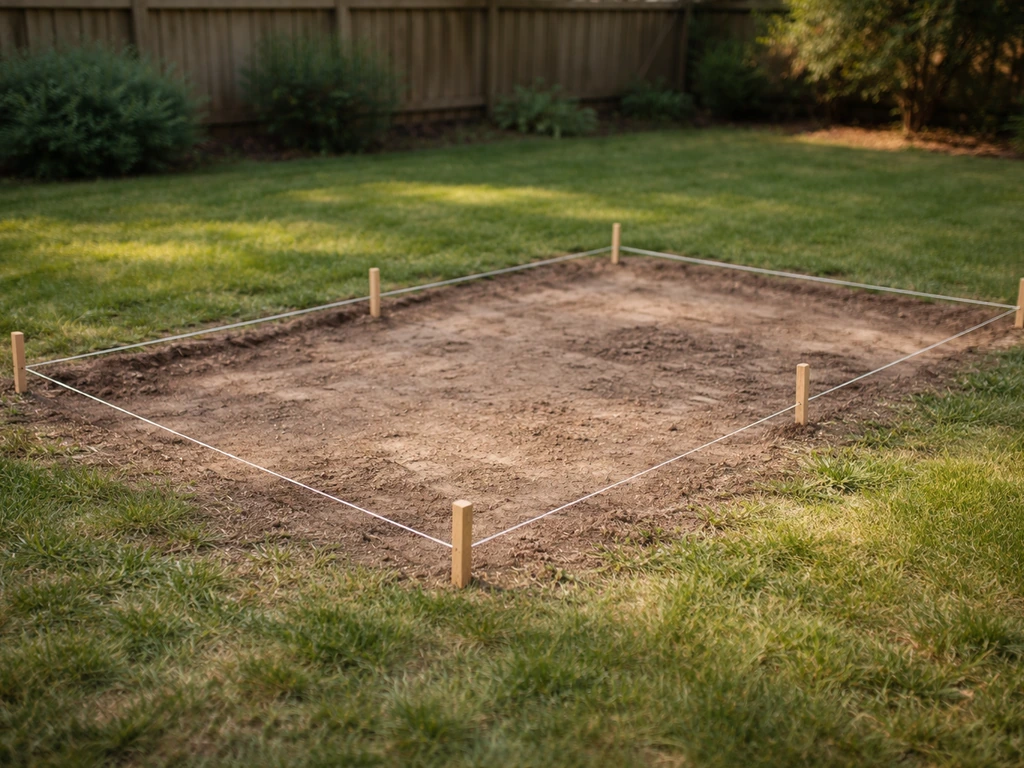
Setting out properly is what keeps your patio square. Drive timber pegs or steel pins into the ground at each corner of the patio and run string lines between them at the exact finished surface height, adjusted for your 1:60 fall. Check for square by measuring diagonally from corner to corner: if both diagonal measurements are the same, your layout is square. If they are not, adjust until they match. Do not skip this check. An off-square layout will cause headaches with every single row of slabs you lay.
With the string lines in place, excavate the whole area to the correct depth. Remove all topsoil, roots, and organic material. Organic matter rots and compresses over time, which causes settlement, so be thorough. Once you are at the right depth, firm the soil base down with a plate compactor if you have one, or a hand tamper for smaller areas.
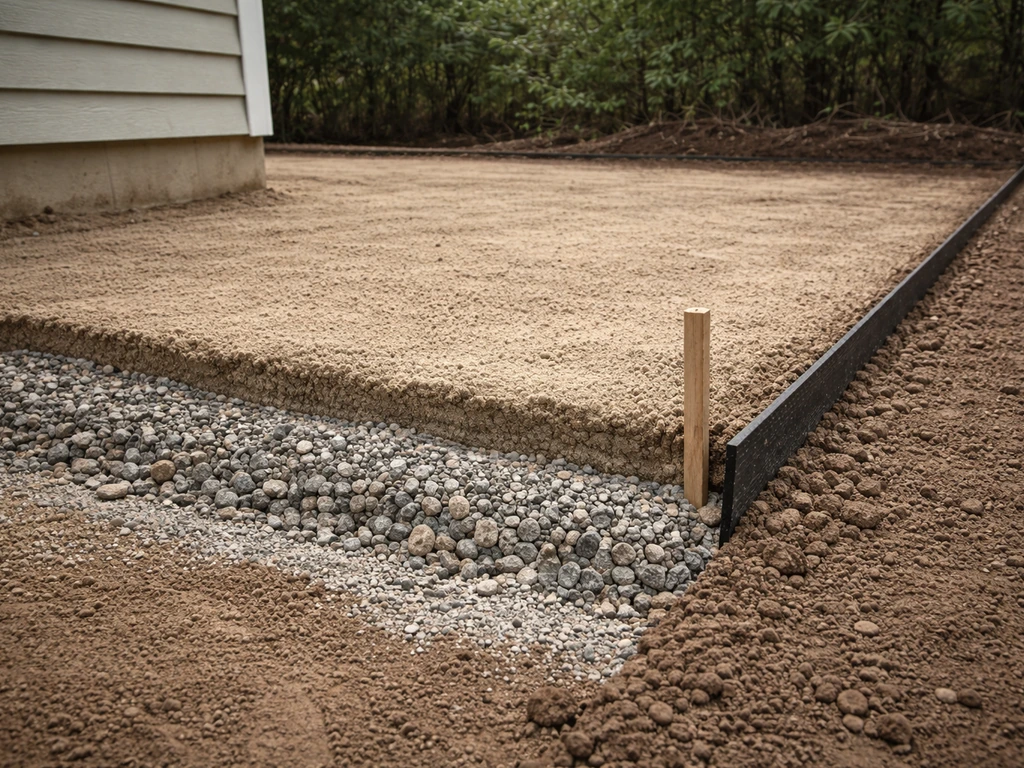
Now add your MOT Type 1 hardcore. Spread it in layers no deeper than 75mm and compact each layer before adding the next. Do not just tip it all in and compact once. Compaction is the single most important thing you can do for long-term stability. A plate compactor, which you can hire for around £50 to £70 per day, makes this much easier and gives far better results than trying to stamp it down by hand. Once the hardcore is fully compacted to 100mm depth, check it is roughly level and at the right height to accept your mortar bed and slabs.
Install edging and the paving pattern (alignment and string lines)
Edging restraints are what keep the outer slabs or blocks from spreading outward over time. For slab patios, a haunched mortar fillet on the outer edges (essentially a wedge of concrete or mortar against the back of the edging slabs) is the traditional approach. For block paving, purpose-made plastic or concrete edge restraints are laid first and pegged into the ground before any paving begins. Either way, set your edging to the finished level of the patio, following your string lines.
Before mixing any mortar, do a dry run with your slabs or blocks across the area. This lets you figure out your joint spacing and identify where cuts will fall. Aim to avoid very thin cuts (less than a third of a slab width) at visible edges, as they look poor and are weak. Adjust your layout or starting point slightly to avoid this. Mark the joint positions on the sub-base with chalk lines or a straight edge so you have a reference when you start laying for real.
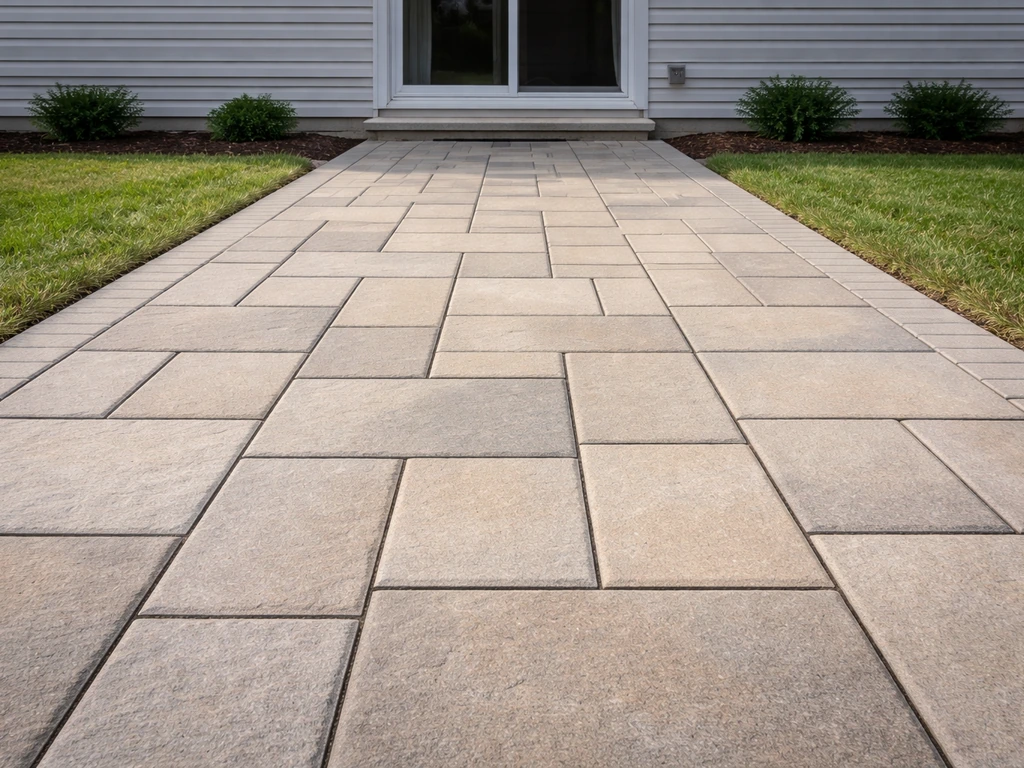
Decide on your paving pattern. A simple grid (or stacked bond) is easiest for beginners but shows off any alignment errors. A stretcher bond (slabs offset by half a length, like brickwork) is more forgiving and stronger. Herringbone or basketweave patterns look fantastic but require significantly more cuts, so save those for when you have a project or two under your belt.
Lay and finish the surface (cutting, leveling, jointing)
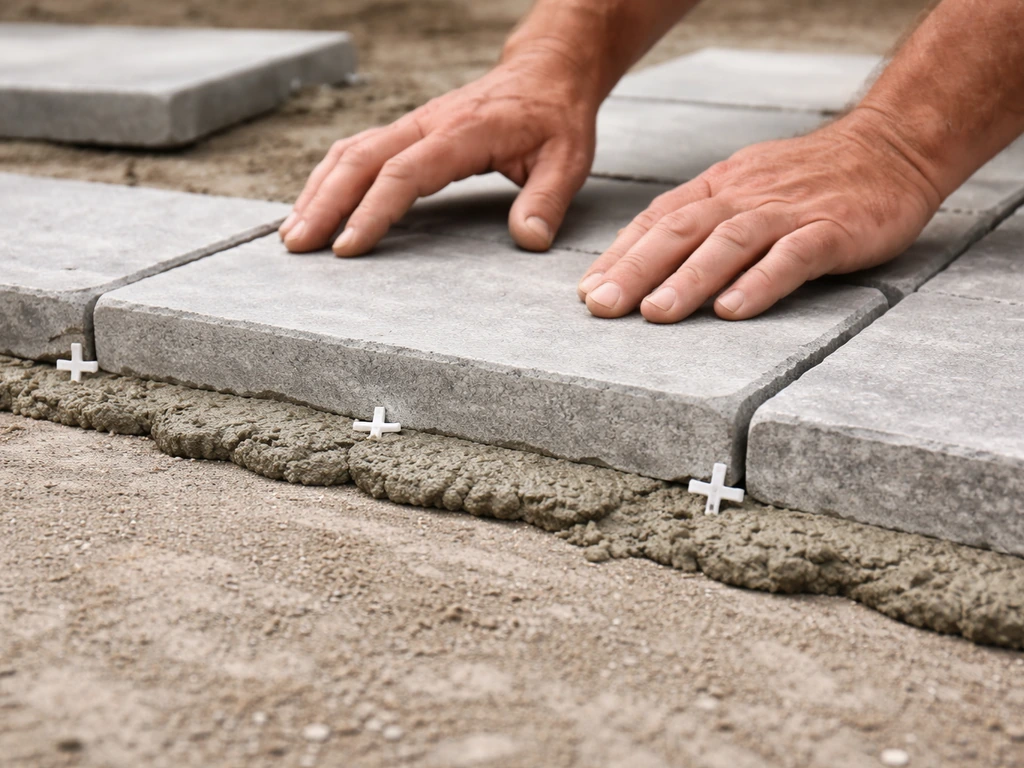
Mix your mortar to a firm but workable consistency (a standard mix is 4 parts sharp sand to 1 part cement) and apply it as a full bed or in five dabs (one at each corner and one in the centre) beneath each slab. A full bed gives better support and is recommended for thinner or more delicate slabs. Lower each slab carefully, making sure not to drag it across the mortar bed, and tamp it down gently with a rubber mallet. Check the level in two directions with a spirit level and also check the fall toward the outer edge. Adjust by adding or removing mortar beneath the slab, not by tapping it aggressively once it is down.
Use spacers or offcuts of plywood to maintain consistent joint widths. The recommended minimum joint width for most natural stone or concrete slabs is 10 to 15mm. Joints that are too tight do not allow for any movement and can cause cracking. Keep a long straight edge or string line across the tops of the slabs you have already laid and check each new slab against it to make sure nothing is riding up or dipping down.
For cutting, a diamond disc angle grinder works fine for straight cuts on most slabs. A rented disc cutter or table saw gives cleaner results for porcelain or large-format slabs. Always wear eye protection, hearing protection, and a dust mask when cutting.
Once all the slabs are laid and the mortar has cured for at least 24 hours (longer in cold weather), you can fill the joints. After that, you can finish with the right jointing material to lock everything in and keep weeds and water under control fill the joints. For most natural stone and concrete slab patios, kiln-dried jointing sand brushed across the surface and worked into the joints is the quickest and most DIY-friendly option.
For a more permanent and weed-resistant result, use a brush-in polymeric jointing compound, which hardens when activated with water. For porcelain, use a dedicated grout or pointing mortar. Brush off any excess and clean the surface with a damp sponge before the jointing material sets.
Quick checklist for avoiding common mistakes and next steps
Here are the mistakes I see most often on DIY patios, and the ones that cause the most grief later. Run through this list before you start laying.
- Not setting a drainage fall: every patio needs a minimum 1:60 fall away from the house. Standing water is not just inconvenient, it can damage walls and foundations.
- Skipping proper compaction: loose or under-compacted hardcore is the number one cause of sinking slabs. Hire a plate compactor and use it properly.
- Wrong excavation depth: always calculate the total depth from finished surface level down (slab + mortar bed + sub-base). Measure twice before you dig.
- Not checking for square: measure diagonals before you lay a single slab. Correcting a skewed layout halfway through is miserable.
- Inadequate edging: outer edges that are not properly restrained will spread over time, especially with block paving.
- Inconsistent joint widths: use spacers. Joints that drift in width look unprofessional and make the whole job look rushed.
- Laying slabs in cold or wet weather: mortar does not cure properly below 5°C. Frost will destroy a freshly laid mortar bed overnight.
- Not cleaning slabs after jointing: cement residue and jointing compound left on natural stone or porcelain can stain permanently. Clean as you go.
If you want to go deeper on any specific part of this process, the full step-by-step laying sequence, tips for getting perfect results, and detailed guides for specific scenarios like laying a patio path are all covered in the related guides on this site. Once you are confident about those early foundations, the steps to laying a patio path follow a similar setup but with extra attention to alignment and edging. Each one builds on what you have learned here, so start with this overview, get your planning solid, and then drill into the detail of whichever stage you are tackling next.
Honestly, the hardest part of laying a patio is the planning and groundwork. Once your sub-base is compacted, your levels are set, and your string lines are in place, the actual laying of the slabs is satisfying, methodical work. Take your time on the prep, and the rest of the job will reward you for it.
FAQ
How do I decide the exact finished height before I excavate?
Start by setting the final finished surface height relative to a fixed reference, usually the bottom edge of the door or the top of the DPC (damp proof course). If your patio would end up higher than the door threshold, you can force rain and debris to sit against the doorway, and in some cases the DPC clearance is reduced, which is a bigger issue than paver height alone.
Can I lay a patio directly over existing concrete or hardstanding?
Yes, but only if you can still achieve the required fall (1:60) after accounting for slab thickness, bedding, and any existing levels. If you cannot re-create the fall without raising the patio too high, the practical answer is to remove the existing base and re-level the sub-base properly rather than trying to “shim” the paving.
What’s the easiest way to confirm my planned drainage is working before paving?
Do a simple drainage check by running a bucket of water on the area and watching where it flows over 5 to 10 minutes. If water collects, you need to plan an outlet at the patio edge (channel drain) or redirect the fall sideways, because once the slabs are set, you generally cannot correct ponding without lifting paving.
Is it really necessary to compact the sub-base, or can I skip compaction on a small patio?
For most DIY jobs, a plate compactor is worth hiring if the patio is more than a small area, because proper layer-by-layer compaction of MOT Type 1 is what prevents rocking and sinking. A hand tamper can work on very small, tight spaces, but it is slower and harder to get consistent results across the whole footprint.
How do I correct slab height mistakes without causing future rocking?
Keep in mind that the mortar bed is not meant to “float” the patio. If you tap slabs aggressively to correct height, you can undermine the bedding and create hollow spots. Adjust with mortar beneath each slab during setting, then tamp gently (and always re-check level and fall).
Does slab thickness change how I should bed and support the paving?
Mix and bed depth should match your slab type. Thicker slabs often cope with a more forgiving bedding approach, but thin or delicate slabs typically need a full bed and careful support to avoid flexing that later turns into hairline cracks.
What joint width should I aim for, and what happens if my joints are too tight?
Minimum joint widths matter more than most beginners expect. Too-tight joints can restrict movement and increase cracking, especially with natural stone. Use spacers or consistent offcuts to hold the joint line, and aim for about 10 to 15 mm for typical slabs.
Where should I start laying the first slabs so the cuts look right at the edges?
Avoid starting with the first row as a “best guess.” Instead, mark a centerline or a straight datum line, dry lay the slabs to check where cuts land, and start from a line that keeps edge cuts reasonably sized. If you end up with very narrow visible cuts at the edges, shift the layout before mortar goes down.
What should I do right after the slabs are laid, before the patio is fully finished?
For joint filling, protect the surface so mortar dust and jointing sand do not get embedded in the face. Brush in the right material for your paving type, then remove excess before it sets, and clean with a damp sponge. This reduces staining and makes the joints look uniform.
What should I do differently if I suspect clay or mixed soil under my patio?
If you have clay or a history of seasonal movement, consider adding geotextile as a separation layer, and do not rely on compaction alone. Also keep the excavation free of topsoil and roots, because organics settle and pump moisture, which increases the risk of sinking and uneven joints.