Building a slate patio from scratch means digging out the ground to the right depth, laying a compacted gravel base with proper drainage slope, bedding your slate slabs in sharp sand or a dry mortar mix, and grouting the joints so the surface stays tight and level for years. It's a weekend-plus project for most homeowners, but it's completely DIY-able if you follow the prep steps without cutting corners. The base is everything. Get that right and the rest falls into place.
How to Build a Slate Patio Step by Step DIY Guide

Clara Farrell
20 May 2026
Choosing the right slate and supplies
Not all slate is suitable for outdoor paving, and picking the wrong type is one of the most expensive mistakes you can make. Outdoor slate needs to handle freeze-thaw cycles without cracking, which means you want stone with low water absorption. American Tile Depot’s freeze-thaw paver guidance recommends targeting very [low water absorption](https://www. americantiledepot.
com/blogs/news/selecting-the-best-outdoor-pavers-for-freeze-thaw-climates), such as under 0. 5%, to improve durability in cold climates. As a screening rule, look for slate with water absorption under 0. 5% (tested to ASTM C97 or equivalent).
Some suppliers provide freeze-thaw test documentation referencing standards like blank" rel="noopener noreferrer">USACE CRD-C 144, where a passing result might show as low as 0.
03% expansion. If you're in a climate that regularly dips below freezing, ask your supplier for this data. Slate that hasn't been tested for freeze-thaw in cold climates is a gamble.
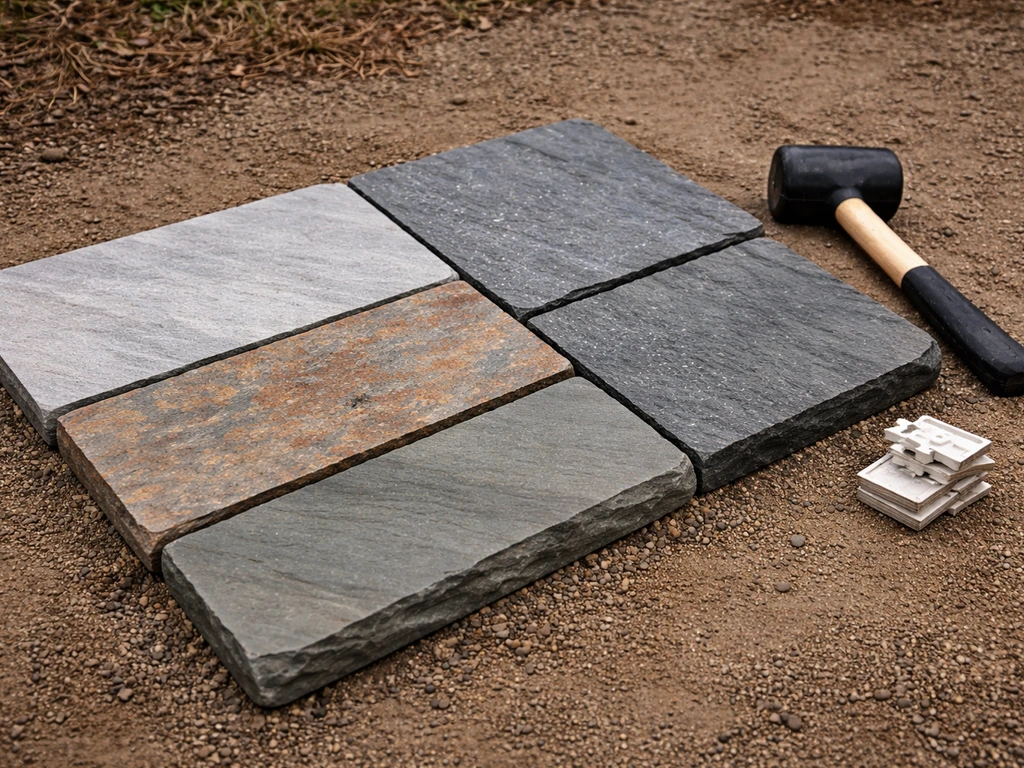
For thickness, 30mm (roughly 1.25 inches) is the practical minimum for patio use. Thicker slabs at 40mm or 50mm are more forgiving to lay and less likely to crack during cutting or under furniture loads. Natural cleft slate (the textured, split-face kind) gives better grip underfoot when wet, which matters outdoors. Gauged slate, where the underside has been sawn flat, is easier to bed evenly and is often the better choice for DIYers because it reduces the leveling work.
Popular outdoor varieties include Brazilian slate, Welsh slate, and Indian slate. Welsh slate is dense, extremely durable, and tends to have very low absorption rates, making it ideal for colder climates. Indian slate is more affordable and widely available, but quality varies considerably between suppliers, so check absorption specs rather than assuming. Brazilian slate often comes in striking colors and is generally frost-resistant when sourced from reputable suppliers.
Tools and materials checklist
- Slate slabs (measure your area and add 10% for cuts and breakage)
- Compactable hardcore/crushed stone (4 inches deep minimum)
- Sharp sand or dry mortar mix for bedding
- Jointing sand or mortar for grouting
- Plate compactor (rent one, don't skip this)
- String lines and pegs for layout
- Tape measure, spirit level, and long straightedge
- Angle grinder with a diamond blade rated for stone
- Rubber mallet
- Bolster chisel and club hammer (for hand cuts)
- Safety glasses, gloves, and dust mask
- Edging restraints (treated timber, metal, or concrete haunching)
- Slate sealer (if you choose to seal)
Planning, measurements, and patio layout
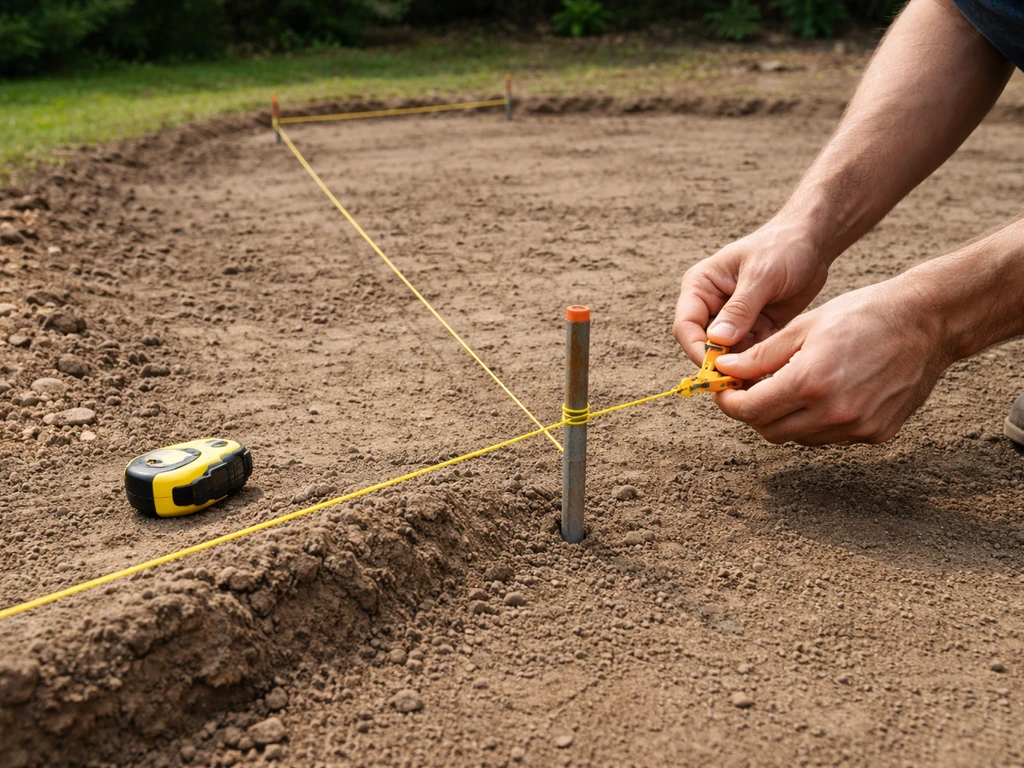
Start by marking out the full footprint of your patio with stakes and string line. Measure twice: the final size you want on the surface, plus the area you'll need to excavate (a few inches wider on each side to allow for edging). Think about how you'll orient your slabs. Running joints in a simple grid looks clean, but a staggered or running-bond pattern hides slight size variations in natural stone much better. If your slabs aren't perfectly uniform, which most natural slate isn't, staggered is the smarter choice.
Drainage slope is not optional. The surface must fall away from your house at a minimum of 1:80 (about 1.5 inches of drop per 10 feet). Many pros aim for 1:60 to be safe. Mark this fall into your string lines now, before you dig anything, so every layer you build follows the correct gradient. A patio that's perfectly level will pool water and cause long-term problems, including frost damage to the slabs and damp issues against the house.
Check for underground services before digging. Call your utility company or use a cable/pipe detector if you're not certain what's below. Also note where existing drainage channels or manholes are, because your patio edges need to stay clear of them or integrate them properly.
Site prep: excavation, base layers, drainage, and ground challenges
Dig down to a total depth that accommodates your base layers plus the slab thickness, plus about half an inch of bedding. For a typical setup with 30mm slate, that's roughly 200mm to 250mm (8 to 10 inches) below your intended finished surface. Here's how those layers stack up:
- Compacted subgrade (the natural ground, firmed up)
- 100mm (4 inches) of compacted hardcore/crushed stone
- 50mm (2 inches) of sharp sand or dry mortar bedding
- Slate slab (30 to 50mm thick depending on your choice)
Once you've dug to depth, clear out loose material and compact the subgrade with a plate compactor. This step is critical and skipped by too many DIYers. Soft, unconsolidated soil under your base will settle unevenly and your slabs will rock. Lay your hardcore in the excavated area and compact it thoroughly in layers. Don't try to compact more than 100mm at a time. Two compacted 50mm passes are far better than one loose 100mm layer.
Dealing with clay soil and slopes
Clay soil is the most common headache in patio building. It holds water, swells when wet, and shrinks when dry, which causes constant movement in whatever you build on top. If your soil is heavy clay, you have two practical options: dig 50mm deeper and add a layer of sharp sand between the subgrade and the hardcore to break the capillary action, or install a perforated drainage pipe around the perimeter of the excavation that leads to a suitable outlet. For serious clay sites, both measures together give the best long-term result.
Sloped ground needs a slightly different approach. A gentle slope (under 1:20) can usually be addressed by stepping the sub-base down in level lifts to keep the overall depth consistent, then building up to a level surface on top. Steeper slopes may need retaining on the lower edge, either with a poured concrete haunch or substantial edging blocks. If your slope is more than 1:10, honestly consider whether a level patio is the right approach or whether a split-level design with a small retaining step would work better and be more stable.
Building the formwork, edges, and setting the base bedding
Edging restraints keep your patio from spreading outward over time, especially when it's not mortared to a rigid perimeter. Before you lay any bedding sand, install your edge restraints along the string line. Treated timber pegged into the ground works for a budget build. For something more permanent, concrete haunching (poured concrete wedged against the outer edge of your first row of slabs) is the standard approach used by professionals. If you want a slate edge that keeps things strictly without concrete, use flexible metal edging or timber restraints instead of concrete haunching and keep your base layers well compacted. Metal patio edging is also available and installs quickly.
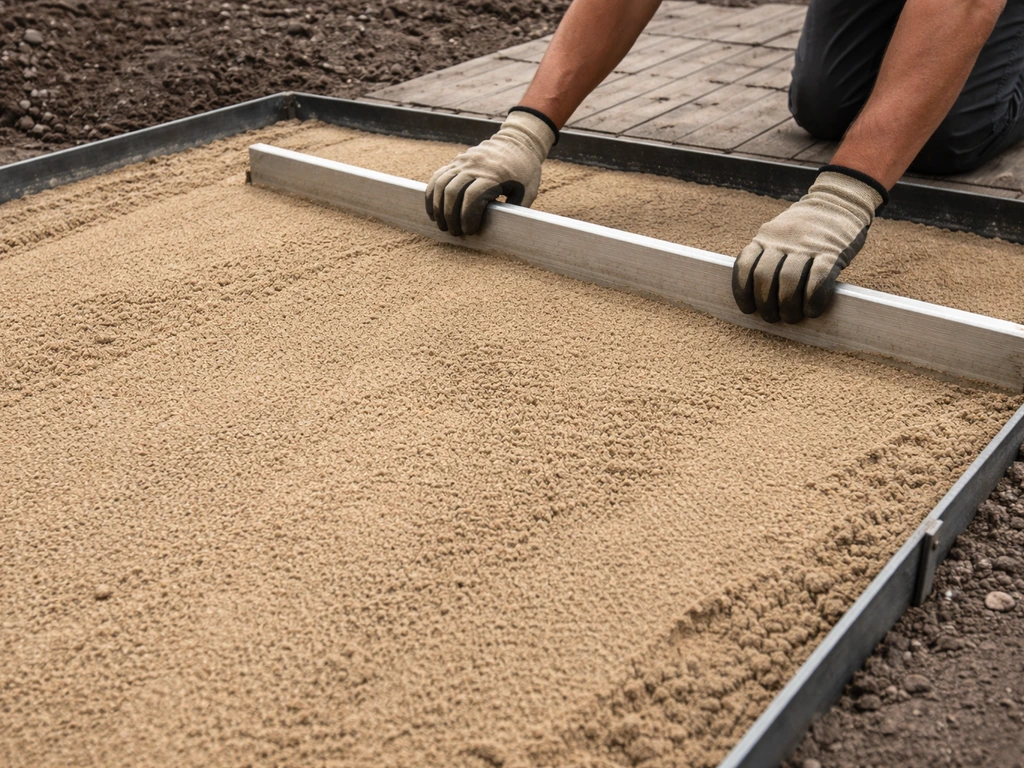
With edges in place, lay your bedding layer. For a mortar-free installation, spread sharp sand to a consistent depth of about 50mm, screed it level using a long straight board dragged across temporary guide rails, and maintain your drainage slope throughout. For a more permanent, stable result, a semi-dry mortar bedding (4 parts sharp sand to 1 part cement, mixed dry or barely damp) gives slabs less ability to shift after setting. Semi-dry mortar is forgiving to work with because it doesn't slump, and it firms up around the slab as it cures. This is the method I'd recommend for anyone building a slate patio they want to last a decade or more without releveling.
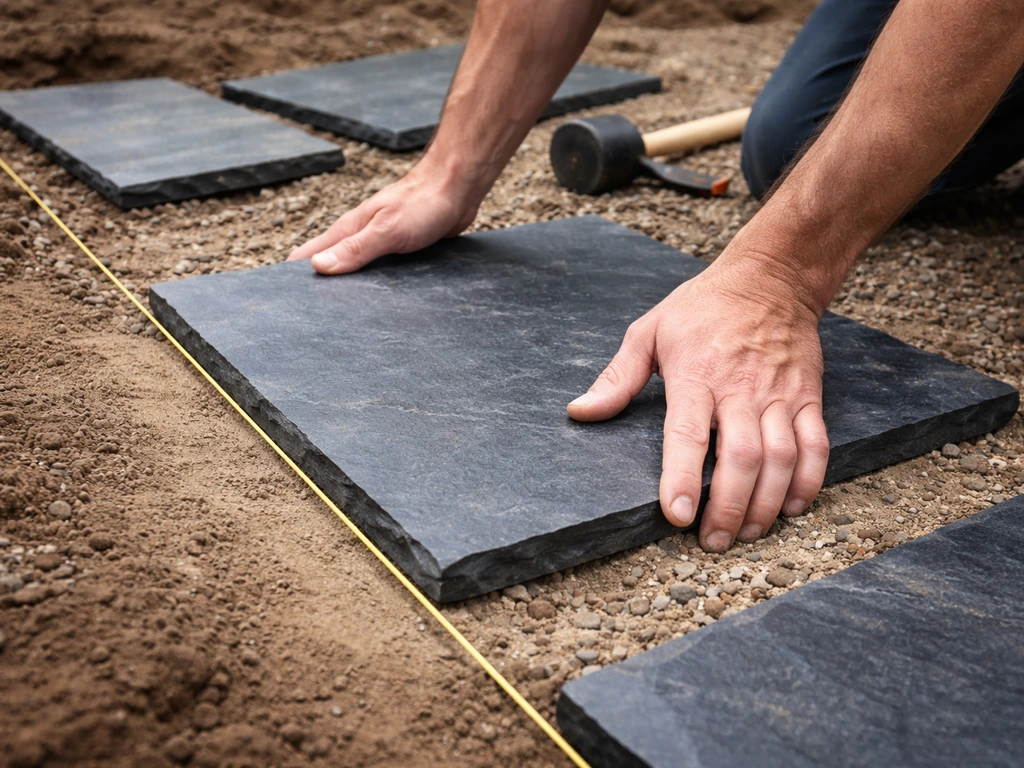
Installing slate slabs: placement, leveling, cutting, and joints
Start laying from a corner or a fixed straight edge (typically the house wall or a step) and work outward. Lay each slab gently onto the bedding without dragging it, then tap it level with a rubber mallet. Check with a spirit level in multiple directions, and use a long straightedge to confirm it sits flush with its neighbors. Allow a consistent joint gap of 10 to 15mm between slabs. Natural slate varies slightly in size, so this gap gives you room to absorb those small differences without the layout creeping out of square.
Cutting is unavoidable around edges and features. An angle grinder with a dry-cut diamond blade handles slate cleanly. Mark your cut line with a pencil or chalk, score it lightly on the first pass, and then follow through on subsequent passes rather than trying to cut through in one go. Always wear eye protection and a dust mask because slate dust is fine and nasty. For straight cuts on thicker slabs, you can also score a deep line with the grinder and then split along it with a bolster chisel, though this technique takes practice to get clean edges.
Once all slabs are laid and you're happy with the levels, fill the joints. Brush kiln-dried jointing sand into the gaps, compact it with the plate compactor (use a rubber mat or scrap carpet between the compactor plate and the slate to prevent surface scratching), and then brush more sand in. Repeat until the joints are full to within a few millimeters of the surface. For a more locked-in result, a slurry grout of fine sand and cement can be brushed into the joints and then cleaned off with a damp sponge before it skins over. This creates a harder joint that resists weed growth better than sand alone.
Finishing steps: sealing, cleaning, and maintenance
Sealing slate is optional but worthwhile for most homeowners. A good quality penetrating sealer designed for natural stone reduces staining from organic debris, oil, and tannins from wet leaves, and it makes routine cleaning much easier. Apply sealer to clean, dry stone at least 48 hours after installation (or after any mortar grouting has fully cured, which takes about a week). Brush or roll it on, allow it to soak in for the time recommended on the product, and wipe off any excess before it dries to a haze. A second coat applied after the first has cured gives better protection, especially in exposed or high-traffic areas.
For ongoing maintenance, sweep the patio regularly to prevent organic debris building up in joints, because that's where weeds start. A light scrub with a stiff brush and soapy water handles most grime. Avoid high-pressure washing at full power on natural cleft slate: it can dislodge jointing material and eventually erode softer stone. Use a pressure washer on a low setting if you need one. Reseal every three to five years depending on how much traffic and weather exposure the patio gets. Inspect joints annually and top up with sand or fine mortar pointing wherever gaps have appeared, before water gets in and freeze-thaw cycles do damage.
Common mistakes and how to troubleshoot them
The single most common failure I see is an inadequate base. People focus on the slabs and rush the groundwork. If slabs are rocking, dipping, or lifting at the edges within the first year, the base wasn't compacted well enough, the depth was insufficient, or drainage wasn't factored in. The fix for existing rocking slabs is to lift them, improve the bedding underneath, and relay them. It's annoying work, but it's the only real solution.
Poor drainage shows up as puddles on the surface or water pooling against a wall. If the fall is wrong, you may need to relay sections with the correct gradient. If a single slab is lower than its neighbors, lift it, add bedding material, and relay. Catching this during installation is much easier than fixing it afterwards.
Cracked slabs during installation usually mean the bedding wasn't supporting the full underside of the slab, leaving a void. When weight hits, the unsupported section snaps. Always check that your bedding is consistent and makes full contact with the slab. You can do a quick check by lifting a freshly-laid slab immediately after tapping it down: the bedding should have transferred a clear impression of the full slab base.
Uneven joints happen when slab sizes vary and you don't compensate as you go. Check your joint gaps regularly with a consistent spacer (a short piece of timber cut to 10-12mm works well) and adjust your layout before you get too far in. Trying to correct a wandering joint pattern three rows from the end is genuinely painful.
| Problem | Most likely cause | Fix |
|---|---|---|
| Rocking or loose slabs | Insufficient base compaction or shallow depth | Lift slabs, improve and re-compact base, relay |
| Surface puddles | Inadequate drainage slope | Relay affected section with correct 1:60-1:80 fall |
| Cracked slabs | Bedding voids under slab | Replace slab, ensure full bedding contact on relay |
| Weeds in joints | Insufficient joint fill or sand joints | Clear weeds, repack joints, consider mortar pointing |
| Frost-lifted slabs | High-absorption slate or poor drainage | Relay with frost-rated slate and improve sub-base drainage |
| Staining | No sealer applied or sealer worn off | Clean and apply penetrating stone sealer |
If you want to go deeper on any specific stage of this process, the approaches for laying without concrete, detailed installation sequences, and step-by-step methods for specific site conditions are covered in more detail in the related guides on this site. Each one builds on the same core principles here: good prep, correct drainage, full bedding contact, and consistent joints.
FAQ
Can I build a slate patio directly over existing concrete or pavers?
Usually no. Slate needs a properly compacted base with a consistent bedding layer and drainage fall. If you have existing concrete, you typically either remove it back to suitable subgrade, or build a new elevated, well-drained build-up over it with an engineered base and restraints, otherwise movement under the stone will cause rocking and joint failure.
How do I know if my slate is suitable for freeze-thaw in my area?
Don’t rely on the supplier’s general claim. Ask for water absorption data (and ideally freeze-thaw performance) for the exact batch, then match it to your lowest expected winter temperatures and thaw cycles. If they cannot provide testing results, treat the slate as a higher-risk gamble for cold climates.
What’s the safest way to choose bedding sand depth and keep slabs from rocking?
Keep bedding consistent across the whole patio, aim for full underside contact, and avoid “spot bedding.” Whether you use sharp sand or semi-dry mortar, use a screed board to set thickness and check levels frequently with a straightedge so every slab sits on supported material, not on edges.
Should I use spacers to control joint width, and what width is best with natural slate?
Yes, use consistent spacers so the gaps stay even as you work, especially because slate size varies. A 10 to 15 mm joint range is a practical target, but keep it visually consistent and avoid making some joints too tight, tight joints are harder to fill and more prone to cracking around edges.
How tight can I make the patio to a wall or step without trapping water?
Leave room to manage drainage and maintenance. Even if the patio is close, integrate a small clearance at the perimeter so water can shed away, and do not grout or mortar the perimeter in a way that locks it to the wall. If the area is prone to water buildup, you may need edging details or a shallow drainage channel rather than a dead-tight interface.
What’s the best approach for cutting slate without damaging edges?
For clean edges, avoid trying to cut through in one pass. Score lightly first, then deepen the cut gradually. Support the slab so it cannot pinch the blade, and consider practicing on offcuts, because slate can chip if it flexes or if the cut line is forced to close.
Do I need to compact the bedding layer too?
You generally compact the base layers, not the bedding itself. Instead, screed the bedding to a consistent thickness and then bed each slab so the material transfers to the full underside. Over-compacting sand can create an uneven surface layer, which then telegraphs as dips under the stone.
When should I grout the joints, and can I do it immediately after installing slabs?
Let the slabs settle into the bedding first, then fill joints promptly so they don’t get washed out or displaced. If you used semi-dry mortar bedding, avoid wetting the area immediately. For slurry grout, follow curing expectations, because cleaning too early can wash out cementitious material before it has set.
Is sealing necessary, and what can go wrong if I seal too soon?
Sealing helps with staining and cleaning, but sealing on damp stone can trap moisture and create uneven darkening. Apply sealer only after the stone and any jointing/grout have fully cured, and ensure the patio is dry for at least the manufacturer’s recommended waiting period.
Can I use a pressure washer on slate, and how do I avoid damaging joints?
Use low pressure only if needed, and keep the nozzle farther back than you would on concrete. High power can blow out jointing material, which then leads to weed growth and water intrusion, and that can accelerate frost damage. Most grime comes off with gentle scrubbing and soapy water.
What should I do if a slab is slightly lower than neighbors after installation?
Lift the affected slab before bedding is fully “set in” and improve the bedding underneath, then relay and recheck levels with a straightedge. Adding sand on top without correcting the bedding contact often leads to a repeat dip, especially where foot traffic or chair legs repeatedly load the area.
How do I prevent weeds if I choose sand-only joints?
Keep joint gaps fully filled and topped up as needed, and brush the patio regularly to remove organic debris before seeds take hold. If weeds appear, avoid digging aggressively into slate edges, instead refresh jointing sand or use a fine mortar pointing mix to reduce water access where cracks form.