Installing a slate patio comes down to four things done right: a solid compacted base, accurate layout and slope, careful paver setting, and clean jointing. Learning how to lay a slate patio correctly starts with getting the layout and drainage right, then setting each paver with consistent joints Installing a slate patio. Get those right and you end up with a beautiful, durable surface that lasts decades.
How to Install a Slate Patio: Step-by-Step DIY Guide

Clara Farrell
1 Jun 2026
Rush or skip any of them and you get cracked pavers, pooling water, or shifting stones within a season or two. This guide walks you through every step, from measuring your space to sweeping in the final joint filler, so you can tackle this with confidence even if it's your first patio project. If you want a step-by-step checklist, these slate patio installation instructions walk you through planning, base prep, setting, and finishing in order.
Project Planning and Materials
Before you pick up a shovel, spend time on planning. A well-planned patio is mostly about getting your numbers right: how many pavers you need, what thickness to buy, and what tools and materials to have on site before you start. Running out of slate halfway through a project is a real headache, especially if you're using a natural stone with batch color variation.
Choosing Your Slate
For outdoor patio use, look for slate pavers in the 20 to 30 mm thickness range (roughly 3/4 to 1.2 inches). That's the sweet spot for residential patios: thick enough to resist cracking under foot traffic, light enough to handle without needing two people for every piece. If you're doing a dry-laid installation over a sand bed, lean toward the thicker 30 mm option for better stability. Gauged slate (uniform thickness) is much easier to work with than ungauged, especially for beginners, because you don't have to compensate for thickness variation in your setting bed.
If you live somewhere that gets hard freezes, pay attention to water absorption specs. Look for slate rated to ASTM C121 (water absorption) and ASTM C217 (weather resistance) standards, or EN 12326 ratings with low water absorption classifications. Slate with low water absorption resists freeze-thaw cycles far better than porous varieties, so this matters more in cold climates than in mild ones.
How Many Pavers Do You Need?
Calculate your paver count using this formula: units per square foot = 144 divided by ((paver length in inches + joint width) × (paver width in inches + joint width)). For example, a 12x12 inch slate paver with 3/8 inch joints gives you roughly 1 paver per square foot, which makes math easy. For irregular or non-square pavers, work from the square footage of the paver face and factor in about 10% waste for cuts and breakage. Always order at least 10% extra, and with natural slate I'd push that to 15% because natural stone can have more variation and breakage than concrete pavers.
Materials Checklist
- Slate pavers (gauged, 20-30 mm thick, quantity plus 10-15% overage)
- Crushed stone or compactable gravel for subbase (6 inches minimum depth)
- Coarse concrete sand or bedding sand (1 inch layer)
- Paver edge restraints (aluminum or plastic with spikes)
- Landscape fabric (optional, for weed suppression under sand layer)
- Polymeric jointing sand or dry mortar mix for joints
- Penetrating exterior-rated stone sealer
- Plate compactor (rent locally)
- Rubber mallet, level, and long screed board
- Angle grinder with diamond wet-cut blade or wet tile saw
- String lines, stakes, and spray paint for layout
- Measuring tape, carpenter's square, and chalk line
Site Prep and Layout
Good site prep is where most DIY patios succeed or fail. It's the least glamorous part of the project but it determines everything that comes after. Give this stage the time it deserves.
Slope and Drainage
Your patio needs to drain water away from your house. The standard is a slope of 1/8 inch per foot away from any structure, which is barely visible to the naked eye but critical for keeping water from pooling or working its way toward your foundation. For patios not adjacent to a structure, aim for at least a 2% slope (about 1/4 inch per foot) in whichever direction sends water away from problem areas. Mark your high point (usually nearest the house) and calculate where your low point ends up. On a 12-foot-wide patio sloping at 1/8 inch per foot, the far edge sits 1.5 inches lower than the house-side edge.
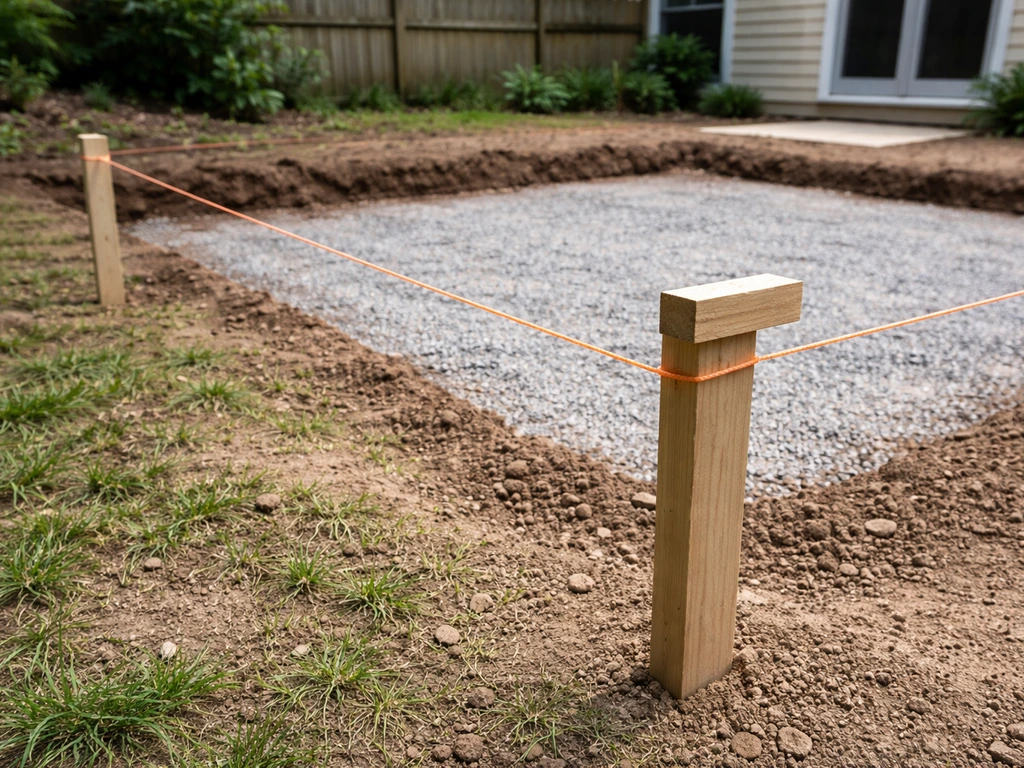
Layout and Marking
Use stakes and string lines to mark out the full patio perimeter. Make the string lines reflect the actual finished surface height (accounting for your slate thickness), not ground level. Check your corners with a carpenter's square or use the 3-4-5 triangle method to confirm square corners. Once you're happy with the layout, spray-paint the outline on the ground so you have a clear reference as you excavate. It's also worth doing a dry layout of a few pavers at this stage to confirm your paver spacing and pattern work within the space.
Removing Old Surfaces
If you're replacing an existing surface like old concrete, wood decking, or a previous paver patio, remove it completely. Installing slate over an old concrete slab is sometimes done, but it only works reliably if the slab is structurally sound, flat, and properly sloped. A cracked or heaving slab will eventually telegraph those problems up through your new slate. If the old slab is in good shape and already slopes correctly, you can mortar or thinset slate directly to it, but that's a different installation process than what this guide covers (a full from-scratch build). For most from-scratch installs, clear everything down to bare soil.
Excavation and Base Construction
This is the backbone of the whole project. A properly built base prevents settling, eliminates drainage problems, and keeps your slate level for years. There are no shortcuts here that don't come back to bite you.
How Deep to Dig
Excavate to a depth equal to 6 inches of compacted gravel, plus 1 inch of bedding sand, plus the thickness of your slate. For 30 mm (1.2 inch) slate, that's roughly 8 to 8.5 inches of total excavation below your finished surface. Also dig out at least 6 inches beyond the patio's marked edges on all sides to give your edge restraints room. In areas with clay soil or poor natural drainage, consider going a bit deeper on the gravel layer to improve water movement. Clay holds water and expands when saturated, which can heave your patio in freeze-thaw conditions.
Building the Subbase
Once you've dug to depth, tamp down the native soil with your plate compactor. Then add your crushed stone in layers of no more than 3 to 4 inches at a time, compacting each layer thoroughly before adding the next. This layered compaction is what actually builds a solid base. If you dump all 6 inches in at once and compact from the top, you leave voids in the lower layers that will settle later. Use a compactable crushed stone (often called crusher run or road base) rather than rounded pea gravel, which doesn't lock together. Maintain your drainage slope throughout the subbase by using your string lines as reference.
The Sand Bedding Layer
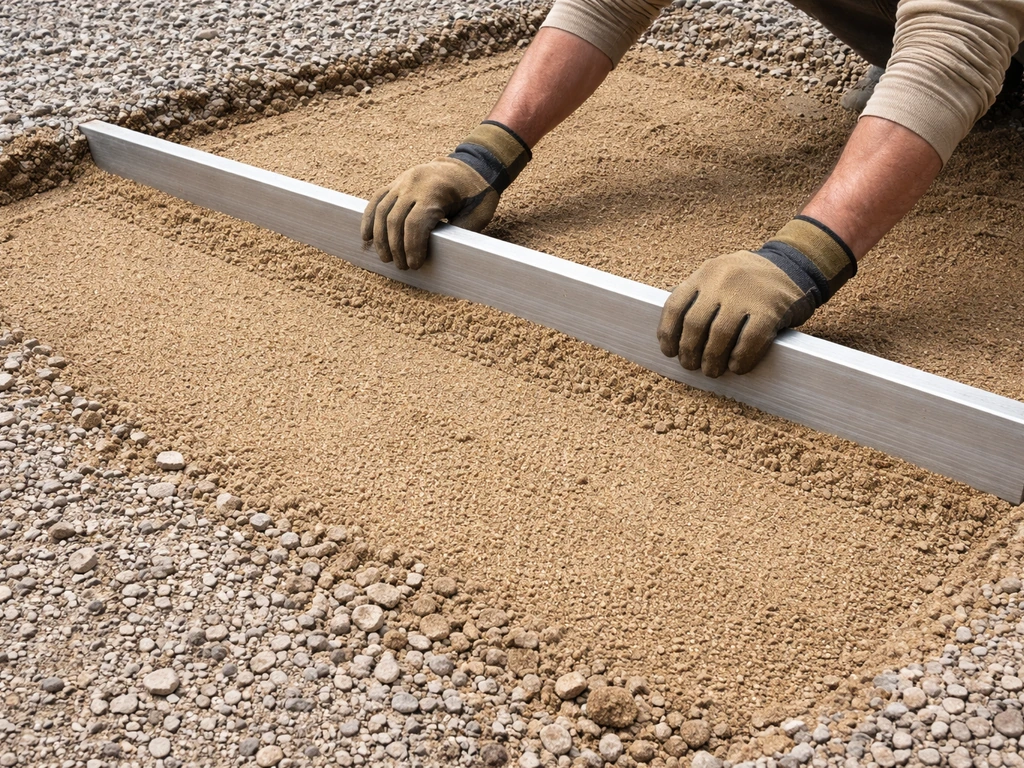
On top of your compacted gravel, spread a 1-inch layer of coarse concrete sand. This is your bedding layer: it lets you fine-tune the level and slope of individual pavers. Screed it smooth using a long straight board pulled across screed pipes or rails set at your target height. The sand layer should be level and consistent. Don't over-water it during this stage: damp is fine, soggy is not. Once screeded, avoid walking on the sand until you're ready to set pavers, or you'll leave footprints that throw off your level.
Edging and Setting Bed
Installing Edge Restraints
Edge restraints are not optional if you're doing a dry-set installation. Without them, your pavers will migrate outward over time, and your joints will open up. Install your edging before you set pavers on the interior. Position plastic or aluminum restraints so the top of the restraint sits about 1/2 inch below the top of your finished pavers. Spike them firmly into the compacted gravel base at regular intervals: aim for a spike every 6 to 12 inches on curves and at least every 12 inches on straight runs. The restraint needs meaningful vertical contact with the paver edge to actually do its job, so don't position it so low that it's only touching the bottom inch of the paver.
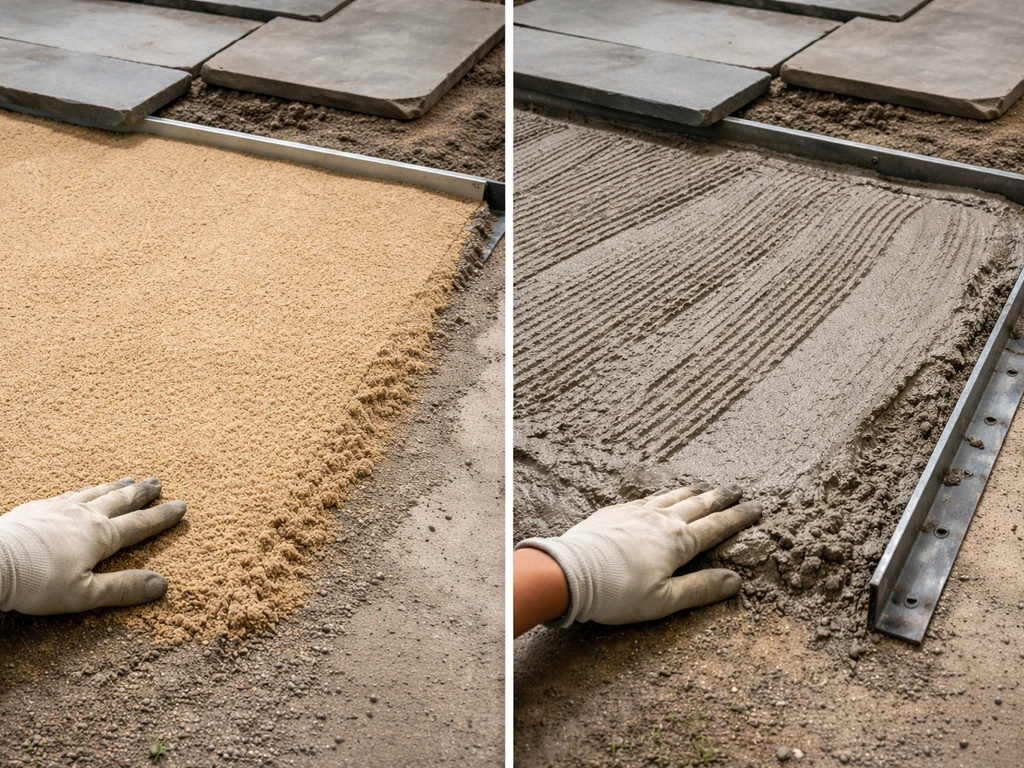
Mortar vs. Dry-Set: Which Should You Choose?
For most DIY slate patio installations, a dry-set (sand bed) approach is the most practical choice. It's forgiving, repairable, and doesn't require mixing mortar or working against a clock. If a slate cracks or shifts a year later, you can pop it out and reset it. The mortar or thinset approach is better suited to patios going over an existing concrete slab or in situations where very precise, permanent positioning is needed. If you go the mortar route, use a polymer-modified thinset rated for exterior stone, and follow the manufacturer's open time closely because slate can vary in porosity.
| Method | Best For | DIY Difficulty | Repairability | Key Risk |
|---|---|---|---|---|
| Dry-set (sand bed) | New ground-up installs | Beginner-friendly | Easy to lift and reset | Pavers shift without proper edging |
| Mortar/thinset bed | Over existing concrete slab | Intermediate | Harder, requires breaking bond | Cracking if slab moves or is poorly sloped |
| Dry mortar (semi-dry) | Flagstone-style irregular slate | Intermediate | Moderate | Efflorescence from Portland cement |
Cutting, Fitting, and Installing the Slate
Laying Out Your Pattern
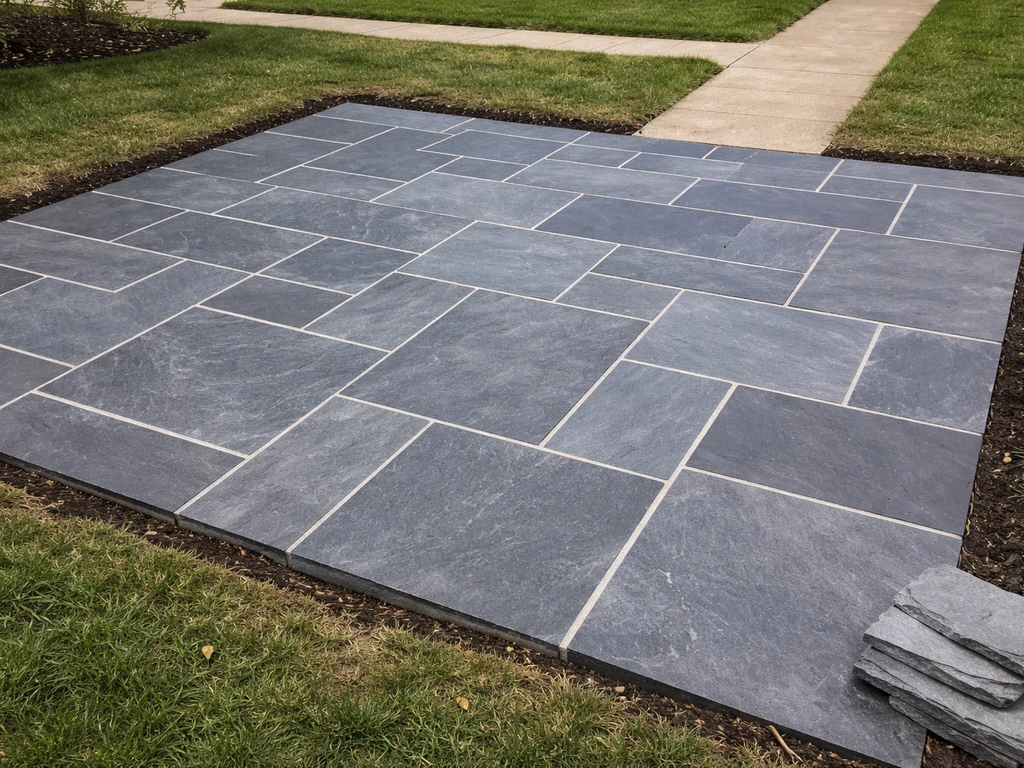
Start laying pavers from a corner that's most visible, usually the corner closest to where people will view or enter the patio. Work outward from that corner, keeping consistent joint spacing of 1/4 to 1/2 inch. Use spacers or cut pieces of tile backer board to maintain consistent gaps as you go. String lines across the patio surface help you keep rows straight and prevent the slow drift that happens when you eyeball every paver.
Check your layout against your string lines every few rows, not just at the start. With natural slate, slight color and texture variation is normal and part of the appeal, but try to mix pavers from different boxes or pallets as you go to avoid clustering similar tones together.
Controlling Lippage
Lippage is the height difference between adjacent pavers, and it's one of the most common complaints with slate patios. Even with gauged slate, some variation exists. Set each paver and use a long level or straightedge that spans three or four pavers to check for lippage. A small tap with a rubber mallet can bring a high paver down slightly, or you can add a thin pinch of sand under a low one. Aim to keep adjacent paver edges within about 1/8 inch of each other. More than that becomes a trip hazard and looks sloppy. If you're fighting persistent lippage, check your screed layer first: an uneven sand bed is almost always the root cause.
Cutting Slate Pavers
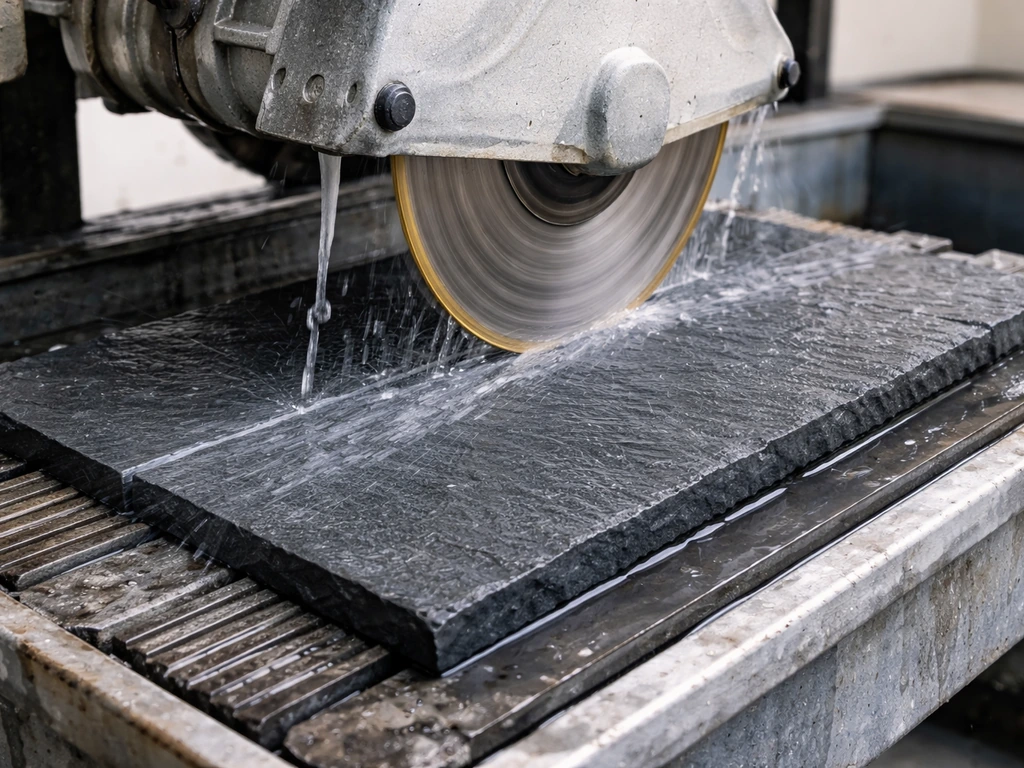
Cuts happen at the edges of your patio and around obstacles. For clean cuts on slate, a wet saw with a diamond blade is the best tool: it cuts smoothly, keeps the blade cool, and dramatically reduces chipping compared to a dry angle grinder.
If you're using an angle grinder, let the blade reach full speed before engaging the cut, score the line first with a shallow pass, and mist the cut line lightly with water to reduce dust and heat. Always cut slate so the scored or cut face is on the outside edge (away from view) if possible, since cut edges are less refined than natural cleft edges. Wear eye protection and a dust mask with any cutting method.
Setting Each Paver
- Place the paver onto the screeded sand bed without sliding it (sliding displaces sand and creates low spots).
- Press firmly and evenly with both hands to seat it into the sand.
- Check with a level in both directions and against neighboring pavers.
- Tap gently with a rubber mallet to adjust height, working from the center outward.
- Verify joint width with a spacer before moving to the next paver.
- Once a section is complete, run your long straightedge across multiple pavers to check for lippage.
Jointing, Sealing, and Finishing Touches
Choosing a Jointing Material
For dry-set slate patios, polymeric jointing sand is the best choice for most homeowners. It's a polymer-modified graded sand that locks together when activated with water, resisting erosion, weed growth, frost heaving, and insect penetration better than plain sand. It can fill joints up to about 2 inches wide. For mortar-set installations, a dry mortar pointing mix or premixed jointing compound is more appropriate. Plain sand is the least durable option and will need regular topping-up, especially in rainy climates.
Applying Polymeric Sand
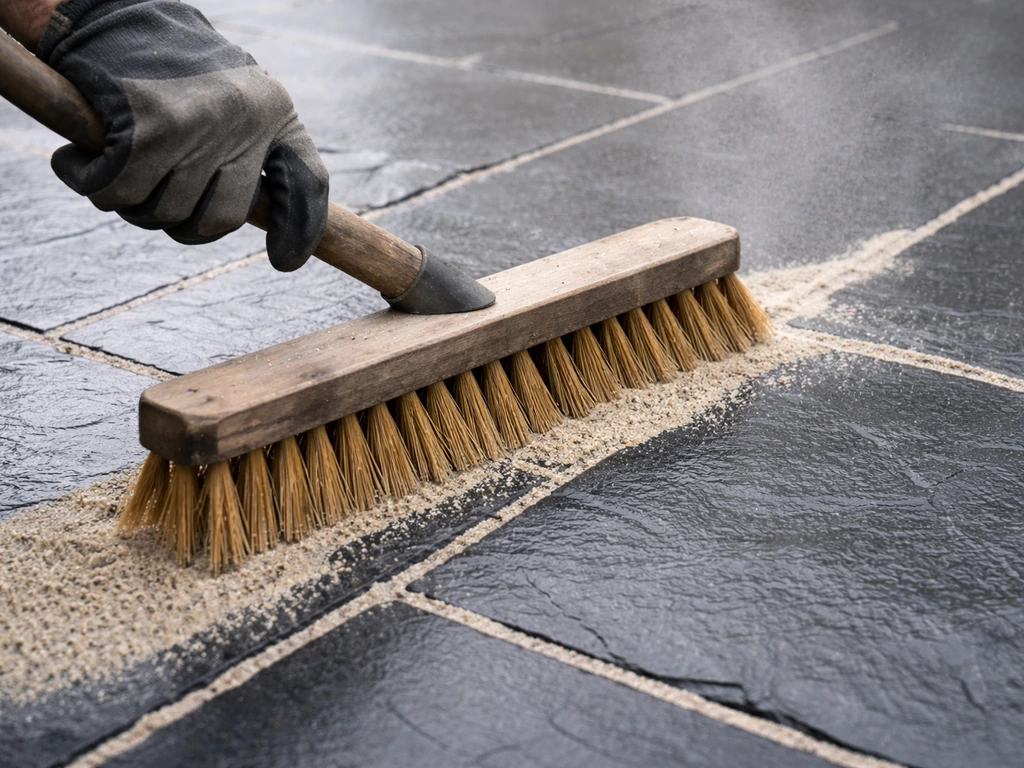
- Make sure your slate surface is completely dry before you start. Never apply polymeric sand to damp pavers.
- Pour polymeric sand over the patio and sweep it across the surface with a stiff broom, working it into all joints.
- Run a plate compactor (with a rubber pad protector on the plate) over the patio to vibrate sand deep into the joints. This step is important: hand-sweeping alone doesn't fully pack the joints.
- Sweep again to refill any joints that settled during compaction.
- Blow or brush off all surface residue from the paver faces before misting. Any residue left on the face will haze when activated.
- Gently mist the entire surface with water, let it absorb, then mist again. Follow the manufacturer's instructions for the number of misting cycles. The goal is to activate the polymer binders through the full depth of the joint column, not to flood the surface.
Sealing Your Slate Patio
Sealing is optional but genuinely useful. A penetrating, exterior-rated stone sealer soaks into the slate and protects against staining, inhibits weed growth in joints, and helps stabilize joint sand. Avoid film-forming or non-breathable coatings: they can reduce slip resistance, trap moisture under the surface, and peel over time. If your slate was newly installed with any cementitious product (mortar or dry mortar joints), wait at least 3 months before sealing to let the stone breathe and let any efflorescence salts work their way out. For clean dry-set installations, you can seal within a few weeks of completion. Plan to reseal every 1 to 3 years depending on your climate and how much use the patio gets.
Final Cleanup
After jointing and sealing, give the patio a thorough rinse with a garden hose. Inspect all joints to confirm they're fully filled and topped up. Check around the perimeter to make sure edge restraints are flush and no pavers are rocking. Backfill around the outside of the edge restraints with soil or sod to finish the perimeter neatly and protect the restraint stakes from being disturbed.
Common Mistakes and Troubleshooting
Most problems with slate patios trace back to a few recurring mistakes. Here's what to watch for at each stage, and how to fix things if they've already gone wrong.
| Problem | Likely Cause | How to Fix It |
|---|---|---|
| Pavers settling or sinking | Insufficient compaction or too-thin subbase | Remove affected pavers, add and compact more gravel, reset pavers and rescreed sand |
| Water pooling on patio | Wrong slope or flat spot in subbase | For minor pooling, re-level individual pavers; for widespread pooling, the base grade needs rework |
| Lippage between pavers | Uneven screed layer or variable slate thickness | Lift the high or low paver, adjust sand bed, and reset. Check screed more frequently as you work |
| Polymeric sand hazing on surface | Applied to damp pavers or residue not cleared before misting | Use a haze remover rated for natural stone; avoid acid-based cleaners on slate |
| Efflorescence (white staining) | Salt migration from cementitious mortar or jointing | Brush off when dry, treat with a diluted efflorescence cleaner; improve drainage to reduce moisture movement |
| Joint sand washing out | Plain sand used instead of polymeric, or polymeric sand not properly activated | Re-sweep polymeric sand into joints and re-activate with water following the misting steps correctly |
| Pavers shifting at edges | No edge restraints or improperly staked restraints | Install or re-stake edge restraints; reset drifted pavers and refill joints |
When to Call a Professional
Most homeowners can handle a standard ground-level slate patio installation with patience and the right tools. Where I'd recommend getting professional help: if your site has severe slope (more than a few inches of grade change across the patio area), if you're dealing with very expansive clay or chronically wet soil, or if you're working on a larger project over 300 to 400 square feet where equipment access and scale make the job significantly harder. For everything else, take it one stage at a time, don't rush the base work, and you'll end up with a patio you're genuinely proud of.
If you're exploring variations on this project, the approach changes somewhat depending on your specific situation. Installing without an underlying concrete slab (a full dig-and-base build like this guide covers) is the most common route, but each scenario has its own considerations worth digging into before you start. Installing a slate patio yourself is very similar to the full dig-and-base process described here, which is the core of how to build slate patio successfully. If your goal is how to lay a slate patio without concrete, focus on a full excavated base, a proper sand bedding layer, and tight dry jointing so the stones stay stable and drain correctly.
FAQ
Do I have to use crushed stone under slate, or can I use gravel or recycled aggregate?
Use a compactable base like crusher run or road base. Rounded pea gravel and many mixed recycled materials do not lock together, so the base can settle unevenly. If you are forced to use an alternative aggregate, test compact a small section first and verify the surface stays stable and does not pump when stepped on.
How do I know my slope is correct after I’ve screeded the sand?
Re-check slope using string lines set to the intended finished heights, then verify with a straightedge at multiple spots. A common mistake is relying only on the subbase string lines and not correcting after sand is added, since the screed step can level out your intended fall.
Can I install slate on top of existing concrete if it seems solid?
Only if the slab is flat, sound, and already has the correct drainage direction. If there are cracks, heaving, or ponding, the movement will transfer through the slate. Also confirm the existing surface is properly prepared and flat enough for consistent thinset coverage, because unevenness usually shows up as lippage or rocking.
What should I do if my slate pavers are different thicknesses (ungauged slate)?
Plan on selective placement and more frequent leveling checks. For dry-set sand beds, you may need to remove and re-bed individual stones to reduce lippage. For a mortar or thinset approach, thickness variation becomes harder to correct without making the bed too thick, so gauged slate is usually the safer choice for DIY.
How should I handle spacing when my pavers are irregular sizes?
Base your layout on consistent spacing you can maintain with spacers (typically 1/4 to 1/2 inch), then measure the pattern edges after dry layout. For irregular pieces, avoid forcing a tight fit that creates very narrow joints, because joints act as the adjustment channel for leveling and jointing sand.
Is polymeric jointing sand safe for natural stone, and how do I avoid incomplete joint fill?
It is commonly used for paver joints, but do not assume it will fully pack into wide or deep joints. Sweep dry sand in multiple passes, then apply water in light mist cycles until the sand darkens and locks, and do not flood the joints. If joints stay light or sandy, it usually means not enough activation or too much dust prevented packing.
How do I prevent slate patio tiles from rocking after installation?
Rocking almost always comes from contact points that are not fully supported. When you set pavers, press down firmly and check adjacent stones using a long level across several units, then correct immediately by adding or removing sand under the affected area. Avoid walking on screeded sand for long stretches, because footprints create localized low spots.
What’s the best way to cut slate to minimize chipping at the visible edge?
Use a wet saw with a diamond blade when possible. If you must use an angle grinder, score lightly first, let the blade reach full speed before the main cut, and keep the cut line on the outside edge whenever you can. Also support the stone so it does not flex during the final portion of the cut.
When should I seal the patio, and do I need to seal if I used only dry joints?
Seal time depends on whether there is cement present. If you used mortar or dry mortar joints, wait about 3 months so moisture and any efflorescence products can escape. If you used purely dry-set and jointed with sand, you can typically seal sooner, but only after joints are fully filled and the surface is completely dry.
Do I need to backfill around edge restraints, and what’s the proper way to finish the perimeter?
Yes, backfill helps stabilize restraints and protects restraint stakes from being disturbed during yard work. After installing pavers and confirming restraints sit correctly relative to the finished surface, backfill with soil or sod around the outside of the edging, then keep the area undisturbed until any jointing sand has fully settled and been topped up if needed.
How do I decide whether to DIY or hire help for my specific patio size?
A practical threshold is where equipment and access make material handling slow. If your project is larger than roughly 300 to 400 square feet, or if the site is hard to reach with a plate compactor and delivery, hiring can save time and reduce the chance of rushed base steps. Also hire out if the site has major grade challenges, like more than a few inches of change across the patio area, because slope errors are difficult to correct later.