Rubber patio tiles go down faster than almost any other patio surface, and if you get the base right, they'll stay put for years. The full process breaks down like this: measure and plan your layout, prepare and level your base (soil, gravel, concrete, or existing pavers), set your edging, then lay tiles from the center or a corner outward, cut borders to fit, and finish the transitions. The biggest thing that trips people up is skipping proper base prep. Get that part right and the rest is genuinely straightforward.
How to Install Rubber Patio Tiles: Step by Step DIY Guide

Clara Farrell
10 Jun 2026
Choose the right rubber patio tile system and layout plan
Before you order a single tile, you need to decide which system fits your situation. Rubber patio tiles come in two main formats: interlocking (jigsaw-style tabs that click together without adhesive) and flat-edged tiles that need to be glued down. Interlocking tiles are the friendlier DIY option. They can be lifted, repositioned, and taken up if you need to move them.
Glue-down systems bond directly to a solid substrate like concrete or asphalt and are more permanent. If you're covering a concrete patio, either system works. If you're going over bare soil or grass, you'll need to build a proper base first regardless of the tile type. Once you know how to build that base, you can follow the rest of the steps to install patio tiles over grass.
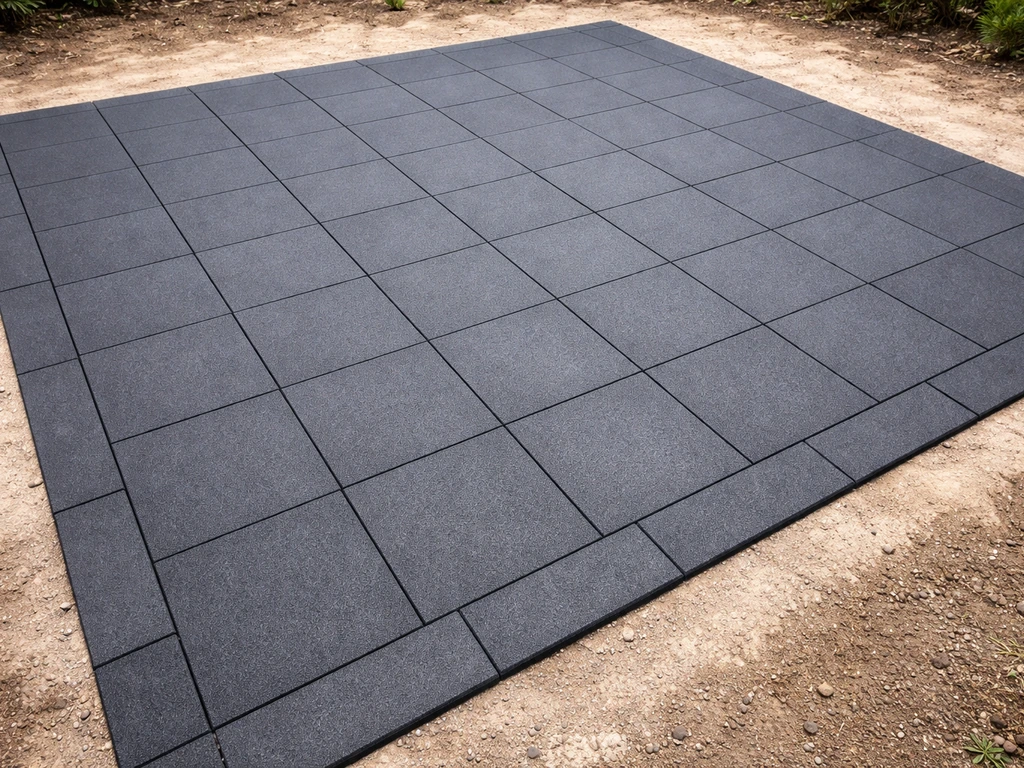
Standard interlocking rubber tiles are typically 24 inches by 24 inches, so planning is easy maths. Keep in mind there's a manufacturing tolerance of around plus or minus 3/16 of an inch, which is normal and doesn't affect the finished look once tiles are locked together. For thickness, outdoor patio and walkway tiles generally run 10 mm to 40 mm thick. Thicker tiles handle foot traffic, furniture, and mild vehicle weight better. Play areas benefit from thicker tiles for impact absorption. Shed floors and dry walkways can get away with thinner options.
For your layout plan, measure the length and width of your patio and sketch it out on paper. Decide whether you want a grid pattern running parallel to the house or a 45-degree diagonal, which looks great but creates more cut pieces at the edges. Starting from the center of the space usually gives you the most balanced border cuts. Starting from one corner works well when one or two walls are the dominant visual anchor. Mark your center lines or starting corner before you touch a single tile.
- Interlocking tiles: best for DIY, removable, no adhesive needed if base is solid
- Glue-down tiles: more permanent, better for high-traffic or commercial use, require a solid substrate
- Tile size: most standard outdoor rubber tiles are 24 x 24 inches
- Thickness: 10–20 mm for light foot traffic, 30–40 mm for play areas or heavy furniture
- Sketch your layout and calculate square footage before ordering. Add 10% for cuts and waste
Tools, materials, and safety you'll need
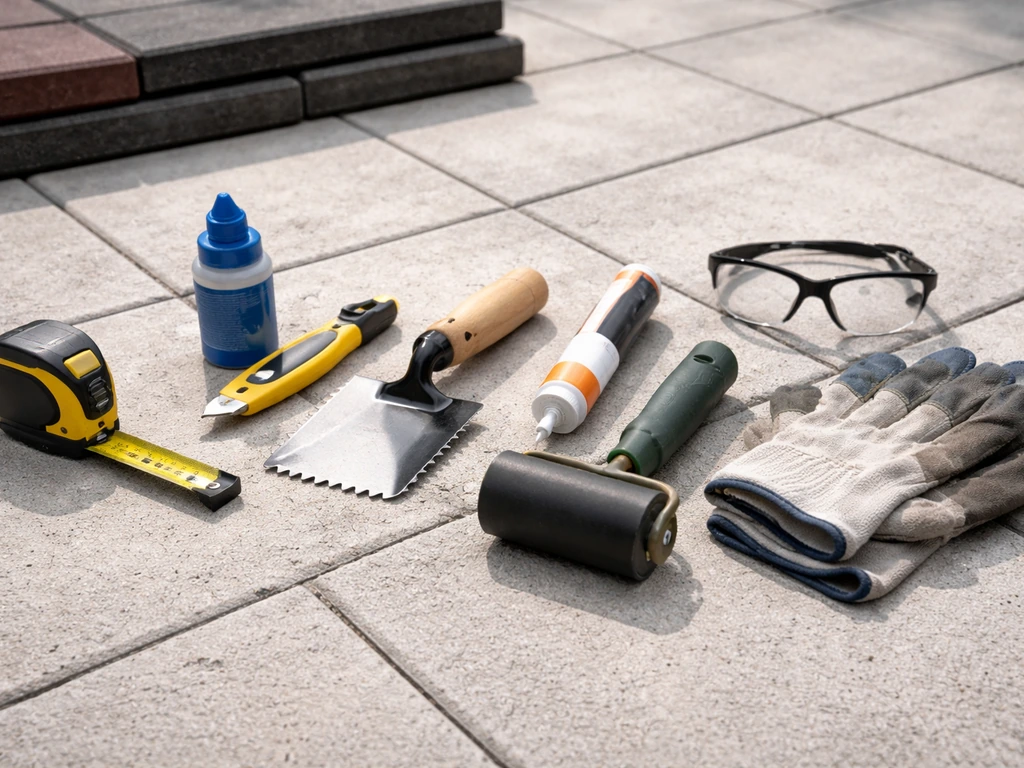
One of the things I like about rubber tile installs is the tool list is short. You don't need anything exotic. Here's what to gather before you start so you're not hunting for something mid-job.
| Item | What It's For |
|---|---|
| Tape measure | Measuring the space and marking layout lines |
| Chalk line or string line | Snapping straight reference lines |
| Carpenter's square | Checking corners are true |
| Utility knife or jigsaw with rubber-cutting blade | Cutting tiles to fit edges and borders |
| Rubber mallet | Tapping interlocking tabs together |
| Plate compactor or hand tamper | Compacting the gravel base |
| Spirit level (at least 4 ft long) | Checking flatness and slope |
| Notched trowel | Spreading adhesive evenly for glue-down tiles |
| Power washer or stiff brush | Cleaning an existing concrete or paver surface |
| Edging stakes or border restraints | Holding the perimeter in place |
| Safety gloves and knee pads | Hand and knee protection during installation |
| Dust mask | For cutting rubber, which produces fine particles |
For materials, you'll need your rubber tiles, edging trim or border tiles, and either adhesive (for glue-down installs) or nothing extra for interlocking systems. If you're building a base from scratch, add compactable gravel (0–20 mm granules work well) and possibly sharp sand for leveling. If you're gluing, choose an adhesive rated for outdoor rubber flooring and always read the open time guidance on the tin before you start spreading.
Prepare the patio surface: soil, gravel base, concrete, or pavers
This is where most DIY rubber tile installs succeed or fail. The base has to be solid, level, and well-drained. Which prep approach you use depends entirely on what you're starting with.
Starting from bare soil
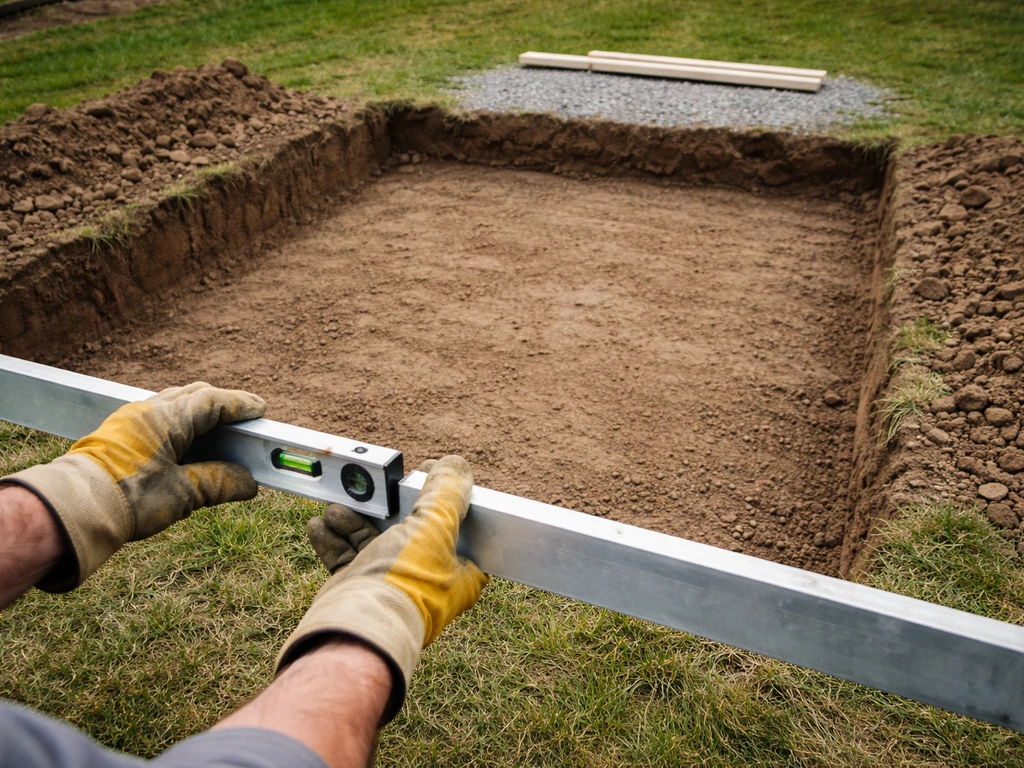
If you're working from bare soil or a grassed area, you need to excavate. If you are laying interlocking patio tiles on grass, your first step is excavating and building a compacted gravel base so the tiles interlock on a stable, level substrate. Remove all vegetation, topsoil, and organic material down to firm subsoil. The total excavation depth should be around 10–20 cm to allow for the base build-up plus your tile thickness. Once you're down to firm ground, compact the subsoil with a plate compactor before adding anything on top. Skip this step and the soil will shift and settle under your tiles over time.
Starting from concrete or asphalt
Concrete and asphalt are the ideal substrates for rubber tiles, especially if you're going for a glue-down installation. Power-wash the surface thoroughly to remove loose debris, dirt, oil, and any algae. Let it dry completely. Check the surface with a long spirit level and note any low spots or high spots. High spots greater than about 5 mm over a 2-meter run need to be ground down or filled before you lay tiles. Any oil stains need degreasing because adhesive won't bond properly to contaminated concrete.
Starting from existing paving slabs or pavers
Rubber tiles can go over existing paving slabs as long as the slabs are stable and firmly bedded. Check each slab by pressing on the corners. If any rock, lift them and re-bed with fresh mortar before proceeding. Loose slabs under rubber tiles will cause the tiles to flex, unlatch at the interlocks, and eventually crack at the edges. Once the slabs are all solid, clean the surface and check levelness the same way you would for concrete.
Leveling, base thickness, compaction, and drainage considerations
Even slight unevenness in the base will show through the finished tiles. Lowe’s notes that even slight unevenness in the gravel base will be reflected on the rubber pavers, so take time leveling and compacting the base Even slight unevenness in the base will show through the finished tiles.. Rubber is flexible, which sounds forgiving, but that flexibility also means tiles will follow every bump and hollow in the surface beneath them. Take time here and you'll thank yourself every time you look at the finished patio.
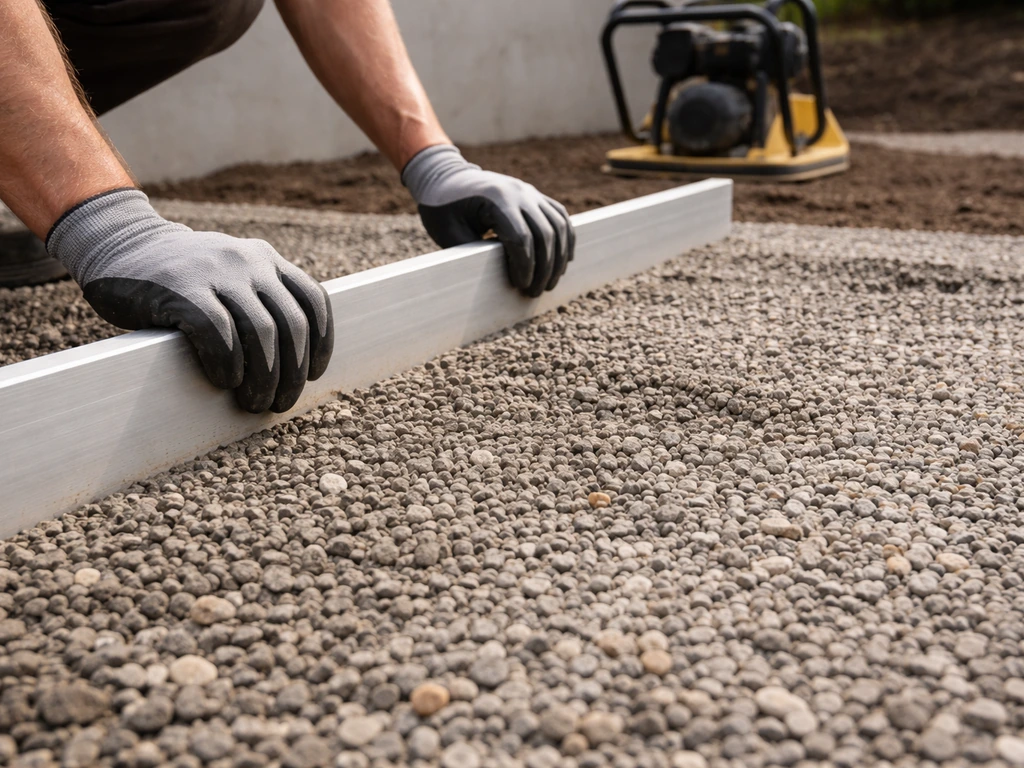
For a gravel base, use 0–20 mm compactable gravel and aim for a compacted depth of at least 3 cm (30 mm). Spread it in one layer, rake it roughly level, then compact with a plate compactor (or a hand tamper for small areas). Run the compactor over the area at least twice. After compaction, check levelness again, fill any low spots, and compact once more. The surface should feel firm underfoot with no movement.
Drainage is non-negotiable outdoors. A flat patio will puddle after rain and encourage the surface to lift or stay damp underneath, which breaks down adhesive and invites moss growth. Build a slope of 2–3% away from the house into your base. That works out to roughly a 2 cm drop for every 1 metre of run. Set this slope into your gravel base using string lines as a guide, and check it with your spirit level as you compact. On a concrete or paver surface, the slope should already be there if it was laid correctly. If it isn't, that's a more serious fix and may need a professional to look at it.
For interlocking tiles going over a gravel base, the gravel surface itself is your finished substrate. Get it as flat and compact as you can because you won't have adhesive to compensate. For glue-down tiles over concrete, a small amount of leveling compound can correct minor dips. Just make sure it's fully cured before you start spreading adhesive.
Install and fit: starting points, interlocking, edging, and cutting
With a clean, level, sloped base ready, you can start laying tiles. Here's the process step by step.
- Snap your layout lines. Use a chalk line to mark the center of the space in both directions (or your corner reference if starting from a corner). These lines keep your rows straight as you work.
- Do a dry lay first. Before any adhesive or interlocking, place a run of tiles along your reference lines to check the fit and confirm border cuts will be a reasonable size. Adjust your starting point if the cuts are going to be tiny slivers at the edges.
- For interlocking tiles: start at your reference point and connect each tile by pressing the tabs firmly together. Use a rubber mallet to tap connections flush. Work outward from your starting point in a pyramid or quadrant pattern rather than row by row, which helps keep everything square.
- For glue-down tiles: spread adhesive over a manageable area (about 1–2 square metres at a time) using a notched trowel. Allow it to reach the right tack before laying tiles. Most outdoor rubber adhesives have an open time of 15–45 minutes, but this varies significantly with temperature, humidity, and how porous the substrate is. Follow the manufacturer's stated open time for your specific product.
- Set each tile into the adhesive and press down firmly. Periodically lift a tile to check that adhesive is transferring to at least 90% of the tile's back surface. If coverage is patchy, you need to adjust your trowel notch size or technique.
- Work toward the edges, leaving border tiles until last.
- Set perimeter edging or border restraints before or during the install to stop tiles shifting while you work. If using adhesive for edging, allow 24 hours for edging adhesive to dry fully before laying field tiles adjacent to it.
- Cut border tiles last. Mark the cut line with a pencil and straight edge. For straight cuts, score deeply with a sharp utility knife and snap. For curved or complex cuts, use a jigsaw fitted with a blade for rubber or foam.
One mistake I see over and over is people letting adhesive skin over before laying tiles. If the adhesive has gone shiny and lost its tack, it's past its open time. Capri@Home notes that adhesive open time varies with air or surface temperature, relative humidity, and substrate porosity past its open time. Scrape it up, clean the area, and start fresh. Don't try to tile over skinned adhesive. Similarly, keep adhesive off the top surface of the tiles as you work. Cured adhesive on rubber is very difficult to remove and can permanently discolor the material.
Handle corners, slopes, and transitions at doorsteps
Corners, slopes, and doorways are where a rubber tile install gets interesting. None of these situations are deal-breakers, but they each need a bit of thought before you start cutting.
Inside and outside corners
Inside corners (where the patio meets two walls) are usually just two straight border cuts meeting at a right angle. Use your carpenter's square to make sure your layout lines are truly square before you start, because an out-of-square room will show badly in the corners once tiles are in. Outside corners are similar: cut each edge tile for its respective side and the corner piece gets both cuts.
Sloped or uneven ground
If your patio area slopes significantly more than the 2–3% you're building in for drainage, you have two choices. For mild slopes, build the gravel base up on the low side to create a level surface, compacting in thin layers as you go. For steeper slopes, you may need to cut into the high side and build up the low side, which is more work and may need timber or concrete retaining edges. Very steep slopes are not ideal for rubber tile installs over a loose base and are better suited to a poured or screeded solid surface first. Interlocking tiles on a slope without a solid locked substrate will gradually walk downhill under foot traffic.
Doorstep transitions and curb edges
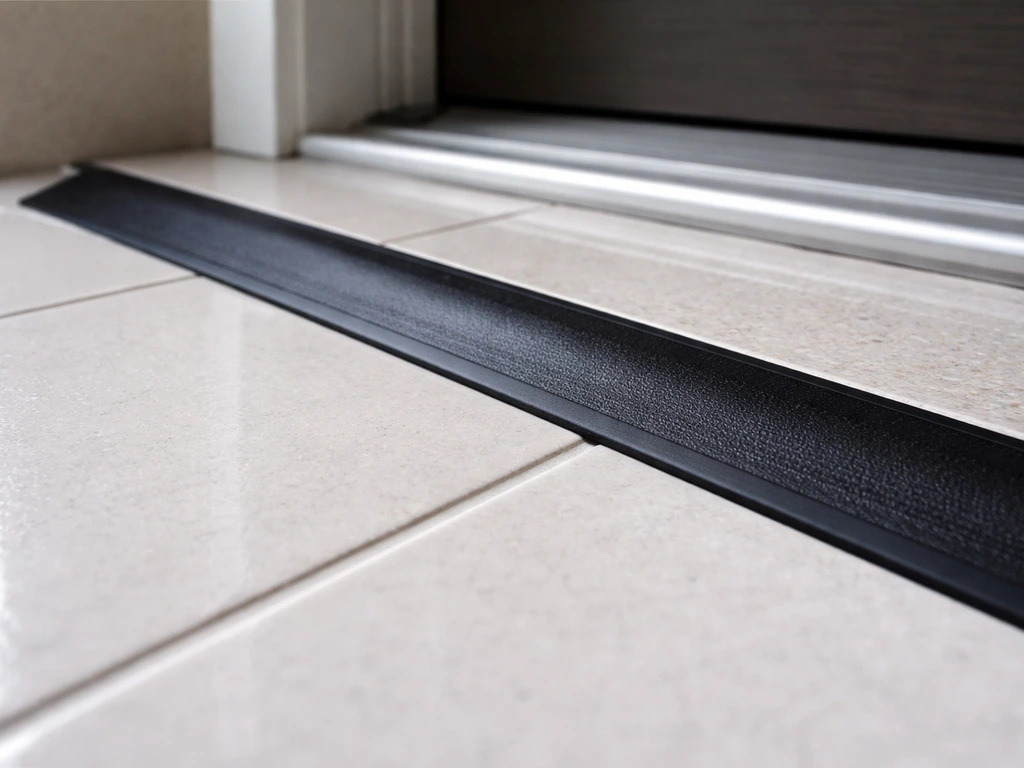
Where the tiled surface meets a door threshold or a step, use a purpose-made rubber transition strip or a tapered edge ramp tile. This prevents a sharp trip hazard at the doorway and gives the install a clean, finished look. The transition piece should be secured with adhesive or screwed down through pre-drilled holes depending on the product. For curb or raised-edge conditions, many tile manufacturers include specific outdoor-to-curb guidance in their installation documentation. If your tiles butt up to a curb, use a half-bullnose edge tile if available, or finish with a beveled aluminum trim strip to cap the raw cut edge neatly.
Finish, curing time, and long-term maintenance
Walking on it and curing time
For interlocking tiles over a solid base, you can walk on the surface as soon as you're finished laying. There's no curing period. For glue-down installs, wait at least 24 hours before light foot traffic, and 48–72 hours before placing heavy furniture or planters. Check your adhesive manufacturer's data sheet for exact cure times because they vary. Cold or damp weather extends curing time significantly.
Cleaning and keeping them looking good
Rubber patio tiles are low maintenance, which is one of their real selling points. For routine cleaning, sweep off loose debris and hose the surface down. For stubborn dirt or algae, scrub with a stiff brush and a mild detergent solution. Avoid solvent-based cleaners, petrol, or harsh chemicals because they can degrade the rubber compound and strip the surface texture. If you notice algae building up, it's usually a sign that drainage isn't working as well as it should be. Check that your drain slope is still clear and that nothing is blocking water from running off.
Long-term care and fixing problems early
Check the tiles once a year, ideally in spring. Look for any tiles that have lifted at the edges, interlocks that have unlatched, or areas where the base seems to have sunk. With interlocking systems, individual tiles can be popped out and replaced if they're damaged without touching the surrounding area. For glue-down tiles, a lifted edge can usually be re-stuck with outdoor rubber adhesive if caught early.
Press the tile down firmly and weight it for 24 hours. One advantage rubber tiles have over ceramic or stone patio surfaces is that a cracked or damaged tile is a simple swap rather than a major repair job. If you're also comparing against other surface options for patios, rubber tiles sit in a different category to fake grass or turf overlays, which have their own drainage and fixing challenges.
If you're specifically wondering how to install turf on patio areas, the base prep and drainage requirements are just as important as with rubber tiles. If you're planning a turf or fake grass patio instead, you'll want to focus on drainage and a stable sub-base so it doesn't sink or smell over time fake grass or turf overlays.
In terms of lifespan, a properly installed rubber tile patio over a well-prepared base should give you a decade or more of reliable use. The base is still the determining factor. A great set of tiles over a poor base will fail in a couple of seasons. A basic set of tiles over a properly compacted, well-drained, level base will outlast most people's patience for a garden refresh.
FAQ
Can I install rubber patio tiles over existing pavers I already have?
Yes, but only if the underlying pavers are solid and the water can still drain away. If you have loose, rocking, or uneven pavers, they will flex and can cause interlocks to unlatch or glue joints to fail. Before tiling, clean thoroughly, test levelness with a long straightedge, and re-bed any slab that moves (or that you can lift by pressing on corners).
Do rubber patio tiles need edging trim, and how important is it for keeping everything straight?
Most rubber patios should stay flat, but even good installs need an edge restraint so tiles cannot creep. Use edging trim or border tiles all the way around, and make sure the final border row is supported, not floating over a hollow. A small gap from wall or step is usually fine, but keep it consistent and fill with the manufacturer-recommended edging solution if specified.
What’s the most common glue-down mistake that ruins adhesion on concrete?
Avoid using adhesive on top of dirt, dust, paint, sealers, or algae. If your concrete is sealed, the adhesive may not bond unless the surface is properly abraded or degreased per the adhesive guidance. Also, do not spread adhesive beyond the working area you can cover within its open time, because “skinned” adhesive will drastically reduce bond strength.
If I accidentally get glue on the top of the rubber tiles, what should I do?
If you get adhesive on the tile surface, let it cure and then remove as much as possible with careful mechanical scraping, because fresh adhesive is likely to smear and spread. Some cured residues can discolor rubber, so test your removal method in a hidden area first. Prevention is best, keep a clean rag for smears, and mask adjacent tile tops if you tend to slop adhesive.
How can I plan tile cutting so I end up with even border rows, especially with a diagonal layout?
For a DIY job, plan for more cut pieces at the edges if you choose a 45-degree layout, and double-check that your measured room corners are truly square before you commit. Use the center or starting line method to distribute border cuts evenly, and do a dry-fit row of tiles without adhesive to confirm the pattern and border widths match your sketch.
What should I do if my patio ground slopes more than expected for drainage?
If the patio slopes more than the intended 2 to 3% drainage grade, build up the gravel base on the low side to create a level tiling surface. On steeper slopes, you may need retaining edging and careful base buildup, otherwise interlocking tiles can “walk” as feet load the downhill edges. If you cannot create a solid, level, well-drained surface, a solid poured or screeded base is usually the safer route.
What’s the best way to troubleshoot lifted edges on interlocking tiles?
If an interlocking tile edge starts to lift, first check whether the base under that area has sunk or if drainage is causing water to sit nearby. Clean and dry the area, then pop the lifted tile out and inspect interlocks for debris. Re-seat it firmly and, if it’s a recurring problem, you likely need to correct the base, not just re-click tiles.
How long should I wait before moving furniture onto glue-down rubber tiles?
For glue-down installs, you generally should not start heavy use too soon, because adhesive cure depends on temperature and humidity. Wait at least the minimum cure period stated by the adhesive, and if it’s cold or damp, extend that timeline. Before furniture or planters, check the tile edges for movement, if tiles can shift, curing is not complete.
What should I check if water still puddles on the tiled area after installation?
If you notice puddling after rain, first verify the surface has a continuous slope away from the house, not just locally around the tile area. Clear any blocked drainage pathways and check that the base is not covered with fines that can trap water. If puddles persist, you may need to lift sections and rework the base slope, because rubber tile flexibility cannot fix a water-management problem.
Can I replace one damaged tile without redoing the whole patio?
Yes, but it must match the product system. Many rubber tile layouts tolerate replacement of single interlocking tiles without disturbing surrounding rows. For glue-down tiles, replace only if you can remove the affected tile without damaging neighbors, then re-glue using outdoor-rated rubber flooring adhesive and weight it properly during cure.