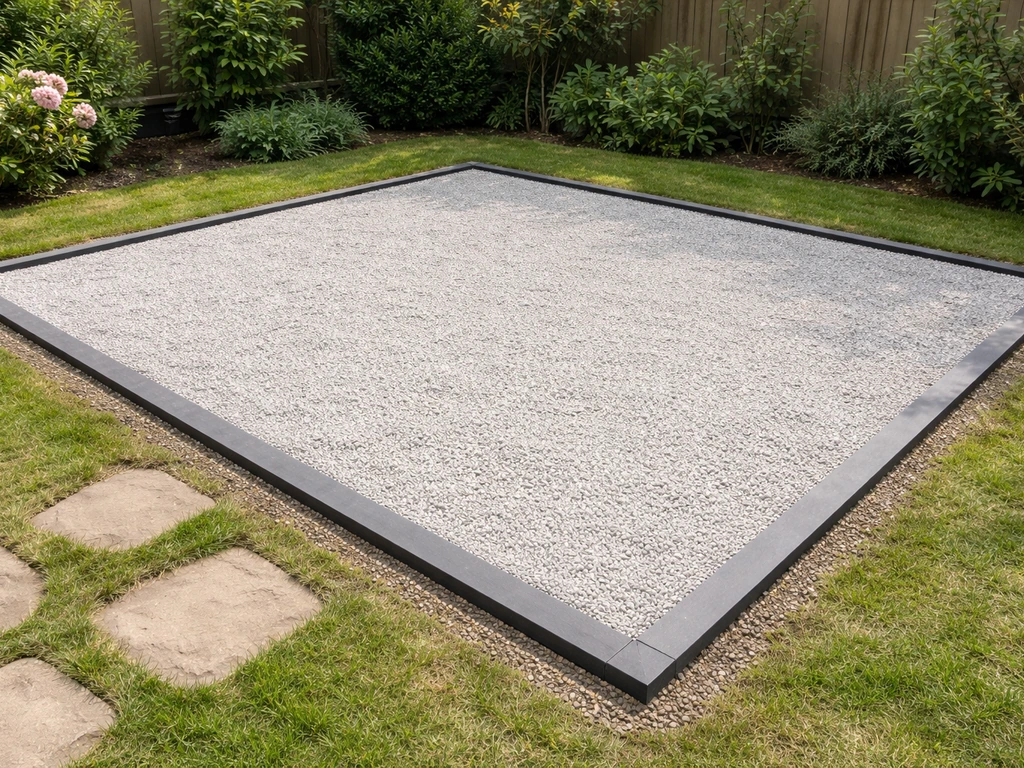
Laying a gravel patio is one of the most beginner-friendly patio projects you can tackle, and with the right prep it will look great and last for years. The basic process is: mark out and measure your area, excavate to roughly 150–200mm deep, compact the subsoil, lay a weed-control membrane, pour in and compact 100–150mm of MOT Type 1 sub-base, install your edging, then top with 40–50mm of decorative gravel raked level and compacted. Get those layers right and you'll have a firm, weed-free, free-draining patio that doesn't sink or wash out. Once you have the sub-base, membrane, edging, and correct drainage fall sorted, you can follow the same steps to lay a rock patio with confidence how to lay rock patio.
How to Lay a Gravel Patio: Step-by-Step UK DIY Guide

Clara Farrell
12 May 2026
Planning, measuring, and choosing your materials
Before you dig anything, spend time on paper. Measure your proposed patio area carefully and sketch it out. A useful rule of thumb for a comfortable outdoor sitting area is at least 3m x 3m, but measure your furniture first and add 600–900mm clearance around it. Mark the boundary with pegs and string so you have a clear picture on the ground.
For gravel, the most popular choices for UK patios are 10mm or 20mm pea gravel (rounded, soft underfoot, rolls a little), 14mm or 20mm golden flint (angular, compacts better, stays put), and self-binding gravel or hoggin (fine-crushed stone that binds firm almost like a soft tarmac surface). If you want something that genuinely locks in place and feels solid, angular or self-binding gravel wins every time. Rounded pea gravel looks pretty but tends to migrate toward the edges and sticks to shoes.
For the sub-base you want MOT Type 1 (also called DTp1 or crusher run). This is crushed limestone or granite with a mix of fine and coarse particles that compact into a rock-solid foundation. You can buy it in bulk bags or loose loads from any local builders merchant. Work out your quantities by multiplying the length x width x depth in metres: a 4m x 4m patio with 120mm of sub-base needs roughly 2.3 cubic metres of Type 1 (add 10–15% for waste and compaction).
- Decorative gravel: 10mm or 20mm angular gravel or self-binding hoggin for a firm surface
- Sub-base: MOT Type 1, typically 100–150mm compacted depth
- Weed membrane: woven geotextile (not the cheap fabric type)
- Edging: concrete kerb edging, steel lawn edging, or treated timber boards
- Concrete for haunching edging (optional but recommended for kerb edging)
- Sharp sand: optional 20–30mm blinding layer between membrane and sub-base
- Tools: pegs and string line, spade, wheelbarrow, plate compactor (hire one), long spirit level or datum level, rakes, rubber mallet
A quick note if you've been wondering about 'laying a patio on gravel': this phrase usually means either using a gravel-only build (sub-base plus decorative gravel) or laying a hard surface like slabs over an existing gravel base. If you decide to go beyond a gravel-only build and want a more solid finish, you can also consider how to lay a pebble patio on an existing base or over a properly prepared sub-base.
The principles behind how to lay a granite patio are similar too, so the sub-base, fall, and edging still matter a lot laying a patio on gravel. If you're specifically learning how to lay a limestone patio, the key differences are the base thickness, edging, and slab bedding so everything stays level and stable laying slabs over an existing gravel base.
If you've got an existing gravel area that's firm and well-compacted, you might be able to top it up and re-edge it rather than start from scratch. But if the existing gravel is mixed with soil, poorly drained, or spongy underfoot, excavate and start fresh. Trying to save work by building on a weak base is the single most common reason gravel patios fail within a year.
Clearing the site and digging to the right depth
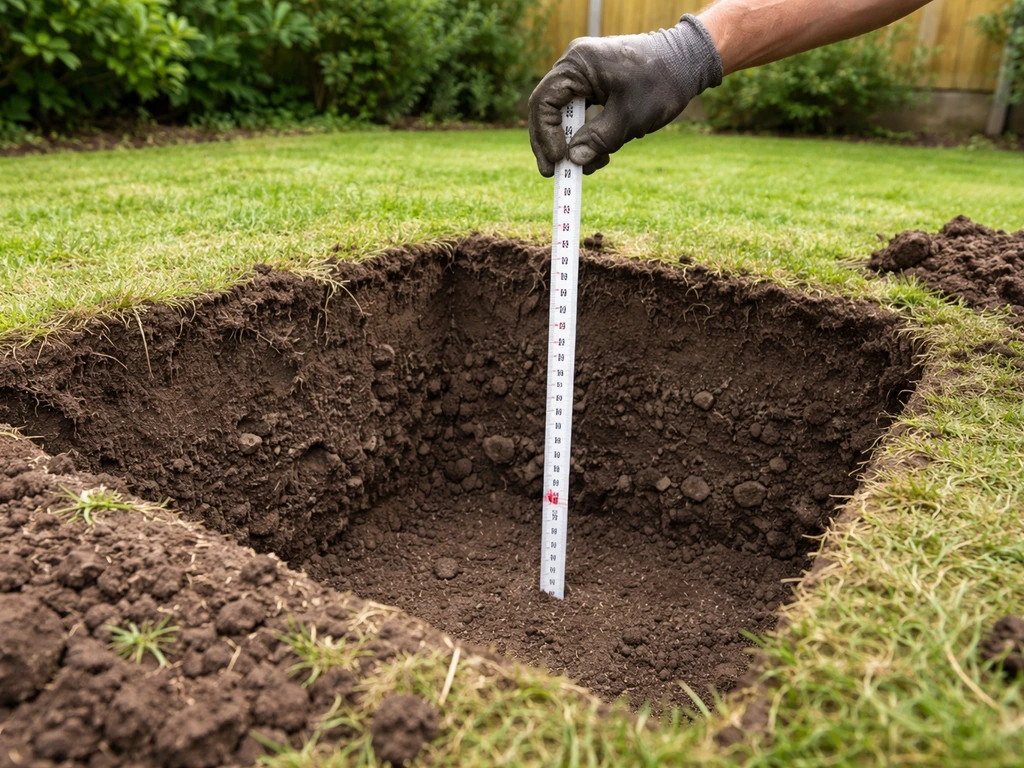
Strip the area of all turf, plants, and debris first. Topsoil is soft, organic, and compressible, so every bit of it needs to come out. How deep you need to go depends on your finished surface level: you're aiming for 100–150mm of compacted sub-base plus 40–50mm of decorative gravel, so you need roughly 150–200mm of excavation below your intended finished level. ARC Building Supplies’ aggregate calculator also advises that a typical domestic patio or gravel build-up uses around 100, 150mm compacted MOT Type 1 (hardcore/DTp1) sub-base depth 100–150mm compacted MOT Type 1 (hardcore/DTp1) sub-base. Mark your target excavation depth on a peg in the centre of the area so you've got something to check against as you dig.
Once the turf and topsoil are cleared, check the subsoil. In most UK gardens you'll hit clay, sandy subsoil, or a mix. Clay is the one to watch: it holds water, expands when wet, and can cause movement if your sub-base isn't deep enough. If you're on heavy clay, go to 150mm of sub-base rather than 100mm.
DIYUK discussions about MOT Type 1 depth often highlight choosing around 150mm rather than 100mm on heavy clay to account for movement and drainage Depth of MOT Type 1 for front garden. The firm, slightly damp subsoil that remains after excavation is your 'subgrade'.
Give it a firm stomp: if it feels springy or spongy, the soil may be too soft and you'll want to compact it with a plate compactor before laying anything on it, or remove a little more and add extra sub-base.
If your garden slopes, now is the time to deal with it. A gentle slope away from the house is actually ideal for drainage. A steep slope is trickier: you'll either need to cut into the high side and build up the low side (cut-and-fill) or use a retaining edge on the lower boundary. Don't try to create a perfectly level patio on a dramatically sloping site without addressing the slope in the groundworks: you'll end up with one side of your sub-base being very thick and unstable.
Building the sub-base: layers, membrane, and compaction
This section is the most important part of the whole job. A gravel patio that sinks, shifts, or gets overrun with weeds within a season is almost always down to a poor sub-base. Get this right and everything else follows.
Lay the weed membrane first
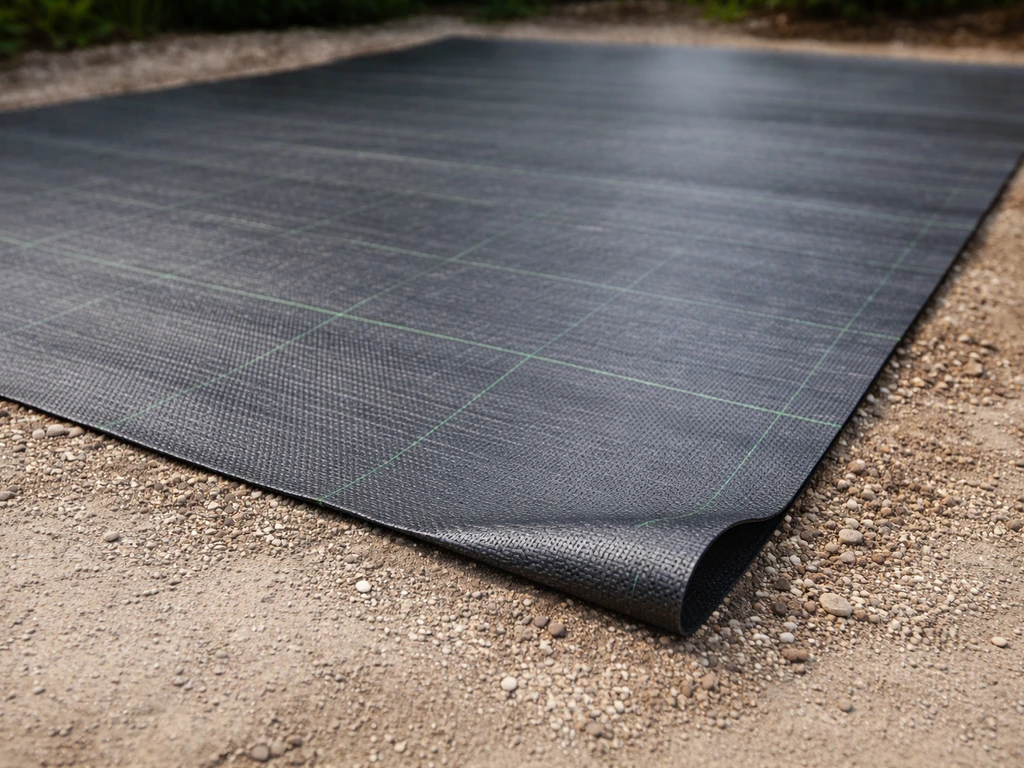
Before any aggregate goes in, lay your woven geotextile membrane directly onto the compacted subgrade. This membrane does two jobs: it suppresses weeds coming up from below, and it separates the sub-base from the soil so fine particles don't migrate upward and contaminate your aggregate over time. Use a proper woven geotextile, not the thin garden-centre fabric type, which degrades faster and lets roots through more easily. Overlap any joins by at least 300mm (this is the minimum recommended by UK installation guidance) and pin the membrane to the edges. Trim excess once your edging is in.
Compact the Type 1 sub-base in layers
Pour in your MOT Type 1 and spread it roughly with a rake. Here's the part that catches people out: don't try to compact it all at once. The maximum practical layer depth per pass with a plate compactor is around 150mm of loose material. If you need a finished compacted depth of 150mm, you're looking at roughly 180–200mm of loose Type 1 before compaction, so compact in two passes: pour in about 100mm loose, compact it, then add the remaining material and compact again. Each pass with the plate compactor should make at least two or three overlapping runs across the whole area.
Hire a plate compactor (also called a wacker plate) for this: a hand-tamper or the back of a spade simply won't achieve the density you need. After compaction, the sub-base should feel absolutely solid underfoot with no bounce or give. If it still feels spongy in any spots, check you've removed all topsoil beneath and give those areas additional passes. A spongy base at this stage means a sinking patio within months.
Blinding layer (optional but useful)
Once the sub-base is compacted, some people add a thin 20–30mm blinding layer of sharp sand on top before laying the decorative gravel. This gives a smoother, more level surface to work from and helps reduce the amount of angular Type 1 that works its way up into your gravel layer. It's not essential, but if you want a very neat, consistent finish it's worth doing.
Edging and setting levels for a clean gravel finish
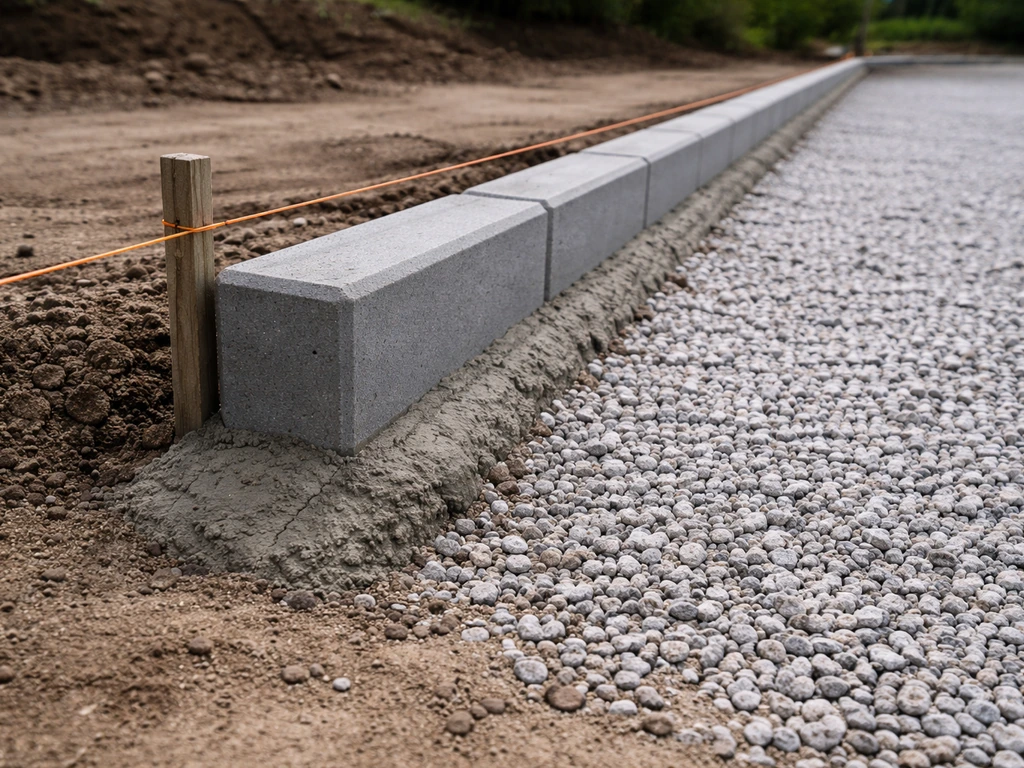
Gravel without edge restraint will gradually migrate outward onto your lawn or borders. This isn't a maybe, it will happen, especially in high-traffic areas. Getting solid edging in place before you spread your decorative gravel is non-negotiable.
The most durable option is concrete kerb edging set on a haunched concrete foundation. Dig a small trench along your boundary, pour a strip of concrete, bed the kerbs into it while it's wet, then haunch (fill and slope) concrete against the back face to lock them in. Set kerbs using a string line so your edge is straight and at a consistent height. For a more natural look, treated timber boards (at least 50mm thick) spiked into the ground with metal stakes work well and are cheaper and easier to install. Steel landscape edging is another clean option, especially for curved boundaries.
Your edging height should sit 10–15mm above the finished gravel level: this lip keeps gravel contained when you walk on it. Set your edging with this in mind and use a long spirit level or datum pegs to check levels across the whole area before moving on.
This is also the stage to set your drainage fall. The finished surface of your patio needs a slight slope away from the house: aim for a 1:60 gradient (that's about 16mm of fall per metre of patio). On a 3m-wide patio, you want roughly 50mm of total fall from house to garden edge. Check this using a long spirit level and tape measure, or a laser level if you have one. Mark the correct level on your edging pegs so you know exactly where the finished gravel surface needs to sit at each point.
Spreading, raking, and compacting the gravel
With your sub-base compacted, edging set, and levels marked, the satisfying part begins. Pour your decorative gravel into the area and spread it with a rake to an even depth of 40–50mm. Use your level marks on the edging as a guide. Work from one end to the other in sections, raking as you go rather than dumping everything at once and chasing it across the area.
Once spread, run the plate compactor over the gravel if you're using angular or self-binding gravel: this beds the material in and firms up the surface considerably. Self-binding gravel especially benefits from a wetting-down followed by compaction, which activates the fine particles and creates a much harder surface. Pea gravel doesn't compact the same way (it's rounded), so for pea gravel just rake level and accept a slightly loose surface.
After compaction, check your levels again with a long straight edge or spirit level. You may need to top up any low spots. Rake any high spots level, compact again, and check once more. It usually takes two or three passes of checking and adjusting to get a consistent, level surface across the whole area.
Keep some spare gravel back (around 10% of your total volume) for topping up later. Gravel settles over the first few months, especially in high-use spots, and you'll want to top up and rake level once or twice in the first year.
Drainage, slope, and fixing common problems
A gravel patio is actually one of the most drainage-friendly surfaces you can install: water passes straight through the gravel and into the sub-base below. But you still need that 1:60 slope away from the house to prevent any surface pooling, especially where the gravel gets compacted over time and becomes slightly less permeable.
If water is running toward the house rather than away from it, you have two options: either add a shallow channel drain (linear drain) at the base of the house wall to intercept water before it reaches the foundations, or relay the patio with the correct fall. Adding a linear drain is usually the quicker fix if regrading isn't practical. Make sure any drain connects to a soakaway, a border, or a surface water drain, not to your foul water system.
Common problems and how to fix them
| Problem | Likely cause | Fix |
|---|---|---|
| Gravel sinking in patches | Under-compacted or shallow sub-base | Dig out, re-compact sub-base in layers, refill with gravel |
| Weeds pushing through | No membrane, or cheap non-woven fabric used | Remove gravel, relay woven geotextile membrane, refill |
| Gravel migrating onto lawn | No edging, or edging too low | Install or raise edging; top up gravel level |
| Puddles forming on surface | Insufficient fall or compacted gravel blocking drainage | Rake to re-establish fall; add linear drain at house wall if needed |
| Surface feels spongy underfoot | Soft subsoil or topsoil left in place | Excavate further, compact subgrade, rebuild sub-base layers |
| Gravel sticking to shoes | Pea/rounded gravel used or too shallow a layer | Top up with angular or self-binding gravel to 40–50mm depth |
One thing worth saying clearly: if you're on very heavy clay with poor natural drainage, a fully permeable gravel patio can actually be an advantage over slabs, since water soaks away rather than sitting on the surface. But the sub-base depth matters more on clay: go 150mm minimum, compact thoroughly, and consider a secondary geotextile layer between the decorative gravel and the sub-base to prevent the fine clay from slowly working its way up through your beautiful finish.
A quick pre-start checklist
- Area marked out with pegs and string, dimensions confirmed
- All turf and topsoil removed to correct excavation depth
- Subgrade firm and compacted (no bounce underfoot)
- Woven geotextile membrane laid with 300mm overlaps at all joins
- MOT Type 1 sub-base compacted in layers to 100–150mm finished depth
- Edging installed and haunched, set at correct height and drainage fall
- 1: 60 drainage fall checked across the whole area
- Decorative gravel spread to 40–50mm and compacted
- Levels checked, low spots topped up and re-compacted
- Spare gravel retained for future top-ups
Gravel is one of the most forgiving and budget-friendly patio materials you can work with. If you decide later that you want something more solid underfoot, a well-built gravel sub-base is already most of the foundation work for laying slabs, limestone, granite, or even a resin-bound surface on top. The preparation principles are largely the same whatever surface you eventually choose, so getting this right is never wasted effort.
FAQ
Do I need to remove all the soil, or can I just lay the membrane and add gravel on top?
You should remove all topsoil and organic material. If any soft, mixed, or spongy soil remains, it can keep compressing later, causing dips in the patio even if the membrane is installed. The membrane blocks weeds, but it does not strengthen a weak subgrade.
What’s the best way to choose gravel size for a patio I’ll use often (chairs, wheelbarrow, bike)?
For heavier foot traffic, angular gravel (like golden flint) or self-binding gravel tends to lock in more firmly after compaction. Rounded pea gravel looks good but is more likely to migrate toward edges and can remain looser under load, especially on the first year’s settling period.
Should I always use a plate compactor, or is tamping by hand enough?
For the sub-base, hire or use a plate compactor. Hand-tamping cannot reach the density you need to prevent movement, and a patio built on an under-compacted base often shifts within months. After the decorative gravel goes in, compactor use is helpful mainly for angular or self-binding gravels.
How do I stop weeds if I’m already using a membrane?
Use woven geotextile, overlap joins, and pin it at the edges before edging goes in. Also keep the membrane clean, if Type 1 and fine particles are allowed to sit on top of it for long periods, they can create pathways for weeds at punctures or tears. Avoid using thin, temporary garden fabric.
Can I build a gravel patio directly on existing gravel if it feels firm?
Only if the existing base is well-compacted and free from soil contamination. If the gravel is mixed with topsoil, drains poorly, or feels springy, you should excavate and start fresh. Topping up over a weak layer usually leads to uneven settlement and weed issues later.
How much fall should I create away from the house, and how do I measure it accurately?
Aim for about a 1:60 gradient (roughly 16 mm fall per metre). Mark a level line on your edging with a long spirit level or laser, then transfer the correct height at intervals so the finished gravel depth is consistent at each point.
What edging should I use if I want the patio to stay level but still look natural?
Concrete kerbs on a haunched foundation are the most rigid, but treated timber boards (at least 50 mm thick) can work well for a natural look if they are deeply staked and well-aligned. For long-term straight runs, steel edging can also be effective, just ensure it is anchored firmly enough to resist lateral gravel pressure.
My site is sloped, do I still need the same sub-base depth everywhere?
Plan cut-and-fill so the sub-base depth and finished level stay consistent, and do not ignore the slope in the groundworks. If you try to level the surface purely with extra gravel, the thin top layer cannot compensate for a thick or unstable sub-base on one side.
Is a blinding layer of sharp sand really necessary before decorative gravel?
It’s optional. Sand can help create a smoother working surface and reduce how much angular Type 1 migrates upward, but it must be placed only after compacted Type 1 is ready and edging is set. If you use it, keep the sand thin and level, then top with the correct gravel depth.
How thick should the decorative gravel layer be, and what happens if I make it too thin?
Target 40 to 50 mm after spreading and leveling. If it is too thin, you’ll expose more underlying material as it settles and compacts, and it becomes easier for weeds to appear through gaps. Too thick can also be problematic, since it increases how far stones can migrate and how long settling takes.
Should I compact pea gravel, or just rake it level?
Rake it level and avoid expecting the same compaction effect as with angular or self-binding gravels. Pea gravel stays more rounded and may not interlock, so your best results come from correct sub-base preparation plus careful leveling and later top-ups.
How long will the patio take to settle, and when should I top it up?
Expect the first settling over the first few months, particularly in high-use areas. Keep about 10% spare gravel and plan to top up, rake level, and re-check heights once or twice during the first year.
What if water pools after installation, even though I tried to slope it?
First re-check the fall, using a long straight edge or laser, because incorrect levels usually cause pooling. If regrading the whole patio is not practical, a linear channel drain at the house wall can intercept water, but it must discharge to an appropriate outlet such as a soakaway or surface water system, not foul drainage.