
You can lay a patio on muddy or soft ground, but not directly on top of it. The mud itself can never be your foundation. What you need to do is excavate down past the soft layer, replace it with compacted hardcore or a concrete slab, manage the drainage so water does not collect under your paving, and then lay your slabs on top. Get those steps right and the patio will last for decades. Skip them and it will rock, sink and crack within a couple of winters.
How to Lay a Patio on Mud: Step-by-Step Guide for DIYers

Clara Farrell
28 Jul 2026
What this guide covers
This guide walks you through every stage of building a patio on wet, loose or clay-heavy ground. We cover how to test and assess your soil before you dig, how to decide which base method suits your conditions, step-by-step preparation and laying instructions for each base type, drainage solutions (including setting the right fall, adding channels and sizing soakaways), and a troubleshooting section for the problems that catch most first-timers off guard. By the end you will know exactly what to excavate, what to fill it with, and how to lay your slabs confidently even if the ground beneath your garden is a soggy mess.
Can you build directly on mud?
The short answer is no, and it is worth understanding why before you start digging. Mud is essentially soil that is saturated with water. It has almost no load-bearing capacity, it compresses under weight, and it expands and contracts as it freezes, thaws and dries out across the seasons. Any slab laid directly on it will move. Use this simple decision flow to figure out what you are dealing with before you commit to a base method.
- Step on the proposed patio area after rain. If your foot sinks more than about 10 mm (half an inch) into the surface, the topsoil and subsoil are too soft to serve as a stable subgrade on their own.
- Dig a trial pit about 400 mm (16 in) deep. Inspect the sides: if the soil is dark, sticky, smells organic, or collapses back as you dig, you are dealing with weak ground that needs full excavation and replacement.
- Check for standing water in the pit after 30 minutes. Water pooling quickly means the drainage is poor and water management must be designed into your base from the outset.
- If the soil is firm, dry, well-drained and sandy or gravelly below the topsoil, a standard compacted hardcore base may be sufficient with minimal extra depth. This is the exception rather than the rule for muddy sites.
- If any of the first three conditions apply, you need one of the three remediation base methods described below. There is no shortcut.
One thing I see homeowners try every year is laying slabs on a thin screed of sand directly over soft ground, hoping it will hold. It never does. Within one wet season the slabs rock, the joints open up and water gets underneath, making the problem worse. The only way to get a stable patio on soft ground is proper excavation and a correctly built base. Everything else in this guide flows from that single principle.
Site assessment and planning
Before you buy a single bag of hardcore, spend an afternoon properly assessing your site. This is where most DIY patios go wrong: people measure the area, order the slabs and start digging without ever asking what is actually going on under the surface. A couple of hours of testing here can save you from rebuilding the whole thing in two years.
Testing your soil type
The simplest hands-on test is the 'feel' method. Take a handful of moist subsoil (from below the topsoil), roll it into a ball and then try to form a ribbon between your thumb and forefinger. Sandy soil will not ribbon at all and feels gritty. Silty soil ribbons briefly and feels silky. Clay soil forms a long, smooth, sticky ribbon and is very plastic when wet. Clay is the most problematic for patios because it holds water, swells when wet and shrinks when dry. If you want a more precise result, the jar sedimentation test (sometimes called the jar test) works well: fill a jar roughly one-third with subsoil, top it up with water, shake it hard for two minutes, then leave it to settle for 24 hours. The sand settles first (within minutes), silt settles in an hour or two, and clay stays in suspension for hours forming the top layer. Measuring the proportions tells you your soil texture, which you can cross-reference against the USDA soil-texture triangle to classify it. You can also check published soil data for your parcel using the USDA NRCS Web Soil Survey, which provides mapped soil descriptions down to field level and is free to use online.
Checking the water table and drainage
Dig at least one observation pit about 600 mm (24 in) deep in your proposed patio area and leave it open for 24 to 48 hours after rain. If water fills the bottom, your seasonal water table is high. On clay-heavy sites, water will sit in the pit for days even if the water table itself is deeper, simply because the soil does not drain. Either condition means your base design must include positive drainage, a surface fall directing water away from the house, and ideally a channel drain or soakaway at the low end. To check whether a soakaway is viable, run a basic percolation test: dig a pit to your proposed soakaway depth (at least 300 mm deep), pre-soak the surrounding soil by filling and emptying the pit twice, then refill to a set depth and time how long it takes the water level to drop 150 mm. On clay soils the water will barely move, which tells you that an unsealed soakaway will not work and you will need either an underdrain discharging to a drainage channel or a sealed, sized attenuation system. UK homeowners can reference BRE Digest 365 for formal soakaway sizing, and the CIRIA SuDS Manual (C753) for broader sustainable drainage guidance. Both are available through building control or online.
Identifying slope and fall
Measure the existing slope across your patio area using a long spirit level, a straight edge or a laser level on a tripod. You need your finished patio surface to fall away from the house at a minimum of 1% (roughly 10 mm per metre, or 1/8 inch per foot). A fall of 1 to 2% is ideal. This Old House and most residential drainage guidance agree on this range as the sweet spot, enough to shift water away quickly without the patio feeling noticeably sloped underfoot. Mark the high and low points with stakes and string lines before you excavate so you can factor the required fall into your formation level from the start, not as an afterthought when you are laying slabs. For more detailed guidance on calculating and setting a fall across your patio, the guide on how to lay a patio with a fall covers the levelling and string-line process in full.
Locating utilities and permitted works
Before you dig anything, call your utility provider or use a cable and pipe locator to check for buried gas, electric, water and drainage runs crossing your proposed area. In the UK, most small domestic patios (non-permeable, under 5 square metres adjacent to a house) require no planning permission, but larger areas or front gardens paved with non-permeable materials may need permitted development approval. Impermeable surfaces over about 5 square metres that drain to a public sewer may also require building control notification in some local authority areas. When in doubt, a five-minute call to your local planning department or building control office will confirm whether you need to notify anyone.
Choosing the right base for muddy or clay ground
There are three practical base options for soft, wet or clay-heavy ground. Which one you choose depends on how bad the ground is, what surface finish you want, and how much of the work you are comfortable tackling yourself. Here is a quick overview before we go through each in detail.
| Base method | Best suited to | DIY difficulty | Relative cost |
|---|---|---|---|
| Compacted hardcore + sharp sand | Moderately soft/clay ground with manageable drainage | Moderate | Low to medium |
| Reinforced concrete slab | Very soft, waterlogged or heavily loaded sites | Hard (mixing/pouring) | Medium to high |
| Raised foundations, timber sleepers or permeable paving | High water table, poor drainage, or eco/aesthetic preference | Moderate to hard | Medium to high |
Base method 1: compacted hardcore and sharp sand
This is the most common base method for domestic patios and it works well on moderately soft or clay ground provided you excavate deep enough and compact properly. The principle is simple: you remove the weak soil and replace it with a thick layer of crushed stone aggregate (Type 1 MOT/hardcore), compact it in layers to create a stable, load-bearing platform, then add a thin screeded layer of sharp sand as a final bedding course for the slabs.
How deep to go on soft or clay ground
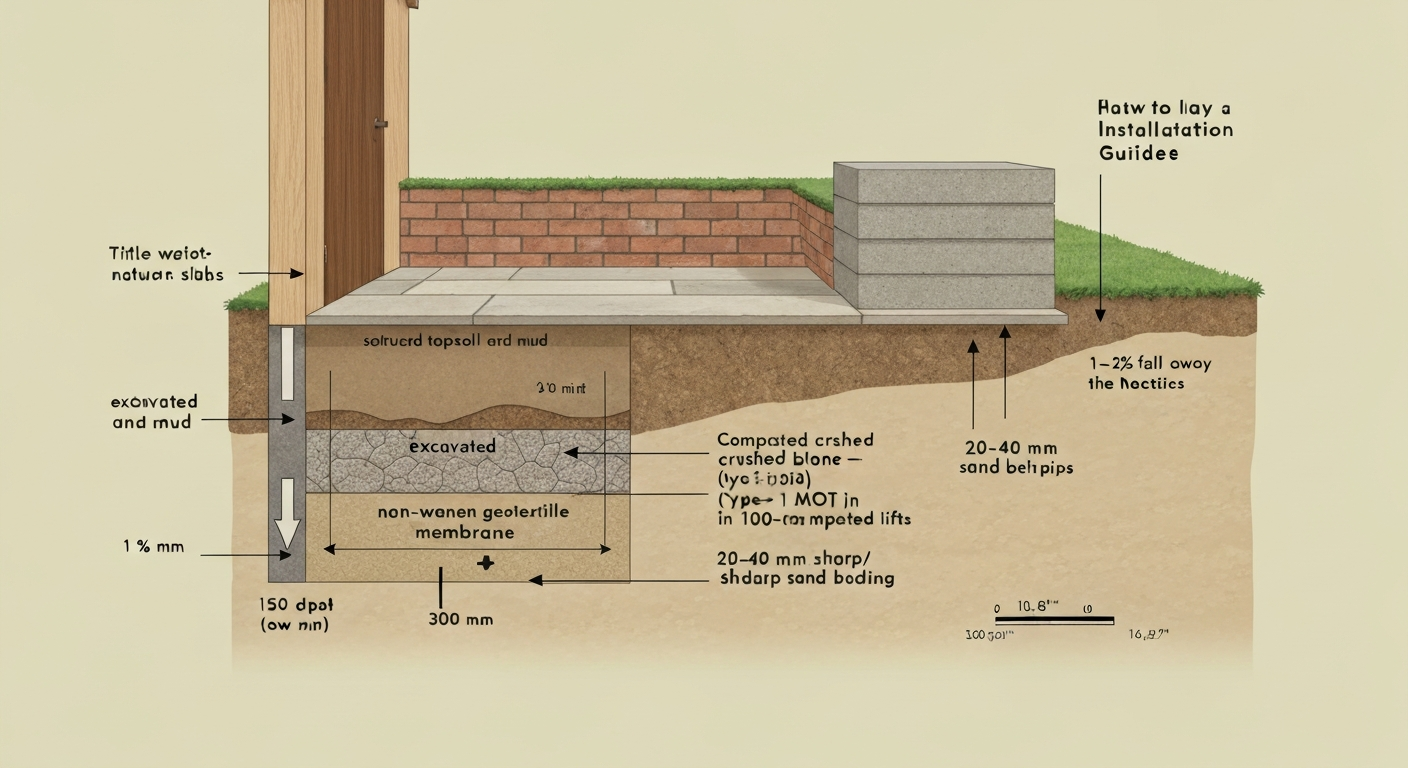
On normal, well-drained soils a 100 to 150 mm (4 to 6 inch) hardcore layer is standard for a pedestrian patio. On soft, clay or waterlogged ground you need to increase this to 150 to 300 mm (6 to 12 inches) of compacted hardcore, sometimes more if the subgrade is very poor. Industry guidance from Interpave and BS 7533 recommends designing sub-base thickness to the subgrade CBR (California Bearing Ratio), but for DIY purposes a simple rule is: the squishier the ground, the deeper you go. Add 150 mm for a moderately soft site; go to 250 to 300 mm if you can push a cane into the subgrade easily with one hand. A layer of geotextile membrane laid on the formation (the bottom of your excavation) before the hardcore goes in is highly recommended on clay and soft sites. It separates the clay from the aggregate so the two layers do not mix over time, prevents the hardcore from being 'pumped' down into soft soil under load, and helps with drainage. Use a non-woven geotextile rated for ground separation, not a thin weed-suppressing membrane.
Compaction: the step most people rush
Do not just tip in the hardcore and screed over it. Compact it in layers of no more than 100 to 150 mm at a time using a plate compactor (available to hire from most tool-hire shops for around £50 to £80 per day in the UK). Make at least two to three passes over each layer before adding the next. Industry compaction standards target around 95% Standard Proctor density, which sounds technical but in practice means: the surface should not deflect more than a few millimetres when you walk on it, and you should not be able to push a steel rod into it by hand. Once the full hardcore depth is compacted, add 20 to 40 mm of sharp sand as a bedding course, screed it level (with the fall built in), and you are ready to lay slabs.
Pros and cons for soft or wet sites
- Pros: widely available materials, no specialist equipment beyond a plate compactor, forgiving to adjust during laying, allows some drainage through the base if combined with geotextile
- Cons: relies entirely on the quality of compaction — cut corners here and slabs will settle; on very soft or high-water-table sites the hardcore layer alone may not be enough without additional drainage measures; requires a larger volume of excavation on clay sites compared to normal ground
If your ground is only moderately soft (seasonal moisture, moderate clay content) and drains reasonably well, this is the method I would choose first. It is the most DIY-friendly and the materials are readily available. For guidance on the sand bedding layer and screed technique in particular, the article on how to lay patio slabs on sand covers that step in detail.
Base method 2: reinforced concrete slab
Where the ground is genuinely poor, very soft, consistently waterlogged, or where you plan to put something heavy on the patio like a hot tub, garden room or large built-in barbecue, a reinforced concrete slab base is the most robust solution. Instead of compacted hardcore alone, you pour a continuous concrete slab over the formation, which distributes loads more evenly and is far less susceptible to differential settlement (the kind where one part of the patio sinks slightly more than another, causing slabs to rock and crack).
Construction steps
- Excavate to the required depth: at least 150 mm for the hardcore sub-base plus 100 mm for the slab itself (125 to 150 mm for heavy loads), plus the thickness of your slab or paving on top. On soft ground allow 150 to 200 mm of compacted hardcore below the concrete.
- Compact the formation as described above, lay geotextile membrane and compact the hardcore sub-base in layers.
- Set up timber formwork (shuttering) around the perimeter of the slab to contain the wet concrete and to hold the edge line. Build the fall into the formwork so the finished slab surface slopes at 1 to 2% away from the house.
- Lay steel reinforcement mesh (A142 or A193 mesh is typical for residential patios) on plastic chairs or off-cuts of tile to hold it roughly mid-depth in the slab — not lying on the formation.
- Pour the concrete (a C25/C20 ready-mix or site-mixed equivalent is standard for residential slabs), screed it level with the top of the formwork using a straight-edged screed board, and apply a float finish.
- Cure: keep the slab damp for at least seven days at temperatures above 10°C (50°F), covered with hessian or polythene sheeting. Do not load it for at least seven days (light foot traffic); wait 28 days before laying heavy materials or placing furniture.
- Once cured, lay slabs on a wet bed (mortar) or on paving adhesive directly on the cured concrete surface.
Control joints
For slabs over about 3 metres in any direction, saw-cut or form control joints at roughly 3-metre intervals to manage thermal cracking. Without them, concrete will crack of its own accord, usually somewhere you did not want it to. Depth of the control joint should be about one-quarter of the slab thickness.
Pros and cons for soft or wet sites
- Pros: the most stable and load-bearing base available; excellent for very soft or waterlogged ground; allows heavy features; slabs bond directly to it with mortar for a permanent, rock-solid finish
- Cons: significantly more work and cost than hardcore alone; once poured it is permanent and very hard to modify; mixing or ordering concrete in quantity is physically demanding and time-sensitive; requires careful formwork and curing; not suitable where you want drainage through the base (it is impermeable)
Base method 3: raised foundations, timber sleepers and permeable paving
This category covers three related but distinct approaches that all share one characteristic: they deal with soft or wet ground by either elevating the paving surface above it or by managing water through the base rather than diverting it around the edges. They are worth considering when the water table is persistently high, when you want a more sustainable drainage approach, or when a traditional hardcore base would require an impractical depth of excavation.
Raised patio on pad foundations or piers
Rather than filling the entire area with hardcore, you can cast a series of concrete pads or piers at regular intervals (typically 600 mm to 1200 mm apart depending on the joist span) and build a frame on top using pressure-treated timber joists or steel. Decking boards or slabs on pedestals sit on this frame. This approach lifts the whole surface above the wet ground, allows air and water to move freely underneath, and avoids the need to excavate large volumes of soft material. It is common for raised garden decks but works equally well with composite or porcelain paving on adjustable pedestals. The trade-off is that the void beneath the deck needs to be managed: left open and unventilated it can harbour damp, moss or pests.
Timber sleeper edging and filled base
On sites with moderately soft ground, railway sleepers (or sawn hardwood landscape timbers) can be used to create a contained raised bed, which is then filled with compacted hardcore and sharp sand to bring the formation level up above the worst of the wet ground. This is a pragmatic approach when excavating down is difficult (e.g., tree roots, shallow bedrock, or you simply want to raise the patio level relative to the garden). Use treated or naturally durable timber rated for ground contact, and accept that timber will eventually decay (typical life expectancy for treated softwood sleepers in ground contact is 15 to 20 years; hardwood or composite sleepers last longer).
Permeable paving systems
Permeable paving uses open-graded aggregate sub-bases and either jointed block paving with permeable gaps or purpose-made permeable paving units to allow rainwater to pass through the surface and into a storage/drainage layer below. It is a genuinely effective solution for sites where surface water management is the primary concern. However, it only works properly where the underlying soil can absorb water at a meaningful rate. US guidance (Virginia Stormwater Management Handbook) recommends permeable pavement for infiltration only where native soil infiltration is at least 0.5 inches per hour and clay content is below 20%. On heavy clay soils (where infiltration is typically far below that threshold), a permeable system needs an underdrain pipe discharging to a suitable outlet rather than relying on the native soil to absorb water. Permeable systems also require an open-graded structural sub-base (void-rich crushed stone) sized to store storm water temporarily while the underlying soil absorbs it.
Pros and cons for soft or wet sites
- Raised patio on piers: excellent for very high water tables or areas prone to flooding; avoids large-scale excavation; flexible and adjustable; higher cost and some maintenance needed on the sub-frame
- Timber sleeper raised bed: cost-effective way to lift a patio level above wet ground; suits smaller areas; limited by timber lifespan and the need for edge containment to stop hardcore spreading
- Permeable paving: sustainable and planning-friendly on front gardens or sealed-surface areas; reduces surface runoff; on clay soils must include an underdrain or it will fail; requires more specialist specification and slightly higher maintenance (sub-base must be kept clear of silt)
Step-by-step installation: laying slabs on your chosen base
Once your base is built and ready, the actual slab-laying process is largely the same regardless of which base method you chose. Here is the process from excavation to jointing, with notes on where muddy-ground sites need extra attention.
- Mark out the patio area with pegs and string lines, including the fall direction and the finished surface level at the high point (usually next to the house, keeping the damp-proof course at least 150 mm above the patio surface).
- Excavate to the required depth: topsoil depth plus sub-base thickness plus slab/bedding thickness. On a typical muddy site this is often 300 to 450 mm in total. Remove all organic material, roots and any very soft mud-filled pockets.
- Proof-roll the formation: if you have access to a small roller or even a loaded wheelbarrow, run it across the excavated base. Any areas that deform or rut significantly need to be dug out further and filled with compacted hardcore.
- Lay geotextile membrane on the formation, overlapping joins by at least 300 mm and turning it up at the edges.
- Fill with compacted hardcore in layers of no more than 150 mm, compacting each layer with a plate compactor. Check levels with a laser or spirit level and straight edge as you go, building in the required fall at this stage.
- Once the sub-base is at the correct level and fully compacted, add 20 to 40 mm of sharp sand as a bedding/laying course. Screed this with a straight board between screeding rails set to the finished fall.
- Lay a dry-run row of slabs along the most visible edge without mortar or adhesive to check the spacing and bond pattern. On sites with curved or irregular edges, this is especially important — the guide on how to lay a curved patio covers setting out curved lines with string and pegs in detail.
- Lay slabs from a corner working outwards: either bed them on five mortar dabs (one at each corner, one in the centre) for slabs on a hardcore/sand base, or on a full mortar bed for slabs on a concrete slab. On wet ground always use a mortar mix rather than a dry mix, as moisture from below can affect the set.
- Check each slab for level and fall as you go using a straight edge and spirit level, and tap down with a rubber mallet. Do not stand or kneel on freshly laid slabs.
- Cut slabs to fit edges using an angle grinder with a diamond disc or a slab splitter hired from a tool shop. Always wear eye protection, hearing protection and a dust mask when cutting.
- Once all slabs are laid, leave the mortar to cure for at least 24 hours (48 hours in cold weather) before walking on the surface.
- Joint the gaps using dry brush-in jointing compound or wet-point mortar depending on the gap width and slab type. Brush in kiln-dried sand for larger block-paving joints. Clean off excess pointing material promptly with a damp sponge.
Drainage solutions for muddy and sloped sites
Getting the surface water off your patio quickly and away from the house is not optional, it is the difference between a patio that lasts and one that becomes a pond every time it rains. On muddy or clay ground where the soil absorbs water slowly, this matters even more because any water that sits under the slabs will eventually cause movement.
Setting the fall correctly
Aim for a 1 to 2% fall (10 to 20 mm per metre) across the full patio surface, consistently in one direction away from the house. To calculate the drop: multiply the patio depth (the distance away from the house) in metres by 0.015 for a 1.5% fall. So a patio 4 metres deep needs a 60 mm total fall across its length. Set this into your screeded sand layer during base preparation so the fall is consistent from the formation up, not just wobbled in at slab level. A laser level makes this much more accurate and faster than a string line, and they are inexpensive to hire.
Channel drains and linear drains
Where the patio abuts the house on one side and a lawn or garden on the other, the water rolling off the patio surface needs somewhere to go. A channel drain (linear drain) set at the low edge of the patio collects this runoff efficiently. It connects to a drain pipe discharging either to a soakaway (if your percolation test shows the soil can absorb it) or to a surface water sewer (check your local authority's rules about connecting to the sewer). On clay-heavy ground, opt for the sewer or a properly sized attenuation tank over a soakaway.
Soakaways on clay and soft ground
If your percolation test showed reasonable infiltration, a soakaway (a pit filled with coarse gravel or a proprietary plastic crate system) can handle runoff from the patio. It must be located at least 5 metres from the house and away from any structures. On clay soils, however, a standard soakaway will not drain fast enough and will simply overflow back towards the patio during prolonged rain. In that case, a lined soakaway or attenuation tank with a flow-restricted outlet to the surface water sewer is the correct solution. UK homeowners should reference BRE Digest 365 for sizing, or ask a drainage contractor to size it for them. BRE Digest 365 Soakaway Calculator (explanation) | Energycount provides a user-friendly explanation and a worked example applying BRE 365 sizing for domestic soakaways. The CIRIA SuDS Manual (C753) is the technical reference point that building control will use if they review your drainage design.
Sloped and uneven sites
If your garden slopes significantly and the proposed patio area has multiple fall directions or a steep gradient, you may need to step the patio level down in terraces, use retaining walls or sleeper edges to hold the base material, or design the patio with a cross-fall rather than a simple single-direction fall. For complex sloped sites, the guide on how to lay a patio with a fall goes into the levelling and string-line techniques in detail, including how to handle compound falls (slopes in two directions at once). For shaping non-rectangular layouts, see the guide on how to lay a curved patio.
Materials, tools and consumables checklist
Here is a practical checklist of everything you are likely to need for a muddy-ground patio project. Quantities will vary depending on your chosen base method, area size and slab thickness, but the material types listed below apply across all three base methods.
Main materials
- Paving slabs, pavers or tiles: natural stone (sandstone, slate, granite), porcelain, concrete flags or clay pavers — choose based on aesthetic, budget and slip resistance (for porcelain on muddy sites, opt for R11 or better slip rating)
- Type 1 MOT crushed aggregate / hardcore: the main sub-base fill material; estimate cubic metres by multiplying area (m²) by depth in metres, then add 10 to 15% for compaction
- Sharp sand (also called coarse or grit sand): for the bedding/laying course (20 to 40 mm depth); not builder's sand, which is too fine
- Geotextile separation membrane: non-woven, ground-contact grade; order area plus 20% extra for overlaps and edge turn-ups
- Concrete (if using Method 2): C25 ready-mix or site mix (1 part cement, 2 parts sand, 3 parts 20 mm aggregate); for large areas order ready-mix
- Steel reinforcement mesh (A142 or A193): for Method 2 concrete slabs
- Bedding mortar: typically 1 part cement to 6 parts sharp sand; pre-mixed bags are convenient for smaller areas
- Jointing compound: kiln-dried polymeric sand for block paving; slurry grout or brush-in jointing mortar for slab paving
- Edge restraints: concrete haunching to the back of edge slabs, or proprietary metal or plastic edge restraints for block paving
Tools to own or hire
- Plate compactor (hire): essential for sub-base compaction; do not skip this
- Laser level or long spirit level and straight edge: for setting falls and checking slab levels
- Angle grinder with diamond cutting disc (or slab splitter, hire): for cutting slabs to fit
- Rubber mallet: for bedding slabs down to level
- Screeding rails and a straight-edge screed board: for levelling the bedding sand
- String lines and pegs: for setting out the patio boundary and fall lines
- Tape measure, builder's square (or 3-4-5 triangle method) for squaring corners
- Shovel, spade and wheelbarrow: for excavation and moving materials
- Club hammer and bolster chisel: for hand-splitting or trimming small cuts
- Pointing trowel: for applying bedding mortar under slab edges
- Stiff brush and bucket: for cleaning slabs and applying jointing compound
- Safety gear: steel-toecap boots, heavy work gloves, eye protection, hearing protection, dust mask (P2 rated for cutting)
Quick quantity and cost estimates
For a typical 20 square metre patio on moderately soft ground using Method 1 (hardcore + sharp sand), you would expect to need roughly 3 to 4 tonnes of Type 1 hardcore for a 150 mm compacted layer, about 0.5 to 0.8 cubic metres of sharp sand for the bedding course, 22 to 24 square metres of geotextile (with overlaps), and enough slab area plus 5 to 10% extra for cuts. Material costs for hardcore and sand are modest (roughly £30 to £60 per tonne in the UK depending on location). Slabs range enormously from around £15 per square metre for basic concrete flags to £80 to £120+ per square metre for natural stone or porcelain. Hiring a plate compactor adds around £50 to £80 per day. Budget at least two to three full weekends for preparation, laying and jointing on a 20 square metre site on soft ground, the preparation phase alone is typically 50% of the total time.
Compaction, levelling and jointing in practice
Compaction is the single step most DIYers rush, and it is the main reason patios on soft ground fail. Run the plate compactor over every layer of hardcore in at least two directions, making three passes in each direction. If the surface springs back noticeably after the compactor passes, the layer is too thick or the underlying ground is too soft, dig out more, add geotextile, and start again. When screeding the sand bedding layer, work in small sections so you are not walking on freshly screeded sand. Lay the slabs and check for the fall constantly: place a spirit level across three slabs in both directions and confirm the bubble is consistently on the correct side. Tap down high spots; do not try to pack up low spots with extra sand after compaction. Once slabs are laid and the mortar has cured, point all the joints. On wet or clay ground, use a flexible jointing compound rather than a rigid cement-rich mortar, as a degree of micro-movement will always occur and a rigid joint will crack and admit water. Polymeric jointing sands are an excellent choice for block paving and wider-jointed natural stone. For thin-jointed porcelain or precision-cut natural stone, use a proprietary epoxy or resin-based grout. If you are laying tile-format paving (thin porcelain, slate or similar), the guide on how to lay patio tile on dirt covers the adhesive bedding and grouting process specifically for tile-format paving.
Troubleshooting: common mistakes and how to fix them
Even well-built patios on soft ground can develop problems if the preparation was not quite right. Here are the issues I see most often and what to do about them.
| Problem | Likely cause | Fix |
|---|---|---|
| Slabs rocking or settling unevenly | Insufficient compaction, inadequate sub-base depth, or organic material left in the base | Lift affected slabs, excavate the soft spot, compact hardcore in layers, re-bed slabs on fresh mortar |
| Standing water on the surface | Incorrect fall or fall in the wrong direction; low spots in slab layout | Re-lay affected slabs with corrected fall; consider adding a channel drain at the low point |
| Water appearing under the slabs (base saturation) | High water table, blocked drainage outlet, or no drainage designed into the base | Add underdrain or French drain beneath the base; check and clear outlet; consider raised base method |
| Frost heave (slabs lifting in winter) | Water getting into the bedding course and freezing; bedding too close to the surface | Improve drainage to prevent water ingress into base; use flexible jointing to limit water entry; ensure sub-base depth is adequate |
| Cracked slabs | Point loads on insufficiently supported slabs; too-thin mortar bed; no mortar under slab edges | Replace cracked slabs; ensure full mortar coverage under each slab, especially at edges and corners |
| Joint mortar cracking and washing out | Rigid mortar used on a flexible base; movement in sub-base | Rake out failed joints and re-point with flexible polymeric jointing compound |
| Green algae and slippery surface | Shaded, damp surface common on north-facing patios over clay ground | Apply proprietary patio cleaner and algae treatment; improve drainage to reduce surface moisture; consider textured or anti-slip surface finish |
Safety notes and when to call a professional
Most domestic patios on soft ground are well within the reach of a competent DIYer, but there are situations where calling in a professional is genuinely the sensible choice rather than a failure of nerve. If your trial pit reveals that the water table is consistently high (water sits within 300 mm of the surface for weeks at a time), a drainage engineer or landscape contractor with drainage experience should design and size your drainage system before you start. If the patio is going to carry a heavy structure (a garden room, a large hot tub, a wall or retaining feature), get the slab or foundation designed by a structural engineer, the cost of an hour's consultation is trivial compared to rebuilding a sunken slab under a £20,000 garden room. If you are cutting slabs, always wear eye protection, hearing protection and a dust mask rated at least P2 for silica dust: silica dust from cutting natural stone or concrete paving is a serious respiratory hazard. And if any of your excavation comes within striking distance of buried cables or pipes identified in your utility survey, stop and contact the utility provider before continuing.
For the paving and grouting stages themselves the risks are more about your back and knees than anything else. Work on a mat or knee pads, take breaks, and do not attempt to carry large-format slabs alone, porcelain and natural stone slabs over 600 mm square should always be handled by two people. Most importantly, pace the project: a patio laid properly over two or three weekends will outlast one rushed in a single weekend by many years.
FAQ
Can I lay a patio directly on muddy, wet or loose ground?
Usually not. If the subgrade is soft, waterlogged or high in clay you’ll get settling, heave and standing water. First assess soil texture, drainage and seasonal water table (trial pits/observation well). If the site drains well (sandy/loamy, infiltration adequate) you may use a well‑designed permeable system; if infiltration is poor or water table high, you must remediate with a structural subbase, a concrete slab, raised construction or install an underdrain/soakaway.
How do I decide whether remediation is required? (decision flow)
1) Do a quick feel/jar soil texture test and dig a 300–600 mm trial pit. 2) Look for standing water, mottling or water within 24–48 hours (indicates high water table). 3) Do a percolation test (soakaway/perk) if planning infiltration. 4) If soil is sandy/loamy with good percolation → consider permeable paving with structural subbase. If soil is silty/clayey, peat or waterlogged → choose compacted crushed‑stone subbase, concrete slab, or raised/timber solution and/or add underdrain or lined soakaway. 5) For slopes or close to buildings check fall requirements and local building/permitting rules; call a pro if unsure.
What site assessment and planning steps should I follow?
Locate underground services, check local permits/building regs, map soil type (jar/test or NRCS Web Soil Survey), dig trial pits to observe water table, run a percolation test if infiltration matters, measure slope/fall relative to the house (target 1–2% away from building), identify surrounding drainage paths, decide desired patio level/finish and choose edge restraint type. Document findings and pick base method accordingly.
What are the practical base-method options for muddy sites and their pros/cons?
1) Compacted hardcore (crushed stone) + sharp sand bedding: Pros—flexible, economical, good for most soils if subbase deep enough and geotextile used; easier DIY. Cons—needs thicker subbase on clay/soft ground; risk of water migration if no drainage. 2) Concrete slab (reinforced/raft slab): Pros—solid, resists settlement and frost heave, good where loads or poor subgrade exist. Cons—more costly, permanent, needs correct mix/cure and edge joints. 3) Raised/pedestal/timber-sleeper or permeable paving with geocellular crates: Pros—can bypass bad subgrade, allows storage/underdrains, improves access and drainage. Cons—costlier and more complex; timber may rot if in contact with saturated soil. Choose based on soil, budget and aesthetics.
How deep should the subbase be on muddy or clay sites?
General guidance: pedestrian patio on normal ground = 100–150 mm (4–6 in) compacted crushed stone. For weak/soft/clayey ground increase to 150–300+ mm (6–12 in). Where subgrade is extremely poor, consider geogrid, geocellular crates or a concrete slab. Always compact each layer to manufacturer or engineer specs (typically ~95% Standard Proctor equivalent).
Do I need geotextile or geogrid?
Yes—use a separation geotextile between soft native soil and granular subbase to prevent migration of fines and improve longevity. Use geogrid when the subgrade is weak and you want to reduce required aggregate depth or spread loads—geogrid improves structural performance and reduces settlement risk.