
You can lay a patio without a powered plate compactor on small residential projects, typically under about 50–80 sq ft, on stable, well-drained soil, with no vehicle traffic planned. The catch is that you need to do more work in thinner layers, be methodical about every pass with a hand tamper, and accept that the result carries a slightly higher risk of minor settlement over time than a mechanically compacted base would. For larger projects, heavy clay soils, or any area that will see vehicle loads, renting a plate compactor is genuinely worth it. But for a modest garden patio on decent ground, the hand-tool approach works, and plenty of homeowners have done it successfully with good results.
How to Lay a Patio Without a Compactor: Hand Tools & Steps

Clara Farrell
12 Aug 2026
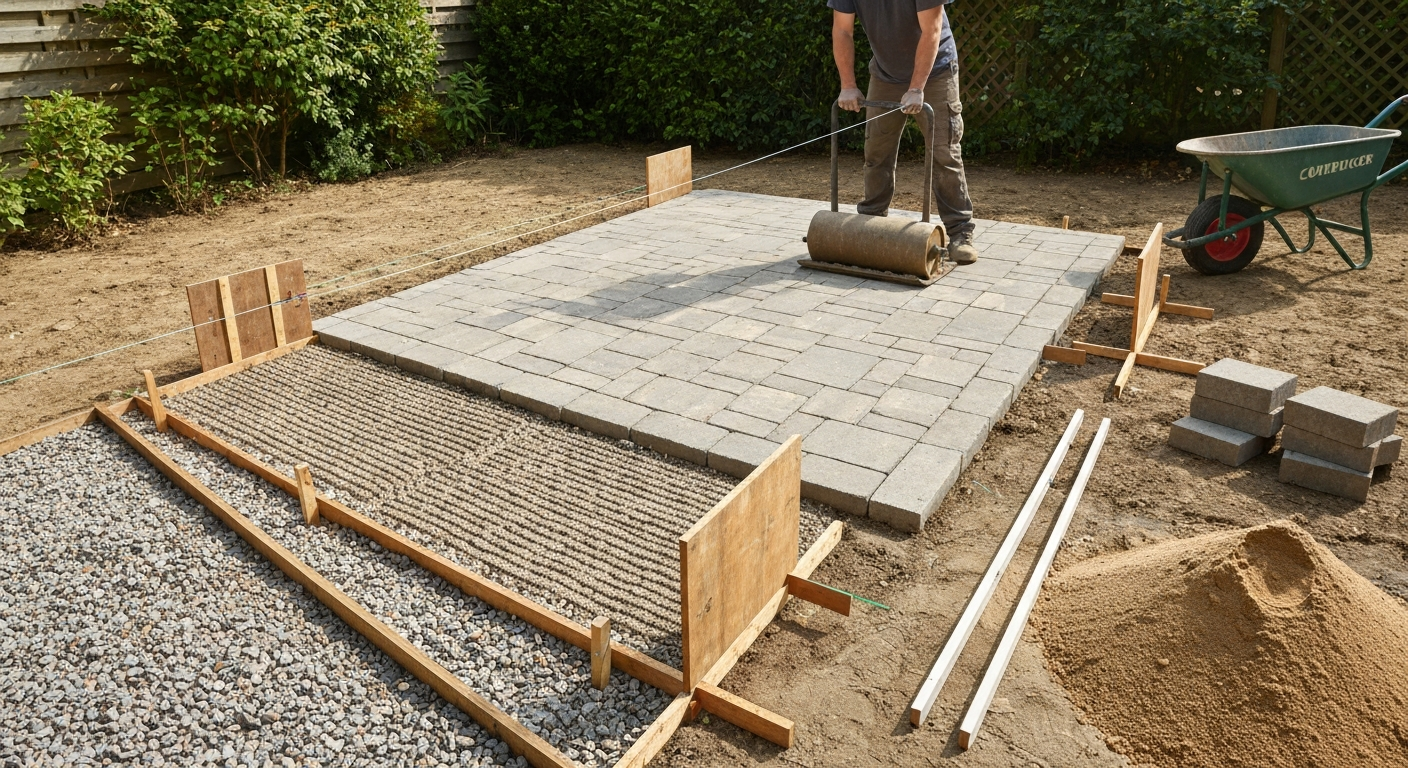
When you can (and can't) skip a powered compactor
Manufacturers like Belgard and industry bodies like the Interlocking Concrete Pavement Institute (ICPI) are upfront about this: their standard installation specs assume a vibratory plate compactor both during base construction and for the final seating pass over your pavers. Hand tampers appear in those same guides as a tool for edges and tight corners, not as a full replacement for mechanical compaction across an entire slab. So going compactor-free is a deviation from the 'ideal' spec, and you should go in with that understanding.
That said, the ideal spec is written for all conditions, including poorly drained clay, large areas, and vehicular driveways. A small backyard patio on stable, granular soil is a very different situation, and working carefully with a hand tamper and garden roller can get you to a base that performs well for foot-traffic use.
Here is a quick framework for the decision. If most of the following are true, you can reasonably proceed without a compactor. If several of these are false, rent the compactor or hire it out.
Quick decision checklist: should you use a compactor?
Run through this before you order materials. Be honest with yourself on each point.
| Factor | Compactor-free is reasonable if... | Rent/hire a compactor if... |
|---|---|---|
| Patio size | Under ~50–80 sq ft | 80 sq ft or larger |
| Traffic load | Foot traffic only | Vehicle access, heavy furniture, or hot tub |
| Soil type | Sandy loam, gravelly, or well-drained soil | Clay-dominant, silty, or waterlogged ground |
| Climate | Moderate; mild freeze-thaw cycle | Hard freeze-thaw climate with deep frost |
| Base depth required | 4 in. compacted base or less | 6 in. or more of aggregate needed |
| Settlement tolerance | Minor settling over 1–2 years is acceptable | Level surface must remain stable (e.g., near a door threshold) |
| Time available | Willing to compact in thin 2–4 in. lifts across multiple sessions | Tight schedule, large area, one-day job |
If your project ticks more than two boxes in the 'rent a compactor' column, seriously reconsider the DIY-only approach. Plate compactor rental typically costs around $60–$100 for a half day, which is cheap insurance against a patio that rocks, shifts, or drains badly two winters from now.
Tools you actually need for compactor-free patio work
Without a powered compactor, your hand tools become your most important investment. Skimping here makes the whole job harder and the results worse. Here is what I'd consider non-negotiable, followed by the useful extras.
Core tools
- Heavy hand tamper: look for a steel head of at least 10 x 10 in. (100 sq in. of coverage) and a total weight of 14–17 lb. Cheaper, lighter tampers (8 x 8 in., 10 lb) exist but you'll work twice as hard for less compaction. Handle length around 48 in. protects your back.
- Garden roller (ballast roller): a water- or sand-filled roller of 200–300 lb when full is excellent for leveling and consolidating the final surface of a granular sub-base or a compacted sand screed. It covers more area per pass than a tamper and applies pressure more evenly across a flat surface.
- Wheelbarrow: a contractor-grade 6-cubic-foot wheelbarrow. You'll be moving gravel, sand, and spoil by hand, so a stable, heavy-duty barrow saves enormous effort.
- Digging spade and square-mouth shovel: a sharp, long-handled spade for cutting edges and a square shovel for shifting loose material. Two different tools; both earn their place.
- Stiff-bristle hand broom: for sweeping joint sand into paver gaps.
- Steel rake and lute: spreading gravel and sand evenly across the base.
- Long straightedge or screed rails: a 6–8 ft aluminum straight-edge or two 1-in. diameter steel pipes used as screed rails to level your bedding sand to exactly 1 in. depth.
- Spirit level (4 ft): for checking slope across the whole area, not just individual pavers.
- Line level and string lines: for establishing your finished surface elevation and checking grade during base preparation.
- Rubber mallet: for tapping pavers into position without chipping.
- Tape measure: at least 25 ft.
- Kneeling pad or knee pads: you will spend a long time on your knees. This is not optional if you want to finish the job.
Useful extras
- Plate-block tamping: a short section of 4x4 or 4x6 timber held vertically and struck with a heavy mallet to tamp individual pavers down without a plate compactor. Useful for final seating.
- Dead-blow hammer or rubber mallet: for adjusting individual pavers during laying.
- Torpedo level: for checking individual paver units.
- Safety glasses, work gloves, steel-toe boots, and dust mask (especially when handling crushed stone): standard PPE for this kind of work. Crushed aggregate dust is a real irritant and the risk of a dropped paver on a foot is high.
Materials list and layer depths
Getting the right materials matters as much as the compaction technique. Using the wrong type of gravel or sand is one of the most common mistakes I see on first patios, and it causes long-term movement regardless of how well you compact.
| Material | Spec / type | Layer depth (compacted) | Notes |
|---|---|---|---|
| Dense-graded aggregate (DGA) base | Well-graded crushed stone, ASTM D2940 compatible; angular, not rounded river gravel | 4–6 in. compacted for pedestrian patios | For hand tamping, work in 2–3 in. loose lifts (compacts to ~2–4 in.). Do not place more than 4 in. loose at once. |
| Geotextile fabric | Non-woven polypropylene, 4–6 oz/sq yd separation/filtration grade | N/A — laid between subgrade and aggregate | Prevents aggregate base from migrating into soft subgrade; especially important on clay or silty soils. |
| Bedding sand | Coarse concrete/mason sand meeting ASTM C33 gradation; no fine play sand | 1 in. compacted (screeded, not compacted separately) | Do not compact bedding sand before laying pavers — screed it level and lay directly on it. |
| Edge restraints | Plastic paver edging with 12-in. spikes, or treated timber/aluminum | Flush with finished surface | Install before final fill and after base is done. Prevents lateral spreading. |
| Quikrete Fast-Setting Concrete or Quikrete 5000 | Bagged concrete mix for slabs | 4–6 in. slab thickness over 4 in. compacted gravel base | For small hand-poured slab patios. Consolidate with rod or tamper immediately after pouring. |
| Joint sand / polymeric sand | Kiln-dried fine sand or polymeric sand | Swept into joints after laying pavers | Polymeric sand resists washing out and ant disturbance; activate with light watering per manufacturer instructions. |
A note on gravel type: angular, crushed stone (sometimes sold as 'crusher run', 'Type 2', 'Class II', or 'DGA') compacts far better than rounded pea gravel or river rock. Industry installation guides, including ICPI Tech Spec 2, Construction of Interlocking Concrete Pavements (ICPI, copy hosted by ORCO), reference ASTM D2940 or equivalent dense-graded aggregate gradation tables for paver base material (commonly supplied as DGA) and recommend washed, angular crushed stone for the base ICPI Tech Spec 2 — Construction of Interlocking Concrete Pavements (ICPI, copy hosted by ORCO). The angular particles lock together under tamping. Rounded stone just rolls around. This single material choice makes a bigger difference to the finished result than almost anything else.
Compactor-free alternatives: what actually works and what doesn't
Let's be direct about what each hand method can realistically achieve, because there is a lot of wishful thinking online about skipping compaction entirely.
Hand tamper
A heavy hand tamper (10 x 10 in., 14–17 lb head) is the workhorse of compactor-free patio work. It applies direct impact energy to the aggregate and works well when you use it in thin lifts with overlapping passes. Its limits: it covers 100 sq in. per blow, so compacting a 50 sq ft area takes many, many overlapping strikes. It also delivers less compactive energy per unit area than a vibratory plate. Research and engineering guidance (UFC 3-220-10) shows hand tamping in confined zones can achieve roughly 85–90% of the density a mechanical plate achieves. For a foot-traffic patio on decent ground, that is usually acceptable. For a driveway or a large patio on clay, it is not.
Garden roller
A filled ballast roller (200–300 lb) is genuinely useful on larger flat areas after hand tamping, especially for the final surface of a crushed-stone base or for a sand screed. It provides more even surface pressure than a tamper and shows you soft spots clearly (the roller will sink slightly where the base is weak). It does not provide the vibratory energy of a plate compactor, but it adds consistent downward pressure across the whole surface. Use it as a complement to hand tamping, not a replacement.
Plate-block tamping (individual paver seating)
For the final seating of pavers, place a short section of 4x4 timber flat on the paver surface and strike it firmly with a dead-blow hammer or heavy mallet. Work in a grid pattern across every paver. This replicates (imperfectly but usefully) the seating effect of a plate compactor. It is slow, but on a small patio it gets the job done. Pay extra attention to the edges, which a plate compactor would normally cover with an edge guard. Edge pavers that aren't seated fully are the first ones to rock.
Manual screeding
For the 1-inch bedding sand layer, mechanical compaction is not used anyway, the industry standard is to screed it level and let the pavers and jointing process settle it. For a step-by-step guide on mixing and using Quikrete for patio projects, see how to make a Quikrete patio. ICPI and industry guidance recommend a coarse, well-graded 'concrete/mason' sand (commonly specified to meet ASTM C33 or recognized bedding‑sand gradations) screeded to 1 in. compacted thickness for standard sand‑set paver installations blank" rel="noopener noreferrer">ICPI and industry guidance recommend a coarse, well-graded 'concrete/mason' sand (commonly specified to meet ASTM C33 or recognized bedding‑sand gradations) screeded to 1 in. compacted thickness for standard sand‑set paver installations.. Set two 1-in. diameter screed rails parallel across the base, pour sand between them, and drag a straight aluminum screed board across the rails. Remove the rails, fill the channels with sand, and lay your pavers immediately. Do not walk on the screeded sand before laying pavers.
Compacting in lifts by hand: the single most important technique
If there is one thing that separates a patio that lasts from one that sinks and shifts, it is lift discipline. A lift is simply how much loose material you place at one time before you compact it. Here is the rule: never place more than 4 inches of loose aggregate before tamping. With a hand tamper, I'd keep it closer to 3 inches loose, which compacts down to roughly 2 to 2.5 inches. Yes, that means several passes if you need a 4-inch compacted base. That is the work.
Step-by-step lift compaction process
- Spread your first lift of crushed stone using a steel rake to an even depth of 3–4 in. loose. Measure at several points.
- Start tamping at one corner. Work in rows, overlapping each tamper strike by about half the tamper head width (5 in. for a 10-in. tamper). Never skip a spot.
- Complete the whole area, then do a second pass perpendicular to the first (rotated 90 degrees). This cross-hatch pattern catches spots missed on the first pass.
- Pay extra attention to edges and corners. These are where voids most commonly hide. Make at least one dedicated pass along each edge.
- After two full cross-hatch passes, check firmness: press your boot heel firmly into the surface. A properly compacted granular base should not indent. If your heel sinks more than 1/4 in., the area needs more passes. Mark soft spots and re-tamp.
- Walk the entire surface and feel for any flex or hollow sound. Any area that flexes under your weight needs more tamping.
- Once the lift is firm, spread and compact the next lift using the same process. On a standard 4-in. compacted base, you will likely complete two or three lifts.
For cohesive soils (clays, silts), engineering guidance such as UFC 3-220-10 recommends keeping hand-tamped lifts to around 4 in. of compacted thickness or less. For granular material (crushed stone, sand-gravel mixes), 4 in. loose lifts are workable, but thinner is better when you're relying on a hand tamper. There is no shortcut here that doesn't come back to bite you later.
How to tell when a lift is firm enough
- The boot-heel test: press your heel firmly into the surface with your full body weight. No more than 1/4 in. of penetration is the target. More than that means more passes are needed.
- The rod test: push a 1/2-in. steel rod or screwdriver into the surface by hand. On a well-compacted granular base it should resist penetration after 1–2 in. of effort.
- Visual check: the surface should look and feel locked together, not loose or rattling underfoot.
- For a more rigorous check on larger or more critical projects, a dynamic cone penetrometer (DCP, ASTM D6951) is a relatively affordable field tool that gives a measured stiffness reading and can identify weak spots across the whole base. Sand-cone testing (ASTM D1556) is another established non-nuclear method to verify achieved density against your target.
Layout and prep: getting your lines, slope, and drainage right before you dig
I can't stress this enough: the 30 minutes you spend on layout and grade control before you pick up a shovel saves hours of rework later. A patio that drains away from your house and sits at the right finished height is far more satisfying than one that puddles every time it rains.
Checking underground utilities
Before any digging, call your local utility locate service (811 in the US, 0800 numbers in the UK) at least 48–72 hours before you start. This is not optional. Buried gas, electric, and water lines are present in most residential gardens, and striking them by hand is just as dangerous as with a machine. Get them marked, flag them with stakes, and keep your excavation at least 18 in. away from any markings horizontally.
Setting up batter boards and string lines
- Set a batter board at each corner of your planned patio: two stakes about 2 ft outside the actual patio corner, connected by a horizontal crosspiece at roughly finished surface height.
- Run string lines between batter boards along each edge of the patio, pulled tight enough to pluck like a guitar string.
- Use a line level or water level to check that your string lines are level across the site before adjusting for fall.
- Adjust the string lines to include your required drainage slope (see below). The string now represents your finished surface elevation, which guides everything that follows.
- Measure down from the string line to check your excavation depth as you dig.
Slope and drainage planning
Every patio needs a minimum slope of 1/8 to 1/4 inch per foot falling away from the house (or toward a planned drain). For a 10-foot-deep patio at 1/8 in. per foot, the far edge sits 1.25 inches lower than the house edge. Set this into your string lines from the start, and it naturally flows through every layer below. Patios that are installed dead-level always end up with puddles, because no base or slab is ever perfectly level in practice.
Digging the patio base by hand: step-by-step excavation
Hand excavation is slower than a mini-digger, but it gives you fine control over depth and lets you spot problems (roots, buried rubble, soft spots) that a machine operator might miss or just power through. For step-by-step instructions on preparing the ground for a gravel patio, see how to prepare ground for gravel patio. For a step-by-step guide on preparing the subgrade and base layers, see our article on how to lay foundation for patio. Here is the full workflow. For a detailed step‑by‑step guide on how to prepare a patio base, see our article on how to prepare a patio base (b106febb-d6d8-4a92-8df0-6077c5e54df1). For detailed, step-by-step guidance on how to dig a patio base, including depth targets, spoil handling, and lift preparation, see how to dig a patio base.
How deep to dig: depth targets by patio type
| Patio type | Paver/surface thickness | Bedding/setting layer | Compacted aggregate base | Total excavation depth (approx.) |
|---|---|---|---|---|
| Sand-set concrete pavers (standard residential) | 2.375 in. (60 mm paver) | 1 in. bedding sand | 4 in. (6 in. in poor soil) | 7.5–9.5 in. below finished surface |
| Natural stone / slab pavers (thicker) | ~2–3 in. stone | 1 in. bedding sand | 4–6 in. aggregate base | 7–10 in. below finished surface |
| Gravel patio | 2–3 in. decorative gravel surface | N/A | 4 in. compacted crushed stone sub-base | 6–7 in. below finished surface |
| Hand-poured Quikrete concrete slab (no pavers) | 4–6 in. concrete slab | N/A | 4 in. compacted gravel | 8–10 in. below finished surface |
| Existing hard surface (overlay situation) | Surface paver or tile thickness | 1/2–1 in. adhesive/mortar | Existing slab acts as base if sound | Minimal — surface prep only |
These depths assume the subgrade (the natural soil below your excavation) is reasonably stable. On soft clay or very silty ground, add 2 in. of extra aggregate depth and always lay geotextile fabric at the subgrade/aggregate interface.
Step-by-step hand excavation workflow
- Mark the perimeter with spray paint or sand lines following your string lines. Cut the grass line cleanly with a sharp spade so you have a defined edge to work to.
- Using your string line as a depth reference, measure down to your required excavation depth at each corner and mark it on a stake. These depth stakes are your visual guide throughout digging.
- Start at one corner and work in manageable strips about 2 ft wide. Use the spade to break through the turf, then the square-mouth shovel to lift and shift the spoil into a wheelbarrow.
- Periodically check depth using a tape measure from the string line. It is easier to dig a little less and re-check than to over-dig and need to fill back in (fill compacts poorly when added later).
- When you have removed the turf and topsoil layer, you will likely hit a different soil layer (often darker/looser above, firmer below). The goal is to excavate to firm, undisturbed subgrade.
- Remove all organic material, roots, and debris from the excavated area. Organic material rots and creates voids, which means settlement.
- Level the excavated floor roughly by eye with a rake, then check with your 4-ft spirit level. You want a reasonably flat floor at the correct depth, matching your slope already built into the string lines.
- Once dug to depth, tamp the exposed subgrade itself with your hand tamper. If the subgrade is soft (your tamper sinks more than 1/2 in. with normal pressure), you may need to add more aggregate depth, install geotextile, or seriously reconsider hand-only compaction.
- Lay geotextile fabric across the entire excavation floor, lapping it 12 in. up each side edge. Overlap fabric joins by at least 12 in.
Handling spoil and waste removal
A 10 x 10 ft patio excavated to 8 in. depth generates roughly 0.6 cubic yards of spoil, which sounds manageable until you realize it weighs around 900–1,100 lb depending on soil type. Spread it in a low area of your garden if you have the space, or arrange a skip/dumpster before you start. Stockpiling it next to the patio is tempting but creates a tripping hazard and tends to collapse back into the excavation. If you have clay soil, the spoil cannot simply be used as fill elsewhere without significant processing, so check your disposal options before you dig.
Special conditions: clay soil, sloped sites, and existing hard surfaces
Clay soil
Clay is the most challenging soil type for compactor-free patio work. It holds water, swells and shrinks with moisture changes, and is difficult to compact by hand to the minimum 95% Standard Proctor density that ICPI specifies for paver bases. On clay ground, always use geotextile fabric, increase your aggregate base depth to 6 in. compacted, keep hand-tamped lifts to 3 in. loose maximum, and budget extra time for drying between compaction sessions if the clay is wet. Compacting wet clay just smears it; it needs to be at or near its 'plastic limit' (firm but not muddy) for hand tamping to achieve useful density. If you squeeze a handful and it sticks together without crumbling or weeping water, the moisture content is roughly in range.
Sloped sites
A gentle slope of up to about 1 in 10 (10%) can be accommodated by stepping the sub-base in level terraces rather than following the slope. Each terrace is excavated, compacted, and filled to a level base, then the next higher terrace begins. This keeps your lifts uniform and prevents the aggregate from washing downslope during compaction. On slopes steeper than about 1 in 8, a compactor becomes much more important for holding material in place during compaction, and you should seriously consider renting one.
Laying onto an existing hard surface
If you're tiling or laying pavers over an existing concrete slab, the compaction question mostly disappears: the existing slab acts as your base, provided it is structurally sound (no crumbling, no significant cracking, no areas that flex or sound hollow). Check it thoroughly, repair cracks with a concrete filler, and address any drainage issues before laying. A thin mortar or adhesive setting bed replaces the aggregate base, and you skip most of the excavation work entirely.
Common mistakes and how to avoid them
- Placing lifts that are too thick: the single most common hand-compaction error. If you dump 6 in. of gravel and tamp it, the bottom 2–3 in. barely gets compacted regardless of how hard you work. Keep lifts to 3–4 in. loose maximum.
- Using the wrong gravel type: rounded pea gravel or river gravel will not compact into a stable base. You need angular, crushed stone (crusher run, DGA, Type 2) that locks together.
- Compacting wet bedding sand: do not compact the bedding sand layer before laying pavers. Screed it flat and lay directly onto it. Pre-compacting creates an uneven surface that makes it almost impossible to get pavers level.
- Skipping geotextile on soft or clay ground: the aggregate will slowly migrate into soft subgrade over time, causing your base to thin and the surface to sink.
- Neglecting edges: edges and corners get less compactive energy than the open field because the tamper head overlaps the boundary. Make dedicated extra passes along every edge.
- Not accounting for slope: a flat patio is a wet patio. Build in 1/8–1/4 in. per foot of fall from the start, not as an afterthought.
- Laying pavers on a dusty or contaminated base: the bedding sand should be clean and consistent. Mixing in organic material or clay from the base layer causes variable settlement.
Time and labor: what to realistically expect
Hand-compacting a patio base is significantly more time-intensive than using a plate compactor. For a 50 sq ft patio with a 4-inch compacted aggregate base, expect to spend about 4–6 hours on excavation and base preparation alone (spread across two or three sessions, especially if you're working solo). Adding the laying, jointing, and finishing stages, a small compactor-free patio is comfortably a full weekend project for one person, or a long day with a helper. A powered plate compactor would reduce the base preparation phase to roughly 1–2 hours for the same area. Plan for rest breaks during tamping: it is physically demanding repetitive work, and fatigue leads to inconsistent passes and missed spots.
When to call a professional
Be honest with yourself on these situations. If your patio area shows signs of poor drainage, standing water, or very soft ground after rain, the subgrade likely needs professional assessment before any base work. Similarly, if your project is over 100 sq ft, has heavy loads planned, or sits on heavy clay in a hard freeze-thaw climate, the risk of hand-only compaction leading to early settlement is high enough that the cost of professional installation or at minimum rented mechanical compaction is worthwhile. Patios near door thresholds, steps, or structures where settlement would cause real problems (tripping hazards, water ingress to the house) are also candidates for the extra investment. The cost to relay a patio that has settled unevenly is almost always higher than doing it right the first time.
FAQ
When is it acceptable to lay a patio without a powered plate compactor, and when is it not advisable?
Acceptable: small pedestrian patios (typical backyard entertaining areas up to ~200–300 sq ft), tight/confined areas where rental equipment won’t fit, or temporary/low‑risk installations when you can work in thin lifts and accept slightly higher settlement risk. Not advisable: any patio supporting vehicle traffic (driveways), large patios where uniform compaction is required (>300 sq ft is a common DIY threshold), sites with loose/unsuitable subgrade (peat, very soft silts), or projects where manufacturer warranty requires mechanical compaction. Industry specs (ICPI/UFC) expect ≥95% Standard Proctor compaction for pedestrian paver bases — hand methods frequently achieve lower density and raise the risk of future settlement.
What basic tools do I need when I won’t use a plate compactor?
Hand tamper (8×8 or 10×10 in. head), heavy garden/roller (lawn/field roller filled with water or sand, where accessible), shovels (square and trenching), bow rake and landscape rake, straightedge/screed rails (2×4 or aluminum), 4‑foot level and stringlines, wheelbarrow, rubber mallet, edging tools, hand saw or wet saw for pavers, gloves, eye protection, and a DCP or sand‑cone kit if you plan to verify compaction.
What materials should I use for a compactor‑free patio base?
Use well‑graded crushed stone (DGA/2A or similar) for the base; bedding sand should be coarse, washed concrete/masonry sand (~1 in. screeded thickness for pavers). Use a geotextile fabric on unstable subgrades, rigid edge restraints (plastic/metal/concrete) to resist lateral movement, and appropriate concrete/Quikrete mixes for poured slabs. For permeable systems choose a clean open‑graded aggregate per manufacturer guidance.
How deep should I dig and how thick should each layer be when using only hand compaction?
Typical total depths for a standard residential patio: paver + 1" bedding sand + 4–6" compacted aggregate base over compacted subgrade. When hand‑compacting, reduce loose lift thickness—work in 1–2" loose lifts that will compact to ~1–1.5–2" each pass, or place compacted lifts of 2–4" max (UFC/industry guidance). For a poured concrete slab, excavate to allow ~4–6" compacted base (placed in multiple thin lifts for hand work) plus slab thickness (typically 4" for patios). Thinner lifts and more passes improve uniformity.
Step‑by‑step: preparing a crushed‑stone (paver) base without a plate compactor
1) Stake and string to finished elevation with correct drainage slope (1/8"–1/4" per ft). 2) Excavate to depth for pavers + 1" bedding + base. 3) Compact the exposed subgrade by tamping and rolling; remove soft spots. 4) Lay geotextile if needed. 5) Place crushed stone in thin lifts (fill 1–2" loose; aim for 2–4" compacted) across the area. 6) Use overlapping, repeated hand‑tamping passes covering every square foot; follow with a loaded garden roller where practical. 7) Check level frequently with screed rails; repeat lifts until you reach finished base elevation. 8) Screed 1" bedding sand on rails and lay pavers. 9) Install edge restraints and joint sand; hand‑tamp perimeter areas and use a rubber mallet on individual units. Note: final mechanical compaction is recommended by manufacturers, so consider renting a compactor for final pass if possible.
Step‑by‑step: laying pavers on sand without a compactor (bedding and finishing tips)
1) After base prepared, set screed rails and spread bedding sand; screed to 1" compacted thickness. 2) Lay pavers tightly in planned pattern. 3) Install edge restraint as you go. 4) Sweep joint sand into joints and compact pavers as well as possible with a heavy hand tamper or by kneeling and pressing; use a flat, heavy board under the tamper for even force. 5) For final seating, make multiple passes with a garden roller if possible; finish corners and edges with a hand tamper and rubber mallet. 6) Top up joints and broom clean. Be aware that industry guides expect final compaction with a plate compactor to properly seat pavers—hand methods increase settlement risk.