
Yes, you can lay a new patio over an old one, but only when the existing surface is structurally sound, drains correctly, and sits at a level that leaves enough clearance at door thresholds and steps. When those conditions are met, overlaying saves time, money, and the misery of breaking out and removing a tonne or more of old concrete or paving. For a detailed, step-by-step discussion and inspection checklist, see the in-depth guide 'can you lay a patio on top of another patio' on this site. When they are not met, going over the top just buries the problem and you will be back to square one within a couple of seasons.
Can You Lay a New Patio Over an Old One? Feasibility Guide

Clara Farrell
13 Jul 2026
Quick answer: can you lay a new patio over an old one?
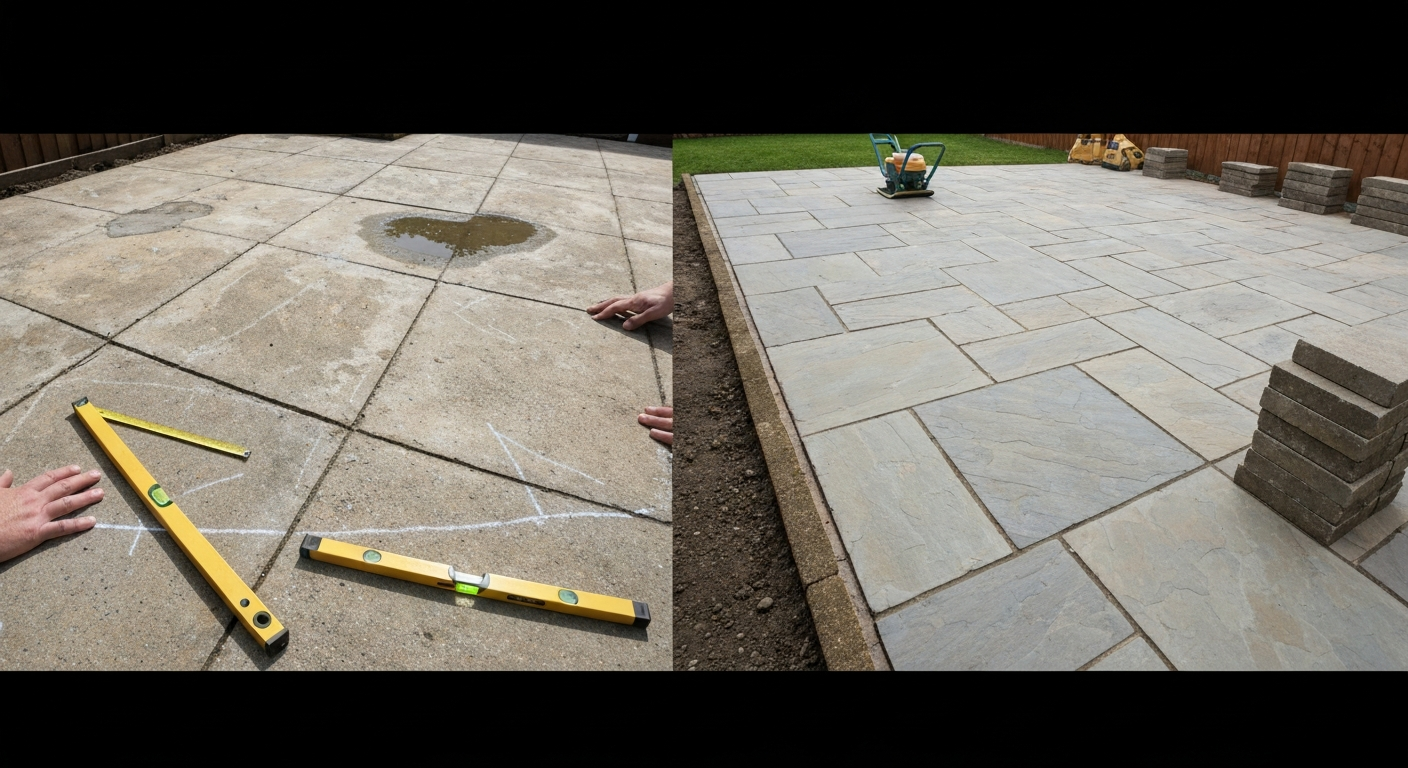
The short version is this: if the existing patio is stable, has no active cracks or signs of movement, drains away from the house, and leaves at least 75 to 150 mm of usable headroom below your door threshold (depending on method), an overlay is a legitimate and durable option. If the base moves underfoot, pools water, shows wide or active cracks, or has subsided in patches, no overlay method will fix that. You need to take it up. In between those two clear outcomes sits a grey area where smart preparation, the right method, and honest inspection determine whether you proceed or demolish.
Which existing bases can actually be overlaid
Not every old patio is the same underneath. What you have down there changes which overlay method is viable, or whether one is viable at all.
- Solid concrete slab: the best candidate for overlaying. A sound, flat concrete base gives you the rigid, stable platform that bonded overlays, new slabs on mortar, and pedestal systems all require. Thin bonded overlays, polymer-modified screeds, and mortar-bedded flagstones all perform well on a good concrete base.
- Compacted sub-base with well-bedded pavers (rigid construction): if the pavers are fully bedded in mortar on a concrete or well-compacted cementitious base and none have rocked or settled, you can treat this much like a concrete slab. Any loose or hollow-sounding pavers need re-bedding or removal before you proceed.
- Flexible-laid pavers on a sand/MOT bed: these are trickier. The surface may look fine but flex slightly underfoot. Thin bonded overlays will not tolerate any movement, so this type of base is better suited to a new compacted aggregate layer on top, pedestal systems, or decking rather than a bonded cementitious finish.
- Old asphalt or tarmac: workable only if the asphalt is firm and not stripping or deforming. Bonded concrete overlays on soft or degraded asphalt delaminate quickly. A new aggregate layer or pedestal system is safer.
- Gravel or loose aggregate: not a suitable direct base for any overlay method. It needs to be compacted and stabilised, or the gravel raked back and a new sub-base built properly. Laying patio slabs on gravel is covered separately on this site if that is your specific situation.
Inspection checklist before you start
Spend thirty minutes with this checklist before you buy a single bag of cement. It will tell you which category your patio falls into and which overlay method, if any, is appropriate.
- Walk the whole surface: does anything flex, rock, or feel hollow? Hollow spots under a concrete slab indicate delamination or voids beneath. Tap with a steel bar or a rubber mallet. Hollow thuds mean the concrete has lifted from its base.
- Check for active cracks: a crack is active if it has moved recently. Look for fresh edges, debris inside the crack, or different heights on either side. Active cracks must be resolved before overlaying because cementitious overlays will not bridge movement and will crack themselves at the same point.
- Assess drainage and falls: place a long spirit level or a straight 2 m batten across the surface and check the slope. The minimum recommended fall away from the house is 1:60 (roughly 16 mm per metre). If the surface falls toward the house or pools water visibly after rain, the drainage problem must be fixed, not covered over.
- Measure the threshold gap: hold a tape measure from the current patio surface up to the underside of your door threshold or the base of any French/bifold doors. Deduct your planned overlay thickness. The remaining gap must be enough for the door to operate and meet building regulations (typically at least 150 mm from ground level to DPC in the UK).
- Look for subsidence: a dip or step at one end of the slab that was not designed in, especially near walls or at the edges, suggests the ground beneath has moved. This is a removal-and-rebuild trigger.
- Check for contamination: oil stains, chemical spills, or paint coverage affect bonding agents. These can sometimes be cleaned by shotblasting or grinding, but extensive contamination may make bonding unreliable.
- Assess bond of existing pavers or tiles: press firmly on individual slabs. A well-bonded surface feels completely solid. Anything that moves is a problem that needs to be fixed or removed before you overlay.
- Note any existing joints or movement joints: identify where expansion joints run. Any new bonded overlay must respect these and should include matching joints or an isolation detail at the same position.
Decide now: overlay, remove and rebuild, or choose decking instead
Use this simple decision flow to land on the right path before you get into method details.
| Your situation | Recommended path |
|---|---|
| Solid slab, sound, good drainage, enough threshold clearance | Proceed with overlay (choose method based on finish and depth) |
| Solid slab but active cracks or hollow spots in places | Repair defects first, then overlay if repairs hold |
| Widespread cracking, subsidence, or water tracking toward house | Remove and rebuild |
| Sound base but tight threshold clearance (under 75 mm) | Consider a pedestal system or decking, which can use thinner profiles |
| Good slab but you want a raised, level deck over a slightly uneven surface | Adjustable pedestals or decking subframe |
| Flexible or loose base (sand-laid pavers, gravel) | New compacted aggregate layer on top, or decking on a subframe |
| Any sign of soil movement, tree root damage, or persistent damp from below | Remove and rebuild |
Decking on top of an existing patio is worth considering seriously if you want to raise the level, have a tight threshold, or prefer a warm surface underfoot. It is a legitimate third option, not a last resort, and I have covered the installation approach in detail in the decking on patio guide on this site.
Overview of practical overlay methods
There are five main methods for laying a new patio over an old one. Which one suits your project depends on the condition of the existing base, how much height you can afford to add, the finish you want, and your budget. Here is a quick orientation before the detailed sections below.
| Method | Best existing base | Added depth (approx) | DIY difficulty |
|---|---|---|---|
| Bonded thin overlay / resurfacing product | Sound concrete slab only | 6–20 mm | Moderate |
| Mortar or screed over concrete | Sound concrete slab | 25–75 mm | Moderate |
| New slabs on compacted aggregate layer | Any firm existing patio | 100–200 mm total | Moderate–High |
| Adjustable pedestal system | Sound slab or firm surface | 40–500+ mm (adjustable) | Moderate |
| Timber or composite decking on subframe | Any stable surface | 75–200 mm (frame + boards) | Moderate |
Bonded thin overlays and resurfacing products
A bonded thin overlay is a new layer of polymer-modified cementitious material, resin-bound aggregate, or proprietary resurfacing product applied directly to the existing concrete surface and chemically or mechanically bonded to it. ACI guidance defines overlays as starting from around 6 mm thickness. In practice, most proprietary decorative resurfacing systems are applied at 6 to 20 mm. They are ideal if you want to refresh the look of a concrete patio, change the colour or texture, or seal minor surface crazing without adding significant height.
The critical point with thin overlays is that they are completely dependent on the substrate being sound. If there is any movement, any hollow area, or any delamination below, the overlay will lift and crack at those points within months. The surface must be mechanically profiled before application, meaning grinding, shotblasting, or high-pressure water jetting to remove laitance (the weak surface layer), contaminants, and to achieve the rough surface profile that the product needs to grip. The ICRI surface profile system runs from CSP 1 (almost smooth) to CSP 10 (very rough). Most polymer-modified overlays need CSP 3 to 7 depending on the product, and most concrete toppings 25 mm or thicker need at least CSP 5. Acid etching alone is not recommended by ACI or ICRI as a surface preparation method for structural bonding because it does not reliably achieve the required profile depth.
Active or moving cracks are a hard stop for bonded thin overlays. Thin bonded concrete overlays or polymer‑modified overlays should not be placed over substrates with evidence of structural settlement, large deflections, or where the substrate moves under live loads, these conditions usually require full removal and replacement (ACI 546R Concrete Repair Guide (overlays and limitations)) Thin bonded concrete overlays or polymer‑modified overlays should not be placed over substrates with evidence of structural settlement, large deflections, or where the substrate moves under live loads — these conditions usually require full removal and replacement.. Industry guidance from both ACI and the Bureau of Reclamation is clear: a cementitious overlay will not bridge a crack that is still moving. Before applying any overlay, you must rout and seal moving cracks with a flexible filler or create an isolation joint at those positions so the overlay is effectively decoupled there.
- Best for: refreshing a sound concrete base with a decorative finish, minor surface repairs, colour change
- Not suitable for: cracked, moving, or hollow substrates; flexible or granular bases; patios with drainage problems
- Thickness range: 6–20 mm for decorative/resurfacing products; up to 50 mm for bonded screed systems
- Surface prep required: shotblasting, grinding, or high-pressure water jetting to achieve required CSP; application of bonding primer per product datasheet
- Follow the product datasheet on moisture conditions and open time for bonding agents
Mortar or screed overlays on sound concrete
A sand-and-cement screed or polymer-modified screed laid over existing concrete is a step up in thickness and robustness from thin resurfacing products. This approach gives you a fresh, level surface that you can then tile, paint, or leave as a brushed finish. BS 8204 specifies surface regularity classes for bases receiving screeds: SR1 at maximum 3 mm deviation under a 2 m straightedge, SR2 at 5 mm, SR3 at 10 mm. If you are going to apply a thin bonded finish or thin floor tiles over the screed, you should be targeting SR1 or SR2 for the screed itself, which requires care and skill in application.
For a bonded screed to work, the existing concrete must be clean and profiled (again, shotblasting or grinding, not just a sweep and a wash), and a bonding agent such as an ASTM C881 epoxy primer or proprietary SBR bonding coat must be applied to the prepared surface before the screed goes down. The screed is laid while the bonding agent is still within its open time. Minimum practical thickness for a bonded sand-cement screed is around 25 mm, though manufacturers of polymer-modified screed products (covered under BS 8204-3) may allow thinner applications. Do not try to lay a sand-and-cement screed thinner than 25 mm: it will dry too fast, crack, and lift.
- Prep: shotblast or grind surface to remove laitance; vacuum clean; check for active cracks and route-and-seal or joint them
- Apply bonding agent (SBR slurry or epoxy primer) to clean, dust-free surface; lay screed while still tacky
- Minimum screed thickness: 25 mm for sand-cement bonded screed; follow manufacturer guidance for polymer-modified products
- Use a 2 m straight edge and spirit level to achieve required flatness (SR1 or SR2 for tiled finishes)
- Allow full cure before loading: typically 28 days for cementitious screeds before heavy foot traffic or tile fixing
- Good for: levelling an uneven but structurally sound concrete slab, preparing a base for external tiles or pavers
Laying new slabs on a compacted aggregate layer over an existing patio
This is probably the most practical DIY route for most homeowners, and the one I recommend most often when the existing patio is structurally sound but you want a completely new slab finish with full-size flagstones or block pavers. Instead of bonding to the existing surface, you build a new working base on top of it.
The principle is to lay a compacted bed of MOT Type 1 (crushed stone) or clean angular aggregate over the existing surface, compact it thoroughly, then bed your new slabs in a sand-and-cement mortar bed or sharp sand layer in the usual way. BS 7533 and PavingExpert guidance recommends 100 to 150 mm of compacted sub-base for domestic paving under typical foot traffic conditions, topped by a 30 to 50 mm bedding layer of either sharp sand (for flexible laying) or semi-dry mortar (for rigid fixing). Because the existing patio provides a solid, non-porous working platform, you can often reduce the aggregate depth slightly compared to building from bare ground, but do not go below 75 mm of compacted aggregate plus the bedding layer.
Edge restraints are not optional here. Aggregate and sand bedding layers need to be confined laterally or they will creep outward over time, causing the edges of your new paving to drop and joints to open. Fix kerb units, concrete haunching, or proprietary metal edging around the perimeter of your new paving before you start laying. This is one of the most commonly skipped steps on DIY projects and one of the most common reasons a patio fails within the first two winters.
- Install edge restraints first: kerbs, haunched concrete, or metal edging around the full perimeter
- Lay 75–150 mm of MOT Type 1 / crushed stone and compact in layers with a plate compactor
- Add 30–50 mm bedding layer: sharp sand for flexible, semi-dry mortar (6:1 sharp sand:cement) for rigid
- Lay slabs with consistent 10–15 mm joints; check falls as you go (aim for 1: 60 away from house)
- Point joints once slabs are set: brush-in kiln-dried sand for flexible, mortar pointing for rigid
- Good for: adding full-size flagstones, natural stone, or concrete slabs over a sound but uneven existing surface
Adjustable pedestal systems and raised pavers
Adjustable pedestal systems are exactly what they sound like: small plastic or HDPE supports with a screw-height mechanism that let you place slabs at any height above the existing surface, from about 40 mm up to several hundred millimetres or more, depending on the product range. Brands like Eterno Ivica make pedestals with a range of head types designed for different slab thicknesses and sizes. The slabs simply rest on the pedestals and are not bonded, which means no curing time, no mess, and fully reversible installation.
Pedestals are particularly well suited to raised terraces, roof terraces, and situations where you need to overlay an uneven existing slab to create a perfectly level surface, or where you want to run cables or drainage channels underneath. The trade-off is that slabs need to be at least 20 mm thick and ideally 40 mm for external use (thinner slabs can crack at the support points under impact or heavy loading), and you need to follow the manufacturer's load rating and maximum spacing guidance for the specific slab size you are using.
- Best for: roof terraces, balconies, uneven existing slabs, situations needing good drainage beneath, reversible installations
- Height range: typically 40 mm to 500+ mm depending on product; check specific datasheet
- Slab thickness: minimum 20 mm porcelain or 40 mm concrete flags recommended for external use
- No bonding, no mortar, no curing time: pedestals are set and levelled, slabs placed on top
- Follow manufacturer spacing guidelines based on slab dimensions and expected load
- Check that the existing surface is stable enough to take point loads without the pedestal feet punching through or settling
Fitting decking on top of an existing patio
Fitting timber or composite decking over an existing patio is a genuinely practical option, not a workaround. If your existing patio is sound but you want a warmer, softer surface, need to raise the level to meet a door threshold, or simply prefer the look, a decking subframe on top of a concrete or paved base works well. I have done this on my own garden and it went down in a weekend.
The subframe is typically 47x100 mm or 47x150 mm treated timber joists fixed or weighted down to the existing surface, with composite or hardwood decking boards fixed across the joists at right angles (or diagonally for a different pattern). The key practical requirement is ventilation: the gap between the underside of the boards and the existing patio surface should be at least 50 mm to allow air to circulate and prevent the timber from sitting in trapped damp. Composite decking is more tolerant of moisture than timber and generally needs less maintenance, but both materials need a well-ventilated subframe. Fix the subframe using stainless steel fixings to prevent rust staining. The full step-by-step process is covered in the decking on patio guide on this site.
- Subframe: 47x100 mm or 47x150 mm treated C16/C24 timber joists or aluminium composite frame
- Joist spacing: typically 400–450 mm centres for timber, follow board manufacturer guidance for composites
- Minimum ventilation gap: 50 mm between underside of boards and existing patio surface
- Fixings: stainless steel screws or proprietary hidden fixings; avoid galvanised fixings on composite boards
- Falls: build a 1:60 fall into the subframe so water drains off the surface
- Best for: threshold height issues, softer underfoot finish, quick installation over a sound existing base
Materials and tools checklist by method
| Method | Key materials | Key tools |
|---|---|---|
| Bonded thin overlay | Proprietary resurfacing product, epoxy or SBR bonding primer, flexible crack sealant | Angle grinder with diamond cup, pressure washer, gauging trowel, steel float, straight edge |
| Mortar/screed overlay | Sharp sand, cement (or polymer-modified screed bag mix), SBR bonding agent, expansion joint strip | Angle grinder or hired shotblaster, screed rails, gauging trowel, straight edge, float, spirit level |
| New slabs on aggregate layer | MOT Type 1 crushed stone, sharp sand or semi-dry mortar mix, new slabs/flags, edge restraint units, pointing mortar or kiln-dried sand | Plate compactor, builder's line, rubber mallet, bolster and club hammer, 2 m straight edge, tape measure, spirit level |
| Adjustable pedestals | Adjustable plastic pedestals (matched to slab size/load), paving slabs (min 20–40 mm thick) | Tape measure, spirit level (short torpedo and long), rubber mallet (to adjust slab position) |
| Timber/composite decking | Treated timber joists or aluminium frame, decking boards (timber or composite), stainless fixings, joist hangers, end caps | Mitre saw or circular saw, cordless drill/driver, tape measure, chalk line, spirit level, string lines |
Step-by-step preparation and installation checklist
This sequence applies regardless of which method you choose. Do not skip the early steps because they decide whether the whole project succeeds or fails.
- Walk and tap the entire existing surface: mark hollow, cracked, or loose areas with chalk
- Repair or remove loose and hollow sections: re-bed rocking pavers, fill hollow voids in concrete with a repair mortar, or break out and relay problem areas
- Identify and treat active cracks: route them out and fill with a flexible polyurethane or epoxy sealant; mark joint positions if decoupling is needed
- Check falls and drainage: use a spirit level and tape on a 2 m straight edge; confirm water runs away from the house at 1:60 minimum
- Measure threshold clearance: confirm you have enough room for the method you have chosen
- Clean the surface thoroughly: pressure wash or shotblast (hire a shotblaster for bonded overlays); remove all laitance, oil, moss, algae, and loose material
- Install edge restraints if laying a new aggregate and slab bed: haunch in kerbs or edging before adding any aggregate
- For bonded overlays: apply bonding agent strictly per product datasheet (correct dilution, open time, moisture tolerance)
- Place your chosen overlay material: work in sections, maintain consistent thickness, check falls continuously
- Compact aggregate layers: use a plate compactor in overlapping passes; never skip compaction
- Lay slabs, boards, or pedestal-supported units: check level and fall on every row; use a string line and level
- Allow full cure before use: 24–48 hours for pedestals and decking; 3–7 days minimum for mortar-bedded paving; 28 days for cementitious screeds under heavy loading
- Point joints or seal fixings: brush-in sand for flexible paving, mortar point rigid paving, apply edge caps or trim on decking
- Final check: walk the finished surface, check falls with water test, tighten any loose boards or unstable slabs
Special conditions and how they change the approach
Laying over gravel or on a loose base
If the existing surface includes a gravel area or loose aggregate, this is not a suitable base for any direct overlay. Gravel must be compacted and stabilised with a geotextile membrane, or raked back and replaced with a proper compact sub-base before any new paving goes on top. This is covered in more detail in the guide to laying patio slabs on gravel on this site. For step-by-step instructions, see the guide Can you lay patio slabs on gravel.
Working on wet ground or in winter
Cementitious bonding agents, screeds, and mortar beds all need conditions above 5 degrees C to cure properly. Below that, curing slows dramatically and can stop altogether, leaving weak, friable material. Frost will destroy freshly placed mortar or screed. If you are working in winter, you need to either wait for a suitable weather window, use frost-protected mortar mixes with an admixture, or protect the freshly laid work with insulating blankets overnight. Pedestal systems and decking are far less sensitive to temperature during installation, making them more realistic winter options. The laying a patio in winter guide on this site covers this in full detail.
Similarly, laying onto a wet surface compromises bonded overlays because moisture under a bonding agent can prevent adhesion and cause blistering. For practical guidance specific to laying patios on wet ground, see the can you lay patio on wet ground guide (ID: 36acf381-bea0-415c-988f-cbc4450e5491). If the existing slab is saturated after rain, allow it to dry out before applying any bonding primer. Most product datasheets specify a maximum surface moisture content, which you can test with a surface moisture meter.
Sloped sites and clay soil
A sloped site is not a barrier to overlaying, but you need to decide whether you want the new surface to follow the same slope or create a level terrace. If following the slope, all the same rules apply. If levelling, a pedestal system or a subframe for decking is far more practical than trying to build up a thick screed to compensate for the fall. Clay soil beneath the existing patio is a flag: clay moves seasonally as it wets and dries, and if the existing patio has not moved with it, there is a risk it will eventually. Check carefully for signs of that movement before overlaying.
When you must remove the old patio
There are situations where no overlay method will give you a durable result. Be honest with yourself when you find these conditions because a botched overlay costs more to fix than a clean demolition and rebuild would have done in the first place.
- Widespread or active cracking: if cracks run through a significant portion of the slab or show evidence of ongoing movement (stepped edges, fresh debris in the crack), the base is unstable and must come up
- Subsidence: any section of the patio that has dropped relative to the rest, particularly near walls or in corners, indicates ground movement beneath that no overlay can resolve
- Water tracking toward the house: if the patio falls toward the building or water is getting under the DPC, you need a full rebuild with correct drainage designed in from the start
- Contamination you cannot clean: oil, fuel, or chemical spills that have soaked deeply into the concrete prevent bonding and may create health or environmental issues
- Hollow or delaminated slabs over a large area: if more than 20 to 30 percent of the surface sounds hollow when tapped, the base has failed and needs to come out
- Signs of tree root intrusion: roots under a slab will continue to grow and no overlay will stop them lifting the new surface
Pros and cons: overlay versus full removal and rebuild
| Factor | Overlay | Remove and rebuild |
|---|---|---|
| Cost | Lower: saves skip hire, breaking-out labour, and disposal costs | Higher: demolition, disposal, and full new base add significant cost |
| Time | Faster: days rather than weeks for most methods | Slower: full excavation, sub-base, and base build adds time |
| Disruption | Less mess, no spoil to move | Major disruption, spoil removal, potentially affects garden access |
| Durability | As good as the base it sits on; limited by existing conditions | Starts fresh; can correct drainage, level, and sub-base design |
| Drainage correction | Difficult; you cannot redesign falls easily with an overlay | Full opportunity to set correct falls and add drainage channels |
| Added height | Adds 6 mm to 200+ mm depending on method | Same final height as original, or redesigned to suit |
| Future maintenance | If base deteriorates, overlay may need removal | Clean base; easier long-term maintenance |
| Flexibility | Limited by existing layout | Complete design freedom |
Realistic time and cost expectations
Costs vary significantly by region, material choice, and whether you are doing the work yourself or paying a contractor. These figures are indicative for a typical 20 to 30 square metre domestic garden patio in the UK as of mid-2026 and are intended as a planning guide rather than a quote.
| Method | DIY material cost (per m²) | Typical DIY time (20 m² patio) | Contractor cost guide (per m²) |
|---|---|---|---|
| Bonded thin overlay/resurfacing | £15–£35 | 1–2 days (plus curing) | £40–£80 |
| Mortar/screed overlay | £20–£40 | 2–3 days (plus 7-day cure) | £50–£90 |
| New slabs on aggregate layer | £40–£90 (incl. slabs) | 2–4 days | £80–£140 |
| Adjustable pedestal system | £50–£120 (incl. slabs) | 1–2 days | £90–£160 |
| Timber/composite decking | £40–£100 (incl. boards) | 2–3 days | £80–£150 |
| Full removal and rebuild (concrete base + slabs) | £60–£120 | 3–6 days | £120–£220 |
The main cost drivers are the quality and size of the new slabs or decking boards (materials are usually the biggest single spend), whether you need to hire a plate compactor or shotblaster, and skip or aggregate disposal costs if there is any demolition involved. Always get three quotes from contractors and check they include surface preparation, not just the laying.
Common DIY mistakes to avoid
These are the ones I see most often, and most of them happen because preparation was rushed or skipped.
- Skipping the surface preparation for bonded overlays: sweeping and hosing is not the same as shotblasting or grinding. Without the right surface profile, your overlay will lift within months.
- Ignoring drainage: covering an existing patio without checking the falls first is the fastest way to end up with a new patio that pools water. Check before you start, not after.
- Not installing edge restraints: even a small amount of lateral movement in a granular bedding layer will cause edge slabs to drop and joints to open. Edge restraints are not optional.
- Using the wrong bedding thickness: too thin a mortar bed dries too fast and cracks; too thick and it never sets properly. Aim for a consistent 30–50 mm.
- Overlaying active cracks without treating them: the crack will reflect through the new surface within one or two seasons.
- Laying in frost or rain: mortar and cementitious products need above 5 degrees C and dry conditions to cure. Laying in the wrong conditions produces weak, crumbling joints.
- Not checking threshold clearance before buying materials: discovering that your new surface level will prevent the door from opening after you have already bought the slabs is an expensive mistake.
- Applying bonding agents out of their open time: most bonding primers have a working window of 20 to 60 minutes. Apply screed or overlay too late and there is no bond.
Maintenance tips for overlaid patios
An overlaid patio does not need dramatically different maintenance from a new one, but there are a few things worth doing in the first couple of years to catch problems early.
- Check pointing joints after the first winter: freeze-thaw cycles can loosen mortar pointing in the first season. Repoint any gaps before water gets into the bedding layer and causes more damage.
- Clean the surface annually with a stiff brush and a patio cleaner or pressure washer (low pressure on mortar joints): this prevents moss and algae build-up which can lift thin overlays and cause slipping.
- Seal natural stone or porous concrete slabs every 2 to 3 years: sealing reduces water ingress and makes the surface easier to clean.
- Watch for new cracks appearing in the same location as old ones: if a crack reappears in your new overlay at exactly the same position as a crack in the old surface, the original crack was still active and needs proper repair.
- Check pedestal systems once a year: inspect that pedestals have not shifted or corroded (HDPE pedestals resist UV and moisture well, but metal components on cheaper systems can corrode) and that slabs have not rocked.
- Inspect decking boards for movement or soft spots at least once a year, especially near fixings: a soft spot under a board usually means moisture has got into the subframe. Catch it early and you may only need to replace a joist, not the whole deck.
Sensible next steps for your project
If you have worked through this guide and concluded that overlaying is the right call, the next step is to pick your method based on the condition of your existing base, your budget, and the finish you want, then go back through the relevant method section above and work through the preparation and installation checklist in order. Do not buy materials until you have completed the inspection checklist and know which method you are using. It sounds obvious, but a huge number of DIY patio problems start with someone buying slabs before they have checked the threshold height or the drainage falls.
If you are laying new flagstones or block pavers on a compacted aggregate layer, the slab-laying guide on this site will walk you through the bedding and pointing process in full detail. If you have decided that decking over the existing patio is the better option for your situation, the decking on patio guide covers the full subframe design, joist spacing, board fixing, and finishing sequence. If the inspection checklist has pushed you toward full removal and rebuild, the same slab-laying guide covers building from bare ground up, including sub-base design, drainage, and edging.
The single most useful thing you can do before starting any of this work is spend the time doing the inspection properly. Every hour you put into understanding what you have got on the ground will save you at least a day of rework later. Get that part right and the rest follows.
FAQ
Can you lay a new patio over an old patio?
Yes — in many cases you can lay a new patio over an existing one, but only if the existing base is sound, stable, provides correct falls/drainage, and can be prepared to accept the chosen overlay. If the existing slab is unstable, heavily cracked, subject to ongoing movement or poor drainage, removal and rebuild is usually the correct choice.
How do I decide if overlay is feasible or if I must remove and rebuild?
Use a simple go/no‑go decision: Proceed with overlay if the slab is: largely intact (only hairline/non‑active cracks), level or correctable with a thin topping, structurally stable (no deflection/subsidence), provides good drainage, and can be profiled and cleaned for bonding. Choose removal/rebuild if you find: wide/open/moving cracks, spalling or delaminated concrete, visible settlement or ponding after rain, soft/weak substrate, or contamination (oil/vegetation) that can’t be reliably removed. If unsure, pull‑off testing or contractor inspection is recommended.
What should I check during a patio inspection before overlaying?
Inspection checklist: 1) Structural stability — step and look for settlement, deflection, or hollow sounds. 2) Cracks/joints — identify active vs non‑active; measure width and movement. 3) Surface condition — spalling, laitance, contamination (oil/moss). 4) Falls/drainage — water should run away from buildings; check for puddles after rain. 5) Level tolerance — how much variation across the area (2 m straightedge SR tolerances). 6) Subgrade/wetness — probe edges for saturated ground. 7) Edge continuity — existing edges must transfer lateral loads or be able to receive new edge restraint. 8) Utilities and services — ensure no buried services will be trapped under a thicker overlay.
What overlay methods are suitable for homeowners/DIYers?
Practical overlay options: 1) Bonded thin cementitious or polymer‑modified overlay (resurfacing) for sound concrete where you want a thin finish. 2) Mortar/screed topping (rigid) over concrete where thickness allows and substrate is structurally sound. 3) Laying new slabs/flags on a compacted aggregate layer (flexible system) built above the existing patio — requires edge restraints. 4) Adjustable pedestals — support new paving or porcelain slabs above the old patio for drainage and services. 5) Install decking (timber or composite) on joists or pedestals above the patio — a good alternative where substrate is poor or access to services is needed.
When is a bonded thin overlay appropriate and what are its limitations?
Appropriate when the concrete is sound, only surface defects exist, cracks are stable or can be repaired, and falls are acceptable. Limitations: thin cementitious overlays (polymer‑modified) require a proper surface profile (mechanical prep), don’t bridge moving cracks, are sensitive to substrate movement, and need correct curing/temperature conditions. They are not appropriate where the slab has structural settlement or active movement.
How do I treat cracks and joints before overlaying?
Categorize cracks: non‑moving (hairline/static) can be routed and filled with mortar/repair compound; active cracks need isolation/movement joints or flexible jointing systems. All joints in the substrate should be replicated or provided with movement capability in the overlay to prevent delamination and reflective cracking.