You can lay decking over an existing patio by building a timber or aluminium subframe directly on top of the slab, levelling it with adjustable pedestals or treated timber feet, then screwing or clipping your boards across the joists. The whole job is very DIY-friendly as long as you get the subframe right first. Rush that part, and everything else wobbles, rots, or fills with standing water within a couple of seasons.
How to Lay Decking on a Patio: Step-by-Step DIY Guide

Clara Farrell
11 Jun 2026
This guide walks through every stage in order: picking the right boards and materials, measuring and marking out, prepping the base, building the subframe, laying the boards, finishing the edges, and keeping it all looking good for years. Whether your patio is flat concrete, uneven paving slabs, or slightly sloped, there's a way to make it work.
Choosing decking boards and materials for patio use
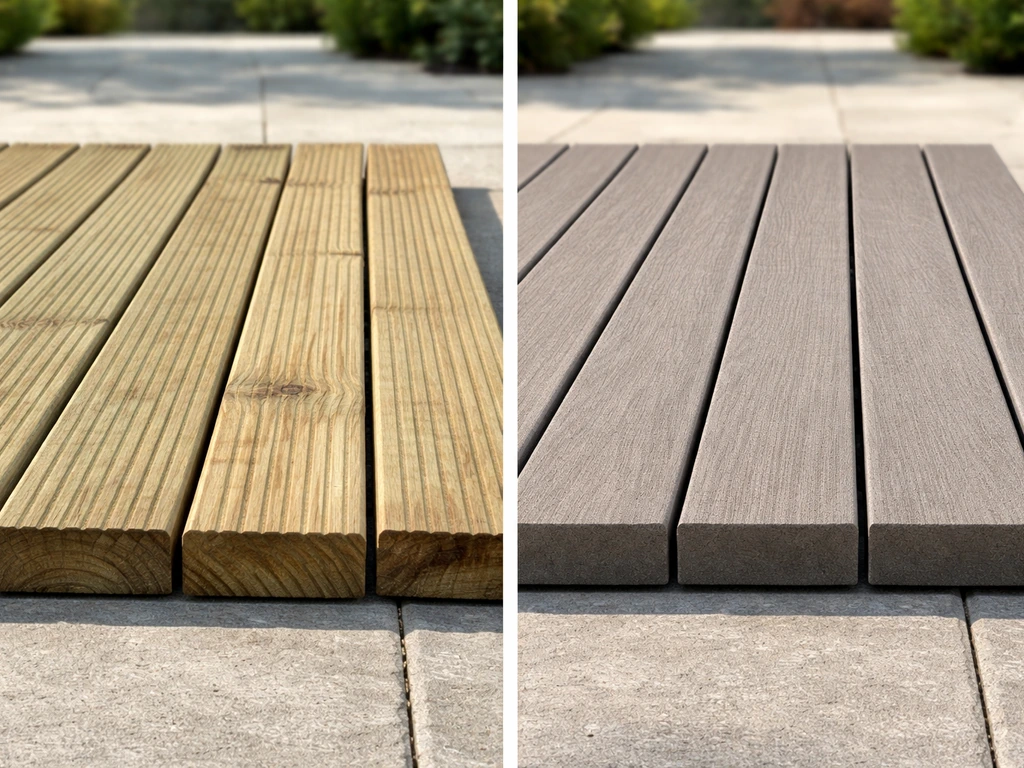
For a patio situation, you're choosing between pressure-treated softwood timber and composite boards. Both work well, but they suit different priorities and budgets.
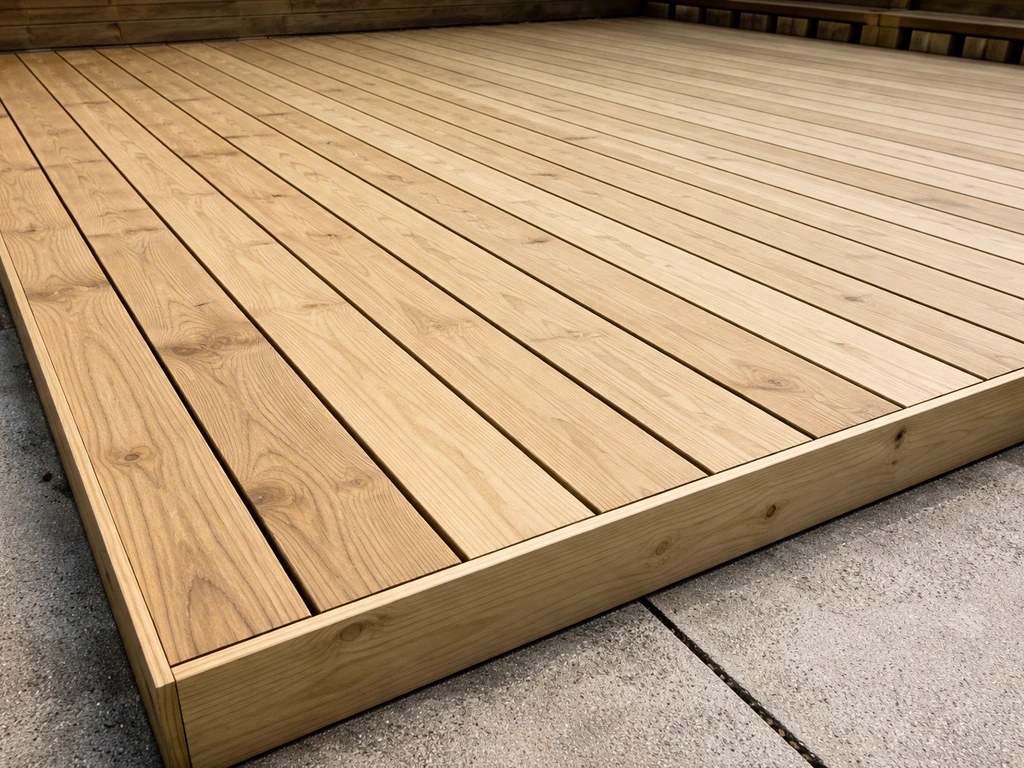
Pressure-treated timber is the most common choice for DIYers in the UK. Standard boards come in 32mm x 125mm sections, and that 32mm thickness is worth specifying if your joists are going to be at 600mm centres or if you're expecting heavier foot traffic. Thinner 28mm boards work fine at 400mm joist centres but start to flex noticeably at wider spans. Timber is cheaper upfront, easier to cut, and forgiving to work with.
The trade-off is maintenance: you'll need to clean and re-oil or re-stain it every year or two, and any end grain cuts need sealing immediately with a penetrating end-grain sealer to stop rot starting from the inside out. With good care, a timber deck can last 15 years and beyond.
Composite decking is made from a mix of wood fibre and recycled plastic. It's more resistant to rot, insects, and moisture, and genuinely needs less maintenance than timber. Most composites in the UK run 20mm to 24mm thick, so you must check the manufacturer's joist spacing spec before buying because a 20mm board spanning 600mm centres will flex. Composite can scratch more easily than timber in some cases, and it expands and contracts with temperature changes more than wood does, which is why gap rules matter more with composite. If low maintenance is your goal and you're happy to spend more upfront, composite is the better long-term choice.
| Feature | Pressure-Treated Timber | Composite |
|---|---|---|
| Typical thickness (UK) | 28mm or 32mm | 20mm to 24mm |
| Upfront cost | Lower | Higher |
| Maintenance | Annual oiling/staining needed | Occasional cleaning only |
| Rot/pest resistance | Good (with treatment) | Excellent |
| Expansion/contraction | Low to moderate | Higher — gaps are critical |
| DIY ease | Very easy to cut and fix | Easy, but follow gap rules closely |
| Lifespan with care | 15+ years | 25+ years |
For most first-time patio decking projects, I'd suggest pressure-treated timber at 32mm x 125mm on 400mm joist centres. It gives you a solid, forgiving result without the strict expansion-gap discipline that composite demands.
Measure, plan, and mark out the deck layout
Before you buy a single board, sketch the deck on paper with real measurements. This saves you from expensive mistakes and helps you calculate materials accurately.
Measure the full area of your patio. If it's an irregular shape, break it into rectangles and measure each section separately. Note any obstacles: drains, inspection covers, walls, steps, or posts. These will affect where your joists run and may require you to box around them with doubled-up framing timber.
Decide which direction your boards will run. Boards running away from the house make a space look longer. Boards running parallel to the house or at 45 degrees can look more dynamic but at 45 degrees you'll need joists at roughly 300mm centres to keep spans within limits, which means more timber. Most people go with boards running away from the house at 90 degrees to the joists, which allows standard 400mm joist spacing.
Once you've decided on board direction, mark out your joist positions on the plan. For 32mm timber boards, 400mm centres are the safe default. For most composites (check yours specifically), 400mm centres are also typically required. Mark the start and end joist positions first, then work inward at your chosen spacing. You'll also need a perimeter joist (rim joist) around the outer edges to support board ends.
Use a long tape and chalk line or spray marker to transfer these positions onto the patio surface. This is your installation map and it makes the subframe build much faster.
Calculating how many boards you need
Take your total deck width, divide it by the board width plus your intended gap (usually 5mm to 8mm for timber, or as specified by the composite manufacturer), and round up to the next whole number. Then multiply by the board length needed. Add 10% for waste and off-cuts. For screws, budget roughly two fixings per board per joist crossing.
Prep the patio base for a stable, draining subframe
This is the step most people skip or rush, and it's also the most common reason a deck fails early. If you are thinking about laying patio slabs on gravel, the key is preparing a firm, level base so the slabs do not rock or crack over time lay patio slabs on gravel. Your patio surface might look solid, but how well it drains and how level it is will directly affect your subframe and your finished deck.
Start by clearing the patio completely and sweeping it down. Check every paving slab or section of concrete for movement. Press down on each slab with your foot. Any that rock or hollow-sound need to be re-bedded or at minimum stabilised before you build over them. A subframe sitting on a loose slab will transmit that movement directly to your deck surface.
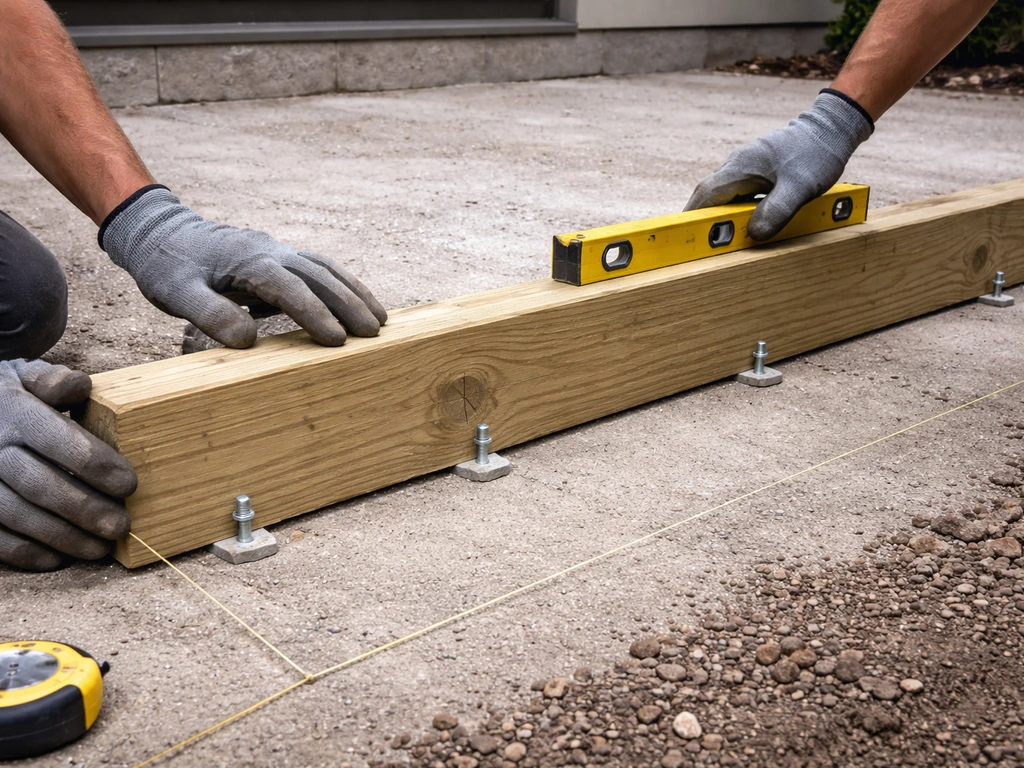
Check the drainage situation. Concrete and paving slabs retain moisture underneath a timber subframe, which creates exactly the damp conditions that cause rot. Laying joists directly on a concrete patio without any gap or moisture barrier is one of the most common mistakes I see. The fix is to either use adjustable pedestals that hold the subframe off the surface and let air circulate underneath, or to use a rubber membrane strip under each joist foot to break the contact. For anything more than a small area, pedestals are worth the extra cost.
Check the slope. A patio should already have a slight fall (around 1 in 80, roughly 12mm per metre) for rainwater to drain away from the house. Use a spirit level with a long straightedge to check this. If your patio slopes significantly in the wrong direction, or has an uneven surface with dips and high spots, adjustable pedestals become even more important because they let you level the subframe independently of what's happening underneath.
Your finished deck surface should also have a slight fall away from the house (around 1 in 100 is fine) to stop puddles forming. If the patio itself already achieves this, you can mirror it with your subframe. If not, build the fall into the pedestal heights or packer heights under your joists.
If your patio is older and you're unsure whether it's structurally sound enough to build over, check out the guidance on whether you can lay a new patio over an old one before committing to the decking project on top.
Install joists and subframe: spacing, supports, and levelling
The subframe is the skeleton of your deck. Get this right and the rest of the job is straightforward. Get it wrong and you'll have a wobbly, draining-poorly, rotting structure within a few years.
Materials for the subframe
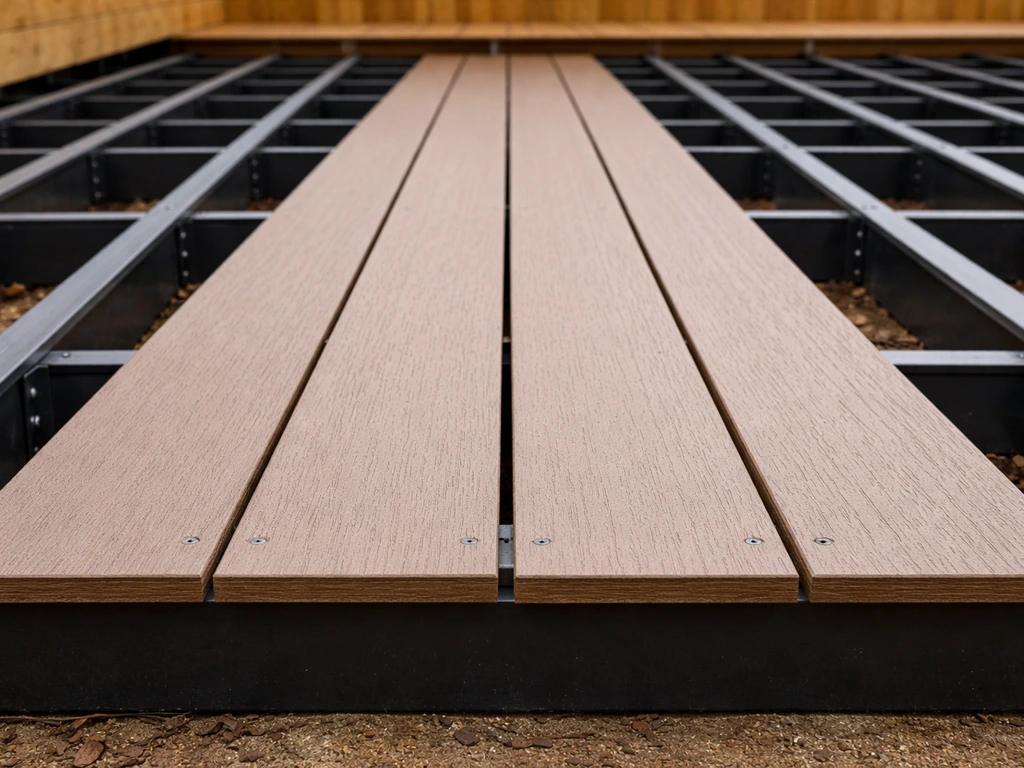
Use 47mm x 100mm (2x4) or 47mm x 150mm (2x6) C16-grade pressure-treated timber for joists. Composite or aluminium subframe systems are also available and are worth the extra cost under composite boards because they won't rot. Whatever you use, make sure it's rated for ground contact or at least above-ground exterior use.
Laying out the joists
- Position your perimeter (rim) joists first around the outer edge of the marked deck area and fix them in place using masonry anchors into the patio surface.
- Install the internal joists at your planned centres (400mm is the standard starting point for most boards). Measure from the same starting edge each time to keep spacings consistent.
- Where joists will sit directly on the patio surface, place a rubber or EPDM pad, a plastic shim, or an adjustable pedestal underneath each joist to prevent direct contact with the damp concrete.
- For pedestals: set the outer joists first, levelling them with a spirit level and adjusting the pedestal heights accordingly. String a line between them to guide the height of internal joists.
- Introduce a gentle fall (1 in 100) across the subframe away from the house by setting pedestals or packers slightly lower on the outer edge.
- Once all joists are positioned, check for any movement by pressing down and side-to-side. Any rocking needs another support point or a tighter pedestal lock before you move on.
A note on joist spacing: 400mm centres work for both standard 32mm timber boards and most composite boards. If your boards are running at an angle (diagonal), you'll need to reduce spacing to around 300mm to compensate for the longer unsupported span. Always check the board manufacturer's technical data for their specific joist spacing requirement, as thinner composites (20mm to 22mm) can be unforgiving at wider spans.
Seal every cut end of pressure-treated timber with an end-grain sealer or penetrating epoxy before it goes into the ground or is fixed in place. Cut ends expose raw wood fibre that isn't protected by the treatment process and will start to absorb moisture and rot from that point inward if you leave them bare.
Lay decking boards: direction, gaps, and fixing
With a solid, level subframe in place, laying the boards is the most satisfying part of the job. Take your time here, because the gaps and alignment you set now will be visible for the life of the deck.
Gaps between boards
Gaps aren't optional. They allow water to drain through, let the boards breathe, and accommodate expansion and contraction. For timber, a 5mm to 6mm gap between boards is a reliable starting point. For composite, follow the manufacturer's spec exactly.
Composite Prime’s HD Deck Pro fitting guide specifies the expansion gap sizing and a clip-based method for installing and aligning deck boards [For composite, follow the manufacturer's spec exactly. ](https://www. composite-prime. com/wp-content/uploads/2020/06/HD-Deck-ProFitting-Guide4pp_WEB-2021.
pdf). Most UK composite brands specify a 5mm to 8mm side gap between boards, and a 5mm gap at butt joints end-to-end. Some specify temperature-dependent gaps: for example, if you're installing on a cool morning below about 16°C, you'll need a slightly larger gap than if you're installing in warm conditions, because the boards will expand when they warm up. Use timber offcuts or purpose-made gap spacers to keep spacing consistent as you work along each row.
Fixing methods
For timber boards, the simplest method is face-fixing with stainless steel or hot-dip galvanised screws (not zinc-plated, which will corrode). Use two screws per board per joist, placed about 20mm to 25mm in from the board edges, pre-drilled and countersunk to avoid splitting. Stainless steel decking screws in 4.5mm x 65mm are a standard choice. Pre-drilling is especially important near board ends.
For grooved composite boards, hidden clip fasteners are the cleaner option and most manufacturers supply or specify them. The clip slides into the groove on the board edge, fixes to the joist with a screw, and holds the next board at the correct gap automatically. Use one clip per board per joist. Hidden fixings give a cleaner surface finish and eliminate the water-trapping dimple you get from face-fixed screws.
Starting and working across the deck
- Start at the edge nearest the house or the most visible edge, as this will be where the full boards show. Lay a starter board with a 5mm to 10mm gap from the wall to allow for expansion and airflow.
- Fix the first board down firmly, checking it's square to the subframe with a set square before fixing both ends.
- Work outward row by row, using your spacers at each joist crossing to maintain consistent gaps.
- Tap each board snug to the spacer with a rubber mallet before fixing. Don't force boards together tighter than the intended gap.
- Check every three or four rows that the boards are still running parallel. If you notice them creeping at an angle, adjust by slightly varying the gap across a few boards to correct before the error compounds.
- Trim the final board to width with a circular saw if needed, maintaining the required gap at the outer edge.
Leave a gap of at least 5mm around any posts, pipes, or protrusions that pass through the deck. These items move independently of the deck and will stress the boards if you butt them up tight.
Edge detailing and finishing touches
The edge of a deck is where a professional finish separates itself from a DIY job that just looks 'done'. Exposed joist ends and rough board ends will look unfinished and weather quickly if left untreated.
Fascia boards and trim
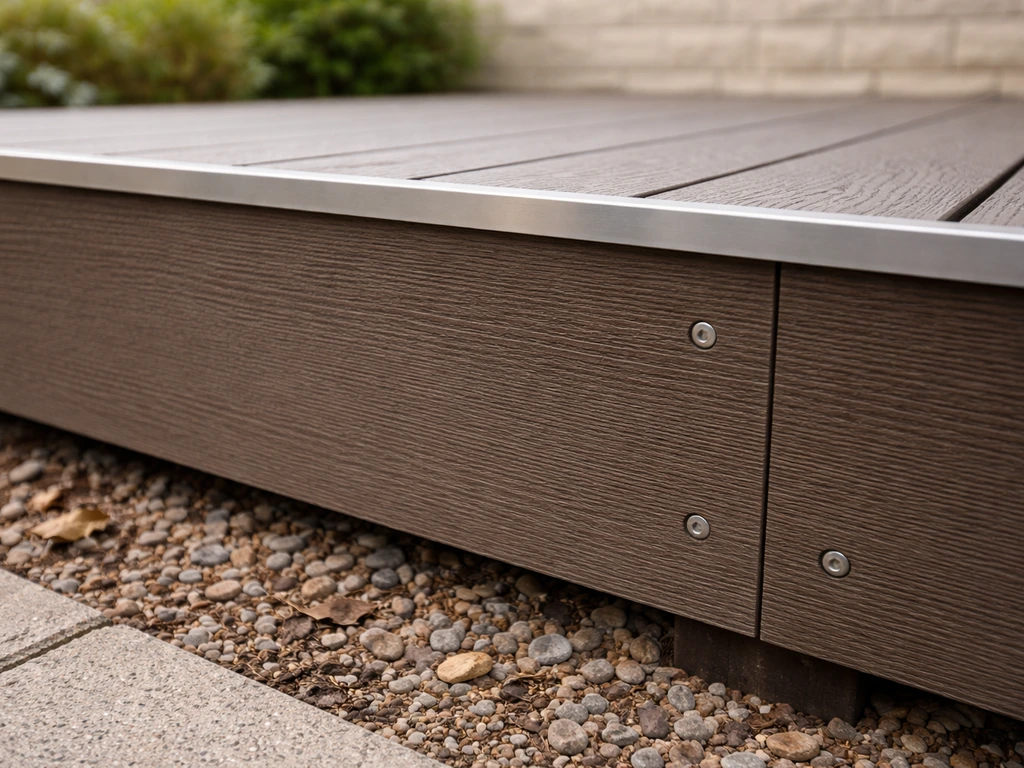
Fix a fascia board (a full-width decking board or purpose-made fascia trim) vertically against the outer face of the perimeter joist. This hides the subframe, gives a clean visual edge, and protects the end grain of the joist from direct weather exposure. Use the same material as the deck surface for a consistent look. Fix with stainless screws through the fascia into the rim joist at 300mm to 400mm intervals.
For composite decks, most board manufacturers supply matching fascia boards or capping strips in the same colour and finish. Use these for the best result. Seal any cut ends of composite fascia with the manufacturer's recommended end-cap or sealant.
Transitions and borders
Where your deck meets a doorway threshold, use a purpose-made aluminium or composite threshold strip to create a neat, safe transition. This also covers the expansion gap at the wall edge. Where the deck meets an existing patio surface or grass edge, use a border board laid flat or a ground-level trim strip to define the transition and stop bark or soil working into the subframe space.
If you have access hatches for drains or inspection covers under the deck area, build a removable hatch section into the deck at that point rather than screwing directly over it. Use shorter boards fixed to an additional pair of joists that form the hatch frame, so the whole section lifts out.
Sealing, maintenance, and troubleshooting common problems
Finishing timber decking
New pressure-treated timber needs to dry out and weather for roughly 6 to 8 weeks before you apply any oil or stain. The treatment process leaves the wood slightly wet, and applying a finish too early means it won't penetrate properly and will peel. Once the wood has dried and lightened in colour, clean it down, let it dry fully, then apply a good quality decking oil or stain with a brush or roller, working along the grain. Two coats are better than one. Re-apply every 12 to 24 months depending on exposure.
Cleaning composite decking
Composite doesn't need staining or oiling, but it does need regular cleaning to prevent mould, mildew, and green algae building up in the board grooves and gaps. Twice a year is a reasonable cleaning schedule. Composite decking cleaning typically involves warm water, a small amount of mild soap, and a gentle brush, with power washing only as needed, and regular cleaning helps reduce mould and mildew risk [twice a year is a reasonable cleaning schedule](https://www. trex.
com/deck-ideas/clean-composite-deck/). Use warm water, a small amount of mild soap, and a soft nylon scrub brush, working along the direction of the board texture rather than across it. A gentle pressure wash at low-to-medium pressure is fine for stubborn patches, but keep the nozzle at least 300mm from the board surface to avoid surface damage. Avoid bleach-based cleaners as these can strip the colour from some composite products.
Troubleshooting common problems
| Problem | Likely Cause | Fix |
|---|---|---|
| Deck wobbles underfoot | Joists too far apart, or fasteners loosening over time | Check joist spacing (should be 400mm or less for most boards); tighten or replace loose screws/clips; add an extra joist if spans are too wide |
| Standing water on deck | Insufficient fall or gaps too small/blocked with debris | Check subframe fall (aim for 1 in 100 minimum); clear gap debris; if blocked, increase gap width on next section |
| Boards lifting at ends | End fixings missed, or expansion gaps too tight causing boards to buckle | Re-fix board ends; check that boards have the specified gap at all fixed points and aren't being compressed |
| Rot appearing in timber | End grain not sealed, or direct contact with damp concrete | Cut out affected section; treat surrounding wood; add pedestals or membrane under joists to lift off the surface |
| Composite boards squeaking | Boards rubbing against joists or clips due to thermal expansion | Check gaps meet manufacturer's spec; ensure clips aren't over-tightened (this restricts movement) |
| Gaps uneven or boards drifting out of line | No spacers used, or boards not checked for parallel regularly | Re-space boards using consistent spacers; correct alignment every few rows during installation |
| Green algae buildup | Infrequent cleaning, especially in shaded or damp conditions | Clean with mild soap solution and nylon brush working along the grain; increase cleaning frequency to twice a year |
Long-term maintenance tips
- Keep gaps clear of leaf litter and debris, especially in autumn. A flat-bladed tool or a stiff brush run along the gaps twice a year is enough.
- Check all fixings annually. Timber decks can see screws work slightly loose over a couple of seasons. Re-tighten or replace any that have lifted.
- Look under the deck every year or two (if accessible) to check for moisture buildup, rot, or any joists sitting in pooled water. Catching this early saves a full replacement.
- Re-oil or re-stain timber decks before they look dry and grey, not after. Prevention is far easier than restoration.
- For composite, clean along the grain direction and keep the expansion gaps clear. Blockages in gaps can force boards to expand upward rather than sideways.
One final thing worth knowing: if you're dealing with a patio that has existing drainage issues, wet ground conditions nearby, or you're thinking about laying new paving under the deck first, you'll find it useful to think through the base conditions thoroughly before committing to the subframe build. Getting the foundation layer right is always the thing that determines whether a patio project lasts or needs ripping up in five years. Can you lay a patio in winter? Learn what weather conditions to look for and how to schedule groundwork to avoid frost and poor curing.
FAQ
Can I lay decking on a solid concrete patio, or do I need a gap under the joists?
For decking over an existing patio, you usually want airflow under the subframe. If your patio is solid concrete or well-set slabs, you can still lay joists on adjustable pedestals or with membrane strips at the joist feet so moisture can escape. If you lay joists directly on bare concrete without a break in contact, you increase the risk of trapped damp and early timber decay.
What if my patio isn’t level, can I still build the deck over it?
Yes, but treat it as a different detailing job. You should avoid burying the deck supports in moving soil, so set the pedestal or timber feet on firm, stable base material (for example, a compacted hardcore pad) and keep the same drainage rules. If the patio is uneven because the paving has settled, level the subframe with pedestals rather than packing with loose shims.
Do I need to leave expansion gaps, and what happens if I skip them?
On a deck, you should not rely on sealants or expanding foam to “fill” gaps. Proper spacing must be maintained at board edges, between boards, and around penetrations so water can drain and boards can move seasonally. If you cannot hold the manufacturer’s gap consistently, you may need to change the fastening method (for example, clips for composite) or re-check board direction and joist spacing.
What fixings should I use, and can I use any exterior screws?
Don’t use zinc-plated screws on treated timber outdoors. Zinc plating can corrode faster in damp conditions, which leads to staining and loosening fixings. Stick to stainless steel or hot-dip galvanised decking screws, and pre-drill and countersink to prevent splitting, especially near board ends.
What should I do if some paving slabs under the deck area move when I press on them?
If you see a section of paving that rocks or sounds hollow, do not build on top of it. Either re-bed and stabilise that area first, or remove the loose slabs and recreate a firm, level base. A wobble at the slab level transfers straight into the deck, causing squeaks, fastener loosening, and faster board wear.
How do I set gaps correctly for composite decking, especially in hot or cold weather?
Composite board installation depends on the temperature and the exact product. If you install on a cold morning, board expansion may require a slightly larger gap than on a warm day, and some systems specify different butt-joint rules. Always follow the board label or manual for minimum gaps and end-joint spacing rather than using a generic timber gap.
Can I face-fix composite decking instead of using hidden clips?
Use the board manufacturer’s clip system for grooved composite boards. Clip fasteners are designed to control spacing and allow movement while keeping the surface clean. If you face-fix composite boards, you can create stress points around screw holes as the boards expand, which may lead to movement, cupping, or visible corrosion streaks over time.
How should I handle deck joists around drains, inspection covers, or posts?
Boxing around obstacles is not just cosmetic. Plan joist continuity and support at every change in direction, and treat penetrations (pipes, posts, rails) as independent movements by keeping a minimum clearance around them. If an obstacle blocks a joist line, double up framing timbers so adjacent joists still have solid ends and do not cantilever.
How can I confirm the deck surface will drain properly after I build it?
A deck can look fine at first but fail if rainwater cannot drain away from the surface. Check that the finished deck has a slight fall away from the house, then ensure water pathways exist through board gaps. If your patio already drains the right way, mirror that fall in the pedestal heights, but verify with a long level so you do not build in a reverse-slope.
If I want a diagonal board layout, do I need to change joist spacing?
For boards that run diagonally at about 45 degrees, spans increase because each board covers a longer unsupported distance. That means you usually need tighter joist spacing (often around 300 mm centres) to keep boards from flexing. The decision aid is simple: calculate the effective span and then check the manufacturer’s specific spacing requirement for your board thickness.
What’s the best way to make sure I can access a drain or inspection cover under the deck?
You should plan for access before you close it up. If you might need to service a drain, build a removable hatch section with a framed opening and short boards that lift out, rather than fixing full-length boards over the access point. This also prevents you from damaging boards if the hatch needs to be reworked later.
When is the right time to oil or stain newly installed pressure-treated timber decking?
Yes, you can stain or oil pressure-treated timber, but wait until it has dried and lightened, typically around 6 to 8 weeks. If you finish too early, the coating may peel or wear unevenly. Also clean any surface residue first, then apply two thin coats along the grain for more consistent penetration.