You can install patio carpet on an existing concrete, paver, or deck surface in a single afternoon using either outdoor carpet roll with perimeter adhesive, outdoor carpet tiles with tack adhesive, or double-sided outdoor tape. The key is choosing a solution-dyed polypropylene carpet with a drainage-friendly backing, prepping your surface properly so moisture can't get trapped underneath, and securing the edges well enough that wind and foot traffic don't lift it over time.
How to Install Patio Carpet Step by Step DIY Guide

Clara Farrell
12 Jun 2026
What 'patio carpet' actually is (and what to buy)
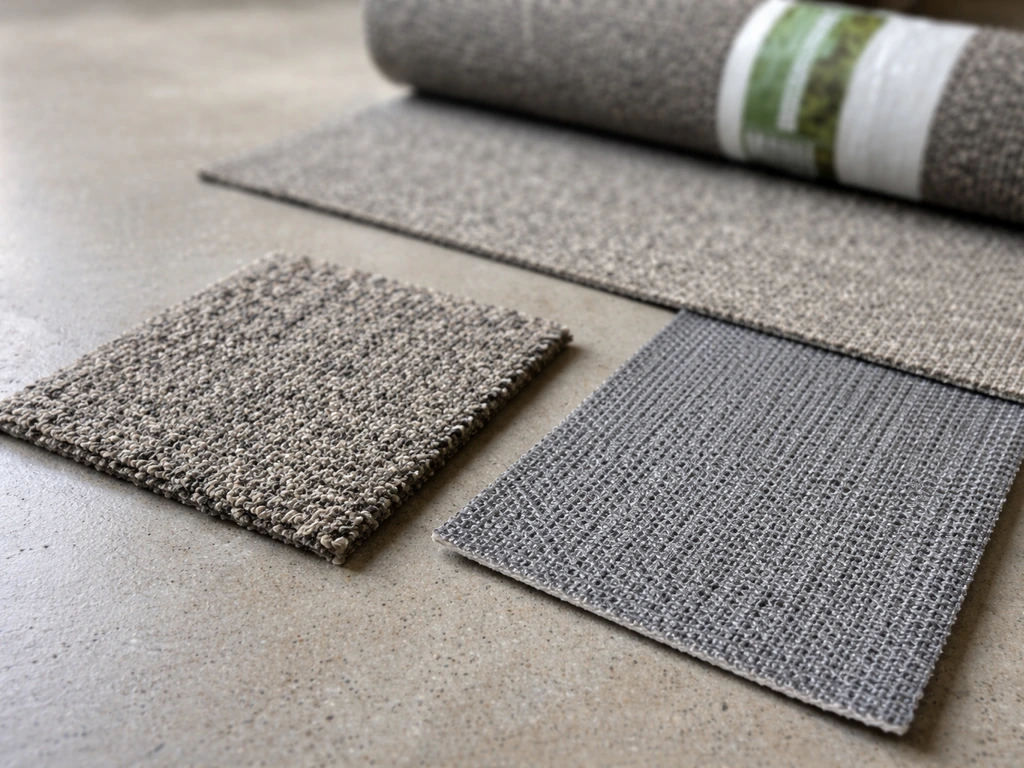
Patio carpet is outdoor-rated carpet designed to handle sun, rain, foot traffic, and temperature swings. It is not the same as indoor carpet dragged outside. Indoor carpet uses moisture-absorbing fibers and closed foam backings that will rot, mold, and fall apart within a season when exposed to rain and humidity. True outdoor patio carpet uses synthetic fibers (almost always polypropylene) and an open or mesh-style backing that lets water pass through rather than pooling underneath.
When you're buying, look specifically for solution-dyed polypropylene. Solution-dyed means the color is baked into the fiber during manufacturing rather than applied on top, which makes it dramatically more resistant to UV fading and bleach. Nylon outdoor options exist but nylon fades more readily under extended sun exposure, so for a fully exposed patio polypropylene or PET are the smarter choice. The backing matters just as much as the fiber: avoid solid rubber backs because they trap moisture against your surface and create the perfect environment for mold. Choose a backing that has an open weave, perforations, or a mesh construction that promotes airflow and lets water drain away.
You have two main product formats to choose from: roll carpet and carpet tiles. Roll carpet (typically 6 or 12 feet wide) gives you a seamless look and suits straightforward rectangular patios. You can follow the same basic surface prep, drainage checks, and edge finishing steps when you learn how to install outdoor carpet on patio. Carpet tiles (usually 18x18 inch or 24x24 inch squares) are easier to cut around obstacles, let you replace individual damaged sections later, and are great for odd-shaped spaces. If you have a complicated patio layout or a shape with lots of cuts around posts and planters, tiles will save you a lot of frustration.
Check your patio surface before you buy anything
This is the step people skip, and it's the reason carpet lifts, bubbles, or grows mildew six months later. Before you order a single roll or tile, go outside and properly assess what you're working with.
Surface type compatibility
Patio carpet installs well on smooth concrete, brushed concrete, timber decking, composite decking, and even over existing pavers if the surface is reasonably level and stable. Rough or heavily textured concrete makes adhesive bonding harder, so you may need to level it first. Pavers with large uneven gaps are tricky because the carpet can flex and eventually crack along grout lines under heavy traffic. Loose or crumbling surfaces won't hold adhesive reliably.
Moisture and drainage
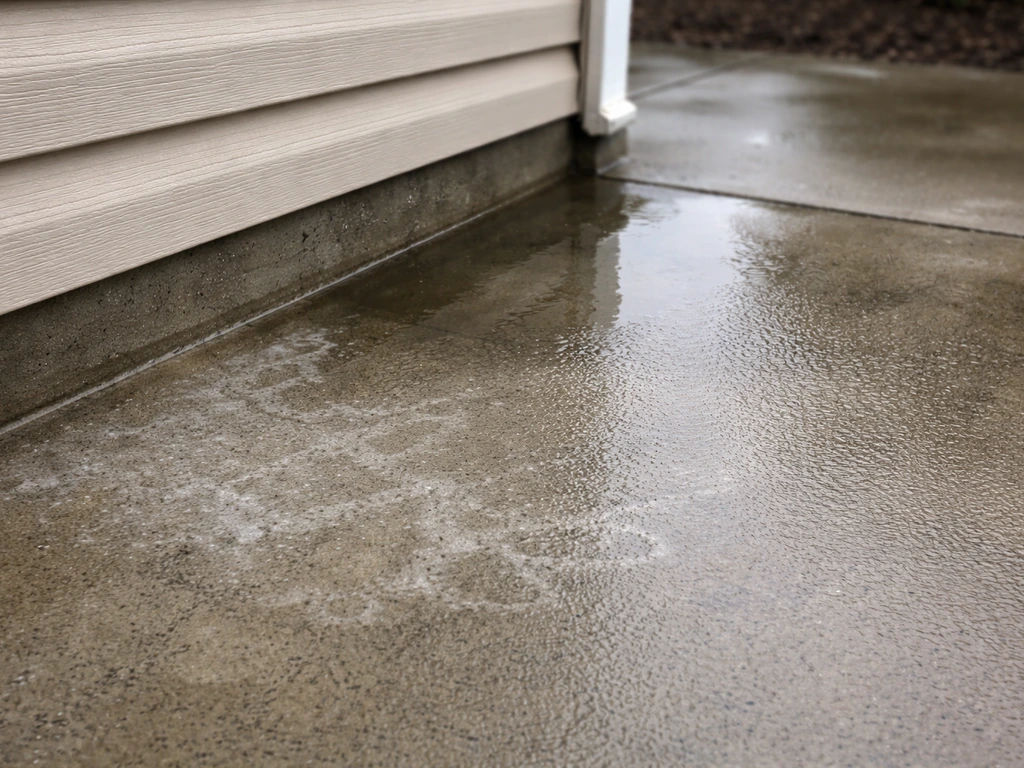
Moisture under carpet is the number one cause of failure. On concrete patios, check for standing water after rain and look for white mineral deposits (efflorescence) on the surface, which signal active moisture pushing through from below.
If you're using adhesive on concrete, the industry standard is to test moisture using either the calcium chloride method (ASTM F1869, which measures surface vapor emission over 60 to 72 hours) or in-situ relative humidity probes (ASTM F2170, which measures moisture conditions within the slab itself). Terrapin notes that ASTM F1869 (CaCl2 MVER) is one of the standard ways to test slab moisture when checking flooring or adhesive compatibility.
Adhesive manufacturers including blank" rel="noopener noreferrer">MAPEI specify maximum moisture limits for their products, and exceeding them causes bond failure and mold growth. If you notice persistent dampness or you're in a high-humidity climate, either seal the concrete first with a non-solvent moisture vapor control sealer before laying carpet, or choose carpet tiles rather than glued roll carpet so individual pieces can be lifted and dried.
Also check that your patio has adequate drainage slope. A patio should slope away from the house at roughly 1 to 2 percent (about 1/8 inch per foot) so water moves off the surface. Outdoor carpet with a drainage backing helps, but if water has nowhere to go it will still pool. If drainage is a real issue on your patio, it's worth sorting that out before you lay carpet.
Measure accurately
Measure the longest length and widest width of your patio and add 3 to 4 inches on each edge for trimming. For roll carpet, note where seams will fall and try to position them away from high-traffic paths and doorways. For tiles, calculate how many you need based on total square footage and add 10 percent for cuts and waste. Sketch a rough layout on paper before you order, especially if your patio has an irregular shape.
Tools and materials checklist
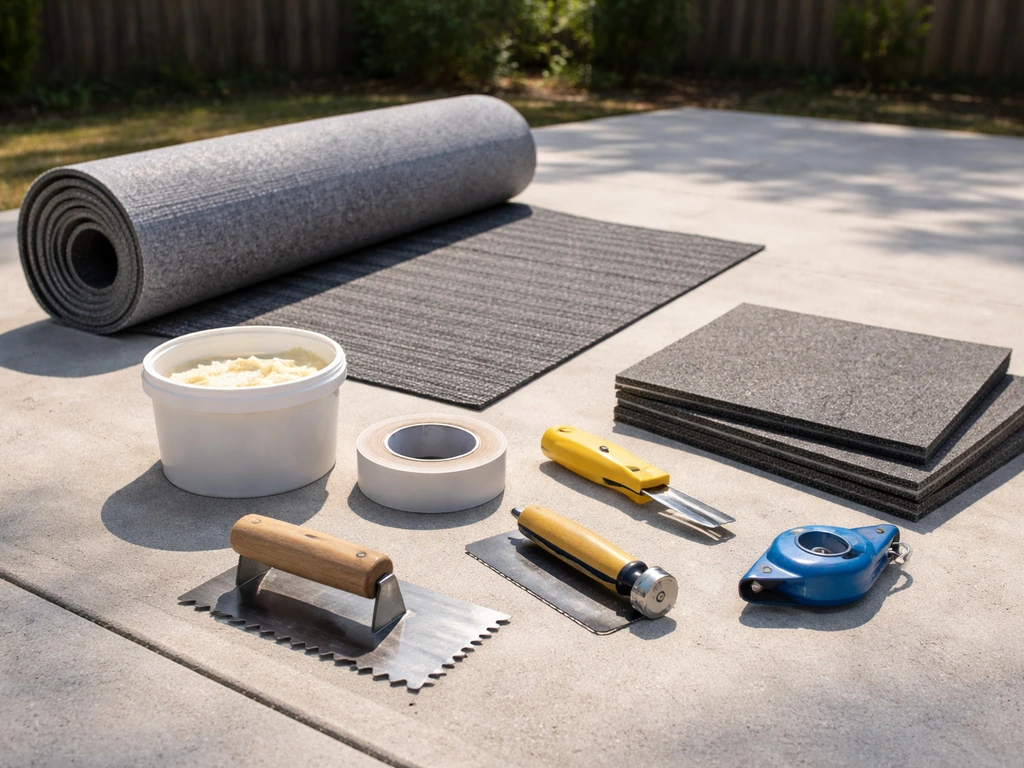
- Outdoor-rated carpet roll or carpet tiles (solution-dyed polypropylene, drainage backing)
- Outdoor carpet adhesive or outdoor double-sided carpet tape (match to product type)
- Notched trowel (for spread adhesive)
- Roller or hand roller (for pressing carpet into adhesive)
- Sharp utility knife with fresh blades
- Straight edge or metal ruler
- Chalk line or chalk pencil
- Tape measure
- Stiff-bristle brush or push broom
- Concrete cleaner/degreaser and pressure washer (or stiff brush and hose)
- Patching compound or floor leveler (if surface has cracks or dips)
- Moisture vapor barrier sealer (if concrete has moisture issues)
- Threshold strips or carpet trim bars
- Knee pads (genuinely worth it)
Planning your layout
For roll carpet, snap a chalk line along the longest straight edge (usually parallel to the house wall) so your first edge is perfectly aligned. Plan seams to fall in low-traffic areas, never in doorways or in the center of a main walking path. For carpet tiles, find the center of your patio by measuring and snapping two chalk lines that cross at 90 degrees. Starting from the center and working outward gives you balanced border cuts on all sides rather than one fat edge and one skinny edge. Dry-lay a few rows before committing to adhesive to confirm the layout looks right and cuts at the edges are workable.
Prep your surface properly (don't skip this)
Good prep is 70 percent of a successful carpet install. I know it feels like the boring part, but every problem I see with carpet lifting, bubbling, or molding traces back to cutting corners here.
- Clear the surface completely. Remove all furniture, planters, and debris.
- Clean thoroughly. Sweep first, then scrub with a concrete cleaner or degreaser and a stiff brush. Rinse with a hose or pressure washer. Remove any oil stains, algae, or mildew with an appropriate cleaner. For old adhesive residue from a previous carpet, scrape it off with a floor scraper and use adhesive remover if needed. Let the surface dry fully (minimum 24 hours in dry weather, longer in humid conditions).
- Check for standing water and cracks. Fill cracks wider than 1/8 inch with a suitable patching compound or floor leveler. Let it cure completely according to the manufacturer's instructions before continuing.
- Test and address moisture. If you suspect moisture issues, perform a plastic sheet test: tape a 16x16 inch sheet of plastic to the concrete and seal all edges with tape. Leave it for 24 hours. If moisture beads under the plastic, you have an active moisture issue. Seal the concrete with a moisture vapor control sealer and allow it to cure fully (typically 24 hours) before proceeding.
- Check flatness. Lay a straight edge across the surface and look for dips or high spots greater than 3/16 inch over a 10-foot span. Fill dips with floor leveler and grind down any significant high spots. Adhesive can bridge small imperfections, but large ones will show through the carpet and cause uneven wear.
- Confirm the surface is completely dry before applying any adhesive or tape.
Which installation method to use
There are four main ways to install patio carpet, and the right one depends on your carpet format, surface type, and how permanent you want the installation to be.
| Method | Best for | Permanence | Difficulty |
|---|---|---|---|
| Perimeter adhesive (roll carpet) | Smooth concrete, permanent install | High | Moderate |
| Full-spread adhesive (carpet tiles) | Concrete, commercial-grade tile systems | High | Moderate |
| Double-sided outdoor tape | Decking, light-use patios, semi-permanent | Medium | Easy |
| Peel-and-stick tile / TacTile system | Carpet tiles, easy repositioning | Medium | Easy |
| Mechanical fastening (staples/tacks) | Timber decking only | Medium-High | Easy |
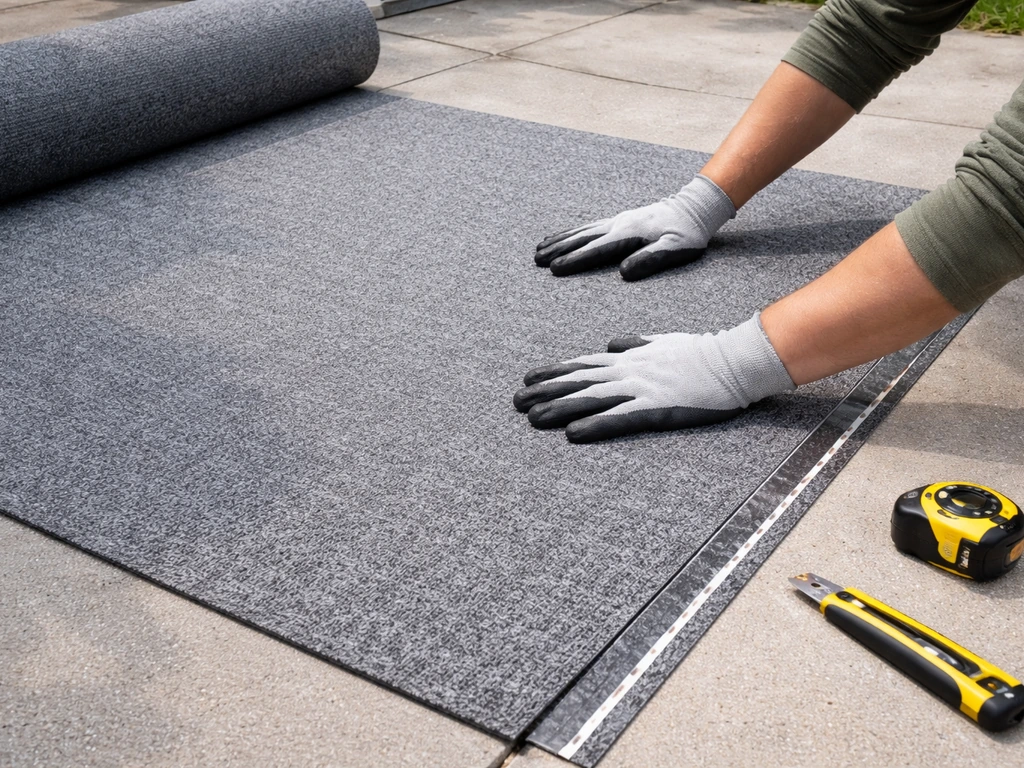
Adhesive installation for roll carpet
For roll carpet on concrete, you don't need to glue the entire field. Secure the perimeter with outdoor carpet adhesive or heavy-duty double-sided outdoor tape, and the carpet stays flat without trapping moisture across the whole surface. Roll the carpet out, let it relax for 30 minutes (it may have a slight curl from being stored in a roll), then fold back each edge about 6 inches, apply a bead of outdoor carpet adhesive or press down a strip of double-sided tape, fold the carpet back down, and press firmly. Seams between two pieces of roll carpet should be glued or taped underneath with a seam sealer or heavy seam tape, then pressed firmly together.
Full-spread adhesive for carpet tiles
For a full-glue tile installation, use a notched trowel to spread outdoor carpet adhesive over the surface in manageable sections (about 10 to 15 square feet at a time). Follow the adhesive manufacturer's open time instructions (the period when the adhesive is still tacky and ready to bond), then press tiles firmly into position. Butt tiles tightly together, checking alignment against your chalk lines as you go. Work from the center outward. After laying a section, use a hand roller to press the tiles down firmly and ensure full contact with the adhesive.
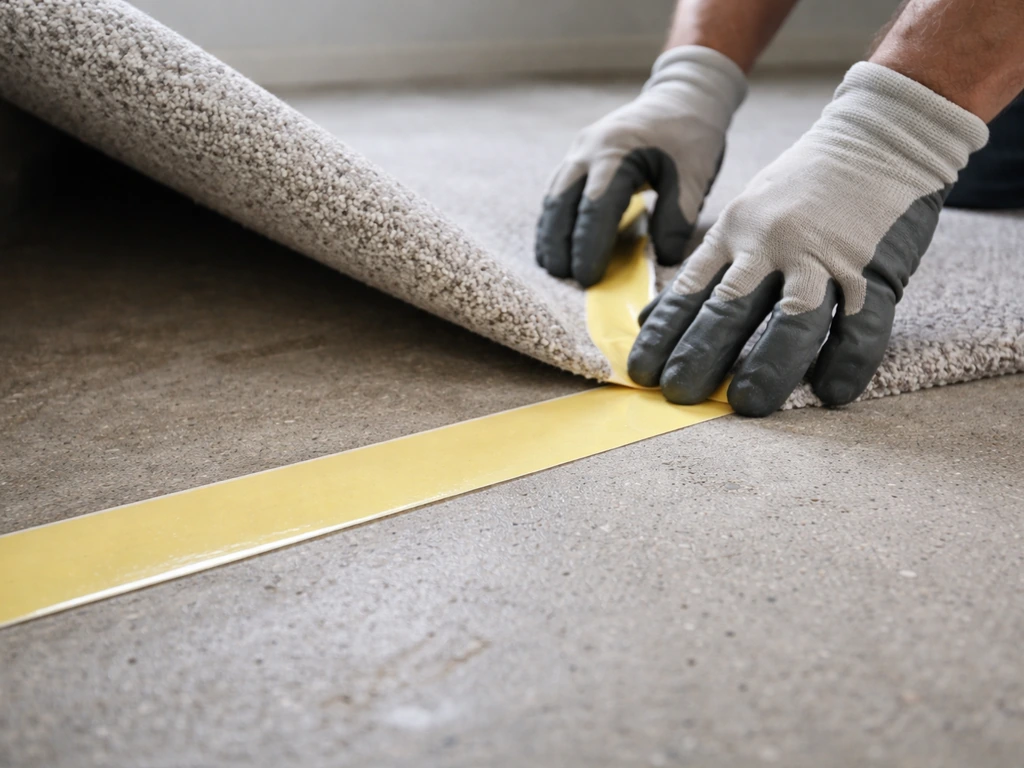
Tape and peel-and-stick for lighter installs
Double-sided outdoor carpet tape works well on timber or composite decking and for semi-permanent installs you might want to remove seasonally. Apply tape along the perimeter and at seams. For peel-and-stick carpet tiles (or adhesive dot systems like Interface's TacTile approach), simply peel the backing and press each tile in place. These systems are easier to reposition if you make a mistake, and individual tiles can be lifted for cleaning underneath, which is a genuine advantage in wet climates.
Mechanical fastening for decking
On timber decking, you can staple or tack the carpet at the perimeter rather than using adhesive. Use stainless steel or galvanized staples to avoid rust staining. This method works well for roll carpet on wooden surfaces and is easy to undo when the carpet needs replacing.
Finishing details: edges, seams, and thresholds

How you finish the edges makes the difference between a professional-looking install and one that peels and frays within a year. Trim the carpet with a sharp utility knife and straight edge, cutting from the back of the carpet for a cleaner line. Leave no overhang at steps or door thresholds where it can be a trip hazard.
At doorways and transitions to other flooring, use a threshold strip or carpet trim bar to cap the edge cleanly and prevent it from lifting. These are available in aluminum and can be nailed or screwed into concrete (use concrete anchors) or screwed into timber. The edge of the carpet tucks under the lip of the trim bar, which holds it down firmly and protects the edge from fraying.
At seams between roll carpet sections, apply outdoor seam sealer along the joined edges before pressing them together. Let it cure before applying any foot traffic. For carpet tiles, the tight butt joint is usually enough, but in areas exposed to rain you can apply a small continuous bead of seam sealer along the base of the seam where the backing meets the substrate, being careful not to get sealer on the carpet fibers themselves.
On exposed edges that meet open air (such as at the edge of a raised patio), fold the carpet under and secure it with adhesive or staples, or use an edge trim that wraps around the edge and screws into place. This prevents the backing from absorbing water through the cut edge and delaminating over time.
Finally, give adhesive installs proper cure time before heavy use. Most outdoor carpet adhesives reach initial set within a few hours but full cure typically takes 24 to 48 hours. Keep foot traffic light during that period and avoid wetting the surface until the adhesive has fully cured.
Common problems, fixes, and long-term maintenance
Problems you might run into
| Problem | Likely cause | Fix |
|---|---|---|
| Carpet won't lie flat / curling edges | Carpet not given time to relax, or poor edge adhesion | Let carpet relax 30+ mins before install; re-glue or re-tape edges with firm pressure |
| Edges lifting after install | Insufficient adhesive at perimeter, wrong tape for surface type | Lift edge, clean off old adhesive, apply fresh outdoor carpet adhesive, weight down for 24 hours |
| Bubbles or wrinkles in the field | Adhesive applied too thick, or trapped air during laying | Slit bubble with knife, inject adhesive, press flat with roller |
| Mold or mildew smell | Moisture trapped under carpet due to solid backing or inadequate drainage | Remove carpet, clean and dry surface, seal concrete, replace with drainage-backed carpet |
| Carpet won't bond to surface | Dirty or damp surface, wrong adhesive type, concrete moisture too high | Re-prep surface, test for moisture, use appropriate adhesive rated for damp conditions |
| Tiles shifting out of alignment | Insufficient adhesive or inadequate tile-to-tile bonding | Re-adhere tiles, ensure full contact with roller, check adhesive open time was not exceeded |
Cleaning and maintenance
Outdoor patio carpet is low maintenance but it does need regular attention to stay looking good and to avoid mold problems. Sweep or blow off loose debris weekly. Rinse with a hose monthly, or more often if you live somewhere dusty or with heavy tree cover. For spills, blot immediately rather than rubbing, and rinse with clean water. For stubborn stains, a diluted outdoor carpet cleaner or a mild dish soap solution works well. Avoid harsh solvents or bleach unless the manufacturer specifically says the product is bleach-safe (some solution-dyed polypropylene carpets are).
Every few months, check the edges and seams for any lifting. Catching a loose edge early is a 10-minute fix with some fresh tape or adhesive. If you ignore it, a lifted edge becomes a trip hazard and dirt works its way underneath, making re-adhesion harder.
To prevent mold and mildew, make sure the carpet can dry out after rain. If your patio is shaded and the carpet stays wet for days after a rain event, consider lifting it occasionally to let the surface beneath breathe, or treat the carpet with an outdoor fabric mildew inhibitor spray. Carpet tiles have a clear advantage here because individual tiles can be lifted, the surface below cleaned, and the tiles re-laid quickly. Note that if a spill soaks through a seam between tiles, you may need to lift those specific tiles, clean the substrate underneath, let it dry, and then re-lay them.
At the end of the outdoor season (if you're in a climate with harsh winters), consider whether to lift roll carpet and store it indoors. Tiles can often be left in place through mild winters but may need lifting in freeze-thaw climates where ice can get under edges and break adhesive bonds. Inspecting and re-securing edges each spring is good habit regardless.
Mistakes worth avoiding
- Installing over a damp or untested concrete surface (this is the biggest cause of adhesive failure and mold)
- Using indoor carpet or a rubber-backed rug as a substitute for outdoor carpet
- Skipping the moisture vapor sealer on concrete that shows any sign of dampness
- Gluing down the entire field of roll carpet rather than securing at perimeter only (traps moisture and makes removal a nightmare)
- Rushing the adhesive cure time and putting heavy furniture back too soon
- Leaving cut edges unsealed at steps or thresholds where water can wick in
- Placing seams in high-traffic doorway zones where they will wear faster and lift more easily
- Ignoring poor drainage under the assumption that the carpet backing handles it all
If your patio project is more complex, such as installing drainage channels to manage water runoff before laying a surface covering, sorting that out before the carpet goes down will save you from having to lift everything later. If you need to run a gas line under a patio, plan the routing and check local codes before you install the carpet system.
If you need a step-by-step walkthrough, this guide on how to install patio drainage channel covers the basics for creating proper runoff before you lay your patio surface. Similarly, if you're considering other surface options for your patio floor, it's worth comparing whether timber decking or another hard surface would suit your space better before committing to carpet, since each has different prep requirements and long-term maintenance demands.
If you decide you want a hard, durable finish instead, follow a dedicated guide for how to install wood patio flooring so you get the right base and spacing.
FAQ
Can I install patio carpet directly over existing indoor carpet or foam padding?
You should not. Indoor carpet and foam can trap moisture and prevent the patio surface from drying. Remove the old materials down to the stable substrate (concrete, pavers, deck boards, or a properly prepared base) so the outdoor carpet backing can vent and drain as designed.
What’s the best patio carpet option if I’m worried about moisture or high humidity?
If you have recurring dampness, choose solution-dyed polypropylene with a mesh or perforated backing, and strongly consider carpet tiles over a glue-on roll system. Tiles are easier to lift, clean, and re-set after wet weather, which reduces mildew risk if water ever gets under a seam.
How do I know whether my concrete is too wet to glue down patio carpet?
Look for active signs like persistent damp patches after rain or recurring efflorescence (white mineral deposits). For a decision-level check, use a moisture test method (calcium chloride or in-situ RH probe) and only proceed if your adhesive is rated for the measured slab moisture.
Do I need to glue the entire patio carpet, or is perimeter-only enough?
Perimeter-only is usually enough for roll carpet on concrete because it prevents edge lifting while reducing the chance of trapping moisture under the whole field. Full-glue is better when you want maximum stability, when the surface is busy with traffic, or when using tile installations that require full contact with the adhesive.
Why does my outdoor carpet bubble or lift after installation?
Most cases come from moisture trapped under the carpet, seams not sealed, or adhesive applied outside the manufacturer’s open time (so it didn’t bond while tacky). Also check that your surface is level and stable, since textured concrete and loose pavers can cause uneven bonding and later flexing.
Can I install patio carpet over pavers with sand or weed gaps?
Only if the paver surface is reasonably level and the gaps are small and stable. If there are large uneven joints or shifting pavers, the carpet can flex and crack over time along grout or sand lines. In those cases, leveling or filling the joints first is usually a safer route than trying to “cover and hope.”
How should I handle a patio that has stairs, door thresholds, or a raised edge?
Don’t leave raw cut edges where people step or where water hits the cut face. Use a threshold strip or carpet trim bar at door transitions, and fold-and-secure or wrap-around edge trim at exposed raised edges so water can’t soak into the backing through the cut.
What’s the correct way to seal seams between roll carpet pieces?
Apply outdoor seam sealer along the joined edges, then press them firmly together. Wait for the sealer to cure before heavy foot traffic. If you get sealer on the carpet fibers, it can stain or make the seam area harder to clean.
Can I walk on the carpet immediately after installing?
Avoid heavy use until adhesive has cured. Even if the initial set feels solid within hours, full cure typically takes 24 to 48 hours, and wetting or heavy traffic during that window can weaken the bond and cause edge lift.
How do I clean patio carpet without damaging solution-dyed fibers or the backing?
Blot spills first, rinse with clean water, and for stains use a diluted outdoor carpet cleaner or mild dish soap. Avoid harsh solvents or bleach unless the carpet manufacturer explicitly says it is bleach-safe, because even UV-resistant dyes can still fade or degrade with incompatible chemicals.
Do I need to lift patio carpet during winter or freeze-thaw conditions?
In freeze-thaw areas, lifted edges can let ice get under the carpet and break adhesive bonds. Roll carpet is often the safer choice to lift and store if winters are harsh. Tiles can sometimes stay down through milder winters, but in freeze-thaw climates plan to inspect and re-secure edges each spring.