Installing wood patio flooring comes down to three things done right: a stable, well-drained base, correctly spaced and fastened boards, and a proper finish applied before moisture gets a chance to move in. Get those three things right and you'll have a patio surface that stays flat, stays dry underneath, and lasts for years. Skip any one of them and you're looking at cupped boards, rot, or a floor that bounces and shifts underfoot within a season or two.
How to Install Wood Patio Flooring: Step-by-Step DIY Guide

Clara Farrell
22 Jun 2026
Choosing the Right Wood Patio Flooring System
Before you buy a single board, you need to decide what kind of wood flooring system you're installing, because that choice drives every other decision: base prep, fasteners, finish, and maintenance schedule. There are three main systems to consider for an outdoor patio: pressure-treated lumber decking, natural hardwood decking (like ipe or Kebony-modified wood), and composite decking (engineered wood-look boards like Trex or TimberTech AZEK). All three get installed over a joist frame, but they behave very differently once they're down.
| Material | Best For | Lifespan (Maintained) | Key Weakness | Maintenance Level |
|---|---|---|---|---|
| Pressure-treated pine | Budget builds, DIY-friendly | 15-25 years | Needs regular sealing, can warp if dried too fast | High (annual sealing/staining) |
| Natural hardwood (ipe, teak) | Premium look, high durability | 25-40+ years | Expensive, heavy, needs oiling | Medium (annual oiling) |
| Modified wood (Kebony, Accoya) | Eco-conscious, stable performance | 25-30 years | Higher upfront cost | Low-medium |
| Composite decking (Trex, TimberTech) | Low maintenance, color-stable | 25-30 years | Higher upfront cost, heat retention | Low (cleaning only) |
For most first-time DIYers, pressure-treated lumber is the most forgiving choice. It's widely available, easy to cut and fasten, and less expensive than hardwood or composite. If you want near-zero maintenance, composite is worth the extra upfront cost. Just know that composite boards still require a proper structural frame underneath, and you must follow the manufacturer's specific installation guide for gaps and fasteners. Trex and TimberTech both publish detailed guides, and the gap requirements vary by product and temperature at time of installation, so don't guess.
One important detail for the framing underneath: always use ground-contact rated pressure-treated lumber (rated UC4A or better) for joists, beams, and posts. These are members that see frequent moisture from below, and standard above-ground PT lumber isn't rated for that exposure. HUD's durability guidelines specifically call out UC4A-rated lumber for exterior deck framing subject to repeated wetting.
Tools, Materials, and Supplies Checklist
Getting everything on-site before you start saves a lot of frustration. There's nothing worse than being halfway through a joist layout and realizing you forgot flashing tape or the right fastener size. Here's what you'll need for a standard wood patio flooring install.
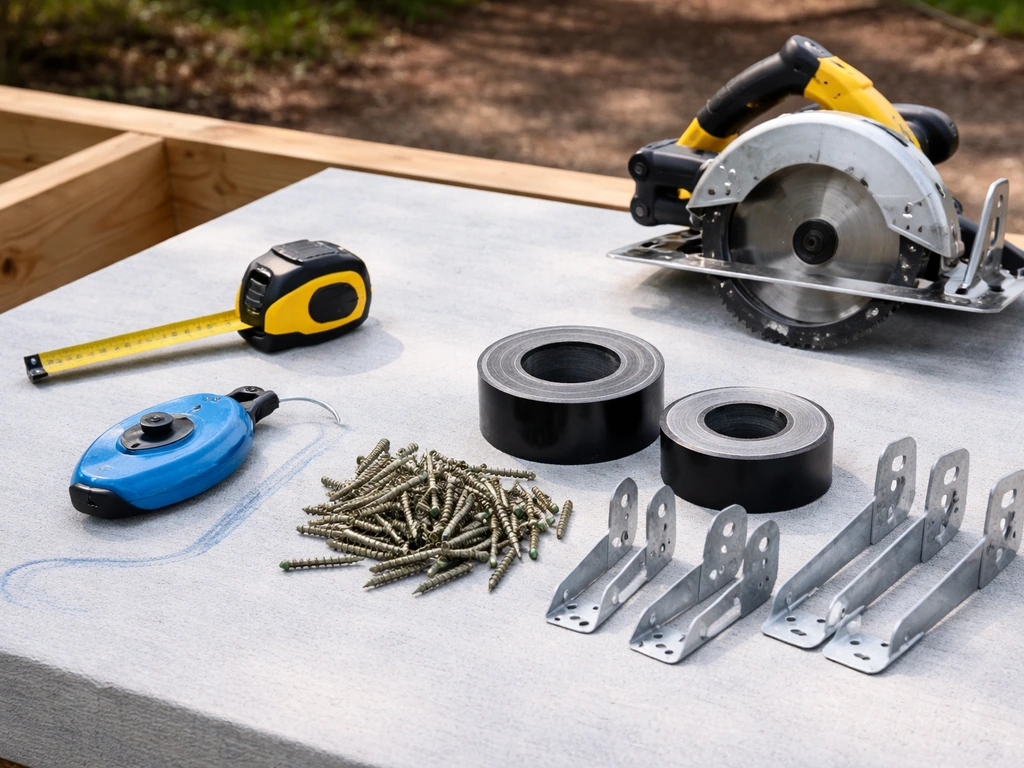
- Tape measure and chalk line
- Circular saw or miter saw (for trimming boards to length)
- Cordless drill or impact driver
- Speed square and framing square
- String line and line level (for checking overall level and straightness)
- Pry bar or board straightening tool (a Bowrench or similar is a big help)
- Post hole digger or rented auger (if setting footings)
- Shovel, rake, and tamper or plate compactor (for site prep)
- Carpenter's pencil and marking tools
- Safety glasses, gloves, and hearing protection
- UC4A ground-contact pressure-treated lumber for joists, beams, and posts
- Decking boards (PT pine, hardwood, modified wood, or composite per your choice)
- Concrete for footings (pre-mixed bags or ready-mix depending on scale)
- Post base hardware and joist hangers (galvanized or stainless)
- Stainless steel screws or hidden fastener clips (product-matched if using composite)
- Joist flashing tape (butyl adhesive-backed membrane for tops of joists)
- Metal flashing (for ledger connections to the house)
- Construction adhesive or exterior-rated wood glue (for select detailing)
- Gravel or crushed stone (for drainage layer beneath frame)
- Weed barrier fabric (optional, for under-frame ground cover)
- Penetrating sealer, stain, or finish (for natural/PT wood)
A note on fasteners: do not use standard zinc-coated screws with pressure-treated lumber. The preservative chemicals in modern PT lumber are corrosive to zinc plating and will cause fasteners to fail within a few years. Use either hot-dip galvanized fasteners (meeting ASTM A153) or, better yet, stainless steel screws. Stainless is the safest choice because it has no corrosion risk. If you mix stainless and hot-dip galvanized hardware in the same connection, the galvanized can corrode faster, so stick with one type throughout.
Site Prep and Base Foundation
This is the step most DIYers underestimate, and it's the one that determines whether your patio floor is still flat in five years. No amount of beautiful boards will save a project that's sitting on a poorly prepared base. If you plan on running a gas line under the patio, you need to account for clearances, venting, and local code requirements before you build the base and frame running a gas line under a patio. Take your time here.
Grading and Drainage
Wood and standing water are enemies. Before you do anything else, figure out where water goes when it rains. Your patio surface should slope away from the house at roughly 1/8 inch per foot (about 1% grade). If the ground under the patio pools water after rain, address that first. Options include adding a drainage channel at the perimeter, grading the soil to redirect flow, or laying a gravel drainage bed beneath the frame. For a deeper walkthrough, see our guide on how to install patio drainage channel systems adding a drainage channel at the perimeter. Drainage channels are a separate topic worth its own attention, but the key point is: don't cover a drainage problem with a patio floor and expect it to disappear.
Clearing and Compacting the Ground
Remove all vegetation, roots, and organic material from the build area. Organic material rots and compresses over time, causing your frame to settle unevenly. Once cleared, compact the soil using a plate compactor (rentable at any equipment yard for about $50-80/day). If you're in an area with clay soil or expansive soils, add a 4-inch layer of compacted crushed gravel to improve drainage and create a stable bearing surface. Lay weed barrier fabric over the soil before adding gravel if you want to keep growth from coming back up through the base.
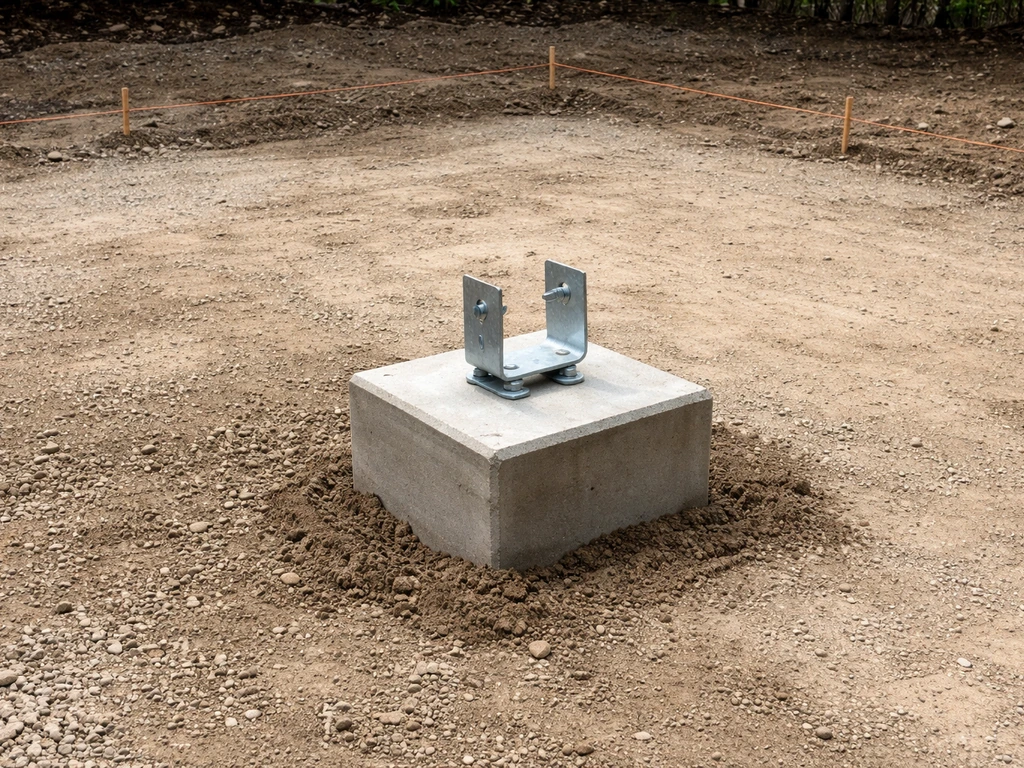
Setting Footings
For any freestanding wood patio frame, you need concrete footings to support the posts. Per the 2021 International Residential Code (IRC Section R507.3.2), footings must be placed at least 12 inches below undisturbed ground surface, and in cold climates they need to go below the frost line to prevent heaving. Dig your holes, set tube forms, pour concrete, and embed your post base hardware while the concrete is still wet. Let footings cure a full 48-72 hours before loading them. If you're attaching the frame to the house via a ledger board, that connection needs to be treated as a structural attachment and properly flashed, which I'll cover in the installation section.
Ventilation Clearance

Leave adequate air space under your frame. A minimum of 18 inches from grade to the bottom of joists is ideal for natural ventilation, though low-profile installations can work down to around 1 inch of fascia clearance if the site drains very well. Kebony's installation guidelines, for example, specify at least 1 inch of clearance from the fascia to grade and at least 3/4 inch of air gap at the deck edge. The goal is airflow under the boards so the underside can dry after rain. Trap moisture under a tight deck frame and you'll have rot within a few years, regardless of how good the lumber is.
Step-by-Step Installation
Step 1: Build or Set the Frame
With footings cured, set your posts and install the beam. Then hang your joists using joist hangers, spacing them according to your decking material's requirements. For most solid wood decking, 16-inch on-center joist spacing is standard. Composite boards often require tighter 12-inch spacing depending on the product and board direction. Before laying any decking, apply joist flashing tape to the top surface of every joist. This butyl-backed adhesive membrane seals around screw holes and keeps moisture from sitting on the joist tops, which is one of the most common rot initiation points. TimberTech and DecksDirect both call this out explicitly in their installation guidance, and it adds minimal cost for a huge durability benefit.
Step 2: Flash the Ledger (If Attaching to the House)
If your patio connects to the house, the ledger board is your biggest vulnerability. Missing or improper flashing at the ledger is one of the most common causes of deck failure and rot in the house rim joist or band board. The flashing needs to go behind the house siding, over the ledger, and direct water away from the wall. Use metal flashing (aluminum or galvanized steel), lapping it over the ledger and sealing the top edge behind the house cladding. Never just caulk the gap between ledger and siding and call it done. Caulk fails. Metal flashing doesn't.
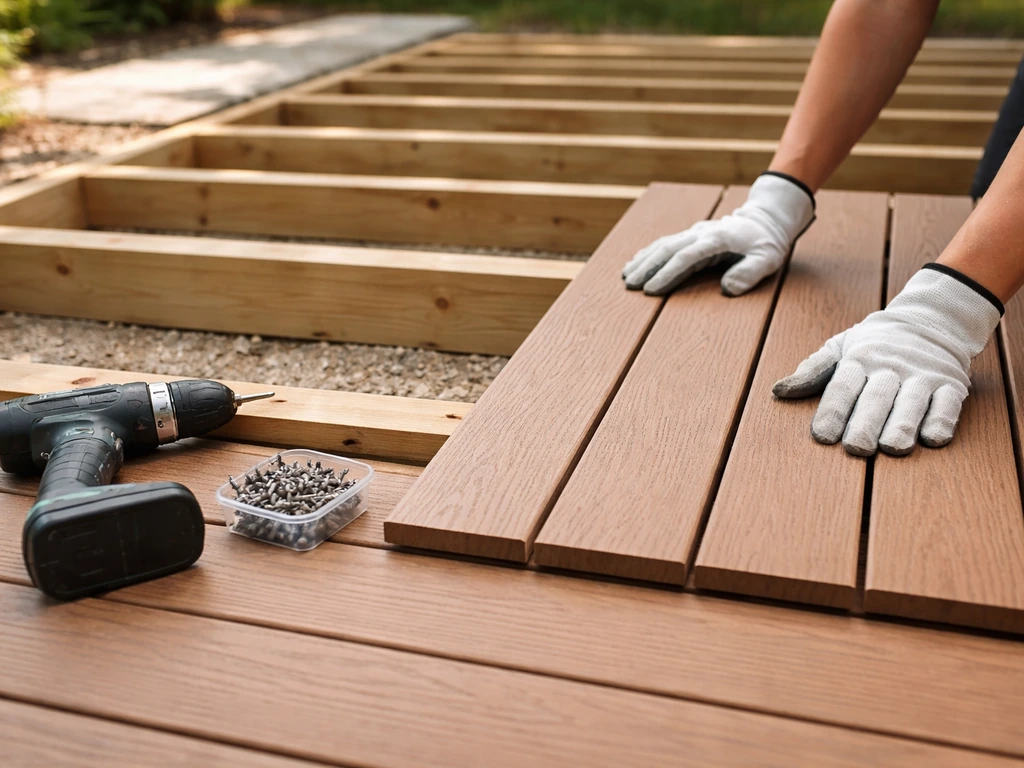
Step 3: Plan Your Board Layout Before You Start
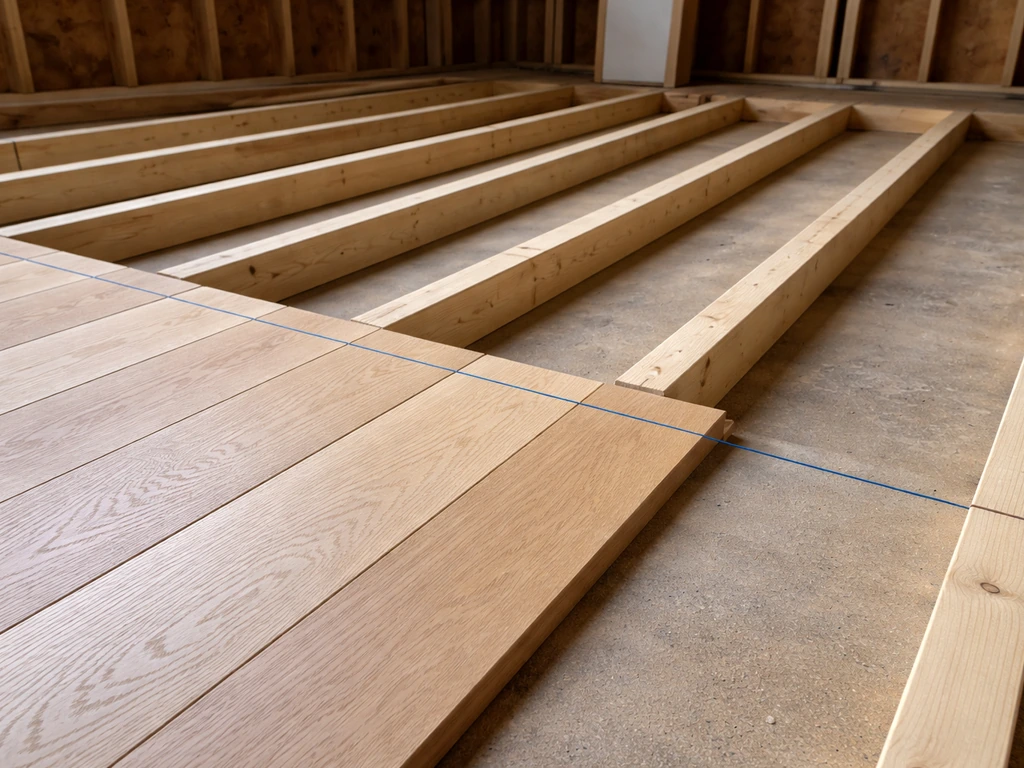
Snap a chalk line across the first joist to establish a straight reference line. Then dry-lay a few boards and calculate your layout so you know what the last board will look like before you fasten anything. The goal is to avoid ending up with a sliver of board at one edge. Trex's installation guidance specifically recommends making small adjustments during layout so the final board has a consistent width. For most patios, boards run parallel to the house and are installed from the house outward.
Step 4: Fasten the First Board
The first board sets the standard for everything that follows. Align it perfectly with your chalk line, check it with a square, and fasten it with face screws driven at a slight angle away from the house. Use two screws per joist crossing. Pre-drill near board ends (within 2 inches of an end) to prevent splitting. This is good practice with any wood, and some product guides (including Starborn's DeckFast stainless screw specifications) explicitly require it.
Step 5: Space and Fasten Remaining Boards
Side-to-side gap between boards is critical. It allows drainage and lets boards expand and contract with temperature and moisture changes. For natural wood, a 1/8 inch gap is typical for wet climates; in dry climates you can go a touch wider. For composite, follow the manufacturer's guide exactly because gap requirements vary by product and by temperature at installation. TimberTech AZEK calls for 1/8 to 1/4 inch side gaps. Trex's gap depends on the temperature the boards are being installed at, because boards installed in cold weather will expand as they warm up and need less gap than boards installed in summer heat. Using a set of spacer gauges keeps this consistent without eyeballing every row.
Check your alignment with a string line every 5-6 rows. TimberTech's installation guide specifically recommends this practice to catch drift before it compounds. A bow in row 3 that goes uncorrected becomes a noticeable wave by row 15.
Using Hidden Fasteners
If you want a clean, screw-free surface, hidden fastener clip systems are an excellent option. They fit into the grooved edges of compatible decking boards and fasten to the joist with a single screw. Products like the Trex Hideaway system use stainless steel clips that lock boards in place while maintaining proper spacing automatically. Hidden fasteners do cost more and take longer to install, but the look is worth it for many homeowners. Just confirm that your chosen decking boards are compatible with the hidden fastener system before buying.
Step 6: Handle Edges, Borders, and Thresholds
At the outer perimeter, install a fascia board to box in the frame and give the patio a finished look. The fascia should be the same species or material as the decking and attached with screws driven from the back side where possible for a clean face. At transitions to the house door threshold or adjacent surfaces, maintain at least a 1/4 inch gap between the decking and the door frame or siding to prevent moisture wicking. Don't butt wood tight against the house. Any gap near the house should be covered with an appropriate threshold trim or transition strip, not caulk.
Finishing, Sealing, and Protecting the Surface
For composite decking, finishing is minimal: clean it and you're mostly done. For natural wood (PT, hardwood, modified wood), sealing and finishing is where you protect your investment. Outdoor carpet can be installed on a patio too, but you need a stable, well-drained surface so the backing stays dry and doesn’t shift how to install outdoor carpet on patio.
When to Apply the First Coat
New pressure-treated lumber needs time to dry before it will accept a stain or sealer. Thompson's WaterSeal, for example, specifies waiting at least 30 days after installation before applying their sealer to new PT wood. If you seal before the wood is dry, the finish sits on top instead of penetrating, peels quickly, and traps moisture underneath. The wait is frustrating, but it matters. For hardwoods like ipe, apply a penetrating oil (teak oil or ipe-specific oil) within a few weeks of installation to replace the natural oils lost during drying, and reapply annually.
Choosing a Finish
Penetrating sealers (like Thompson's WaterSeal) soak into the wood grain and protect from within without forming a surface film that can peel. Semi-transparent stains add color while still showing wood grain and offer UV protection. Solid stains and paints sit on top of the surface, provide maximum color and UV protection, but require more prep work when it's time to recoat. For most DIYers, a semi-transparent stain with waterproofing protection is the best balance of appearance and maintenance. Reapply every 2-3 years, or sooner if water stops beading on the surface.
Decks.com recommends annual staining and sealing for pressure-treated decks as a general best practice. Bob Vila's guidance suggests a full recoat every three years under normal conditions. Real-world experience from DIY communities shows that stains in sun-exposed locations often need attention after just two years. Do the water bead test: splash some water on the surface. If it soaks in instead of beading up, it's time to clean and recoat.
How to Apply
- Clean the surface thoroughly with a deck cleaner or mild detergent and a stiff brush. Rinse well.
- Let the wood dry completely (at least 48 hours after washing, longer if weather is humid).
- Sand any rough spots or raised grain with 80-grit sandpaper.
- Apply finish with a brush, roller, or pump sprayer, working with the grain.
- Wipe up any puddles or runs before they dry.
- Apply a second coat if the product recommends it or if the first coat absorbs quickly (thirsty wood).
- Keep foot traffic off for at least 24-48 hours after the final coat.
Common Mistakes and How to Fix Them
Even experienced builders make these mistakes. Knowing what to watch for can save you from having to tear up boards you just installed.
Boards Cupping or Warping
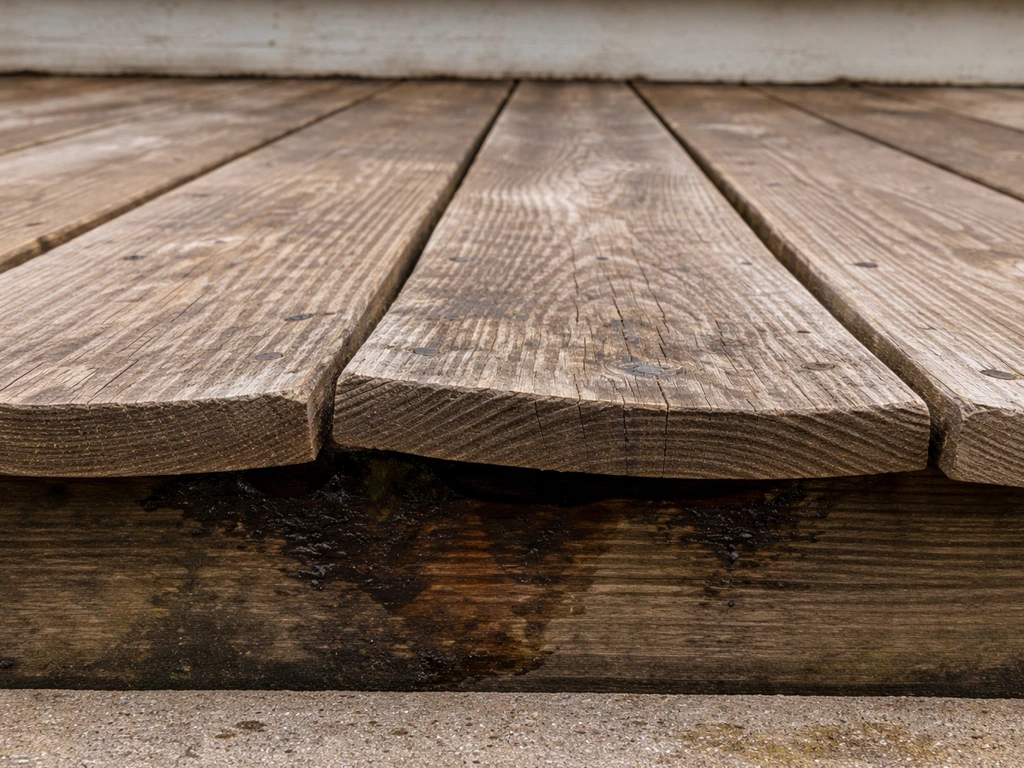
Cupping (boards curling up at the edges) is almost always a moisture problem. The most common causes are: using green or wet lumber that hasn't dried, no drainage gap between boards so water pools on the surface, poor ventilation underneath so the board's top and bottom sides are drying at different rates, and no sealer applied so the top surface weathers faster than the protected bottom. Fix the drainage and ventilation first, then let the boards dry. Some mild cupping can reverse itself once moisture balance is restored. Severe cupping usually means replacement.
Wavy or Uneven Surface
A wavy deck surface almost always traces back to the frame, not the boards. Either joists weren't set at a consistent height, the frame flexed before the decking locked it in, or boards were forced into a bowed position during installation. Check your joists before laying decking: pull a string line across the tops and shim or plane down any high spots. If you're already done and the surface is wavy, you may need to pull boards and re-level the frame. It's painful, but a wavy floor only gets worse over time as boards continue to move.
Wrong Fasteners Causing Corrosion or Staining
Using standard zinc screws in PT lumber causes dark streaking on the boards within a year or two as the zinc corrodes and the rust bleeds out. There's no good fix once this happens except pulling the screws, treating the stains as much as possible, and replacing with stainless. Avoid this entirely by using stainless screws from the start. They cost a bit more per box, but they're the one component you never want to cheap out on.
Gaps Too Tight or Too Wide
Boards installed with no gap will buckle in summer heat as they expand. Boards installed with gaps that are too wide look sloppy and can become a trip hazard or allow debris to pack in. The fix for too-tight boards is to re-space them, which means pulling and re-fastening. For composite, this is even more critical because the expansion and contraction range is larger than solid wood. Always set gaps per the manufacturer's guide for the temperature at installation time.
Missing or Failed Ledger Flashing
This is the silent killer of decks attached to the house. Water gets in behind the ledger, sits against the house rim joist and wall framing, and rots the structure from the inside out. By the time you notice it, the damage is often significant and expensive. If your patio is attached to the house and you're not 100% certain about the flashing detail, stop and check. Pull the first board back, look at the ledger-to-house connection, and make sure metal flashing is lapped correctly. If there's no flashing or it's just caulk, address it before you finish the install.
Sealing Too Soon on New PT Wood
Sealing before the wood is dry enough to absorb finish means the sealer forms a film on the surface that peels within months. It doesn't protect the wood and you'll end up doing the whole job again. Wait the full 30 days (or longer in humid climates) before applying any finish. While you're waiting, do the splash test periodically: when water beads up and rolls off, the wood is ready.
Wood patio flooring is one of the most rewarding DIY projects you can take on, and most of the risks are very manageable if you respect the prep work and follow the details. Focus on a solid, well-drained base, use the right fasteners, leave proper gaps, flash your ledger correctly, and seal the surface at the right time. If you're also thinking about what goes around the patio, drainage channels at the perimeter edges work hand in hand with everything covered here, since good surface drainage only helps if the water has somewhere to go. If you are considering carpet on the patio, also plan for proper subfloor drainage and airflow so the surface stays dry under the material drainage channels at the perimeter edges.
FAQ
How do I know if my ledger flashing detail is actually protecting the rim joist?
If the patio is attached to the house, you should treat the ledger area as a “no shortcuts” zone: stop and verify you have metal flashing that laps correctly, and confirm the water path runs out and away from the wall. Also leave a small, consistent gap at any trim or transition at the siding line, since caulked joints near the ledger are where moisture gets trapped first.
Can I use the same joist spacing for all wood patio flooring types?
Before buying decking boards, match the board thickness to your joist spacing and deck height goals. For example, composite often needs tighter spacing than solid decking, and lowering joists to “make it fit” can cause bounce even if the boards look fine. If you are unsure, check the decking product’s maximum span table and build the frame to that, not to a generic 16-inch rule.
What if my patio is already poured concrete, can I install wood flooring directly on it?
Yes, but only if you are allowed to make it a floating or separately drained system. Running boards directly over a slab that cannot drain can trap moisture, leading to moldy underside and fastener corrosion. Use a proper exterior deck over-slab approach (typically sleepers/joists over a waterproofed separation layer) and maintain airflow under the decking.
How do I prevent splitting or raised board edges when fastening near board ends?
Pre-drill near board ends helps, but you also need to pre-drill for the actual screw diameter and avoid over-driving. Drive screws so the head is snug but not crushed into the board, and keep screw lines consistent so boards sit flat. If you notice lifted grain or bulging around screw points, your pilot hole size or driving force is likely off.
When should I recoat, and what’s the best quick test to tell if my finish has failed?
Plenty of DIYers use the splash test and then wait too long to clean and recoat. If water soaks in or the surface darkens unevenly, clean thoroughly and reapply the correct product for the wood type, keeping coats thin and even. For pressure-treated lumber, remember that waiting time after installation depends on drying conditions, not the calendar alone.
What are the most common problems with hidden fastener clip systems?
Hidden fasteners require compatible board profiles and specific gap requirements, and spacing can drift if the first row is off. Dry-lay your layout, snap a reference line, and confirm each board locks fully into the clip before fastening. If you skip a clip or force a board into place, you can create cumulative misalignment that shows up as gaps later.
How much side gap should I leave, and how does temperature change my install plan?
Yes, especially with composite or modified woods where expansion range is larger. A gap gauge at every row helps you stay consistent, and you should set gaps based on the temperature at install time, then expect the boards to move after. If you install too tight in warm weather, boards can buckle during hot spells, and fixing it usually means pulling rows and re-fastening.
Is it okay to mix stainless and hot-dip galvanized fasteners in the same deck build?
If you use hot-dip galvanized fasteners, keep them fully compatible within each connection and avoid mixing with stainless in the same joint unless you follow the manufacturer’s guidance. Galvanized can corrode faster when paired with dissimilar metals in wet conditions, and the connection may fail even if the board itself is fine. When in doubt, choose stainless for the whole project.
What should I do if boards cup even after I think I left the right gaps?
If you see persistent cupping after you correct drainage and airflow, check whether boards were stored wet or installed before they reached equilibrium moisture content. Mild cupping may settle back once underside dries, but severe cupping usually means the board can’t recover. Don’t “force it flat” by tightening screws, replacement is often the durable fix.
Can I route utilities under the patio deck, and what changes once I include a gas line?
Plan the cut and flashing around penetrations before framing closes in. For example, gas lines require clearance and permitted methods for routing and venting, and you must follow local code, not deck-building rules of thumb. Once the frame is up, modifying for a utility is far more disruptive than setting the route early.
What’s the correct way to handle gaps at door thresholds or near siding, without relying on caulk?
Replace caulk with the right transition details. Keep wood out of direct, recurring contact with siding and trim, use a ventilated transition or threshold strip, and maintain at least the required clearance so moisture cannot wick into the joint. If a gap is covered only with caulk, it can fail and hide ongoing water intrusion.