Installing a patio drainage channel means digging a trench across or along your patio at a minimum 1% slope (roughly 1 cm drop for every metre of run), bedding the channel sections in concrete, connecting the outlet end to a soakaway or storm drain, and finishing with a grate set just below the surrounding surface. Done right, water flows away reliably every time it rains. Done wrong, you get pooling, cracking, and a soggy patio that's worse than the problem you started with. This guide walks you through every step, from marking out your drain route to testing the flow before you call the job finished. You can apply the same drainage and sub-base principles when you learn how to install outdoor carpet on your patio, so the surface stays dry and safe how to install outdoor carpet on patio.
How to Install a Patio Drainage Channel Step by Step

Planning your patio drainage route
Before you buy a single length of channel, spend time on the ground working out where water currently pools and, more importantly, where it needs to end up. Drainage channels are only useful if the water they collect has somewhere legal and safe to go. Walk your patio during or just after heavy rain and watch the low spots. That tells you exactly where the channel needs to sit.
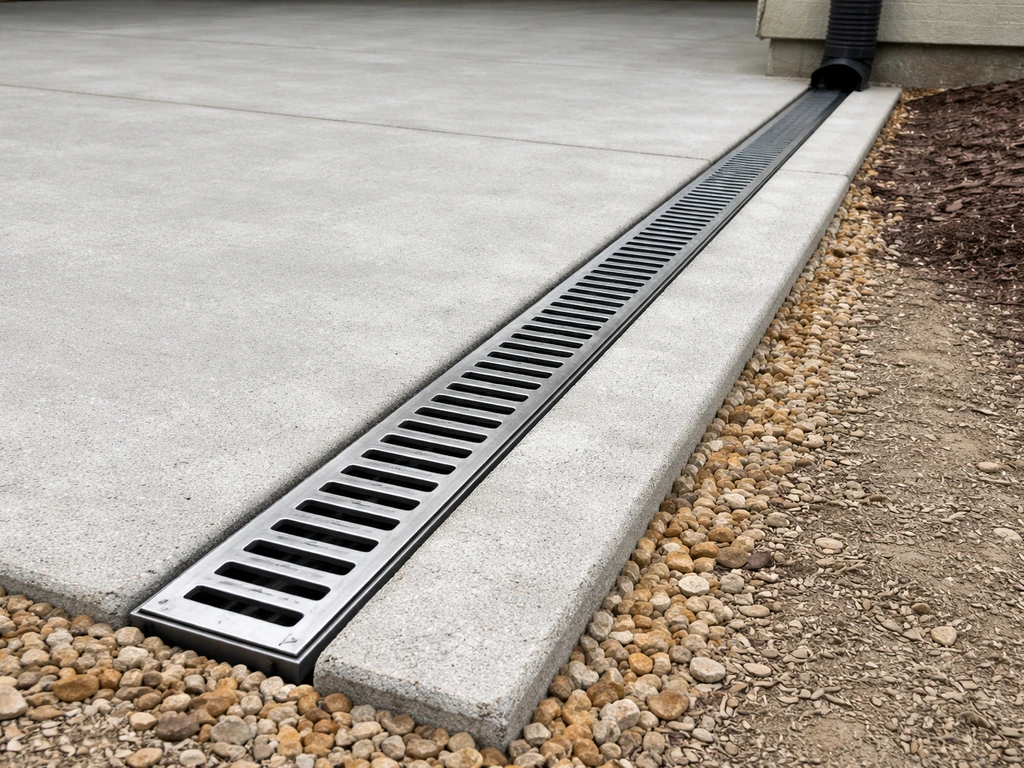
Drainage channels typically run across the lowest point of a patio, perpendicular to the slope, intercepting water before it can pool or get near the house walls. If your patio slopes away from the house already, a single channel at the far edge may be enough. If the surface is fairly flat or slopes toward the building, you may need a channel running across the middle or close to the house wall. Either way, the golden rule is: the channel always needs to be at least 1/4 inch (about 6 mm) below the finished surface of the surrounding paving so water actually falls into it rather than over it.
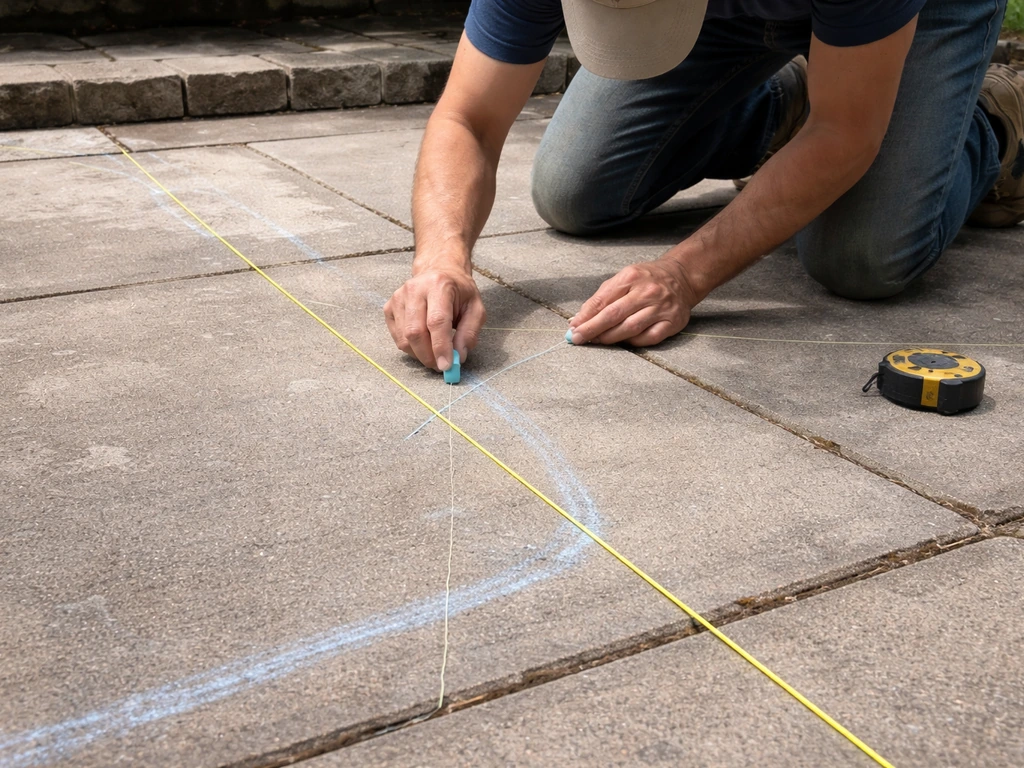
Once you know where the channel sits, trace a line from the outlet end of the channel to your discharge point. Options include a soakaway (a gravel-filled pit dug at least 5 metres from the house), an existing storm drain, or a French drain running to a lower part of the garden. Connecting to a foul sewer is not permitted for surface water in most regions, so check local regulations if you are unsure. Mark the full route with spray paint or string line before you start digging anything.
Choosing the right patio drain and drainage channel materials
The two main types of patio drainage you will encounter are point drains (a single grate over a trapped body) and linear drainage channels (lengths of channel with a continuous grate). For a patio, linear channels are almost always the better choice because they collect water along the full width of the surface rather than relying on the surface slope to direct everything to one spot.
Linear channels come in polymer concrete, HDPE plastic, and galvanised or stainless steel. For a residential patio with foot traffic only, HDPE or polymer concrete channels are both excellent. Polymer concrete is heavier and more rigid, which makes it a good option if you are bedding it into a concrete base. HDPE is lighter and easier to cut, which makes it popular for retrofit installs where you are breaking into an existing surface. Stainless steel channels look sharper and suit contemporary tile or stone patios, but they cost significantly more and are mainly a cosmetic upgrade.
| Material | Best for | Load rating | Relative cost | DIY friendliness |
|---|---|---|---|---|
| HDPE plastic | New builds and retrofits on standard patios | Pedestrian (A15) | Low | Very easy to cut and handle |
| Polymer concrete | Heavier-duty or permanent patio builds | Pedestrian to light vehicle (A15-B125) | Medium | Heavier, needs careful bedding |
| Stainless steel | Contemporary tile or stone patios | Pedestrian (A15) | High | Easy to handle, but pricier |
| Galvanised steel | Budget builds with brick or block paving | Pedestrian (A15) | Low-medium | Straightforward, check for rust over time |
For the grate, match the load class to your use. A pedestrian-only patio needs an A15-rated grate at minimum. If vehicles will ever cross the channel, step up to a B125 or higher. Grate styles range from slotted to mesh to solid bar, and most manufacturers offer interchangeable grates so you can match the look of your paving. One practical tip: choose a channel system where the grate screws down to the body. This keeps everything locked in place underfoot and makes it simple to lift for cleaning later.
Tools and materials checklist for installation
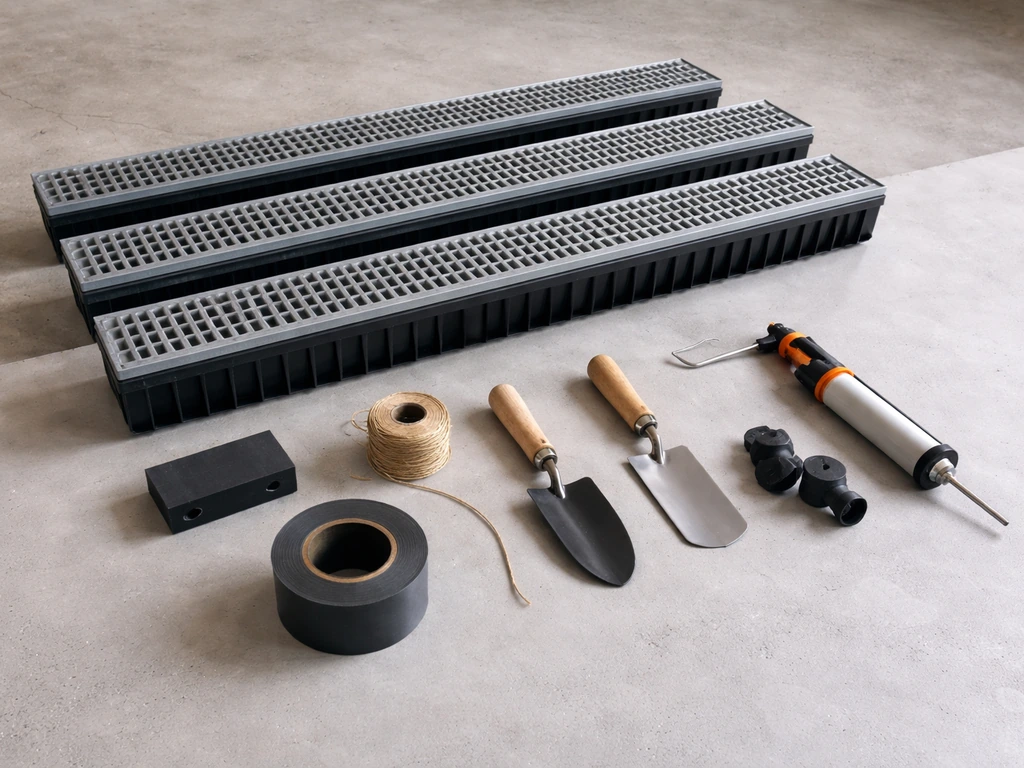
Getting everything together before you start saves a lot of back-and-forth mid-job. Here is what you will need for a standard residential patio drainage channel install.
- Linear drainage channel sections and end caps (measure your run and add 10% for cutting tolerance)
- Bottom outlet or elbow connector to match your pipe diameter (typically 110 mm for UK residential drains)
- Pipe to connect the channel outlet to the soakaway or storm drain
- Ready-mix concrete or site-mixed concrete (1: 2:4 mix) for bedding the channel
- Builder's sand and ballast for sub-base if installing on bare ground
- Spirit level and a long straight edge
- String line and line pins
- Tape measure and marker
- Angle grinder or jigsaw with the correct blade for cutting channel material
- Bolster chisel and lump hammer (for breaking existing paving)
- Spade and mattock for trench digging
- Float or trowel for finishing the concrete bed
- Silicone or drainage channel sealant (for joints where specified by the manufacturer)
- Protective gloves, safety glasses, and knee pads
Step-by-step installation on common patio bases
The basic process is the same whether you are working on a new patio build or retrofitting into an existing surface, but the preparation differs. I will cover both, because retrofitting is where most people get stuck. Once your drainage channel is sorted, you can plan the steps for installing wood patio flooring on a stable, well-drained base.
Installing during a new patio build
- Mark out the channel position with string line across the lowest point of the patio area. The channel needs to run perpendicular to the water flow direction.
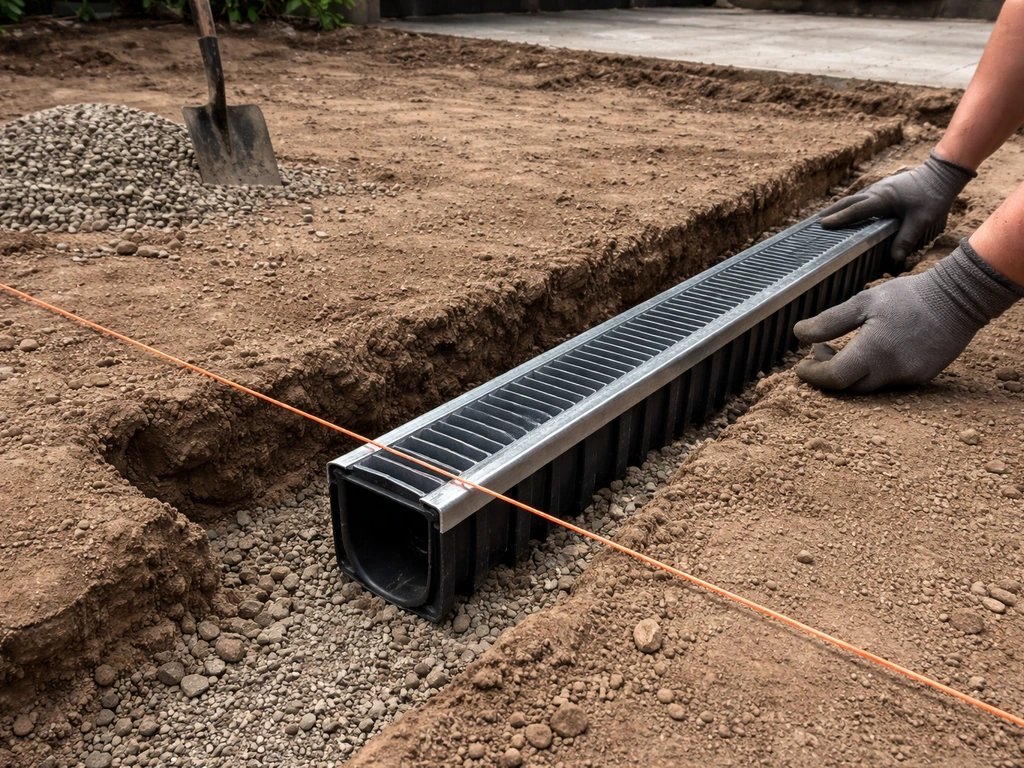
- Dig a trench wide enough to allow at least 75 mm of concrete either side of the channel body, and deep enough to accommodate the channel depth plus a 100 mm concrete bed beneath it.
- Compact the bottom of the trench with a hand tamper or plate compactor. Do not skip this step. A soft base is the number one reason channels sink and lose their fall.
- Pour a 100 mm layer of concrete into the trench and roughly level it. Allow it to stiffen slightly (30 to 60 minutes depending on weather) so the channel does not sink when you push it in.
- Start laying from the outlet end (where the pipe connection is) and work against the direction of flow. This is the opposite to what feels intuitive, but it means each channel section sheds water into the next one correctly rather than creating a lip that traps debris.
- Press the first channel section into the concrete bed and check it is level across its width with a spirit level. Then introduce the fall along its length using a string line or a digital level set to your target slope.
- Add subsequent sections, pushing them firmly together and checking the slope is maintained with each one. Most channel systems use a simple push-fit or spigot-and-socket joint. Apply sealant to the joints if the manufacturer specifies it.
- Fit end caps to any open ends. Tamp concrete firmly around the sides and under any overhangs to lock the channel in position. Leave the top of the channel body exposed.
- Allow the concrete to cure for at least 24 hours before you lay surrounding paving. The finished paving surface should sit so that the grate, once fitted, is 1/8 inch (3 mm) below the surface in non-traffic zones, and flush in trafficked areas.
- Fit the grates and screw them down once all surrounding work is complete.
Retrofitting a channel into an existing patio
Retrofitting is more disruptive but very achievable. Mark your channel line on the existing surface, then use an angle grinder to score and cut through the paving along both edges of your intended trench. Break up the paving with a bolster and lump hammer and remove the pieces. If there is an existing concrete sub-base, you will need to break through that too. From this point, follow the same steps as the new build process above, making sure the finished channel grate sits 1/4 inch below the level of the surrounding undisturbed paving. You may need to pack or re-bed the paving slabs immediately adjacent to the channel to get a neat, flush finish.
Connecting the channel to a proper outlet and maintaining correct fall
The fall (slope) of the channel is what makes the whole system work. A minimum of 1% slope is required, which equals a 10 mm drop for every metre of channel run. On a 3 metre channel, you need at least 30 mm of height difference between the high end and the outlet end. Mark the required drop on both ends of your trench before you pour any concrete so you are working to a clear target.
Set your string line at the required height on the outlet side and use that as your datum. As you bed each channel section, check the fall with a long level or by measuring down from the string. A digital slope level makes this faster, but a standard spirit level with shims works fine. If you get to the end of the run and realise the fall is not quite right, adjust the concrete bed while it is still green (before it fully cures). Do not try to fix a wrong slope by packing grout under a set channel. Lift it, re-bed, and re-check.
At the outlet end of the channel, fit the bottom outlet or elbow connector according to your manufacturer's instructions. The outlet typically takes 110 mm pipe. If you need to run a gas line through or under a patio, the same idea of planning the route and maintaining safe clearances applies, but you must follow gas-safe installation rules The outlet typically takes 110 mm pipe.. Run the pipe from the channel to your chosen discharge point, maintaining a minimum fall of 1:40 (about 25 mm per metre) along the pipe run so nothing sits stagnant. Wrap the soakaway end with geotextile membrane to keep soil from silting up the gravel, and make sure the pipe end discharges into the soakaway below the gravel surface so water disperses properly.
Finishing, testing water flow, and common DIY mistakes
Finishing up
Before you fit the grates and call the job done, point or seal any gaps between the channel body and the adjacent paving. Unsealed gaps are where grit, soil, and debris get in and eventually clog the bottom of the channel. Use a flexible exterior sealant or a fine mortar mix, depending on the gap width. On natural stone or tile patios (including slate), use a flexible joint rather than rigid mortar so it can move slightly without cracking.
Fit the grates and screw them down. In non-traffic areas, the grate surface should sit 1/8 inch (3 mm) below the surrounding finish grade so water flows in rather than sheeting past. On trafficked surfaces, it can be flush. Step back and eyeball the alignment. A channel grate that is slightly off-angle or sticking up on one side looks sloppy and can be a trip hazard. Take the time to get it level and visually straight.
Testing with water
Once everything is in place, test the system before anything is permanently sealed. Pour a bucket of water at the high end of the channel and watch it run. It should travel along the channel cleanly and exit at the outlet without backing up or pooling. Then walk around the patio and pour water near the channel edge on all sides. Water should flow toward the grate rather than away from it. If you see water sitting in the channel rather than moving, your fall is not enough. If water runs away from the channel along the patio surface, the surrounding paving is not sloping correctly toward the drain.
The mistakes I see most often
- Not enough fall: A flat or near-flat channel collects water but does not move it. Stick to the 1% minimum and aim for 1.5% if you can, especially on longer runs.
- Soft or uncompacted base: Channels that are not bedded on firm, compacted ground will sink over winter as the ground moves. Always compact before pouring your concrete bed.
- Laying in the wrong direction: Channels must be installed starting from the outlet end and working against the flow. Laying in the wrong direction creates reverse lips at joints that catch debris and block flow.
- Gaps left between the channel and adjacent paving: Even a 5 mm gap around the channel body will funnel grit and soil into the channel over time. Fill and seal every joint properly.
- Wrong outlet choice: Connecting surface water to a foul sewer is against regulations in most areas. Confirm your discharge point is a storm drain or soakaway before you connect the pipe.
- Grate sitting too high: If the grate surface is level with or above the surrounding paving, water will just sheet past the drain instead of entering it. The grate should be set slightly below the finish surface.
- Forgetting a silt trap or trap body: On heavy clay soil especially, fine silt will travel into the channel. Adding an inline silt trap or trap body at the outlet end makes cleaning much easier and protects the downstream pipe.
If your test reveals water is not moving, resist the urge to just add more grates or extend the channel. Go back to the outlet end with your level and measure the actual fall you have achieved. If it is under 1%, you need to raise the high end or lower the outlet end. Both involve re-bedding sections, which is frustrating but not a disaster if the concrete is still within the first 24 to 48 hours. After that, you are breaking it out and starting fresh, so test early.
Long-term maintenance is straightforward. Lift the grates a couple of times a year, sweep or hose out any accumulated debris, and check the joints for cracking or movement. A well-installed channel bedded on a solid concrete foundation with correct fall should serve a residential patio for 20 or more years without any major intervention. If you are also thinking about adding comfort underfoot, see our guide on how to install patio carpet for the best prep and fixing method. The work you put in on preparation, correct slope, and sealed joints is what delivers that kind of lifespan.
FAQ
Can I install a patio drainage channel on a flat patio, or do I need the patio to already slope?
It is possible, but you should not “make up” for an insufficient patio slope by making the channel shallower. Keep the channel body set so the grate sits below the surrounding finished surface (about 6 mm is the usual target), and maintain the required fall both through the channel and along the outlet pipe. If you cannot achieve the required fall without digging too deep, redesign the route so the outlet point is lower (for example, toward an existing drain or lower garden area).
How do I know the correct location if water pools in a different spot after heavy rain?
If the channel is too close to the house wall, roof and ground water may still bypass the grate. A common mistake is aiming the channel at the wrong “low spot” you see on a sunny day, rather than where water actually pools after heavy rain. Mark the route by observing pooling after a proper downpour, then place the channel to intercept flow before it reaches walls, door thresholds, or expansion joints.
What mistakes cause standing water in the outlet pipe, even if the channel itself has correct fall?
For a channel connected to a soakaway, the pipe run should not be laid level. Maintain the pipe fall (the article’s rule of thumb is about 25 mm per metre, minimum 1:40) so water does not sit in the pipe and force sediments into the channel. Also keep the soakaway outlet discharging below the gravel bed, and consider wrapping the end with geotextile to reduce silt buildup.
Why does my channel clog quickly if the grate is clean but the joints were not sealed properly?
Do not rely on loose gravel or unsealed joints between the channel and paving. If the channel bedding is not continuous, water can carve a gap and carry grit into the channel. Seal any edge gaps with an exterior flexible sealant or appropriate fine mortar, and check that the concrete bed is solid under the channel body (no voids).
Can I retrofit a drainage channel into an existing patio without breaking everything up?
Yes, but only if the products are compatible. Many retrofit installs require cutting existing slabs, then re-bedding adjacent paving for a flush finish. Before you start, check whether your channel system allows the grate to be screwed down and whether your chosen bedding method (concrete versus polymer concrete base) matches the channel material. Mixing a lightweight channel body with a brittle bedding approach can lead to rocking or grout cracking.
What should I do if I notice the fall is slightly too small after the concrete sets?
If the fall is wrong, the most reliable fix is re-bedding the sections while the concrete is still within the early cure window. The guide recommends lifting and re-setting rather than packing grout under an already set channel. Waiting too long often means you will need to break out and redo the bed, so measure the fall early with the string line and level.
How do I choose the right grate rating if the patio sometimes gets light vehicle or equipment traffic?
Use the load class based on actual traffic patterns, not your intention. If you might drag a bin, move a wheelbarrow, or drive over during maintenance, treat it as trafficked and choose a grate rated for that use (higher than A15 pedestrian grade). Also ensure the grate sits correctly relative to the surface to avoid trip hazards and wheel catch.
What could cause water to back up instead of running to the outlet during testing?
If you see water backing up toward the house, first re-check the slope of the channel and confirm the outlet connection is not blocked or incorrectly angled. Then verify the pipe run has its own minimum fall and that the outlet discharges into the soakaway or drain below the gravel surface. Do not assume the issue is caused only by the channel, the discharge system matters just as much.
Can I swap grate styles after installation for appearance or easier cleaning?
Most manufacturers provide interchangeable grates, but not all combinations fit every body. Before buying, confirm the grate type you want (slotted, mesh, solid bar) is designed for your specific channel system and that it can be secured the way the installation instructions specify (for example, screwing down). This affects both safety underfoot and how easily you can lift and clean later.
How often should I inspect and clean a patio drainage channel, and what signs mean it needs adjustment?
Routine maintenance should focus on preventing sediment from reducing the cross-section. Lift and clean grates a couple of times per year, remove debris that can bridge inside the channel, and inspect sealed joints for cracking or separation. If you notice repeated debris buildup, it can indicate the channel is not intercepting runoff as intended, so reassess the route and surrounding paving slopes.