Laying a patio in the UK is a genuinely achievable DIY project, but the difference between one that lasts 20 years and one that sinks, cracks, or floods after the first winter almost always comes down to what happens before a single slab goes down. Get the excavation depth right, build a properly compacted sub-base with the correct drainage fall (1:80, or about 12–15mm per metre, away from the house), and bed your slabs on a full mortar bed. Do those three things well and the rest follows naturally.
How to Lay a Patio UK Step by Step Slab Guide

Clara Farrell
28 Apr 2026
Before you start: measurements, layout, and choosing materials
Start by marking out the full area with string lines and pegs, then measure twice. Calculate the square meterage (length x width) and add about 10% for cuts and breakages when ordering slabs. Think carefully about the shape too: a simple rectangular patio is much easier to execute than curves or complex borders, especially for a first build.
For materials, your main choices are concrete slabs, natural stone (sandstone, limestone, granite), or porcelain. Concrete slabs are the cheapest and easiest to work with. Natural sandstone looks great but is porous and needs sealing. Porcelain is increasingly popular because it's durable and low maintenance, but it's harder to cut, less forgiving on an imperfect base, and needs a non-permeable sub-base with the right polymer jointing compound rather than a standard sand/cement joint. If this is your first patio, concrete or sandstone slabs in the 600x600mm or 600x900mm range are the most manageable size to handle and lay accurately.
Slab thickness matters too. Standard concrete paving slabs for foot traffic are typically 35–50mm thick. Natural stone varies from 20mm to 40mm+. Work out your total build-up depth before you start digging: sub-base (100–150mm compacted MOT Type 1) + bedding mortar (30–40mm before compression, settling to around 25mm) + slab thickness. That gives you a typical total excavation depth of around 200–250mm from finished patio surface level.
Tools and materials for a slab patio (UK-specific practical checklist)
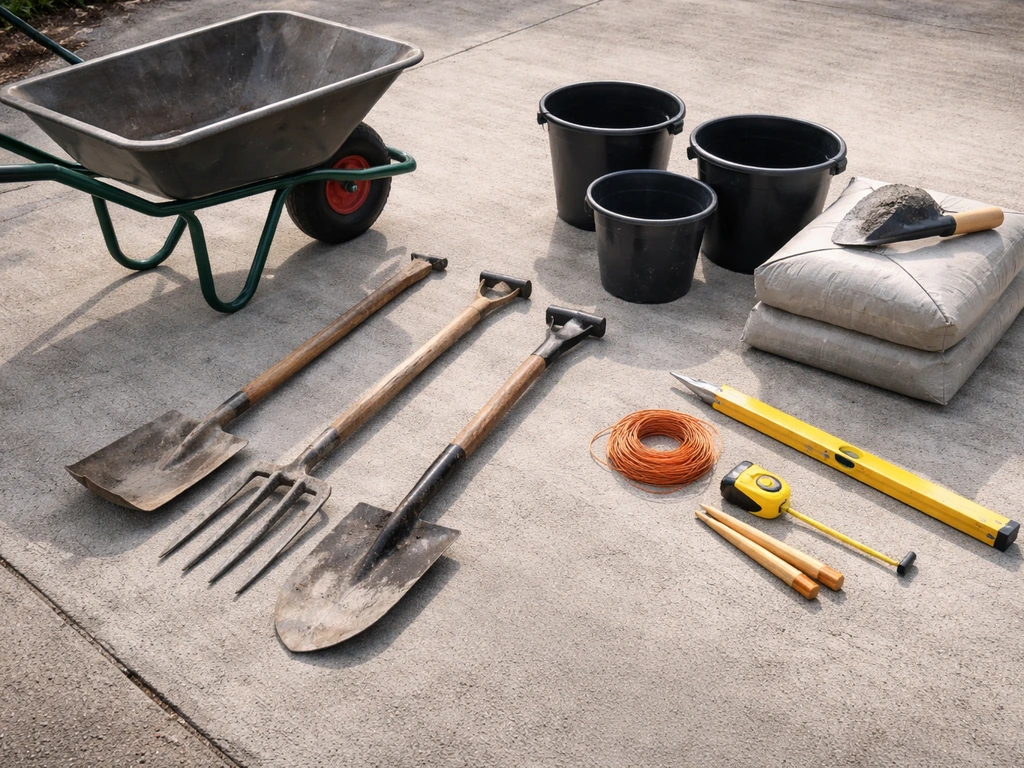
Getting everything on site before you start saves a lot of frustration. Here's what you'll need for a standard mortar-bedded slab patio:
- Spade, fork, and mattock (for excavation)
- Wheelbarrow and buckets
- String line, line pins, and a tape measure
- Long spirit level (at least 1.2m) and a short torpedo level
- Rubber mallet
- Plate compactor (hired — essential, don't skip this)
- Angle grinder with a diamond blade for cutting slabs
- Pointing trowel and a margin trowel
- Cement mixer or large mixing tub and mixing paddle
- Stiff brush and garden hose
- Safety gear: goggles, gloves, dust mask, knee pads
- MOT Type 1 (DTp1) hardcore: roughly 0.15–0.2 tonnes per square metre at 100–150mm depth
- Sharp sand for blinding layer (thin layer over compacted sub-base)
- Cement (Ordinary Portland Cement)
- Paving slabs of your chosen material and size
- Weed control membrane (optional but useful under sub-base on clay or weedy ground)
- Plastic or wooden spacers for consistent joint gaps
- Jointing compound or pointing mortar for finishing
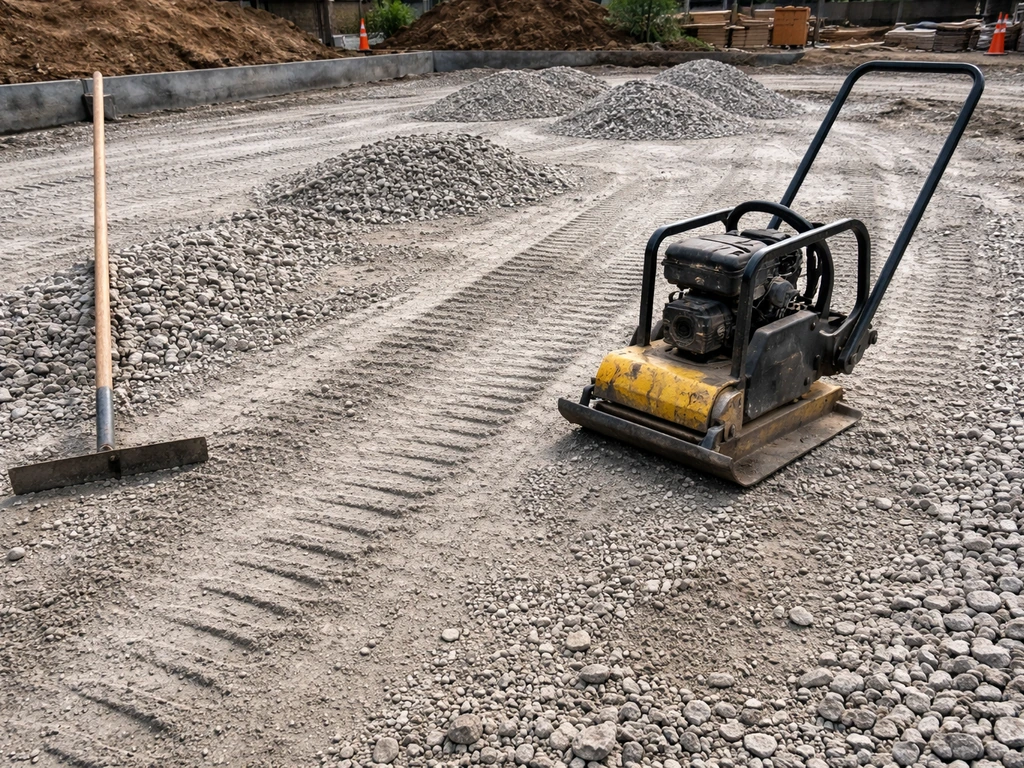
One thing worth saying upfront: hiring a plate compactor is non-negotiable. You cannot adequately compact MOT Type 1 with just a hand tamper on anything bigger than a very small area. Most hire shops will deliver and collect, and it's one of the best investments of the whole project.
Site prep and excavation: removing topsoil, handling existing surfaces, and safety
Before you dig, mark out the area and check for any underground services using a cable avoidance tool (CAT scanner), again, available from hire shops. If you're close to the house wall, check that you won't end up with patio surface level sitting blank" rel="noopener noreferrer">within 150mm of the damp proof course (DPC). buildwiz.uk also highlights a 150mm DPC clearance requirement for patios, noting that ignoring it can lead to damp-related problems and inspection or insurance implications blank" rel="noopener noreferrer">sitting within 150mm of the damp proof course (DPC). This is a building regulation requirement and an important one. Your finished patio should sit at least 150mm below the DPC.
Remove all topsoil and organic material from the area. Topsoil is compressible and will cause movement over time, so it all has to go. Typical excavation depth is 200–250mm below your intended finished surface level, but on clay or unstable ground you may need to go deeper. Clay is particularly problematic because it shrinks and swells with moisture. On clay soil, aim for 150mm of sub-base minimum (rather than 100mm) and consider a layer of weed membrane at the bottom before any hardcore goes in.
If you're laying over an existing hard surface like old concrete or block paving, check it's sound and level first. If it's cracked, uneven, or hollow, break it out rather than laying on top. Laying over a failed surface just buries the problem. If the existing surface is genuinely solid, you can sometimes lay on top but you'll need to account for the extra height in your build-up and ensure falls still work.
Topsoil disposal is something people underestimate. A 4x4m patio at 250mm deep generates roughly 4 cubic metres of spoil. That's several skip loads or trailer runs. Book your skip or arrange disposal before you start digging, not after.
Building the base: sub-base, MOT Type 1, weed control, and compaction
The sub-base is the most important part of the whole job, even though you'll never see it once it's done. A solid, well-compacted base is what keeps your slabs level and stable for years. Skimping here is the single most common reason patios fail.
Lay MOT Type 1 (sometimes called DTp1 or crusher run) across the excavated area. For a patio that will only see foot traffic, a minimum of 100mm compacted thickness is fine on decent ground. On clay, soft ground, or if you want extra longevity, go to 150mm. Here's the important bit: don't try to compact 150mm in one go. Compact it in two 75mm layers. Each pass of the plate compactor knocks down and binds the material. One thick layer won't compact properly in the middle, leaving a soft zone that moves later.
After the first layer is compacted, lay the second, compact again, and then add a thin blinding layer of sharp sand over the top (about 20–25mm). This fills the voids and gives you a surface you can fine-tune before laying bedding mortar. Lightly compact or tamp the sand, but don't over-compact it, it just needs to be stable and even.
On ground with persistent weed problems, lay a weed membrane directly on the excavated subgrade before any hardcore goes in. It won't stop everything forever, but it significantly slows down weed breakthrough. Some people skip this step and regret it later when weeds push through joints.
Setting levels and falls: string lines, screed boards, and drainage basics
Getting the falls right is the step most DIYers rush through, and it's where a lot of patios end up with puddles. Your patio needs to slope away from the house at a gradient of 1:80. In practical terms that's about 12.5mm of fall for every metre of patio. Some guidance suggests using 15mm per metre (roughly 1.5%) as an easy working figure, which gives you a comfortable margin.
Set up string lines along both edges of the patio at the correct height and with the fall built in. Tie the string at the house end at your intended finished surface height (remembering the 150mm DPC clearance), then move along the string at 1m intervals and drop it by 12–15mm for each metre away from the house. Staves or timber pegs marked at the correct height intervals make this much easier to visualise on a longer run.
The critical rule here: form your falls in the sub-base, not in the bedding mortar. Your compacted MOT Type 1 and blinding layer should already be sloping at the correct gradient before you mix a single batch of mortar. Trying to create the fall by varying the thickness of your mortar bed is difficult, inconsistent, and unreliable. Set the sub-base at the right level and the rest of the layers simply follow.
Check your levels constantly using a long spirit level and a piece of timber straight-edge. A digital level gauge (cheap from any hardware shop) is a useful addition here because it gives you the actual percentage gradient, which takes the guesswork out. Once your string lines are set and your base levels are confirmed, you're ready to lay.
Laying patio slabs: pattern, staggering joints, cutting, and spacing
Mixing and applying bedding mortar
Mix your bedding mortar at 5 parts sharp sand to 1 part cement (by volume). For porcelain or heavy natural stone slabs, use a proprietary bedding mortar like BAL Bedding Mortar which is specifically designed for the purpose and can be applied at depths from 10mm up to 100mm, with a minimum 25mm on MOT Type 1. For standard concrete or sandstone slabs on a well-prepared base, a traditional 5:1 sharp sand and OPC mix works well. For a complete step-by-step diy how to lay a patio walkthrough, follow the sequence from base prep and drainage through to bedding mortar and setting the slabs.
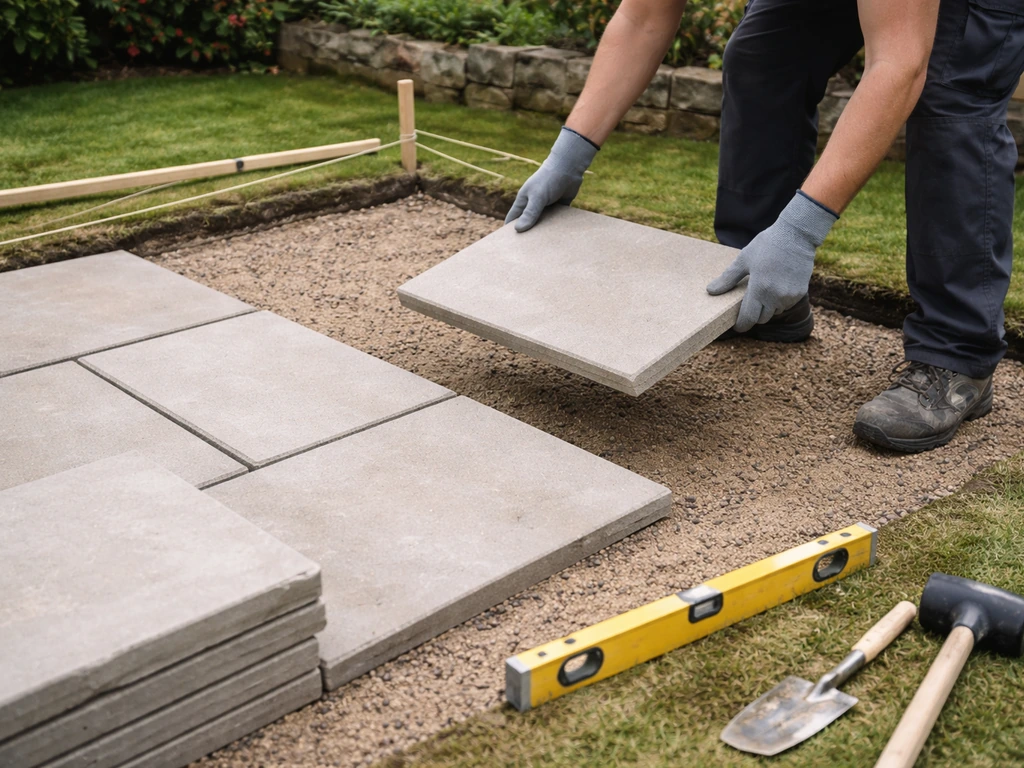
Lay the mortar as a full bed, not as five blobs (the old 'five spot' method is still seen but it leaves hollow areas under the slab that crack over time and cause rocking). Spread the mortar across the full slab footprint at around 30–40mm depth before compression. When the slab is lowered onto it and tapped down with a rubber mallet, it compresses to around 25mm. This full bed contact is what gives the slab stability.
Starting point and laying pattern

Start from a fixed edge, usually the house wall or an established boundary, and work outwards. For a single-size slab, a staggered brick-bond pattern (joints offset by half a slab length on alternate rows) gives a clean traditional look and is structurally stronger than a straight grid. For a random or multi-size pattern, dry lay a section first to work out your sequence before any mortar goes down.
Place each slab carefully onto the mortar bed (don't drop it or you'll shift the mortar unevenly), then use your rubber mallet to tap it down level. Check with your spirit level across adjacent slabs in both directions. Adjust up or down by adding or scraping mortar before it starts to go off. The slabs need to be positioned accurately first time, shuffling a slab around once it's on the mortar bed compromises the contact. If a slab is rocking after the mortar sets, the bed wasn't full enough or the sub-base had a soft spot. Lift it, re-bed properly.
Spacing and cutting
Use plastic spacers or small pieces of timber to maintain consistent joint gaps. A 10mm joint is typical for most slabs and gives you enough room for pointing mortar or jointing compound to seat properly. For porcelain, narrower joints of 3–5mm are common, but check the manufacturer's guidance.
Border cuts are inevitable on any patio. Use an angle grinder with a diamond blade and score the slab first before cutting through. Always cut outside (on grass or a stable surface), wear eye protection and a dust mask, and keep children and pets well away. For anything more than a straight cut, a wet-cut tile saw hired for the day gives much cleaner results, especially on porcelain or thin natural stone where chipping is more likely.
Edging, jointing, and finishing: jointing sand, grout, sealing, and cleaning
Edging and restraints
Once your slabs are laid and the mortar bed has cured (at least 24 hours, ideally 48 before walking on it), install your edging restraints if you haven't already. Haunching (a concrete haunch poured against the outer edge of the last row of slabs) locks the perimeter in place and prevents the edge slabs from lifting or migrating outwards. Use a mix of gravel, sharp sand, and OPC, and build the haunch up to just below the top of the slab edge so it's not visible once the job is done.
Jointing options
You have two main choices for pointing the joints:
| Method | Mix/Product | Best for | Watch out for |
|---|---|---|---|
| Traditional sand/cement mortar | 1 part cement : 4 parts sharp sand (some use 1:3 for a harder finish) | Concrete, sandstone, or natural stone on a solid base | Can crack on slight movement; needs replacing over time |
| Polymer/resin jointing compound | Ready-mixed or two-part compound (e.g., Rompox, Easyjoint) | Porcelain, premium stone, or high-traffic areas | More expensive; must be applied correctly to avoid surface staining |
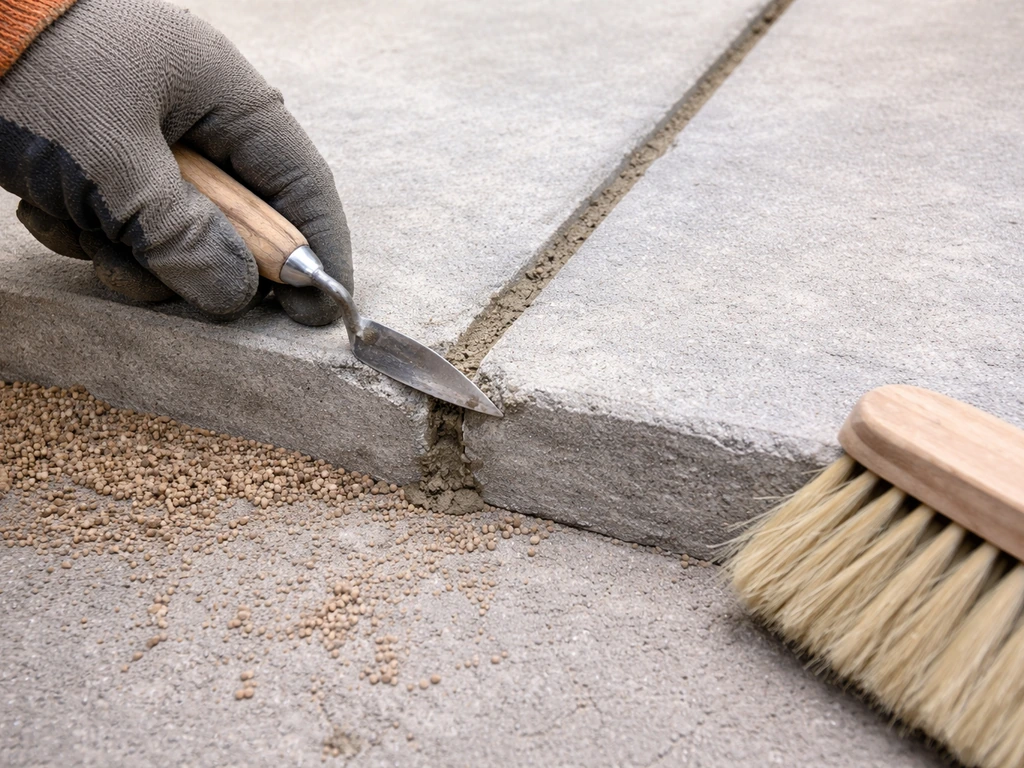
For traditional pointing, make the mortar slightly wetter than your bedding mix (still stiff, but workable). Pack it firmly into the joints with a pointing trowel, compressing it slightly below the slab surface so water runs off rather than pooling in the joint. Work carefully and keep mortar off the slab faces as much as possible. For polymer jointing compound, follow the product instructions carefully, most require you to brush or pour the compound into dry joints, then mist with water to activate. Residue left on slab surfaces can set hard and be very difficult to remove.
Sealing and cleaning
Not every patio needs sealing, but natural sandstone and limestone benefit from it. A patio sealer applied once the mortar has fully cured (allow at least 7–10 days for the bedding mortar to go off completely) helps resist staining, moss growth, and moisture penetration. Porcelain generally doesn't need sealing, which is one of its advantages.
Clean the finished patio thoroughly before sealing. Brush off any loose debris, rinse down with clean water, and remove any mortar smears with a diluted hydrochloric acid solution (sold as patio cleaner at most builders' merchants) following the product instructions and always wearing gloves and eye protection. Let the surface dry completely before applying any sealer.
Common mistakes and how to avoid them
- Skipping proper compaction: the most common cause of patio failure. Always hire a plate compactor and compact in layers.
- Not allowing for the DPC clearance: patio surface must sit at least 150mm below the damp proof course on the house wall.
- Using the bedding mortar to create the fall: set the falls in the sub-base before any mortar goes down.
- Five-spot bedding: always use a full mortar bed for slabs. Spot bedding leaves voids that cause cracking and rocking.
- Mixing jointing mortar too wet: it slumps out of the joints. Aim for a stiff, slightly damp mix that holds its shape.
- Rushing the cure time: don't walk on freshly laid slabs for 24–48 hours and don't point joints until the bedding mortar has set.
Your next steps today
If you're planning a straightforward rectangular patio with standard concrete or natural stone slabs, you can absolutely tackle this yourself. This smaller-scale approach follows the same key principles, so you can learn how to lay a small patio step by step. This guide focuses on how to lay a patio yourself, step by step, from planning and excavation through to base prep and slab laying.
If you want an even simpler walkthrough, check this guide for how to lay a patio easy from start to finish. Start today by measuring your space, calculating your material quantities, and getting quotes from builders' merchants for MOT Type 1, sharp sand, cement, and slabs. Book your skip and plate compactor hire at the same time. The groundworks and base prep will take a full weekend.
Laying the slabs typically takes another day or two depending on the size of the area.
If your garden is significantly sloped, has very soft or waterlogged ground, or you're working on a larger area adjacent to the house foundations, it's worth getting a professional eye on the groundworks at minimum before proceeding. For everything else, a bit of careful preparation and patience with the levels and falls will see you with a patio that lasts decades.
If you prefer to learn by watching, search for a YouTube how to lay a patio walkthrough alongside this guide. If you are looking for the full, step-by-step process, follow our guide on how to lay patio paving from excavation to final jointing. The hard work is almost entirely in the base, once that's right, the laying itself is genuinely satisfying.
FAQ
Can I lay a new patio on top of my existing patio slabs or concrete base?
Yes, but you need to treat it as extra groundworks. If you lay on top of existing paving, you must keep the finished patio level and falls working out, and you should only proceed if the old surface is fully sound, well bedded, and not rocking. Also factor in the extra build-up height so you still achieve the required DPC clearance (finished patio at least 150mm below the DPC).
Do I really need to hire a plate compactor, or will a hand tamper do?
For small patios it can be tempting to use a hand tamper, but on anything beyond a very tiny area it usually leaves soft spots that later show up as rocking slabs and cracked joints. The usual hire solution is a plate compactor, and the key is to compact in lifts (for example 75mm layers for MOT Type 1) rather than trying to compress too much thickness at once.
Why do my falls keep ending up wrong, and should I adjust the slope in the mortar?
Not reliably. The fall should be created in the sub-base and blinding layer, then you bed the slabs at a consistent thickness. If you try to form the slope by varying mortar thickness, you can end up with an uneven mortar bed, poor full support, and slabs that settle differently after curing.
What if my garden is on clay, very wet, or water pools where the patio will be?
You can, but you still need proper drainage and a plan for water leaving the patio. If the ground is clay or poorly draining, you may need more sub-base depth, a stronger compaction spec, and sometimes drainage measures. For waterlogged sites, getting advice before digging is often the most cost-effective way to avoid lifting and recurring puddles.
What joint width should I use, and does it change for porcelain or natural stone?
Aim for consistency: keep joint gaps uniform, and for most concrete and standard paving slabs a 10mm joint is typical. If the patio uses porcelain, many systems prefer narrower joints (often 3 to 5mm), so follow the slab or jointing compound instructions. Incorrect joint widths make pointing fail faster and can lead to movement and cracking.
Can I substitute different sand or aggregate layers, and what matters most between blinding sand and bedding mortar?
If you’re on MOT Type 1, the blinding layer should be sharp sand so it can lock the surface and allow minor adjustment, then bedding mortar goes on top as a full bed. Avoid using overly soft or dusty material in the bedding stage, because it reduces the contact area and increases the chance of rocking or settlement.
When should I clean mortar off the slab faces, and can I just clean it all at the end?
Yes, and it’s one of the biggest causes of debris staining and difficult cleaning. Cement and mortar smears can set hard, so clean as you go using a damp sponge and remove excess before it cures. If you do miss some, plan a proper clean before any sealer, otherwise residue can prevent uniform sealing and attract moss.
How long do I need to wait before walking on the patio and sealing it in UK weather?
Weather affects both mortar cure and sealing timing. Bedding mortar generally needs at least 24 hours before walking and ideally longer before heavy use, then sealing typically needs the bedding mortar to be fully cured (often 7 to 10 days). If it’s cold or damp, curing can take longer, so don’t seal just because the surface looks dry.
A slab is rocking or uneven after laying, what’s the correct way to fix it?
If you see rocking after the mortar has started curing, don’t try to “fix it in place” by adding extra mortar. Lift the slab, remove any contaminated or hollow areas of the bed, re-bed on full mortar contact, then tap down and re-check levels. Rocking usually means you didn’t achieve full bed contact or there’s a soft spot below.
When do I need haunching or edging restraints, and how do I place them correctly?
It’s generally best not to lay haunching too low. The idea is to lock the outer edge slabs so they cannot migrate, build it up to just below the top edge of the slab so it isn’t visible, and ensure the mix is packed and set properly. If you skip restraints on a larger or traffic-exposed patio, the perimeter is more likely to lift or spread over time.
I used polymer jointing compound, why are my joints not filling properly or leaving residue?
For jointing compound, the usual mistake is using the wrong workflow for the product. Many require dry joints, correct application depth or brushing technique, then misting or activating with water. If the joints aren’t clean and dry, compound performance drops and you may get incomplete filling or stubborn residues on the slab faces.
What’s the cleanest way to cut border slabs in porcelain or thin natural stone?
Check your slab choice early because it changes cutting and jointing. Thin natural stone and porcelain can chip easily with an angle grinder, so a wet-cut tile saw hired for the day is often cleaner and faster. Also score first, then cut outside, keep the working surface stable, and protect against dust.