Laying a basic patio yourself is totally doable in a weekend or two. You dig out the area to the right depth, compact a gravel sub-base, bed your pavers into sharp sand, keep everything level with the right drainage slope, then lock it all in with edge restraints and kiln-dried jointing sand. That's the whole job. The steps below walk you through each stage in order, with the measurements and tips that actually make the difference between a patio that stays flat for years and one that sinks and shifts after the first winter. If you want to learn the same process step by step, searching for a YouTube patio installation video can be a helpful way to see each stage in action.
How to Lay a Patio Easy: Beginner Step by Step Guide

Clara Farrell
28 Apr 2026
Choosing patio type, size, and layout
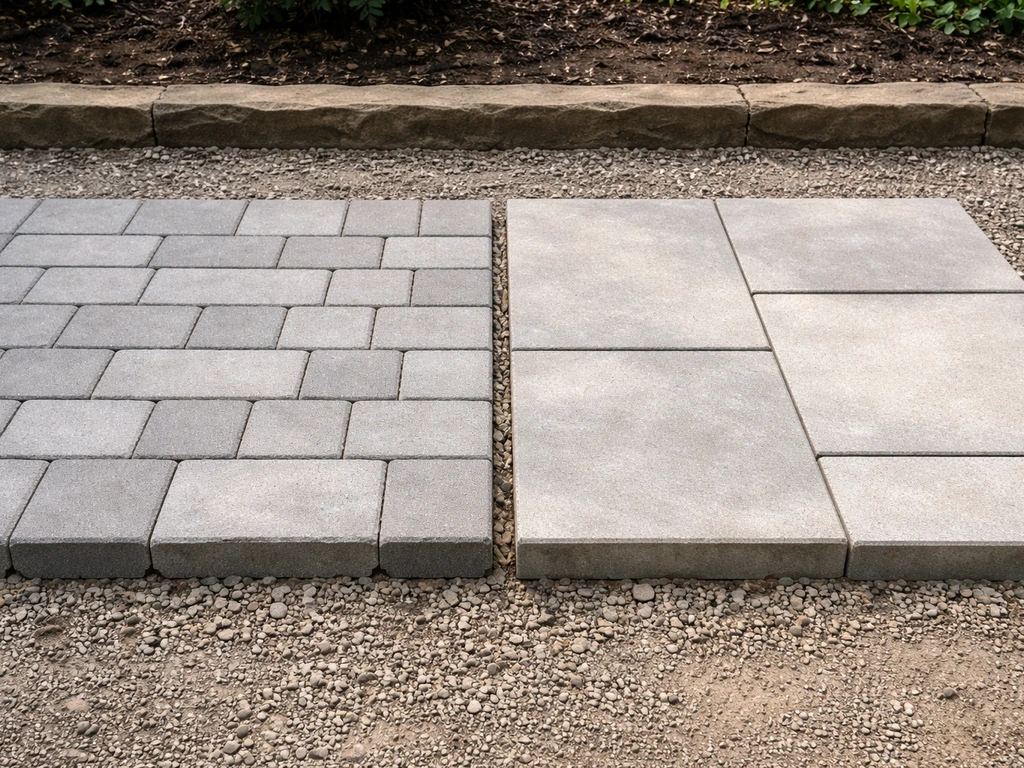
For a first-time DIY patio, the two most beginner-friendly options are concrete block pavers and paving slabs (flags). Both use a compacted gravel sub-base and can be laid without specialist equipment. Concrete block pavers (also called block paving) are smaller, easier to handle solo, and very forgiving because you can adjust individual blocks easily. Paving slabs are larger and heavier but give a cleaner, more open look and are great for patios where you want fewer joints.
| Feature | Concrete Block Pavers | Paving Slabs (Flags) |
|---|---|---|
| Typical thickness | 50 mm (domestic), 60 mm (heavier use) | 40–50 mm typically |
| Bedding method | 30–50 mm sharp sand (unbound) | 30–40 mm mortar bed |
| Jointing | Kiln-dried sand brushed in | Mortar or jointing compound |
| DIY difficulty | Very beginner-friendly | Slightly harder (weight, mortar) |
| Repair ease | Very easy: lift and relay individual blocks | Moderate: lift and re-mortar |
For a truly easy first project, concrete block pavers on a sand bed are the recommendation here. They're forgiving, drain well, and individual blocks can be lifted and reset if something goes wrong. If you prefer the slab look, the same sub-base principles apply but you'll be working with a mortar bed instead of sand, which adds a little complexity. The steps in this guide focus on the block paver method but call out the slab differences where it matters.
On size and layout: measure the space you actually want to use. A 3m x 3m area (9 square metres) is a comfortable starting size for a small seating area and manageable for a solo DIYer. Sketch the area on paper and think about the pattern. If you want to build a small patio step by step, follow this guidance from start to finish and plan your layout before you start digging. A simple running bond (staggered rows like brickwork) or a straightforward grid pattern are both easy to cut and lay. Avoid complex herringbone or circular patterns for your first attempt as they create a lot of angled cuts.
Tools and materials checklist for an easy patio
Getting everything on site before you start saves a lot of back-and-forth. Here's what you'll need for a basic block paver patio:
- Concrete block pavers or paving slabs (calculate area plus 10% for cuts and breakages)
- Type 1 (MOT) compacted sub-base gravel: enough for at least 100 mm depth across your whole area
- Sharp sand: for the 30–50 mm bedding layer
- Kiln-dried jointing sand: for filling joints after laying
- Plastic or concrete edge restraints (and fixing pegs or haunching mix)
- Plate compactor (hire from a tool hire shop for a weekend)
- Rubber mallet
- Builder's line and line pins
- Tape measure and builder's square
- Spade and shovel
- Wheelbarrow
- Long spirit level (1.8 m or longer)
- Screeding rails and screed board (or a straight piece of timber)
- Bolster chisel and club hammer (for cuts, or hire an angle grinder with a diamond blade)
- Broom
- Safety glasses and gloves
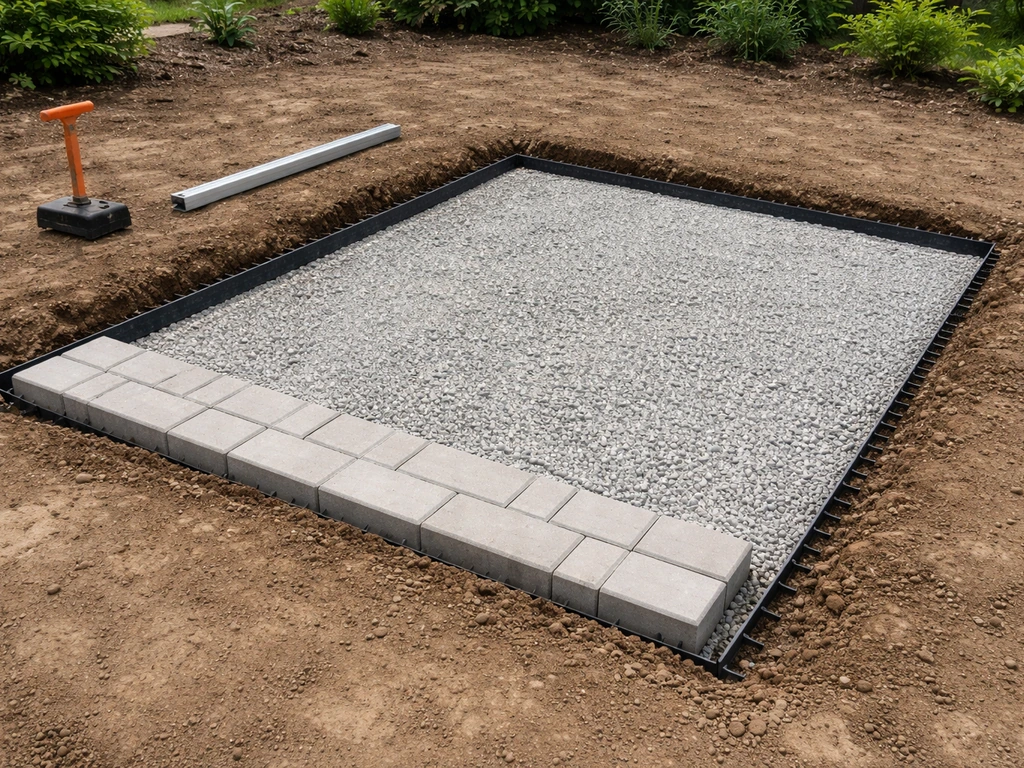
One tool worth emphasising: the plate compactor. Hiring one is cheap (usually around £50–70 for a weekend) and it's what actually gives you a stable base. Trying to compact Type 1 by hand is one of the most common beginner mistakes and it leads to a surface that sinks and shifts. Don't skip it.
Marking out the area and digging to the right depth
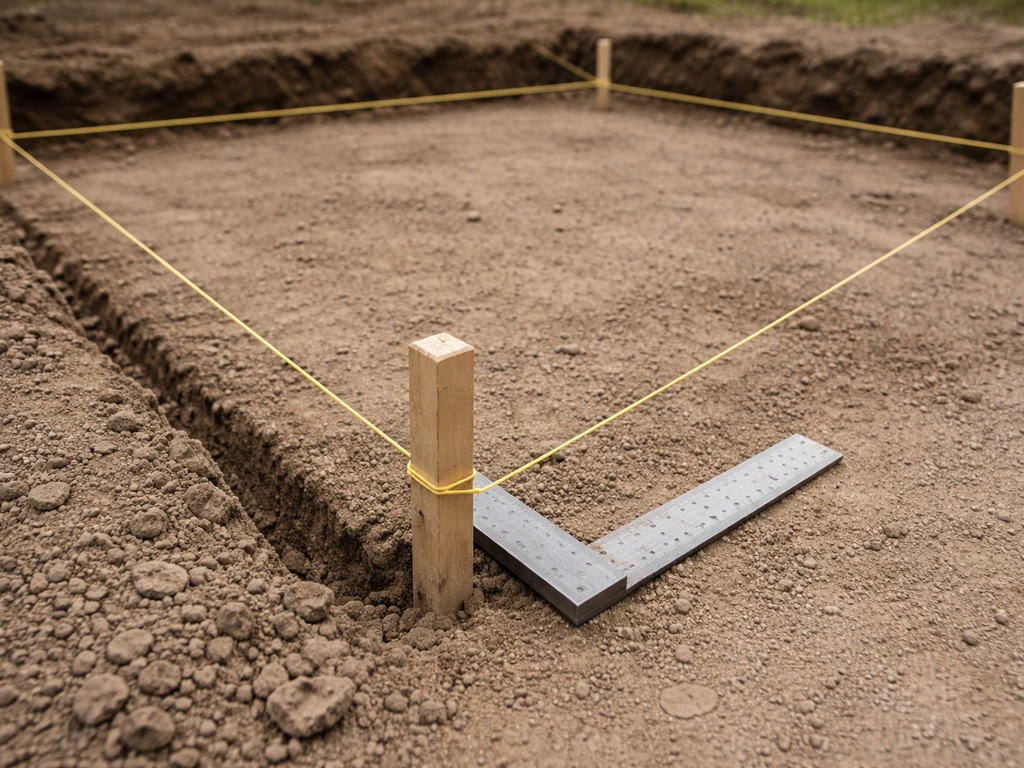
Start by marking the exact outline of your patio using builder's line and pegs. Use a builder's square to get your corners at a true 90 degrees (or check by measuring diagonally: both diagonals should be equal if the shape is square). Mark the full perimeter clearly before you dig a single spadeful.
Depth is where a lot of beginners underestimate the work. For concrete block pavers, you need to dig deep enough to fit: 100 mm of compacted Type 1 sub-base, plus 30–50 mm of sharp sand bedding, plus the paver thickness itself (typically 50 mm for domestic use). That adds up to roughly 180–200 mm below your finished surface level. For paving slabs, the slab sits on a 30–40 mm mortar bed over the same 100 mm Type 1 base, so your dig depth is similar. Mark the finished surface level on your pegs first, then measure down to find your dig depth.
When digging, remove all topsoil and any organic material. Roots, grass, and soft organic soil will decompose and cause sinking. You want to be digging into firm subsoil. If your ground feels soft or spongy even after excavation, add extra depth to the sub-base layer to compensate. Remove all the spoil from the site as you go as it adds up fast.
Building and compacting the base with proper drainage slope
The sub-base is the most important part of the whole job. Pour in your Type 1 MOT gravel in layers of no more than 75–100 mm at a time, then compact each layer with the plate compactor before adding the next. Running the plate compactor over uncompacted gravel 150 mm deep in one go won't give you a properly consolidated base. Compact in multiple passes, working in different directions.
Before you compact, set your drainage slope. Every patio needs to fall away from the house to stop water pooling against the wall or under a door. The standard fall for a domestic patio is 1:60, which means roughly 1 cm drop for every 60 cm of run. On a 3 m deep patio, that's a 5 cm total fall away from the house. For textured or riven surfaces, some guides suggest a slightly steeper fall (closer to 1:40) because rougher surfaces need more gradient to shift water, but 1:60 is the safe minimum for most patio surfaces. Set your string lines at the finished surface height with this fall already built in so every subsequent layer follows the slope.
Once the sub-base is compacted and at the right level, install your edge restraints along all edges before you lay the bedding layer. Edge restraints (plastic kerbing or concrete haunching) are what physically stop your blocks from spreading outward over time. Secure them firmly: either peg plastic edging into the sub-base or haunch concrete edging blocks with a stiff concrete mix. This step is easy to skip because it feels like fiddly work at this stage, but without it the whole patio will gradually push outward at the edges.
Laying pavers and keeping it level
With the sub-base compacted and edge restraints in place, add your sharp sand bedding layer. Rake it roughly level, then use screeding rails and a screed board to pull the sand to a consistent depth of 30–50 mm across the whole area. The screeded sand surface should already reflect the drainage slope you built into the sub-base. Do not compact the sand at this stage: it needs to stay loose so you can tap pavers into it.
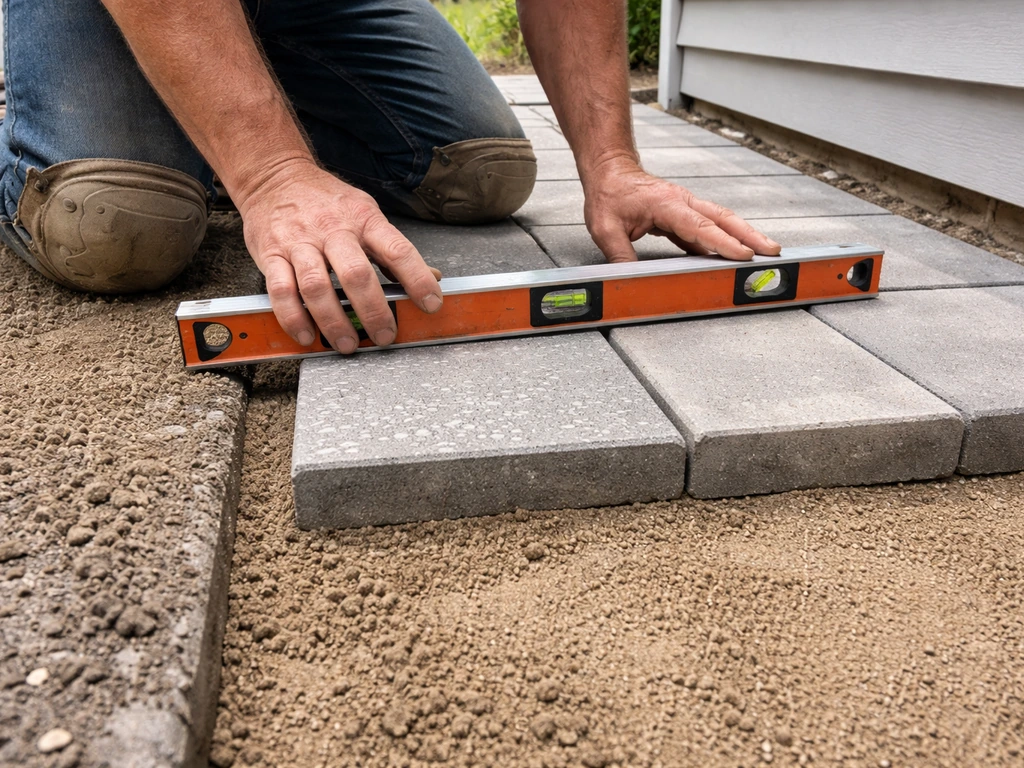
Start laying pavers from a fixed, straight edge, usually the edge closest to the house or a known straight line. Lay each paver by placing it directly down rather than sliding it, which disturbs the sand. Use a rubber mallet to tap each block down flush with its neighbours. Check level frequently with your long spirit level, both along rows and across rows. If a block sits too high, lift it and remove a little sand. If it sits too low, add a small amount of sand and re-lay. Never try to correct level by hammering a block down excessively as this just compresses the sand unevenly.
Work from a laid area outward, kneeling on a board placed over already-laid blocks to avoid disturbing the sand you haven't reached yet. Keep your joint gaps consistent (usually 2–3 mm for block pavers). Use spacers if needed to maintain uniform gaps.
Cutting, edging, and finishing for a clean border
Lay all the full blocks first, then come back and deal with cuts at the edges. Mark each cut block in place using a pencil or chalk line rather than measuring off a tape, as small discrepancies can make tape measurements unreliable at the edges. For straight cuts, an angle grinder fitted with a diamond blade is the fastest and cleanest method. A bolster chisel and club hammer works fine for smaller cuts but takes practice to get a clean break.
Always wear safety glasses and gloves when cutting pavers. Cut dry where possible as wet cutting in a domestic setting creates messy slurry that's hard to clean off finished paving. After cutting, test each cut piece in position before committing it to the sand bed.
Once all blocks are laid including cuts, check that edge restraints are still firmly in place and that no blocks are sitting proud or low at the perimeter. The edge is the first thing people notice, so take extra time here to get it straight and tight. If you're laying next to a wall or a building, leave a small gap (around 10 mm) rather than butting hard against the structure to allow for any movement.
Compacting, jointing sand, and keeping your patio in good shape
With all blocks laid, run the plate compactor over the entire surface. This beds every block firmly into the sand and brings the surface to final level. Use a rubber or neoprene pad under the plate if you're using decorative blocks that could be scratched. Make at least two passes in perpendicular directions.
After compaction, spread kiln-dried jointing sand over the surface and brush it into the joints using a stiff broom. Kiln-dried sand is clean, fine, and dry, which allows it to flow down into tight joints easily. Sweep in all directions to fill every joint, then run the plate compactor over the surface again to vibrate the sand fully into the joints. Add more kiln-dried sand and repeat the brushing and compacting cycle until all joints are full to just below the paver surface. Don't leave joints empty: unfilled joints allow water to undercut the sand bed and give weeds a foothold.
For slab patios bedded on mortar, the jointing process is different. You'll point the joints with a semi-dry mortar mix or a polymer jointing compound, pressing it firmly into each joint and finishing it flush or slightly recessed. QUIKRETE PowerLoc polymer jointing sand systems for pavers can be swept into joints and then dampened with a water mist to harden, as an alternative to kiln-dried dry-sand systems polymer jointing compound. Allow mortar jointing to cure for at least 24–48 hours before using the patio.
Basic maintenance to keep it looking good
- Top up kiln-dried jointing sand annually or whenever joints look depleted, especially after a wet winter
- Brush off leaves and debris regularly to prevent staining and moss growth
- Apply a patio cleaner or pressure wash once a year to remove algae and staining, then re-apply jointing sand afterwards if any washes out
- Check edge restraints every couple of years and re-secure any that have shifted
- If a block sinks or lifts, lift it, adjust the sand bed, and relay: this is one of the main reasons the sand-laid method is so practical
A well-built patio on a properly compacted sub-base with correct drainage will stay level and solid for 10 to 20 years with minimal attention. The work is genuinely in the groundwork, not the laying, so take your time on the sub-base and get the slope right from the start. Everything laid on top of a good base is the easy part. If you’re ready to tackle the diy how to lay a patio process yourself, plan your layout first and follow the bedding and compaction steps carefully.
FAQ
Should I build the sub-base to exactly the finished height, or account for pavers settling?
For a block paving patio on a sand bed, yes, it’s normal for the surface to sit slightly lower than your intended finished level before final compaction. The compactor pulls the bedding and blocks down to a stable final height, so set your string lines and peg marks to the finished surface level including the paver thickness, then let the final bed settle during compaction.
What if my sand bedding got compacted accidentally?
Avoid compacting the sharp sand bedding before you lay blocks, because it needs to stay moveable so you can lift or tap blocks into level. If it accidentally gets compacted, rake it back up, add a small extra layer of sand, screed again, and only then start placing pavers.
My soil feels soft when I dig, do I still lay the patio on the same depth?
If you hit soft or spongy ground, don’t just keep going with the same depth. Either remove more material until you reach firm subsoil, or increase the Type 1 sub-base depth in line with the instructions you are following, then compact in layers. A stable base matters more than saving excavation.
How tight should the gaps be between block pavers, and what happens if they’re too wide?
Minimum joint size matters for stability and drainage. For block paving, aim for the consistent 2 to 3 mm gaps mentioned in the guide, use spacers if needed, and ensure cuts are tight. Over-wide joints can take longer to fill and may shift during compaction.
Can I compact the patio immediately after laying, before filling the joints?
If you run the plate compactor over an area without a jointing sand fill, you risk disturbing blocks and forcing them into an uneven pattern because the sand bed can move. Compact in stages, but keep the final jointing cycle (brushing and compacting) for after the pavers are fully laid and aligned.
What if I forget edge restraints, can I fix it later?
Edge restraints are not optional. The small amount of inward spread at the edges is what later becomes uneven surfaces and rocking blocks. If you skipped them, the practical fix is to install restraints correctly now, then re-check the perimeter levels and bedding before laying or re-compacting.
How should I finish the patio edge where it meets a wall?
For any patio beside a wall or door, leave a movement gap rather than packing pavers hard against the structure. A common approach is the 10 mm gap suggested in the guide, then deal with that space using appropriate edging or infill so water doesn’t track behind it.
How can I tell early on that my drainage slope is correct?
If your slope looks off, fix it before edging and before bedding. Once sand is screeded and blocks start going down, redoing is much harder. A quick check is measuring across the whole area and confirming the total fall matches your planned run, then adjust the base or string lines before you add sand.
What’s the easiest way to avoid awkward tiny cuts at the patio perimeter?
Choose your cut plan before digging and avoid patterns with lots of angled trimming for a first job. If you end up with skinny slivers at the edges, reduce the patio footprint slightly or shift the starting line so edge pieces stay workable and look intentional.
Is it okay to fill joints with sand when the patio is damp?
You can use kiln-dried jointing sand that’s dry at the time of application. If the patio is damp or rainy, wait until the surface dries, then sweep sand into joints fully. Wet jointing sand behaves differently and can wash out or not vibrate properly into tight gaps.
How do I correct a paver that sits too high or too low during installation?
If a paver is too high after placement, lift it, remove a little sand, and re-lay. If it’s too low, add sand. Avoid repeated hammering to force level, because it compresses the bedding unevenly and can create a ripple effect after compaction.
How long should I wait before using the patio, and what should I check after the first rain?
Most beginner patios should be left alone for weathering and settling, but jointing sand should still be fully compacted into the joints after the final sweep. After that, it’s safest to avoid heavy traffic for a short period, then monitor the next rainfall. If joints sink or wash out, top up with kiln-dried sand and re-vibrate.