To lay a block paving patio that stays flat and lasts for years, you need to dig down at least 230–240mm from your finished level, lay a compacted Type 1 sub-base at 150mm, bed your blocks on 30mm of sharp sand screeded to the correct fall, and compact the whole thing into place before jointing with kiln-dried sand. Get those four things right and you'll have a patio that looks sharp and doesn't rock or sink. Skip any of them and you'll be lifting slabs within a few years.
How to Lay Patio Paving: Step-by-Step Block Paving DIY

Clara Farrell
28 Apr 2026
Planning and measuring your patio layout
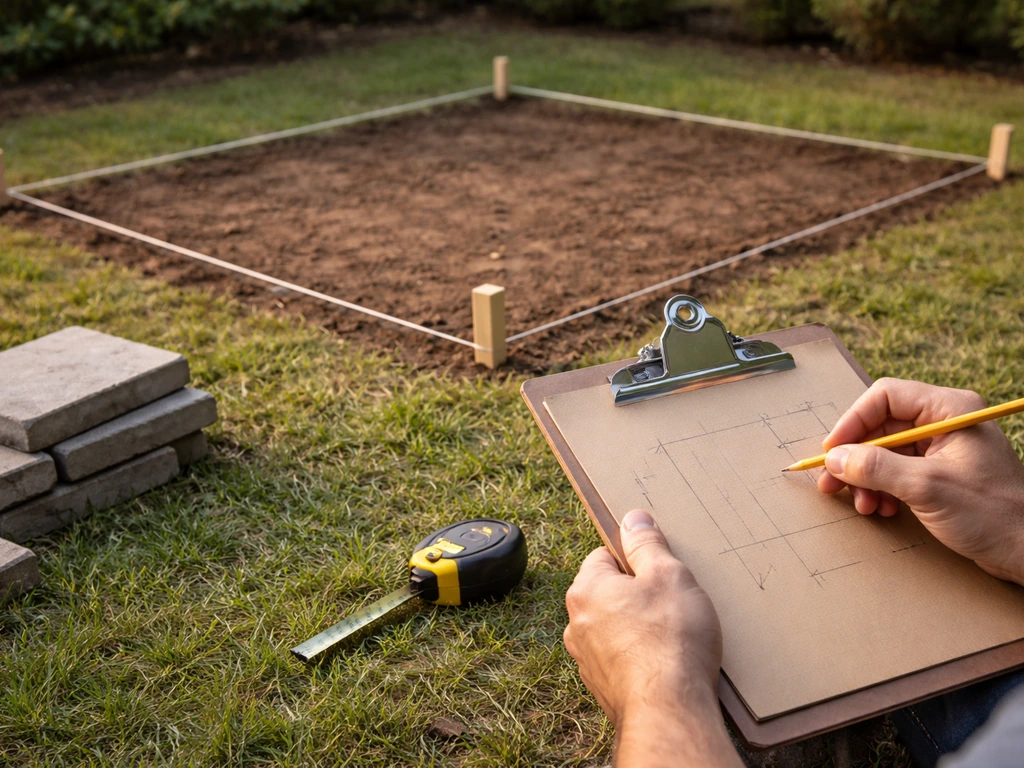
Before you order a single block, spend some real time planning the layout on paper. Measure the area you want to pave and break it into simple rectangles if the shape is irregular, calculating each section separately and adding them together. For standard 200×100mm concrete block pavers, you'll need roughly 50 blocks per square metre. Add a 10% wastage allowance on top for cuts, breakages, and border pieces, more like 15% if your space has lots of curves or angles. It's much cheaper to over-order than to run short mid-job.
Think carefully about where the edges of your patio will fall. Ideally you want to avoid lots of tiny cut pieces at the borders, so it's worth doing a dry run with a tape measure to see how your block size fits the space. If you can shift the patio by 50mm in any direction and save yourself a row of fiddly cuts, do it. Also confirm where your drainage point will be, because everything about your levels and layout flows from that.
A quick note on the difference between a small, simple patio and a more complex project: if you're tackling a straightforward rectangular space, the process is very manageable as a DIY job. Curved designs, slopes in multiple directions, or areas immediately adjacent to house foundations add complexity. For anything near the house DPC (damp-proof course), the patio must finish at least 150mm below it, that's non-negotiable.
Choosing materials and tools for block paving
For an unbound block paving patio (the standard DIY method), you need the following materials. Type 1 MOT sub-base aggregate is the go-to for the structural layer, it's crushed, angular stone that compacts firmly and doesn't shift. Sharp sand (also called grit sand or concreting sand) is used for the 30mm bedding layer. Don't use builders' sand or soft sand here, it's too fine and won't compact properly. Kiln-dried sand goes in last for the joints. For edging, you'll need concrete haunching mix or pre-mixed mortar to bed and back the edge restraints.
- Block pavers (200×100mm is the standard size — roughly 50 per m², plus 10–15% wastage)
- Type 1 MOT sub-base aggregate (calculate volume as: area × 0.2m, then add 25% for compaction — 125mm uncompacted Type 1 compacts to roughly 100mm)
- Sharp sand for bedding layer (area × 0.035m to allow for ~30mm compacted depth plus a slight surcharge)
- Kiln-dried jointing sand (one or two bags per m² depending on joint width)
- Concrete edge restraints or kerb blocks
- Geotextile membrane (for clay or weak/unstable ground)
For tools, you need a plate compactor (hire one, don't try to get away without it), a builder's line and pins, a long spirit level, a straight edge or screed rails, a bolster chisel and club hammer for cuts (or better, hire a disc cutter), a rubber mallet, a shovel and wheelbarrow, and a tape measure. You'll also want a length of timber or straight-edged aluminium profile to screed your sand bed flat.
| Material | Purpose | Specification |
|---|---|---|
| Type 1 MOT aggregate | Sub-base structural layer | 150mm compacted depth |
| Sharp sand | Bedding/laying course | 30mm compacted depth |
| Kiln-dried sand | Joint filling | Brushed in after compaction |
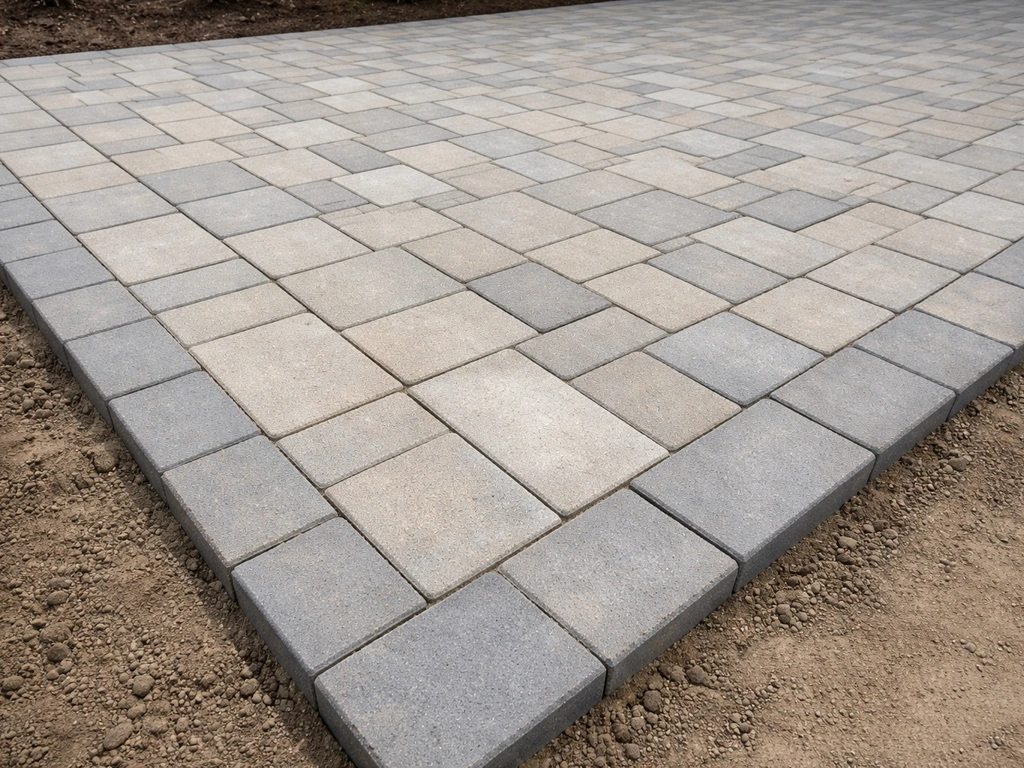
| Concrete block pavers | Surface layer | 200×100×65mm typical |
| Edge restraints | Border containment | Bedded and haunched in concrete |
| Geotextile membrane | Prevents sub-base/subgrade mixing | On clay or soft ground |
Site preparation: digging out, sub-base, and drainage
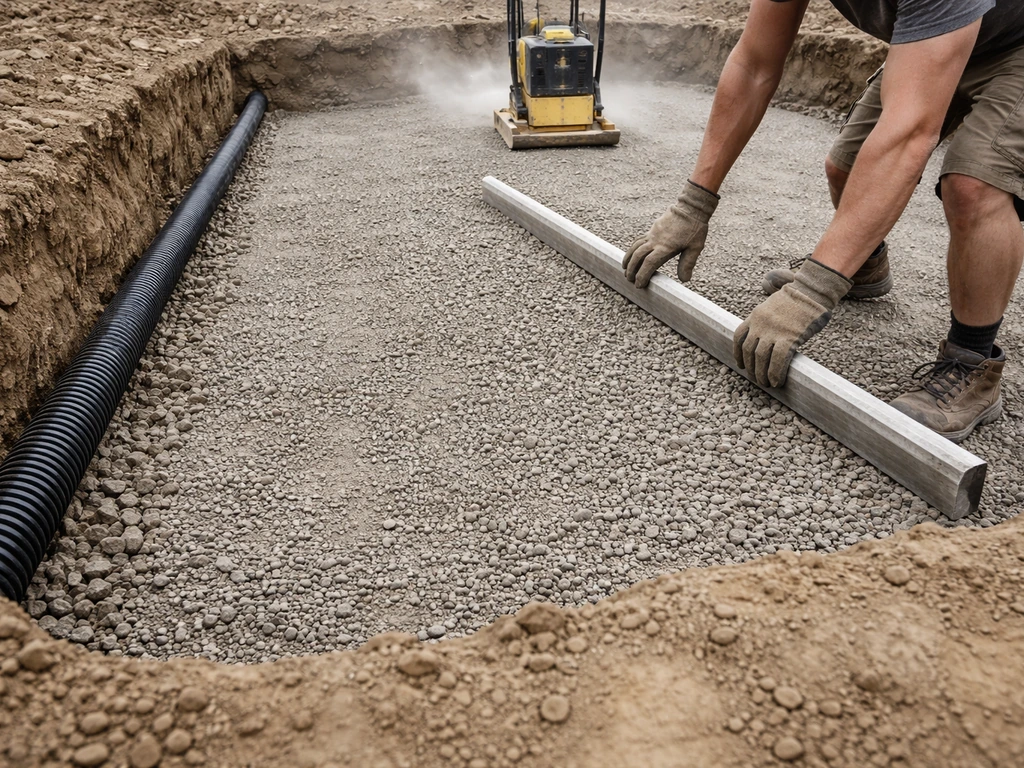
This is the step most people underestimate, and it's where most DIY patios fail down the line. Get this right and everything else is straightforward. Your excavation depth from finished paving level needs to be 230–240mm to accommodate: 150mm compacted sub-base, 30mm compacted sand bedding, plus the block thickness (typically 65mm for standard blocks). Mark this depth on a peg and use it as your consistent reference across the whole area.
If you're digging into clay soil, take extra care. Clay doesn't drain well and can heave when it freezes or dries. Lay a geotextile membrane directly on the excavated subgrade before you tip your sub-base aggregate, this stops the Type 1 from gradually mixing into the clay below and losing depth over time. On sandy or well-draining ground, a membrane is still a good idea but less critical.
Once excavated, you need to create your drainage fall in the subgrade itself, don't leave it all to the surface. A minimum fall of 1 in 40 (25mm per metre) is the standard benchmark for residential paving, directing water away from the house toward a drain, gully, or grassed area. A fall of 1 in 60 (about 17mm per metre) is sometimes used but 1 in 40 gives you more comfortable drainage. Set up your fall in the sub-base and it will carry through to your finished surface level. Use string lines on pegs with a spirit level to set the fall accurately before you start spreading aggregate.
Tip the Type 1 sub-base in layers no deeper than 100mm at a time and compact each layer with the plate compactor before adding the next. Remember: 125mm of uncompacted Type 1 compacts down to roughly 100mm. So if you need a 150mm compacted depth, you're tipping and compacting in two passes. Don't skip compaction between layers, loose aggregate underneath your blocks is a recipe for sinking. Run the plate compactor in overlapping passes across the whole area, and check your falls again once compacted.
Edging, levels, and setting out courses
Always install your edge restraints before you lay a single block. Edge restraints stop the whole paved area from spreading outward under load over time, without them, joints open up and blocks drift. Bed your edging blocks or kerb units on a concrete mix, check they're to your desired finished level, then haunch them with more concrete on the back face. Let this cure for at least 24 hours before you start laying the main field of blocks.
With edges in place, set up your string lines across the area to mark both your level and your laying pattern. For a standard stretcher bond or herringbone pattern, you'll want a string line at the start of each row as a guide. Use the edge restraints as your primary level reference, transferring those levels across the area with a long spirit level or laser level. Remember your fall is built into the sub-base and edging, your string lines should reflect that slope, not be perfectly horizontal.
Before screeding your sand, double-check levels one more time. Once you start screeding, disturbing the sand knocks everything out of true. Set screed rails (lengths of steel pipe or timber batten) at the correct depth to guide your straight-edge. Spread the sharp sand generously to about 35–40mm, then draw a long straight-edge across the screed rails to flatten it to a consistent depth. The screeded sand should be slightly higher than the final target level, because it'll compact down when blocks are bedded in. A 30mm compacted depth typically means screening at around 35mm. Don't walk on the screeded sand once it's done.
Laying block paving: pattern, cutting, and proper bedding
Start laying from a straight, defined edge, usually your longest edge restraint or the edge nearest the house. Herringbone at 45 or 90 degrees is the most popular pattern for block paving because it interlock the blocks in multiple directions, giving the surface strength. Stretcher bond (running bond) is easier to set out but offers less interlock. Whatever pattern you choose, keep it consistent from the start because errors compound quickly.
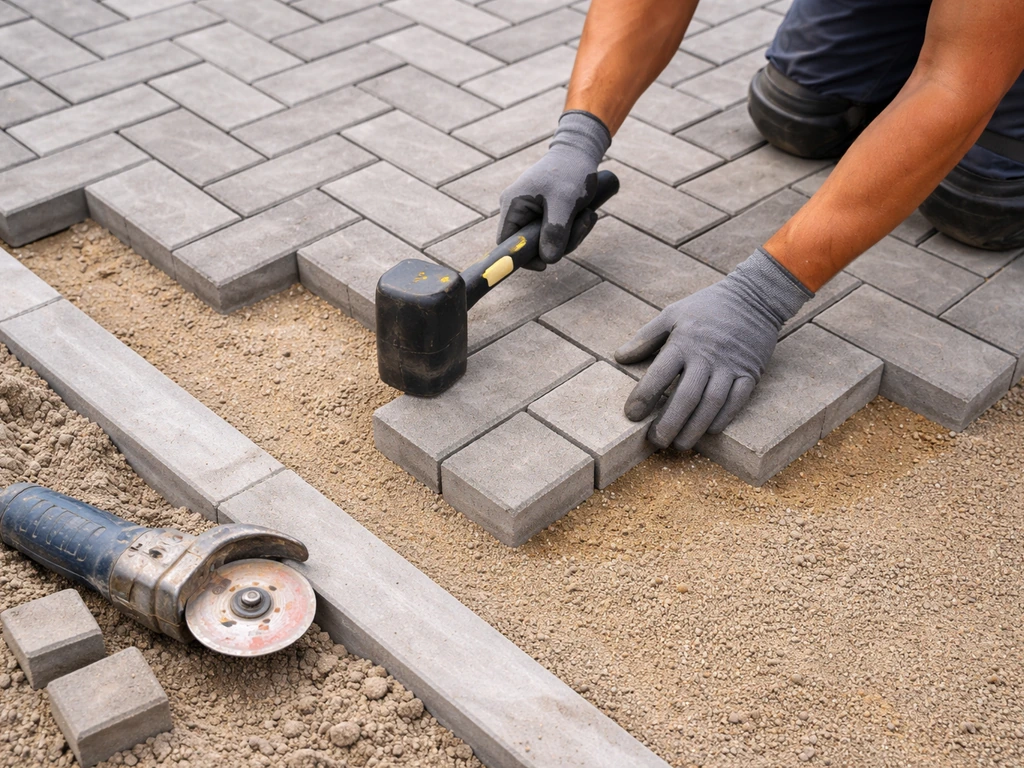
Place each block firmly onto the screeded sand by hand and tap it down with a rubber mallet until it sits at the right level. Don't drag blocks across the sand, place them down squarely and directly. Lay blocks hand-tight, aiming for a joint width of 2–5mm between each unit. That narrow gap is intentional: when filled with kiln-dried sand, it locks the whole surface together. Avoid butt jointing (blocks touching) because it makes straight lines harder to maintain and can cause edge spalling when blocks expand and contract.
Cut blocks will be needed at borders and around any features like drains or inspection covers. The rule here is: never use a cut piece smaller than one-third of a full block. Anything smaller will rock, work loose, and look poor. Plan your layout from the start to minimise small cuts, sometimes shifting your start point by half a block width saves you a row of awkward slivers. Use a disc cutter with a diamond blade for clean cuts, or a bolster and club hammer for less precise cuts in less visible areas. Wear eye protection and a dust mask when cutting.
As you work across the area, regularly check your levels with a straight-edge and spirit level across multiple blocks. If a block sits too high, lift it, remove a little sand, and relay it. If it sits low, add a pinch of sand beneath it. Catching these small variations as you go is far easier than trying to correct them after the whole area is laid.
Compaction, jointing, and finishing details
Once all the blocks are laid (including all cuts), it's time to compact. This step is what locks the whole surface into one rigid, interlocked pavement. Run a plate compactor over the entire area in overlapping diagonal passes, go across the blocks in at least two directions. The compactor drives each block down into the sand bed until it reaches refusal, meaning it won't go any further. This consolidation is what gives block paving its characteristic solid feel and long-term strength. Use a rubber or plastic pad (a compaction mat) between the plate and the blocks to prevent surface scuffing or cracking.
After the first compaction pass, check your finished levels across the whole area with a long straight-edge. Any blocks that are slightly proud can be tapped down gently with a rubber mallet. Blocks that have sunk below level are more of a problem, you'd need to lift them, add a little more sand, and relay. This is why the screeded surcharge method matters: laying blocks slightly high and compacting them to finished level is far more controllable than laying them at exactly the right height and hoping they don't drop further.
Now apply the kiln-dried jointing sand. Tip a small amount onto the surface and sweep it diagonally across the blocks, working it into all the joints. Keep sweeping until every joint is full right to the top. Sweep away all excess sand from the block surfaces, then run the plate compactor over the area again with the compaction mat in place, this vibration settles the sand down into the joints firmly. You'll likely see the joints drop slightly after this pass. Sweep in a second application of kiln-dried sand, compact again, and sweep clean.
Don't be surprised if the joints settle a little more over the first few weeks, especially after rain. Top them up with kiln-dried sand as needed, this is normal and not a sign anything has gone wrong. Once joints stay full and stable, the paving is locked up and ready for use.
Common mistakes and how to avoid them
- Not digging deep enough: skimping on excavation depth is the single biggest cause of block paving failure. If the sub-base is too thin, blocks will sink under load.
- Using the wrong sand for bedding: soft/builder's sand compacts poorly and can wash out. Always use sharp sand for the laying course.
- Skipping edge restraints: without haunched edging, the whole surface gradually spreads and joints open up.
- Setting out without a fall: flat paving puddles water and deteriorates faster. Always build in a fall of at least 1 in 40 (25mm per metre).
- Not compacting the sub-base in layers: tipping all your Type 1 at once and running a compactor over 250mm of loose aggregate doesn't work. Compact in 100mm layers.
- Laying blocks butt-tight: joints that are too narrow can't be filled with jointing sand, which means the surface never fully locks up.
- Using cut pieces smaller than one-third of a block: small cuts work loose and look untidy. Adjust your layout to avoid them.
- Forgetting to top up jointing sand: joints that aren't kept full allow the surface to rock and water to undercut the sand bed.
What to do if things aren't level after laying
If you notice a low or high spot after compaction, don't try to fix it by adding sand on top of the blocks or shimming under corners. Lift the affected blocks out cleanly, adjust the sand bed beneath them (add or remove sand as needed), and relay and compact again. It feels tedious but it's the only proper fix. A patio that's slightly off-level in a visible area will bother you every time you look at it, so take the time to get it right.
If you're finding that a whole section is consistently too high or too low compared to your string lines, the problem is usually in the sub-base level rather than the bedding sand. This is why checking sub-base levels thoroughly before you screed the sand layer matters so much. Getting into the habit of checking levels at every stage saves a lot of remedial work later.
Putting it all together
Block paving is one of the most satisfying DIY projects you can take on because the results are immediate and dramatic. The job is very doable for a first-timer on a small-to-medium patio, and the process is the same whether you're covering 10m² or 50m². If you want a complete DIY walkthrough, follow the step-by-step approach in this diy how to lay a patio guide from planning to jointing.
The key is to resist any temptation to rush the groundwork, everything that happens above ground is only as good as what's underneath it. Get the excavation depth right, compact the sub-base properly, screed your sand to the correct fall, and the laying and jointing will go smoothly. If you also need a UK-focused overview of materials, levels, and steps, use this guide on how to lay a patio uk as your main reference.
If you want the quickest, simplest approach, follow a straightforward step-by-step method on how to lay a patio easy and adapt it to your space.
If you're working on a very small space or a first-timer project, the principles here are exactly the same, the scope is just smaller, which makes the whole thing more manageable. For a full walkthrough of a compact project, it's worth reading up on small patio layouts to see how the same method scales down. A small patio still needs the same solid excavation, compacted sub-base, proper fall, and correct bedding and jointing to last small patio layouts.
Equally, if you want to see the process in action before you start digging, video guides showing the full sequence of steps can be a great complement to a written guide like this one. For example, you can use a YouTube patio-laying walkthrough to see each step, from excavation through jointing video guides.
One honest note on when to call in a professional: if your ground conditions are very poor (deep, soft clay, filled ground, or any suspicion of underground structures), or if the patio abuts the house on more than one side, it's worth getting a professional assessment before you start. The laying process itself is well within DIY reach, but ground conditions that need engineering solutions are a different matter. For a standard back garden patio on reasonably firm ground, you've got everything you need right here to do it yourself and do it well.
FAQ
Can I lay patio paving on uneven ground, or does everything have to be level underneath?
Yes, but only if you can control the fall and the edge restraint properly. A patio that slopes toward the house will create water pooling, which accelerates weed growth and joint failure. When adjusting levels for uneven ground, set the drainage fall in the subgrade first, then rebuild the sub-base to match that fall all the way to the edges, and keep edging at the correct finished level so water can only drain away, not under the blocks.
Can I use kiln-dried sand for both the bedding layer and the joints?
In most DIY patios, it is better to bed blocks onto sharp sand with kiln-dried jointing sand later, not the other way around. Jointing sand goes only between blocks and is compacted to lock the surface, whereas the bedding layer sets the pavement level. If you put joint sand under blocks, it usually will not support the blocks after compaction, so you end up with rocking or unevenness.
What happens if I accidentally use the wrong sand for the bedding layer?
For block paving, avoid softer or too-fine sand for the bedding layer, because it compacts inconsistently and can let blocks sink over time. If you are unsure what sand you have, do a quick field check: bedding sand should feel gritty and angular, not powdery or smooth, and it should compact when you tamp it. If it does not compact into a firm layer, switch material before laying.
Do I really need to avoid walking on the screeded sand, or is it okay if I'm careful?
Not walking on screeded sand is important because it can leave ruts, which then transfer into the block levels. A practical workaround is to lay blocks from an access path, and when you need to cross the area, use temporary boards laid flat over the screeded bed so your weight does not disturb the depth or the fall.
Is a membrane required, and can I skip it if I have decent drainage?
It can be, but only if you can achieve the correct thickness and fall, and you still compact properly. Lay-and-compact in thin enough lifts so each layer reaches refusal, otherwise the surface can settle and open joints later. Also check that your chosen membrane does not create drainage problems or act like a floating layer, especially if your ground is poorly draining.
Can I lay block paving without edge restraints if I’m only doing a small patio?
Yes, but the edge restraints must still be installed, and you need a reliable compacted base. Removing edging restraint or using loose timber edging generally leads to outward movement, joint widening, and block drift. If you are unsure about restraint compatibility, choose a restraint system designed for block paving and bed and haunch it to the correct finished level.
How should I handle the border cuts to avoid tiny slivers at the edges?
Use the rule about minimum cut size when placing final border pieces, but also plan the layout so that you do not end up with a single narrow strip that has no interlock benefit. If you need to adjust, shifting the whole pattern by half a block width is usually better than creating multiple tiny slivers along both sides.
How do I make sure water drains correctly if the patio is near a drain or gully?
For drainage, it is usually not enough to rely on the surface slope alone, because water can still find shallow paths. Build the fall in the subgrade/sub-base as the instructions emphasize, then ensure the edging and any channels or gully match that same fall. If you are unsure, dry-fit your string lines to the intended outlet point before placing any sub-base.
Do I need to re-sand the joints, and how long should I monitor them?
You should not pour jointing sand once and assume it will stay full forever. After the first compaction pass, sweep again to top up, compact again, then re-check after the first few weeks, especially after heavy rain. If joints keep dropping repeatedly, it often means you did not fill fully to the top or compaction was not enough.
What’s the right way to fix a low or high spot after compaction?
If you consistently see a high or low area after compaction, do not try to correct it by adding sand on top of already-laid blocks. The correct fix is to lift the affected blocks, adjust the sand bed beneath them (or underlying sand depth), then relay and compact again. Persistent level issues usually come from the sub-base or bedding depth, not the top layer.
Do I really need to hire a plate compactor, and what breaks if I try to do it without one?
Plan for the right equipment before you start. If you do not have a plate compactor, block paving is more likely to settle because bedding sand and sub-base will not reach the density needed for refusal. Similarly, if you use hand tools only for excavation without creating consistent depth and compaction-friendly layers, you increase the chance of rocking blocks later.
What’s the biggest mistake to avoid when setting out the first row of blocks?
Start from a straight, defined reference edge and keep checking as you go, because small layout errors compound quickly with interlocking patterns. If your first row is slightly off, every subsequent row can drift and increase the chance of uneven cutting at the far edge. Use string lines at the start of each row and verify against the original reference often.