Laying a patio yourself is completely achievable as a DIY project, and the process comes down to six core stages: plan and measure your space, choose your materials and base system, excavate and level the ground, build a properly compacted sub-base, lay your pavers or bricks to a consistent fall and pattern, then finish with edging, jointing, drainage, and sealing. Get the groundwork right and your patio will stay solid, level, and free of weeds for years.
DIY How to Lay a Patio: Step by Step Guide

Clara Farrell
28 Apr 2026
Rush the base or skip the fall (the slight slope that sheds water), and you'll be lifting slabs within a couple of seasons. This guide walks you through every stage in order, with the common mistakes flagged along the way. This includes figuring out how to plan the layout, choose the right base system, and lay the pavers or blocks in a consistent pattern for a neat small patio how to lay a small patio.
If you want a full UK-focused walkthrough, work through the steps in our guide on how to lay patio paving guide walks you through every stage in order. If you're looking for how to lay patio paving step by step, use these stages as your checklist from start to finish.
Planning and measuring your patio space
Before you touch a spade, spend time getting the layout right on paper and on the ground. A poorly planned patio is one of the biggest sources of regret I hear from homeowners, so this stage is worth doing properly.
Decide on size and position
Think about how the space will actually be used. A table for four needs at least 3m x 3m to feel comfortable. If you're positioning the patio next to the house, you need to keep it at least 150mm below the damp-proof course (DPC) so water can't bridge into the wall. Check where your DPC sits before you commit to a finished surface level.
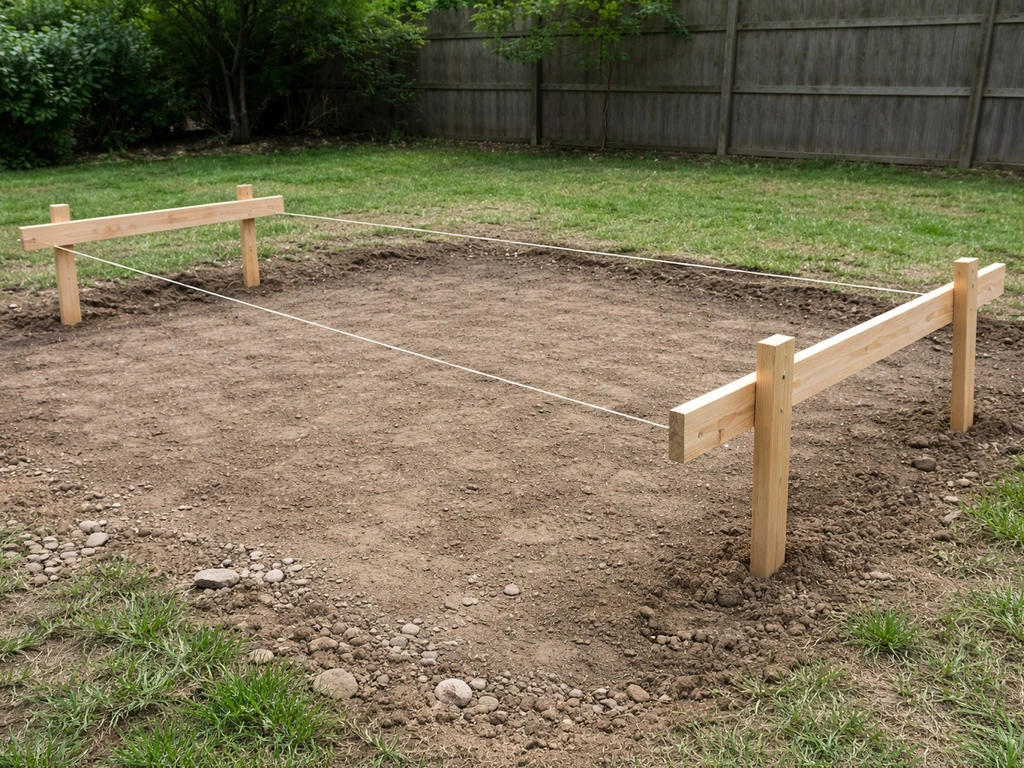
Set out the layout with batter boards and string lines
The most reliable way to mark out a patio is with batter boards and taut string lines. Drive timber batter boards into the ground about 600mm outside each corner of your planned patio, then run string lines between them to define the exact edges and corners of the paved area. This offset means you can still see the lines while you're digging, because the boards sit outside the excavation zone. Use a builder's square or the 3-4-5 triangle method to check your corners are truly 90 degrees. Once the strings are set, drop a plumb line or spray the ground directly below to mark your digging boundary.
Work out how many materials you need
Measure the length and width of your area, multiply them together for your square meterage, and then add a wastage allowance before ordering. For a straightforward rectangular patio with a simple running bond or grid pattern, add around 5% for cuts and breakages. If you're planning a more complex pattern, a border detail, or working around curves and obstacles, push that up to 10%. Calculate your border separately from the field (the main area), then add wastage on top of both figures. Under-ordering and having to match materials from a new batch is a real headache, so it's always worth having a few spare slabs or bricks left over.
Plan the drainage fall from the start
Every patio needs to slope slightly away from the house so rainwater runs off rather than sitting or tracking into the building. The standard recommendation is a fall of 1:60, which works out at roughly 17mm of drop for every metre of patio width. So on a 3-metre-wide patio, the far edge should be about 50mm lower than the edge against the house. This sounds small, but it's critical. Build the fall into your string lines now so it's baked into every layer of the build-up from the ground up.
Choosing the right patio materials and base system
The material you choose dictates the base system you need, so make this decision before you start excavating. The two most common approaches for DIY patios are an unbound (flexible) system using concrete block paving on a sand laying course, and a bound (rigid) system using natural stone or porcelain slabs on a mortar bed. The build-up for an unbound block paving patio versus mortar-bedded slabs or porcelain is a key part of how to lay patio paving, so it is worth choosing your base system up front bound (rigid) system using natural stone or porcelain slabs on a mortar bed. Both can give excellent results, but they behave differently and require slightly different build-ups.
| Material type | Typical base system | Laying course | Skill level | Best for |
|---|---|---|---|---|
| Concrete block paving / clay bricks | Compacted Type 1 sub-base + sharp sand | ~30mm compacted sharp sand | Beginner-friendly | Driveways, patios, good value |
| Natural stone flags (sandstone, limestone) | Compacted Type 1 sub-base + mortar bed | 40-50mm semi-dry mortar | Moderate | Traditional garden patios |
| Porcelain paving slabs | Compacted Type 1 sub-base + cementitious mortar | ~40mm full-bed mortar | Moderate to advanced | Modern, low-maintenance patios |
| Reclaimed brick / clay paviors | Compacted Type 1 sub-base + sharp sand or mortar | 30mm sand or 40mm mortar | Moderate | Period gardens, character patios |
For a first patio, concrete block paving on a sharp sand laying course is the most forgiving option. Blocks are easy to cut, the unbound system lets you lift and relay individual units if something goes wrong, and you don't need to mix mortar. Porcelain is beautiful but unforgiving: it needs a full-contact mortar bed, the slabs can't flex at all, and any voids beneath them will cause cracking. If you're going for porcelain, take your time with the bedding course and don't rush it.
Site preparation and ground leveling
This is where most DIY patios fail. People underestimate how much excavation is needed, rush the prep, and then wonder why slabs are rocking six months later. Take your time here.
Calculate your excavation depth
Add up all your layers from the finished surface down to the bottom of the excavation. For a typical block paving patio, that's: paving unit thickness (typically 60-80mm for blocks) + laying course (30mm compacted sand) + sub-base (100-150mm compacted Type 1 hardcore). That gives you a minimum dig depth of around 190-260mm from finished level. For mortar-bedded slabs or porcelain, swap the 30mm sand for a 40-50mm mortar bed. Always measure from your finished surface level, not from existing ground level, because the ground may already be higher or lower than where you want to end up.
Strip the topsoil and vegetation
Remove all topsoil, grass, plant roots, and organic material from the patio footprint. Topsoil compresses and rots over time, which causes settlement. Don't be tempted to leave even a thin layer of topsoil under the sub-base. Dig it all out, then check whether the subgrade (the natural ground beneath the topsoil) is firm. Press your heel into it: if it sinks easily or feels spongy, the ground needs attention before you go further.
Dealing with clay soil and soft ground
Clay soil is one of the most common challenges for patio builders. It holds water, shrinks and swells with temperature changes, and can cause the sub-base to move. If you're working on clay, lay a geotextile membrane directly over the prepared subgrade before adding your Type 1 sub-base. The membrane acts as a separator, preventing clay fines from pumping up into the aggregate layer and contaminating it over time. Fold the membrane up the sides of the excavation slightly and lap it generously at any joins. On very soft or waterlogged ground, you may need to dig deeper and use a thicker sub-base, or consider consulting a professional before proceeding.
Sloped ground
A gently sloping garden can actually help with drainage, but you need to account for the slope in your excavation so the finished patio is level (or has a controlled fall). On steeper ground, you may need to cut and fill: dig into the high side and build up the low side with compacted hardcore. Avoid building up the fill side without compacting it in layers, as loose fill will settle. On very steep plots, retaining walls or steps may be needed, which takes this project into more complex territory.
Building the patio base (subbase, weed control, compaction)
A solid sub-base is the single most important thing you can do for a long-lasting patio. Think of it as the foundation: get it right and the paving on top will perform well for decades.
Lay the geotextile membrane (where needed)
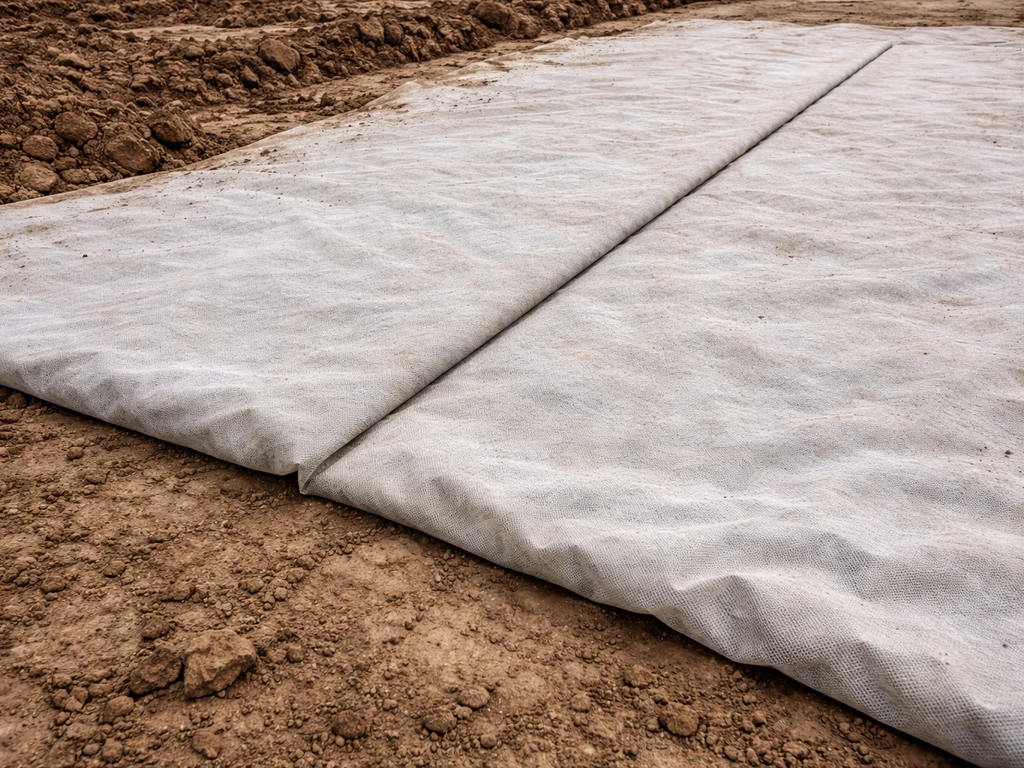
On clay, silty, or soft ground, lay your geotextile membrane over the prepared subgrade now, before any hardcore goes in. Overlap joins by at least 300mm and tuck the edges up the sides of the excavation. On firm, free-draining ground (sandy or gravelly soil), you may not need one, but it never hurts. One thing to note: the membrane goes under the sub-base, not directly under the bedding or paving. Placing it between the sand laying course and the slabs can actually cause problems by allowing movement between layers.
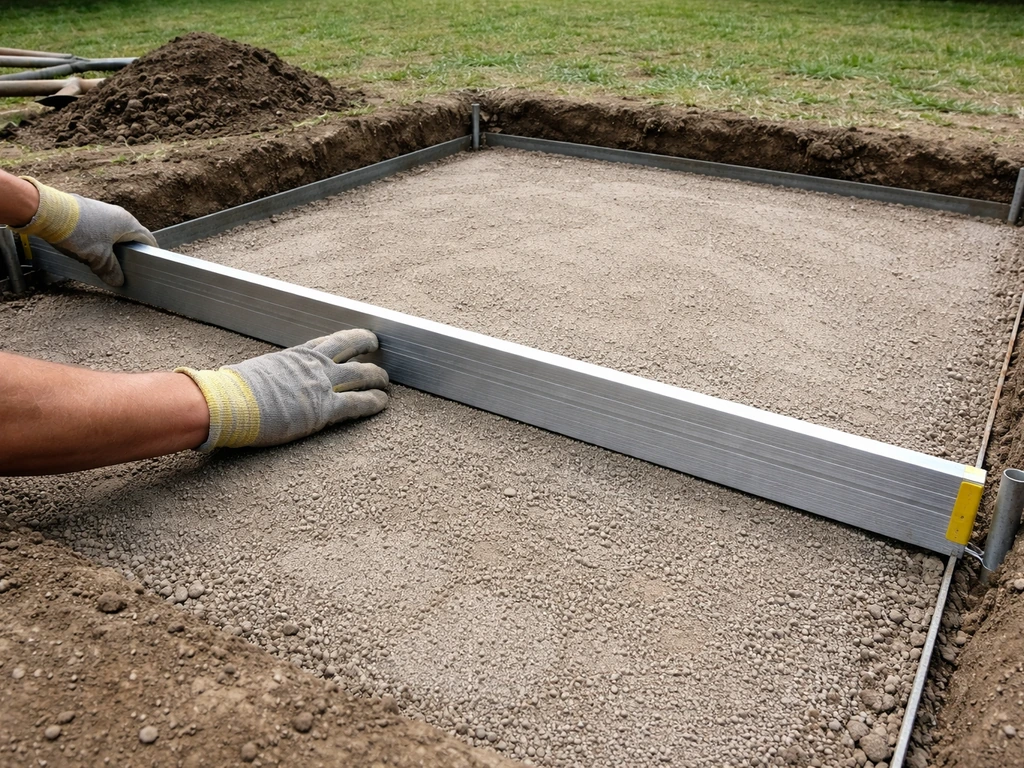
Add and compact Type 1 hardcore in layers
Spread your MOT Type 1 crushed hardcore into the excavation, but don't tip it all in at once. Add it in layers of no more than 75-100mm loose depth, then compact each layer with a plate compactor (wacker plate) before adding the next. Trying to compact a 200mm layer in one pass is one of the most common mistakes on DIY builds: the surface looks firm but the material underneath stays loose and will settle later. For a typical residential patio, aim for a final compacted sub-base depth of at least 100mm on good ground, or 150mm on softer ground. After compacting, use a long straight-edge or level to check the surface is graded to your planned fall.
Add the laying course
For unbound block paving, spread sharp sand over the compacted sub-base to a depth of around 30-35mm (this will compact down to approximately 30mm once the blocks are in and vibrated). Screed it to a smooth, even surface using timber screeding rails and a straight-edge board, working backwards so you don't walk on the screeded sand. For mortar-bedded slabs or porcelain, mix a semi-dry mortar (one part cement to five or six parts sharp sand, just damp enough to hold its shape when squeezed) and apply it as a full-bed laying course at around 40-50mm thick, working in manageable sections. Porcelain requires a fully supported bed with no voids underneath, so this step takes patience.
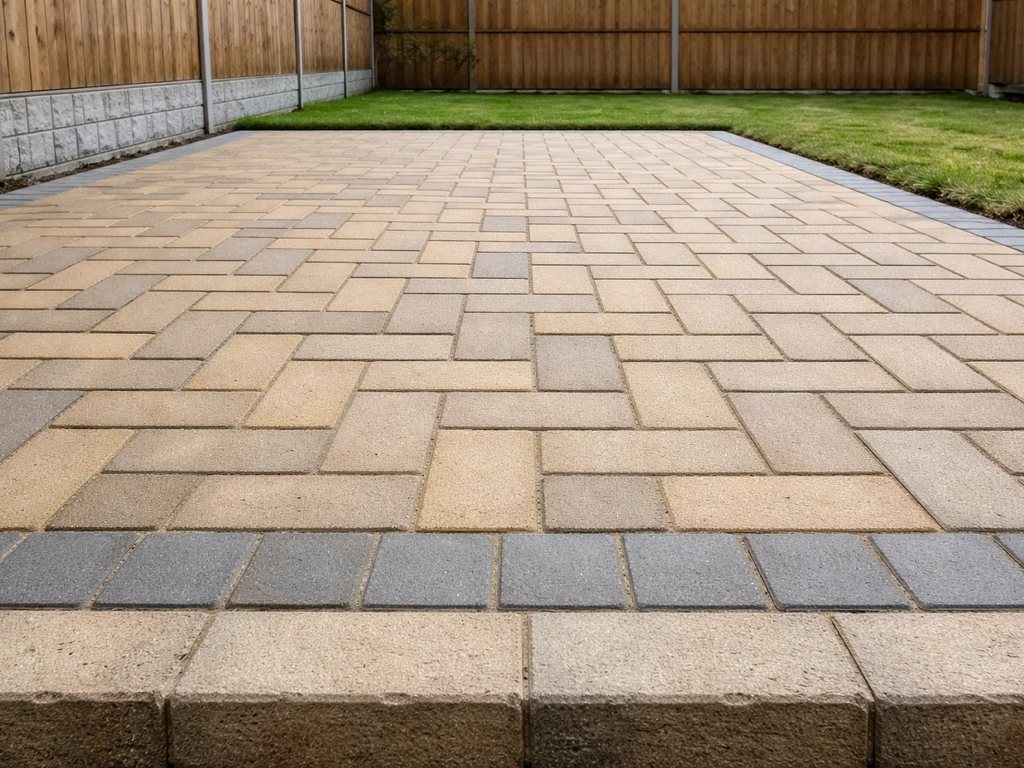
Laying patio pavers and bricks (patterns, alignment, and cuts)
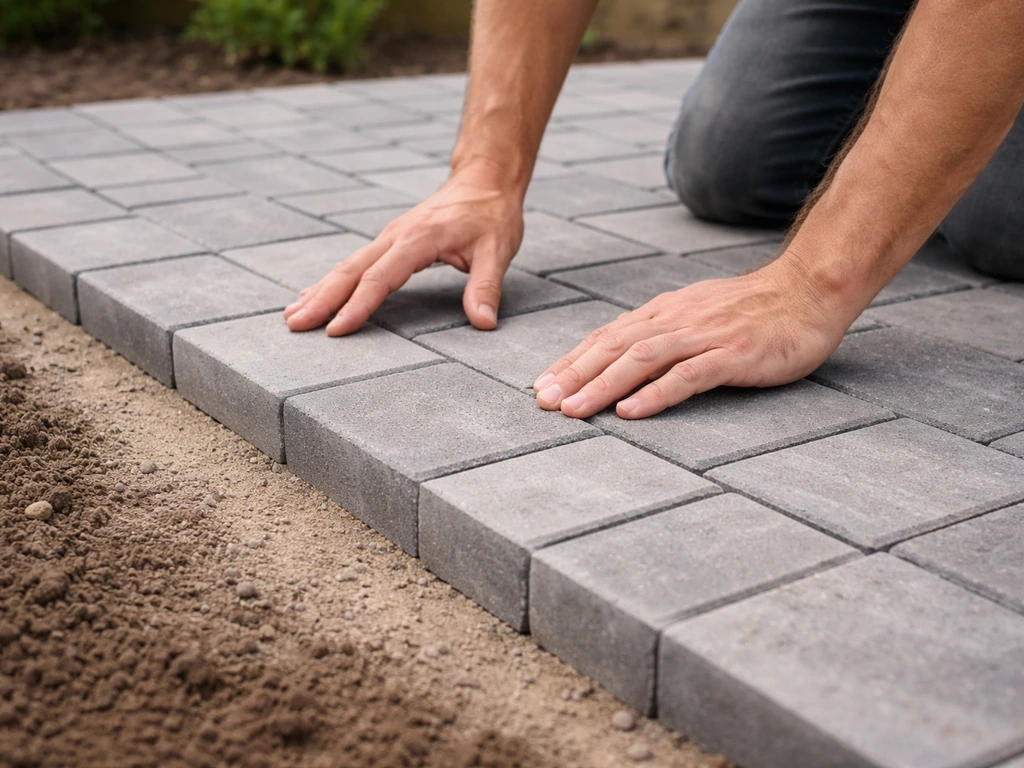
With the base prepared, the actual laying is the most satisfying part of the project. Take your time, keep checking your levels and alignment, and don't let one slightly-off unit throw out everything that follows.
Start from the right place
For most patios adjoining a house, start laying from the house wall or from a fixed edge (like a step or door threshold) and work outwards. This way your most visible edge is full units with cuts hidden at the far boundary. Snap chalk lines or use your string lines to keep rows straight as you go. For a freestanding patio with no fixed reference, start from a centre line and work outwards symmetrically so any cuts at the edges are equal on both sides.
Keep your joints consistent and your lines straight
For block paving, keep joints to 2-5mm. Don't butt blocks directly together with zero gap: not only does this make it nearly impossible to brush in jointing sand later, but the blocks can chip and spall at the edges under load. Use plastic spacers or a consistent gap gauge as you work. For slabs, joints are typically 10-15mm. Use tile spacers or a piece of timber cut to the right width to keep spacing consistent across the whole area. Keep re-stringing lines every few rows to check alignment hasn't drifted.
Check levels constantly
Every few units, lay a long spirit level or straight-edge across the surface to check the units are flush with each other and maintaining your planned fall. Individual units should be bedded firmly with no rocking: press down on each corner and if it rocks, lift the unit, adjust the bedding, and re-lay it. A rubber mallet is essential here: tap each unit down gently and evenly. Never stand or kneel on freshly laid sand-bedded blocks without a board to spread your weight.
Paving patterns to consider
- Running bond (stretcher bond): offset rows like brickwork, the easiest pattern for beginners and good structural interlock for block paving
- Herringbone (45 or 90 degrees): excellent interlock and load distribution, great for driveways and heavily used patios, but requires more cuts at the edges
- Grid/stack bond: slabs laid in a simple grid, clean and modern but needs very precise spacings to look right
- Basketweave: pairs of blocks alternated horizontally and vertically, decorative but best suited to low-traffic areas
- Random/natural: mixed slab sizes laid in a staggered pattern, works well with natural stone but requires more planning to avoid awkward joins
Cutting blocks and slabs
You'll inevitably need to cut units to fit edges, corners, and obstacles like drainage gullies or manhole covers. For concrete blocks, a block splitter (hired from most tool hire shops) is fast and accurate. For natural stone or porcelain, you'll need an angle grinder or wet-cut disc cutter with a diamond blade. Always wear eye protection, a dust mask, and gloves.
Mark cuts with a pencil or chalk line, score first with a shallow pass, then cut through fully. Porcelain is brittle and can shatter if you rush the cut or use too much pressure, so slow steady passes work best. Cut pieces that are less than half a unit in width are prone to rocking and cracking: if possible, adjust your layout slightly to avoid very thin slivers at the edges.
Finishing: edging, jointing, drainage, and sealing
Don't make the mistake of thinking the job is done once the last paver goes down. The finishing stage locks everything in place, keeps weeds out, and protects the surface for years to come.
Install edge restraints
Edge restraints stop the paving from spreading outward under load. For unbound block paving, these are non-negotiable: without them, blocks at the perimeter will gradually migrate outward and joints will open up. Concrete edge kerbs, timber sleepers, or purpose-made plastic paving edging are all options depending on your style. Bedded and haunched (backfilled with concrete on the outer face) concrete kerbs are the most durable. For mortar-bedded slab patios, the mortar bed and pointing effectively lock the edges, but an edging detail still gives a cleaner, more finished look. Install edge restraints before you lay the main field of paving so you have a firm boundary to work up to.
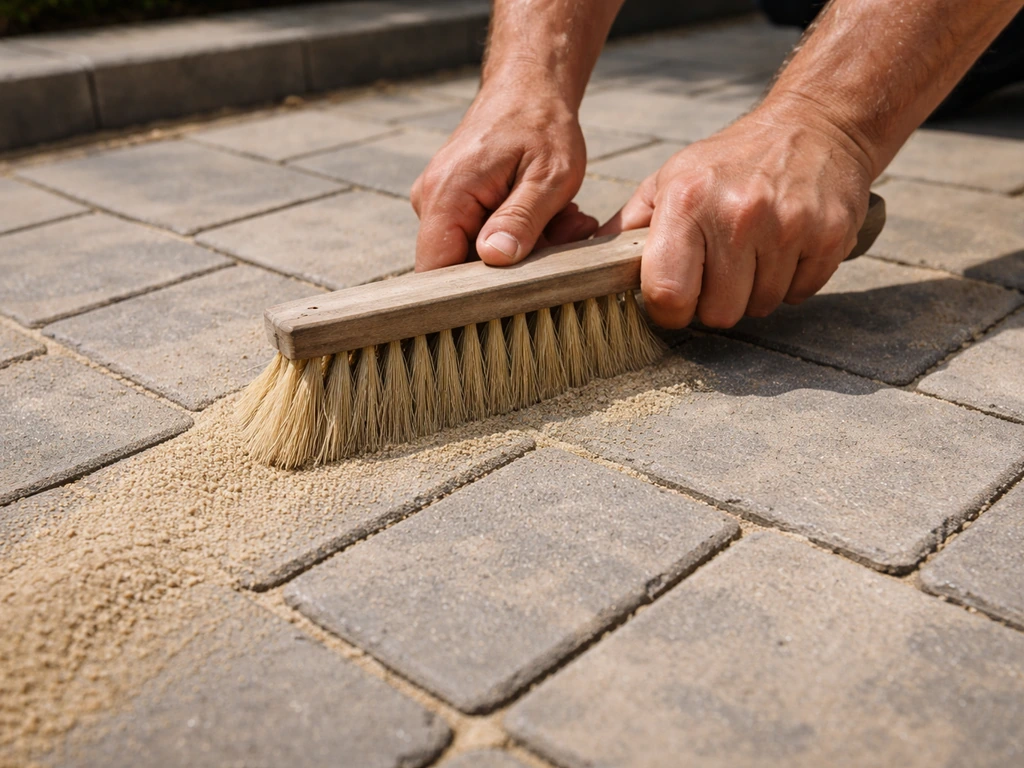
Fill the joints
For block paving, brush kiln-dried jointing sand across the surface and sweep it into the joints, working in multiple passes until joints are consistently filled to just below the chamfer. Then run the plate compactor over the whole paved area (put a rubber mat or old carpet under the plate to avoid scratching the surface) to consolidate everything. After compaction, add more jointing sand and brush in again, as it will drop slightly.
For slab patios, point the joints with a stiff brush mortar mix or a purpose-made paving grout, working it into the joints with a pointing tool and keeping mortar off the face of the slabs. Brush away any excess and let it cure. Polymeric jointing compounds (which set hard but stay slightly flexible) are a great option for reducing weed growth and ant activity in joints.
Double-check your drainage fall
Once the patio is complete, pour a bucket of water on it and watch where it goes. It should run smoothly away from the house at your planned 1:60 fall (about 17mm per metre). If you see it pooling anywhere, you have a low spot that needs addressing. Catching this early, before pointing has fully cured, means you can lift and re-bed the affected units relatively easily.
Left alone, a low spot will stain, support algae growth, and potentially push water toward the house foundations. If the patio is adjacent to your house and drains towards neighbouring land or a soakaway, check that you're not directing runoff onto someone else's property: you may need a channel drain or linear drain along the outer edge to capture surface water.
Sealing and ongoing maintenance
Sealing isn't strictly necessary for all paving types, but it makes a significant difference to the long-term appearance of natural stone and porcelain. For natural sandstone and limestone, an impregnating sealant applied after the patio has fully dried (allow at least 2-4 weeks after laying) helps resist oil and organic stains. For porcelain, the surface is already non-porous, but a sealant on the joints can help prevent weed growth and moss.
Concrete block paving generally doesn't need sealing unless you want to enhance the colour. Whatever material you've used, brush the patio regularly to remove leaves and debris (organic matter sitting on the surface accelerates algae and moss growth), and re-apply jointing sand to any joints that thin out over time. A patio that gets a little attention each year will stay looking sharp for a very long time.
Common mistakes to avoid
- Not digging deep enough: leaving topsoil or organic material under the sub-base is the number one cause of patio settlement
- Compacting sub-base in one thick lift: always compact in layers of 75-100mm maximum or the base won't be properly consolidated
- Ignoring the fall: no drainage slope means pooling water, algae, and potential damp issues against the house wall
- Zero joints on block paving: butt-jointing blocks causes edge spalling and prevents jointing sand from locking the surface
- Mortar contaminating the slab face: clean porcelain and natural stone immediately as mortar is almost impossible to remove once cured
- Skipping edge restraints: without them, the paved area will gradually spread and open up at the joints
- Laying on wet sub-base: a saturated sand laying course compresses unevenly; wait for dry conditions before laying
If your project is a smaller or more straightforward job, the same principles apply in a more compact form, and the planning stage becomes even more critical because there's less room to adjust as you go. For those tackling a very large or complex area, splitting the work into manageable sections over a weekend or two makes the project far less daunting and helps you maintain quality throughout.
With the groundwork done properly and a bit of patience on the laying stage, a DIY patio is absolutely within reach for most homeowners. If you’re looking for a simple approach, follow these steps on how to lay a patio easy and focus on getting the base, fall, and alignment right DIY patios are completely achievable.
If you’re more of a visual learner, you can also watch a youtube how to lay a patio walkthrough to see each stage in action before you start.
FAQ
How do I make sure my patio drainage is correct, not just that it has a slope?
Plan for your patio to drain away from the house, but also check the destination. If the runoff flows onto neighbouring land or towards foundations, you may need a captured channel, a linear drain at the outer edge, or a soakaway/connection arrangement (especially in wet UK summers).
Can I lay a patio on sloped ground without making it uneven?
Yes, but only if you keep the finished fall consistent and your base depth matches the finished level. You can still build up the low side, but compact any fill in thin layers and confirm your string lines reflect the final surface, otherwise you end up with a step-like patio.
What should I do if my subgrade feels soft when I test it?
Treat “soft” ground as a base failure risk. If the subgrade is spongy when pressed, do not proceed, because sand and hardcore can still settle later. Remove down to firm material, consider a geotextile separation, and if it is very soft or waterlogged, consider professional advice or a deeper build-up.
Do I need to use geotextile on every patio?
Avoid covering the geotextile with topsoil or letting organic matter remain, because it will decompose and create settlement. If you already disturbed the area, re-excavate to remove roots and topsoil again, then re-lay the membrane and hardcore in the correct order.
What’s the best way to fix a low spot or rocking paver if I find one before finishing?
If you notice low or rocking slabs after laying, lift the affected units as soon as possible, re-check the fall with a straight-edge, then re-bed and recompact the area. Waiting until jointing and curing is complete makes fixes messier and can leave permanent staining or weak points.
Can I lay a patio that abuts a door or step and still keep correct levels?
It is possible, but it requires a solid plan for levels and a perimeter detail. Using edging without proper restraint can lead to movement, but even with restraints you must ensure the DPC clearance and fall are maintained all the way around door thresholds or steps.
What’s the difference between jointing sand and grout, and how do I apply them correctly?
For unbound block paving, it helps to use kiln-dried jointing sand and to compact after the joints are filled, then re-fill because compaction causes sand to drop. For slab patios, keep mortar off slab faces and use a purpose-made grout where appropriate, otherwise joints can crumble and weeds return.
How can I reduce chipping or cracking when cutting porcelain or stone?
Wet cutting porcelain creates different risks than cutting blocks, you should plan dust control and do shallow scoring passes before deeper cuts. If a cut piece will be narrow, adjust the layout earlier to avoid very thin edge segments that are prone to shifting and cracking.
What are the most common “looks fine now” mistakes that cause patios to fail later?
Avoid using the wrong compaction approach, compact in layers (not one thick pass), and check levels after compaction, not before. Also do not skip the final re-check of the fall using a long straight-edge, because small errors become visible once units are laid.
Should I seal my patio, and when is the wrong time to seal it?
Usually, yes. Many people keep the patio looking clean by brushing off debris and re-sanding joints as they thin out. For sealing, use it selectively based on material, then do not seal until the patio is fully dry, otherwise trapped moisture can cause patchy marks.