Yes, a first-time DIYer can absolutely lay their own patio, and thousands do it every year. The project isn't easy, but it's well within reach if you're willing to do the prep work properly. The part most people underestimate isn't the laying itself; it's everything underneath. Get the ground preparation, sub-base, and drainage fall right, and the rest follows naturally. Rush or skip those steps, and you'll be lifting slabs within a few years.
How to Lay a Patio Yourself: Step-by-Step DIY Guide

Clara Farrell
28 Apr 2026
Is laying your own patio actually feasible?
For most garden patios, DIY is genuinely realistic. You don't need specialist skills, you need patience, a willingness to hire the right tools (mainly a vibrating plate compactor), and enough time to do each stage properly. A standard 20–30m² patio with concrete slabs or block paving is exactly the kind of project a capable first-timer can handle over a weekend or two.
That said, a few situations shift the risk calculation. If your ground has very heavy clay soil that drains poorly, if your garden slopes significantly toward the house, or if you need to work close to existing drainage runs or structural footings, you're in trickier territory. These aren't necessarily reasons to hire out, but they do mean you need to understand the process more deeply before you start, particularly the drainage and base sections below.
What you genuinely need to pull this off: basic physical fitness (there's a lot of digging and lifting), a full weekend free per stage, and the ability to follow measurements carefully. You do not need to have done anything like this before.
Tools and materials checklist before you start
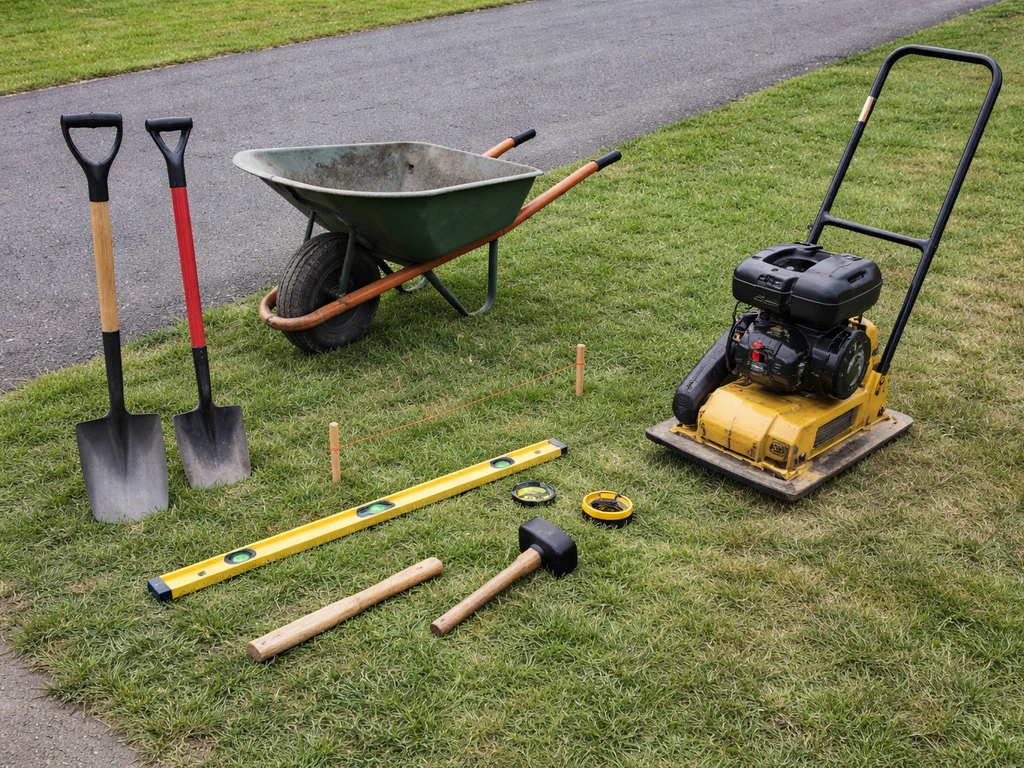
- Spade and mattock for digging
- Wheelbarrow (ideally two if you have help)
- Builder's line and pegs for setting out
- Spirit level (1.2m or longer is ideal)
- Rubber mallet
- Tape measure and chalk/spray line
- Vibrating plate compactor (hire one — don't skip this)
- Screeding rails or a length of box section steel
- Angle grinder with diamond blade for cutting slabs or blocks
- Pointing tool or brush depending on joint type
- MOT Type 1 sub-base material (hardcore)
- Sharp sand or grit sand for bedding
- Cement (for mortar bed if laying slabs)
- Kiln-dried jointing sand (for block paving)
- Paving slabs, blocks, or bricks
- Edging units and concrete for haunching
Planning: size, layout, materials, and quantities
Before you order a single thing, spend proper time on planning. Mark out the patio area with pegs and builder's line, then measure carefully. A simple rectangular patio is the easiest to start with, and if you're new to this, don't talk yourself into curves or complex patterns for your first go.
The most important planning decision, one most beginners miss, is accounting for the drainage fall. Your finished patio surface must slope slightly away from the house. A practical target is 1:60, which works out to roughly 17mm of fall for every metre of patio measured out from the wall. So a 3m-deep patio needs to finish 51mm lower at the outer edge than at the house wall. If you aim for 1:60 but get 1:80 in places, you'll likely be fine; go flatter than that and you risk puddles. Build this fall into every stage from excavation onwards, not as an afterthought at the end.
For materials, your main choice at this stage is between concrete paving slabs, natural stone slabs, and concrete block paving. Each is a viable DIY option, but the installation method differs slightly, particularly in how you prepare the bedding layer.
| Material | Typical Use | Bedding Method | Joint Type | DIY Difficulty |
|---|---|---|---|---|
| Concrete paving slabs | Most common patio choice | Mortar bed (5:1 sand:cement), 25–50mm | Mortar pointing or brush-in grout | Beginner-friendly |
| Natural stone slabs | Premium look, irregular thickness | Mortar bed, may need adjustment per slab | Mortar pointing or resin grout | Moderate — needs more patience |
| Concrete block paving | Durable, flexible, repairable | 30mm compacted sharp sand bed | Kiln-dried jointing sand, 2–5mm joints | Moderate — needs plate compactor |
Calculate your material quantities by working out the total area in square metres, then add 10% for cuts and waste. For sub-base, 1 cubic metre of Type 1 covers roughly 10m² at 100mm compacted depth, or about 6.5m² at 150mm depth. Order a bit extra, you can always use leftover hardcore elsewhere, but running short mid-project is a pain.
Site preparation: clearing, digging, and drainage
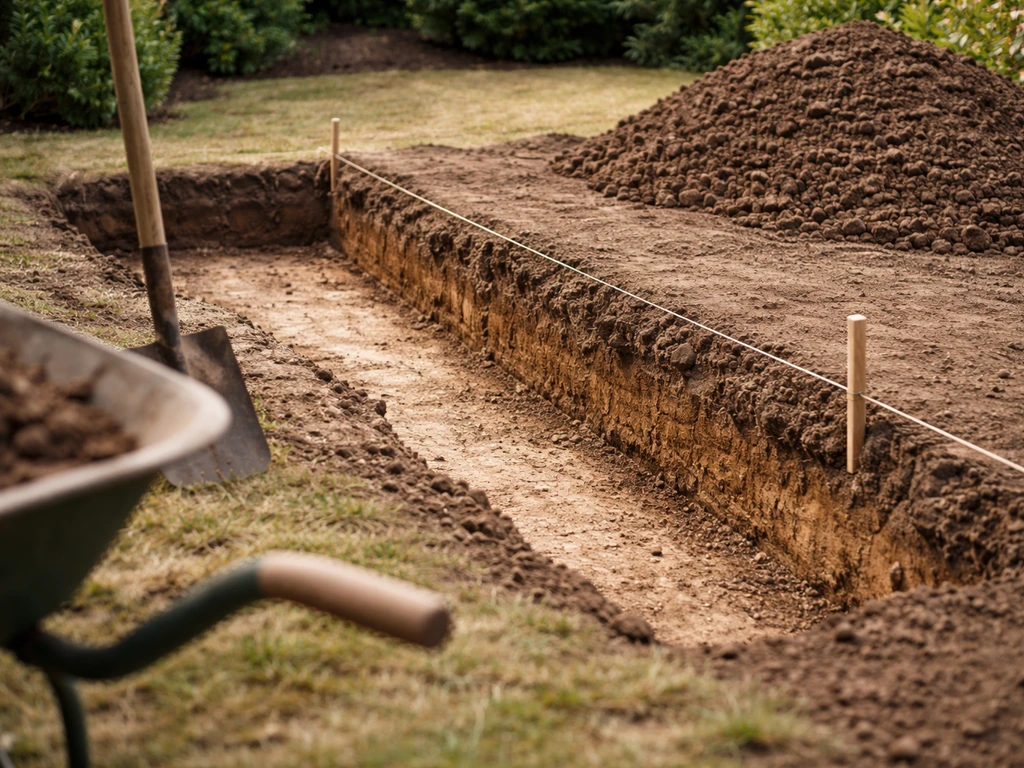
This is the stage that makes or breaks a patio. If you're wondering how to lay a patio easy, focus on the prep work first, then follow the right bedding and compaction steps. Most gardens have around 150mm of topsoil before you hit firm subsoil, and all of that topsoil needs to come out. Topsoil is organic, compressible, and unstable. Building on it is the single most common reason DIY patios sink, rock, or crack. Dig down until you're into firm, consistent subsoil, then add your sub-base on top of that.
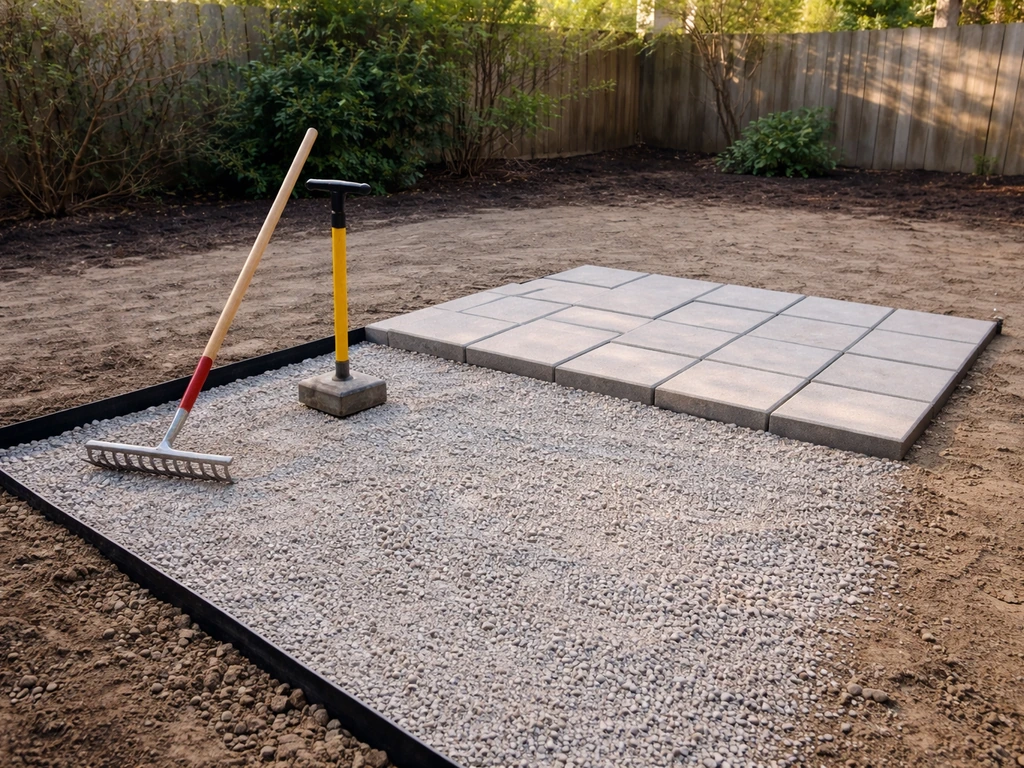
Work out your total dig depth before you start. For a standard garden patio, a typical build-up looks like this: 100mm compacted sub-base, then a 25–40mm mortar bed (or 30mm sand bed for block paving), then the paving itself (which might be 35–50mm for slabs, or 60–80mm for block paving). Add these up, include your drainage fall, and you know exactly how deep to excavate at each point.
If you're on heavy clay, drainage becomes even more critical. Clay drains slowly and can cause standing water under your patio. On clay ground, consider a slightly thicker sub-base (150mm) to improve stability, and make sure your drainage fall is working consistently across the whole area. In some cases on very heavy clay, a layer of geotextile membrane between the subsoil and sub-base helps prevent clay migrating up into the hardcore over time.
Once you've excavated, compact the exposed subsoil with your vibrating plate compactor. This isn't optional. Even firm-looking subsoil will compress under load if it isn't consolidated first. Then rake the area to establish your drainage fall, checking with a spirit level and measuring the height difference at each end.
Building the sub-base: the foundation everything sits on
The sub-base is the most important layer of your patio, and it's one most beginners either rush or under-specify. Use MOT Type 1 crushed stone (also called DTp1). Don't use building sand, topsoil, or general rubble here, Type 1 compacts predictably and drains well. Other materials don't.
For a garden patio with foot traffic only, aim for at least 100mm of compacted Type 1. If your ground is soft, you're on clay, or you'll have any wheeled loads (garden furniture, bikes, the odd small vehicle), go to 150mm. Lay the Type 1 in layers of no more than 100mm at a time and compact each layer before adding the next. One loose 150mm dump then compacted once is not the same as two properly compacted 75mm layers, compaction doesn't penetrate deeply enough to consolidate the whole lot in one pass.
Compaction with a plate compactor on Type 1 typically achieves around 30% reduction in depth, so a 130mm loose layer compacts to roughly 100mm. Keep this in mind when you're calculating how much to tip. Spread the material with a rake, pass the compactor over it in overlapping rows, and re-check your levels and fall as you go. This is where precise measurements matter most, because fixing fall errors at this stage is easy; fixing them later with extra sand is not (it's tempting but compromises stability).
Pavingexpert puts it bluntly: it's nearly impossible to achieve tight level tolerances using sub-base material alone. Use the sub-base to get close to your final levels, then fine-tune with the bedding layer. Never use a thick bedding layer to compensate for a poorly-prepared sub-base, bedding is not a levelling medium, it's a precision bed.
Laying the bedding and setting your slabs or blocks
For paving slabs (mortar bed method)
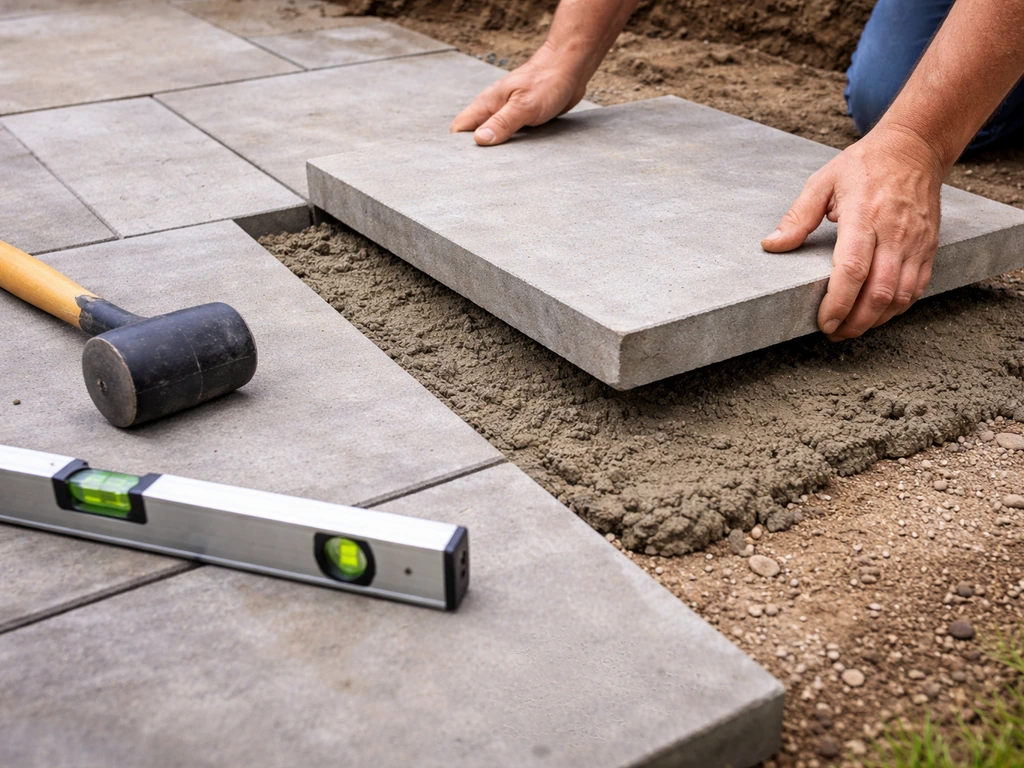
Mix a semi-dry mortar at 5:1 or 6:1 sharp sand to cement (it should hold its shape when squeezed but not be wet). Lay this across the sub-base to a depth of 25–40mm. You can either lay a continuous bed or use the 'five spot' method (a dab under each corner and one in the middle), though a continuous bed gives more consistent support and is generally better for natural stone and larger format slabs.
Set each slab carefully onto the mortar, tapping it down with a rubber mallet. Check level in two directions and also check the fall toward your outer edge. Work from a fixed reference point (usually the house wall or a string line set at your finished height) and work outward. Leave consistent joint gaps, typically 10–15mm for most concrete slabs, slightly tighter for natural stone. Don't walk on freshly laid slabs; let the mortar firm up for at least 24 hours before working on adjacent sections.
For block paving (sand bed method)
Block paving uses an unbound method: a 30mm layer of compacted sharp sand forms the bed. Screed this sand level using rails set to your finished height targets (accounting for the fall). For 60mm-thick blocks, set your screeding rails so the sand surface is 7–10mm above your target finished level, the blocks will compress the sand during final compaction, so you need that extra height built in. This is called 'laying proud,' and getting it right takes a bit of practice on your first few square metres.
Lay blocks in your chosen pattern, keeping joints between 2–5mm. Work from a corner outward, using a string line to keep rows straight. Do not compact block paving until the whole area (or a full section) is laid and edging is installed. Then sweep kiln-dried jointing sand across the surface, making sure it fills all joints, before making your first compaction pass. Make several more passes of the plate compactor in different directions, you're looking for 'compaction to refusal,' the point where the plate starts to bounce or rattle slightly on the blocks and can't consolidate them further. Then top up with more jointing sand, sweep in again, and make a final light compaction pass.
Cutting slabs and blocks
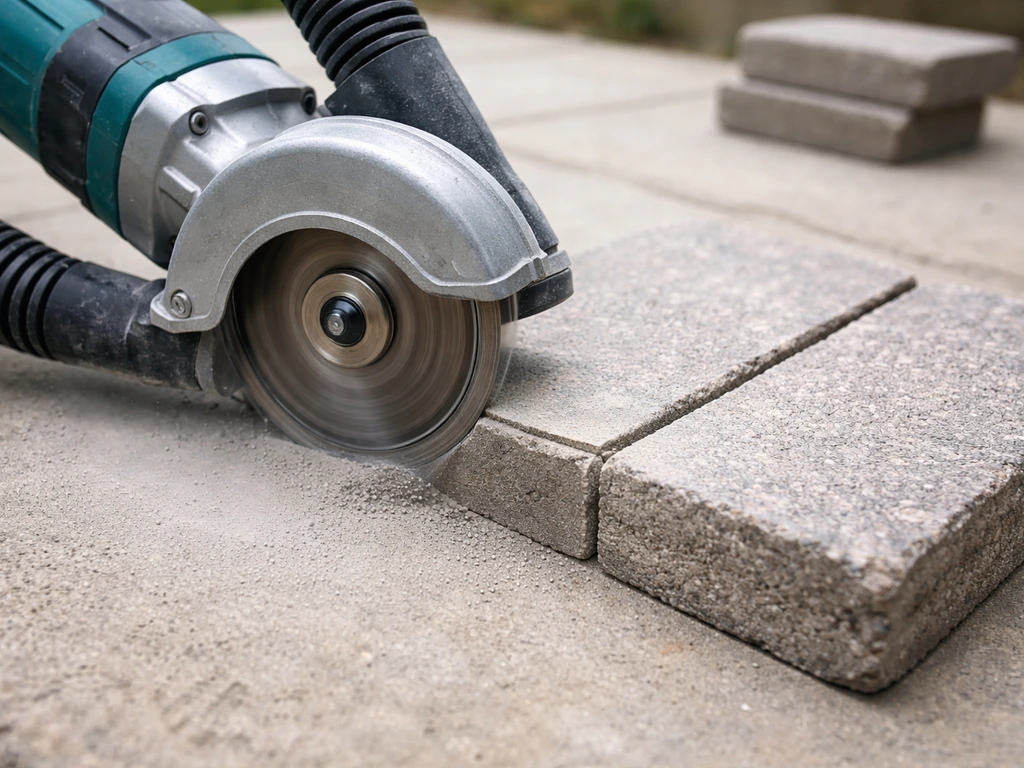
You'll almost certainly need to cut some pieces to fit edges and obstacles. An angle grinder with a diamond blade works for most cuts. For slabs, score the cut line first with a single pass, then deepen it progressively. For block paving, a block splitter (available to hire) is faster and cleaner for straight cuts. Curves require cutting with an angle grinder. Always wear eye protection and a dust mask.
Edging, pointing, and finishing touches
Edge restraints aren't just decorative, they hold the whole patio together. For block paving especially, without solid edging, blocks at the perimeter will gradually creep outward under load and foot traffic, causing the joints to open and the surface to become uneven. Marshalls states it is always recommended to install edge restraints, especially where paving is subjected to movement and loading blank" rel="noopener noreferrer">without solid edging. Install edging units on a concrete bed and haunch (support) them with concrete on the back face. Avoid butt-jointing edging units tightly together; leave a small gap to allow for thermal movement, as blank" rel="noopener noreferrer">Marshalls' installation guidance specifies.
For slab patios, you can use the slabs themselves as their own edge if they're haunched with concrete on the outer faces. Alternatively, bull-nose edging slabs or a row of bricks laid on edge gives a neat finish. The front face alignment is what matters for appearance; the back edge is usually buried in soil or lawn anyway.
Once edging is set and mortar or concrete has cured (24–48 hours minimum), you can point the joints on slab patios. A standard mortar pointing mix of 3:1 or 4:1 sharp sand to cement works well. Pack it into the joints firmly, finishing slightly recessed rather than flush or proud, which helps water run off rather than pool in joints. For a neater finish, use a pointing iron or the edge of a trowel to compact and profile each joint.
On sealing: for most concrete slabs, you don't need to seal immediately, or at all. For natural stone, it's often better to let it weather for several weeks first before considering a sealant. Sealing brand-new natural stone, especially in damp conditions, can trap moisture and cause staining or discolouration. If you do decide to seal, make sure the surface is completely dry and that no rain is forecast for at least 24–48 hours.
Common DIY mistakes (and how to avoid them)
Most patio failures trace back to a handful of consistent errors. Here's what to watch for:
- Not digging deep enough. If you don't remove the topsoil and get down to firm subsoil, your patio will move. There's no shortcut here.
- Skipping or under-doing compaction. A hired vibrating plate compactor is not optional. Hand tamping doesn't achieve the same result, and loose sub-base or bedding sand is the most common cause of sunken slabs.
- Ignoring the drainage fall. A flat patio will puddle. Set your fall during excavation, maintain it through the sub-base, and check it with every slab or section of blocks. A 1:60 fall (roughly 17mm per metre) is your target.
- Using thick bedding to fix a bad sub-base. Bedding should be 25–40mm for slabs or 30mm for block paving. If you need more than that to reach your finished level, go back and fix the sub-base.
- Leaving block paving joints empty. Kiln-dried jointing sand must be swept and compacted into all joints before the job is done. Without it, water gets in, blocks loosen, and weeds take hold. Top up joints if they drop below 5–10mm.
- Laying edging too late or skipping it for block paving. Edge restraints must be installed before you compact block paving, not after. Blocks without containment will spread.
- Not checking levels as you go. Check level and fall after every few slabs, not at the end. Catching a creeping error early takes two minutes to fix; catching it at the end means lifting and resetting entire sections.
When you should consider calling a professional
DIY is realistic for most flat-ish gardens, but some situations genuinely warrant professional help. If your garden slopes toward the house (not away from it), you have a more complex drainage problem that needs proper engineering. If you're laying near underground drainage runs, utility pipes, or structural footings, you need to know exactly where those are before you excavate. Similarly, if you're dealing with very unstable ground, made ground, filled areas, or areas with tree root systems nearby, the sub-base specification becomes more complex than a standard DIY guide can cover safely. In those cases, getting a professional assessment isn't giving up; it's just being sensible.
Your next steps right now
If you're ready to get started, here's the sequence to work through this week. First, mark out your patio area and measure it accurately. Calculate your dig depth based on your chosen materials and a 100mm sub-base. Book or hire a skip for the spoil, and arrange your vibrating plate compactor hire for the weekend you plan to lay.
Order your Type 1 sub-base, paving material, and bedding materials with at least 10% extra for waste. On day one, excavate and compact the subsoil. On day two, lay and compact your sub-base. On day three onwards, lay your bedding and paving.
Don't rush any stage by combining it with the next, each layer needs to be right before you build on it.
If you're still deciding on the type of paving to use, it's worth looking into the specifics of laying patio paving slabs versus block paving in more detail, as the bedding method, tools, and finishing process are meaningfully different. If you want to learn the full method, follow our step by step guide on how to lay patio paving laying patio paving slabs.
For a helpful walkthrough, you can also search YouTube for videos on how to lay a patio that match your slab or block paving method How to lay patio paving slabs. There are also specific guides for small patios and for UK conditions that go deeper into drainage requirements and material choices suited to wetter climates.
If you want a simple, practical walkthrough for how to lay a small patio, use the same workflow but focus on tight measurements and careful drainage planning for your space. The foundation you've got here covers the full process, now it's just about picking your material and committing to the prep. For step-by-step UK advice on laying slabs and setting the bedding, follow our guide on laying patio paving slabs and block paving methods UK advice on laying patio slabs.
FAQ
How deep do I need to excavate if my ground level is already close to the patio thickness?
For a DIY patio, you generally want at least 150mm from the bottom of the final paving to firm subsoil (topsoil removed). If your build-up plus your 1:60 drainage fall would force you below that, do not “make it up” with thicker bedding, fix the build-up with the correct sub-base depth (often 150mm on clay) or reassess the layout levels before you start.
Can I lay a patio over clay soil by using a membrane instead of digging deeper?
Yes, but only if you prevent movement and water transport. Use a geotextile membrane in the specific area between subsoil and sub-base when clay or poor subsoil migration is likely, and then still compact and maintain the correct 1:60 fall. Membrane is not a substitute for removing topsoil and building a properly compacted Type 1 sub-base.
What’s the best way to verify the patio fall so I don’t get puddles?
Don’t rely on “visual level.” Check fall and level with a spirit level and tape, and measure height at multiple points (at least each corner and midpoints). Build the fall into every stage, then re-check after compacting the sub-base and again after screeding the sand or placing mortar, because bedding thickness changes can hide a fall mistake but won’t correct stability.
Can I fix a slightly uneven sub-base by adding thicker mortar under the slabs?
For slab patios, use the mortar bed only to bed slabs, keep it consistent (about 25 to 40mm). If you find you need to vary bedding thickness by more than a small amount, stop and correct the sub-base levels instead, because uneven bedding can cause rocking, cracking, and settlement even if joints look fine.
When should I compact block paving, before or after edging and jointing sand?
For block paving, do compact to refusal only after the blocks, edging, and jointing sand are in place for a section. Compaction too early can disturb lines and open joints, especially before edging locks the perimeter. After the first compaction, top up jointing sand because some will be driven down as the blocks settle.
How do I know if a slab is properly bedded, and what should I do if it rocks?
If you’re using slabs, it’s normal for there to be small variations, but your goal is no rocking and consistent fall. A quick check is to press and test each slab corner with your weight after tapping down. If you can rock it, lift it and correct the bed, do not add extra mortar later by “topping up” under a finished slab.
What joint gap should I use for concrete slabs, and should I fill joints with mortar?
For most concrete slabs, joint widths around 10 to 15mm help debris escape and allow slight movement. Make sure joints are consistent along the whole run, and don’t pack mortar into gaps between slabs. Overfilled joints can prevent natural drainage and can create uneven staining or efflorescence patterns.
Should I seal the patio right after laying it, especially if it’s natural stone?
No, sealing is often a common mistake. Concrete slabs typically do not need immediate sealing, and applying sealant over damp natural stone can trap moisture and create staining. If you choose to seal, ensure a fully dry surface and follow a wait period after paving, then test on a small hidden area first to confirm the color and sheen.
How can I prevent the patio edges from spreading or cracking over time?
Most DIY patios start to fail from edging and perimeter movement. Ensure restraints are supported on a concrete bed and have proper haunching on the back face, and leave a small movement gap between edging units. If you’re near a raised garden bed or existing hardscape, treat those junctions as movement points too.
What’s the best way to handle tight edges and awkward corners without ending up with lots of tiny cuts?
Yes, but plan for it. If you have to cut many small slivers at the edge, re-space the patio layout so you end up with fewer narrow pieces, keeping at least a reasonable cut width. It’s better to adjust the patio footprint during planning than to “live with” unusable sliver widths at the boundary.
What should I do if I notice the fall is slightly wrong after paving?
If you accidentally get the fall wrong in a small area, don’t try to correct it by adding extra bedding on top of a stable base. The durable fix is usually to lift paving stones, adjust sub-base or sand levels to restore the fall, then relay with correct compaction. If the mistake is minor and on a non-traffic corner, you may re-bed, but you still need stable support and correct drainage.
How do I know I’m compacting correctly with a vibrating plate compactor?
A plate compactor that’s correctly sized for patios helps, but the key is technique: overlap passes in rows, compact each sub-base layer separately (no single thick dump), and re-check levels after compaction. If you’re only bouncing the plate without consolidation, that’s a sign you’re either over-dense or under-graded, and you should stop and evaluate the layer thickness and material before continuing.