
Laying a resin patio is one of the most rewarding weekend upgrades you can make to your garden, and with the right preparation it is genuinely achievable as a DIY project. You mix kiln-dried aggregate with a two-part polyurethane resin, spread it across a prepared base to a depth of around 15–18 mm, trowel it smooth, and leave it to cure for 24 hours. That is the core process. Where most DIYers run into trouble is not the laying itself but everything that comes before it: choosing the right system, getting the base right, and understanding drainage. Get those three things right and the rest follows naturally.
How to Lay a Resin Patio: Complete DIY Guide and Checklist

Clara Farrell
4 Aug 2026
What a resin patio actually is (and who this guide is for)
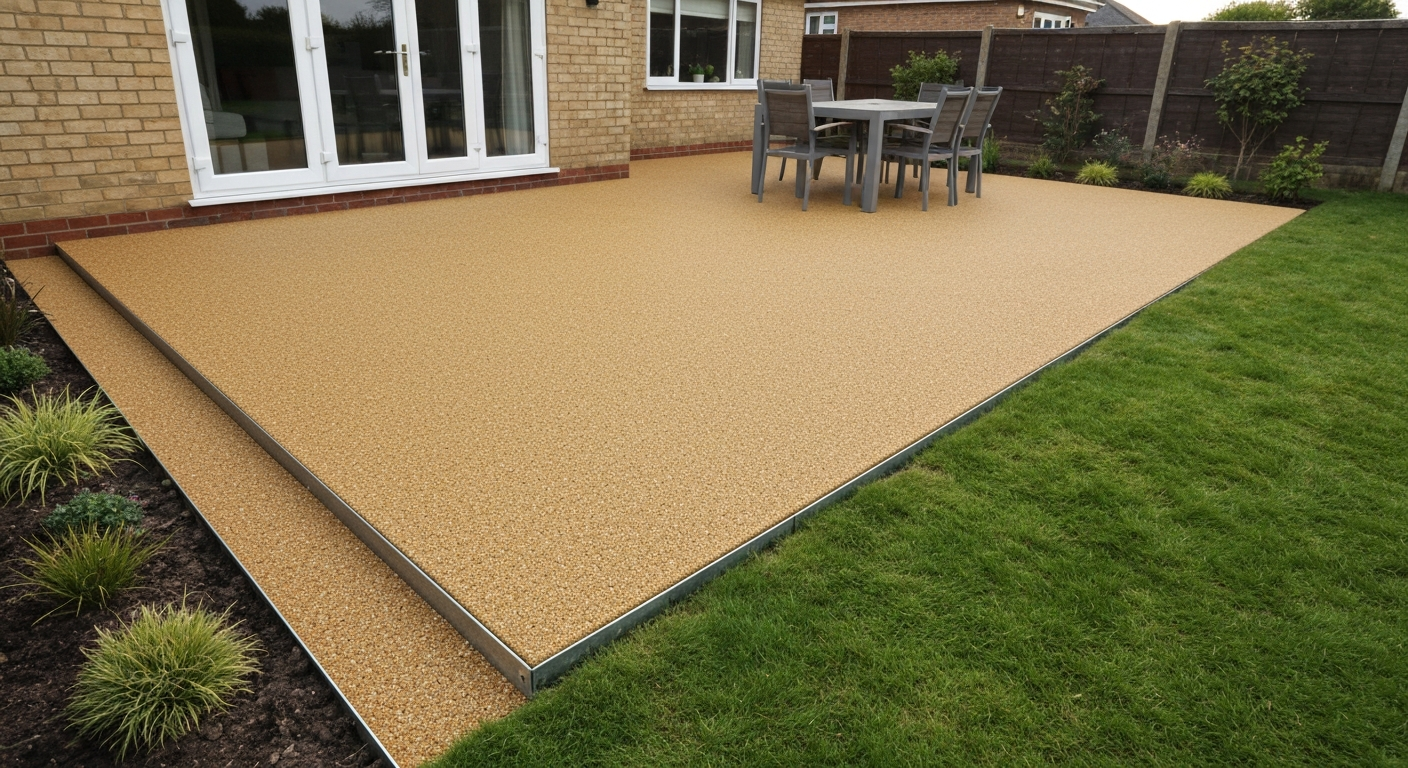
A resin patio is a seamless, decorative hard surface created by combining natural aggregate (usually stone, gravel or recycled glass) with a two-part polyurethane or epoxy resin binder. The finished surface looks a bit like a gravel path, but it is solid, stable underfoot, and in its most popular form it is permeable, meaning rainwater passes straight through it rather than pooling on top. That permeability is one of its biggest selling points over traditional paving slabs or concrete.
This guide is written for homeowners and confident DIYers tackling their first resin patio. I have made most of the common mistakes myself, and I will flag them throughout so you do not have to repeat them. If you have already read guides on laying a gravel patio or explored loose-laid options like pebble or rock patios, resin bound sits a step up in complexity and cost, but it also lasts significantly longer and needs far less ongoing maintenance. By the end of this article you will know exactly what to buy, how to prepare your site, and how to lay and finish the surface correctly.
Resin bound vs resin bonded: which system do you need?
These two names sound almost identical but they describe very different products and installation methods. Choosing the wrong one for your situation is an expensive mistake, so it is worth taking a few minutes to understand the distinction properly.
Resin bound is the system you almost certainly want for a patio. You thoroughly mix kiln-dried aggregate with resin inside a forced-action mixer until every stone is fully coated, then trowel the blended material onto the substrate in a smooth, consistent layer. The result is a joint-free, permeable surface where the stones are permanently locked in place. Resin bound surfaces meet sustainable drainage (SuDS) requirements in the UK and EPA permeable pavement guidance in the US, meaning they can be installed on driveways and patios without requiring additional surface drainage in many planning scenarios.
Resin bonded works differently. A thin film of resin is applied to the substrate first, then loose dry aggregate is scattered (broadcast) onto the sticky surface. The stones that land aggregate-side-down bond; the rest are swept away after curing. The resulting surface looks textured and natural but it is typically impermeable, and individual stones can and do work loose over time, especially in high-traffic areas or after frost. Resin bonded is cheaper and quicker to install, but for a permanent garden patio used regularly, resin bound is the more durable and practical choice.
| Feature | Resin Bound | Resin Bonded |
|---|---|---|
| How it works | Aggregate pre-mixed with resin, trowelled on | Resin applied to base, aggregate broadcast on top |
| Permeability | Permeable (SuDS compliant) | Typically impermeable |
| Stone security | Stones fully encapsulated, very durable | Stones partially bonded, prone to loss over time |
| Finish | Smooth, seamless, consistent | Textured, more variable appearance |
| Typical depth | 15–20 mm for patios | 3–6 mm surface coat |
| DIY suitability | Achievable with correct tools and prep | Easier to apply but less forgiving over time |
| Best used for | Patios, driveways, paths, pool surrounds | Decorative overlays, low-traffic areas |
| Approximate cost (materials) | Higher upfront cost | Lower upfront cost |
For the rest of this guide I will focus on resin bound, with relevant notes where resin bonded differs meaningfully.
Choosing your resin system and aggregate
Resin types
Most resin bound systems sold for exterior use today are polyurethane-based two-part systems, labelled as Part A (resin) and Part B (hardener). Some systems use epoxy resin, which is harder and more chemical-resistant but less UV stable and can yellow outdoors. For a garden patio, a UV-stable polyurethane system is the standard recommendation. Look for products with BBA (British Board of Agrément) certification if you are in the UK, as this provides independent verification of performance and is useful evidence if you ever need to satisfy building control or an insurer. Always read the Technical Data Sheet (TDS) before you buy; it will tell you the exact mix ratios, pot life, working temperature range, and cure times.
Aggregate grades and what they mean
Aggregate is sold in graded sizes, and the grade you choose affects both the look of the finished surface and how much resin you need. Finer aggregates produce a smoother, denser finish but require more resin binder per kilogram of stone, which increases cost. Coarser aggregates have a chunkier, more natural appearance and use slightly less binder. The three grades you will most commonly see for patios are 1–3 mm, 2–5 mm, and 3–5 mm. For a residential patio, 2–5 mm or 3–5 mm is a good all-round choice: it gives a clean, contemporary look, is comfortable underfoot, and handles the resin:aggregate ratio efficiently.
Colours and blends
Aggregate colour ranges from pale Cotswold gold and champagne to charcoal, burnt amber, red granite, and multi-toned blends. Most suppliers sell pre-blended bags that are designed to go directly into the mixer, which is easier than blending your own colours on site. Stick to a single supplier's blended product for consistency, and order at least 10% more than your calculated quantity to account for waste and any touch-up work.
Anti-slip considerations
A well-laid resin bound surface using 2–5 mm aggregate provides reasonable slip resistance in most conditions, but if your patio is shaded and prone to algae growth, or if it will be used by elderly people or children, check the supplier's slip resistance data. Slip resistance for pedestrian surfaces is assessed using the pendulum test method (BS EN 13036-4 in the UK), and better manufacturers will publish pendulum test values for their aggregates. If in doubt, choose a slightly coarser aggregate blend or ask about anti-slip additive options.
Site survey and planning before you start
Before you order a single bag of aggregate, spend time properly surveying your site. I skipped this step on my first project and ended up with a drainage issue I could have avoided entirely.
- Measure the area carefully: length x width in metres. Add 10% to your material calculations for waste and overlaps at edges.
- Check for underground utilities: gas, water, electricity and drainage runs. In the UK use Dial Before You Dig (now part of LSBUD) or contact your local utility companies. In the US use 811 (Call Before You Dig). Mark any runs before you dig.
- Check planning requirements: in England, front garden paving over 5 m² that is not permeable requires planning permission. Resin bound is permeable and generally exempt, but confirm with your local planning authority, especially for listed buildings or conservation areas.
- Identify the natural fall of the ground: you need water to drain away from the house. Use a long spirit level and a tape measure to establish the direction and degree of slope across the site.
- Identify where water currently goes: does your garden drain well after rain, or does it sit in puddles? This will determine your drainage strategy (see the next section).
- Check existing surfaces: if you are laying over concrete or asphalt, inspect it for cracks, hollow spots, and contamination. Tap suspicious areas with a metal bar — a hollow sound means delamination underneath.
- Plan your layout on paper: mark the patio boundary, any steps or level changes, the position of edge restraints, and access routes for material delivery.
Drainage and permeability: getting water where it needs to go
Drainage is the section most DIY guides gloss over, and it is the one that causes the most long-term problems. Resin bound surfacing is classified as permeable pavement, meaning it is designed to allow rainwater to pass through the surface layer and into an engineered sub-base below, rather than running off the surface. EPA guidance 'Soak Up the Rain: Permeable Pavement, US EPA' explains that permeable pavements allow infiltration to reduce runoff, can reduce the need for conventional drainage, and should be designed with an engineered open‑graded subbase or underdrain where native soils have low permeability Soak Up the Rain: Permeable Pavement — US EPA. This is the basis for its SuDS compliance in the UK and its equivalence to EPA-recognised permeable pavement in the US.
For permeability to work properly, the sub-base underneath must also be permeable. This means using an open-graded angular sub-base aggregate (Type 3 or MOT Type 3 in the UK, rather than the more common MOT Type 1 which is too dense). Water passes through the resin surface, through the open-graded sub-base, and then infiltrates into the ground beneath. This is the correct full-system approach and it is what the CIRIA SuDS Manual C753 and MPA permeable paving guidance describe.
What to do on clay or poorly draining soil
If your subsoil is clay or another low-permeability material, water cannot infiltrate at a useful rate. In this case you have two options. The first is to design a tanked (impermeable) system: the sub-base and resin surface are laid to a cross-fall of at least 1:80 (about 12 mm per metre) directing water to a drainage channel, linear drain, or channel connected to a soakaway or surface water drain. The second option is to install a soakaway at the downhill edge of the patio and connect it via perforated pipe beneath the sub-base, allowing slow infiltration to continue even in clay soils. If you are on heavy clay and planning a patio larger than about 15 m², I would seriously consider getting a drainage engineer to assess the site before you start.
As a general rule, aim for a minimum finished surface fall of 1:80 (1.25%) away from any structures regardless of whether the system is permeable or tanked. This prevents any standing water accumulating at the building line even during heavy rainfall events.
Base options and preparation: the most important part of the whole job
I cannot overstate this: your resin surface is only as good as the base it sits on. A poorly prepared base will cause cracking, delamination, and subsidence within a few years. Spend more time and money on base preparation than on anything else and you will not regret it.
Building a new sub-base from scratch
If you are starting from bare ground, the standard construction sequence for a residential resin bound patio is: excavate to formation level, compact the subgrade, lay a geotextile membrane, compact a granular sub-base to the specified depth, then apply a binder course or lay the resin bound surface directly depending on your system. For a SuDS-compliant permeable installation, use open-graded Type 3 sub-base compacted to a minimum depth of 150 mm for light foot traffic, or 200 mm for areas where vehicles may occasionally cross. For a non-permeable tanked system, MOT Type 1 at 100–150 mm compacted depth is acceptable. Compact in layers no deeper than 75 mm using a plate compactor.
Once the sub-base is compacted, many installers apply a 40–50 mm asphalt (tarmac) binder course on top as a stable, consistent working surface before the resin bound layer. This is optional for a patio but it gives a much more reliable base, especially on ground that experiences seasonal movement. If you go this route, allow the asphalt to cool and harden fully (at least 24 hours) before applying the resin.
Laying over existing concrete or asphalt
This is the most common scenario for a garden patio project, and it is where a lot of DIYers save significant time and cost. Resin bound can be laid directly over sound existing concrete or asphalt, but the preparation has to be thorough.
- The existing surface must be structurally sound: no active movement cracks, no large hollow areas, no crumbling edges.
- Clean the surface thoroughly: remove all moss, algae, oil, grease, and loose material. Pressure wash and allow to dry completely.
- Repair any cracks: dormant hairline cracks can be filled with epoxy crack filler or flexible sealant. Active cracks (ones that are still widening due to ground movement) must be structurally repaired first, otherwise the crack will reflect through your new resin surface within months. Epoxy injection works well for structural cracks in concrete; larger areas of failure need cutting out and patching with a compatible repair mortar.
- Profile the surface: the substrate needs a mechanical key for the resin primer to bond to. Shot-blasting or diamond grinding is the professional standard. For a small DIY patio, vigorous wire brushing and a clean acid etch (followed by thorough rinsing and drying) can provide adequate key on concrete.
- Apply a primer: most resin bound system manufacturers specify an epoxy or polyurethane primer applied to the prepared substrate before the resin mix goes down. Follow the TDS for coverage rate and open time — typically you apply the primer and then lay the resin within a specific window (often 12–24 hours) while the primer is still tacky enough to bond.
When the existing surface is not good enough
If the concrete or asphalt is significantly cracked, heavily sunken in places, or showing widespread delamination, do not try to save it with filler and hope. The cost of breaking it up and starting with a fresh sub-base is almost always less than the cost of re-doing a failed resin surface two years later. It is a hard decision to make when you can see a serviceable-looking slab in front of you, but this is one of the most common causes of premature resin patio failure.
Edge restraints, borders, and level changes
Resin bound material needs a hard edge to be trowelled up to. Without it, the edges will crumble and the surface will gradually migrate and break down from the perimeter inward. Edge restraints are not optional.
The most common options are: concrete haunched kerb stones bedded on a concrete foundation, steel or aluminium L-section metal edging pinned into the sub-base, or natural stone sett borders. For a domestic patio, metal L-section edging is the most DIY-friendly option. It is flexible enough to follow curves, it can be cut with a hacksaw, and it is available from most builders' merchants and online suppliers. Fix it at regular intervals (every 500–600 mm) with ground stakes driven firmly into the sub-base, and check it is level and consistent before you start mixing resin.
For steps and level changes, the most reliable approach is to build the steps in concrete block or brick first, finish the vertical faces, and then lay the resin surface across the horizontal treads as a final coat. Use a stainless steel or aluminium nosing profile at the front edge of each tread to protect the resin from chipping and to define the step edge clearly. The resin surface on treads should be at least 15 mm thick for durability.
Tools, equipment, and PPE: your day-of checklist
Getting your kit sorted the day before makes the actual laying go much more smoothly. Once you start mixing resin you are working against the clock (pot life is typically 20–30 minutes at 20°C), so there is no time to be hunting for a trowel.
Equipment checklist
- Forced-action mixer (paddle mixer): essential for resin bound. A standard drum mixer will not coat the aggregate evenly. Hire one if you do not own it — typically a 100–120 litre capacity machine for domestic patios.
- Drill mixer with paddle attachment: for mixing the two-part resin before adding to the mixer.
- Accurate weighing scales (at least 20 kg capacity): essential for hitting the correct resin:aggregate ratio.
- Smooth steel trowels: for spreading and finishing the mixed material. Have at least two different sizes.
- Notched squeegee or gauge rake: helps achieve consistent depth across larger areas.
- Bucket and measuring containers: for batching resin components.
- Wheelbarrow: for transporting mixed material from mixer to working area.
- Straight edge and spirit level: for checking falls and finished levels.
- Plate compactor: for compacting the sub-base layers (not used on the resin surface itself).
- String lines and pegs: for setting out the patio boundary and level datum.
- Power washer: for final sub-base or substrate cleaning.
- Heat gun or propane torch: for warming the substrate in cooler weather (above 5°C but below 10°C) to help adhesion and cure.
- Extension lead and RCD: for power tools.
PPE checklist
- Chemical-resistant nitrile gloves (not latex): resin components are skin sensitisers and prolonged or repeated contact can cause dermatitis.
- Safety goggles or face shield: splashing resin or aggregate is a serious eye hazard.
- Respirator (FFP2 or FFP3 rated): for mixing dry aggregate and working with uncured resin in enclosed or poorly ventilated spaces.
- Steel-toed boots with slip-resistant soles
- Old clothing or disposable coveralls: resin is permanent on fabric.
- Knee pads: you will spend a significant amount of time kneeling on the substrate.
Consumables list and estimated quantities
The quantities below are based on a 20 m² patio at a finished depth of 18 mm using a 3–5 mm aggregate blend and a standard polyurethane resin system with a 1:25 resin:aggregate ratio by weight. Always calculate from your specific product's TDS, as ratios vary between systems and aggregate grades.
| Item | Estimated Quantity (20 m²) | Notes |
|---|---|---|
| 3–5 mm kiln-dried aggregate | approx. 750–800 kg | Includes ~10% waste allowance; aggregate must be completely dry |
| Two-part polyurethane resin (A+B) | approx. 30–32 kg total | Based on ~4% resin by weight of aggregate for 3–5 mm grade; verify against TDS |
| Epoxy or PU primer | approx. 0.2–0.3 litres/m² (4–6 litres) | Coverage varies; follow product TDS |
| Epoxy crack filler | as required | For repairing existing substrate cracks before priming |
| L-section steel edging | perimeter length + 10% | Typically sold in 2.4 m or 3 m lengths |
| Ground stakes for edging | 1 per 500–600 mm of edging | Usually included with edging packs |
| Geotextile membrane | area + 15% for overlaps | For new sub-base builds only |
| MOT Type 3 sub-base aggregate | area x 0.2 m depth x 1.4 (compaction factor) | For new builds; adjust depth to site loading |
| Roller/brush and tray for primer | 1 set | Disposable after use |
| Mixing paddle / spiral attachment | 2 spares | They wear out faster than you expect |
| Acetone or resin cleaning solvent | 2–3 litres | For cleaning tools before resin cures; after curing it is permanent |
| Plastic sheeting / tarpaulin | enough to cover working area | For weather protection during cure |
Mix ratio reference table
The mix ratio varies by aggregate grade and by manufacturer. The values below are representative industry figures; always cross-check against your specific product's TDS and use those numbers on site.
| Aggregate Grade | Typical Resin:Aggregate Ratio (by weight) | Resin Component A:B Ratio (by weight) | Approximate Resin Use per 100 kg Aggregate |
|---|---|---|---|
| 1–3 mm | ~1:12 to 1:15 (6–8% resin) | 3:1 (verify with TDS) | 6.5–8 kg resin per 100 kg aggregate |
| 2–5 mm | ~1:18 to 1:22 (4.5–5.5% resin) | 3:1 (verify with TDS) | 4.5–5.5 kg resin per 100 kg aggregate |
| 3–5 mm | ~1:22 to 1:25 (4–4.5% resin) | 3:1 (verify with TDS) | 4–4.5 kg resin per 100 kg aggregate |
| Mixed/blended packs | As stated on bag/TDS | As stated on TDS | Follow supplier calculator exactly |
Step-by-step: laying the resin bound surface
Once the base is prepared, edging is fixed, primer has been applied and is within its open time window, you are ready to start. Work from the furthest point from your exit route back toward the exit so you never have to step on fresh material.
- Check conditions: temperature should be between 5°C and 30°C (40°F–85°F). Do not lay if rain is forecast within 24 hours, if there is standing moisture on the substrate, or if the surface is below 3°C. Strong direct sunlight can shorten pot life significantly — plan morning starts in hot weather.
- Pre-weigh your batches: use your scales to weigh out each batch of aggregate and resin before mixing begins. Consistency between batches keeps the colour and texture uniform across the whole patio.
- Mix the resin components: pour Part B into Part A (always check TDS for the correct order) and mix with a drill mixer and paddle for 60–90 seconds until fully blended and streak-free. Do not introduce air by over-mixing.
- Add resin to the forced-action mixer first, then add aggregate: pour the blended resin into the running forced-action mixer, then add the pre-weighed aggregate. Mix for 2–3 minutes until every stone is uniformly coated and the material looks consistent in colour and texture. Do not add water.
- Empty the mix onto the primed substrate promptly: tip the mixer into a waiting wheelbarrow or directly onto the substrate. You typically have 20–30 minutes of workable time at 20°C — less in warm weather, more in cool weather.
- Spread with a gauge rake or notched squeegee first: rake the material out to roughly the target depth (15–18 mm for a patio), working it into corners and up to the edge restraints.
- Finish with a smooth steel trowel: trowel in smooth, overlapping strokes to achieve a consistent, closed surface. Work quickly but do not over-trowel — excessive working can drag the resin to the surface and affect permeability and appearance.
- Check levels and falls with a straight edge as you go: correct any low spots by adding a small amount of fresh mix; correct high spots by gently drawing the trowel across to redistribute material.
- Mix the next batch before the previous one is completely worked: this keeps the joints between batches wet and ensures a seamless finish.
- Clean tools immediately: uncured resin comes off easily with acetone. Cured resin does not come off at all.
Curing and weather: the 24-hour window that matters most
Most polyurethane resin bound systems reach initial set in around 3 hours at 20°C and achieve full cure in approximately 24 hours at 20°C. In cooler conditions (5–10°C) full cure can take 48–72 hours. In warmer conditions (above 25°C) set times shorten and pot life is reduced, so you need to work faster. These are typical industry figures; your product's TDS will give you the specific values.
Do not allow foot traffic on the surface until initial set is complete (at least 3–4 hours in normal conditions). Do not allow vehicle loading or heavy loading until full cure is achieved. Protect the fresh surface from rain using plastic sheeting supported on a frame that does not touch the resin, rain on uncured resin causes surface blushing (a whitish, cloudy finish) that is very difficult to correct. If it looks like rain is coming sooner than forecast, stop laying and cover what you have got.
Avoid laying in direct strong sunlight if possible, as the substrate can heat up rapidly, shortening pot life and causing the surface to skin over before it has been properly trowelled. Early mornings in summer are ideal: cooler temperatures, longer working time, and less risk of sudden afternoon showers.
Troubleshooting: common problems and how to fix them
Adhesion failure and delamination
This shows up as areas of resin surface that lift, peel, or hollow-sound when you tap them. The most common causes are: a contaminated substrate (oil, moisture, dust), a missed or failed primer application, or applying resin over a damp surface. If adhesion failure is localised, you can cut out the affected area, re-prepare the substrate, reprime, and patch with fresh material. Widespread delamination usually means the substrate was not properly prepared and the entire surface may need removing and relaying.
Ponding water
If water is sitting on the surface after rain, there are two possible causes. On a non-permeable tanked system it usually means the fall is insufficient or there is a low spot that was not corrected during laying. On a permeable system, ponding often means the sub-base has become blocked with silt or fine material and is no longer draining. The fix for the former is grinding down the high surrounding area or adding a surface drain channel at the low point. The fix for the latter is flushing the sub-base with water pressure from the edges, or in persistent cases, breaking out and relaying with a cleaner open-graded sub-base.
Crazing and surface cracking
Fine surface crazing is almost always caused by one of three things: incorrect mix ratio (too much resin or wrong A:B ratio), application during cold or damp conditions, or laying too thin (under 12 mm). Deeper cracking that follows a pattern similar to the substrate below is reflective cracking from unrepaired cracks in the base. Surface crazing can sometimes be stabilised with a dilute resin wash if caught early, but significant cracking usually requires cutting out and patching.
Colour inconsistency between batches
Visible colour banding across the patio is almost always caused by inconsistent batch sizes, varying aggregate moisture content, or mixing for different lengths of time. This is why pre-weighing every batch before you start and sticking rigidly to the same mixer cycle time matters so much. Prevention is far easier than cure here: once the resin has cured, batch-to-batch colour variation is permanent.
Maintaining your resin patio
One of the genuine selling points of a well-laid resin bound patio is how easy it is to maintain. The surface is seamless so there are no weeds pushing through joints, no individual stones to resettle, and no pointing to re-do. Routine maintenance is straightforward.
- Sweep regularly with a stiff brush to remove leaves, organic debris, and surface dirt. Debris left sitting encourages algae and moss growth.
- Wash down with a garden hose or pressure washer (low pressure, wide fan setting) two or three times a year. Avoid using a turbo nozzle at close range as this can dislodge aggregate from the surface if the resin has degraded.
- Treat algae and moss with a diluted patio cleaner or biocide wash, following the manufacturer's instructions. Rinse thoroughly afterwards.
- Inspect edges annually: check that edge restraints are still firmly fixed and that no crumbling or chipping has developed at the perimeter.
- Seal if recommended by your resin supplier: some systems benefit from a resin sealant applied every 3–5 years to refresh the surface appearance and protect against UV degradation. Check your product's maintenance guidance.
What does a resin patio cost?
Costs vary considerably based on area, sub-base requirements, aggregate choice, and whether you DIY or hire a contractor. The figures below are indicative ranges for the UK market in 2026, based on standard residential patio sizes.
| Cost Element | DIY Estimate | Professional Contractor Estimate |
|---|---|---|
| Materials (resin + aggregate, 20 m²) | £400–£600 | Included in day rate |
| Sub-base preparation (new build, 20 m²) | £150–£300 (materials + hire) | £300–£600 (labour + materials) |
| Tools and equipment hire | £80–£150/day (mixer, compactor) | Included |
| Total installed cost (20 m²) | £650–£1,100 approx. | £1,500–£3,000 approx. |
| Cost per m² installed | £35–£55 approx. | £75–£150 approx. |
The DIY saving is real and meaningful, but it comes with a significant time commitment. A 20 m² patio with sub-base preparation is a 2–3 day project for two people working competently. Factor in the cost of a mistake, especially if base preparation needs redoing, and the case for professional installation on complex or large projects becomes clearer.
DIY or hire a pro? An honest assessment
Resin bound is one of the more challenging patio DIY projects, but it is not out of reach for a careful, methodical homeowner. The key is being honest with yourself about what your site and skill level actually require.
DIY is reasonable if:
- The area is under 30 m² and a regular shape.
- You are laying over a sound, well-prepared existing concrete or asphalt base.
- The site is flat or has a clear, manageable natural fall.
- You have a helper for the day of laying — this is not a solo job.
- You are comfortable with measuring, mixing, and working to a fixed time window.
- You have read the product TDS thoroughly before buying anything.
Call a professional if:
- The area is large (over 50 m²) or has a complex shape with multiple level changes.
- The ground is heavily clay-based or has significant drainage problems.
- The existing base is in poor condition and needs substantial repair or full reconstruction.
- The patio connects to a driveway that will take vehicle loading.
- You are in a conservation area or need formal planning permission.
- You want BBA-certified installation with a manufacturer-backed warranty.
If you are undecided, consider doing the sub-base and preparation work yourself to save cost, then bringing in a professional to do the resin laying. Many contractors will work this way, and it splits the cost sensibly while putting the technically demanding part in experienced hands.
How resin compares to other patio surface options
Resin bound is one of several attractive options for a modern garden patio. If the seamless, contemporary look of resin appeals but you are also considering natural stone alternatives such as limestone, granite, or even a more relaxed gravel patio finish, the main practical differences come down to installation complexity, ongoing maintenance, and the feel of the finished surface underfoot. For step-by-step guidance on installing a rock or stone patio, see how to lay rock patio (resource ID bed66800-1384-4c4f-aed2-6518da5a2acb). Natural stone options like limestone and granite require careful jointing and precise bedding, while a gravel patio trades permanence for simplicity and very low cost. For a detailed, step‑by‑step walkthrough on preparing and laying limestone paving, see how to lay limestone patio (reference ID 373f7c2c-1e3e-433c-889b-cf3d5bf73b75). For step-by-step instructions on installing a pebble (gravel) patio, see how to lay a pebble patio. If you prefer natural stone, see a practical guide on how to lay a granite patio for step-by-step instructions on bedding, jointing and finishing. Resin bound sits in an interesting middle ground: it uses natural aggregates but delivers a fixed, stable, low-maintenance surface that natural gravel cannot match.
FAQ
What is the single‑sentence scope and goal of the how‑to article?
Provide a start‑to‑finish, evidence‑based DIY guide that enables a competent homeowner or small crew to select the correct resin system (resin‑bound vs resin‑bonded), prepare the site and base, mix and lay the material to manufacturer standards, manage curing and weather risks, troubleshoot common defects, estimate costs, and decide when to hire a pro.
Which primary technical distinctions and product definitions must be explained?
Clearly define resin‑bound (two‑part resin thoroughly mixed with kiln‑dried aggregate to produce a smooth, joint‑free, permeable surface) versus resin‑bonded (thin resin coat broadcast with loose aggregate; generally less permeable and more prone to stone loss). Cite an industry primer (e.g., Resin Bound vs Resin Bonded guidance) and manufacturer TDS examples to show typical finished depths and uses.
What authoritative standards and guidance should be referenced for design and drainage (SuDS/permeability)?
Use CIRIA SuDS Manual (C753) as the UK industry reference for permeable paving design/maintenance, and US EPA permeable pavement guidance for stormwater benefits and design principles. Also reference MPA/Precast or equivalent industry guidance on subbase design and when underdrains/soakaways are required.
Which product technical data sources are essential to cite for mix ratios, cure times and temperature windows?
Manufacturer Technical Data Sheets (TDS) for each resin system used — examples include PaveSet, ResinScape/SEK, and other branded TDS that give component A:B ratios, resin:aggregate binder percentages, pot life, working temperature ranges and cure times. Emphasize 'always follow the TDS for the chosen product.'
What specific mix ratio and material‑consumption information should the article include?
Provide rule‑of‑thumb resin:aggregate ranges (typical resin binder ~4–8% by weight; many installers use ~7–8% overall for common blends), and note that finer aggregates need higher binder rates. Include example kit/component ratios from TDS (e.g., A:B by weight such as 3:1) and a small mix‑ratio table showing common aggregate gradings (1–3 mm, 2–5 mm, 3–5 mm) with typical binder % and finished depth guidance (paths/patios ≈10–20 mm; driveways ≈15–25 mm). Always advise readers to calculate coverage from the chosen manufacturer's calculator/TDS.
What base and substrate preparation topics must be covered with evidence?
Describe options: new engineered open‑graded subbase (Type 3/MOT Type 3 or site‑equivalent) compacted to specification (common depths ~150–200 mm for pedestrian/drive loading), overlay on sound concrete/asphalt after mechanical profiling and priming, and repair strategies for cracks (epoxy injection, patch mortars, addressing active movement). Cite manufacturer installer guides and concrete repair guidance for crack remediation and profiling methods (shot‑blast/grit‑blast/diamond grind).