
Yes, you can lay patio slabs on gravel, but only when that gravel is a properly compacted, well-graded sub-base material like MOT Type 1, not a loose decorative gravel like pea shingle. The key distinction is this: a compacted granular sub-base creates a firm, load-bearing foundation, while uncompacted or decorative gravel simply shifts under weight and causes slabs to rock, sink, and crack. Get that one thing right and a gravel sub-base is a perfectly sound base for most domestic pedestrian patios.
Can You Lay Patio Slabs on Gravel? Clear DIY Guide

Clara Farrell
5 Aug 2026
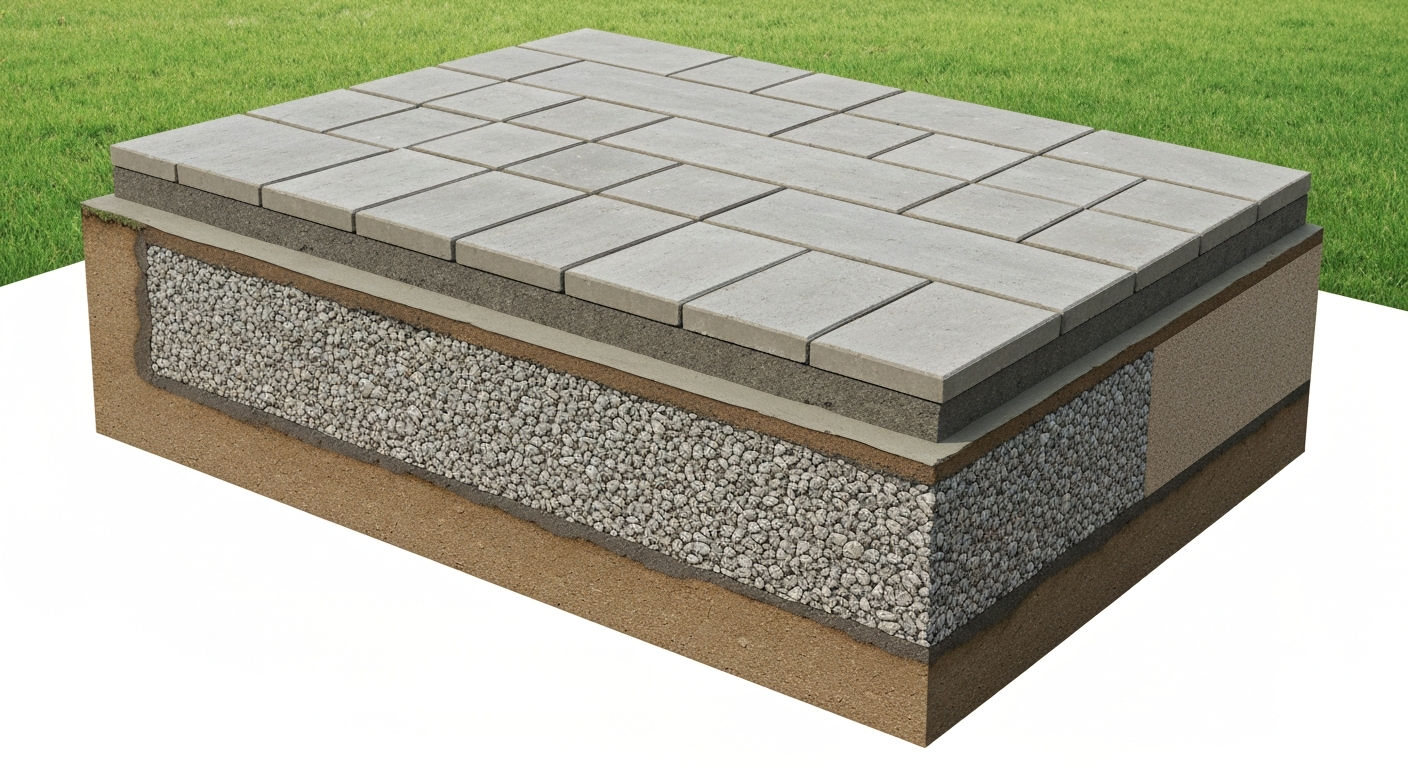
When gravel is actually the right choice for your patio base
A compacted granular sub-base is appropriate for pedestrian patios, garden paths, and light-use outdoor areas where ground conditions are reasonable. Specifically, it works well when your soil is free-draining or moderately compact (sandy loam, firm topsoil), when you are not expecting vehicular or heavy loads, when the site is relatively level or has a manageable slope, and when you have room to excavate to the required depth. Most domestic patio projects in the UK fall into this category, and a MOT Type 1 sub-base is the accepted industry standard for this kind of work. Holcim, MOT Type 1 Sub‑Base (SHW Clause 803) provides a commonly specified compacted granular material suitable for pedestrian patio sub‑bases Holcim — MOT Type 1 Sub‑Base (SHW Clause 803) provides a commonly specified compacted granular material suitable for pedestrian patio sub‑bases..
You will also find that a gravel sub-base is easier for a first-time DIYer to work with compared to a full concrete slab. It does not require mixing large volumes of concrete, it is more forgiving during compaction, and it dries out quickly after rain. For straightforward garden patios, it is the go-to method recommended by most major paving manufacturers.
The honest pros and limits of laying slabs on gravel
| Factor | Pros | Limits / Watch-outs |
|---|---|---|
| Ease of installation | No concrete mixing required; layers are manageable for a solo DIYer | Compaction equipment is still needed; hand tamping is rarely sufficient |
| Drainage | Granular sub-base drains freely, reducing waterlogging risk | On clay soil, water still pools below the sub-base unless drainage is improved |
| Flexibility | Individual slabs can be lifted and re-laid if they settle | Mortar-bedded slabs on gravel still require proper break-out to relay |
| Cost | Generally lower material cost than a full concrete bed | Savings are lost if insufficient depth leads to premature failure |
| Frost performance | Well-drained granular base reduces frost heave risk | Poorly drained sites still suffer frost damage regardless of base material |
| Load capacity | Fine for pedestrian use with correct build-up | Not appropriate for driveways or areas with regular vehicle loading |
| Weed risk | Can be reduced with membrane under the sub-base | Joints still need quality jointing compound to prevent weed ingress |
Site assessment: decisions you must make before you start
Before you order a single tonne of Type 1, spend 20 minutes assessing your site. The decisions you make here determine your build-up depth and whether a gravel sub-base will work at all.
Soil type
Dig a test hole about 300 mm deep. If the soil is sandy, gravelly, or firm loam, a standard 100 mm compacted sub-base is usually adequate. If you hit heavy clay or waterlogged ground within that depth, you need to increase your sub-base depth to at least 150 mm and consider drainage improvements before you lay anything. Organic material (old roots, topsoil, compost-rich fill) must be fully removed, as it compresses over time and causes sinking.
Drainage and water behaviour
Watch the area after heavy rain. If water sits on the surface or the soil is saturated for more than 24 hours, you have a drainage problem that no sub-base alone will fix. You will need to install a drainage channel or land drain before building up the layers. Skipping this step is one of the most common reasons DIY patios fail within the first winter.
Frost risk
Frost heave happens when saturated ground freezes and expands. A well-drained, compacted granular sub-base greatly reduces this risk. On wet or clay-heavy sites in colder regions, the risk remains higher and a deeper sub-base plus improved drainage become non-negotiable.
Slope and falls
A finished patio needs a fall of around 1:60 to 1:80 (roughly 12–17 mm per metre) away from the house to shed rainwater. Gentle natural slopes can be worked into your design. Steeper ground needs either a stepped terrace design or additional excavation on the high side to achieve a level platform. Critically, the fall should be built into the sub-base level, not fudged with uneven bedding thickness.
Load
A gravel sub-base is designed for pedestrian use. If any part of the patio will carry vehicle weight, even just a car driving over the edge, you need a concrete slab base and thicker slabs (30 mm minimum for porcelain, for example). Do not try to work around this; the sub-base will fail.
Quick specification ranges at a glance
| Layer | Typical Range | Common Domestic Patio Target |
|---|---|---|
| Compacted sub-base (MOT Type 1) | 50–150 mm | 100 mm (firm ground), 150 mm (clay or soft soil) |
| Bedding / laying course | 15–40 mm | 30–40 mm (mortar bed, compacted to ~30 mm target) |
| Slab thickness (porcelain, pedestrian) | 20–30 mm | 20 mm pedestrian; 30 mm driveway/heavy use |
| Slab thickness (natural stone, e.g. Indian sandstone) | 22–50 mm+ | 22 mm calibrated packs are common; thicker for large format |
| Total excavation depth (approximate) | 150–250 mm | ~200 mm from finished level on firm ground |
These are starting points, not guarantees. Adjust upward for softer ground, larger slab formats, or heavier loads. Manufacturers including Marshalls specifically state that sub-base depth must be designed for actual ground conditions and intended loading, not just copied from a generic spec sheet.
Recommended materials
Sub-base materials
- MOT Type 1 (also called SHW Clause 803 sub-base): crushed, well-graded stone typically ranging from about 40 mm down to fine dust. This is the standard choice for domestic patios. It compacts into a dense, interlocking layer that resists movement.
- Crushed concrete or recycled aggregate (RC6A): an acceptable alternative to virgin Type 1 on many domestic projects, but check your local supplier's spec to confirm it meets equivalent grading standards.
- Avoid: loose pea gravel, decorative chips, rounded river gravel, or ungraded hardcore. These do not compact properly and will not provide a stable base.
Bedding options
- Full mortar bed (rigid installation): a mix of 1 part cement to 3 or 4 parts sharp sand, laid at 30–40 mm and compacted to a target of around 30 mm. Recommended for porcelain, dense natural stone, and most concrete flags. This is the most common method for domestic patios and the one most manufacturers specify.
- Flexible (sand) laying course: well-graded grit sand (not building sand or soft sand) laid and screeded to about 30 mm. Used for concrete block paving and some natural stone in flexible systems. Less common for large-format patio slabs.
- Adhesive or slurry prime coat: some thin porcelain tiles (under 20 mm) require a polymer-modified adhesive or slurry applied to the back of the slab in addition to a mortar bed. Check the slab manufacturer's installation guide specifically, as using standard mortar alone on non-porous porcelain can result in adhesion failure.
Jointing materials
- Polymeric jointing compound (brush-in): products like Instarmac UltraScape Premjoint are brushed dry into joints, then activated with water. They resist weeds and remain slightly flexible. Good for most patio applications.
- Flowable grout: products like Instarmac UltraScape Porcelpoint are poured into joints. Ideal for porcelain where getting a brush-in compound deep enough into tight joints is difficult.
- Mortar pointing (1: 3 or 1:4 cement:sand): the traditional method. More rigid, slightly more prone to cracking over time, but cost-effective and durable when done well.
- Avoid: soft building sand brushed into joints. It washes out, encourages weeds, and provides zero structural support.
Edge restraints
- Concrete haunching: the most robust option. A collar of concrete (typically a 1:4 mix) packed around the perimeter slabs from below the laying course level up to just below the slab surface.
- Proprietary plastic or aluminium edge restraint strips: manufacturer systems with fixing stakes driven into the sub-base. Faster to install and effective when fixed at the manufacturer's recommended depth and stake spacing.
- Timber edging: acceptable as a temporary restraint but will rot over time unless it is pressure-treated hardwood. Not recommended as a permanent solution.
Tools, equipment and safety essentials
- Spade and mattock for excavation
- Wheelbarrow (at least one; two if working with a helper)
- Plate compactor (vibrating plate): do not skip this — hand tamping cannot achieve the required compaction depth. Hire one for the day if you do not own one.
- Long spirit level (1.2 m minimum) and line levels or laser level for setting falls
- String lines and timber pegs for marking out
- Screeding rails and a straight-edge board for levelling bedding
- Rubber mallet for bedding slabs
- Angle grinder with a diamond blade for cutting slabs (or a disc cutter/block splitter for larger jobs)
- Pointing iron or trowel for jointing
- Stiff brush for sweeping in polymeric jointing compound
- Measuring tape and chalk line
- Safety: dust mask (P3 rated) when cutting stone or porcelain, safety glasses, steel-toe boots, and heavy-duty gloves when handling slabs. Silica dust from cutting is a serious health risk. Always cut wet or use a vacuum extraction system on cutting tools.
Step 1: Marking out, setting levels and excavation
Start by marking out the full patio area with string lines and pegs. Set your finished patio level first, working back from any doors, thresholds, or damp-proof course levels. Your finished surface must sit at least 150 mm below any damp-proof course if the patio is adjacent to the house wall. Factor in your fall of 1:60 away from the building.
Once the finished level is established, calculate your total excavation depth. For a typical domestic patio on firm ground: 20 mm slab + 30 mm bedding + 100 mm compacted sub-base = 150 mm of build-up below finished surface level. Add 20–25 mm to account for sub-base settlement during compaction, bringing your excavation to around 170–200 mm total. On soft or clay ground, increase the sub-base to 150 mm and adjust accordingly.
Remove all topsoil and organic material across the full area. Topsoil is not a stable subgrade. You want to be cutting into firm, undisturbed subsoil. If you encounter soft spots, loose fill, or old root systems, dig these out and fill with additional Type 1 compacted in layers. Do not be tempted to leave soft patches and hope the sub-base bridges over them. It will not.
Step 2: Building the gravel sub-base
Before adding Type 1, compact the exposed subgrade with your plate compactor. This is an often-skipped step that makes a real difference to long-term stability. If the ground is very soft even after compaction, lay a geotextile membrane before adding the sub-base. This separates the subgrade from the granular material and prevents fines migrating up into the Type 1 over time.
Spread Type 1 in layers (called lifts) no deeper than about 75 mm loose before compaction. If your total compacted depth target is 100 mm, you will likely need two lifts since loose material compresses roughly 20–25% when properly compacted. Compact each lift thoroughly with multiple passes of the plate compactor, working in overlapping longitudinal runs and then transverse runs, until no further settlement is visible under the plate. Do not just make one pass and assume it is done.
Lightly dampen each layer before compacting if the material is very dry. This helps the fines bind together and improves compaction. After compaction, check your levels and falls using a spirit level and string lines. Remember: the finished fall of the patio should be built into the sub-base at this stage. If your sub-base is level and you try to create the fall in the bedding layer, you will end up with inconsistent bedding thickness that causes hollow spots and cracked slabs.
Step 3: Bedding and laying the slabs
For a rigid mortar bed installation, mix your bedding mortar at approximately 1 part cement to 3 or 4 parts sharp sand. The consistency should be what installers call 'damp mix' or 'semi-dry': it should hold its shape when squeezed in your hand but crumble when dropped. Do not use a wet, sloppy mix for laying large format slabs, as it gives you no control over level.
Spread and screed the mortar bed to approximately 40 mm before placing the slab, which should compress to a target of around 30 mm once the slab is bedded down. Use a straightedge and screeding rails to achieve a consistent, even surface. Place each slab carefully onto the bed, press it down, and tap it level with a rubber mallet. Check level and falls constantly with your spirit level. Do not drag slabs across the bed once placed, as this disturbs the mortar underneath and creates voids.
Leave consistent joint gaps as you lay. For most patio slabs, a 10–15 mm joint is standard. Use plastic tile spacers or cut pieces of timber as temporary spacers to maintain consistent gaps. Full bed contact is critical: every corner and every edge of the slab must be supported. Unsupported corners are the single most common cause of cracked slabs. For porcelain specifically, check the manufacturer's guidance on whether a slurry prime coat or back-buttering is required before bedding, as non-porous porcelain will not bond reliably to dry mortar without it.
Step 4: Jointing and finishing
Allow the bedding mortar to cure before jointing. Most installers wait a minimum of 24 hours, and 48 hours is safer in cool or damp conditions. Walking on freshly bedded slabs before the mortar has set is a very common mistake that creates hollow spots under the surface.
For polymeric jointing compounds, ensure the slab surface and joints are completely dry before application. Sweep the dry compound across the surface and into the joints, working it in with a stiff brush. Remove excess carefully from the slab face, then activate with a fine water mist as directed by the manufacturer. Most products are open to light foot traffic within a few hours but need longer before full garden furniture use. Follow the specific product data sheet for set and cure times.
For flowable grout (ideal for tight porcelain joints), pour carefully into joints and tool to just below the slab surface. Remove any surface contamination immediately with the manufacturer's recommended cleaner, as grout staining on polished porcelain is extremely difficult to remove once set. For traditional mortar pointing, pack the mortar firmly into joints with a pointing iron and finish with a slightly recessed weathered joint. Brush off crumbs once the mortar is thumb-print hard but not fully set.
Sealing is optional on most natural stone and porcelain, but applying a quality patio sealer after jointing has fully cured protects against staining and makes long-term maintenance easier. Always test any sealer on an offcut or inconspicuous area first, particularly on lighter natural stone where some sealers can darken the surface permanently.
Edge restraints and detail work
Edge restraints are not optional. Without them, the perimeter slabs will gradually migrate outward under foot traffic and seasonal ground movement, causing joint widths to grow and slabs to become unstable. Install edge restraints before or immediately after laying the perimeter slabs, not as an afterthought.
Concrete haunching is the most reliable method for most DIY patios. Mix a 1:4 cement:all-in ballast mix and pack it firmly against the outside faces of perimeter slabs, from below the bedding course level up to just below the slab surface. It should be completely hidden from view when finished. Allow it to cure fully before removing any temporary support formwork.
For proprietary edge strips, drive fixing stakes at the spacing the manufacturer specifies (typically every 300–500 mm) and ensure the top of the restraint sits at or just below your finished paving level. Check alignment frequently as you install, as edge strips that bow outward provide very little lateral resistance.
Special considerations for sloped sites
A gentle slope is manageable within a single level patio design, but steep or significantly sloped gardens require a different approach. For slopes steeper than about 1:15, laying a single-level patio means either a lot of excavation at the top end or a significant step up on the lower end, both of which create structural and drainage challenges. In these situations, a stepped terrace design with two or more level platforms connected by steps is far more practical and better-looking.
On any sloped site, water management is critical. Make sure each terrace level sheds water away from the house and toward a lawned area, planted bed, or drainage channel rather than over the step onto the level below. For each terraced level, the edge restraint on the downhill side needs to be particularly robust, as it bears both the lateral pressure of the paving and the weight of any soil retained above it. On steeper sections, proper retaining edges (concrete kerbs, brick soldier courses, or timber sleepers) are needed rather than standard edge restraint strips.
Special considerations for clay, wet or poorly drained ground
Clay soil presents the biggest challenge for any paved surface. It holds water, swells when wet, shrinks when dry, and is slow to drain. A standard 100 mm Type 1 sub-base on clay is often not enough. Increase the depth to 150 mm minimum and compact in smaller lifts. More importantly, address the drainage before you lay anything. Even the best-compacted sub-base will eventually fail if water is pooling beneath it.
Consider installing a perimeter land drain (100 mm perforated pipe in a gravel surround, graded to a soakaway or outlet) around the patio before building the sub-base. On very poor ground, a geotextile membrane between the subgrade and the Type 1 is worth adding. In extreme cases, where the ground is consistently waterlogged or where the clay is very deep and heavy, a granular sub-base alone may not be sufficient and a concrete raft foundation becomes the sensible alternative. If you are at all unsure, get a ground conditions assessment before committing to materials.
Working in winter and cold or wet conditions
Cold and wet conditions create real risks for patio laying. Cement-based bedding mortar and jointing compounds cannot cure properly below about 3 degrees Celsius, and freshly laid mortar that freezes will crumble. The general rule of thumb is not to lay if overnight temperatures are forecast to fall below 3 degrees C within 24 hours of laying.
If you are determined to work in autumn or early spring, monitor forecasts closely. You can protect freshly laid work with frost protection fleece or insulating blankets overnight, but this is only practical for short frost events, not sustained freezing. Avoid working in heavy rain, as water sitting on fresh bedding mortar weakens the mix. The sub-base preparation work (excavation, compaction) can be done in cold or wet weather as long as the ground is not frozen solid or so saturated that compaction is impossible. For a fuller look at seasonal timing, the article on laying a patio in winter covers this in more detail. For detailed guidance on whether you can lay a patio in winter, see the article can you lay a patio in winter for timing, protection methods, and practical tips.
When gravel is not suitable and what to use instead
There are situations where even a well-installed granular sub-base will not give you the stability you need. If any of the following apply to your site, a gravel sub-base is not the right choice.
- The area will carry vehicle loads, even occasionally
- The subgrade is organic (peat, made ground, landfill, old compost heaps)
- The ground is consistently waterlogged and drainage cannot be improved
- The slope is extreme and significant earthworks or retaining structures are required
- You are laying very large format slabs (1000 mm x 1000 mm or larger) where sub-base inconsistencies create unacceptable hollow spots
In these cases, your alternatives are: a concrete raft slab (100–150 mm reinforced concrete, typically specified by a structural engineer for problem ground), or laying patio slabs on full mortar over an existing concrete base. If you already have an old concrete yard or driveway, you may not need to excavate at all. For guidance on whether you can lay a new patio over an old one, see our detailed advice on laying a new patio over an old one. Laying a new patio over an old one is a viable option where the existing slab is sound and levels allow for it. Similarly, if your ground conditions are poor but you still want an outdoor surface, converting to decking on a timber subframe is worth considering. Converting a patio to decking is a practical alternative for very uneven or problematic ground.
Troubleshooting: diagnosing and fixing common problems
Rocking or wobbly slabs
This almost always means hollow spots under the slab, usually caused by inadequate mortar coverage during laying or a slab that was dragged across the bed rather than placed directly. Lift the slab (use two flat chisels or slab lifters), remove and re-lay with fresh mortar ensuring full bed contact. Check the sub-base underneath for soft spots at the same time.
Sinking or settlement
Usually caused by insufficient sub-base depth, inadequate compaction, or organic material left in the subgrade. To fix, lift the affected slabs, excavate deeper, add and compact additional Type 1, and re-lay. If the sinking is widespread rather than isolated, the entire sub-base depth was probably insufficient for the ground conditions.
Weed ingress
Weeds grow in joints, not through compacted sub-base. The solution is proper jointing: replace failed or missing joint material with a quality polymeric compound. A geotextile membrane under the sub-base helps prevent weeds from below, but joint maintenance is the primary defence at surface level.
Drainage problems
If water is pooling on the finished surface, the falls are either incorrect or the joint material has failed and blocked drainage channels. Check your falls with a long spirit level. For a surface that was originally draining well but now pools, sweep-clean the joints and check for mortar or joint compound that has heaved above the slab surface, effectively creating a dam. If the original falls were simply not built into the sub-base, the only full fix is to lift and relay the affected section.
Common mistakes DIYers make (and how to avoid them)
- Using decorative gravel as a sub-base: rounded, ungraded gravel does not compact. Use MOT Type 1.
- Not compacting in layers: dumping 150 mm of Type 1 and running the plate over it once is not compaction. Work in lifts of 75 mm maximum.
- Skipping edge restraints: without them, perimeter slabs will move. Install them on every free edge before or immediately after laying the perimeter.
- Building the fall into the bedding layer: the sub-base should mirror the finished surface fall. Using thick bedding on one side and thin on the other creates uneven support and hollow corners.
- Leaving gaps in the mortar bed: every square centimetre of the slab underside needs support. Spot bedding (mortar on the corners only) is not suitable for flag-style patio slabs.
- Pointing too soon: walking on slabs before the bedding mortar has cured (minimum 24 hours) creates hollow spots that you may not discover until a slab cracks months later.
- Using soft sand in joints: it washes out immediately. Use polymeric compound or mortar.
- Not checking levels frequently enough: lay three or four slabs, then stop and check. It is much easier to correct a problem after four slabs than after forty.
Routine maintenance and simple repairs
A well-built patio on a proper sub-base needs very little maintenance. An annual clean with a patio cleaner or diluted detergent and a stiff brush keeps it looking good. Avoid high-pressure power washing of jointed surfaces, as it can erode polymeric compounds over time. A low-pressure rinse is fine.
Inspect joints every spring. Top up any that have cracked, eroded, or washed out. This is the single most effective maintenance task you can do, as failed joints allow water and weed seeds in, which accelerates further deterioration. Re-applying a patio sealer every two to three years (on sealable surfaces) adds another layer of protection.
For individual cracked or sunken slabs, early action saves money. A single slab can usually be lifted cleanly, the bedding scraped out, fresh mortar laid, and the slab re-bedded in under an hour. Leave it and the problem typically spreads to neighbouring slabs as water gets under the surface and erodes the mortar bed.
When to hire a professional and how to brief them
Most domestic pedestrian patios on reasonable ground are well within the capability of a competent DIYer. But some sites genuinely warrant a professional contractor. Consider getting a professional in if: the ground is heavily contaminated, consistently waterlogged, or showing signs of significant movement; the patio involves complex drainage works or ties into the house drainage system; you need to cut into or alter an existing retaining structure; the area is large (over 30–40 square metres and you have no prior paving experience); or the patio will form part of a planning application or building control submission.
When briefing a paving contractor, ask them to provide a written specification covering: excavation depth, sub-base specification and depth, bedding mix and thickness, jointing product, edge restraint method, and any drainage provisions. A contractor who cannot or will not provide this in writing is a red flag. Ask for evidence of previous similar projects and check that they are familiar with the specific slab material you have chosen, as porcelain in particular requires different handling to concrete flags.
Related projects and what to look at next
Now that you have the full picture on gravel sub-bases, a few related topics are worth exploring depending on your specific situation. If you have an existing concrete yard or old patio, the question of whether you can lay a new patio over an old one is very relevant and often saves a great deal of excavation work. If your project is time-sensitive and you are heading into autumn, understanding the rules for laying a patio in winter will help you plan timing realistically. For ground that is persistently wet, the full detail on laying a patio on wet ground goes deeper into drainage solutions than this article can cover. And if you are reconsidering the patio idea altogether in favour of a raised timber platform, understanding how to lay decking on a patio, particularly over an existing hard surface, is a practical alternative worth knowing about. For another relevant comparison, see how to lay decking on patio.
FAQ
Can you lay patio slabs on gravel — short answer?
Yes — provided the gravel is a suitable, well‑graded, compacted granular sub‑base (for example MOT Type 1 or equivalent) and you use the correct bedding/laying course, edge restraints and jointing. You should not simply place slabs loose on decorative pea gravel or un‑compacted aggregates.
When is gravel an appropriate base for patio slabs?
Gravel is appropriate when it is a purpose‑made, crushed, well‑graded granular sub‑base installed in compacted layers to form a stable load‑bearing layer beneath the bedding. Use this method for pedestrian patios, paths and domestic terraces where ground conditions are reasonable and drainage is adequate. Increase sub‑base depth on soft, wet or clay soils.
When is gravel NOT suitable?
Not suitable if the gravel is decorative pea/grit without compaction, if the subgrade is very soft/organic or subject to significant movement, or for heavy vehicular loading unless the sub‑base and slabs are specifically designed for it. Also avoid loose gravel when frost heave, poor drainage or large slab spans are present unless remedied.
What are the main pros and cons of using gravel as the sub‑base?
Pros: cost‑effective, good drainage, widely available, easy to compact in lifts. Cons: requires correct specification and compaction, mistakes cause rocking/settlement, not suitable as a substitute for engineered sub‑soils on very poor ground, and decorative gravel is inappropriate without compaction and binder.
Quick spec ranges — base depth, bedding thickness and slab thickness?
Typical ranges: compacted granular sub‑base 50–150 mm (100–150 mm common for domestic patios; use the higher end on soft ground). Bedding/laying course 15–40 mm (target compacted ~30 mm for many installations). Slab thickness: porcelain 20–30 mm for pedestrian use (30 mm+ for driveways), natural stone often 22–50 mm depending on product and loading. Adjust for slab size, soil and expected loads.
Which gravel types are recommended for a sub‑base?
Use a crushed, well‑graded granular material (e.g., MOT Type 1, crushed limestone or crushed granite sub‑base per local spec). Avoid rounded decorative aggregates (pea gravel) as a structural sub‑base. Check supplier data sheets to confirm grading and suitability.