To lay a patio, you dig out the area to the right depth, compact a solid sub-base of MOT Type 1 gravel, bed your slabs or pavers onto mortar or sand, set a gentle slope away from the house for drainage, then fill the joints and seal. That's the whole job in one sentence. The rest of this guide is about doing each of those steps correctly so you end up with a level, long-lasting surface instead of a wobbly, puddle-collecting mess. If you're wondering how hard it is to lay a patio, getting the base, levels, and drainage right is the key how hard is it to lay a patio.
How to Lay a Patio: Step-by-Step DIY Guide

Clara Farrell
11 May 2026
Planning and choosing your patio materials
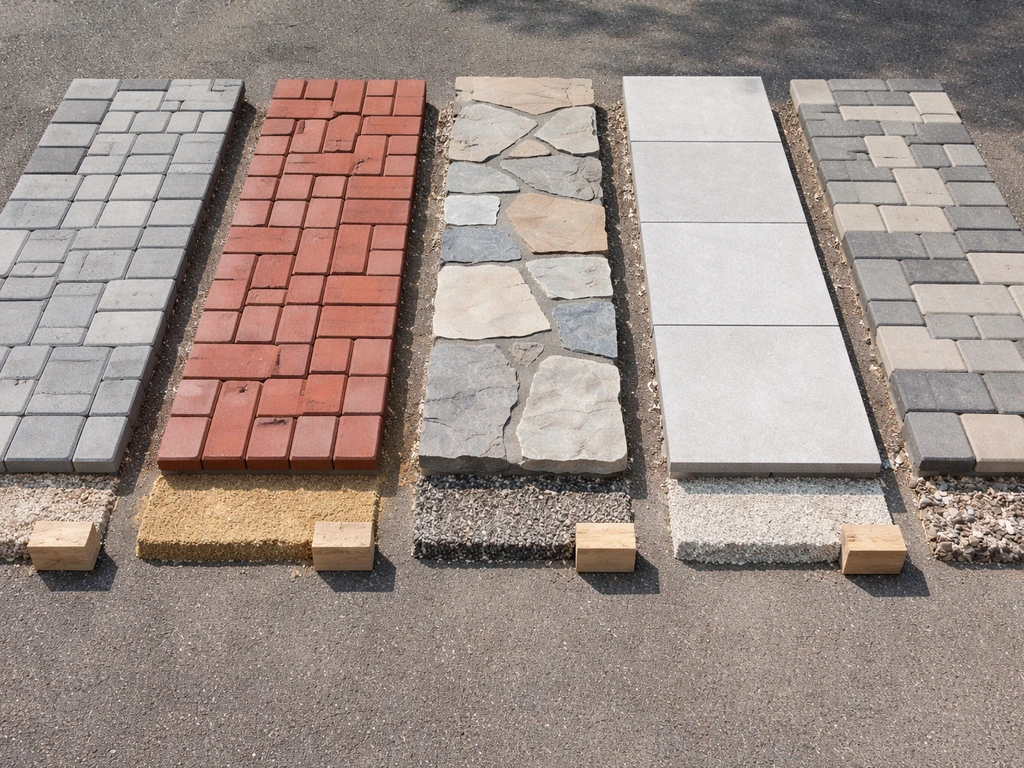
Before you touch a spade, decide what you're laying. The material you choose affects your base depth, your bedding method, and how you cut and finish. Here are the main options most homeowners end up choosing between: To get the exact materials list, start by matching your paving choice to the bedding and base layers, then add edging, jointing sand, and sealing (if needed) patio materials.
| Material | Typical Thickness | Bedding Method | Best For | Watch Out For |
|---|---|---|---|---|
| Concrete block paving | 60–80mm | Sharp sand (30–50mm) | Driveways, informal patios | Weeds in joints if not sealed |
| Natural stone slabs | 25–50mm | Mortar bed (30–40mm) | Traditional, period gardens | Needs careful levelling, heavy to handle |
| Porcelain tiles/slabs | 20mm outdoor rated | Full mortar bed (30–40mm) | Modern, low-maintenance patios | Slippery if not R11 rated; needs diamond blade to cut |
| Brick pavers | 50–65mm | Sharp sand (30–50mm) | Classic look, flexible install | Fades over time, can shift without edging |
| Reconstituted concrete slabs | 35–50mm | Mortar bed or sand | Budget-friendly, consistent sizing | Less premium look than natural stone |
If you're going with porcelain, make sure it's 20mm thick and rated R11 or higher under the DIN 51130 slip-resistance standard (look for 36+ PTV on the spec sheet). That rating means it's tested for wet outdoor conditions. Thinner indoor porcelain is not the same product. If you're doing block paving, 60mm blocks suit most foot-traffic patios. Natural stone is beautiful but heavy and uneven in thickness, which makes bedding it properly slower work.
Also plan your laying pattern before you order. A simple stack-bond (grid) pattern wastes least material. A running-bond (brickwork offset) is stronger and more forgiving of small size variations. Herringbone looks great with blocks and is very stable. Sketch it out, then calculate your square meterage and add 10% for cuts and breakages.
Site prep and measuring the area
Mark out your patio with pegs and string lines. Use a builder's square (or the 3-4-5 triangle method) to get your corners at true 90 degrees. Measure the diagonal from corner to corner in both directions: if those two measurements match, your rectangle is square. Get this right now because every other step builds on it.
Once you have your outline, set your finished surface level. If the patio is next to the house, the finished paving surface must sit at least 150mm below the damp-proof course (DPC). Designing Buildings notes that where it isn't possible to keep external levels at least 150mm above the DPC, external drainage solutions such as French drains may be required 150mm below the damp-proof course (DPC). This is non-negotiable. Bridging the DPC is a common and expensive mistake that allows moisture to travel up into your walls. Measure down from a visible mortar course that you know is below the DPC and mark that level on a batten screwed to the wall.
Now transfer that finished level around the whole perimeter using a spirit level, laser level, or water level. Drive in timber pegs at 1–1.5 metre intervals around the area to mark the finished surface height. These pegs become your reference throughout the whole job, so take your time getting them accurate.
Base layer excavation and subgrade prep
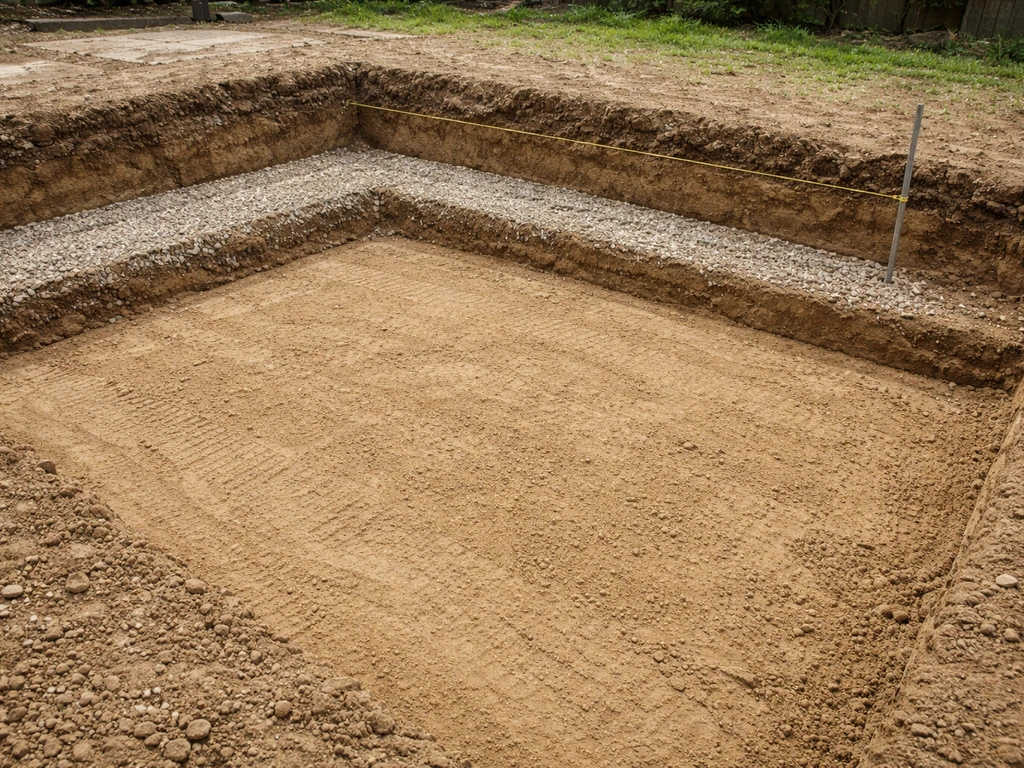
This is the part most people underestimate and the single biggest cause of patio failure. A patio that sinks, cracks, or becomes uneven almost always traces back to a weak or thin base.
Work out how deep to dig by adding up your layers from the top down: finished paving thickness + bedding layer (30–40mm mortar or sand) + compacted sub-base (100mm minimum for light pedestrian use). If you are wondering how long to lay a patio, the best starting point is the square meterage, the base and bedding type, and the drying and curing times for mortar. For a typical 20mm porcelain slab, that's 20 + 40 + 100 = 160mm below your finished surface level. For thicker natural stone (say 40mm) on a 30mm bed, add 100mm sub-base: 170mm total. Mark this excavation depth clearly on your reference pegs and dig to it.
Once you've dug out, compact the exposed soil (subgrade) with a vibrating plate compactor before adding anything else. If you hit soft, waterlogged ground or thick clay, you may need to dig deeper and add extra sub-base. Clay holds water and moves seasonally, so don't skimp on depth if conditions are bad. Remove all roots and organic material. Organic matter rots and leaves voids.
Now bring in your MOT Type 1 crushed aggregate and spread it in layers. Critically, don't dump the full 100mm in one go. Compact it in layers of roughly 50–75mm at a time. Compaction of around 30% with Type 1 aggregates is generally looked for as guidance to achieve the right density. A standard flat-plate compactor can't effectively compact much more than 75–100mm in a single pass. Add your first layer, compact it thoroughly, then add the second layer and compact again. Use your string lines or a laser level to keep the sub-base at a consistent depth and to start building in your drainage fall.
Installing edging and setting proper slopes
Edging goes in before you lay a single paver. It holds everything together and stops the edges creeping outward over time. For block or brick patios on a sand bed, edging is essential. For mortar-bed jobs, the edge slabs are typically haunched in concrete anyway, which achieves the same thing.
Concrete kerb edging or treated timber boards both work. Lay them on a firm concrete haunch, check they're at your finished surface level, and let them set before you start filling inside. If you're using flexible plastic edge restraints, peg them firmly every 300mm or they'll bow under pressure.
Slope is critical and easy to get wrong. Water needs a way off the surface or it pools, stains, and in winter can freeze and lift your slabs. Aim for a fall of 1:60 away from the house (roughly 16mm for every metre of patio length). That's enough to move water effectively off both smooth and textured surfaces. A fall of 1:80 (12.5mm per metre) is the absolute minimum for a smooth surface. To set this fall, simply drop your string lines and reference pegs by the correct amount every metre as you move away from the house.
If your garden is sloped toward the house, you have a more complex problem. You either need to re-grade the subgrade to redirect water before it reaches the patio, install a channel drain at the edge of the patio closest to the house, or use a combination of both. If your patio is cracking or moving, adding rebar for patio reinforcement may be part of the fix re-grade the subgrade to redirect water. Don't just build a patio on a slope and hope for the best.
Laying the patio pavers, bricks, or tiles in pattern
With your sub-base compacted and edging set, it's time to lay your bedding and start placing paving. The bedding method depends on your material.
Mortar bed (for slabs, natural stone, porcelain)
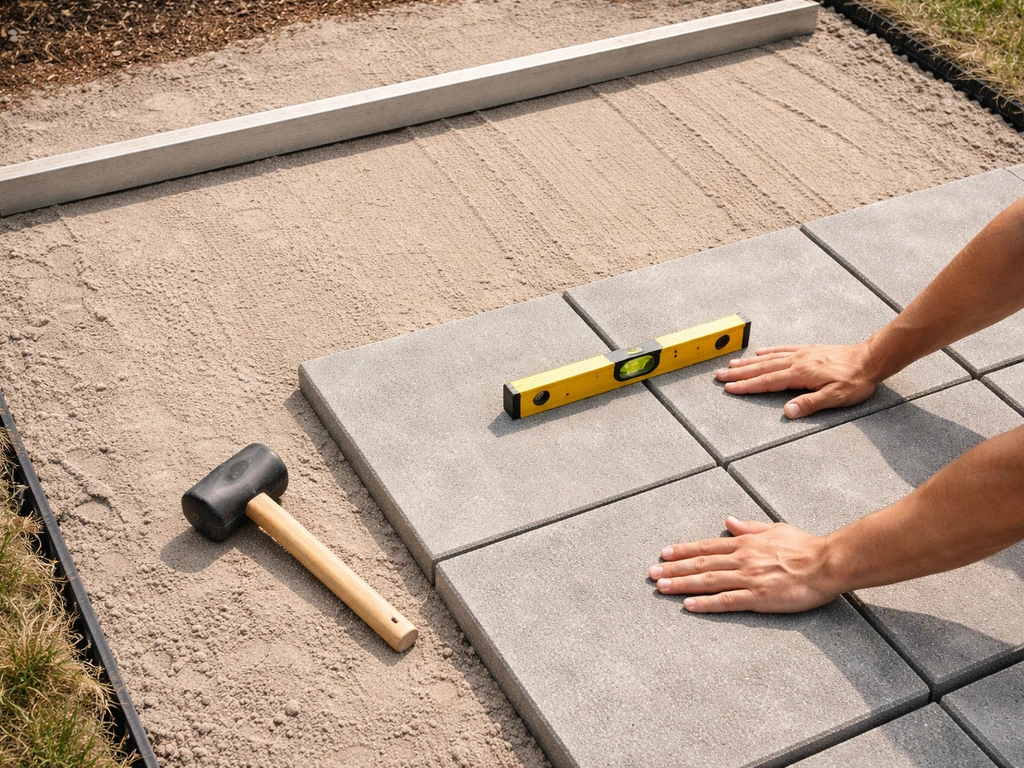
Mix a 4:1 or 5:1 ratio of sharp sand to cement as a semi-dry mortar. It should clump in your hand but not be wet. Spread it at 30–40mm depth, screed it roughly level, then place each slab on top and tap it down with a rubber mallet. Check the level and slope with a spirit level after each slab. Butter the back of porcelain with a coat of flexible tile adhesive before setting it on the mortar bed. This gives full contact and prevents hollow spots that cause cracking.
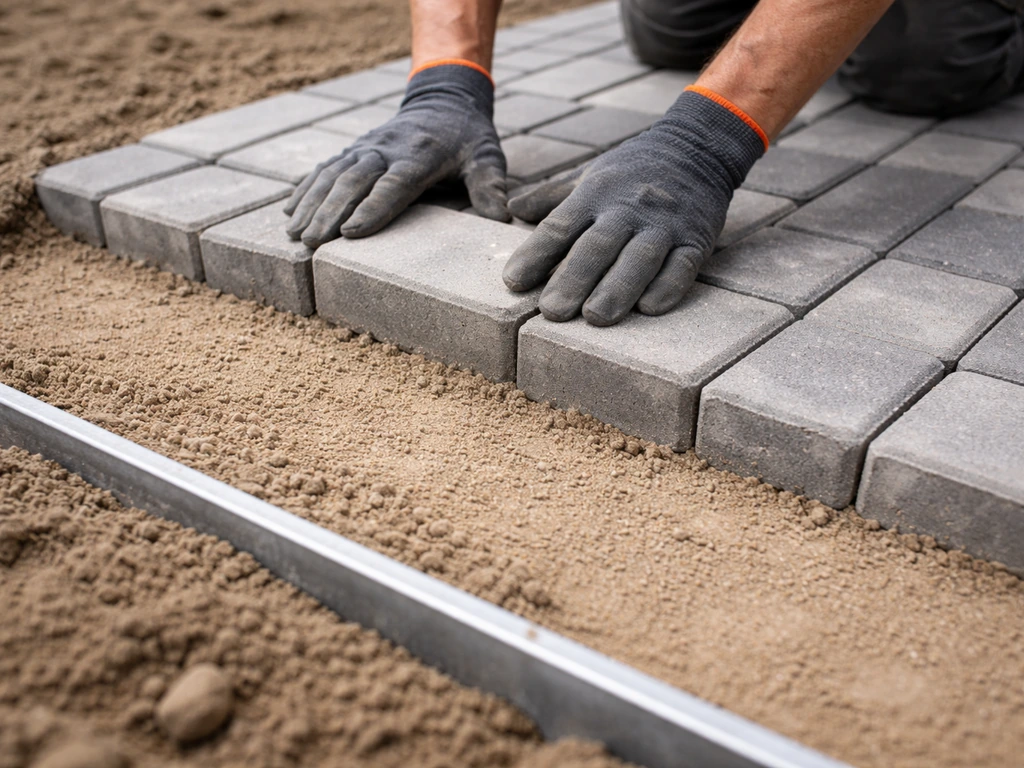
Sand bed (for concrete blocks and brick pavers)
Spread sharp sand at 30–40mm depth (after compaction this will reduce to about 25mm, which is what you want). Screed it flat using your reference pegs and a straight screed board. Lay blocks in your chosen pattern, butting them tight together. Don't walk on the screeded sand before placing blocks. Work from a board placed on the blocks you've already laid to keep your screeded sand undisturbed.
In both cases, start from a fixed straight edge (usually the house wall or a fixed edge restraint) and work outward. Check your pattern alignment and fall regularly. Don't assume things are staying in line. A small error over the first few rows becomes a large problem later.
Cutting around obstacles and finishing details
Unless you're incredibly lucky, you'll hit obstacles: drain covers, corners, steps, curved edges, or existing walls. Cutting neatly around these is what separates a professional-looking patio from an amateur one.
For cutting, use an angle grinder with the right blade for your material. Porcelain must be cut with a diamond disc specifically rated for porcelain stoneware. A standard concrete cutting disc will chip the edges or crack the tile. Natural stone can be cut with a standard diamond blade but scores along the cut line first with a chisel to reduce chipping. Concrete blocks can be split with a bolster chisel and club hammer for straight cuts, or cut with a disc cutter for precision.
Always dry-lay cut pieces first to check the fit before committing to mortar. Around drain covers, leave a gap of at least 10mm for movement. If you have a manhole cover in the middle of the patio, a recessed cover frame lets you infill the lid with matching paving to hide it. Plan this before you start laying because you'll need a slightly deeper recess.
Border and edging details are where the job looks finished or unfinished. If you're using a contrasting border slab, lay it first (after the edging is in) and use it as your second reference line for the field laying. Keep joint widths consistent using plastic tile spacers or off-cuts of the same material.
Compaction, jointing, and curing or sealing
Once all the paving is laid, go over the whole surface with a vibrating plate compactor to bed everything down evenly and settle the bedding layer. For block paving on sand, this is a key structural step. Run the compactor in multiple passes across the surface, ideally from different directions (north-south then east-west), to get an even settlement. For mortar-bed slabs or porcelain, use the compactor with a rubber sole plate to avoid chipping. If you've used mortar, wait at least 24–48 hours for it to firm up before compacting.
For block paving joints, brush kiln-dried jointing sand across the surface and work it into the joints with a soft broom. Make several passes, compacting between each to help settle the sand deeper into the joints. You'll need to top up the jointing sand over the following 4–6 weeks as it continues to settle. Expect this and don't be alarmed by it.
For mortar-bed slabs, point the joints with a dry or semi-dry mortar mix pressed in with a pointing trowel or a grout bag. Keep the mortar slightly below the surface edge so water runs off the slabs rather than pooling in the joints.
On sealing: don't rush it. Wait at least 3 months before sealing block paving, and make sure any white efflorescence (salt deposits) has fully appeared and cleared from the surface first. If you seal over efflorescence it gets locked in. Power wash the surface at least 14 days before sealing to let the base dry out and allow any reactive efflorescence to show itself. Check that your sealer is compatible with any polymeric or resin jointing compound you've used. For porcelain patios, sealing is optional since porcelain is non-porous, but a light enhancing sealer can be used on natural stone and concrete block.
Troubleshooting uneven slabs and drainage problems
Even a well-laid patio can develop issues. Here's how to diagnose and fix the most common ones.
Rocking or uneven slabs
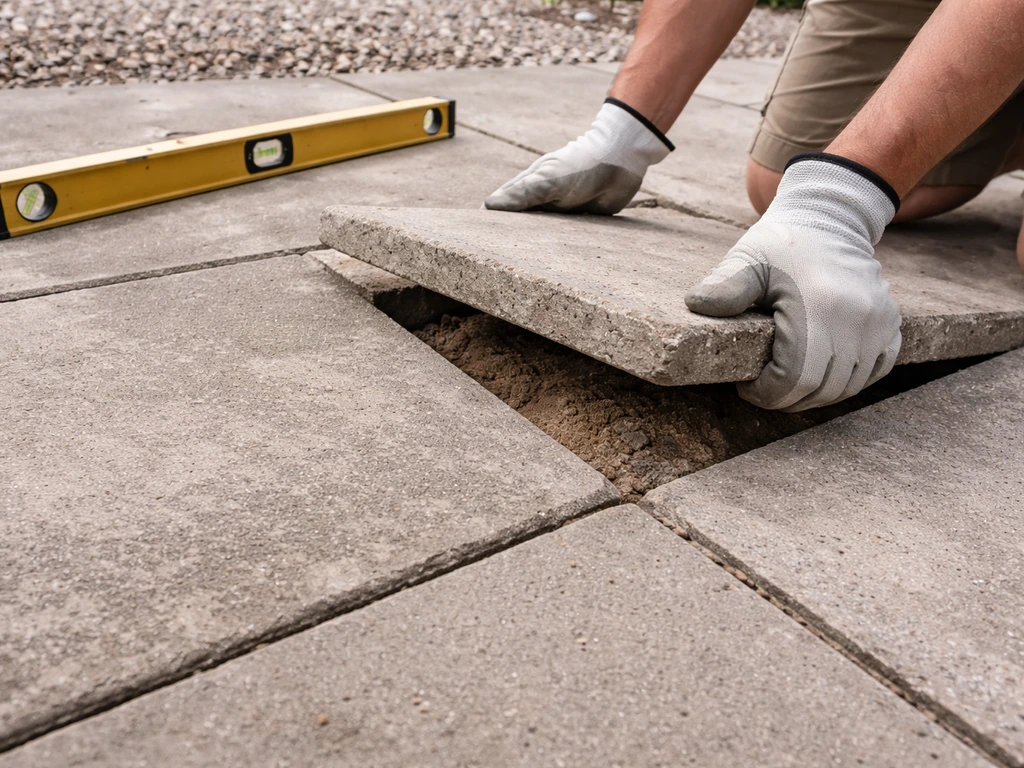
A rocking slab almost always means hollow spots in the bedding. This happens when a mortar bed isn't fully supporting the slab or when a sand bed was uneven. The fix is to lift the slab, add material to the low spots, rebed and relay. It's a proper fix, not a patch. Trying to grout around the edges won't stop the rocking and the slab will crack under foot traffic. If multiple slabs are rocking, it may point to an insufficiently compacted sub-base that has settled unevenly.
Water pooling on the surface
Pooling water means your fall is insufficient or slopes the wrong way. Check your surface with a long spirit level and measure the actual fall. If the fall is less than 1:80, you'll need to relay the affected section with the correct slope built in. If the patio is draining correctly but water backs up at one edge, you may need to install a linear channel drain along the lowest edge to catch and redirect runoff.
Sinking areas or depressions
Localised sinking usually means soft spots in the subgrade that weren't fully compacted or treated before the sub-base went in. In clay soils this is especially common where water has pooled and softened the ground. Lift the affected slabs, dig out the area, and either add a geotextile membrane below the sub-base to stabilise it, increase the sub-base depth in that area, or compact the subgrade more aggressively before rebuilding. A membrane won't fix a fundamentally soft subgrade, but it does help prevent sub-base material mixing into soft soil over time.
Efflorescence and staining
White efflorescence is salt migrating from the cement or sand to the surface. It's very common in the first year and usually clears on its own with weathering and cleaning. Don't panic and don't seal over it. Clean it off with a diluted efflorescence remover or let rain do the work. It can take up to a year to fully clear before sealing is appropriate.
Cracked slabs
Cracking usually comes from point loading over hollow bedding spots, using slabs that are too thin for the application, or frost heave in a poorly drained base. Thin (10mm) indoor porcelain used outdoors is a common culprit. Always use 20mm outdoor-rated porcelain. For natural stone, make sure the full underside is bedded and there are no voids. If frost is an issue in your area, make sure your base material is non-frost-susceptible (MOT Type 1 is) and that drainage is good enough that water doesn't sit in the base and freeze.
Your patio project checklist
Use this to keep track of where you are and what's still to do. If you're wondering what tools do i need to lay a patio, use the checklist to make sure you have everything ready before you start digging. Work through it in order and don't skip steps to save time. The prep stages take longer than the laying, but they're the difference between a patio that lasts 20 years and one that needs redoing in five.
- Choose your paving material and calculate quantities (add 10% for cuts)
- Mark out the area with pegs and string lines, check corners are square
- Confirm finished surface level is at least 150mm below the DPC
- Set drainage fall reference pegs at 1: 60 (16mm drop per metre) away from the house
- Calculate total excavation depth (slab thickness + bedding depth + 100mm sub-base minimum)
- Excavate to depth, remove all roots and organic matter
- Compact the subgrade with a plate compactor
- Add MOT Type 1 sub-base in 50–75mm layers, compacting each layer
- Install edge restraints and haunch with concrete, allow to set
- Lay bedding material (mortar for slabs/porcelain, sharp sand for blocks)
- Lay paving in your chosen pattern, checking level and fall regularly
- Cut pieces to fit around obstacles using the correct blade for your material
- Compact the full surface with a plate compactor (rubber pad for slabs)
- Fill joints with kiln-dried sand (blocks) or point with mortar (slabs)
- Top up joints over the following 4–6 weeks as settlement occurs
- Wait at least 3 months and for efflorescence to clear before sealing
If you want to go deeper on specific parts of this project, the tools needed, how long the job realistically takes, and how to handle a patio immediately next to the house wall each deserve their own attention. If you're wondering how long to lay a patio in the UK, that timing depends on your base prep, materials, and whether the patio is next to the house wall how long to lay a patio uk. Handling a patio immediately next to the house wall has some extra do's and don'ts, so pay special attention to the damp-proof course and drainage. The preparation steps covered here are universal, but the hands-on workflow for dry-laying versus mortared slabs, and for tricky sloped sites, have their own extra details worth knowing before you start.
FAQ
Can I lay a patio on top of an existing concrete base?
Yes, but only if you keep the required levels and drainage. On an existing concrete slab, you usually need either a bonded resurfacing system or a properly ventilated separation, because you cannot rely on compacted Type 1 below. If you’re aiming to lay pavers over concrete, check whether the concrete is stable, sound, and has no rising damp, and plan for a true fall because you cannot “dig down” to build the slope like you would on soil.
What should I check if my patio ends up higher than expected near the house or steps?
Do a dry run with spacers and cut plans before you commit to mortar or bedding. A practical rule is to leave a small, planned gap at edges (especially by drains, steps, and walls), then build the slope from your reference pegs. Also, confirm that your paving thickness plus bedding leaves enough room to achieve the correct fall and the DPC clearance, otherwise you may end up too high against the house.
Do I need expansion or movement joints when laying a patio?
Use edging and movement gaps, plus a compressible joint where appropriate. Leave movement joints at regular intervals for long runs, and around fixed structures like walls, drain frames, and pipe penetrations. Without gaps, temperature movement can push blocks or slabs outward and cause hairline cracking or “tenting” over time.
My patio is starting to sink, how can I tell if it’s a sand-bedding issue or a weak sub-base?
If you suspect soft ground, do not proceed with just “more sand.” Lift one or two test slabs, expose the base, and check whether the sub-base was compacted in lifts, whether the soil was fully removed of roots and organic material, and whether there is any sign of pumping or voids. A solid fix is to re-dig to firmer material and rebuild with adequate compaction, sometimes adding geotextile on soft subgrade.
Can I lay a patio on grass or topsoil directly?
Yes, if you prepare the soil correctly and get good compaction. For lawns, remove turf and topsoil, then compact the subgrade thoroughly, ideally with a vibrating plate compactor. Avoid installing on spongy ground, and in heavy clay ensure you have sufficient depth and drainage so the sub-base does not stay wet and move seasonally.
How do I keep drainage correct when I have drain covers or utility access points?
Start with a plan to keep the fall consistent, even around openings. If the patio must pass over a drain cover or utility box, you may need a recessed frame and to rebuild the surrounding bedding so the cover sits at the correct finished height, still maintaining the overall slope away from the house. Leaving the cover proud or low will disrupt water run-off and invites cracking around the frame.
How should weather and curing time change my plan for bedding, compaction, and sealing?
For mortar-bed installations, sealing or compaction timing matters. Don’t compact over mortar immediately after laying, wait for the mortar to firm up (often at least a day or two depending on conditions), and keep the surface from getting washed out by rain. For sand or resin jointing systems, follow the jointing and setting time so the joints lock in rather than being disturbed.
If I use porcelain, do I still need to worry about algae or slip?
Yes, and the “non-porous” label only covers water absorption, not performance. For porcelain, confirm you still have a compatible bedding and grout or joint sand choice, and ensure slip resistance is sufficient for your local conditions. If you have algae risk from shade and moisture, even porcelain can get slippery, so prioritize drainage and consider a suitable algae-resistant cleaning routine.
What’s the most common mistake with patio cutting and small infill pieces?
Make sure your cut pieces do not create narrow strips that act like hinges. If a cut edge would be too thin, redistribute cuts by adjusting your pattern start point, and keep joints consistent using spacers. Around obstacles, avoid forcing dry-fit shapes into position, instead tweak the layout so the cuts can sit flat on full bedding and do not leave unsupported corners.
Can I fix a problematic patio by regrouting or re-sanding, or do I have to lift slabs?
Sometimes, but it depends on the cause. If only joints are failing, you might be able to re-sand and re-compact. If slabs are rocking, uneven, or water is pooling, the cure is usually to lift and re-bed or re-grade, because patching joint sand or grout will not fix hollow spots or an incorrect base slope.