
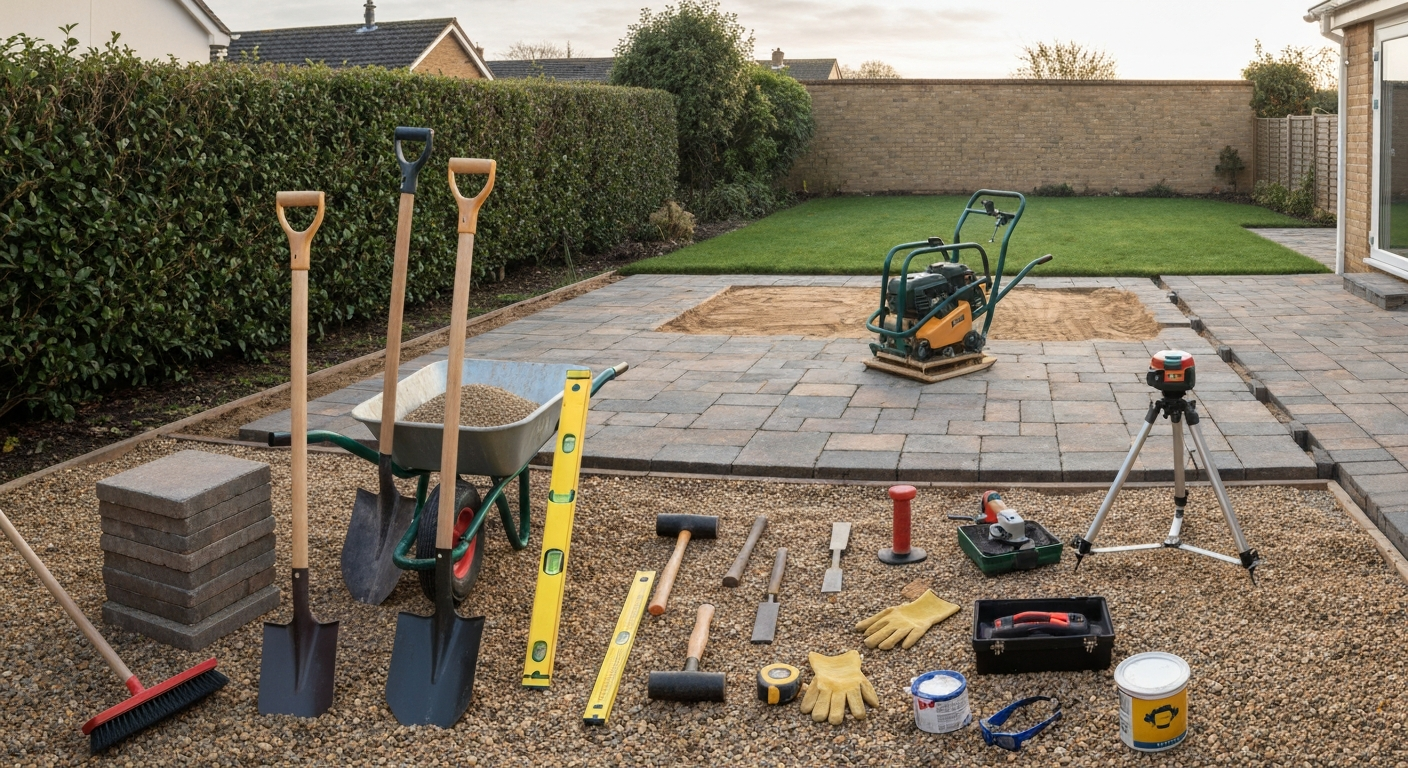
To lay a patio you need a spade, shovel, mattock or pick, wheelbarrow, tape measure, stringline and stakes, a spirit level, a plate compactor (rented), a rubber mallet, a hand tamper, screed rails, a bolster chisel and club hammer, and basic PPE including safety glasses, gloves, and knee pads. That covers the vast majority of straightforward block or slab patios. Depending on your paving method and site conditions, you may also want a wet tile saw, an angle grinder, a rotary laser level, or specialist concrete and rebar tools, all of which are covered below.
What Tools Do I Need to Lay a Patio: Complete DIY Checklist

Clara Farrell
25 Jul 2026
Who this guide is for and what it covers
This guide is written for homeowners and DIYers tackling a patio for the first time, as well as anyone upgrading from a simple block installation to something more complex like a mortar-bedded stone patio or a reinforced concrete slab. If you are wondering what tools you need before you go shopping or start hiring equipment, this is the article to read first. For a step-by-step walkthrough of the whole process, see how lay a patio. It walks through every tool phase by phase, from initial digging to the finishing sweep, and then breaks things down by construction method so you know exactly what applies to your specific project. I have also flagged the tools that are genuinely worth hiring rather than buying, the common mistakes that come from missing a key item, and the situations where honest advice says: get a professional in.
The essential tools checklist, what every patio project needs
No matter what type of patio you are laying, these are the tools you will use on every single job. Do not start without them.
- Spade (flat blade) — for cutting clean edges and lifting turf
- Shovel (round or square mouth) — for shifting bulk material like gravel, sand, and spoil
- Mattock or pick — for breaking up compacted soil, clay, and roots
- Wheelbarrow — a large builders' barrow (at least 85L capacity) for moving spoil and base materials
- Tape measure (at least 5m/16ft) — for setting out dimensions and checking square
- Builder's line (stringline) and stakes — for setting your perimeter, checking straight lines, and controlling your finished level
- Spirit level (at minimum 1.2m/4ft, ideally 1.8m/6ft) — for checking individual slabs and short runs
- Rubber mallet (1–1.5kg) — for seating slabs and pavers without cracking them
- Hand tamper — for compacting small areas and bedding material before the plate compactor arrives or for tight spots it cannot reach
- Screed rails or straight edge (aluminum or timber) — for pulling bedding sand or dry mortar to a consistent depth
- Bolster chisel and club hammer (or lump hammer) — for hand-cutting bricks, blocks, and concrete pavers
- Stiff-bristle broom — for sweeping jointing sand into gaps and cleaning down
- Builder's square or a 3-4-5 measuring triangle — for checking that corners are truly 90 degrees
- Marker paint or chalk line — for marking out cut lines on the ground or on slabs
- Safety glasses, work gloves, knee pads, and steel-toe boots (PPE) — non-negotiable from day one
One tool that first-timers consistently underestimate is the spirit level. A 600mm/2ft level is not long enough for accurate patio work. Buy or borrow at least a 1.2m/4ft one, better still a 1.8m/6ft straightedge with a level built in. Getting your surface slope right matters far more than most people realise: you need a consistent fall of around 1 to 2% (roughly 10–20mm per metre, or about 1/8 to 1/4 inch per foot) away from the house or any structure to ensure water drains correctly. A short level makes that impossible to judge accurately over a full patio run.
Tools that make the job significantly easier
These tools are not strictly essential for every small patio, but they save serious time and improve accuracy. If your budget allows, these are the upgrades I would recommend first.
- Plate compactor (vibratory) — rental is the sensible option for homeowners (typically £60–£100/day in the UK or $60–$100/day in the US); an uncompacted base is the single biggest reason patios sink, rock, and fail within a couple of years
- Rotary or rotating laser level — rental costs around £40–£80/day and pays for itself in time saved when setting out grades and drainage falls across a large area; a line laser at minimum is very helpful for any patio over about 10 square metres
- Angle grinder with a diamond blade (115mm or 125mm) — essential for cutting curves, notches around drain covers, and last-minute trimming; far more versatile than a bolster for odd shapes
- Dead-blow mallet — heavier and more precise than a rubber mallet for seating large format slabs
- Block paving screed bars (purpose-made rails, typically 10mm or 15mm diameter) — far faster and more accurate than improvising with timber for screeding sand depth
- Long-handled float or gauge rake — for spreading and roughly levelling base material across larger excavations before the plate compactor runs
- Pointing trowel and margin trowel (for mortar-bedded work) — not needed for dry-lay but essential for slabs bedded on mortar
- Jointing brush or grout bag — for working jointing compound into gaps on natural stone and larger-format slabs
- Knee boards (kneeling boards) — spreads your weight when working on freshly laid slabs and protects the bedding layer
Optional specialist equipment, when to consider power tools and hired kit
For larger, more complex, or more demanding projects, specialist tools move from optional to pretty much necessary. Here is what to consider and when.
- Wet tile saw (table saw with continuous-rim diamond blade) — essential for natural stone, porcelain, and large-format tiles; wet cutting dramatically reduces airborne silica dust and gives far cleaner, safer cuts than a dry blade; rental is widely available for around £60–£100/day
- Mechanical paver splitter (guillotine splitter) — a fast, dust-free way to make straight cuts through concrete block pavers and standard clay bricks on high-volume jobs; rental or hire-shop tool
- Reversible plate compactor — recommended over a standard forward-only machine for anything larger than a small courtyard; the reverse action speeds up coverage significantly and prevents you from having to drag the machine back manually
- Jumping-jack rammer (trench rammer) — better than a plate compactor for compacting cohesive or clay-heavy soils and for tight, narrow trenches around edge restraints
- Concrete mixer (electric, 120–140L drum) — saves enormous time and effort when mixing large quantities of mortar or concrete for a full mortar-bedded or cast slab project; hire for anything requiring more than about 6–8 bags of cement
- SDS rotary hammer drill — for fixing edge restraint pegs into existing hard surfaces, drilling holes in concrete, or pinning framework
- Laser distance measurer — quicker and more accurate than a tape alone for large areas and calculating material quantities
- Theodolite or optical level — only relevant for large or sloped sites where a rotary laser alone is insufficient; most homeowners will never need this
- Water level (a long, clear hose filled with water) — a low-cost alternative to a laser level for transferring a datum point across the site, especially useful where direct sightlines are blocked by steps or changes in level
On the topic of buying versus renting: a plate compactor costs £600–£1,200 to buy and the average homeowner uses it once or twice in their lifetime. United Rentals' guide 'How to Choose a Plate Compactor for the Job, United Rentals (rental/equipment guidance)' recommends plate compactors for granular bases and rammers for cohesive soils, and notes that renting is typically more cost‑effective for homeowners How to Choose a Plate Compactor for the Job — United Rentals (rental/equipment guidance). Rent it every time. The same applies to a wet tile saw (£400–£800 to buy) and a rotary laser (£300–£900 to buy). The three tools I do think are worth owning if you are doing even one patio project are a quality spirit level, a decent angle grinder, and a rubber mallet, all three see regular use around the home and cost relatively little.
Tools by construction method: block and paver patios
Interlocking concrete pavers and clay brick patios (dry-laid on a sand bed over a compacted aggregate base) are probably the most forgiving patio method for first-timers. The ICPI (now CMHA) installation sequence is well-established: excavate and compact the subgrade; install geotextile fabric if required; build a compacted granular base (around 100mm/4 inches for pedestrian patios) in lifts of no more than 100mm/4 inches at a time; screed a 25mm/1 inch bedding sand layer; lay pavers to a stringline; install edge restraints; sweep in jointing sand; and give the finished surface a final pass with the plate compactor to bed everything in. Each phase uses specific tools.
| Phase | Tools needed | Notes |
|---|---|---|
| Excavation and layout | Spade, shovel, mattock, wheelbarrow, tape measure, stringline and stakes, builder's square, marker paint | Excavate to 150–200mm below finished level for a pedestrian patio (base + sand + paver thickness) |
| Subgrade compaction | Plate compactor or jumping-jack rammer (hire) | Jumping-jack is better for clay subgrades; plate compactor suits granular fill |
| Base layer (aggregate) | Shovel, gauge rake, plate compactor (hire) | Compact in lifts of max 100mm; at least 2 passes per lift |
| Screed sand bed | Screed rails (10–15mm diameter), long straight-edge or screed board, tape measure | Pull a consistent 25mm/1 inch depth; do not walk on screeded sand |
| Laying pavers | Rubber mallet, kneeling boards, stringline, tape measure, spirit level (1.2m+) | Check every 4–5 courses against the stringline and level |
| Edge restraints | Spade, rubber mallet or hammer, SDS drill (for pinning) | Restraints must be on compacted base, not sand; spike into base at max 300mm centres |
| Cutting | Bolster chisel + club hammer, angle grinder with diamond blade, or mechanical paver splitter | Mechanical splitter is fastest for straight cuts on block pavers |
| Jointing and finishing | Stiff-bristle broom, plate compactor with rubber pad (hire), pointing brush | Add jointing sand, sweep in, compact surface — repeat 2–3 times |
One thing to be aware of with surface tolerance on block paving: the accepted standard (from ICPI guidance) is flatness of plus or minus 10mm over a 3m/10ft straight-edge, with lippage between adjacent pavers of no more than 3mm. ICPI tolerances are summarized in Dimensional Tolerances in Construction and for Surface Accessibility, U.S. Access Board (compilation including ICPI tolerance guidance), noting ±10 mm over 3 m (≈3/8 in. over 10 ft) flatness and ≤3 mm (≈1/8 in.) lippage for segmental pavers Dimensional Tolerances in Construction and for Surface Accessibility — U.S. Access Board (compilation including ICPI tolerance guidance). That sounds generous, but it only stays within tolerance if your screed sand is truly consistent and your compaction is done in proper lifts. Skip the screed rails and try to eyeball the sand depth, and you will almost certainly exceed that tolerance in places, leading to rocking pavers and trip hazards.
Tools by construction method: slab, tile, and porcelain patios on a mortar bed
Larger format slabs, porcelain tiles, and natural stone set on a full or spot mortar bed require a different toolset to block paving. The bedding material is a semi-dry mortar mix rather than loose sand, and getting the levels accurate on heavy, awkward slabs means the work is less forgiving of improvised tools.
- All the excavation tools listed above (spade, shovel, mattock, wheelbarrow)
- Plate compactor for base preparation (hire)
- Concrete mixer for mixing semi-dry mortar in volume (hire for anything beyond a few slabs)
- Pointing trowel and margin trowel for applying and adjusting mortar spots or a full mortar bed
- Large float or hand float for spreading mortar across the bed area
- Spirit level (1.8m/6ft is worth having here — slabs are large and a short level will mislead you)
- Rotary laser level or line laser for setting consistent falls across the whole patio (hire)
- Rubber mallet or dead-blow mallet for seating slabs — never use a steel hammer directly
- Slab lifters or vacuum lifting pads (hire or buy cheaply) — large porcelain and stone slabs can weigh 40–60kg each and are nearly impossible to place accurately by hand without tools to grip them
- Wet tile saw with continuous-rim diamond blade for cutting porcelain and ceramic tile (hire)
- Angle grinder with diamond blade for trimming and shaping
- Pointing tools: grout bag, pointing gun, or small trowel depending on joint width and material
- Sponge and bucket for cleaning mortar off slab faces before it cures
- Kneeling boards — essential when working on a fresh mortar bed
Porcelain specifically requires wet cutting, dry cutting creates excessive airborne silica dust, which is a serious long-term health hazard, and a dry blade will also chip and crack porcelain. Always use a wet tile saw or at minimum an angle grinder with a continuous-rim wet-rated diamond blade, and wear a P3 or FFP3 dust mask even when cutting wet. UK Control of Substances Hazardous to Health (COSHH) regulations and equivalent US OSHA silica rules both apply. This is one area where the right tool is not optional, it is a health and safety requirement.
Tools by construction method: natural slate and irregular paving
Natural slate, sandstone, limestone, and other irregular natural stone patios are among the most rewarding to install but also the most demanding in terms of cutting and levelling. Irregular thickness means more adjustment at the bedding stage, and the material itself is less predictable to cut than manufactured block or tile.
- All standard excavation and base preparation tools (spade, shovel, mattock, wheelbarrow, plate compactor)
- Concrete mixer for mortar (hire — natural stone almost always goes on a full or spot mortar bed)
- Spirit level (1.8m/6ft) and a long straightedge
- Rotary laser level (hire strongly recommended) — compensating for irregular stone thickness while holding consistent surface levels is very difficult without a laser reference
- Rubber mallet and dead-blow mallet
- Stone chisel set and club hammer — for hand-trimming irregular edges and splitting thin pieces
- Angle grinder with a 115mm or 125mm continuous-rim diamond blade — for shaping curves and trimming irregular pieces; this is the most used cutting tool on natural stone work
- Wet tile saw with a segmented or continuous-rim diamond blade suited to stone (different from porcelain blades) — for straight through-cuts on thicker pieces; hire if needed
- Pointing tools: trowel, pointing iron (a flat metal tool for compressing mortar joints), jointing brush
- Stone sealer applicator (brush or roller) — many natural stones (especially limestone and sandstone) should be sealed on completion; this is not a cutting or laying tool but you will need it at the end
- Kneeling boards
- FFP3/P3 dust mask and safety glasses for all cutting operations
One practical tip from experience: on irregular natural stone, your screed or mortar bed depth will vary from piece to piece to compensate for differences in stone thickness. This means you are constantly making small adjustments by eye and level rather than relying on a consistent screed depth the way you would with block paving. A rotary laser on a tripod positioned at the edge of the work area gives you a consistent reference plane to check every stone against, which makes this far less frustrating. It is the single most useful hire tool on a natural stone job.
Tools by construction method: cast concrete slabs and reinforced concrete work
Pouring a cast concrete patio slab is the most technically demanding option and requires the most extensive toolset. It is also the method where mistakes are hardest to fix, once concrete sets, your options are limited. That said, a well-poured reinforced concrete slab is extremely durable and forms an excellent base for tile or stone on top. If reinforcement (rebar or wire mesh) is part of your plan, there are additional tools specific to that work.
Formwork and preparation tools
- Spade, shovel, mattock, wheelbarrow — same as all other methods
- Plate compactor or jumping-jack rammer for subgrade and base (hire)
- Timber formwork boards (typically 50mm x 150mm or 50mm x 200mm softwood) — these form the perimeter mould for the slab
- Stakes and pegs (25mm x 25mm or 50mm x 50mm timber) for holding formwork in position
- Hammer (claw hammer or sledge) for driving formwork stakes
- Spirit level and rotary laser level for setting formwork to the correct fall and finished height
- String line and pins for aligning formwork boards
- Tape measure and builder's square for checking dimensions
- Release agent (form oil) and brush — applied to formwork boards before pouring to prevent sticking
Rebar and reinforcement tools
ACI guidance (ACI 318) specifies a minimum of 75mm (3 inches) of concrete cover between the reinforcement and the bottom of a slab cast directly on the ground. In practice, this means your rebar or mesh must be held up off the subbase at the correct cover depth using plastic or concrete spacer chairs before the pour. Getting this wrong means the steel corrodes, which eventually cracks the slab from the inside. For step-by-step guidance on placing and securing reinforcement, see how to lay rebar for patio.
- Rebar cutter and bender (hire for heavy gauge rebar, or buy bolt cutter equivalents for lighter steel)
- Rebar tying wire and tie wire pliers (twist twisters) — for tying reinforcement intersections together
- Plastic or concrete bar chairs and spacers — to hold rebar or mesh at the correct cover height
- Bolt cutters — for cutting wire mesh (welded wire fabric) to size
- Tape measure for spacing rebar at consistent intervals (typically 300–450mm centres for domestic slabs)
Concrete pouring and finishing tools
- Concrete mixer (hire a 130–140L electric mixer, or order ready-mix and use a pump for large areas)
- Wheelbarrow or concrete buggy for transporting fresh concrete from mixer to pour area
- Shovel and concrete rake for spreading concrete within the formwork
- Vibrating poker or concrete vibrator (hire) — for consolidating concrete and eliminating air pockets around reinforcement; important on any reinforced slab
- Screed board (a straight 2m–3m length of timber or aluminium) — for striking off (screeding) the concrete surface level with the top of the formwork
- Bull float (large magnesium or aluminium float on a long handle) — for initial surface smoothing after screeding
- Hand float (magnesium or steel) — for finishing the surface texture
- Edging tool — for finishing and rounding the perimeter edges of the slab
- Jointing tool (grooving tool) — for cutting control joints into the surface before the concrete sets to control where cracks occur; typical joint spacing for domestic slabs is around 3m x 3m panels
- Plastic sheeting or curing compound — for covering and curing the slab once finished; curing for at least 7 days improves final strength significantly
- Rubber boots for working in fresh concrete
Dry-lay vs mortar/bed: how the tool requirements differ
Whether you are laying block pavers dry (on sand) or setting slabs on a mortar bed, the excavation, base compaction, and levelling tools are essentially the same. The key differences come at the bedding and jointing stage. Dry-lay paver installations need screed rails, a sand screeding board, and a plate compactor for final compaction, but no mixing tools, no pointing trowels, and no mortar work at all. Mortar-bed installations need a concrete mixer, pointing and floating trowels, and significantly more time per square metre because mortar requires adjustment before it sets and proper curing time before the patio can be used. Dry-lay is faster, more forgiving, and easier for first-timers; mortar-bedded work is more permanent and better suited to larger-format materials. The choice of method will directly determine how many tools you need, which is worth considering when planning your budget.
Tools for difficult site conditions
Some site conditions mean you need additional tools beyond the standard list. Here are the most common situations.
| Site condition | Additional tools needed | Why |
|---|---|---|
| Sloped ground | Rotary laser level (hire), additional stringline and datum pegs, stepped formwork boards | Establishing a consistent fall and managing level changes across the slope requires accurate reference points throughout |
| Clay soil | Jumping-jack rammer (hire) instead of or alongside plate compactor, mattock or pick, geotextile fabric | Clay compacts differently to granular material; a rammer is more effective on cohesive soils; geotextile prevents clay migration into base |
| Existing hard surface (breaking up) | SDS rotary hammer drill with chisel attachment, demolition hammer (hire), skip or rubble bags for waste | Breaking out existing concrete or tarmac requires impact tools and a plan for disposing of heavy rubble |
| Tying into a house wall | SDS drill, rawl plugs or frame fixers, DPC (damp-proof course) material, spirit level, tape measure | The finished level must be at least 150mm below the damp-proof course of the house wall; accuracy here is non-negotiable |
| Tree roots | Pruning saw, root saw or reciprocating saw with pruning blade, mattock | Roots must be cut cleanly to prevent regrowth; a mattock alone is rarely enough for larger roots |
PPE and safety, the tools you must not skip
Every tool list for a patio project should start and end with personal protective equipment. This is not box-ticking, cutting stone, handling cement-based products, and using compaction equipment all carry real risks that PPE directly reduces. Here is what I would have in my kit before starting any patio project.
- Safety glasses or goggles — mandatory when cutting, chiselling, or using power tools; chips of stone and fragments of block move fast
- FFP3 or P3 rated dust mask — essential when cutting stone, porcelain, or any silica-containing material; wet cutting reduces dust but does not eliminate it entirely
- Heavy-duty work gloves — concrete and mortar are caustic and will cause chemical burns with prolonged skin contact; cut-resistant gloves for stone handling
- Steel-toe cap boots — plates and slabs are heavy and drop without warning
- Knee pads — you will spend hours kneeling; proper knee pads make a significant difference to comfort and long-term joint health
- High-visibility vest if working near a road or shared access
- Ear defenders when using a plate compactor, concrete mixer, or angle grinder for extended periods
Common mistakes that come from missing the right tool
In my experience, most patio failures trace back to a handful of tool-related shortcuts. Skipping the plate compactor produces a base that settles unevenly and causes slabs to rock and dip within a season or two. Using a 600mm spirit level instead of a 1.8m one makes it nearly impossible to hold a consistent drainage fall, leading to puddles. Trying to cut natural stone or porcelain with a dry blade (or a bolster and hammer) results in ragged edges, cracked tiles, and excessive silica dust exposure. Using a short screed rail or a piece of timber instead of proper screed bars means your sand bed depth varies from place to place, causing uneven slab heights and lippage. The good news is that the right tool for each of these problems is either cheap to buy or cheap to hire, the barrier is usually not knowing you need it in the first place.
Quick guide to buy vs rent and approximate costs
| Tool | Buy or rent? | Approximate cost |
|---|---|---|
| Plate compactor (forward) | Rent | £60–£100/day ($60–$100/day) |
| Reversible plate compactor | Rent | £80–£120/day ($80–$120/day) |
| Jumping-jack rammer | Rent | £60–£100/day ($60–$100/day) |
| Rotary laser level | Rent | £40–£80/day ($40–$80/day) |
| Wet tile saw | Rent | £60–£100/day ($60–$100/day) |
| Concrete mixer (130–140L) | Rent | £40–£70/day ($40–$70/day) |
| SDS rotary hammer drill | Buy (worth owning) | £80–£200 ($80–$200) |
| Angle grinder with diamond blade | Buy (worth owning) | £40–£120 for tool; £10–£30 per blade |
| Spirit level (1.8m/6ft) | Buy | £25–£60 ($25–$60) |
| Rubber mallet | Buy | £10–£20 ($10–$20) |
| Screed rails (set) | Buy | £15–£30 ($15–$30) |
| Bolster chisel and club hammer | Buy | £15–£30 ($15–$30) |
| Spade and shovel | Buy (if you do not own) | £20–£40 each ($20–$40 each) |
| Full PPE set (glasses, mask, gloves, knee pads) | Buy | £30–£60 total ($30–$60) |
When to call a professional instead
Most standard patios are well within reach for a determined homeowner with the right tools and preparation. If you’re wondering how hard is it to lay a patio, see the beginner’s difficulty guide for a step-by-step breakdown and realistic time estimates. But there are situations where honest advice points towards bringing in a professional. If your site has significantly sloped ground that requires retaining walls or extensive cut-and-fill earthworks, that moves beyond standard DIY territory. If you are laying a large reinforced concrete slab (say, over 20 square metres) and have never worked with concrete before, the margin for error is low and the cost of failure is high. If your ground investigation reveals very poor subgrade, deep fill, unstable clay, or old demolition rubble, the base design becomes more complex than a straightforward homeowner installation. And if you are building directly next to the house wall and are unsure about drainage routing, damp-proof course levels, or structural implications, get professional advice before you start. The cost of a consultation or a professional installation is almost always less than the cost of pulling up a failed patio and starting again.
With the right tools assembled and a clear picture of your construction method, the process becomes much more manageable. Understanding the materials side of the project is equally important alongside the tools, what you are laying determines a great deal about what you need in your toolkit. For a detailed list of necessary materials, see what materials do I need to lay a patio. Similarly, if you are weighing up how long the project will take or how much effort is genuinely involved, those are worth thinking through before you start digging. If you need a practical timeline, see our guide on how long to lay a patio in the UK for typical build times by method and size. For a quick estimate of typical timelines and factors that influence duration, see how long to lay a patio.
FAQ
What are the absolute essential tools every homeowner needs to lay a patio?
Essentials (cover all common methods and phases): - Measuring & layout: tape measure (25–50 ft), marker paint, stakes, mason's string/line. - Excavation & clearance: spade, square‑mouth shovel, digging fork or mattock (for roots/compacted soil), pruning saw/brush cutter for small vegetation, heavy‑duty wheelbarrow. - Base work & compaction: plate compactor (rental—forward or reversible) or jumping jack/rammer for clay/trenches. - Leveling & screeding: straight screed bar or aluminum screed rails, 4–6 ft spirit level, rubber mallet, broom. - Bedding & jointing: gypsum or coarse masonry sand for bedding (for pavers) or specified mortar/tools for bed installations, broom for sweeping jointing sand. - Edge restraints/finish: edge restraint materials (plastic/metal or concrete), hammer, masonry nails/anchors. - Safety/PPE: safety glasses, ear protection, dust mask/respirator (N95 or P100 when cutting), gloves, steel‑toe boots. (Sources: ICPI/CMHA tech specs, equipment rental guides, contractor DIY guides such as This Old House and RemodelCalculators.)
What optional or nice‑to‑have tools speed the job or improve accuracy?
Useful optional tools: - Rotary laser level or line laser (or optical auto‑level) for larger/accurate grade and drainage control. - Long straightedge (8–12 ft) and longer spirit level for checking flatness. - Rubberized plate underlay/compactor pad for delicate pavers. - Paver/splitter guillotine for straight cuts; wet tile saw or wet table saw for natural stone/porcelain. - Hand tamper for small areas and edging. - Concrete floats and magnesium trowels for slab finishes; edger/jointer tools for control joints. - Mixing: gas or electric mortar mixer or heavy-duty mixing paddle. - Power tools: angle grinder with diamond blade for small cuts, masonry drill/hammer drill for anchoring edge restraints. - Wheelbarrow dolly, cart, or powered wheelbarrow for heavy material handling. (Sources: tool manufacturers, rental company guidance, tile/stone suppliers.)
Which tools are specific to each project phase?
Phase-by-phase highlights: - Site clearance & excavation: shovel, spade, mattock/pick, pruning saw, wheelbarrow, tape, stakes, marker paint, gloves. - Subgrade & base preparation: geotextile (if needed), aggregate delivery tool(s), plate compactor or jumping‑jack, tamper, rake, shovel, measuring rod for lift thickness. - Levelling & setting: rotary/line laser or stringline & stakes, screed rails/bars, straightedge, spirit level, rubber mallet, mason’s line, chalk. - Bedding/laying: screed board for sand bedding, masonry trowels and pointing tools for mortar beds, paver splitter/wet saw/angle grinder for cuts, spacer/tapping block. - Jointing & finish: polymeric sand or joint mortar, push broom, plate compactor with pad, hand brush, jointing tool/pointing trowel. - Clean‑up & edges: edge restraint materials, concrete anchors or spikes, floor sealant applicator (if sealing). (Sequence consistent with ICPI segmental paving guidance.)
What cutting tools do I need for pavers, porcelain, natural stone, and concrete slabs?
Cutting tools by material: - Concrete pavers: guillotine paver splitter for fast straight cuts; handheld angle grinder with diamond blade for odd shapes. - Porcelain & tile: wet tile saw (table saw with diamond blade, continuous rim for porcelain). - Natural stone (slate, sandstone, granite): wet saw with diamond blade (continuous rim for many stones) to reduce chipping and dust. - Concrete slab adjustments: concrete saw (walk‑behind) for slab cutting/control joints and angle grinder for small cuts. Always use wet cutting where recommended to reduce airborne silica and use appropriate respirators. (Sources: tile/stone supplier manuals, contractor tool guides.)
How do site challenges change tool selection (sloped sites, clay soil, existing surface, tying into a house, rebar work)?
Tool adjustments for common challenges: - Sloped sites: rotary laser or optical level to set consistent cross‑slope (1–2% recommended), additional stakes/stringline, and shims for step formation. - Clay/cohesive soils: jumping‑jack (rammer) for better compaction in narrow areas; possibly deeper excavation/engineered subbase and geotextile. - Existing hard surfaces: angle grinder or concrete saw to remove/cut existing slab; demolition hammer for removal; skip to tying details when reusing subbase. - Tying into a house/floor level: mortar tools, tuckpointing tools, flashing materials, silicone/expansion joint tools; accurate level control via laser. - Rebar/mesh in concrete slab: rebar bender/cutter or bolt cutters for mesh, tie‑wire and tying tool or pliers, chairs/supports to maintain cover (follow ACI cover guidance). (Sources: ACI slab guidance, ICPI/BS7533 for modular paving.)
What safety and PPE should I prioritize during patio work?
Minimum PPE and safety items: safety glasses or face shield, hearing protection for power tools and compactors, dust masks/respirators (N95 for general dust; P100 or NIOSH‑approved respirator when cutting silica‑bearing materials), gloves (cut‑resistant for cutting tools), steel‑toe boots, knee pads for prolonged kneeling, high‑visibility vest if working near traffic, first‑aid kit. For wet cutting/sawing use water suppression + respirator; for demolition use appropriate respiratory protection and eye protection. (Sources: tile/stone supplier instructions, OSHA silica guidance, equipment rental safety pages.)},{