
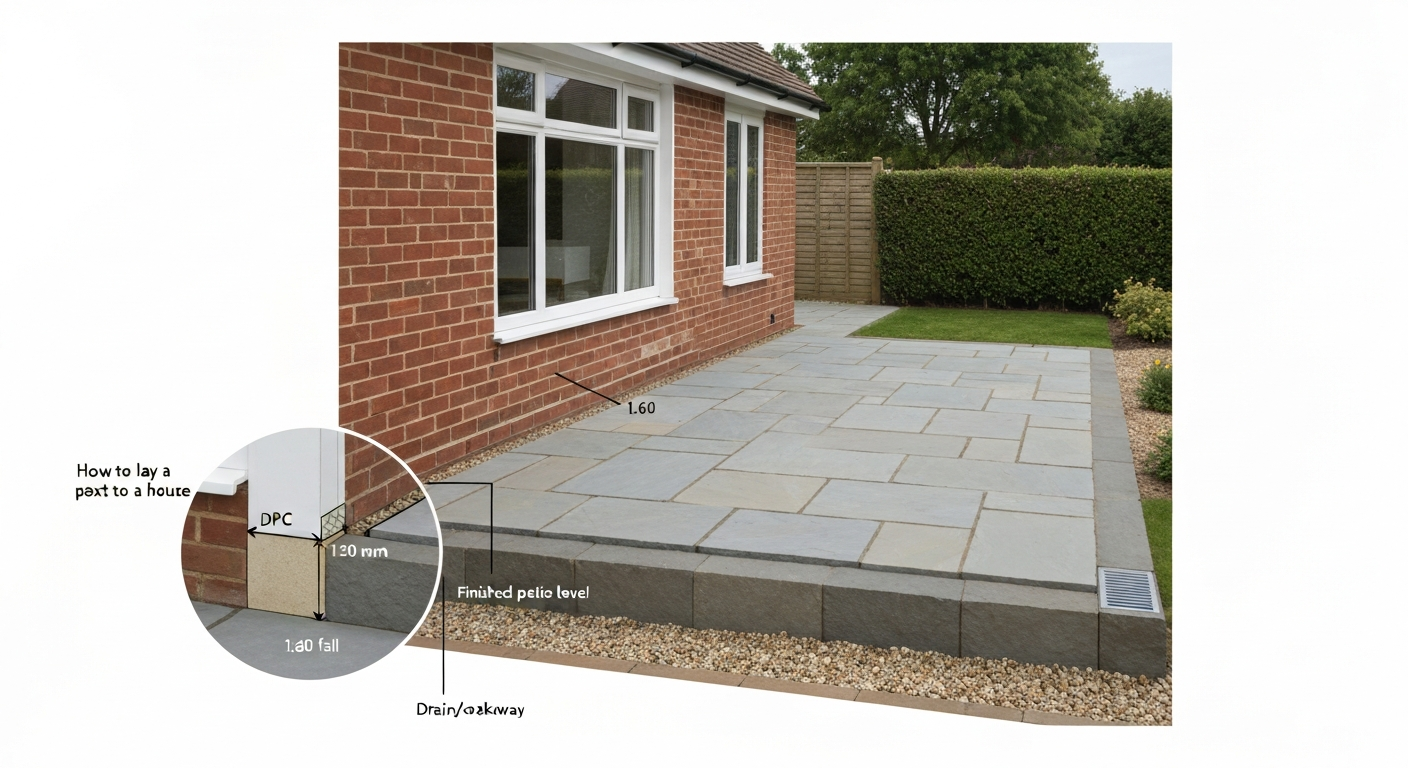
Laying a patio next to a house is absolutely a DIY-friendly project, but it has a few non-negotiable rules that differ from laying one in the middle of a garden. Your finished surface must sit at least 150 mm below the damp-proof course (DPC) in your wall, it must slope away from the house at roughly 1:60 (about 1.7%), and any water it sheds needs somewhere to go. Get those three things right and the rest is just groundwork, materials and patience. This guide walks you through every stage: planning and permissions, ground assessment, excavation, base preparation, and laying by method (dry-laid pavers, mortar bed flagstones, or a reinforced concrete slab), along with full materials and tools checklists and honest troubleshooting advice. For a detailed, step-by-step walkthrough on how lay a patio, see the linked guide (internal resource ID 6b7359fb-4dda-419e-a65f-cdcd38e54034).
How to Lay a Patio Next to a House: Step-by-Step Guide

Is this a DIY job or should you hire someone?
Most homeowners can handle a mortar bed or dry-laid patio up to about 20-25 square metres without professional help, especially if the ground is reasonably flat and the soil drains well. If you're asking how hard is it to lay a patio, see our dedicated discussion of difficulty, time estimates and when to hire a pro. The job gets significantly harder when you are working on a slope, have clay or made ground, need to cut drainage channels, or are pouring a reinforced concrete slab. Use this checklist to make an honest call before you commit.
| Factor | DIY-friendly | Consider a pro |
|---|---|---|
| Area | Up to ~25 m² | Over 25 m² or awkward shapes |
| Ground condition | Firm, well-draining soil | Clay, peat, made ground, waterlogged |
| Slope | Gentle fall (under 1:20) | Steep slope, retaining walls needed |
| Method | Dry-laid pavers or mortar bed flags | Reinforced concrete slab, structural works |
| DPC clearance | Threshold easily 150 mm+ above patio | Low threshold, bridging risk, remedial drainage needed |
| Drainage tie-in | Shed water to borders or lawn | New drainage runs, gullies, soakaways |
| Permissions | Standard rear patio, permitted development | Front garden over 5 m², conservation area, raised platform over 0.3 m |
| Time available | Spread over 2-3 weekends | One continuous installation needed |
| Budget | Comfortable managing materials and hire tools | Tight budget and no room for errors |
If three or more of those 'consider a pro' boxes apply to your project, at least get a quote. A structural slab or drainage-heavy job done poorly is expensive to fix. If you are in the DIY column on most factors, read on.
Planning, permissions and the rules you cannot skip
Before you dig a single spade of soil, spend an hour sorting out the planning and building regulations side of things. Most rear-garden patios at ground level fall under permitted development in England and Wales, meaning no planning permission is needed. But there are important exceptions. See Appeal Decision referencing permitted development technical guidance (GPDO), Planning Inspectorate which explains that raised platforms or patios over 0.3 m above the highest adjacent ground can be treated as engineering operations and may require planning permission Appeal Decision referencing permitted development technical guidance (GPDO) — Planning Inspectorate.
When you do need permission
- Front garden hard surfacing over 5 m²: must use permeable or porous materials, or drain surface water to a permeable area (lawn, borders), otherwise planning permission is required under GOV.UK guidance on permeable surfacing.
- Raised patios over 0.3 m above the highest adjacent ground level: these are treated as engineering operations and may fall outside permitted development, requiring a planning application.
- Conservation areas, Article 4 directions, or listed buildings: always check with your local council before starting.
- Significant drainage works: if you need to connect to a public sewer or culvert, this involves separate approval.
Call 811 (UK: call 0800 96 93 22) before you dig
Mark out your dig area and check for underground utilities before excavating. In the UK, use the free 'dial before you dig' service or check with your utility providers. Gas pipes, electric cables, water mains and drainage runs can all sit surprisingly close to a house wall. Take particular care near downpipes, inspection chambers and any external tap connections.
DPC clearance: the rule that protects your house
This is the most important structural rule for a patio next to a house. Approved Document C (Building Regulations) requires that the damp-proof course in your wall sits at least 150 mm above the finished external ground level. That means your patio surface must be at least 150 mm below the DPC. If you raise the patio level above that, moisture can bridge the DPC, travel up the wall, and cause serious damp problems inside. Find your DPC (usually a thin line of mortar or bitumen felt between two brick courses, typically about two brick courses above ground level) and measure down from it. That measurement sets your maximum finished patio height. If your threshold or doorstep is very low and 150 mm clearance is impossible, Approved Document C allows for alternatives like an external drainage channel (French drain) tight to the wall, but this is a complication worth flagging to a builder or building control officer.
Surface fall away from the house
All patio surfaces next to a house must slope away from the wall. The standard recommended fall is approximately 1:60, which works out to about 17 mm of drop per metre of patio length. So a 3 m wide patio needs roughly 50 mm of total fall across its width. This is not optional. Flat or back-sloping paving directs rainwater into your wall and is one of the most common causes of damp problems I see on patios that were installed without proper guidance.
Drainage: where does the water go?
Once the water runs off the patio, it needs a destination. For permeable paving (open-jointed gravel, porous block paving, open-graded sub-base systems), water infiltrates through the surface and into the ground below. For impermeable paving, your options are: directing runoff onto an adjacent lawn or planting border, installing a linear drainage channel at the patio edge, or connecting to a soakaway. If you are relying on a soakaway, BRE Digest 365 sets out the standard UK percolation test method to check whether your ground can accept the water. You fill trial pits repeatedly and time how fast the water level drops. Clay-heavy soils often fail this test, meaning a soakaway is not viable and you need a different drainage solution.
Reading your ground conditions
The ground under a patio next to a house takes more stress than you might expect. The soil close to a building often contains backfill from the original construction, old rubble, tree roots, or heavily compacted clay. Each of these affects how you prepare the base, and getting this wrong is the number one reason patios crack, sink or heave within a few years.
Slopes
A gentle natural slope away from the house actually helps drainage. A slope toward the house is a problem. Slopes steeper than about 1:10 will need cut-and-fill work (digging into the high side and building up the low side) or a retaining edge. For anything involving retaining walls over 600 mm tall, get structural advice. Raised platforms over 0.3 m above natural ground level may also need planning permission, as mentioned above.
Clay and poor soil
Clay soil shrinks when dry and swells when wet, which is a nightmare for paving. If you dig down and find sticky, grey or orange clay, you have a few options. For a dry-laid or mortar bed patio, remove the clay to the full excavation depth, replace it with compacted hardcore and a proper Type 1 sub-base, and accept that some movement may still occur seasonally. For a more permanent solution, particularly on heavy clay, a reinforced concrete slab with mesh or rebar distributes loads and resists differential movement far better. Made ground (demolition rubble, old topsoil deposits, soft infill) is similarly unreliable and should be excavated until you reach consistent natural ground or engineered fill. On very poor soils, geotechnical standards (BS EN 1997/Eurocode 7) and NHBC guidance support deeper investigation before laying anything structural.
Existing surfaces
If there is already an old concrete path, slab or paving next to the house, you have a choice: break it out and start fresh, or lay over it. Laying over an existing surface is only practical if it is solid, level within about 10 mm, correctly sloped away from the house, and at a height that still gives you 150 mm DPC clearance after adding the new paving thickness. If the old surface is cracked, uneven, or already too high, breaking it out is the right call. Hiring a petrol breaker (110V site breaker in the UK) for a day makes this much faster than a hand sledgehammer.
Measuring, layout and calculating materials
Accurate measurement before ordering materials saves money and prevents frustrating shortfalls halfway through the job. Here is how I approach it.
Measuring the area
For a rectangular patio, multiply length by width in metres to get the area in square metres. For irregular shapes, break the area into rectangles, calculate each, and add them together. Add 10% to your final material quantities to account for cuts and wastage, or 15% for natural stone that has variable sizing.
Calculating fall
At 1:60, for every 60 cm of patio depth (measured away from the house), the surface drops 1 cm. For a 3 m deep patio: 3000 mm divided by 60 equals 50 mm total fall. Set your string lines at the house end and calculate the exact height at the outer edge before you start. Build the fall into your sub-base and bedding layer, not just the top surface.
Volumes for sub-base, mortar and concrete
Multiply your area by the required depth (in metres) to get the volume in cubic metres. For a 20 m² patio with 100 mm (0.1 m) of compacted sub-base, you need 2 cubic metres of Type 1 aggregate before compaction. Type 1 compacts by roughly 15-20%, so order about 2.3-2.5 m³. For a mortar bed (40 mm average depth over 20 m²), you need 0.8 m³ of mixed mortar. A standard 1:4 cement:sharp sand mix uses roughly 1 bag of cement per 4 bags (25 kg) of sharp sand to produce a workable batch, covering approximately 1.5-2 m² at 40 mm depth per mix. For a 100 mm concrete slab over 20 m², you need 2 m³ of concrete, which at typical site-mix ratios (1:2:4) requires around 6 bags of cement, 12 bags of sharp sand, and 24 bags of 20 mm aggregate, or you can order ready-mix (C20/C25 specification is standard for a domestic patio slab).
Materials checklist by method
The materials you need depend on which laying method you choose. For a full, itemised materials checklist for each method, see what materials do I need to lay a patio. Below is a breakdown by method. The three main approaches for a patio next to a house are dry-laid pavers (flexible), mortar bed flagstones (semi-rigid), and a reinforced concrete slab (rigid). Each has its place depending on your site conditions, budget and how permanent you want the result to be.
| Material | Dry-laid pavers | Mortar bed flags/slabs | Reinforced concrete slab |
|---|---|---|---|
| Pavers / slabs / flags | Concrete block pavers (min 60-80 mm thick) | Natural stone, porcelain or concrete flags (min 40-50 mm) | N/A (slab is the surface) |
| Sub-base aggregate | 100 mm compacted MOT Type 1 (or Type 3 open-graded for permeable) | 100 mm compacted MOT Type 1 | 100-150 mm compacted MOT Type 1 |
| Bedding layer | 30-50 mm sharp sand (screeded level) | 15-40 mm mortar bed (1:4 cement:sharp sand) or flexible adhesive for porcelain | N/A |
| Concrete | Not required | Not required | C20/C25 ready-mix or site-mixed at 100-150 mm depth |
| Rebar / wire mesh | Not required | Optional on clay or poor ground | A142 or A193 mesh (or 10 mm rebar at 200 mm centres) required |
| Geotextile membrane | Recommended over sub-base | Recommended over sub-base | Recommended below sub-base |
| Edging restraints | Required (concrete haunch or proprietary edge restraint) | Helpful but mortar bed provides restraint | Formwork during pour; permanent edging optional |
| Jointing compound / pointing mortar | Kiln-dried jointing sand swept into joints | Wet mortar pointing or resin-based grout | Not applicable (slab is monolithic) |
| Cement | Minimal (for edging haunches) | Yes (mortar bed and pointing) | Yes (large quantity for slab) |
| Sharp sand | Bedding layer | Mortar bed component | Concrete mix component |
| Gravel / 20 mm aggregate | Sub-base only | Sub-base only | Sub-base + concrete mix component |
| DPC continuity measures | Check and clear existing DPC | Check and clear existing DPC | Check and clear existing DPC; may need cavity tray or drainage detail |
Tools checklist by method
You do not need to buy all of these. For a full list, see the tools checklist (what tools do I need to lay a patio) which covers hand tools, hireable power tools and recommended sizes. Most of the powered tools are available from hire shops for a day or a weekend, which makes much more sense for a one-off project. Hire the plate compactor, breaker and concrete mixer rather than buying them.
| Tool | Dry-laid pavers | Mortar bed flags | Reinforced concrete slab |
|---|---|---|---|
| Tape measure and string lines | Yes | Yes | Yes |
| Surveyor's level / spirit level (long) | Yes | Yes | Yes |
| Laser level or water level | Recommended | Recommended | Recommended |
| Builder's square (or 3-4-5 triangle) | Yes | Yes | Yes |
| Spade and mattock | Yes | Yes | Yes |
| Wheelbarrow | Yes | Yes | Yes |
| Vibrating plate compactor (hire) | Yes – essential | Yes – for sub-base | Yes – for sub-base |
| Petrol/electric breaker (hire) | If breaking existing concrete | If breaking existing concrete | If breaking existing concrete |
| Screed rails / aluminium straight edge | Yes (for sand bed) | Yes (for mortar bed) | Yes (for concrete surface levelling) |
| Rubber mallet | Yes | Yes | N/A |
| Bolster chisel and club hammer | Yes (for cuts) | Yes (for cuts) | N/A |
| Angle grinder with diamond disc (hire) | Yes (for accurate cuts) | Yes | N/A |
| Wet-cut disc saw / table saw (hire) | Optional | Recommended for stone | N/A |
| Concrete mixer (hire) | For edging haunches | Yes – for mortar | Yes – essential (or use ready-mix) |
| Float and trowel | N/A | Yes (pointing) | Yes (surface finish) |
| Bolster or jointing tool | N/A | Yes (raking joints) | N/A |
| Wire cutters and tie wire | N/A | N/A | Yes (for rebar or mesh) |
| Rebar bending bar (hire) | N/A | N/A | If using rebar |
| Safety gloves, glasses and knee pads | Yes | Yes | Yes |
| Dust mask (cutting) | Yes | Yes | Yes |
| Slab lifting clamps or paving lifters | Yes (for heavy flags) | Yes | N/A |
Preparing the base and excavation: the most important part of the whole job
I have seen more patios fail from poor base preparation than from any other cause. Cracks, sinking, loose slabs and puddles nearly always trace back to this stage. Do not rush it.
How deep to dig
Your total excavation depth is the sum of: your paving/slab thickness, plus your bedding layer thickness, plus your sub-base thickness, plus any concrete slab thickness. For an overview of typical project durations and time estimates, see how long to lay a patio in the UK. For a standard mortar bed flagstone patio with 50 mm flags on a 40 mm mortar bed over 100 mm of compacted Type 1, your total excavation depth is 190 mm. Add 20-30 mm as a working tolerance. For a concrete slab at 100 mm with 150 mm sub-base under it, you are digging 250-280 mm below your intended finished patio level. Remember to calculate this against your DPC height: if your DPC is 200 mm above the existing ground, and you need to raise the finished patio level slightly, check your math carefully.
Step-by-step base preparation
- Mark out the patio area with string lines and pegs, incorporating your 1: 60 fall away from the house. Double-check corners with a 3-4-5 triangle (measure 3 m along one edge, 4 m along the other, and the diagonal should be exactly 5 m for a square corner).
- Strip all topsoil and vegetation from the excavation area. Do not leave organic material under the base; it will rot and compact, causing sinking.
- Excavate to your calculated depth. Keep the walls of the excavation vertical, especially close to the house wall. Do not undercut the foundation footings.
- Check for and mark any pipes, cables, drains or manholes within the excavation area. If you expose anything unexpected, stop and identify it before continuing.
- If you find clay, peat or soft/made ground, remove it to a consistent firm substrate or to a depth of at least 300 mm (whichever comes first) and replace with compacted hardcore or Type 1 aggregate in layers.
- Lay a geotextile (weed membrane) over the compacted subgrade. This prevents fines migrating up into your sub-base and helps with long-term drainage in permeable systems.
- Lay MOT Type 1 sub-base in layers no thicker than 75 mm per lift. Compact each layer with a vibrating plate compactor before adding the next. Two passes in perpendicular directions gives better compaction. A 100 mm compacted sub-base typically requires two lifts of loose material. For permeable paving, use open-graded Type 3 or 4/20 aggregate instead of Type 1.
- Check the compacted sub-base with a long straight edge and spirit level. It should be firm, with no soft spots, and it should already incorporate your 1:60 fall. A good sub-base is hard to push a finger into and does not deflect under a heavy stamp.
- Install edge restraints around the outer perimeter (concrete haunched kerbs for dry-laid pavers; a treated timber or concrete edge for concrete slabs). For mortar bed patios next to the house, the edge closest to the wall is restrained by the house itself and the mortar bed; the outer edges need a physical restraint concreted into the ground.
- For reinforced concrete slabs: set up your formwork (timber boards staked firmly at your finished slab level, incorporating the fall), then lay A142 or A193 steel mesh (or 10 mm rebar at 200 mm centres each way) on plastic spacer chairs at 30-40 mm above the sub-base surface. Overlap mesh sheets by at least 200 mm and tie them with wire. Check your slab thickness allows at least 40 mm of cover over the reinforcement.
Tolerances to aim for
- Sub-base level tolerance: within ±10 mm of your target height across the whole area.
- Finished paving level tolerance: within ±3 mm over a 3 m straight edge (the better your base, the easier this is to achieve).
- Fall consistency: check your 1:60 fall every metre with a level and a straight edge. A 1 m level with a 17 mm packing piece (wedge of timber) at one end is a quick DIY check: when the bubble reads level, the surface has a 1:60 fall.
- DPC clearance: measure this at the wall before laying the first paver. Do not assume; measure it every time.
Base preparation differences by method
For dry-laid pavers, the screeded sand bed sits directly on the compacted sub-base. Keep the sand layer as thin and consistent as possible (30-50 mm), and do not walk on it once screeded. Disturbed sand is the most common cause of uneven dry-laid patios. For mortar bed flags, you can lay a slightly thicker mortar bed and adjust individual flags for level as you go, which gives you a little more tolerance. For reinforced concrete, the sub-base and formwork work must be exactly right before you pour, because you cannot adjust a slab once it has set.
Laying by method: step-by-step workflows
Method 1: dry-laid pavers (flexible)
Dry-laying is the most forgiving method and the easiest to repair. It works best with concrete block pavers (minimum 60 mm thick), clay pavers, or sett-style paving. It is not suitable for large-format natural stone flags or thin porcelain, which need a rigid bed.
- Compact and prepare sub-base as above. Install edge restraints on all sides not restrained by the house wall or a permanent structure.
- Spread and screed a 30-50 mm layer of sharp sand (not building sand) over the sub-base. Use screed rails (metal pipes of a consistent diameter work well) as guides. Remove the rails and fill the channels with sand once screeded.
- Start laying pavers from the house wall outward and from one corner, keeping your pattern consistent. Use string lines as a guide every 2-3 rows to maintain straight lines.
- Bed each paver by pressing it firmly down with your hands or tapping with a rubber mallet. Do not use a metal hammer directly on the paver surface.
- Check levels frequently with your straight edge and spirit level. If a paver is high, lift it and remove a little sand. If it is low, add sand. Never leave a paver rocking; it will crack under foot traffic.
- Cut pavers to fit edges using an angle grinder with a diamond disc or a block splitter (hire both if needed).
- Once all pavers are laid and levelled, run the vibrating plate compactor over the entire surface to bed the pavers into the sand. Use a rubber mat on the plate to avoid cracking paver surfaces.
- Spread kiln-dried jointing sand over the surface and brush it into the joints. Make 2-3 passes with the plate compactor, adding more jointing sand until the joints are consistently full. Brush off excess.
- Check the 1: 60 fall is maintained across the finished surface.
Method 2: mortar bed flagstones (semi-rigid)
A mortar bed is the standard method for natural stone flags, concrete paving slabs and porcelain tiles. It gives a more solid, stable surface than dry-laying, handles larger formats better, and is required for any paving adjacent to a house where movement needs to be minimised. For porcelain specifically, use a flexible tile adhesive rather than traditional sand:cement mortar, as porcelain has very low porosity and does not bond well to wet mortar.
- Prepare and compact the sub-base as above. Dampen the surface lightly before laying mortar in hot weather.
- Mix mortar at a 1: 4 cement:sharp sand ratio (or use a bagged ready-to-use bedding mortar). It should be firm enough to hold a footprint without slumping, not sloppy.
- Apply mortar in dabs or as a full bed (full bed is strongly recommended next to a house to prevent water pooling under the flag). For flags over 600 mm in any dimension, always use a full bed. Bed thickness should be 15-40 mm.
- Set each flag gently into the mortar and tap down with a rubber mallet. Use a long spirit level or straight edge to check both level and fall as you go.
- Leave consistent joint gaps (typically 8-12 mm for natural stone, 3-5 mm for porcelain). Use plastic spacers to maintain gaps.
- Allow the mortar bed to cure for at least 24 hours (longer in cold or damp weather) before walking on the flags or pointing.
- Point joints with a stiff mortar mix (1: 3 cement:sand) pressed firmly into the joint. Tool the surface to match the flag profile and brush off excess. Alternatively, use a ready-made resin-based grout or brush-in pointing mortar, which is less likely to stain stone surfaces.
- Keep the patio damp (lightly misted) for 2-3 days to allow the mortar to cure properly. In temperatures below 5°C, delay the job or use frost-protection measures.
Method 3: reinforced concrete slab
A poured concrete slab is the most durable and structurally sound option for a patio next to a house, particularly on clay or poor soil, or where you want to tile over the surface with a thin flexible adhesive bed. It requires the most preparation and is harder to DIY on larger areas, but it eliminates the risk of differential settlement that affects flexible and mortar bed methods. For any slab next to a house with poor ground, or over 15 m², I strongly recommend reinforcement with A142 or A193 welded wire mesh, or 10 mm rebar at 200 mm centres each way.
- Prepare sub-base (100-150 mm compacted Type 1) and install formwork at your finished slab level, incorporating the 1:60 fall.
- Lay reinforcement (mesh or rebar on plastic spacer chairs) 30-40 mm above the sub-base surface. Overlap mesh sheets by at least 200 mm and tie at junctions.
- For a slab adjacent to a house wall, install an expansion joint (10-20 mm foam strip) between the slab and the wall. The slab must not be bonded to the house structure; it needs to move independently.
- Order or mix C20 or C25 concrete. For most domestic patios, ready-mix concrete (ordered by the cubic metre) is the most practical option for slabs over about 5-6 m². Site-mixing large volumes is very labour-intensive and increases the risk of inconsistent batches.
- Pour the concrete and rake it roughly level with the top of the formwork boards. Work quickly on a ready-mix pour.
- Use a screed board (a straight piece of timber resting on the formwork) to screed the surface level, using a sawing motion while pulling toward you.
- Float the surface with a bull float or hand float to close the surface and remove trowel marks. For a fine walking surface, follow with a steel trowel once the bleed water has evaporated.
- For a textured (non-slip) finish, drag a stiff broom across the surface before it fully stiffens.
- Cure the slab by keeping it damp (cover with wet hessian or curing membrane) for a minimum of 7 days. Do not walk on it for at least 24-48 hours, and avoid heavy loads for 7 days. Full structural strength develops over 28 days.
- Strip formwork after 24-48 hours. Backfill edges carefully to avoid undermining the slab edge.
How long will it take?
Time estimates for a typical 15-20 m² patio next to a house, working as one person with occasional help: For a breakdown of timing for each stage and different team sizes, see our guide on how long to lay a patio.
| Stage | Dry-laid pavers | Mortar bed flags | Reinforced concrete slab |
|---|---|---|---|
| Planning, marking out and ordering materials | Half day | Half day | Half day |
| Excavation and disposal of spoil | 1-2 days | 1-2 days | 1-2 days |
| Sub-base laying and compaction | Half-1 day | Half-1 day | 1 day |
| Edge restraints / formwork | Half day | Minimal | Half-1 day |
| Laying pavers / flags / concrete | 1-2 days | 2-3 days | Half day pour + curing time |
| Pointing / jointing | Half day | Half-1 day | N/A |
| Curing / settling time before use | Walk on immediately (light traffic after jointing) | 24 hrs before walking, 7 days before furniture | 24-48 hrs before walking, 28 days full cure |
| Total working time (approximate) | 3-4 days spread over 2 weekends | 4-6 days spread over 2-3 weekends | 3-4 days work + 28 days curing |
Common mistakes and how to fix them
Here are the problems I see most often, and what to do about them before or after they happen.
- Paving too close to or above the DPC: the fix is painful but necessary. Lift the offending paving, lower the base level, and relay. If that is not possible due to threshold height, a French drain channel tight to the wall (filled with 20 mm washed gravel and connected to a drainage outlet) is the approved remedial solution per Approved Document C guidance.
- Surface sloping toward the house: lift the affected slabs, re-screed or re-lay the mortar bed at the correct fall, and relay. This is much easier with dry-laid pavers than mortar bed work.
- Sunken or rocking slabs: usually caused by inadequate compaction or thin sand bedding. Lift the slab, add or remove bedding material, and relay. Compact the sub-base underneath if the problem is deeper.
- Cracked concrete slab: small shrinkage cracks in the first 28 days are normal and largely cosmetic. Wide cracks (over 3-4 mm) or cracks that move (step cracks) indicate a structural or settlement problem, and the affected section may need to be broken out and replaced. Proper curing and reinforcement largely prevent this.
- Efflorescence (white staining) on new slabs or mortar: a natural result of calcium salts migrating to the surface as mortar cures. It normally weathers away in a few months. Specialist efflorescence removers can speed it up, but do not use acid cleaners on natural stone.
- Grout or mortar staining on stone surfaces: prevention is best, using a sealant on porous stone before pointing. Mortar stain on natural stone can sometimes be removed with a dilute hydrochloric acid solution (handled very carefully and tested in a hidden spot first) or a proprietary stone cleaner.
- Poor joint fill in dry-laid pavers: if kiln-dried sand keeps disappearing from joints, the sub-base may still be settling. Wait a week, then refill and compact again. Polymeric (stabilising) jointing sand resists washout better than plain kiln-dried sand for long-term joint stability.
- Water pooling away from the house but on the patio: the fall may be too shallow at the outer edge. Check the full fall with a level and straight edge, and if the outer area is low, you may need to lift and re-lay a section or install a drainage channel at that point.
Finishing and long-term maintenance
Once the patio is laid and cured, a few finishing steps protect your investment. Natural stone and some porcelain benefits from a penetrating sealant applied after the paving has fully dried (allow at least 28 days after pointing). Sealing reduces staining, limits efflorescence and makes cleaning easier. Read the manufacturer's guidance for your specific stone; some stones (particularly certain granites and sandstones) can darken with the wrong sealant.
For ongoing maintenance, sweep the surface regularly to prevent debris build-up in joints, which encourages weed growth. Annual checks of the DPC clearance gap are a good habit, particularly after hard winters that can shift paving. Re-point any open joints as soon as you notice them; open joints let in water and accelerate frost damage in cold climates. For concrete slabs, check the expansion joint along the house wall every year and replace the foam strip if it has degraded. Keep the drainage outlets clear, and jet-wash the surface in spring to remove algae before it becomes a slip hazard.
A quick note on UK-specific rules
If you are in England or Wales, the permeable surfacing rules for front gardens (GOV.UK guidance) apply specifically to the street-facing side of your property. For rear and side patios that are at ground level and behind the principal elevation, permitted development rights generally allow you to proceed without planning permission, but always check for local Article 4 directions, conservation area restrictions, or listed building status. Building Regulations Approved Documents A, C and H are the statutory references for structural adequacy, damp protection and drainage adjacent to a building, and they underpin the DPC clearance, drainage fall and sub-base standards described throughout this guide. If you are ever unsure about DPC bridging, drainage tie-ins, or ground conditions, a quick call to your local building control office (free in most councils for a preliminary question) will save you far more time than a failed inspection later.
FAQ
Do I need planning permission or consents to lay a patio next to my house in the UK?
Often no for ground‑level patios behind the principal elevation, but check local rules. Front‑garden hard surfacing over 5 m² must be permeable or drain to a porous area (GOV.UK). Raised patios or platforms more than 0.3 m above adjacent ground, locations inside conservation areas, listed buildings or Article 4 directions can require permission — consult the Planning Portal and your local authority before starting.
How should I plan drainage and falls so the patio doesn’t cause damp to my house?
Provide a fall away from the house, typically about 1:60 (≈1.7%) as a practical target. Maintain DPC clearance (normally at least 150 mm between finished external ground/paving level and the DPC). If you cannot keep the 150 mm clearance, design external drainage (French drain/soakaway or cavity trays) to prevent bridging the DPC. For infiltration use, carry out BRE 365 percolation testing and size soakaways to CIRIA C753 standards.
How do I choose between dry‑laid pavers, mortar bed/flagstone, and a reinforced concrete slab?
Choose based on stone type, subsoil, expected loads, movement risk and DIY skill: - Dry‑laid pavers: best for modular concrete or clay units on a compacted sub‑base with bedding sand; good for patios where some flexibility is acceptable, easier for DIY and permeable options. - Mortar bed/flagstone: suitable for irregular natural stone or large flags needing a rigid bed; better where precise levels and minimal movement are required. - Reinforced concrete slab: use where poor ground, heavy loads, or where a rigid, long‑lasting base is needed. If soil is weak (clays, made ground) or you need to tie into existing concrete steps/walls, a reinforced slab or pro assessment is advised.
When should I hire a professional instead of DIY?
Hire a pro if any of the following apply: poor/variable subsoil (clay, peat, made ground), required engineered drainage or soakaway design, slab higher than 0.3 m, complex levels/tie‑ins to existing structural elements, working adjacent to listed or conservation properties, or you lack tools/experience for accurate levels, compaction and bedding. For straightforward flat, well‑draining sites with modular pavers and accessible tools, experienced DIYers can do dry‑laid installs.
What are the exact material and sub‑base specifications for a typical pedestrian patio?
Typical build-up (pedestrian patio): - Excavation to required depth. - Compacted sub‑base: ~100 mm compacted MOT Type 1 (for impermeable) or 100–150 mm open‑graded aggregate (for permeable). - Bedding: 30–40 mm coarse sand (for flexible dry‑laid) or 15–30 mm mortar bed for flags. - Paving units: chosen slabs/pavers. - Jointing: kiln‑dried sand for permeable systems or mortar/pointing for rigid systems. Maintain layers compacted in lifts (≈75 mm per lift) with a vibrating plate.
What tools do I need for each installation method?
Common tools: tape, spirit level, straightedge, string lines, shovel, spade, wheelbarrow, tamper/plate compactor, petrol or electric mixer (for concrete/mortar), masonry saw/angle grinder with diamond blade, rubber mallet, pointing trowels, broom, gloves, dust mask. Method‑specific: - Dry‑laid: vibrating plate, wacker plate, compaction boards, edging restraints, jointing brush. - Mortar bed/flagstone: cement mixer, margin trowel, large trowel, mortar boards. - Reinforced slab: rebar cutter/bender, wire mesh, spacer chairs, concrete screed straightedge, float, curing membrane.