You can absolutely lay a patio on a slope, but the approach is different from a flat site. The key is deciding early whether you'll create a level, terraced surface (cutting into the slope and using a retaining edge) or a continuously sloped surface that follows the ground but still drains correctly. Either way, you need a solid compacted sub-base, proper edge restraints to stop slabs moving downhill over time, and a controlled drainage fall of between 1:80 and 1:60 (about 12.5 mm to 16 mm per metre) away from the house. Get those three things right and sloped patios are very doable as a DIY project.
How to Lay a Patio on a Slope Step by Step

Clara Farrell
13 May 2026
Assess the slope and decide on your layout strategy

Before you buy a single slab, spend time reading the ground. Walk the site and check how dramatic the slope is. A gentle slope of less than 1:20 (50 mm per metre) is usually manageable as a single continuous laid surface. Anything steeper than that and you should seriously consider building a stepped terrace, which means cutting the slope into two or more flat levels separated by a low retaining wall or raised edge. Trying to lay slabs continuously on a steep slope creates problems: slabs sit at odd angles, water runs too fast, and the whole surface can slowly creep downhill.
To measure the slope accurately, use a long straight edge, a spirit level, and a tape measure. Rest the straight edge on the high point, level it, then measure the drop to the ground at the low end. Divide the drop by the length and you have your gradient. For example, a 200 mm drop over 4 metres is 1:20, which is steep. A 100 mm drop over 4 metres is 1:40, which is manageable but will need careful drainage planning. Write these numbers down because you'll use them repeatedly when setting out string lines later.
Once you know your gradient, decide on the layout direction. Ideally, the main fall of your finished patio should run away from the house (not towards it) and towards a suitable drainage point like a gully, a planted border, or a permeable gravel strip. If the natural slope runs sideways across the patio rather than away from the house, you'll need to introduce a crossfall during construction rather than just following the ground. Mark out the full patio perimeter with pegs and string lines before you excavate anything.
Tools, materials, and slab choice for sloped patios
Sloped sites need a slightly more considered kit list than flat ground projects. You'll need all the usual patio tools, plus a few extras that make level control much easier on uneven ground.
- Pegs and string lines (lots of them, set at finished level height)
- Long spirit level (1.2 m or longer) and a shorter torpedo level
- Line level or water level tube for transferring levels across the site
- Laser level (hire one if you can, it transforms level control on slopes)
- Tape measure and a builder's square
- Mattock or mini digger for excavation (hire the digger for anything over 10 square metres on a slope)
- Plate compactor for sub-base compaction
- Rubber mallet and block splitter or angle grinder with a diamond blade
- Pointing trowel and a wide bucket for mortar mixing
- Wheelbarrow and a stiff brush for jointing
For materials, you need MOT Type 1 crushed stone for the sub-base (compacted to a minimum of 100 mm for pedestrian patios, 150 mm on soft or clay ground), sharp sand for bedding, and cement for the mortar bed. On a sloped site, a semi-dry mortar bed (the consistency of damp soil, not wet mortar) works better than a wet mix because it holds its shape while you're adjusting slabs on uneven ground.
Slab choice matters more on a slope than people realise. Avoid highly polished or smooth-faced slabs on any surface with a noticeable gradient: they become dangerously slippery when wet. Choose slabs with a riven, brushed, or textured finish and a slip-resistance rating of R11 or above. Riven natural sandstone, textured porcelain, and rough-hewn concrete slabs all work well. Bear in mind that heavily textured or riven surfaces may need a slightly more generous drainage fall (closer to 1:60 or even 1:40) to stop water pooling in the surface texture, whereas smoother porcelain can get away with 1:80.
Excavate and form the sub-base
This is the most physical part of the job, and on a slope it takes longer because your excavation depth changes as you move across the site. The goal is a sub-base surface that mirrors the finished fall you want, with consistent depth throughout.
Start by setting out string lines at finished slab level across the whole patio area. Use your pegs and a line level or laser level to get these accurate. From these lines, you can calculate your excavation depth at any point by adding the slab thickness, the mortar bed thickness (usually 50 mm), and the compacted sub-base thickness (100 to 150 mm). On a slope, this means you'll dig deeper at the high end and shallower at the low end to achieve the same finished surface height relative to your string lines.
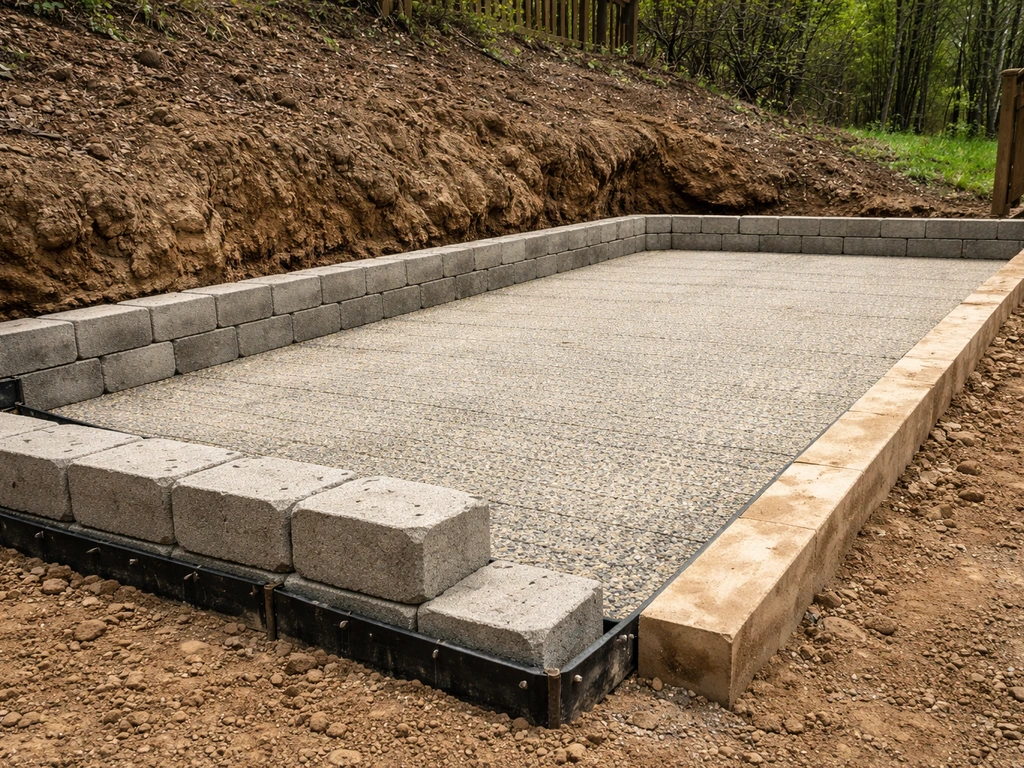
If you're building a terraced patio with steps, excavate each level separately, working from the top of the slope downward. Form a clean, vertical cut into the slope at each terrace edge before compacting the base. This prevents the sub-base from sliding before edging goes in.
Once excavated, lay a geotextile membrane over the soil before adding sub-base stone. This stops the stone mixing with soft ground below and extends the life of the base considerably on clay-heavy soils. If you are working on soil, focus on building a strong sub-base and getting proper drainage before you lay any slabs lay a small patio on soil.
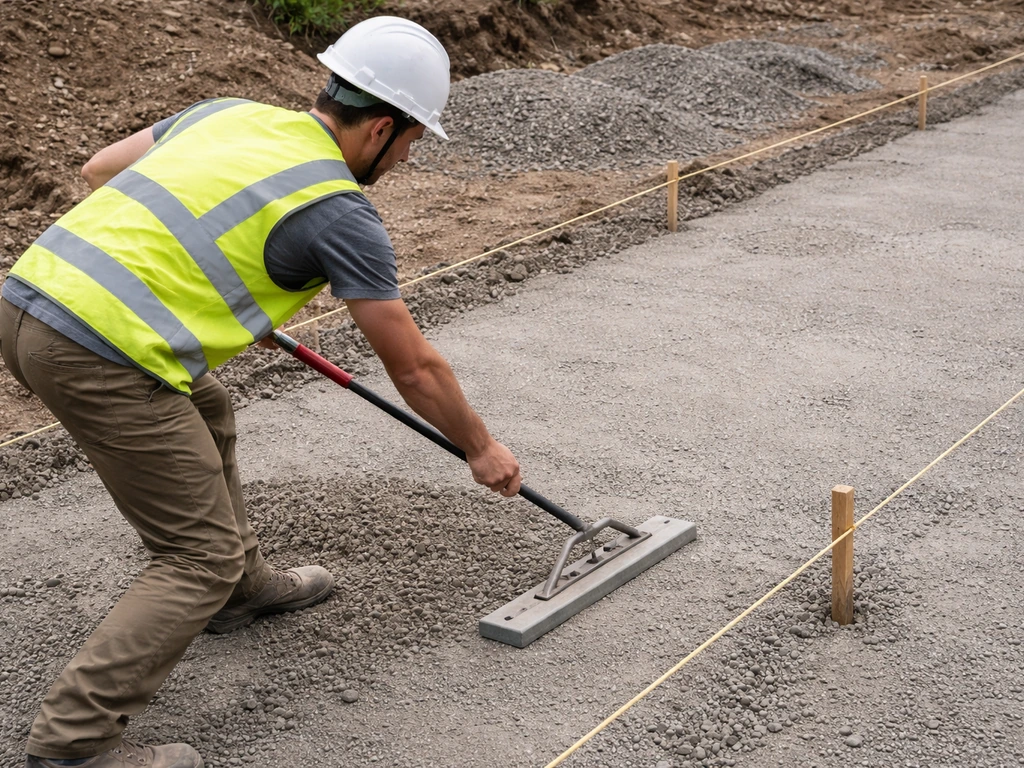
Spread Type 1 in 75 mm layers and compact each layer thoroughly with a plate compactor before adding the next. Two passes of the compactor in different directions is the standard approach. Don't try to compact it all in one deep layer: it won't compact properly below the top 75 mm and you'll end up with a spongy base that causes settlement later.
| Ground condition | Minimum sub-base depth (compacted) | Notes |
|---|---|---|
| Firm, free-draining soil | 100 mm | Standard for most residential patios |
| Clay or soft/waterlogged ground | 150 mm | Consider adding a drainage layer beneath |
| Made-up ground or fill | 150–200 mm | Compact in 75 mm lifts, consider a pro assessment |
| Steep slope (greater than 1:20) | 150 mm minimum | Edge restraints especially critical |
Getting the drainage falls right on a sloped site
This is where sloped patios trip people up more than anywhere else. The natural slope of the ground and the drainage fall you need in the finished surface are often two different things, and you need to reconcile them deliberately rather than just assuming the slope will sort itself out.
blank" rel="noopener noreferrer">The standard minimum fall for patio drainage is 1:80, which works out to about 12.5 mm of drop per metre of run. Many professionals aim for 1:60 (approximately 16.5 mm per metre) as a reliable working figure, and on heavily textured or riven surfaces you may want to go as far as 1:40 (25 mm per metre) to prevent water sitting in the surface texture. The direction of that fall must be away from the house and towards blank" rel="noopener noreferrer">a drainage point, not towards a neighbour's land.
If the natural ground slopes away from the house at roughly the right gradient, you're in luck: you can largely follow it. But if the ground slopes towards the house, or runs sideways, you'll need to build the correct fall into your mortar bed and sub-base levels, not rely on the ground at all. This is exactly why setting string lines at finished level is so important before you touch the sub-base. Those string lines tell you what you're building towards.
Plan where the water goes when it reaches the lowest edge of the patio. Options include a linear drainage channel, a gully connected to a soakaway, a permeable gravel border, or a planted bed that can absorb the runoff. Never just let it sheet across a path or driveway: it will erode joints and create a slip hazard. Make sure your drainage destination is in place (or at least planned and cleared) before you lay the first slab.
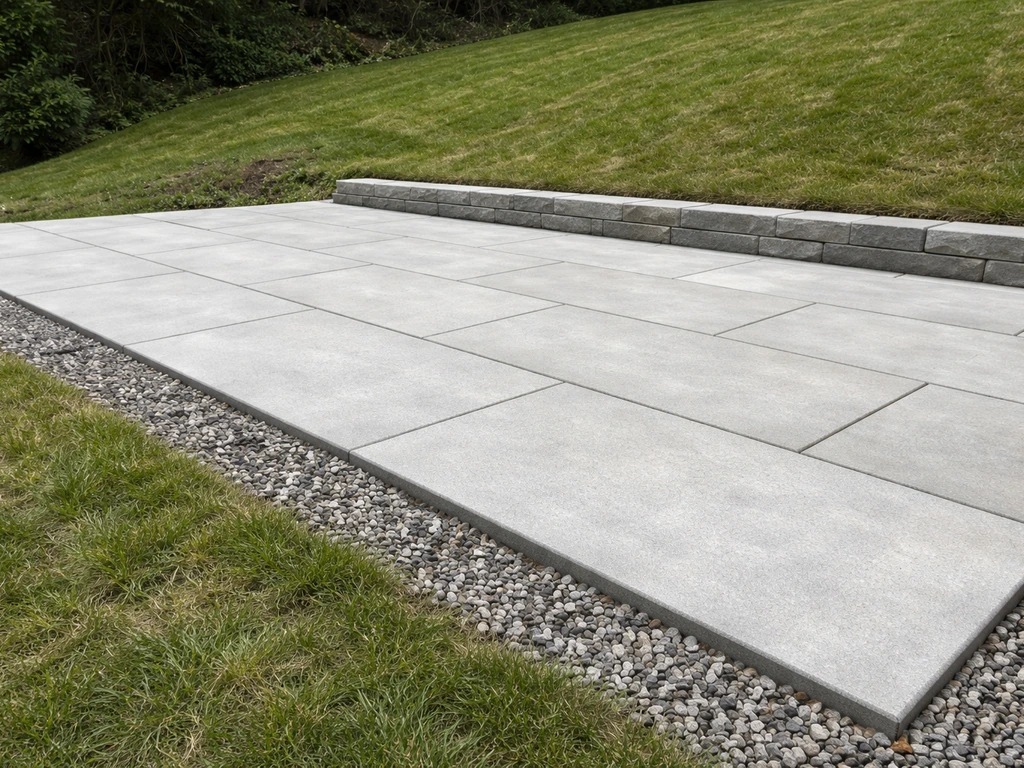
Install edging and retaining support before laying a single slab
On flat ground, edge restraints are helpful. On a slope, they're non-negotiable. Slabs laid on a slope have a constant tendency to migrate downhill, especially as the mortar cures and settles over the first year or two. If there's nothing holding the bottom edge of the patio, the whole surface can gradually creep, opening up joints and eventually causing slabs to lift or crack.
Install edge restraints before laying any slabs. At the lowest edge of the patio (the downhill side), this means setting a robust concrete haunch, a row of concrete kerb sections, or a proprietary metal edge restraint that is bedded in fresh concrete to at least half its depth. For a terraced patio, each terrace drop needs a proper retaining edge or low wall: a single course of engineering bricks or dense concrete blocks bedded in a generous concrete footing is the minimum. Don't rely on slabs themselves to act as retaining elements.
Side edges on a slope also need restraint, especially if the ground falls away at the sides. Haunch concrete along both side edges too, set at the correct finished-slab height using your string lines. The mortar for haunching should be a fairly stiff 3:1 or 4:1 mix (sharp sand to cement). Allow the haunching to cure for at least 24 hours before you start bedding slabs next to it.
Laying the slabs step by step
Set your string lines and working reference
With your sub-base compacted and edging set, re-check your string lines. You should have lines at finished slab height running in both directions across the patio, set to the correct fall. If you have a laser level, set it up at this point: it lets you check the height of every point on the mortar bed without constantly re-measuring from string lines.
Mix and lay the mortar bed
Use a semi-dry mortar mix: 5 or 6 parts sharp sand to 1 part cement. It should clump when you squeeze it in your fist but not feel wet or sloppy. Lay it in a layer approximately 50 mm deep (more if you're packing up to meet a level at the high end of a slope).
On a slope, lay the mortar bed for one slab or a small area at a time rather than screeding a large area in advance: semi-dry mortar on a slope will slump if it's spread too far ahead. After the mortar bed is set, screed sand can be used to fine-tune the level before you bed and set the patio slabs how to screed sand for patio.
Set and level each slab
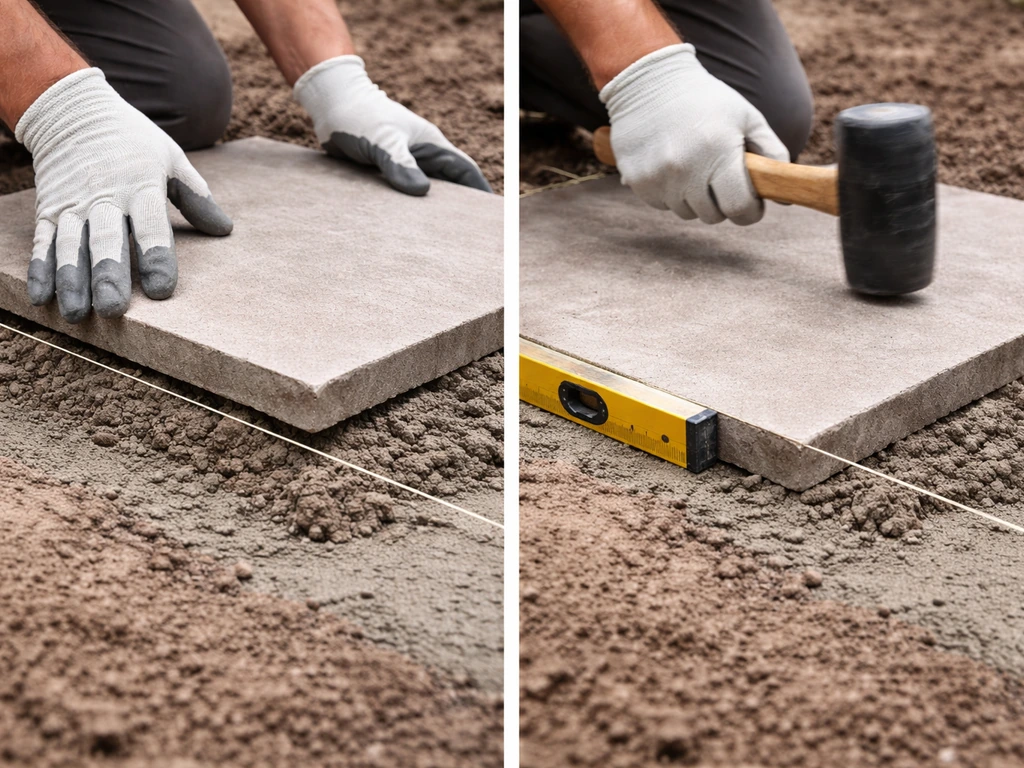
Lower each slab onto the mortar bed and tap it down with a rubber mallet. Check the height against your string lines or laser, and check the fall with your spirit level and a piece of tile or a thin wedge as a gauge. A 1:60 fall over a standard 600 mm wide slab is about 10 mm of drop across the slab: you should be able to feel and see that with a level. Adjust by adding or removing mortar underneath. Work from the house outward and from one side to the other, keeping consistent joint gaps using tile spacers or purpose-made plastic spacers (10 mm joints are standard for most slabs).
On a sloped site, check both the fall direction and the crossfall (side to side) of every slab. It's easy to let slabs rotate slightly on a slope, which creates an uneven surface that looks wrong and sheds water in the wrong direction. Use your square and level frequently.
Cutting slabs to fit
On a slope, your cut slabs at the edges may not be the same width all the way along a row if the slope runs diagonally. Measure each cut individually rather than assuming they'll all be the same. An angle grinder with a diamond blade or a hired slab splitter makes this manageable. Always wear eye protection and a dust mask when cutting.
Finishing, grouting, and slope-specific checks
Once all slabs are laid and you're happy with levels and falls, leave the mortar bed to cure for at least 24 hours (48 hours in cold weather) before walking on the surface or applying jointing material. Disturbing slabs before the bed has hardened is one of the most common ways to undo good work on a slope.
For jointing, a brush-in dry mortar (4:1 sharp sand to cement, bone dry) or a proprietary jointing compound are both suitable. On a sloped surface, a wet pointing mortar can wash out of open joints before it sets if rain catches it, so dry jointing compounds have a practical advantage here. Brush the mix into joints with a stiff brush, compact it lightly with a pointing iron, and brush off the excess. Mist the joints lightly with a fine sprayer to start the curing process, then keep off the surface for another 24 hours.
Slope-specific checks and common mistakes
Once the jointing has cured, carry out these final checks before you consider the job done:
- Pour a bucket of water at the top of the patio and watch where it goes. It should run smoothly across the surface and off the low edge into your planned drainage point. Any pooling means a slab is sitting high or low and needs re-bedding.
- Check all joints are consistent and fully filled. Open or hollow-sounding joints on a slope will allow water to undermine the mortar bed from below over winter.
- Check the lowest edge restraint is still firm. Tap it with your foot: it should not move at all.
- Look at the junction between the patio and the house wall. There should be a gap of at least 150 mm between the slab surface and the damp proof course (DPC) in the wall. If your slope has pushed the finished level too high at the house end, this is the time to address it.
The most common mistakes on sloped patio projects are an insufficient or poorly compacted sub-base (leading to settlement on the downhill side), inadequate edge restraints at the bottom of the slope (allowing slabs to creep), no planned drainage exit point (leaving water trapped against the house), and trying to eyeball level rather than using proper string lines and a spirit level throughout. None of these are hard to avoid: they just require patience in the preparation stages.
If your slope is very steep (steeper than 1:10) or the ground is heavily waterlogged clay, this is one of those projects where getting a professional assessment of the sub-base and drainage first is worth the money. A landscaper or civil engineer can tell you whether a soakaway is needed, or whether the slope requires a retained terrace with a proper concrete footing rather than a DIY edging strip.
Your practical next steps
Start with a day just measuring and planning: mark out the area, check the slope gradient, decide between a continuous surface and a terraced layout, and identify your drainage exit point. Once you know those things, you can calculate your excavation depths, order materials, and hire equipment confidently. If you need help working out how much sand or mortar you need for the bedding layer, or how to screed a sand bed accurately to a consistent depth across a sloped area, those are worthwhile things to understand before you start laying. Getting the sub-base and bedding depth consistent is especially important on sloped sites because small errors in bed depth create big level problems at the surface.
Take your time with the string lines and sub-base work. Those two things decide whether your finished patio looks and drains properly, or whether you're re-laying slabs in three years. The actual slab laying is the satisfying, visible part: it goes much faster when the groundwork is solid.
FAQ
How do I decide between a continuous sloped patio and a terraced design on a slope?
Use the slope gradient as your first filter. If it is steeper than about 1:20 and you expect to use large-format slabs, terracing usually gives better control of appearance, slip risk, and drainage. Also consider how much cutting you can safely do, because a terraced layout needs a stable retaining edge with a proper footing, not just edging trim.
What happens if I accidentally build the patio with the wrong drainage fall direction?
If the finished fall runs toward the house, water will collect along the lowest edge and can undermine the base over time. The most practical fix is to adjust the mortar bed and re-level before bedding more slabs, rather than trying to “correct” drainage after jointing. Once the patio is laid, reversing the fall often means lifting and relaying the affected section.
Can I lay slabs on a slope without a geotextile membrane?
You can, but it is riskier on clay or when the sub-base is near soft ground. The membrane helps stop fine soil migrating up into the Type 1 and reducing its strength. If you skip it, you may still need the base to be thicker and more carefully compacted, and you should expect earlier settlement or loss of fall.
How thick should my sub-base be if my slope has both soft spots and compacted ground?
Treat the softest area as the baseline. You should excavate to a uniform sub-base formation level across the whole footprint, then build your consistent compacted Type 1 layers from there. If you leave “high” soft soil pockets, you will create differential settlement that shows up as rocking slabs, usually first on the downhill side.
Is plate compaction really necessary for Type 1 on a slope, or can I compact by driving backfill in?
Plate compaction is necessary for a stable base. Loose or partially compacted Type 1 can deform under foot traffic and cause slabs to drop or shift downhill. If you are compacting 75 mm layers, keep compaction passes consistent across the slope, because uneven compaction leads to uneven fall even when string lines are correct.
Should I use a laser level the whole time, or is a string line enough?
String lines are essential for setting the correct finished level and fall, but a laser makes “spot checking” faster once the excavation is done. A good workflow is: set fall with string lines during set-out, then use the laser to verify the mortar bed heights point-by-point before laying each section. That reduces the chance of small bed errors stacking across a long run.
What is the easiest way to check crossfall (side-to-side fall) as I lay slabs on a slope?
Check the crossfall for each slab with a spirit level positioned on a known edge of the slab, then confirm with a short straight edge across two adjacent slabs. Do not assume crossfall will “automatically” match the slope shape, because slab rotation is common on diagonally sloping sites.
How do I handle cut slab widths at the edges when the slope runs diagonally?
Measure each edge course individually. On a diagonal slope, the cut width can change every few slabs, even with the same row line. Plan a layout so you minimize narrow sliver cuts near the middle of the patio, because slivers are harder to seat accurately on a semi-dry mortar bed.
Do I need to slope the mortar bed, or can I just slope by trimming the sub-base?
Either approach can work, but the article’s method of setting finished slab height with string lines is the safest because it ensures the combined build-up (sub-base, bedding, slab thickness) produces the drainage fall. In practice, trimming the sub-base is often necessary to reach the correct final heights, then the mortar bed is adjusted for fine level correction.
What mortar and jointing mix should I use to reduce washing out on rainy days?
For the bedding, use the semi-dry consistency so it holds shape while you adjust slabs. For joints on a sloped surface, choose dry brush-in mortar or a proprietary jointing compound rather than wet pointing mortar, because rainfall can wash wet mortar out of open joints before it sets.
How long should I keep people off the patio after laying, especially on a slope?
Avoid walking on it until the mortar bed has cured, typically at least 24 hours (longer in cold weather). On slopes, walking too early can create micro-movements at the downhill edge where the restraint loads are highest, which may later show up as gaps opening.
Can I use polymeric jointing on a sloped patio?
It is often possible, but you must ensure the patio is fully stable and the base is not settling, because polymeric products are less forgiving if joints keep widening. Also follow the manufacturer approach for water during installation, because application timing matters more when water runs quickly downhill.
What drainage outlet options are safest near a building foundation?
Directing runoff into a gully connected to a soakaway, or a controlled permeable gravel strip or planted area designed to accept flow, is safer than letting water sheet across the hardscape. Keep the outlet location planned before slab laying so water does not travel through joints and into the foundation area.
When would I stop DIY and get professional input for a sloped patio?
If the slope is very steep (around steeper than 1:10), if the ground is heavily waterlogged clay, or if you see signs of existing ground movement or poor drainage, get a professional assessment. A specialist can advise whether a properly founded terraced retaining structure or a specific drainage system is needed to prevent long-term creep and undermining.