
Screeding sand for a patio means dragging a straight board across guide rails to create a smooth, even sand bed at the exact right height and slope before you lay your slabs or pavers. You want a nominal 1 inch (25 mm) uncompacted layer of sharp concrete sand, set to a fall of roughly 1 inch per 4 feet away from the house, with screed rails holding that height perfectly consistent across the whole area. To work out how much bedding sand you need for the whole patio, calculate the area and multiply by the required thickness, then allow for a small waste factor calculate how much sand you need. Get this step right and every slab you lay goes down flat and level without fiddling. Rush it or skip the rails, and wavy paving will haunt you every time you look at the finished job.
How to Screed Sand for a Patio: Step-by-Step Guide

Plan your patio levels and drainage before you touch any sand
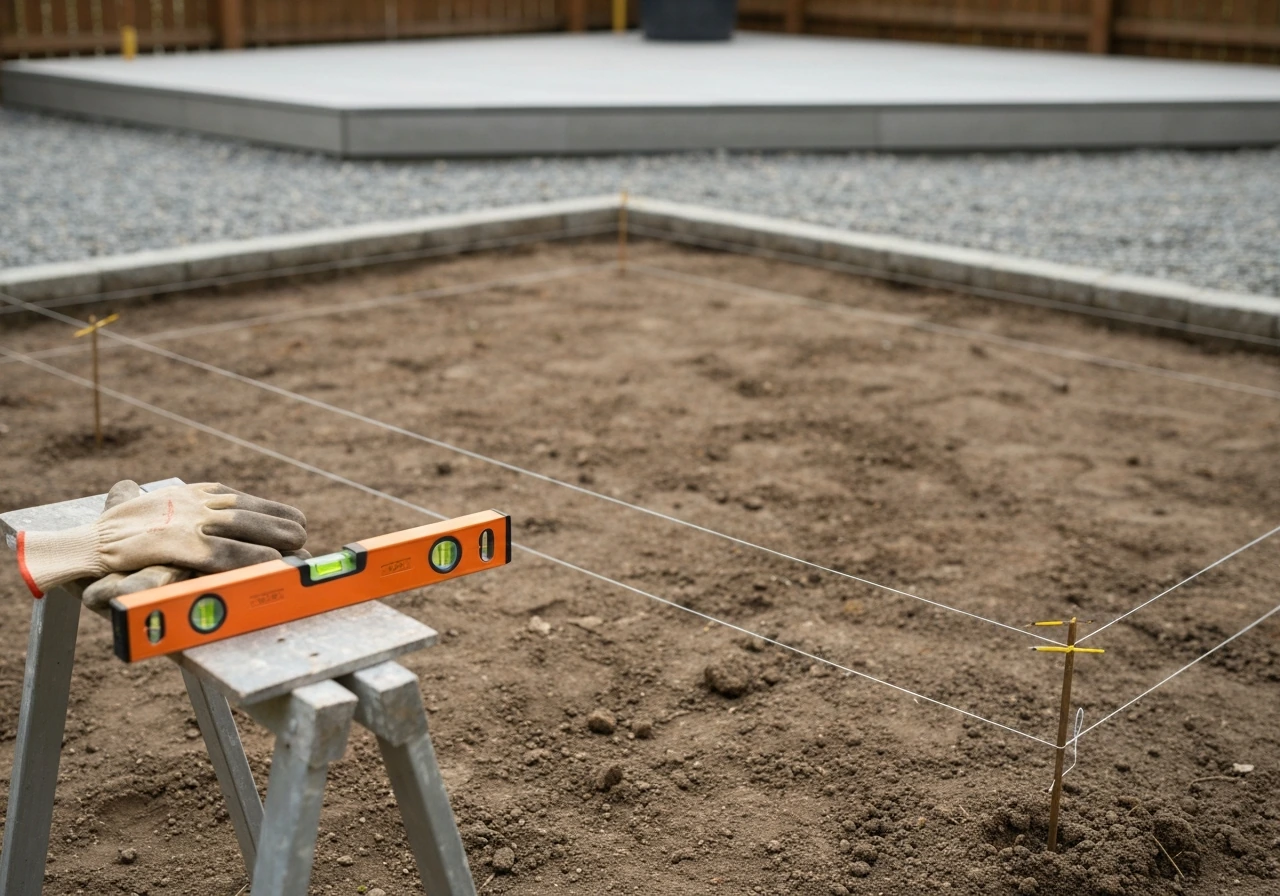
Before anything goes down, you need to know where your finished surface will sit and which direction the water will run. The standard drainage fall for a patio is 1 inch per 4 feet (about 1:48, or roughly 17 mm per metre) sloping away from the house. Some guides suggest as little as 1/4 inch per foot, and that works fine too, but anything less than 1:60 (about 16.7 mm per metre) is pushing your luck on a flat site. Mark up this fall on your string lines now, not later, because every decision you make from here is tied to these numbers.
blank" rel="noopener noreferrer">Set up taut string lines around the full perimeter of the patio area, using timber pegs and a spirit level or a laser level to transfer your finished paving height to each corner. The string lines should represent the top of your finished slabs, not the top of the sand. Once you know the finished height, subtract your slab thickness plus your 1 inch (25 mm) sand bed to find where the top of your compacted base needs to be. Write these numbers down. Having them on a piece of tape stuck to your straightedge saves a lot of mental maths mid-job.
If your site has poor natural drainage or sits on heavy clay soil, think about this now rather than after you've laid everything. If you are wondering how to lay a small patio on soil, focus on stabilizing the subgrade and getting drainage right before you spread any sand heavy clay soil. A geotextile separation fabric installed directly on the native soil before your aggregate base acts as a permanent barrier that stops fine particles migrating upward and contaminating the base under water pressure. This is especially worth doing on clay, where ICPI specifically recommends it.
Prepare the base and get your edge restraints in before the sand goes down
The sand bed is only as good as what sits underneath it. Your compacted aggregate base needs to be solid, level to your target grades, and finished before you even think about screeding sand. If the base is soft, wavy, or hasn't been compacted properly, no amount of careful screeding will save you. A good base is compacted to at least 95% of its maximum density, firm underfoot, and shows no deflection when you walk across it.
Edge restraints go in next, and they go in before the sand, not after. This is a step that catches a lot of DIYers out. Bedding sand needs a physical edge to butt up against, otherwise it creeps horizontally over time, taking your pavers with it. A minimum 1 inch (25 mm) vertical surface must be in contact with the side of the paver to restrain it properly. Concrete edging, plastic paver restraints pinned to the base, or a mortared soldier course all work. What doesn't work is relying on soil backfill as an edge restraint. Install your edging to the correct finished height, check it with your string lines, and make sure it's set firmly before you move on.
Choose the right sand and get the moisture content right
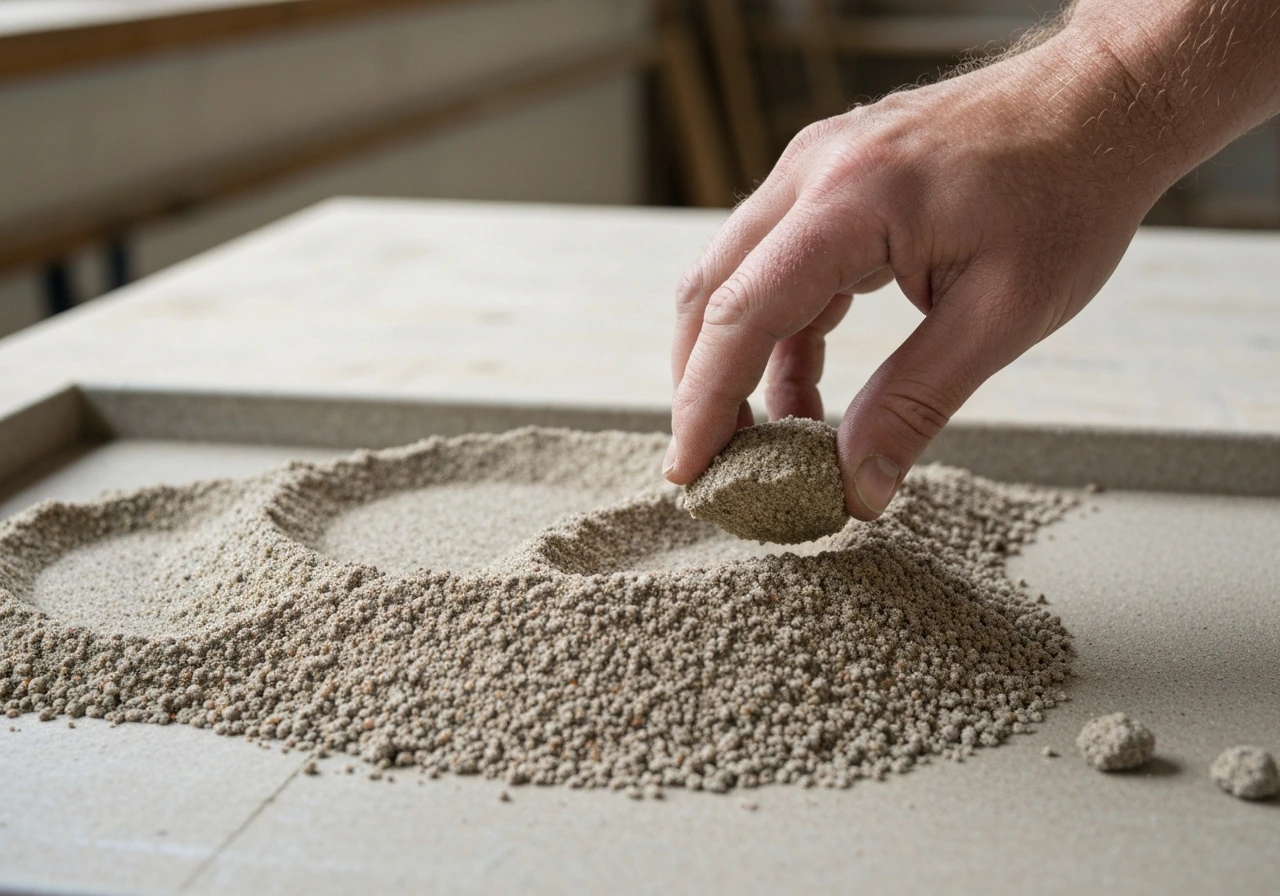
Use sharp concrete sand, sometimes called C-33 sand, that meets ASTM C33 gradation. This is a coarse, angular, well-graded sand that compacts without locking up or becoming fluid. Do not use building sand (also called soft sand or mason's sand) for bedding. It has too many fines, and when it gets waterlogged it can become almost fluid beneath your slabs, leading to settlement and movement. The difference really is that significant.
Moisture content matters more than most people realise. The sand should be just damp, not wet and not bone dry. The field test is simple: grab a handful and squeeze. It should hold its shape when you open your hand but not leave your palm wet or release any water when squeezed hard. Sand that's too wet will slump after you screed it, leaving you with a surface that's lower than your rails by the time you lay slabs. Sand that's too dry won't hold the rail impressions well and crumbles. If your sand is too wet, spread it out and let it dry for an hour before you start. If it's too dry, mist it lightly and turn it over.
One more distinction worth knowing: the bedding sand you screed now is regular paver sand with no bonding agents. Polymeric sand (which contains a dry polymer binder that activates with water) is used later to fill the joints between pavers, not as a bedding layer. Don't mix them up.
Set your screed rails and dial in the fall
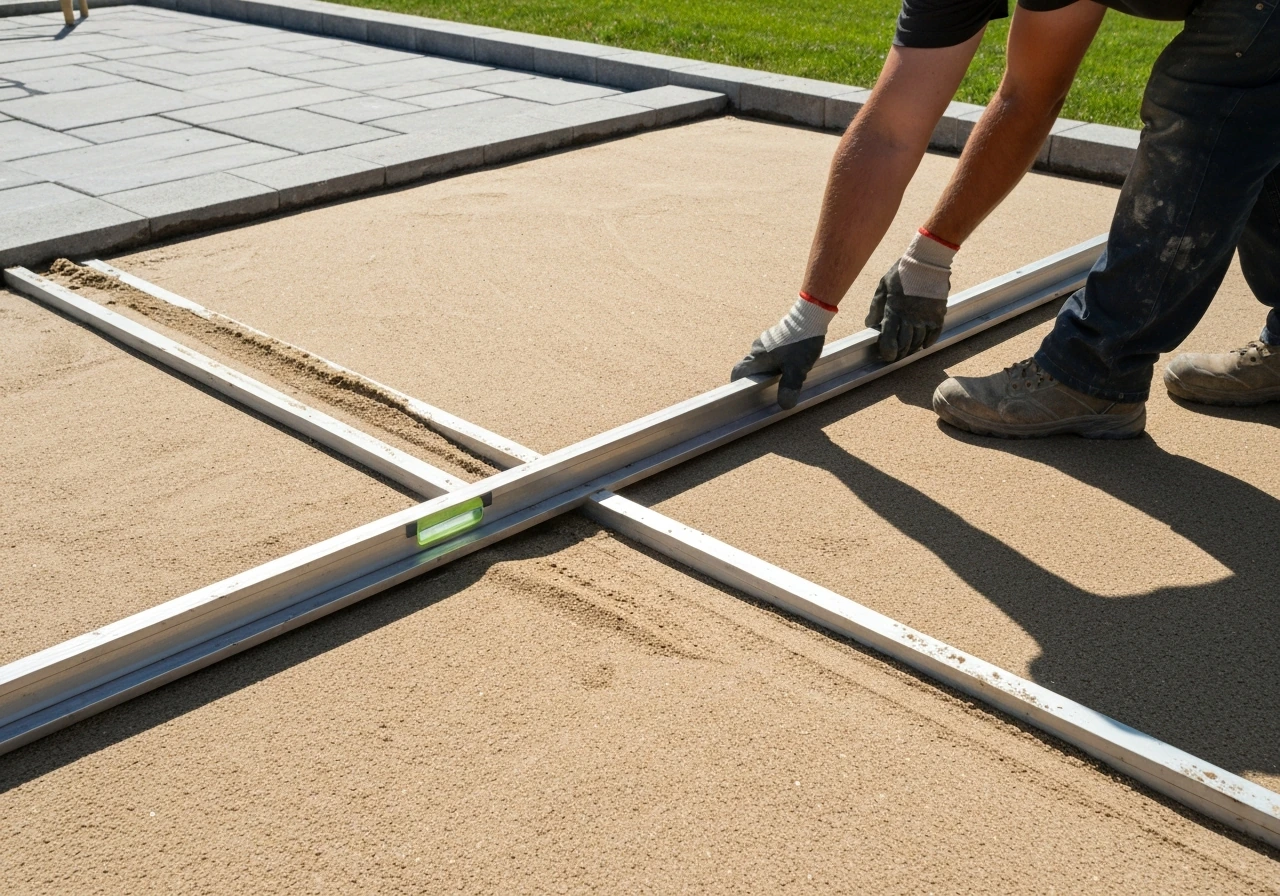
Screed rails are the guides your straightedge rides on to scrape the sand to a consistent, accurate height. The most common DIY approach is to use 3/4 inch diameter metal conduit or pipe laid directly on the compacted base. Because the finished sand bed should be 1 inch (25 mm) thick and the conduit is 3/4 inch, the sand surface ends up sitting just above the rails, which is exactly right for most interlocking pavers and concrete slabs. For thicker slabs, you might use 1 inch pipe. Match the rail diameter to your target bed thickness.
Place two rails roughly 4 to 6 feet apart running in the direction you'll screed (usually away from the house). Set each rail at the correct height to deliver your target fall using your string lines as the reference. Check each rail end with a spirit level and adjust by packing a little sand or grit underneath until it sits exactly where it needs to be. If you have a longer patio run than about 10 to 12 feet, work in sections rather than trying to find rails long enough to span the whole area.
Double-check the fall along each rail by measuring the drop across a known distance. A 1 inch per 4 foot fall means one end of a 4-foot spirit level should show a bubble that's one division off centre, or you can simply measure: if your rail is 8 feet long and falls away from the house, the far end should be exactly 2 inches lower than the near end. Take your time here. Five minutes spent getting the rails perfect saves hours of relaying slabs later.
Spread and lightly compact the sand before screeding
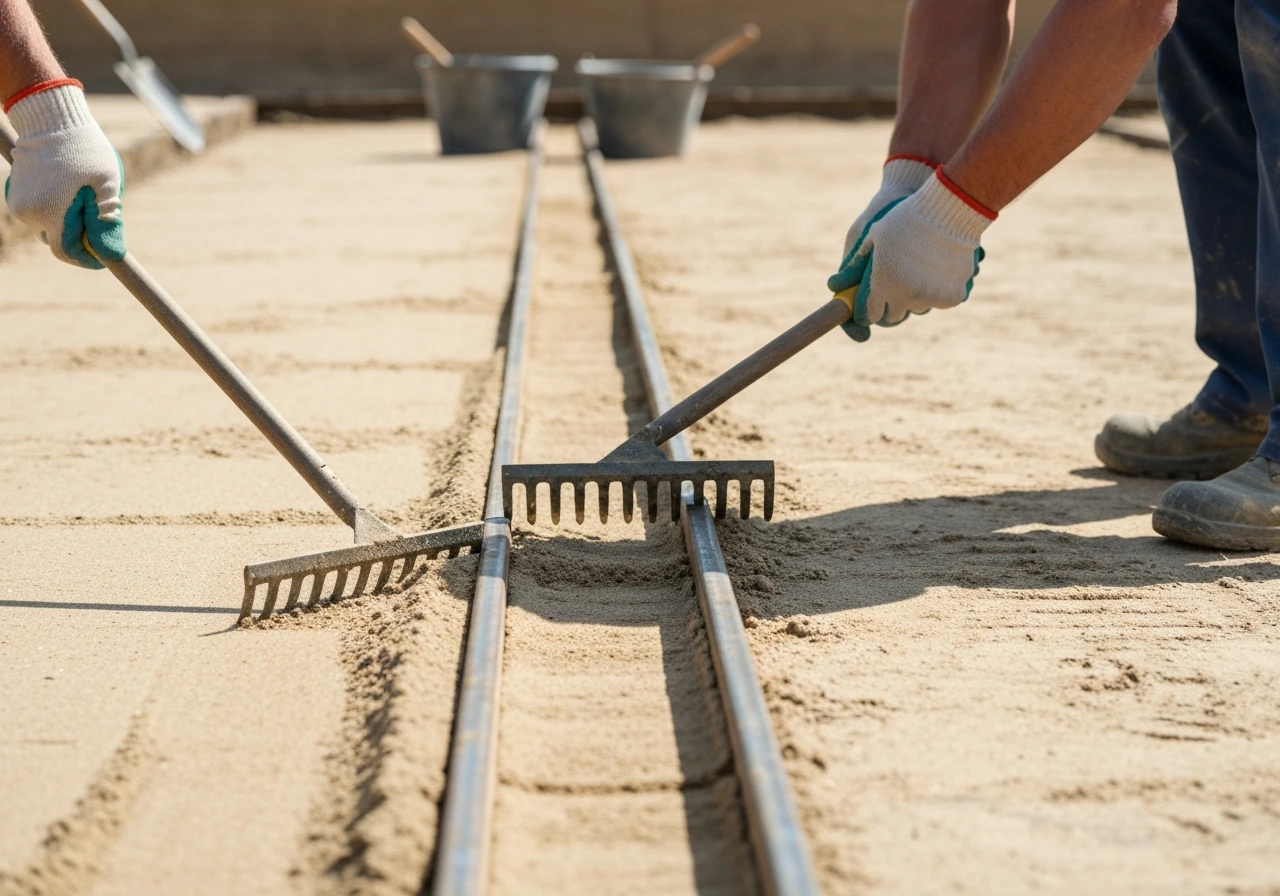
Tip or shovel the sand between the rails to fill the area slightly above the rail height, then rake it roughly level by hand before you screed. You want enough material that the straightedge will be scraping off excess rather than dragging through empty sections. If there are low spots the straightedge can't reach, the result will be thin areas in the bed.
Some contractors give the spread sand a single light pass with a hand tamper or plate compactor at this stage, especially on larger commercial jobs. For most DIY patios, this isn't strictly necessary before screeding, but it does reduce the risk of the straightedge pushing sand ahead of it rather than skimming it off. If you do compact before screeding, add a little extra sand on top afterwards to account for the slight reduction in thickness, then screed over it.
How to screed: technique and finishing passes
Your screed board needs to be long enough to rest on both rails simultaneously with a few inches to spare each side. A straight piece of timber (a 2x4 works well), a metal straightedge, or even a length of box section steel all do the job. Check that your board is actually straight before you start. A slight bow in the middle will give you a bed that's high in the centre or low in the centre across the whole section.
- Rest the straightedge on both rails at the far end of the section.
- Apply light downward pressure on both ends of the board.
- Pull the board toward you using a gentle side-to-side sawing motion as you go. This zigzag action cuts through the sand much more cleanly than a straight pull.
- Go slowly. Rushing creates ridges and drag marks.
- When you reach the end of the rail, look back over the surface. You should see a smooth, consistent plane with no obvious high ridges or hollows.
- Fill any low spots by sprinkling a small amount of sand by hand, then pass the straightedge over that area again.
- Remove the screed rails carefully once the section is done, pulling them straight up rather than dragging sideways. Fill the rail channels by hand with sand and pat them level gently with a float or the back of a trowel.
- Move the rails to the next section and repeat, making sure the new section ties in at the same level as the finished one.
The most common mistake at this stage is overworking the sand. Two or three passes are usually enough. More passes than that tends to start dragging and redistributing material unevenly, especially if the sand is slightly wet. If the surface keeps looking rough after three passes, the problem is usually moisture content or a bowed straightedge, not technique.
Do not walk on the screeded sand after finishing a section. Even footprints create depressions that are hard to remedy without rescreeding. Work backwards so your last section is at the entry point where you'll start laying pavers. If you need to cross a finished section to move rails, lay a piece of board flat to distribute your weight.
Check the results, fix problems, and get ready to pave
Once all sections are screeded, do a final check before any slabs go down. Lay your spirit level or straightedge across the whole area in multiple directions. You're looking for a consistent plane with the correct fall, not a dead-flat surface (which wouldn't drain). Minor depressions of a few millimetres can be filled and re-struck by hand. Larger dips or high spots mean re-screeding that section.
Common problems and quick fixes
| Problem | Likely cause | Fix |
|---|---|---|
| Wavy surface after screeding | Bowed straightedge or rails not level | Check board straightness, re-level rails, rescreed |
| Ridges along the rail lines | Rails dragged sideways when removed | Lift rails straight up, fill channels by hand, re-strike lightly |
| Low spots appearing after you walk away | Sand too wet, settling after screeding | Let sand dry, refill and rescreed the low area |
| Sand segregating (coarse particles separating) | Too dry or mixed too roughly | Lightly mist the sand, turn it, rescreed the affected section |
| Straightedge digging into sand rather than skimming | Sand not spread thickly enough above rails | Add more sand, rake level, rescreed |
| Incorrect fall across the patio | Rails not set to the right gradient | Re-measure and reposition rails before continuing |
Once you're happy with the surface, start laying slabs or pavers immediately. Screeded bedding sand that's left open is vulnerable to disturbance from wind, foot traffic, and rain. At the end of each day, cover any screeded but unpaved sections with plastic sheeting to protect them. The pavers themselves go directly onto the screeded surface, pressed firmly down so the full base of the slab is in contact with the sand. Do not grout or compact with a plate compactor until all pavers in a section are laid and joints are filled.
After laying, a plate compactor run over the finished paved surface (with a rubber pad or carpet to protect the slab faces) vibrates the pavers into the sand bed and eliminates any remaining small variations. This is the final stage that truly locks everything in, and it's worth doing even on small patios. Once compacted and jointed, the patio can take foot traffic almost immediately, though you should avoid heavy loads like furniture or vehicles for at least 24 hours if you've used polymeric joint sand that needs time to cure.
What to tackle next
If your patio is on a slope or you're working on uneven ground, the screeding process follows the same principles but the fall calculation and rail setting become more involved. Similarly, if you're still at the planning stage and working out how much sand to order, getting those quantities right upfront saves multiple trips to the builder's merchant. And if you're laying directly on soil rather than a prepared aggregate base, the preparation work before you even reach the screeding stage is different again and worth reading up on before you start.
FAQ
How can I tell if my sand bed thickness is correct once I’ve finished screeding?
Measure from your string line (finished paver top) down to the screeded sand surface at several points, not just at the rails. Your target is the finished height minus slab thickness minus the designed bedding thickness. If you are ending up consistently thinner or thicker across a whole run, it usually means the rails were set wrong, not a screeding technique issue.
Should I screed in one continuous run, or is it better to work in smaller sections?
Work in sections if your run is longer than about 10 to 12 feet or if you cannot keep pace through the entire area before sand starts to change moisture. Smaller sections also make it easier to re-check fall before pavers go down, and they reduce the temptation to walk on screeded sand while repositioning rails.
What straightedge length should I use, and does it matter if it overhangs the rails?
Use a board or straightedge that rests on both rails at the same time with a few inches to spare each side, because overhanging allows you to scrape consistently without catching on rail ends. Also check for bow across the full length, a slightly warped straightedge can create a persistent high or low center that looks “level” locally but not across the patio.
Can I level the patio by adjusting sand thickness instead of getting the base and fall right?
Avoid relying on sand thickness changes to fix drainage or a weak base. If the aggregate base is out of grade, your screeding will still produce movement risk and uneven bedding, and you may end up with areas thinner than the bedding thickness. Use the rails only to achieve the designed bedding height on top of a properly compacted, correctly graded base.
How do I handle wet weather, and what should I do if the sand gets rain-soaked before laying pavers?
If the sand becomes slushy, it will slump when screeded and can shift after pavers are set. Stop, spread the sand to let excess moisture escape, then re-mix by turning it so it dries evenly. Resume only when the field-squeeze test holds shape without leaving wet water on your palm.
Is it ever okay to use a less expensive sand or mason’s sand for bedding?
In most patio builds, it’s not. Building sand tends to have more fines, and when water moves through the jointing and bedding area it can behave like a finer, more fluid layer, increasing the chance of settlement under pavers. Stick to sharp, angular bedding sand with an appropriate grading (often sold as C-33 type) so it compacts firmly.
Do I need to compact the bedding sand before screeding?
Usually no, the article approach is to place it slightly above rail height, rake roughly level, then screed. Some contractors do a light pass with a tamper or plate compactor to reduce sand being dragged by the straightedge, but if you compact first, plan to add extra sand back on top because compaction can reduce thickness slightly.
What’s the correct way to set the rails at height, and how often should I re-check them?
Set rails using your string lines as the reference to the top of the finished slabs, then transfer the rail height by subtracting slab thickness and the bedding thickness. Re-check each rail end with a level and confirm fall with a measured drop across a known distance before committing to screeding, then re-check if you adjust anything or change sections.
Why does my screeded surface look wavy even though I used the rails?
Common causes are a bowed straightedge, rails not level across their length, or sand moisture that is dragging instead of skimming cleanly. If the waves appear after a few passes, reduce to two or three passes and confirm the sand is just damp, then verify the straightedge is true by checking it against the rails.
Can I walk on the sand to place paver materials or get to the next rail?
Try not to walk on screeded sand at all. If you must cross a finished area, lay down a flat board to distribute your weight and remove it after crossing. Footprints create depressions that are difficult to fix without rescreeding, especially after the sand surface stabilizes.
Should I leave screeded sand exposed overnight, or cover it?
If it will not be paved immediately, cover it with plastic at the end of each day to protect against rain, wind disturbance, and surface crusting. Do not rely on leaving it open for long periods, because even light foot traffic or weather can disturb the surface profile.
How long should I wait after compacting the pavers before using the patio?
After plate compaction and jointing, foot traffic is typically okay soon, but avoid heavy loads such as vehicles or moving furniture for at least 24 hours, especially if you used polymeric joint sand that needs time to cure. If the weather is cool or damp, curing can take longer, so wait for fully set joints before stressing the surface.