
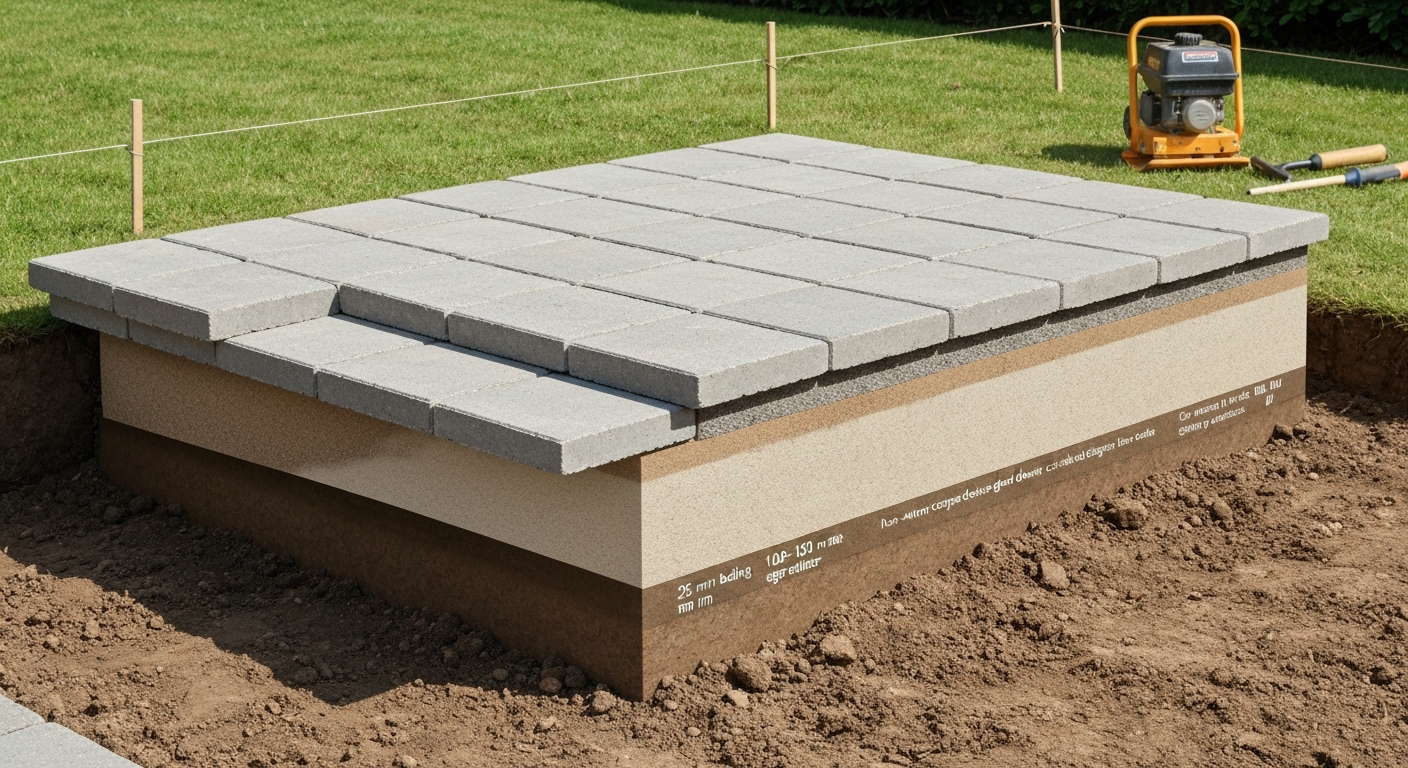
Yes, you can lay a small patio directly on soil, but only under the right conditions. For most DIY homeowners, the safest and most durable approach is to excavate around 150–200 mm (6–8 in) deep, compact the native soil, lay a 100 mm (4 in) compacted crushed-stone base, add a 25 mm (1 in) screeded bedding sand layer, and then set your pavers or slabs on top. Skipping the compacted base and placing slabs straight onto undisturbed soil, especially clay, is the single most common reason small patios sink, crack, and shift within a couple of seasons. That said, very small feature patios on stable, well-drained sandy or gravelly subgrade can sometimes work with just a geotextile and a screeded sand bed, if you go in with realistic expectations.
How to Lay a Small Patio on Soil: Step-by-Step for DIY

Clara Farrell
12 Jul 2026
Can you actually lay a patio straight onto soil (including clay)?
The honest answer is: it depends entirely on what kind of soil you have and how the patio will be used. On well-drained, stable sandy or gravelly soil with no real frost risk, a small decorative patio with lightweight slabs can be laid over a geotextile with a compacted sand bed, and it will hold up reasonably well for years. On clay, wet or boggy ground, ground with any organic content (old turf roots, leaf matter, fill), or anywhere with heavy foot traffic, skipping a proper compacted sub-base is asking for trouble. Clay expands when wet and shrinks when dry, so slabs laid directly on it will rock, tilt, and develop uneven joints season after season. The industry minimum for any pedestrian patio on a properly drained subgrade is a 100 mm compacted aggregate base plus 25 mm of bedding sand, and on clay or frost-prone ground, that base depth typically needs to go up to 150 mm or more.
Decision checklist: soil only vs. sub-base vs. full concrete base
Use this checklist before you commit to any method. Being honest at this stage saves you from ripping everything up in year two.
| Condition | What it means for your base |
|---|---|
| Stable sandy or gravelly soil, free-draining, no clay | Compacted sub-base (100 mm) + 25 mm sand is likely sufficient for a pedestrian patio |
| Firm loam with no standing water after rain | Compact the subgrade well and use a 100 mm crushed-stone base + 25 mm sand |
| Clay soil but stable and low plasticity | Minimum 100–150 mm compacted crushed-stone base; geotextile separator recommended |
| Reactive or high-plasticity clay (cracks badly in summer, very soft in winter) | 150 mm compacted base minimum; consider lime or cement stabilisation of the top 150 mm of subgrade, or professional advice |
| Soft, wet, boggy or organic soil | Full excavation to firm ground required; professional assessment strongly recommended |
| Freezing winters in your region (significant frost depth) | Add 50–100 mm extra base depth; ensure excellent drainage; check local frost depth requirements |
| Heavy use: BBQ, furniture, hot tub, wheelchair access | Full concrete slab or at minimum a well-engineered compacted base engineered to spec |
| Vehicular access (parking) | 80 mm thick pavers + 150 mm compacted base minimum; concrete base for heavy vehicles |
| Any doubt about bearing capacity or buried services | Get a soils assessment or call a professional before breaking ground |
Comparing your options: four methods side by side
There are four main ways to lay a small patio on or near native soil, and each has a different level of permanence, effort, and suitability. Here is how they compare honestly.
| Method | How it works | Pros | Cons | Best suited for |
|---|---|---|---|---|
| Direct on geotextile | Excavate, lay geotextile fabric on prepared subgrade, screed bedding sand on top, set slabs | Quick, minimal materials, reversible | Only works on stable, well-drained sandy or gravelly subgrade; slabs can shift over time | Very small, lightly used patios on free-draining sandy soil; stepping stone areas |
| Compacted hardcore (crushed stone) + sand | Excavate, compact subgrade, lay 100–150 mm compacted crushed stone, screed 25 mm bedding sand, set slabs | Industry-standard method; durable; works on most soils including moderate clay | More excavation and material cost; requires plate compactor | Most small to medium DIY patios; best all-round choice for typical garden conditions |
| Sand (bedding) only — no hardcore | Excavate lightly, lay and level compacted sharp sand, set slabs on top | Fast and cheap | Not recommended on clay or soft soil; high risk of settling and rocking slabs; not CMHA/ICPI compliant | Temporary arrangements only, or on proven stable sandy ground with minimal traffic |
| Mortar (cement) bed | Pour a concrete slab base, then bed slabs in a cement mortar mix on top | Permanent; most stable; mortar fixes slabs in place | Highest cost and effort; requires concrete; almost irreversible; cracking possible if concrete base moves | Formal, permanent patios; natural stone requiring exact levels; mortar-bonded porcelain tiles |
For a mortar-set installation, the slabs need to sit on a structural concrete slab, not just on compacted soil. If you are thinking about mortar-bedding natural stone or porcelain directly onto prepared ground, you really need that concrete base underneath, otherwise any slight ground movement will crack both the mortar and the slabs. Manufacturer datasheets such as PCI Carraroc medium/thick bed methods describe mortar-bed systems and recommended bed thicknesses for bonding natural stone and porcelain.
The recommended method for most small DIY patios
For the vast majority of homeowners tackling a first patio project, the compacted crushed-stone sub-base plus 25 mm screeded bedding sand method is the one to use. It meets CMHA (formerly ICPI) guidance for pedestrian paving, it works on most soil types including moderate clay, and it gives your slabs a stable, free-draining platform that will last for years without constant relaying. Paver base & aggregate specifications referencing ICPI/CMHA guidance (CraftedCalcs) recommends a dense‑graded crushed‑stone sub‑base (e.g., AASHTO No.57 / 3/4" minus or equivalent) placed in 50–75 mm lifts and compacted to CMHA/ICPI targets. The basic assembly is: excavated and compacted subgrade, then 100 mm of dense-graded crushed stone (compacted in two 50 mm lifts with a plate compactor), topped with 25 mm of ASTM C33 or equivalent sharp/grit sand screeded to your final level, and your 60 mm pavers or slabs laid on top. On clay-heavy or frost-prone ground, increase the crushed-stone base to 150 mm.
Site assessment: measure, mark out, and check what you are working with
Measuring and marking out
Start by marking out the full patio footprint with timber pegs and string lines. Measure the width and length carefully and check the rectangle is square by measuring both diagonals, they should be equal. Add about 50 mm outside your slab area on all sides where you plan to install edge restraints. Write down the total area in square metres (length x width) because you will need it to calculate materials.
Checking your soil type
Once you have your area marked, dig a test hole about 300 mm deep in the centre and at one corner. Feel and look at the soil. A quick ribbon test tells you a lot: take a small handful of moist soil and try to squeeze it into a ribbon between your thumb and forefinger. A long, smooth ribbon (more than 25 mm) means high clay content, that is the one that causes most patio problems. Soil that feels gritty and won't ribbon at all is sandy and much more cooperative. Silty soil feels smooth like flour. If you can get the USDA Web Soil Survey data for your postcode or address, it will give you a reliable breakdown of soil texture, drainage class, and whether your soil is shrink-swell prone, worth five minutes of your time before you order materials.
Checking load and use
Think honestly about how you will use the patio. A couple of garden chairs and occasional foot traffic is very different from a heavy outdoor dining set, a built-in BBQ, or a hot tub. The heavier the load, the more important your base becomes. Hot tubs in particular can weigh 1,500 kg or more when filled, that needs a dedicated concrete slab, not just a compacted gravel base.
Locating underground services
Before you dig, contact your local utility locator service (in the US, call 811 before you dig, it is free and legally required in most states). Electricity cables, gas pipes, and water lines can run surprisingly shallow in garden areas. Mark any identified services on your layout plan and keep at least 500 mm clear of them wherever possible. If you are unsure, hand-dig carefully rather than using a powered rotary cultivator or mini-digger.
Dealing with clay and poor drainage
Clay is the most common headache in DIY patio projects and it genuinely does make things harder, but it is not a reason to give up. The key issue is that clay moves: it swells when it absorbs water and shrinks when it dries out, especially reactive plastic clays. Lay slabs directly on it and they will mirror every move the clay makes beneath them.
Stabilisation options for clay subgrade
For most small garden patios on moderate clay, the practical solution is thorough excavation down to firm subgrade, good compaction of the exposed clay surface, a geotextile separation layer (which prevents your crushed-stone base migrating down into the clay over time), and a 150 mm compacted crushed-stone base instead of the standard 100 mm. This handles the vast majority of residential clay situations without specialist intervention.
On highly plastic or reactive clay, the kind that cracks dramatically in summer and turns to mud in winter, the FHWA and Portland Cement Association both document chemical stabilisation as the proper engineering solution. Lime modification (typically 3–8% hydrated lime by dry soil weight, worked into the top 150 mm of subgrade) flocculates clay particles, reduces plasticity, and stiffens the subgrade. Portland cement treatment is an alternative but needs careful attention to soil sulfate levels. The target for a lime-modified clay subgrade is typically around 0.34 MPa (50 psi) unconfined compressive strength at 28 days. For a small domestic patio, this level of treatment is rarely needed, but if you are looking at a large area of highly reactive clay or planning a heavy-use surface, it is worth calling a geotechnical engineer for a proper assessment rather than hoping a thick layer of gravel will fix it.
When clay requires professional treatment or a different approach
- The clay is visibly very soft, wet, or has a shiny, slick surface when exposed
- The test hole fills with water overnight after a dry spell
- There is obvious organic material (roots, old turf, black peaty layers) in the subgrade
- The ground is on a slope and the clay shows signs of creep or slippage
- The intended patio area is larger than about 20–25 square metres on reactive clay
- You are planning to place a heavy structure (hot tub, large BBQ island) on top
In any of those situations, get a professional opinion before you order materials. It is much cheaper than relaying a sunken patio two years from now.
Planning levels and falls: getting drainage right from the start
A patio that holds puddles is frustrating to use and shortens the life of your slabs. Every patio needs a slight fall away from any buildings or structures. The standard minimum is a 1:80 slope (roughly 12 mm fall per 1 metre of patio), and a more practical target for most garden patios is 1:60 (about 16 mm per metre). This is gentle enough that you barely notice it visually but enough to shed water reliably.
Mark your datum level (the finished surface height at the highest point, usually at the house wall, remembering to keep the finished patio surface at least 150 mm below the damp-proof course) and then calculate the fall across the full width of your patio. For a 3-metre-wide patio at 1:60 fall, you need 50 mm of total fall from house to outer edge. Set your string lines at this angle before you start excavating and check them regularly as you work. Surface drainage becomes more complex when dealing with sloped ground, that is a separate topic worth exploring if your garden has any significant gradient.
Tools, materials, and edge restraints: your complete checklist
Tools
- Tape measure (at least 5 m)
- Timber pegs and string lines for layout
- Spirit level (1.2 m or longer) and a long straight edge or screed rails
- Spade and mattock for excavation
- Wheelbarrow
- Plate compactor (hire if you do not own one — essential, not optional)
- Hand tamper for areas the plate compactor cannot reach
- Rubber mallet for tapping slabs
- Bolster chisel and club hammer for cutting, or an angle grinder with diamond blade
- Brick saw or wet-cut tile saw for accurate cuts (hireable at most tool-hire shops)
- Bucket and trowel for mixing jointing compound or mortar
- Brush or squeegee for jointing
- Safety glasses, dust mask (P2 rated when cutting), knee pads, and work gloves
Materials and approximate quantities
These quantities are based on a typical small patio of 10–15 square metres. Adjust proportionally for your measured area. To calculate sand quantities accurately for your specific project, it helps to work through the screeding depth and coverage maths carefully before ordering. If you need a quick calculator for precise amounts, see how to calculate sand needed for patio.
| Material | Specification | Approximate quantity (10 m² patio) |
|---|---|---|
| Pavers or paving slabs | 60 mm concrete pavers (pedestrian use) or equivalent natural stone/porcelain | 10–11 m² (allow 5–10% extra for cuts and breakages) |
| Crushed stone sub-base | Dense-graded 3/4 in minus (AASHTO No. 57 equivalent) or MOT Type 1 | Approx. 1.5–2 tonnes for 100 mm compacted depth over 10 m²; 2–2.5 tonnes for 150 mm |
| Bedding sand | ASTM C33 sharp sand or equivalent coarse grit sand (not building sand) | Approx. 250–300 kg for 25 mm layer over 10 m² (roughly 0.25 m³) |
| Geotextile membrane | Non-woven polypropylene separation fabric (130–200 gsm) | Slightly more than your excavated footprint area — buy per linear metre at typical 2 m roll width |
| Edge restraints | Plastic paver restraint, treated timber edging, or concrete haunching | Linear metres of perimeter (measure your boundary) |
| Jointing material | Kiln-dried jointing sand, polymeric sand, or mortar pointing mix depending on slab type | Approx. 5–10 kg dry polymeric sand per m² depending on joint width |
| Concrete (if haunching edges) | Pre-mixed or site-mixed C20/C25 concrete for haunching edge restraints | Approx. 50–80 kg bagged pre-mix per 10 linear metres of edge |
Edge restraint options
Edge restraints stop your pavers migrating outward under load, which causes joints to open and slabs to rock. You have a few good options depending on the look and your budget:
- Plastic paver restraint clips: purpose-made, fast to install, near-invisible once slabs are laid, secured with spikes into the sub-base
- Treated timber edging (50 x 100 mm): easy to work with, looks natural next to garden beds, fixed with timber stakes; rot-treated timber will last 10+ years
- Concrete haunching: the most permanent option — a thin collar of concrete poured against the outside of the perimeter slabs; invisible once landscaping grows in
- Existing structures: walls, steps, and raised beds can act as natural edge restraints where they border the patio
Step-by-step: laying the patio
Step 1: Excavate to the right depth
Calculate your total excavation depth: finished slab surface level, minus slab thickness (typically 60 mm for concrete pavers, or check your specific slab thickness), minus 25 mm bedding sand, minus 100–150 mm compacted sub-base. For a 60 mm paver with a 100 mm base and 25 mm sand, that is 185 mm total excavation from your finished surface level. Mark this on your datum pegs and excavate cleanly, removing all turf, roots, and organic material. Do not leave any vegetation in the base area, it will decompose and create voids.
Step 2: Compact the subgrade
Once excavated, compact the exposed subgrade with your plate compactor. Make at least two to three passes in different directions. The CMHA target for a prepared subgrade is 95% Standard Proctor density (ASTM D698), you cannot measure this on a DIY project, but a practical sign of adequate compaction is that the surface no longer visibly moves or deflects under the plate compactor. If the soil is very dry and powdery, lightly mist it with water before compacting. If it is saturated and muddy, wait for it to dry out, compacting wet clay just smears it rather than consolidating it.
Step 3: Lay the geotextile separation layer
Unroll the geotextile over the entire excavated area, overlapping joins by at least 300 mm. Fold it up the sides slightly at the edges. This fabric layer does a specific job: it stops your crushed-stone base gradually migrating down into the subgrade over time (a process called pumping), which is particularly important on clay or silty soils. It is cheap insurance and worth doing on any patio project.
Step 4: Build and compact the crushed-stone sub-base
Add your crushed stone in layers no more than 75 mm (3 in) thick when loose. Compact each layer fully before adding the next, do not dump the full 150 mm in one go and compact just the top. The CMHA specification calls for compacting the aggregate base to 98% Standard Proctor. In practice, this means multiple passes with your plate compactor until the surface is rock-solid and no longer kicks up or deflects. Check your levels constantly as you build up, use your string lines and spirit level to confirm you are maintaining your planned fall gradient.
Step 5: Screed the bedding sand
Spread your sharp/grit sand over the compacted base to an even depth of 25 mm (1 in). For a step-by-step guide on preparing and screeding the sand bed, see how to lay a patio with sand. Use two parallel lengths of conduit pipe or metal screed rails as guides: set them at your required level and drag a straight-edged board (a piece of timber works well) across them to create a perfectly flat, even surface. Once screeded, do not walk on the sand before laying slabs, footprints will create uneven spots. Screeding technique makes a big difference to how well your finished patio sits, and getting it smooth and level is worth taking your time over. The bedding sand absorbs minor irregularities in the base and allows small adjustments when you tap slabs with a rubber mallet.
Step 6: Lay the slabs
Start from a fixed straight edge, usually the house wall or a string line. Lay your first slab, press it gently into the sand, and check it is level and at the correct height with your spirit level. Use plastic spacers to maintain consistent joint widths (typically 3–10 mm depending on slab type and jointing method). Work outward in a running-bond or stacked pattern as suits your design. Tap each slab level with a rubber mallet, never force them hard as this disrupts the screeded sand beneath adjacent slabs. Cut slabs for edges and corners using your angle grinder with a diamond blade or a wet-cut saw. Always wear eye and respiratory protection when cutting.
Step 7: Compact the laid surface
Once all slabs are laid (except final jointing), run the plate compactor over the entire surface, but fit a rubber mat or protective pad to the compactor plate to avoid scratching textured slabs. This final compaction seats each slab firmly into the bedding sand and locks the installation. Check levels one more time after compaction and re-set any slabs that are visibly proud or low.
Step 8: Fill joints and finish
For sand-set concrete paver joints, polymeric jointing sand is the best choice for most DIYers. Sweep it into the joints in two or three passes, compact again lightly, then activate it with a light spray of water following the manufacturer's instructions, it hardens and resists wash-out and weed growth. For larger natural stone or porcelain slabs with wider joints, a bagged patio pointing mortar brushed in and lightly tooled gives a clean, weather-resistant finish. Keep traffic off the patio for the cure time specified on the jointing product (typically 24–48 hours for polymeric sand, longer for mortar pointing).
Common mistakes and how to avoid them
- Not excavating deep enough: people frequently underestimate total depth needed and end up with a patio that sits too high against the house wall or floods at the edges
- Skipping compaction between sub-base lifts: dumping all the crushed stone at once and running the compactor over the top does not compact the bottom layers — this is the number-one cause of premature settling
- Using the wrong sand: building sand (soft, fine, yellow) is not suitable for bedding — it holds moisture and shifts; always use coarse sharp sand or grit sand
- Forgetting the fall: a flat patio looks perfect on day one and becomes a paddling pool after the first heavy rain
- Laying on wet clay without a geotextile: without the separator, your crushed stone gradually disappears into the clay over a few seasons
- Not securing edge restraints properly: without firm edges, pavers migrate outward and joints open up, usually within one or two freeze-thaw cycles
- Ignoring frost depth: in climates with significant ground frost, an undersized base will heave in winter and never re-settle level in summer
When to call a professional
Most small patios (under about 20 square metres) on reasonably stable soil are genuinely within reach of a careful first-time DIYer. But there are situations where the honest advice is to bring in help. Call a professional if the soil is soft, organic, or saturated and does not firm up after a dry period; if your test hole reveals the ground is significantly uneven in bearing quality across the area; if you are on a slope with any sign of soil movement; if you plan to install anything very heavy (hot tub, large water feature, pizza oven on a plinth); or if underground services are in an uncertain location. A patio contractor or geotechnical engineer will often save you more in avoided mistakes than they cost upfront.
Maintenance and keeping your patio in good shape
A well-built patio needs very little ongoing work. Re-sand joints every couple of years with fresh polymeric or kiln-dried sand as it naturally erodes. Check that drainage channels and edges stay clear of leaf debris so water always moves freely off the surface. Inspect the perimeter edge restraints each spring, especially after a hard winter, and re-secure any that have shifted. If a slab becomes loose or rocking, re-lift it, add a little fresh bedding sand, re-level, and reset. Catching these small issues early stops them cascading into larger repairs.
FAQ
Can you lay a small patio directly on soil (including clay)?
Yes — but only in limited, well‑drained, stable situations. Small, low‑use patios (e.g., ≤2–3 m² stepping‑stone or small flagstone areas) can be laid directly on soil if the subgrade is non‑plastic, well‑drained, free of organics, and has adequate bearing. For most pedestrian patios you should prepare and compact the subgrade and normally add a compacted crushed‑stone base (commonly 100 mm / 4 in) plus a 25 mm sand bedding. On reactive clay or weak, organic, or poorly drained soils, placing slabs directly on soil risks settlement, heave and failure — stabilise the subgrade, add a full aggregate base, or use a concrete slab instead.
How do I decide whether direct‑on‑soil is acceptable for my site?
Run quick checks: do a ribbon or jar soil texture test (to estimate clay content); look for standing water/poor drainage; check for organics (peat, topsoil) — remove if present; do a simple plate load test or watch for excessive rutting with a boot. If soil is sandy/gravelly, drains well, and is firm underfoot, small patios may be OK with compaction and geotextile separation. If clay is abundant, the site is wet, has compressible fill, is on a slope with drainage problems, or will carry heavy loads, use a compacted aggregate base or concrete slab and consider professional geotechnical advice.
What are the main methods for installing a patio on soil and when to use each?
1) Direct on geotextile + sand/stone (for very small, temporary/low‑use patios on good soil). 2) Compacted crushed‑stone base (recommended for most pedestrian patios): prepare subgrade, lay geotextile (optional), place 100 mm compacted dense‑graded aggregate in lifts, then 25 mm screeded bedding sand and pavers. 3) Mortar bed on concrete slab (for permanent, bonded natural stone or uneven tolerances) — requires a structural concrete slab. 4) Soil stabilisation (lime/cement) when clay is reactive — used before placing aggregate to improve bearing. Use crushed‑stone base for durability and frost‑response in most climates.
What tools and materials will I need (checklist)?
Tools: spade, mattock, wheelbarrow, spirit level and straightedge (2 m), builder’s line and pegs, tape measure, rubber mallet, brick bolster/angle grinder for cuts, plate compactor, rake, wheelbarrow, broom, trowels. Materials: paving slabs/pavers, edge restraints (concrete kerb, metal/plastic edging), dense‑graded crushed stone (AASHTO No.57 or equivalent), screeding sand (ASTM C33 or sharp sand), geotextile membrane (if used), jointing sand/polymeric jointing compound or mortar (for pointing), concrete for edge restraints. Optional: geogrid for weak subgrades, lime or cement for stabilisation.
Exact step‑by‑step for the recommended (practical) method: compacted base + sand bed
1) Mark out and set levels with string lines and fall (minimum 1:80–1:100 away from buildings). 2) Excavate topsoil/organics to desired depth (pavers + 25 mm bedding + 100 mm base + 25–50 mm extra working depth). 3) Check/prepare subgrade: remove roots, soft pockets; trim and lightly compact. 4) (Optional) Lay geotextile over soft subgrade. 5) Place crushed stone in 50–75 mm loose lifts and compact each lift to target (~95–98% density). Final compacted depth ≈100 mm for pedestrian patios (increase for frost or weak soils). 6) Set edge restraints firmly on compacted base (concrete haunching if needed). 7) Spread and screed 20–25 mm bedding sand (ASTM C33), using screed rails and straightedge to create uniform thickness and fall. 8) Lay pavers/slabs tightly to pattern, tapping with rubber mallet; maintain consistent joints and levels. 9) Sweep jointing sand or apply polymeric jointing compound and compact pavers with plate compactor (with protective mat). 10) Final clean, point edges, and check falls/drainage.
How do I calculate sand quantity and screed depth for pavers?
Screed depth: aim for 20–25 mm bedding sand beneath pavers. Sand quantity: calculate volume = area × bedding depth. Example: for 10 m² at 25 mm depth: 10 × 0.025 = 0.25 m³ of sand. Convert to tonnes using sand bulk density (~1.6 t/m³) → 0.4 tonnes. Always allow 5–10% waste and rounding. For crushed stone base: base volume = area × base depth (e.g., 0.1 m for 100 mm). For 10 m² at 100 mm: 10 × 0.1 = 1.0 m³ (≈1.6–1.8 t depending on aggregate density). Adjust for compaction factor (order slightly more loose volume than compacted target).