
You can lay patio blocks directly over prepared dirt, but the dirt itself is never the base. What you're actually doing is excavating down, removing all organic material, compacting the subgrade, building a crushed stone base, adding a thin layer of bedding sand, then laying your blocks on top of that engineered sandwich. Done right, this approach produces a stable, long-lasting patio that won't heave, sink, or shift. Skip any of those layers and you'll be relaying blocks within a season or two.
How to Lay Patio Blocks on Dirt: Complete DIY Plan with 16x16 Slab Guide

Clara Farrell
11 Aug 2026
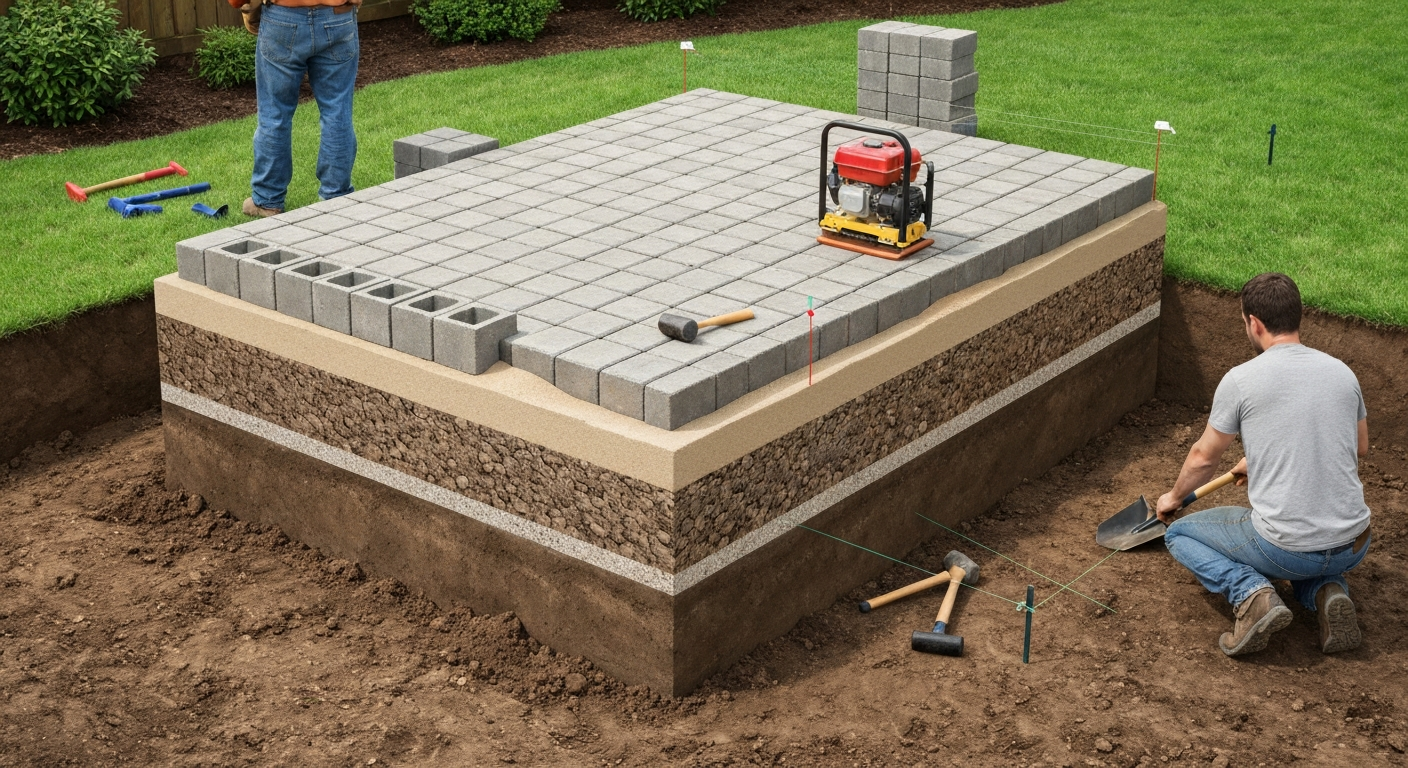
What this project involves and who it's for
This guide is written for homeowners and first-time DIYers tackling a ground-level patio installation from scratch. Whether you're working with standard concrete patio blocks, larger 16x16 slabs, or removing an existing grass area to start fresh, the core process is the same. By the end of this project, you'll have a patio that's properly leveled, drained, edged, and finished with jointing sand. A typical 10x12-foot patio takes one person about a weekend, sometimes two if the soil is difficult or you're working alone.
This guide covers the complete process: assessing your site, choosing the right base, excavating and grading, building the base layers, laying the blocks, installing edge restraints, and finishing with sand and sealer. It also covers the specific challenges of large 16x16 blocks and what to do when you're starting on grass rather than bare dirt.
Tools and materials you'll need
Getting the right equipment before you start saves a lot of frustration. Some of these tools you can rent for the weekend rather than buy, and I'll flag which ones are worth renting versus owning.
Must-have tools
- Plate compactor: rent a forward-plate vibratory compactor for subbase and base compaction. For compacting the aggregate base properly, you want a machine rated at minimum 13,500 lbf (about 60 kN) of compaction force. Wacker Neuson's WP 1550AW and Mikasa MVC-88 are commonly available at rental centers and both hit that threshold.
- Hand tamper: for small areas or tight corners the plate compactor can't reach
- Sod cutter or flat spade: for removing turf. A rented sod cutter (Husqvarna SC18, Ryan Jr. Sod Cutter) makes this job 10x faster on larger patios
- Wheelbarrow: at least one, ideally two if someone's helping you
- Long-handled shovel and square spade
- Landscape rake for spreading and rough-grading aggregate
- Screed pipes (two 1-inch-diameter metal conduit pipes work perfectly) and a long straight board or screed board for leveling bedding sand
- Rubber mallet for setting pavers
- String line and string line level (or laser level)
- Tape measure
- Stakes (wood or metal)
- 4-foot spirit level and 2-foot level
- Push broom for sweeping in jointing sand
- Garden hose with spray nozzle (for activating polymeric sand)
- Knee pads (you'll thank yourself)
Must-have materials
- Patio blocks (concrete, natural stone, or porcelain slabs — your choice)
- Crushed stone aggregate for the base: typically ASTM D2940-compliant 3/4-inch clean crushed stone or processed gravel
- Coarse concrete sand (also called washed sharp sand) for the 1-inch bedding layer
- Edge restraints: anchored plastic snap-edge restraint (Snap Edge by Oly-Ola or EasyFlex are widely available) for pedestrian patios; use concrete troweled curb or steel for high-load or cut edges
- Galvanized 10-inch spike nails for anchoring plastic edge restraint (typically 12 inches on-center)
- Polymeric sand for jointing (Techniseal HP Polymeric Sand or Alliance Gator G2 are well-reviewed options)
Optional but useful extras
- Geotextile landscape fabric: place between subgrade and aggregate base on clay or high-moisture sites to prevent soil migration upward into the base
- Paver sealer: a water-based or solvent-based topical sealer for concrete blocks, or a penetrating sealer for natural stone; wait 60-90 days after installation before applying (wait until any white efflorescence fades)
- Paver saw or angle grinder with diamond blade: for cutting blocks to fit edges and corners
- Suction cup lifters or a slab cart: essential for handling 16x16 and larger slabs safely
- Chalk line for marking cut lines
- Paint or spray chalk for marking layout on the ground
- Plate compactor pad: a rubber attachment for your compactor that protects paver surfaces during final seating passes
Gravel-and-sand base vs. poured concrete base: which one do you need?
The overwhelming majority of residential patio projects use a compacted gravel subbase with a 1-inch bedding sand layer on top. This is the standard approach recommended by the Interlocking Concrete Pavement Institute (ICPI) and used by manufacturers like Unilock, Belgard, and Techo-Bloc for concrete and porcelain pavers. It's flexible, drains well, and is genuinely DIY-friendly. A poured concrete setting bed (wet-set) is a different method that essentially mortars pavers into a rigid slab. It has specific use cases, but it's not the right default choice for most backyard DIY patios.
| Factor | Gravel + Sand Base | Poured Concrete Base |
|---|---|---|
| DIY difficulty | Moderate — manageable for most homeowners | High — requires concrete work and longer cure times |
| Cost | Lower material and equipment costs | Higher — concrete, forms, and possible professional help |
| Drainage | Good — naturally drains through joints if properly set up | Poor — requires deliberate slope and drainage planning |
| Repairability | Excellent — lift, re-level, relay individual blocks | Difficult — cracked mortar beds mean full demo |
| Best for | Standard concrete and clay brick pavers, most residential patios | Very large or heavy slabs, vehicular loads, near-foundation installations |
| Freeze-thaw performance | Good — the flexible system accommodates movement | Requires proper jointing and expansion control; rigid systems can crack |
| Typical paver size | Up to 24x24 inches comfortably; larger with care | Preferred for very large-format slabs (24x24 inches and above) |
| Sealer compatibility | Yes, after 60-90 days | Yes, after full concrete cure (28 days minimum) |
My recommendation: use a compacted gravel and sand base for nearly all DIY residential patios, regardless of whether you're laying standard concrete blocks, 16x16 slabs, or natural stone. Reserve a concrete bed for situations where you're setting very large, heavy slabs (think 24x24 porcelain at 90-plus pounds per piece), working next to a foundation wall where zero movement is critical, or if an engineer or manufacturer specifically calls for it based on load requirements.
Assessing your site before you dig a single shovel
Spending 30 minutes on a proper site assessment saves you from discovering problems after you've already hauled in a ton of gravel. Here's what to look at.
Soil type
Dig a hole about 12 inches deep where your patio will go and look at what comes out. Sandy or gravelly soil is your best-case scenario: it drains well and compacts predictably. Loam (dark, crumbly mix of sand, silt, and organic matter) is workable but needs the organic topsoil layer removed. Clay soil is the most common problem: it's dense, drains poorly, holds water, and swells and shrinks with moisture changes. If your soil is clay, expect to need a deeper base and possibly a geotextile separator. Do the ribbon test: wet a handful of soil and squeeze it between your thumb and finger. If it forms a long, smooth ribbon over 2 inches before breaking, you've got heavy clay.
Existing turf and organic material
Never lay patio blocks over grass or any organic material, even if it looks solid. Grass, roots, and organic topsoil decompose over time, causing settlement and voids beneath your blocks. This applies even if you're planning a casual installation over lawn. The top organic layer (typically the first 4-8 inches) must come out. If you're working over a grassy area, a related guide covering the specific challenges of laying blocks over existing grass is worth reading alongside this one. See our guide on how to lay patio blocks on grass for step-by-step advice on removing turf, preventing settlement, and techniques specific to grassy sites. For step-by-step instructions on how to put patio blocks down over existing grass, see our companion guide covering that specific workflow. For detailed steps on how to lay patio block over existing grass, see how to lay patio block.
Slope and drainage
Before you design your patio, figure out where water currently flows. You want your finished patio to slope away from any structure at a minimum of 2% (about 1/4 inch per foot), which is what the International Residential Code requires for impervious surfaces within 10 feet of a building. If the overall lot grading drops at least 6 inches within the first 10 feet from your house, you're in good shape from a drainage standpoint. If your yard slopes toward the house, you have a drainage problem that needs to be addressed before building a patio, not after. Look for standing water after rain, low spots, and the direction natural runoff takes.
High water table
If your test hole fills with water within a few hours, or you notice the ground stays perpetually soggy, you may have a high water table. This doesn't mean you can't build a patio, but it does mean your base design needs to account for it. A permeable paver system with an open-graded aggregate reservoir base is often the right answer for high-water-table sites, and that system has its own specific construction rules. For most standard installations, focus on getting drainage right at the surface and base levels.
How deep to excavate and how much base you need by soil type
The total excavation depth is the sum of your paver thickness, the 1-inch bedding sand layer, and the compacted aggregate base depth. Most residential patios end up at 10 to 12 inches of total excavation. Here's how base depth breaks down by soil type and site condition.
| Soil / Site Condition | Recommended Compacted Base Depth | Geotextile Needed? | Notes |
|---|---|---|---|
| Sandy or gravelly soil (stable) | 4 inches | No | Minimum base on ideal subgrade; compact subgrade to 95% Standard Proctor |
| Loam (organic topsoil removed) | 4-6 inches | Optional | Remove all organic material first; compact exposed subgrade |
| Clay soil | 6-8 inches | Yes, recommended | Clay swells/shrinks with moisture; deeper base reduces movement risk |
| Heavy clay or expansive soil | 8-12 inches | Yes, required | Consider soil stabilization or consulting a pro for very expansive clay |
| High water table | 6-8 inches minimum, open-graded base | Yes | Use open-graded (no-fines) aggregate; consider permeable paver system |
| Sloped site (more than 2% grade) | 4-6 inches (level each lift) | Situational | Cut-and-fill or step-down base design; ensure base drains laterally, not toward structure |
Compaction targets matter here. The industry standard from ICPI calls for compacting the soil subgrade to at least 95% of Standard Proctor density (ASTM D698) for pedestrian and residential patio loads. In practical terms, this means you're running your plate compactor over the exposed subgrade before you place any aggregate. Place your aggregate in lifts no more than 4 to 6 inches of loose material at a time, compact each lift fully before adding the next, and don't try to compact the whole base depth in one shot. The bedding sand layer on top is never compacted before paver placement; it stays loose so you can screed it flat, then the pavers and a final compaction pass firm everything up.
Measuring your patio and calculating materials
Measuring and laying out the area
Start by marking the patio corners with stakes. For a rectangular patio, use the 3-4-5 triangle method to get perfectly square corners: from one corner stake, measure 3 feet along one string line and 4 feet along the other; the diagonal between those two points should be exactly 5 feet if the corner is square. Adjust until it is. Run string lines around the full perimeter at your planned finished-surface height, then factor in your excavation depth below that. Spray chalk or paint on the ground to mark the excavation boundary.
Calculating materials (sample: 10x12-foot patio)
Here's a worked example for a 10x12-foot patio using 16x16-inch concrete blocks with a 6-inch compacted gravel base on loam soil and a 2.5-inch paver thickness.
- Patio area: 10 x 12 = 120 square feet
- Total excavation depth: 2.5-inch paver + 1-inch bedding sand + 6-inch compacted base = 9.5 inches (round to 10 inches for practical purposes)
- Crushed stone aggregate: 120 sq ft x (6 inches / 12) = 60 cubic feet = 2.22 cubic yards. Add 15% for compaction and waste = about 2.6 cubic yards (roughly 3.5 tons of 3/4-inch crushed stone)
- Bedding sand: 120 sq ft x (1 inch / 12) = 10 cubic feet = about 0.37 cubic yards. Add 10% = roughly 0.41 cubic yards (about 400 lbs of coarse sand)
- Pavers (16x16 inch blocks): each block covers 1.78 sq ft (16x16 = 256 sq in = 1.78 sq ft). 120 sq ft / 1.78 = 67.4 blocks. Add 10% for cuts and breakage = about 75 blocks
- Edge restraint: measure perimeter = (10 + 12) x 2 = 44 linear feet. Most edge restraint sections are 8 feet long, so you need about 6 sections plus fasteners
- Polymeric sand: coverage varies by joint width and paver thickness; follow the bag's coverage chart. For 16x16 blocks with 1/8-inch joints, expect roughly one 50-lb bag per 30-40 square feet
Always order 10% extra on pavers to account for cuts, chips, and future repairs. Gravel and sand can be topped off easily, but running out of matching pavers from the same dye lot mid-project is genuinely painful.
Step-by-step site prep: from lawn to ready-to-build
Step 1: Call 811 before you dig
Call 811 (in the US) at least 3 business days before you excavate. It's free, it's legally required in most states, and it protects you from accidentally hitting gas, water, or electrical lines. Most residential patios are shallow enough that utilities aren't a concern, but verify it before you start.
Step 2: Remove turf and organic topsoil
For patios over grass, rent a sod cutter to strip the lawn in clean rolls. This is much faster than a spade and gives you clean, reusable sod you can relocate elsewhere in the yard. If you're working on bare dirt with heavy organic content in the top layer, remove at least the top 4-6 inches of that organic material. Don't cut corners here: every bit of organic material left under your base is a future void waiting to happen as it decomposes.
Step 3: Excavate to depth
Dig down to your total excavation depth, keeping the bottom of the excavation as flat as possible. Use your string lines to check depth as you go. On a sloped site, you'll be cutting into the high side and possibly filling on the low side, but never build your base on uncompacted fill dirt. Any fill needs to be placed in compacted lifts the same way you'll build your aggregate base.
Step 4: Rough grade and plan surface drainage
At the bottom of your excavation, establish your drainage slope. For a patio adjacent to a house, that slope needs to run away from the foundation at a minimum of 2% (1/4 inch per foot). Use a level and tape measure to verify this slope at the subgrade level, then maintain it through every layer above. Mark your slope on the string lines so you're not guessing as you build up. If the natural terrain slopes the wrong direction, now is the time to deal with it, not after the base is in.
Step 5: Compact the subgrade
Before any gravel goes in, compact the exposed native soil with your plate compactor. Make two or three passes over the entire area in overlapping rows, then rotate 90 degrees and do two more passes. If the soil is very dry, lightly dampen it first. Clay soil compacts better at the right moisture level: too dry and it won't compact properly; too wet and you'll just push it around. The goal is a firm, unyielding subgrade that doesn't deflect when you walk on it.
Building the base layer by layer
Installing the geotextile (if needed)
On clay or high-moisture sites, unroll a non-woven geotextile fabric over the compacted subgrade before placing any aggregate. Overlap seams by at least 12 inches. The fabric acts as a separator: it keeps the clay from migrating up into your aggregate base over time while still allowing water to drain through. Don't skip this on clay; without it, the fine clay particles slowly work their way up into your gravel layer and ruin the drainage and stability you're building.
Compacting the aggregate base in lifts
Pour your first lift of crushed stone: no more than 4 to 6 inches of loose aggregate at a time. Rake it level, then run the plate compactor in overlapping passes (aim for 4 passes minimum over the entire area, 2 in one direction and 2 at 90 degrees). The loose material will compress down noticeably as it compacts. For a 6-inch compacted base, you'll typically place and compact two lifts. After the final lift is compacted, your aggregate surface should be firm, shouldn't sink under your feet, and should be at the right elevation to accept the 1-inch bedding sand and your pavers.
Compaction targets: for residential pedestrian patios, the ICPI standard calls for 95% Standard Proctor (ASTM D698) on the subgrade and on each compacted aggregate lift. For practical DIY purposes this means running a proper vibratory plate compactor (minimum 13,500 lbf compaction force) over multiple passes, not just a hand tamper. Hand tampers are fine for tight corners but cannot achieve the required compaction across a full base.
Tips for clay soils and slopes
- On clay: compact your aggregate lifts slightly wetter than on sandy soil; clay subgrades don't drain freely so moisture in the aggregate lifts matters
- On slopes: work from the low end up so each compacted lift supports the next; consider cutting steps into the clay subgrade on steep slopes so the base material doesn't shear downhill
- Never compact the aggregate base when it's saturated; wait for it to drain if there's been heavy rain
- Check the elevation of your compacted base often with a straightedge or level across the string lines; it's much easier to fix low spots in the base than to shim pavers later
Screeding the 1-inch bedding sand layer
Once the compacted aggregate base is done, place two 1-inch-diameter metal conduit pipes parallel across the surface (they act as screed guides). Spread coarse concrete sand between them and drag a straight 2x4 board across the pipes to create a perfectly flat, 1-inch-deep sand bed. Pull out the pipes as you go and fill the pipe channels with sand by hand, smoothing lightly. Do not compact or walk on this screeded sand layer. It needs to stay perfectly flat until you set the first paver. If you disturb it, re-screed that section before laying on it.
Laying the patio blocks
Starting point and pattern
Start laying from a straight reference edge (usually the house wall or a string line) and work outward. For a step-by-step walkthrough on how to set patio blocks, see our detailed guide on how to set patio blocks. For most rectangular patios in a running bond or straight pattern, starting from one corner and working in rows is the simplest approach. For a 90-degree herringbone or other diagonal pattern, start from the center and work outward to keep cuts even at the edges. Whatever pattern you choose, lay full blocks first and leave all edge cuts for the end.
Setting each block
Place each block gently onto the sand bed without sliding it (sliding disturbs the screeded surface). Press it down firmly by hand, then tap it into final position with a rubber mallet. Use a level to check each block against its neighbors constantly. The target joint width for most concrete patio blocks is about 1/16 to 3/16 of an inch. Use plastic paver spacers to maintain consistent joint gaps if your blocks don't have built-in spacing lugs.
Handling 16x16 blocks and large-format slabs
Large 16x16 concrete blocks weigh between 35 and 55 pounds each, which is manageable with two people or with suction cup lifters. Porcelain slabs in the same size can be more brittle and require more care. For anything 24x24 and up, a slab cart or mechanical suction lifter is worth the rental cost, both for your back and to avoid cracking expensive material. When setting large-format blocks, check that the bedding sand provides full, even contact across the entire underside of the slab. Any voids create stress points that can crack the slab over time. For large porcelain slabs, some installers back-butter the slab with a thin skim of flexible mortar to ensure full contact, but for standard concrete blocks, a properly screeded sand bed is sufficient.
Cutting large blocks requires a diamond-blade wet saw or a good angle grinder with a segmented diamond blade. Mark your cut line with chalk or a marker, score the line first with light passes, and then make the full cut. Wear eye protection and hearing protection. For 16x16 slabs, a wet saw is strongly preferred over an angle grinder because the larger cut area generates a lot of heat and dust.
Installing edge restraints
Edge restraints are not optional. Without them, the outer rows of your patio will slowly migrate outward over time, opening up joints and creating trip hazards. Install plastic snap-edge restraint along every exposed patio edge (not against the house wall, where the wall itself acts as a restraint). Spike the restraint down with 10-inch galvanized nails spaced about 12 inches apart, driven at an outward angle into the aggregate base below. For cut edges or high-traffic areas, concrete troweled curb or steel edging is a stronger choice. Install edge restraints before the final compaction pass.
Final compaction, jointing, and finishing
Final compaction pass
After all blocks are laid and edge restraints are in place, do a final pass with the plate compactor over the entire patio surface. Use a rubber pad attachment (or a sheet of plywood under the compactor base plate) to avoid scratching or cracking the pavers. Make two to three passes in overlapping rows. This final pass seats the blocks firmly into the sand bed and eliminates any remaining high spots or unevenness. Check across the surface with a level after compaction and tap down any high blocks.
Sweeping in polymeric sand
Polymeric sand hardens when it gets wet, which locks the joints and inhibits weed growth and ant activity. Pour it out on the dry paver surface and sweep it into all the joints with a push broom. Make multiple passes in different directions to fully fill every joint. Blow off (with a leaf blower on low) or sweep off any sand remaining on the paver faces before wetting, because activated polymeric sand on the surface leaves a haze that's hard to remove. Once the surface is clean, lightly mist the entire patio with a gentle spray. Follow the manufacturer's timing exactly: most products need two or three light applications of water over 24 to 48 hours. Keep foot traffic off for at least 24 hours while it cures.
Sealing the patio (optional but recommended)
Wait at least 60 to 90 days after installation before applying a topical sealer. For concrete pavers, you have a choice between water-based and solvent-based film-forming sealers (solvent-based tends to give a wet look with more sheen; water-based is lower VOC and easier to apply). For natural stone, use a penetrating sealer rather than a topical one. For porcelain, check the manufacturer's guidance carefully: many porcelain pavers are non-porous and don't need or accept conventional sealers. Apply sealer on a cool, dry day and follow the product's coverage rates. Two thin coats are better than one thick coat.
Common mistakes and how to fix them
| Mistake | What happens | Fix |
|---|---|---|
| Skipping turf/organic removal | Settlement, voids, and uneven surface within 1-2 seasons | Remove organic layer; if patio is built, lift blocks and rebuild from subgrade |
| Insufficient base depth on clay | Heaving and cracking in freeze-thaw cycles | Plan for 6-8 inches minimum compacted base on clay from the start |
| Compacting all base depth in one lift | Poor compaction in lower portions; base is soft underneath | Always compact in 4-6 inch lifts; no shortcuts here |
| Not establishing drainage slope | Water pools on patio or runs toward house | Set string lines at 2% slope away from structure before any digging |
| Walking on screeded sand before laying | Sand surface is disturbed, pavers are uneven | Re-screed any disturbed areas before laying blocks on them |
| Skipping edge restraints | Outer rows migrate outward over time | Install before final compaction; retrofitting is possible but harder |
| Wetting polymeric sand with sand still on paver face | Permanent haze on paver surface | Always blow or sweep off all surface sand before applying water |
| Sealing too soon | Sealer traps moisture and turns milky white (efflorescence) | Wait 60-90 days; apply penetrating sealer for natural stone |
Maintenance after the patio is in
A properly built patio needs very little upkeep. Sweep off debris regularly to prevent organic buildup in the joints. Top up any joints that lose sand after the first winter (joint sand can wash out during heavy rain in the first year; polymeric sand significantly reduces this). If weeds appear in joints, pull them early before the roots disturb the sand. Re-apply sealer every 2 to 4 years, or when water no longer beads on the surface. For minor settling of individual blocks, simply lift the affected block with a flat bar, add or remove bedding sand as needed, and relay it. This repairability is one of the biggest advantages of the sand-set method over mortar or concrete beds.
Time and cost estimates
For a 10x12-foot patio on average soil conditions, one person working at a comfortable DIY pace should expect about 12 to 16 hours of physical labor spread over a weekend. Having a helper cuts that time roughly in half. Material costs vary by region and paver choice, but for a basic concrete block patio at this size, expect roughly $400 to $700 for materials (gravel, sand, blocks, edge restraint, polymeric sand) plus $150 to $250 for equipment rental (plate compactor, possibly a sod cutter and wet saw). Nicer pavers, large-format 16x16 slabs, or natural stone will push material costs higher. The same patio installed by a professional contractor typically runs $1,500 to $3,500 depending on your market, so the DIY savings are real and worth the weekend effort if you're comfortable with the physical work.
When to call a professional
Most homeowners can handle a standard ground-level patio with the process described here. But there are situations where hiring a contractor or at least consulting one makes sense: severely sloped sites that require significant cut-and-fill work or retaining structures; sites with chronic drainage problems or very high water tables; installations immediately adjacent to a foundation where water management is critical; very large patios over 400 square feet where equipment and material handling become logistically demanding; and any project involving large quantities of concrete or structural work. Getting a professional opinion on the base design for difficult sites costs very little and can save you from rebuilding the entire project.
FAQ
What are the right situations to lay patio blocks on dirt vs. building a concrete slab?
Use compacted aggregate base + 1" bedding sand (sand‑set) when: the area is for pedestrian use (patio, walkway), subgrade is stable or can be remediated, and you want a flexible, repairable surface. Choose a poured concrete or full mortar bed when: you need a rigid, monolithic surface for heavy concentrated loads, are installing very large slabs where manufacturer requires mortar/back‑buttering, or need a floodproof/surface‑level tying to structures. Permeable interlocking pavers require an open‑graded reservoir base and different detailing—use them when stormwater infiltration is a project goal.
How deep should I excavate and how thick should the base be?
General guidance (adjust for local soil and loads): - Typical pedestrian patio on stable granular subgrade: excavate to paver thickness + 1" bedding sand + 4" compacted aggregate (total excavation ≈ paver thickness + 5"). - Weak or clayey subgrades: increase to 6"–12" compacted aggregate (total excavation ≈ paver thickness + 7"–13"). - Permeable PICP: larger open‑graded reservoir base (often 8"–18" depending on design). - For 16×16 large slabs, follow manufacturer: many recommend a thicker base or a mortar/concrete bed for full support (often 2"–4" concrete bed or equivalent engineered base). Compact each aggregate lift in ≤4–6" loose lifts. Always include 1" screeded bedding sand for concrete/porcelain pavers.
How do base depth and compaction vary by soil type (sand, silt, clay) and slope?
Soil type: - Sandy/granular subgrade: lighter base (4" compacted) often acceptable. - Silty subgrade: add base (6" recommended) and consider geotextile and improved drainage. - Clay/subgrade with high plasticity: use 6"–12" compacted base, geotextile separator, or excavate and replace poor soil; compact subgrade to ≥95% Standard Proctor for pedestrian use. Slope: - On slopes, step the base into short retaining tiers when slope >6–8% or build small retaining edges; provide positive surface drainage (minimum 1.5%–2% slope away from structures). - For sloped sites, compacted lifts and edge restraints must resist lateral loads; consider concrete edge restraint and subdrain if runoff concentrates.
What tools, materials and safety gear do I need? (short checklist)
Tools: shovel, wheelbarrow, landscape rake, plate compactor (heavy ~5,000–13,500 lbf for base; lighter plate for paver seating), 2×4 screed, mason's line and stakes, rubber mallet, level, measuring tape, angle grinder or wet saw (for cutting), slab cart/suction cups for 16×16. Materials: pavers/slabs, crushed aggregate base (ASTM D2940 spec gradation or similar), 1" bedding sand (concrete sand), jointing sand or polymeric sand, edge restraint (concrete curb, precast restraint, metal/plastic anchored restraint), geotextile fabric (where required), concrete or mortar (if using mortar bed), sealer (as appropriate). Safety gear: gloves, safety glasses, ear protection, dust mask/respirator when cutting, steel‑toe boots, knee pads. Optional: compaction indicator, level/laser, slurry pump for cleaning cuts.
Step‑by‑step site preparation: how do I remove turf, grade and ensure drainage?
1) Mark the area and outline with string/stakes. 2) Remove turf and topsoil down to desired subgrade depth (remove organic soil; leave uniform subgrade). 3) Rough grade with shovel/backhoe to establish fall: minimum 1.5%–2% (~1/8"–1/4" per foot) away from buildings; local code may require 5% (6" in 10'). 4) If poor soils exist, remove and replace with compactable fill or install geotextile + thicker engineered base. 5) Confirm subgrade is level within the planned lifts and compact to ≥95% Standard Proctor target for pedestrian loads. 6) Install subdrain or slope grading if site has concentrated runoff or springs. 7) Stake and string offsets to final paver surface elevation (account for paver thickness + 1" bedding + base).
How do I build the aggregate base and install bedding sand?
1) Place geotextile if needed on soft subgrade. 2) Spread aggregate base in controlled lifts (≤4–6" loose). 3) Compact each lift with a heavy plate compactor until target compaction is reached (use a compaction indicator or experience; specification commonly 95% Standard Proctor or as engineered). 4) Final compacted base thickness should match design (see depth guidance above). 5) Screed a 1" bedding sand layer over the compacted base using two screed guides (pipe or 2×4 rails) and a 2×4 screed board; bedding sand must be loose (do not compact sand into base). 6) Do not over‑screed—bedding sand must be uniform 1" for proper paver seating.