
You can run a buried gas line under a patio to feed an outdoor grill, firepit, or heater, but it has to be done at the right depth, with the right pipe, and with a permit in hand before you touch a shovel. The International Fuel Gas Code (IFGC) sets the minimum burial depth at 12 inches below grade, though plenty of local jurisdictions push that to 18 inches or deeper, so your local building department's requirements always take priority. This is not a purely DIY-friendly job in most areas: a gas permit is almost universally required, a pressure test and inspection are mandatory before you bury anything, and some states require a licensed gas fitter to do the actual connections. What you can reasonably handle yourself is the trenching, bedding, sleeving, and surface patching. The gas work itself deserves a hard, honest look before you decide whether to pick up a wrench.
How to Run a Gas Line Under a Patio: Code, Safety & Costs

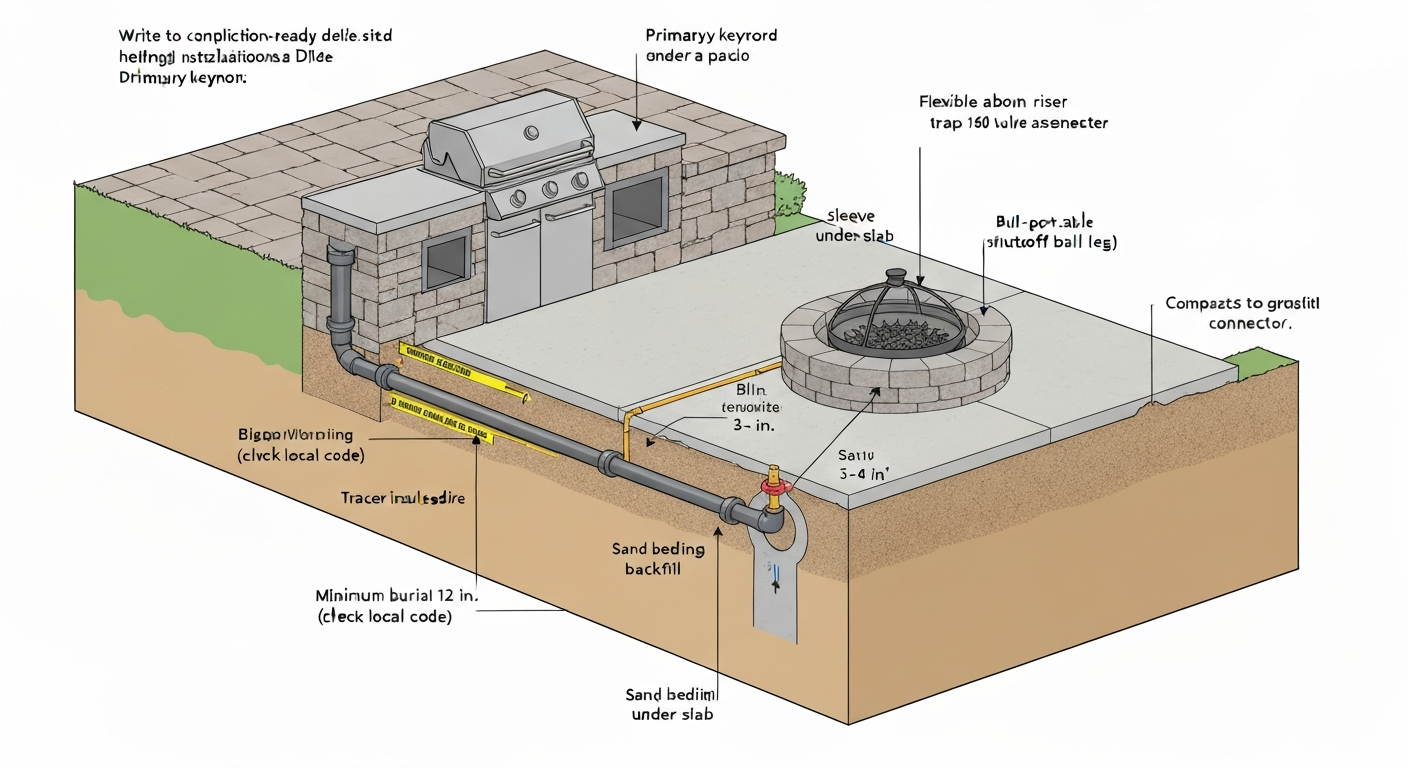
What this guide covers and who it's for
This guide is written for homeowners and DIYers who are planning or renovating a patio and want to add a permanent gas supply for an outdoor appliance. Maybe you're tired of swapping propane tanks at a cookout, or you want a clean, always-on gas line to a firepit table or patio heater. Whatever the reason, you're in the right place. I'll walk you through every stage: permits and regulatory requirements, planning the route, choosing the right pipe, trenching and bedding the line, sleeving it properly where it passes under the patio surface, and finishing the job with a documented pressure test. I'll also be straight with you about where the legal and safety lines are drawn, and where it genuinely makes sense to hire a licensed gas fitter rather than go it alone.
Why a permanent buried gas line is worth the effort
A buried gas line is a long-term upgrade that changes how you use your outdoor space. A permanent natural gas connection to a built-in grill means you never run out of fuel mid-cook. A firepit wired to the house supply turns a seasonal prop into something you use on cool April evenings without hauling anything. Patio heaters on a permanent line run longer and more reliably than tank-fed versions, and you don't have the storage or safety concerns that come with leaving full propane cylinders on a covered patio.
That said, it's worth acknowledging the alternatives. If you only need gas occasionally, a dedicated propane quick-connect hose and a nearby tank stored in a ventilated enclosure may be simpler and cheaper. Some firepit tables run perfectly well on a small 20-lb cylinder. If your patio is already installed and the idea of cutting and re-laying pavers or concrete is putting you off, a surface-run flex line with appropriate protection might be an option your local code permits in certain limited situations. But for a clean, permanent, code-compliant setup, the buried line is almost always the right answer for long-term outdoor living.
The regulatory checklist: permits, codes, and calling 811
Before anything else, work through this checklist. Skipping any of these steps can result in failed inspections, fines, insurance headaches, or genuinely dangerous conditions.
- Call 811 (or your state's one-call center) at least two full business days before you dig. This is the law in virtually every state. A utility locator will come out and mark buried electrical, gas, water, sewer, and telecom lines on your property. Do not skip this step even for a shallow trench. The Common Ground Alliance's 811 service coordinates this nationally, and most state systems expect that two-business-day minimum notice.
- Pull a gas permit from your local building department. Most jurisdictions require a plumbing, mechanical, or gas permit for any new or altered consumer gas piping downstream of the meter. Attempting to bury a line without one is a code violation and can cause serious problems when you sell the house or file an insurance claim.
- Check your local burial depth requirement. The 2024 IFGC sets 12 inches as the minimum, but many local amendments require 18 inches. La Plata County and the Municipality of Anchorage, for example, have adopted 18-inch minimum burial requirements. Ask your permit office for the specific local depth, not just the code minimum.
- Confirm whether your jurisdiction requires a licensed gas fitter. Some states or municipalities will not issue a gas permit to a homeowner, or they require a licensed contractor to perform and certify the piping work. This is non-negotiable: check with your local authority having jurisdiction (AHJ) before assuming you can DIY the gas connections.
- Plan for a pressure test inspection. Most building departments require a rough-in pressure test inspection before the trench is backfilled and before any appliance is connected. You cannot cover the pipe until an inspector has signed off. Factor this into your project timeline.
- Request a final inspection before first use. After the appliance is connected and the system is complete, a final inspection is typically required before you light the first burner.
Safety and liability: what you're responsible for
Gas work carries consequences that other patio projects don't. A leaking buried line can allow gas to accumulate under a patio slab, inside a structure, or in a low-lying space before anyone notices. The risks are real, and you need to understand where your responsibility sits before you start.
- Homeowner liability: any gas piping you install downstream of the meter is your responsibility, not the utility company's. If a leak causes damage, injury, or fire, your homeowner's insurance will investigate whether the work was permitted and code-compliant. Unpermitted work can result in a denied claim.
- Insurance notification: some insurers require you to notify them before adding gas appliances or new gas supply lines. Check your policy before starting work.
- Trench safety: OSHA 29 CFR 1926 Subpart P requires protective systems (sloping, shoring, or shielding) for any trench 5 feet or deeper. For most backyard gas line trenches you'll be well under that depth, but if you're in soft or unstable soil, even shallower trenches can collapse. Never enter a trench without assessing stability.
- Never pressure-test with a flame. Use a calibrated gauge and soapy water or an electronic gas detector to check for leaks. A match or lighter near a pressurized line is never acceptable.
- Carbon monoxide risk: outdoor appliances can still back-draft CO into enclosed spaces like a covered outdoor kitchen or a patio with a partial roof. Always check appliance clearances and ventilation requirements before connecting.
- Bonding and grounding: CSST gas piping requires a bonding connection to the building's electrical grounding electrode system. Failure to bond CSST correctly is a recognized fire hazard during lightning events. This is not optional.
DIY or hire a licensed gas fitter? Here's how to decide
I'll be honest: this is the section where I have to tell some of you to put down the wrench. Gas work is different from laying pavers or digging a drainage channel. The physical installation skills are not especially complex, but the regulatory picture is, and the consequences of getting it wrong are serious.
Here's a practical way to frame the decision. The work splits into two distinct parts: the civil work (trenching, bedding, sleeving, backfilling, surface patching) and the gas work (pipe joints, valve installations, pressure testing, connections to the meter and the appliance). In many jurisdictions, a capable homeowner can legally do the civil prep and then have a licensed gas fitter do the actual piping connections and sign off on the pressure test. That approach saves money while keeping the work legal and safe.
| Task | Typically DIY-able? | When to hire a pro |
|---|---|---|
| Calling 811 and locating utilities | Yes | N/A |
| Pulling the gas permit | Yes (homeowner can apply in most areas) | If your jurisdiction only issues to licensed contractors |
| Trenching and bedding | Yes | If you hit unmarked utilities or unstable soil conditions |
| Sleeving under existing patio | Yes (with correct sleeve material) | If slab coring or directional boring is needed |
| Cutting and joining black iron pipe | Possible but difficult | Recommended: hire a gas fitter for iron pipe jointing |
| Installing PE/MDPE underground pipe | Possible where legally permitted | If your state requires a licensed plumber or gas fitter for any joint |
| Installing CSST | Generally requires licensed installer | Almost always: CSST bonding and jointing is code-sensitive |
| Pressure testing and inspection sign-off | Assist only | Licensed gas fitter or inspector must witness/certify in most areas |
| Final appliance connection and commissioning | Sometimes (flex hose to appliance only) | For all hard connections: hire a licensed gas fitter |
The legal triggers to hire a pro are: your state licenses gas work and prohibits unlicensed connections, your AHJ requires a licensed contractor on the permit, you're working with CSST (which has specific bonding and installation requirements that manufacturers mandate be followed precisely), or you're connecting directly to the gas meter. If any of those apply, get a licensed gas fitter. The trenching work is yours to do if you want to save money. The pipe joints are where professional accountability matters most.
Planning the gas route under your patio
Before you trench a single inch, sketch the full route on paper (or use a simple diagram on your phone). The goal is the shortest, most direct path from the gas source to the appliance location, avoiding every buried utility, structural footing, and drainage pipe along the way.
Depth requirements and frost line
Your trench depth must meet both the IFGC minimum and your local frost penetration depth. The IFGC requires a minimum of 12 inches of cover for buried gas piping. In colder climates, your local frost depth may be significantly greater: in northern states and Canada, frost can penetrate 36 to 48 inches or more. While gas lines don't need to be protected from freezing the way water lines do (gas doesn't freeze), many local codes require burial below the frost line to prevent ground movement from stressing the piping. Check your local frost depth map (available from NOAA or your local building department) and use the greater of 12 inches, your local code minimum, or the local frost depth requirement.
Mapping the route and avoiding utilities
After your 811 locate, the marked utilities define where you cannot run your trench. Plan a route that maintains a minimum horizontal separation from other buried utilities: most codes and good practice call for at least 12 inches of horizontal separation from electrical conduit, water lines, and sewer pipes. Keep the route away from tree root zones if you can, since roots can eventually displace or damage buried piping. If the route crosses under the existing patio, you have two options: cut a slot through the surface material and patch it afterward, or bore/sleeve under it without breaking the surface. For short crossings under a thin concrete or paver patio, a manual directional bore using a hydraulic bore kit is often practical. For longer crossings or reinforced concrete, hire a contractor with directional boring equipment.
Planning for the riser and termination point
The gas line needs to transition from buried pipe to above-grade at the appliance location. This transition point is called the riser. Plan for the riser to emerge in a location that is accessible, above grade, and protected from physical damage. A sediment trap (drip leg) is typically required close to the appliance connection. The shutoff valve for the outdoor appliance must be accessible, located above grade, and clearly identifiable. Many inspectors want to see the shutoff valve within a few feet of the appliance and not buried or obscured under a patio structure.
Materials and tools you'll need
Here's a practical checklist of everything you're likely to need for a typical residential patio gas line installation. Quantities will vary based on your run length and layout. Source everything before you start so you're not making mid-project hardware store runs with an open trench.
Pipe and fittings
- MDPE (medium-density polyethylene) underground gas pipe, marked to ASTM D2513, in the appropriate size for your appliance BTU load (commonly 1/2 inch or 3/4 inch IPS for residential outdoor runs)
- Transition fittings (PE to iron or PE to CSST) for the connection points at each end of the buried run
- Black iron pipe and fittings for above-grade sections (riser, drip leg, shutoff valve assembly) if required by your local code or AHJ
- Approved shutoff valve (full-port ball valve rated for natural gas or LP as appropriate)
- Sediment trap (drip leg) assembly for the appliance end
- Appliance connector: flexible gas connector sized for your appliance (these are typically 1/2 inch, rated for outdoor use, and should be listed for the appliance type)
Protective and detection materials
- Protective pipe sleeve: rigid PVC conduit or steel conduit, sized to allow the gas pipe to pass through with clearance, for use wherever the line passes under the patio slab or in areas with potential mechanical damage
- Non-hardening sealant rated for gas service to seal the annular space at both ends of the sleeve (required by IFGC)
- Tracer wire: minimum 18 AWG, direct-burial-rated insulation (yellow is the standard color for gas), continuous run alongside the buried pipe for the full length; products listed to UL Subject 2989 are preferred by many AHJs
- Detectable warning tape: yellow polyethylene tape printed with 'WARNING: GAS LINE BELOW' or similar, installed approximately 12 inches above the buried pipe during backfill
- Dielectric isolation fitting if required by your local code for the transition between buried ferrous pipe and above-grade connections
Bedding and backfill materials
- Clean, washed sand or fine granular bedding material (free of rocks, glass, or sharp debris) for the pipe bed and initial cover
- Compactable fill for upper backfill lifts (native soil is acceptable if free of large rocks and debris)
- Compaction equipment: hand tamper or plate compactor for backfill lifts
Tools
- Shovel and/or trenching spade
- Manual or electric trencher (rental) for longer runs
- Hydraulic bore kit or manual piercing rod for boring under existing patio sections
- Pipe cutter or hacksaw rated for PE pipe
- Pipe wrenches and thread-sealing compound or PTFE tape rated for gas service
- Calibrated pressure gauge (0-15 psi range is typical for residential low-pressure tests)
- Soapy water solution or electronic gas detector for leak checking
- Chalk line and measuring tape for layout
- Angle grinder or circular saw with masonry blade if cutting concrete or pavers for the trench
- Knee pads, work gloves, and safety glasses
- Camera or phone for photographing the buried pipe before backfill (required documentation in many jurisdictions)
Choosing the right pipe for a buried patio gas line
This is one of the most common points of confusion, and choosing wrong can mean a failed inspection or a pipe you can't legally use in your jurisdiction. Here's a practical breakdown of the main options.
| Pipe Type | Suitable for Buried Use? | Under Patio Slab? | Key Requirement | Common Use Case |
|---|---|---|---|---|
| Black Iron (steel) | Yes, with coating/wrapping | Yes, with sleeve | Must be coated or wrapped to resist corrosion; sleeved at slab crossings; dielectric fitting often required | Short above-grade risers; some older buried runs, but largely replaced by PE |
| MDPE/PE (polyethylene) | Yes — preferred for direct burial | Yes, per IFGC 404.12 with correct depth | Must be marked to ASTM D2513; tracer wire required; not permitted inside buildings or under building slabs | Primary choice for residential buried gas runs; widely available, flexible, and easy to work with |
| CSST (corrugated stainless steel) | Limited — check manufacturer and local code | Generally not recommended for direct burial without additional protection | Bonding to electrical grounding system required; follow specific manufacturer's installation manual; jacketed arc-resistant products have different bonding rules | Interior runs and short exterior transitions; some products have listed exterior/buried ratings — verify with manufacturer |
| Copper | Not permitted for natural gas in most U.S. jurisdictions | No | Copper reacts with odorant compounds in natural gas; prohibited by IFGC for natural gas service | Not applicable for natural gas; sometimes used for LP in specific local codes — always verify |
| Galvanized Steel | Not recommended for buried use | No | Galvanized coatings are not reliable corrosion protection in soil; most codes and good practice prohibit buried galvanized pipe for gas | Not applicable for new installations |
For most residential patio gas line projects, MDPE polyethylene pipe (marked to ASTM D2513) is the right choice for the buried portion of the run. It's flexible, corrosion-resistant, approved for direct burial, and widely accepted by AHJs. Products like HOME-FLEX Underground are specifically designed for this application and come with installation manuals that walk you through approved joining methods and depth requirements. At the point where the pipe transitions above grade (the riser), you'll typically transition to black iron pipe using an approved transition fitting. That above-grade iron assembly is where the shutoff valve and drip leg live.
One important caution about CSST: it's commonly used inside homes and is available in products rated for some exterior uses, but it's not a general-purpose solution for buried patio runs. CSST requires a bonding connection to the building's electrical grounding electrode system to reduce the risk of arc damage during a lightning strike. The specific bonding requirements (conductor size, connection point, and whether arc-resistant jacketed CSST changes those requirements) vary by manufacturer and local code. If someone on a forum tells you to just run CSST underground to your grill, push back and ask them to show you the manufacturer's installation manual and confirm it's been accepted by their AHJ. This is exactly the kind of thing that fails inspections.
Fittings and compatible connections
Every fitting in a buried or outdoor gas system must be rated and listed for that specific service. For PE pipe, use mechanical compression fittings or heat-fusion fittings that are approved for the pipe diameter and listed for gas service. Do not use fittings designed for water or irrigation service on gas pipe, even if they physically fit. At the transition from PE to iron (the riser fitting), use a listed PE-to-iron transition fitting, not a field-fabricated connection. Thread sealant on iron fittings must be a gas-rated compound or PTFE tape rated for gas, not standard plumber's tape. Apply thread sealant to male threads only and never on the first two threads from the pipe end.
Trenching, bedding, and sleeving the line
With planning done and permits in hand, you can open the trench. OSHA 29 CFR 1926 Subpart P (Excavations) requires protective systems (sloping, shoring, or shielding) for trenches 5 feet deep or more and daily inspections by a competent person. Dig to your required depth plus the thickness of your bedding layer (typically 4 inches of sand below the pipe). Keep the trench bottom as level and smooth as possible. Remove any rocks, roots, or debris that could bear on the pipe. For a standard residential patio run, a trench about 8 to 10 inches wide is plenty to work comfortably.
Lay 3 to 4 inches of clean, washed sand or fine granular bedding in the trench bottom and compact it lightly. Place the pipe on the bedding. Run the tracer wire alongside the pipe (not coiled or tied off, but running continuously the full length of the buried section). Cover the pipe with 3 to 4 inches of the same clean sand before transitioning to compacted fill. During backfill, place the detectable warning tape (yellow, printed with a gas warning) approximately 12 inches above the top of the pipe. NFPA 54 (National Fuel Gas Code) and NFPA code listings specify burying below the local frost‑penetration depth where required, using clean, non‑damaging bedding and compacted backfill, and placing a continuous warning tape immediately above buried piping. This is a code and best-practice requirement from NFPA 54 and federal utility installation guidance: it serves as a warning layer for any future excavation in the area. Backfill the remaining depth in compacted lifts of 6 to 8 inches, working around and over the warning tape without displacing it.
Where the line passes under an existing patio slab, concrete, or paver section, the pipe must be sleeved in a protective conduit. The sleeve should be rigid PVC or steel conduit, large enough for the gas pipe to pass through with clearance. Once the gas pipe is through the sleeve, seal both ends of the annular space (the gap between the pipe and the sleeve) with a non-hardening gas-rated sealant. The IFGC requires this seal at penetration points. Do not use expanding foam, standard silicone, or caulk not rated for gas service.
Connecting, testing, and getting inspected
Once the pipe is in the ground and the above-grade assembly (riser, drip leg, shutoff valve) is installed, the system needs to be pressure-tested before you backfill or cover anything. This is not optional: your building department requires an inspection at this stage in virtually every jurisdiction. Do not call for inspection without having the system assembled, capped, and pressurized with air or inert gas (never with natural gas for the test itself). A typical residential low-pressure test is conducted at 1.5 times the normal operating pressure, commonly around 3 to 5 psi for low-pressure natural gas systems, held for at least 15 minutes with no pressure drop. Check every joint, fitting, and valve connection with soapy water or an electronic gas detector. Document the test with photos of the gauge reading and a note of the time.
Once your inspector has signed off on the rough-in pressure test, you can backfill the trench and patch the patio surface. If you cut through concrete, re-pour with a matching mix and allow it to cure fully before loading it. For paver patios, set the cut pavers back in place on fresh bedding sand and compact the edge joints with polymeric sand. For step-by-step instructions on preparing and installing outdoor carpeting over a patio surface, see how to install patio carpet. Take photos of the completed buried run before and after backfill: most building departments require you to have these available for the record, and they're invaluable if anyone ever excavates near the line in the future.
The final connection from the shutoff valve to the appliance uses a listed flexible gas connector (the corrugated stainless appliance connector). These are rated for outdoor use and typically come in lengths from 18 inches to 5 feet. Do not use an indoor-rated connector outdoors; the yellow-coated outdoor versions are specifically listed for exterior exposure. Connect the flex line to the appliance per the appliance manufacturer's instructions, then open the shutoff slowly, check all connections once more with soapy water, and call for your final inspection before first use.
What it costs: a realistic budget range
Costs vary significantly by run length, pipe type, permit fees, and local labor rates. Here's a rough framework for a typical 20 to 40-foot residential patio gas line run.
| Cost Item | DIY Estimate | Hired Pro Estimate |
|---|---|---|
| Gas permit (building department) | $50 – $200 | $50 – $200 (same fee either way) |
| MDPE pipe and fittings (20–40 ft run) | $40 – $120 | $40 – $120 (materials) |
| Sleeve, tracer wire, warning tape, bedding | $30 – $80 | $30 – $80 (materials) |
| Shutoff valve, drip leg, riser assembly | $50 – $120 | $50 – $120 (materials) |
| Tool rental (trencher, bore kit, compactor) | $80 – $200 | Included in labor |
| Licensed gas fitter labor (connections + test) | $0 if fully DIY where legal | $300 – $800 for connections, test, and sign-off |
| Patio surface patching (concrete or pavers) | $20 – $100 | $100 – $400 if contracted |
| Typical total range | $270 – $820 (DIY civil + pro gas connections) | $570 – $1,720 (fully contracted) |
The hybrid approach, where you do the trenching and civil work yourself and hire a licensed gas fitter for the pipe connections, pressure test, and sign-off, is usually the most cost-effective legal option. It can cut the total cost by $300 to $500 compared to a fully contracted job while keeping the safety-critical work in professional hands.
Mistakes that trip people up (and how to avoid them)
- Not calling 811 before digging: this is the single most dangerous shortcut and is illegal in most states. Even a shallow trench can hit a buried cable or pipe. Make the call.
- Using the wrong pipe: irrigation PE pipe and gas PE pipe look similar but are not interchangeable. Only pipe marked to ASTM D2513 is approved for buried gas service.
- Forgetting the tracer wire: buried PE pipe is not detectable by standard utility locating equipment on its own. Running the line without a continuous 18 AWG direct-burial tracer wire makes future locates impossible and may cause a failed inspection.
- Skipping the sleeve under the slab: an unprotected gas pipe bearing directly against the underside of a concrete slab is a point of mechanical damage risk and is not code-compliant at that crossing.
- Not sealing the sleeve ends: the IFGC requires the annular space in the sleeve to be sealed. An unsealed sleeve is a path for gas to migrate into a void under the slab.
- Calling for inspection with a cold trench and uncapped pipe: your inspector needs to see the full above-grade assembly in place, pressurized, and ready to test. Show up unprepared and you're paying for a re-inspection.
- Using indoor-rated CSST or flex connectors outdoors: outdoor appliance connectors are specifically listed for exterior exposure. Indoor-rated versions degrade quickly in sun and moisture.
- Not documenting the buried run: take photos of the pipe in the trench with a tape measure showing depth before you cover it. This takes five minutes and can save enormous trouble later.
Finishing up and keeping good records
Once the final inspection is passed and the appliance is connected, keep a file with your permit, inspection sign-off, pressure test documentation, pipe manufacturer spec sheets, and the photos of the buried run. If you sell the house, these documents demonstrate that the work was permitted and inspected, which matters for buyers and their insurers. If anyone excavates near the line in the future, your buried pipe photos show the route and depth. It's a small administrative task that protects a significant investment.
Running a gas line under a patio is one of the more involved upgrades in the outdoor living toolkit, but it's also one that genuinely transforms how a patio works. Paired with a well-drained, properly bedded patio surface (the same compaction and bedding principles that make your patio stable also make your buried gas line installation easier), this project is very achievable for a prepared homeowner working within the rules. If you're also installing or repairing a wooden patio surface, see our guide on how to install wood patio flooring for techniques on proper subbase, bedding, and fastening that complement buried utility work. For guidance on installing a finished patio floor, see our step-by-step guide on how to install outdoor carpet on a patio. If your patio project also involves cutting drainage channels into the surface or laying new flooring materials after patching a gas line trench, the techniques covered in those related patio topics connect directly to the finishing work you'll do here.
FAQ
What is the short answer to: How do I safely and code‑compliantly run a buried gas line under a patio for grills, heaters or firepits?
Follow local code and manufacturer instructions, obtain required permits, call 811 for utility locates, choose approved pipe (typically MDPE/PE or listed metallic piping), run the line at the required burial depth with tracer wire and warning tape, sleeve and seal any slab/penetrations, perform required pressure/leak testing and inspections, and use an accessible shutoff/riser and listed appliance connection. If you are not experienced or your local code requires a licensed installer, hire a licensed gas fitter—don’t guess.
Regulatory checklist — what must I do before digging or installing?
1) Call 811 / your one‑call center and wait for utility markings. 2) Verify local code (municipal or county amendments to IFGC/NFPA) for minimum burial depth and material restrictions. 3) Obtain the required gas/mechanical/plumbing permit(s). 4) Review applicable manufacturer installation manuals (MDPE/CSST, etc.). 5) Plan for AHJ inspections (rough/pressure test before concealment and final inspection). 6) If bonding/grounding is required (CSST), coordinate with an electrician per AHJ and manufacturer.
What safety and liability warnings should I keep in mind?
Working on gas piping carries risk of fire, explosion, carbon monoxide, injury and code noncompliance. Unpermitted or improper work can void insurance, create legal liability, and endanger occupants. Do not use unknown fittings or materials, do not work without utility locates, do not connect to the meter without coordinating with the utility where required, and stop and call a licensed professional if unsure. For trenches ≥5 ft, follow OSHA excavation rules or hire an experienced contractor.
How do I decide DIY versus hiring a licensed gas fitter?
Consider hiring if any of the following apply: your jurisdiction requires a licensed installer for consumer gas piping; the run is complex (meter relocation, high‑pressure service, multiple appliances, under slab penetrations), you lack gas‑piping experience, you cannot obtain required inspections, or bonding/grounding is needed for CSST. DIY may be reasonable for a simple short run using listed MDPE with clear manufacturer instructions, a permit and AHJ approval, proper tools, and you are comfortable with testing/inspections. When in doubt, hire a licensed professional.
What materials and tools will I need?
Materials: listed gas piping (ASTM D2513 MDPE/HDPE gas pipe or approved metallic pipe), continuous buried tracer wire (direct‑burial rated, typically 18 AWG, yellow), detectable warning/utility tape, sleeve/conduit for patio slab penetrations, shutoff valve at an accessible riser, fittings and couplers listed for gas, appliance flex connector, regulators if appliance requires, dielectric fittings/isolation if required, corrosion protection for metallic pipe. Tools: shovel/trencher or mini‑excavator, tape measure, level, pipe cutters, fusion equipment or authorized connectors for MDPE, torque wrenches, pressure test pump/gauge, leak detection solution or electronic gas detector, compacting plate or hand tamper, PPE, inspection camera (optional).
How should I plan the route and determine burial depth and frost considerations?
Route along the shortest practical path that avoids other utilities and minimizes crossings. Maintain required clearances from electrical lines per local code. Check local code for minimum burial depth—IFGC cites 12 in as a baseline but many jurisdictions require 18 in or deeper; some products and local amendments require greater depth or protection under driveways/slabs. Where frost penetration is an issue, bury below local frost depth where required by code. Include a riser and shutoff at an accessible location and plan to sleeve the pipe under any slab, step or wall with sealed penetration.