Building a brick patio wall is absolutely a DIY-friendly project if you break it into the right sequence: plan the layout, prep the ground properly, pour or compact a solid footing, lay courses in running bond with consistent mortar joints, handle corners cleanly, and finish with a cap. The whole thing lives or dies on base prep and drainage, not on how fast you can lay brick. Get those two things right and the rest follows.
How to Build a Brick Patio Wall Step by Step DIY

Clara Farrell
1 Jul 2026
Project planning and measuring the wall line
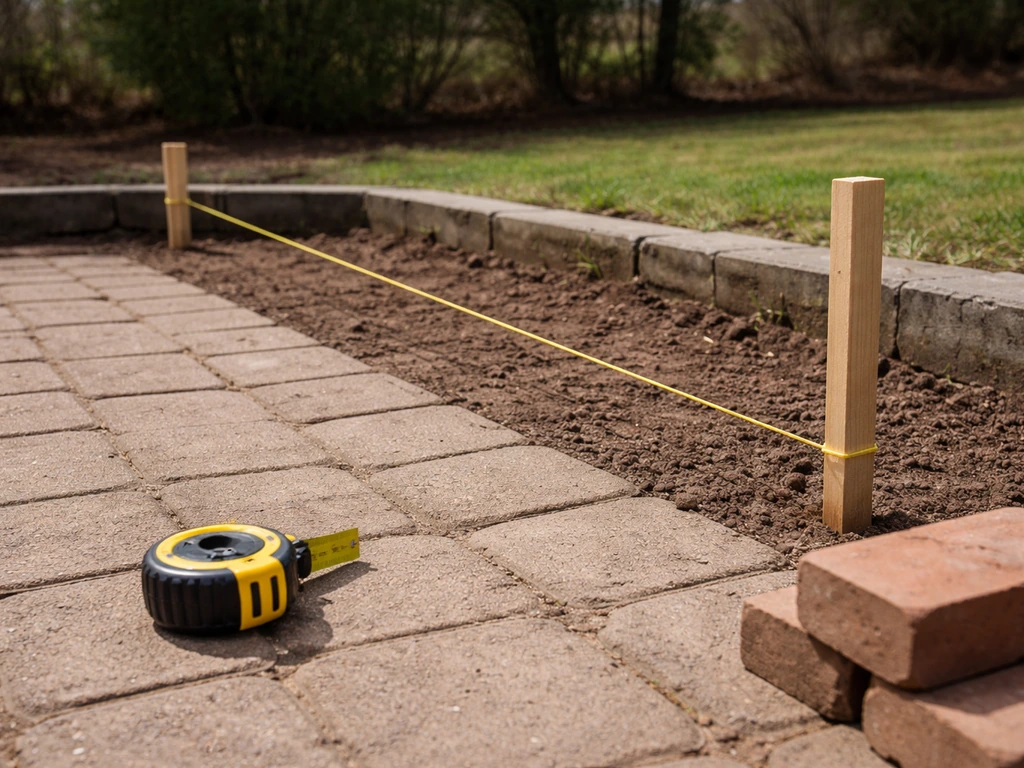
Before you order a single brick, walk your site and decide exactly what this wall is doing. Is it a low decorative border around the patio edge, a raised planter wall, or something closer to a retaining wall holding back a slope? That distinction matters because a wall retaining soil carries real lateral pressure and drainage requirements that a flat-grade border wall does not. A general rule in most US jurisdictions is that retaining walls under 4 feet tall (measured from the bottom of the footing to the top of the wall) typically don't require a permit or engineering sign-off, but that threshold varies by city and state. Walnut Creek's permitting guidance notes that retaining wall approval or engineering requirements can apply when the wall is over 4 feet tall, measured from the bottom of the footing to the top of the wall, and when other loading conditions exist. Check with your local building department before you start. Portland, Walnut Creek, Renton, and New Jersey all have specific rules, and your town likely does too.
Once you know what you're building, mark the wall line with stakes and mason's string. Measure twice: the length of each straight run, any corners, and the planned height. Sketch it on paper with dimensions. This sketch becomes your material list. A standard modular brick is roughly 7.5 inches long by 2.25 inches tall by 3.75 inches wide (nominal 8 x 2.25 x 4), and with a 3/8-inch mortar joint you get about 4.5 courses per foot of wall height. Use that to estimate how many bricks you need, then add 10 percent for cuts and breakage.
If your wall connects to or borders the main patio surface, it makes sense to plan both at the same time so they share a base and drainage path. A wall that's isolated from the patio drainage system can end up trapping water against the back face, which is one of the fastest ways to cause efflorescence and freeze-thaw damage.
Materials and tools you'll actually need
Bricks and mortar
For an outdoor patio wall, use SW (Severe Weathering) grade brick. These are denser and more frost-resistant than MW (Moderate Weathering) grade, which matters anywhere temperatures drop below freezing. Check the ASTM C62 or C216 grade stamped on the pallet or the spec sheet. For mortar, use Type S. It's the right call for below-grade and at-grade exterior applications because it's stronger and more water-resistant than the common Type N. You'll find it bagged as Sakrete Type S or similar products at any home center. Type S is typically proportioned at about 1 part masonry cement to 2.25 to 3 parts sand by volume if you're mixing from scratch, but pre-bagged mixes are easier and more consistent for a DIY project.
If you want to go a step further on moisture resistance, look for an integral water repellent (IWR) mortar, which is mixed with a water-repellent additive built in. Products like SPEC MIX IWR mortar reduce water penetration at the joints and help cut down on efflorescence over time. It's not required, but for a patio wall in a wet climate or a freeze-thaw zone, it's a smart upgrade.
Base materials
- Angular crushed stone (3/4-inch clean crushed stone or crusher run) for the compacted base layer, not rounded river gravel
- Concrete for the footing pour (typically a 4- to 6-inch-thick continuous footing under a mortared wall)
- Geotextile fabric if you're on clay or silty soil to separate the aggregate base from unstable subgrade
- Coarse sand or fine stone dust for leveling the first course if setting on a concrete footing
Tools
- Mason's line and line blocks or pins
- 4-foot level and torpedo level
- Laser level (a cross-line or pulse model makes setting corner heights much faster and more accurate)
- Brick trowel and margin trowel
- Jointing tool (a 3/8-inch concave jointer is standard)
- Rubber mallet
- Brick hammer and brick bolster chisel for hand cuts
- Angle grinder with a diamond blade or a wet-cut brick saw for clean cuts
- Tape measure, pencil, chalk line
- Plate compactor or hand tamper
- Mixing drill with paddle attachment or a mortar mixing tub and hoe
- Safety glasses and gloves
Finishing materials
- Coping bricks or concrete cap stones for the top course
- Penetrating silane/siloxane water repellent sealer for after the wall cures
- Gravel or drainage aggregate for backfilling behind any retaining section
- Perforated drain pipe if the wall retains soil or water pools near the base
Site prep and ground conditions
Here's the honest truth: the most common reason a DIY brick wall fails is not bad bricklaying, it's bad ground prep. Bricks are rigid. If the base moves, the wall cracks. So this phase deserves the most attention.
Level ground
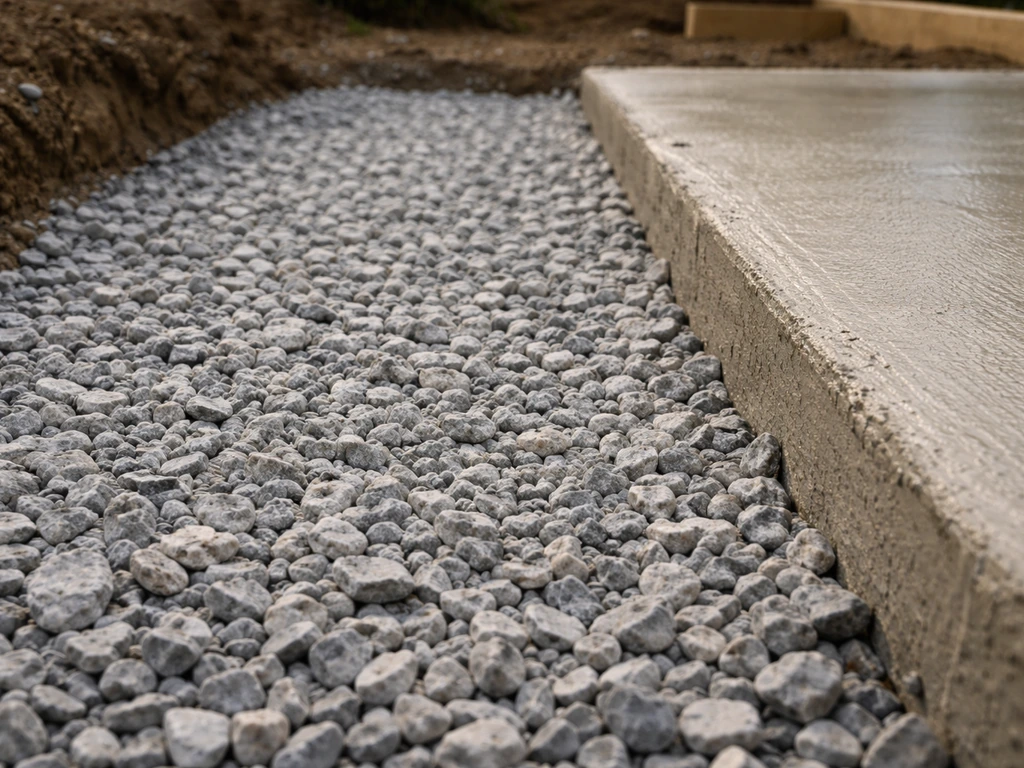
On flat ground, your job is straightforward. Strip away any sod or topsoil along the wall line (typically 12 inches wide and 12 to 18 inches deep to get below the frost line in cold climates, or at least 6 to 8 inches in mild climates). Compact the subgrade with a plate compactor. Add 4 to 6 inches of angular crushed stone in layers, compacting each pass. If your soil is clay or silty, lay a geotextile fabric over the subgrade first before adding stone. This stops clay from migrating up into the aggregate over time and turning your solid base into a soggy mess.
Sloped ground
On a slope, you'll need to step your footing down in increments rather than trying to pour one angled footing. If you are building diy brick patio steps on a slope, you’ll use the same stepped footing logic so each rise stays stable and aligned step your footing down in increments. Each step should be at least one full brick height (roughly 3 inches plus mortar) and the horizontal run of each step should overlap with the previous one. The footing always stays level within each step. Step foundations take more planning but are actually pretty manageable once you understand the logic.
Clay soil and drainage
Clay soil doesn't drain, it holds water. A wall sitting on or retaining clay will deal with elevated hydrostatic pressure every time it rains, which pushes against the back of the wall and eventually moves it. The fix is to replace clay backfill behind any retaining section with free-draining gravel (pea gravel or clean crushed stone), lay a perforated drain pipe at the base of the wall, and wrap the drain trench in geotextile so fine soil doesn't clog the pipe. This isn't over-engineering, it's the most practical decision you'll make on this project.
Building the footing and setting level lines
A mortared brick wall needs a concrete footing. Period. A footing that's just compacted gravel or packed soil will allow movement, and movement means cracked mortar joints, shifting courses, and a wall that looks bad within a couple of winters. The footing should be at least twice as wide as the wall (so 8 inches wide for a 4-inch-wide single-wythe wall) and 6 to 8 inches deep in mild climates, or deeper in freeze-thaw zones where frost can push it. Pour concrete into your prepared trench, level it off, and let it cure for at least 48 hours before you start laying brick on top.
Once the footing is cured, set up your level lines. This is where a laser level earns its keep. Set the laser at one corner and shoot across to all other corners to confirm they're at equal elevation. A laser level can also help you confirm that your corners are set at equal elevations and keep your courses plumb and level as you build confirm they're at equal elevation. Mark your intended first-course height on each corner stake. Then stretch a mason's line between corners, pulled tight so there's no sag. This line is what you'll build to on every course. Raise it one brick-height-plus-mortar after each course is complete. Never eyeball this, every experienced bricklayer uses a line.
How to lay the brick: courses, alignment, and mortar joints
Starting the first course
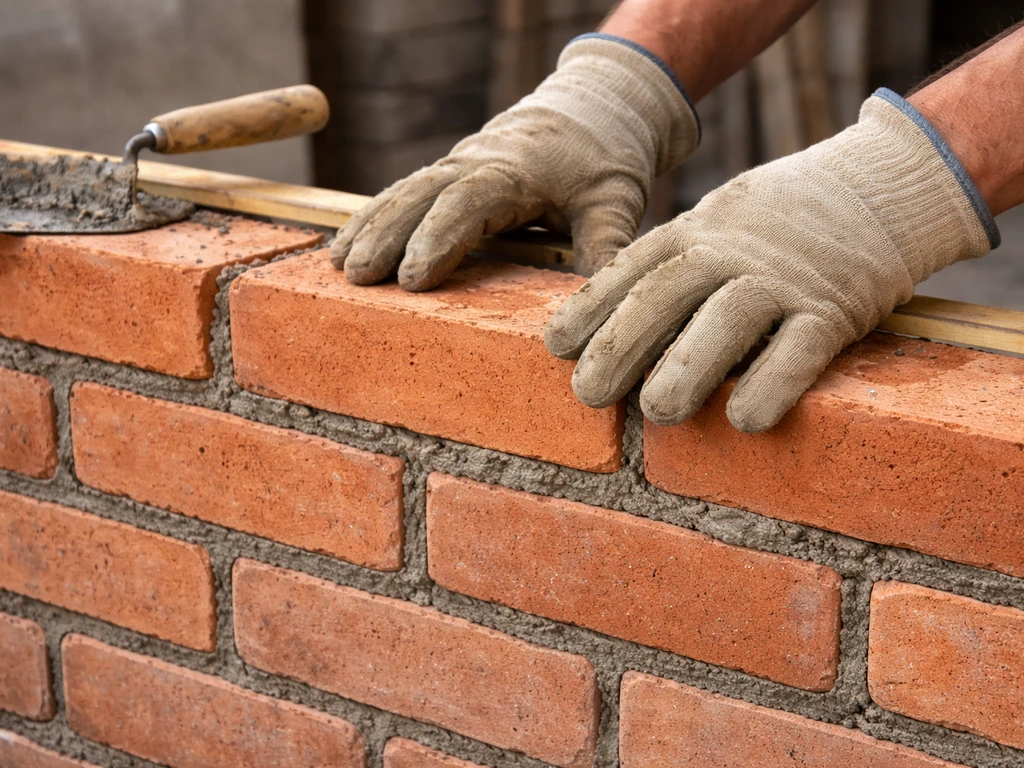
Dry-lay (no mortar) your first course along the footing to check spacing and figure out where cuts will fall. Adjust the layout so you minimize the number of awkward small cuts at corners and ends. Once you're happy with the layout, mix your mortar to a peanut-butter consistency and begin. Spread a full bed of mortar on the footing, about 1 inch thick, then furrow it down the center with your trowel tip. Set each brick with a firm downward press and a slight wiggle to seat it into the mortar, then check it against the line and level. Tap down high spots with a rubber mallet.
Running bond and break joints
Use running bond as your default pattern. Each course offsets from the one below it by half a brick length, so vertical joints never line up continuously. This is not just aesthetic, it's structural. Continuous vertical joints (called stack bond) create a wall that can split apart under lateral pressure. Running bond distributes load and ties the wall together.
Mortar joints and consistency
Aim for 3/8-inch mortar joints. Thicker joints are weaker and more prone to water penetration; thinner joints are hard to work with. Butter the end of each brick (called the head joint) before placing it, and make sure the bed joint (horizontal mortar under each brick) is full with no voids. As you lay each brick, mortar will squeeze out of the joints. Scrape off the excess with your trowel, then tool the joint with a concave jointer when the mortar is thumb-print firm, usually 30 to 60 minutes after placement depending on temperature. Tooling compresses the mortar into the joint edges, which is what makes the joint dense and water-resistant.
Cutting brick
For cuts at corners, ends, and around obstacles, a wet-cut brick saw gives you the cleanest, most consistent results. A brick bolster and hammer works for occasional rough cuts but produces more variance. Cut brick is sharp, wear gloves. Always measure, mark with a pencil, and cut on the waste side of the line.
Handling corners, ends, and reinforcement
Corners are where running bond gets a little tricky but also where it gets strong. At each corner, alternate which wall's brick extends to the corner on each course. Course 1: the north-south wall bricks run to the corner, the east-west wall bricks butt up to them. Course 2: flip it. This interlocking alternation is what ties the two wall runs together. If both walls always terminate at the corner without overlapping, you'll get a visible vertical crack down the corner over time.
At exposed ends (a wall that terminates in the open rather than at a corner), finish with a full brick or a neatly cut half brick, not a thin sliver. Thin cuts are fragile and look bad. Plan your layout from the start to avoid them.
For walls taller than about 18 to 24 inches, or any wall dealing with significant lateral load from retained soil, add horizontal reinforcement. Lay strips of ladder-style wall tie mesh (joint reinforcement) in the mortar bed every two or three courses. This doesn't replace proper drainage and footing design, but it does add resistance against the wall bowing or separating under pressure. For taller retaining walls approaching 4 feet, consult your local building department before you proceed. Most jurisdictions require engineering above that height, and that's not a rule to ignore.
Finishing the wall: caps, drainage, and sealing
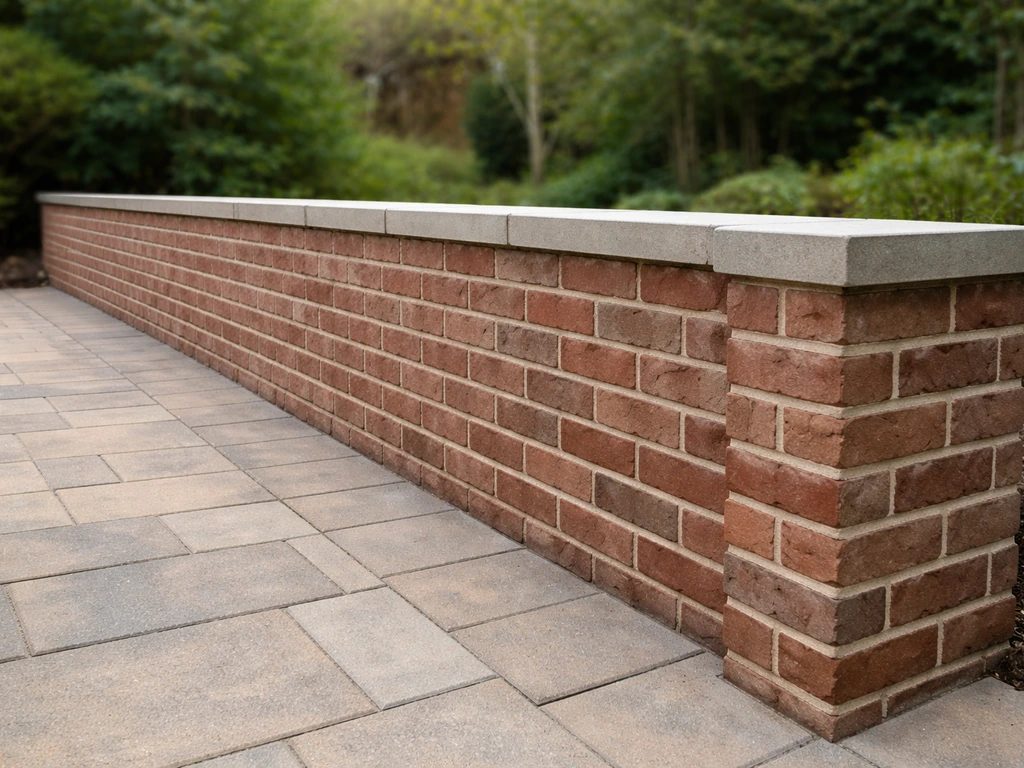
Cap or coping
The top of a brick wall is its most vulnerable point. Water sits on top, works into open joints, and in a freeze-thaw climate that's where spalling starts. Cap the wall with purpose-made coping bricks, bullnose bricks, or concrete cap stones mortared in place. If you are planning a full brick patio, search for a step-by-step video on building a brick patio so you can see the process from layout to mortar how to build a brick patio youtube. The cap should overhang the wall face by about 1/2 to 3/4 inch on each side so water drips free rather than running down the face. Make sure the bed joint under the cap is completely filled with no voids.
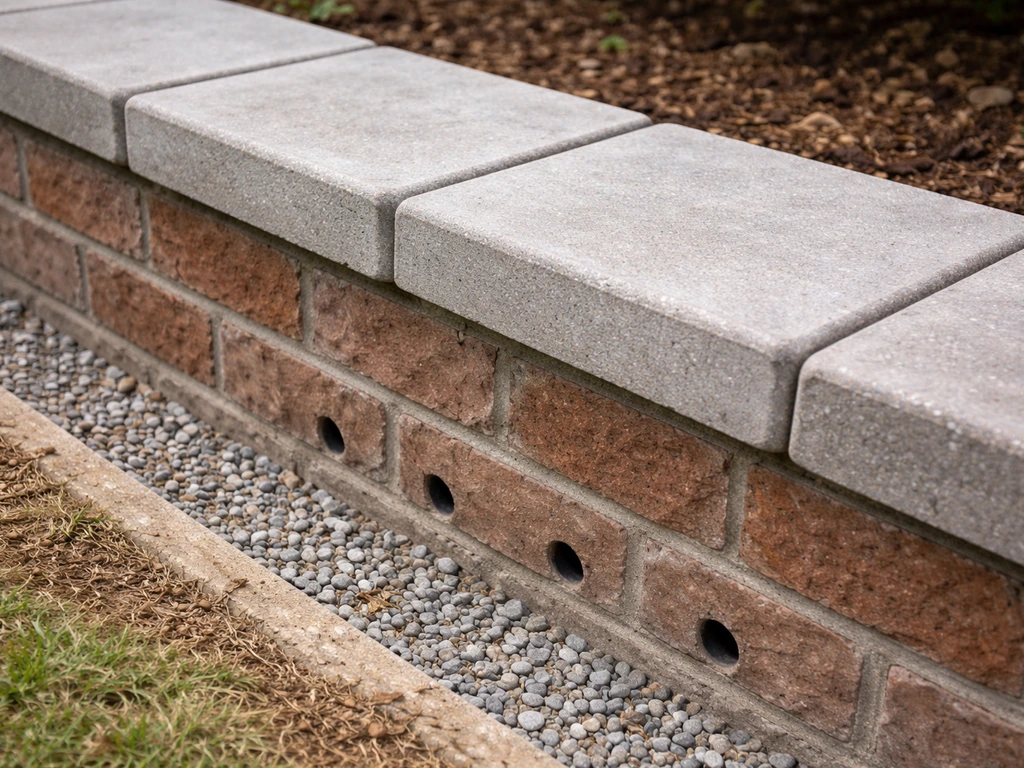
Drainage and weep holes
If your wall is holding back soil or a raised planter bed, you need drainage on the back side and weep holes through the wall. If your patio deck needs support from a brick wall, plan the drainage layer and weep holes first so water pressure does not damage the structure holding back soil. Weep holes are simply open head joints (no mortar) placed at the base of the wall, typically every 24 to 32 inches along the bottom course. They let water that collects behind the wall escape rather than build up pressure. Do not backfill over them or block them with soil. Combine weep holes with a gravel drainage layer behind the wall for best results. A wall without drainage is a wall that will eventually fail.
Sealing after cure
Let the wall cure for at least 28 days before applying sealer. Once cured, clean off any efflorescence (white salt deposits) with a diluted masonry cleaner, rinse thoroughly, let dry completely, then apply a penetrating silane/siloxane water repellent. These sealers penetrate the brick and mortar surface rather than forming a film on top, so they don't peel or trap moisture. They significantly reduce water intrusion, which is the root cause of both efflorescence and freeze-thaw spalling. Reapply every 5 to 10 years depending on exposure.
Common mistakes and how to avoid them
| Mistake | Why It Happens | How to Fix or Prevent It |
|---|---|---|
| Skipping or under-sizing the footing | Seems like extra work; gravel base feels solid enough | Pour a concrete footing at least twice the wall width; don't skip this step for mortared brick |
| Poor base compaction | Rushing to start laying brick; not using a plate compactor | Compact subgrade and each aggregate layer separately before pouring the footing |
| No drainage behind a retaining wall | Not thinking about what happens when it rains | Install drainage gravel, perforated pipe, and weep holes before backfilling |
| Using Type N mortar for exterior below-grade applications | It's more common at hardware stores and easier to find | Use Type S mortar for all exterior at-grade and below-grade applications |
| Inconsistent mortar joint thickness | Rushing, not using a mason's line, or letting mortar get too stiff before placing brick | Mix only what you can use in 30 to 45 minutes; use a line for every course |
| Stack bond (vertical joints lined up) | Not understanding running bond layout before starting | Dry-lay the first two courses before mixing mortar to confirm the offset pattern |
| Uncapped wall top | Leaving the top course as regular brick to save money | Always install a full-mortar cap or coping; it's cheap insurance against freeze-thaw damage |
| Blocking or forgetting weep holes | Not planning weep holes in the layout from the start | Mark weep hole locations on your plan before laying; leave unmortared head joints at the base course |
Final inspection checklist
Before you call the job done, walk the finished wall and check each of these points. If you're also planning a fire pit on your brick patio, focus on safe placement, proper heat clearance, and a fire-resistant base before you finish the space fire pit on brick patio. Catching a problem now costs a few minutes; catching it two winters from now costs a lot more.
- All courses are level and plumb. Hold your 4-foot level against the face and check in multiple spots.
- No continuous vertical joints anywhere along the wall (running bond is intact).
- All mortar joints are fully tooled with no hollow spots, voids, or crumbling edges.
- The cap course is fully mortared with no open gaps on top.
- Weep holes are open, unobstructed, and spaced no more than 32 inches apart at the base.
- Drainage aggregate or pipe is in place behind any retaining section before backfilling.
- No fresh mortar smeared on brick faces; clean any spots now with a damp sponge before the mortar fully hardens.
- Corners alternate properly with each course, with no vertical seam running straight up either corner face.
- Wall is cured and cleaned before sealer application is scheduled.
- All local permit requirements have been met if the wall height triggers your jurisdiction's threshold.
A well-built brick patio wall is genuinely satisfying work, and it lasts for decades when you get the basics right. If you're also building the main patio surface at the same time, planning both the wall and the field brick layout together will save you headaches with drainage slopes and edge details. For a complete walkthrough, follow this guide on how to install patio bricks. Take it one course at a time, trust your level, and don't rush the base prep. That's really the whole secret.
FAQ
How high can I build a brick patio wall without needing engineering or a permit?
Height thresholds vary by city and state, but many places treat small non-retaining walls differently than retaining walls. If the wall holds back soil, even if it is under 4 feet, confirm with your local building department because drainage, footing depth, and reinforcement rules often still apply.
What’s the difference between a decorative border wall and a retaining wall, and why does it change the build?
If the wall is supporting or holding back soil behind it, it behaves like a retaining wall with lateral pressure and water buildup risk. A decorative border at flat grade usually does not need the same back drainage system, weep holes frequency, or free-draining backfill approach.
Can I use the same brick and mortar for the patio wall as I would for indoor masonry?
No. Outdoor patio walls need exterior-grade bricks that handle moisture and freeze-thaw cycles, and mortar designed for exterior exposure. Use severe-weathering-rated brick for cold climates, and exterior mortar type like Type S rather than a typical interior mortar mix.
Do I need a concrete footing if my wall will be low, like a 12 to 18 inch border?
A mortared brick wall should be on a concrete footing, not just compacted gravel or soil. Even low walls can shift slightly, and rigid bricks will crack the mortar and misalign courses if the base moves.
How deep should the footing be if I live in a mild climate with less frost?
In mild climates, footings are often around 6 to 8 inches deep, but the key is still frost protection and a stable base. Follow local requirements and design guidance, especially if your soil type is clay or if water collects near the wall.
My soil is clay, can I avoid geotextile and just add more crushed stone?
In clay or silty soils, geotextile helps prevent fines from migrating upward into the aggregate, which otherwise turns the base into a water-retaining, unstable layer. Skipping geotextile can lead to increased settlement and cracking over time.
How do I prevent water from building up behind the wall even if I install weep holes?
Weep holes work best when combined with a continuous free-draining gravel layer behind the wall and a perforated drain pipe at the base, wrapped in geotextile to reduce clogging. Also keep soil from contacting or covering the weep-hole openings, and route surface water away so it does not overload the system.
How far apart should weep holes be?
A common spacing is every 24 to 32 inches along the bottom course. Place them in the mortar-free head joints and do not backfill over them or pack soil in a way that blocks the openings.
Should I seal the wall immediately after building it?
Wait until the wall fully cures, typically at least 28 days, before sealing. Sealing too early can trap moisture in the masonry system, increasing the risk of staining or efflorescence.
What type of sealer should I use, and will it stop efflorescence for good?
Use a penetrating silane or siloxane water repellent rather than a film-forming coating, so it does not peel and it allows moisture to move through. Sealing reduces water intrusion, but it does not remove the underlying cause if drainage is incorrect, so fix water management first.
Why do my mortar joints look uneven, and how do I keep the joint width consistent?
Consistency comes from using a reliable joint target (like 3/8 inch) and building to a tight line each course. Tool joints when the mortar is thumb-print firm, and avoid thick joints that weaken mortar or thin joints that are difficult to compact properly.
Can I skip tooling the joints after laying brick?
Tooling compacts mortar into the joint edges and makes joints denser and more water-resistant. If you skip tooling, joints may be more porous and can hold water longer, which increases efflorescence and freeze-thaw damage risk.
What should I do about reinforcement in taller walls?
For walls taller than about 18 to 24 inches, or any situation with meaningful lateral load, add horizontal joint reinforcement (ladder-style mesh) in the mortar bed every two or three courses. For retaining walls approaching about 4 feet, consult local requirements because engineering is commonly required.
How do I lay bricks at corners without creating a visible crack?
At each corner, alternate which wall’s bricks extend into the corner each course, so the runs interlock instead of both walls meeting without overlap. If the pattern always ends at the corner independently, a vertical crack is more likely over seasonal movement.
What’s the best way to handle the exposed end of a wall so it doesn’t look fragile?
Finish ends with a full brick or a neatly cut half brick, avoid leaving thin slivers. Plan the layout early so cuts at ends are practical, and use a brick saw when you need clean, consistent pieces.
Do I need to plan the patio and the wall together?
Yes, at least at the interface. Planning both at the same time helps you share a drainage strategy and avoid a condition where water is trapped against the back face, which can drive efflorescence and freeze-thaw deterioration.
What’s the most common reason a DIY brick wall fails, and what should I double-check first?
Most failures trace back to base and drainage problems rather than bricklaying technique. Before starting brickwork, re-check footing depth, base compaction, geotextile use where needed, gravel backfill behind retaining sections, and that water has a clear path away from the wall.