Building a patio deck with bricks comes down to one non-negotiable rule: get the base right, and the rest follows naturally. You need to excavate to at least 8 to 10 inches below your finished surface, lay a compacted gravel base of 6 to 8 inches, add a 1-inch sand setting bed, and then set your bricks with a drainage slope of about 1/4 inch per foot away from the house. Do that correctly, and you'll have a solid, beautiful brick patio that lasts decades. Skip steps or rush the base, and you'll be releveling bricks within a season.
How to Build a Patio Deck With Bricks: Step-by-Step Guide

Clara Farrell
30 Jun 2026

Planning and site prep for a brick patio deck
Before you dig a single shovelful of dirt, spend real time on the planning phase. This is where most DIYers get themselves into trouble, not during the actual installation. Once your brick patio base is set, you can plan and build a fire pit structure that sits safely on the finished surface fire pit on brick patio. Measure your intended patio area carefully and mark it out with stakes and string lines.
A rectangular layout is the easiest place to start, especially for a first project. Use the 3-4-5 triangle method to confirm your corners are square: measure 3 feet along one edge, 4 feet along the adjacent edge, and the diagonal between those two points should be exactly 5 feet if the corner is 90 degrees.
Once you have your layout marked, check what's underneath. Look for tree roots, buried utilities (always call 811 before digging), drainage pipes, or irrigation lines. Also look at what's nearby: how close is the house foundation, are there existing garden beds, and where does the water naturally flow during a rainstorm? That last point matters more than anything else. Your finished patio needs to shed water away from the house, not toward it. If you want a wall-style finish, focus on strengthening the base and choosing a brick layout that locks the structure in place brick patio wall.
Sketch a rough plan on paper with dimensions. Include where you want the patio to start and end, any transitions to lawn or existing concrete, and where you'll place furniture or a grill. This sketch also helps you calculate how many bricks and how much base material you need, which saves money and multiple hardware store trips.
What you'll need before you start
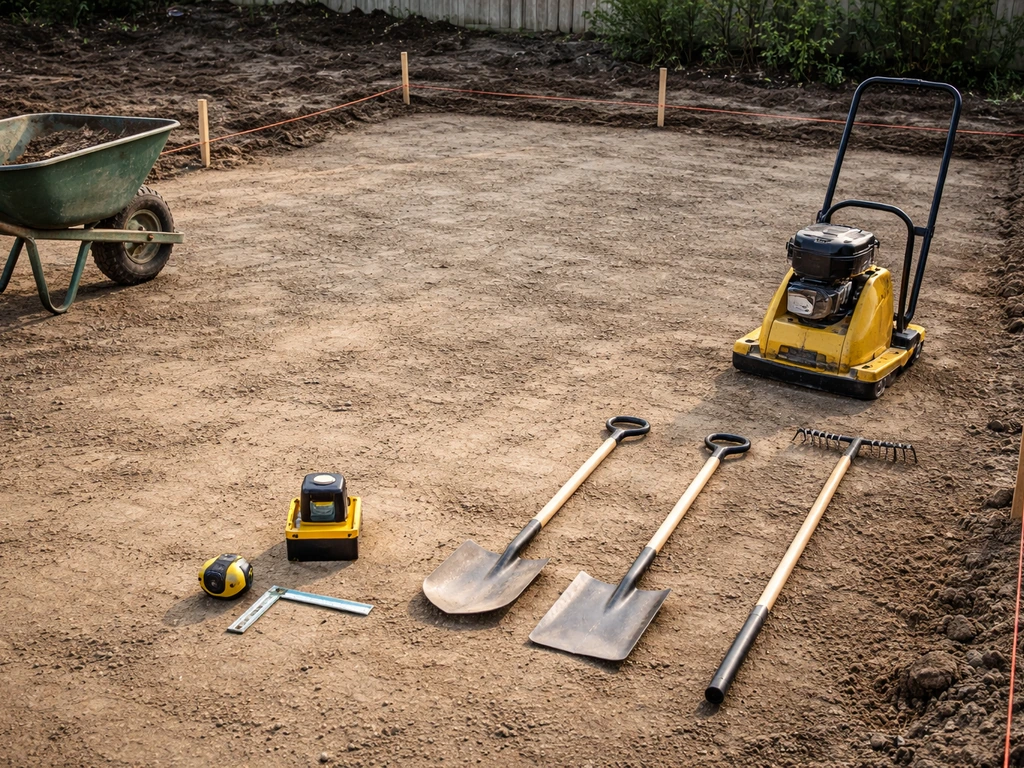
- Stakes and mason's string for layout
- Line level or laser level
- Tape measure and square
- Shovel, spade, and garden rake
- Plate compactor (rent one — don't skip this)
- Wheelbarrow
- 6 to 8 inches of crushed stone or compactable gravel base
- Coarse bedding sand (concrete sand, not play sand)
- Brick pavers of your choice
- Polymeric sand for joints
- Edge restraints and spikes
- Rubber mallet and screed rails or pipes
- Broom, hand tamper, and garden hose
Choosing brick layout, materials, and base system
Not all bricks are created equal for patio use. True clay bricks can work, but concrete pavers are the far more practical choice for most DIY projects. They're designed specifically for paving, come in consistent sizes, have a chamfered (slightly beveled) edge that leaves a uniform joint gap, and are available in a huge range of colors and textures that mimic traditional brick. If you want the look of classic red brick, simply choose a concrete paver in a brick-red tone and a running bond pattern.
For the pattern itself, a running bond (offset rows, like a classic brick wall laid flat) is the most forgiving for beginners and one of the strongest structural layouts because the joints don't line up. Herringbone at 45 or 90 degrees is slightly more complex to cut but incredibly stable and looks stunning. Basketweave is easy to lay but requires more precise cutting at the edges. Whatever pattern you choose, dry-lay a small section first to check the visual result and work out your cutting needs before you start the real installation.
| Pattern | Difficulty | Structural Strength | Best For |
|---|---|---|---|
| Running Bond | Easy | Very Good | First-time DIYers, larger areas |
| Herringbone (90°) | Moderate | Excellent | High-traffic patios, traditional look |
| Herringbone (45°) | Moderate-Hard | Excellent | Decorative, premium finish |
| Basketweave | Easy-Moderate | Good | Smaller patios, traditional style |
| Stack Bond | Easy | Fair | Decorative only, avoid for main field |
For the base system, most residential patios use a dry-set method: compacted gravel base, sand setting bed, pavers on top. This is what you'll follow in this guide. If you want step-by-step detail, this section covers how to install patio bricks from start to finish This is what you'll follow in this guide.. It handles freeze-thaw cycles better than a mortared slab and allows individual bricks to be lifted and re-leveled if needed. Mortar-set installations exist and are explored in more detail in related guides covering how to build a patio with bricks and cement, but for a standard ground-level deck-style patio, dry-set is the smart choice.
Building a stable deck-style subframe vs a traditional patio base
Here's where the term 'patio deck with bricks' needs some unpacking, because it can mean two different things. The first is a traditional ground-level brick patio, which sits directly on a prepared gravel and sand base. If you are specifically trying to build brick columns for a patio, the same careful planning and base preparation will help everything stay level and solid over time traditional ground-level brick patio. The second is an elevated deck-style structure where a subframe of posts and joists is built first, and brick pavers are then laid on top of that frame. The right choice depends entirely on your yard.
Ground-level brick patio (the most common approach)
If your yard is relatively flat or has only a gentle slope, a ground-level patio built directly on a gravel and sand base is the standard, practical method. This is what 90% of DIY brick patios are. It's structurally sound, easier to build, cheaper in materials, and long-lasting when the base is done right. The entire guide from excavation onward applies to this type.
Elevated deck-style subframe with brick pavers
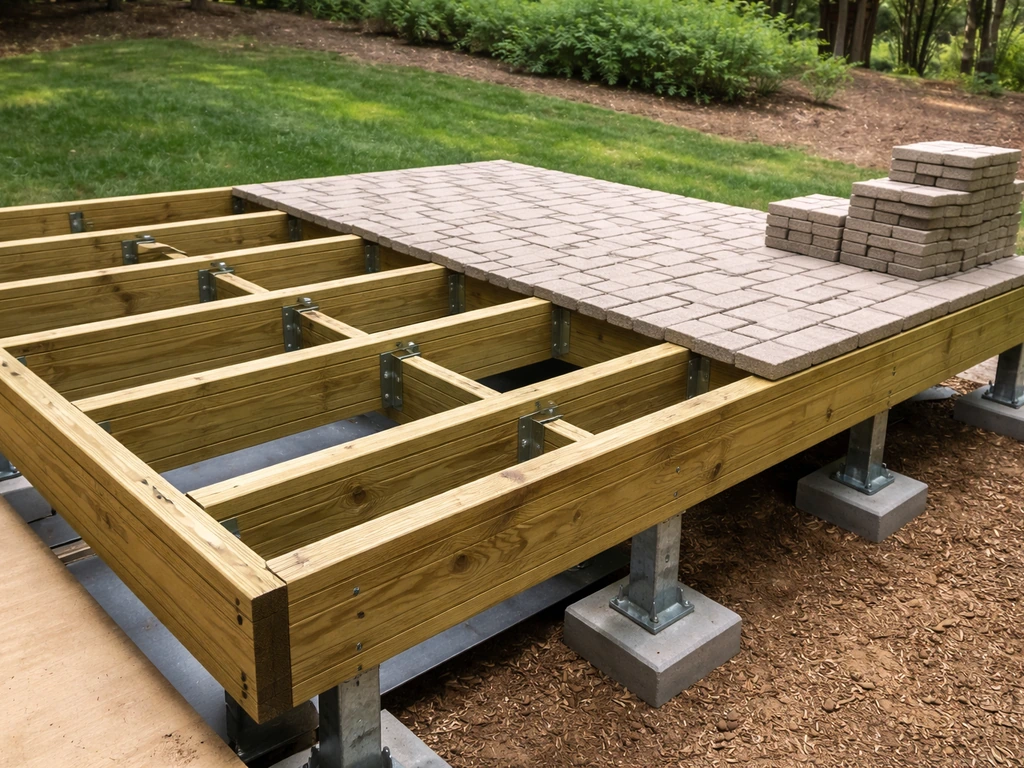
If your yard drops sharply away from the house, or you want a platform raised more than about 8 to 12 inches above grade, a structural subframe becomes necessary. This involves setting concrete footings below the frost line, installing posts, building a frame of pressure-treated joists, and then using a product like a pedestal paver system or a deck surface designed to support pavers.
Standard brick pavers are quite heavy (often 10 to 15 lbs each), so the frame must be engineered to handle the load. This is not a beginner project. If you need an elevated platform more than a foot off the ground with brick, consider consulting a structural engineer or a professional contractor for the subframe portion, then handling the brick-laying yourself once the frame is approved.
For most homeowners reading this guide, you're building a ground-level patio with a deck-like aesthetic, meaning a clean, level, defined surface that looks finished and intentional. That's exactly what the steps below will give you.
Excavation, drainage, grading, and leveling
This section is where the real work happens, and where the long-term success of your patio is decided. I can't stress this enough: a beautiful brick surface on top of a weak, poorly drained base will fail within a few years. Take your time here.
How deep to dig
Calculate your excavation depth by adding up all your layers from the bottom: 6 to 8 inches of compacted gravel base, plus 1 inch of sand setting bed, plus the thickness of your paver (typically 2.375 inches for a standard concrete paver). That puts you at roughly 9.5 to 11.5 inches of total excavation. Round up to be safe. Mark the depth on your stakes so you can gauge as you dig. Remove all grass, roots, and organic material completely. Organic matter compresses and rots over time, which causes sinking.
Slope and drainage
As you excavate, you're not digging flat. You need to build in a drainage slope away from the house. The standard recommendation is 1/4 inch of drop for every 1 foot of distance. So a 10-foot-wide patio should drop 2.5 inches from the edge nearest the house to the outer edge. Some sources cite 1/8 inch per foot as the minimum, but 1/4 inch per foot is the safer target and gives better drainage on lower-slope days. Use your string lines with a line level to establish this slope before you dig, and maintain it through every layer you install. The slope goes into the subgrade (the native soil), not just the surface layer.
On clay soil, drainage is a particular challenge because clay doesn't let water pass through easily. In clay conditions, consider adding a layer of geotextile fabric between your native soil and your gravel base. This fabric prevents the clay from migrating up into your gravel (a process called pumping or base contamination) while still allowing water to move through. It extends the life of your base significantly.
Compacting the base
Once you've excavated to your target depth with the slope built in, compact the native soil with a plate compactor. Then add your crushed gravel base in layers of no more than 4 inches at a time, compacting each layer before adding the next. Never dump all 6 to 8 inches in at once and compact it at the end. Layered compaction builds a much more stable base.
The goal is to reach at least 98% of modified Proctor density, which is a technical way of saying the gravel is packed as tightly as it reasonably can be. A properly rented plate compactor with multiple passes will get you there. Make a few passes in perpendicular directions across each layer for even compaction.
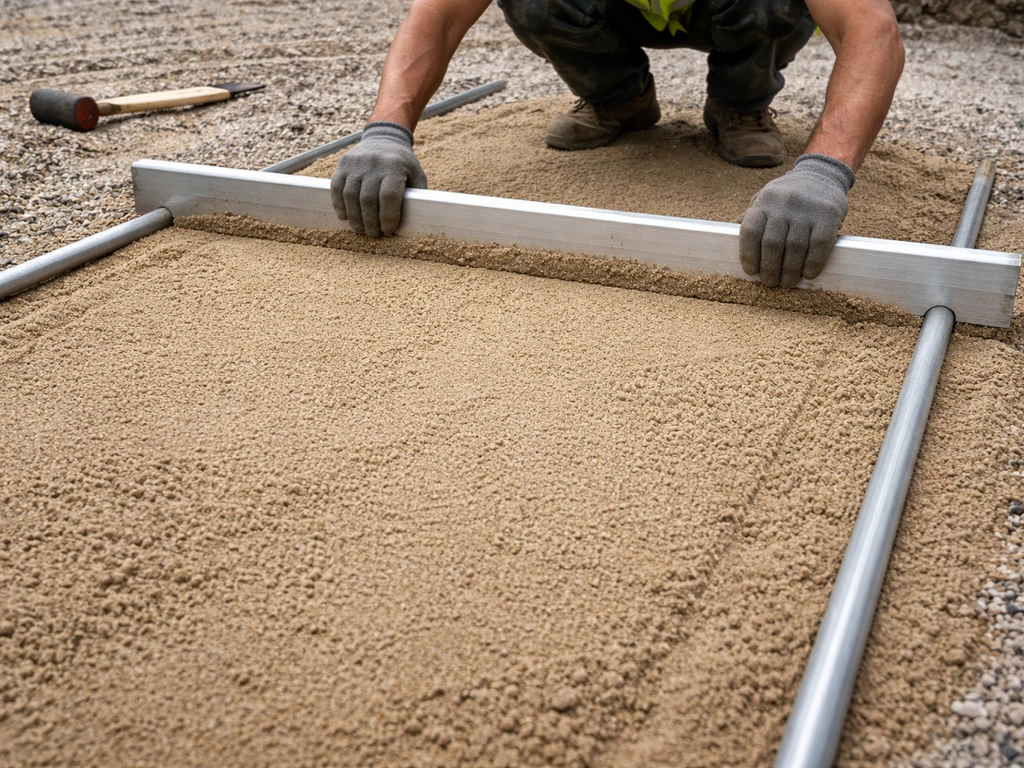
Setting the sand bed
Once your compacted gravel base is done, add your 1-inch sand setting bed using coarse concrete sand. Use screed rails or steel pipes as guides to pull a straight board across the sand to create a perfectly flat, 1-inch-deep layer. Do not walk on the screeded sand before laying bricks. The sand bed should maintain your drainage slope, so set your screed rails with that slope factored in. Do not use fine play sand or mason's sand for this layer. Coarse concrete sand drains better and compacts more firmly under the pavers.
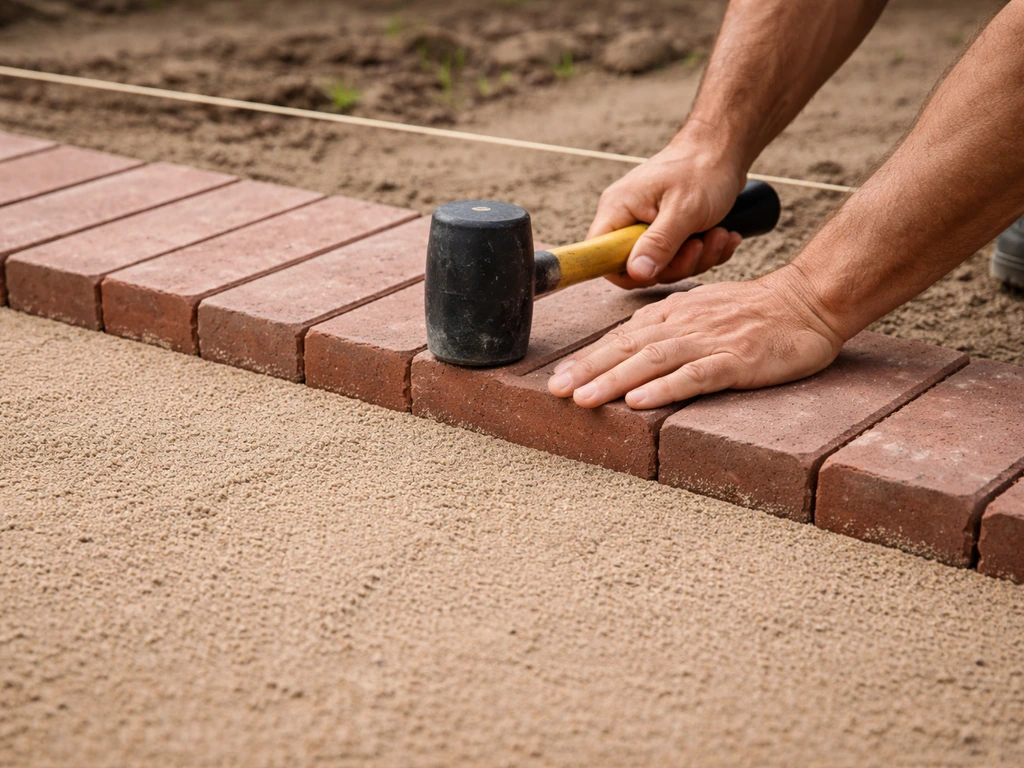
Installing the brick pavers
With your sand bed screeded and ready, it's time for the satisfying part. Start laying bricks from a fixed straight edge, typically along the house wall or a marked string line. Work outward from that reference point so any cut pieces end up at the far edges where they're less visible. Never kneel or walk directly on the screeded sand. Use a piece of plywood to kneel on as you work forward.
Dry-set method (recommended for most patios)
Place each paver firmly onto the sand, pressing it down gently and giving it a slight back-and-forth wiggle to seat it. Use a rubber mallet to tap each brick down level. Continuously check your slope and level with a long straightedge or level as you go. Small height differences between adjacent pavers can be adjusted by adding or removing a tiny amount of sand beneath them. Aim to keep the gap between pavers consistent at between 1/8 inch and 1/2 inch. Many concrete pavers have built-in spacer nibs that maintain this gap automatically.
Mortar-set option
Mortar-setting bricks on a concrete slab base creates a more permanently fixed surface and is a good option for areas with less freeze-thaw movement or for vertical surfaces like steps. It requires more skill to keep everything level and doesn't allow for easy future repairs. If your project involves mortared bricks, the process is covered in more depth in guides focused specifically on how to build a patio with bricks and cement.
Cutting bricks for edges and corners
You'll almost certainly need to cut some bricks for the perimeter. A diamond-blade wet saw gives the cleanest cuts and is worth renting for a full patio project. A circular saw with a diamond blade works too but creates more dust. Score-and-snap with a brick splitter is fast and works for straight cuts on pavers. Always wear eye protection and a dust mask when cutting.
Finishing details: edging, joints, sealing, and maintenance
Install edge restraints first
Edge restraints are what keeps your patio from slowly spreading outward over time. They go in before you fill the joints. Use plastic or aluminum paver edging spiked into the gravel base with 10-inch spikes every 12 inches. The restraints should sit tight against the outside edge of your border bricks and be blank" rel="noopener noreferrer">driven into the compacted gravel base, not just into the sand. On curves, use flexible edging that bends to your shape. This step is non-negotiable: without edge restraints, your outer bricks will slowly migrate and your joints will widen.
Filling the joints with polymeric sand
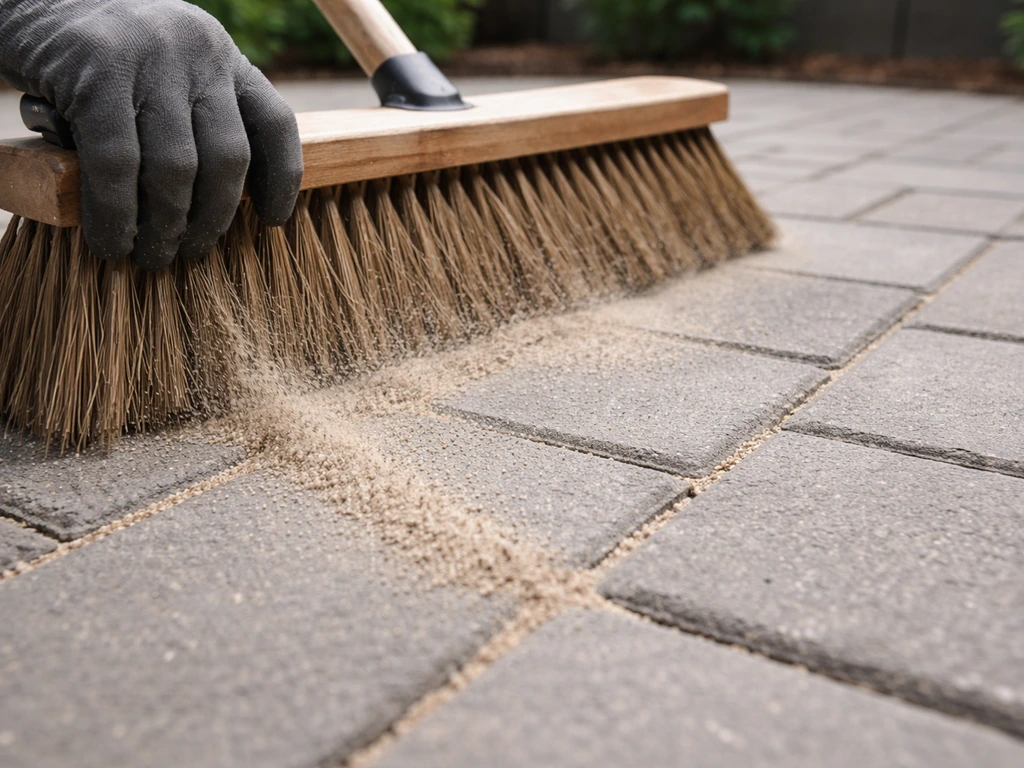
Once all bricks are set and edge restraints are installed, sweep polymeric sand into the joints. Polymeric sand contains binding agents that harden when activated with water, locking the bricks together and resisting weed growth and ant infestation. Spread the sand across the surface and sweep it diagonally with a stiff broom to work it into the joints.
Make a few passes, then run the plate compactor over the entire surface (with a rubber pad on the plate to protect the bricks) to vibrate the sand deeper into the joints. Add more sand as needed, sweep again, and repeat until joints are consistently filled to about 1/8 inch below the top of the pavers or just below the chamfer line on beveled edges.
Only do this step when the surface is completely dry and you have at least 24 hours of dry weather forecast. Activating polymeric sand in humid or damp conditions causes it to clump on the surface rather than curing properly in the joints. Once you're confident the joints are filled and the surface is dry, mist the entire patio gently with a garden hose to activate the polymers. Work in sections and avoid puddling.
Sealing the patio
Sealing is optional but recommended for longevity and stain resistance. Here's the catch that many guides skip over: don't seal too soon. New pavers naturally release a white powdery residue called efflorescence as the minerals inside them cure and leach to the surface. If you seal over efflorescence, you trap it under the sealer and get a permanent hazy film on your patio. Wait a minimum of 3 months after installation before sealing, and make sure any efflorescence is completely gone first. Clean the surface with an appropriate paver cleaner, let it dry fully, then apply a penetrating or film-forming sealer with a roller or pump sprayer.
Ongoing maintenance
- Sweep regularly to prevent debris buildup in joints
- Re-apply polymeric sand to any joints that erode after heavy rain
- Inspect edge restraints annually and re-spike any that have lifted
- Reseeal every 3 to 5 years depending on sun exposure and traffic
- Address any sunken or rocking bricks immediately: lift, add or remove sand, reset
- Use a plastic or rubber-edged snow shovel in winter to avoid scratching the surface
- Avoid harsh chemical de-icers that can degrade paver surfaces; use sand for traction instead
Common mistakes and troubleshooting by site condition
Even well-intentioned DIY projects run into problems. Here are the most common ones and how to fix them or avoid them entirely.
The base wasn't deep enough or compacted properly
This is the number one cause of patio failure. If bricks start rocking, sinking, or developing low spots within a year or two, a weak base is almost always the culprit. The fix is unfortunately labor-intensive: you need to pull up the affected bricks, dig out and replace the base material, compact in layers, re-screed the sand, and relay the bricks. There's no shortcut. If you're seeing widespread sinking across a large area, the entire base may need to be rebuilt.
Poor drainage and water pooling
If water ponds on your patio after rain, your slope is insufficient or running the wrong direction. You can sometimes fix minor pooling by carefully lifting a section of bricks and re-grading the sand bed with more slope built in. If the problem is larger, the issue is in the gravel base grade itself, which means a more significant repair. Prevent this by constantly checking your slope with a level during excavation and base installation.
Clay soil conditions
Clay soil expands when wet and contracts when dry, which puts constant pressure on your base. In clay conditions, use a geotextile fabric between the native soil and your gravel base to prevent clay migration. Also make sure your drainage slope is at the higher end (closer to 1/4 inch per foot) to get water off the surface and away from the clay as quickly as possible. Some DIYers in heavy clay areas add an extra inch or two to their gravel base depth as added insurance.
Sloped ground
A sloped yard doesn't mean you can't have a level patio. It means you have more excavation work on the high side and potentially some retaining on the low side. Dig deeper on the uphill edge and use a retaining border or landscape blocks to hold the lower edge. Keep checking your level throughout the process. If the slope is severe (more than 12 to 18 inches of drop across the patio area), the elevated subframe approach mentioned earlier may actually be the more practical solution.
Building next to or over existing concrete
Existing concrete that's in good condition can actually serve as a base for dry-set pavers in some cases, with a sand setting bed laid directly on the concrete. The challenge is that the transition between brick and existing concrete can be tricky to make look clean and watertight. If the existing slab is cracked, heaved, or has drainage issues, laying bricks over it will eventually reproduce those same problems in your new surface. Removal is often the better long-term choice, even if it's more work upfront.
Shifting or lifting bricks along the edges
If bricks at the perimeter start shifting or popping up, your edge restraints have failed or were never properly installed. Check that the spikes are driven all the way through the restraint flange into the gravel base (not just into the sand or soft soil). Replace any cracked or bent restraints and add additional spikes. This is an easy repair as long as you catch it before the movement spreads inward.
Wrong sand in the joints
Using regular sand instead of polymeric sand in the joints means weeds will grow through within one season and ants will excavate the joints from below. If this has already happened, the fix is to clear the joints with a pressure washer or joint-clearing tool, let everything dry completely, and refill with proper polymeric sand. It's a good afternoon's work but very doable.
If you're planning to add steps down from the patio to the yard, or want to incorporate a fire pit into the finished space, those are natural next steps once the main surface is done and settled. Getting the flat patio base right first gives you the stable foundation that everything else connects to, so resist the urge to rush ahead and enjoy the process of building something that genuinely lasts.
FAQ
What joint width should I aim for, and how do I keep it consistent across the whole patio?
Use the joint system that matches your pavers (built-in spacer nibs if they exist). For a target joint width of about 1/8 to 1/2 inch, the simplest way to stay consistent is to dry-lay a short run and adjust the paver spacing before you start the full install, so your perimeter cuts end up similar on both sides.
Can I use polymeric sand on a patio that I expect to get frequent foot traffic and moving furniture?
Polymeric sand can still be used, but don’t compact it like a base. After sweeping it in, vibrate only once with a plate compactor that has a rubber pad, then add more sand if needed. Avoid repeated heavy passes, which can drive sand out of joints and create gaps.
If my yard slopes, can I make a portion of the patio surface perfectly level without ruining drainage?
Yes, but only after you confirm there is no rocking or soft spots. If you want a level seating area on a sloped patio, build the patio base with the correct overall drainage slope, then create the level zone using small sand adjustments and lots of straightedge checks. Don’t remove gravel to chase level, that undermines the base.
Why does the guide recommend coarse concrete sand instead of play sand for the setting bed?
No. Fine play or masonry sand tends to wash and move more than coarse concrete sand, which can loosen pavers and reduce locking over time. Keep the sand setting bed around 1 inch deep, and screed it with the drainage slope built in.
What should I do if I notice uneven pavers while laying them, before I fill joints?
If you see a few high or low bricks, fix it immediately before joints are filled. Lift the affected pavers, adjust the sand beneath them in thin increments, then re-seat and re-check slope. Once polymeric sand and compaction are done, changes are much harder and can disturb neighboring joints.
How can I tell when it is truly time to seal, beyond just waiting three months?
Don’t seal until efflorescence is fully gone and the pavers have dried out after weather exposure. A practical check is to sprinkle water on the surface, if it beads quickly without a white haze spreading, you can usually move forward. If the surface still shows powdery residue, wait.
What if buried utilities or irrigation lines are in the area I marked for the patio?
If utilities run through the area, you may need to redesign the layout or use a different access route for plumbing and electrical. Calling 811 is essential, but also confirm how deep lines are, because excavation depth and bedding layers could intersect them. If you’re unsure, hire a locator service.
Where exactly do I need edge restraints, perimeter only or also along internal borders?
For regular concrete paver patios, edge restraints should be installed at the perimeter and any internal borders you expect to contain movement (like changes in pattern or areas around a fire pit base). If you create an open border and rely only on sand, the outer rows are more likely to spread.
How do I handle transitions from my brick patio to existing concrete or to lawn?
Yes, but plan transitions before you build the base. Where bricks meet lawn or concrete, you still need a solid, restrained edge and a compatible drainage path. If you attach the patio to existing concrete, keep the joint system tight and avoid trapping water at the seam, which can lead to undermining.
What is the correct fix if part of the patio starts sinking or rocking after a year?
If a section is sinking, don’t just add sand on top. You typically have to lift bricks, remove and replace the compromised gravel, compact it in layers, re-screed the sand, and relay. Adding sand without rebuilding the base can temporarily hide the issue while the voids return.
How should I plan brick cutting so the pattern looks good at the perimeter?
For cuts, wet saws produce the cleanest edges, but the real decision is how you’ll hide them. Start your full rows from your most visible reference edge (often along the house), then put most cuts on the least visible perimeter. For angled corners, dry-lay the pattern first to determine which bricks need trimming and which can be rotated.