To flatten ground for a patio, you excavate down to a consistent depth below your finished surface level, remove all soft material and topsoil, lay and compact a firm sub-base in layers, then screed a bedding layer to a precise, even plane. The whole process is about building a stable, level foundation from the bottom up, not trying to fix lumps at the last minute when you're placing slabs. Get the base right and the surface practically looks after itself.
How to Flatten Ground for a Patio Step by Step

Clara Farrell
27 Jun 2026
Check the site first and decide your target height
Before you touch a spade, walk the area and figure out what you're dealing with. Is the ground fairly flat already or does it slope dramatically toward the house? Are there any low spots that collect puddles? Is the soil clay-heavy, sandy, or loose fill? All of this changes how much work you're in for. Probe the ground with a steel rod or screwdriver in several places. If it sinks more than a few inches without much effort, you likely have soft spots that need extra excavation and base depth.
Your target height is the finished surface level of your patio. Work backwards from there. If the patio is against the house, the finished surface needs to sit at least 150 mm (6 inches) below the damp proof course, and it must slope away from the building. blank" rel="noopener noreferrer">The standard minimum fall is 1:80, which works out to about 12.5 mm per metre, or roughly 15 mm every 1.5 metres as a practical rule of thumb. blank" rel="noopener noreferrer">In the US, the guidance is at least 1/4 inch of drop per foot of run, for a minimum of 10 feet out from the structure. Either way, the point is simple: water must run away from your house, not toward it.
Sketch your patio dimensions on paper and mark the high point (usually the house end or the highest existing corner) and the low point (the far edge). Calculate the total drop needed. For a 4-metre-deep patio at 1:80, you need 50 mm of fall across the depth. That number becomes the difference in height between your string lines at each end, which you'll set up in the next step.
Tools and layout: marking levels with string lines and stakes
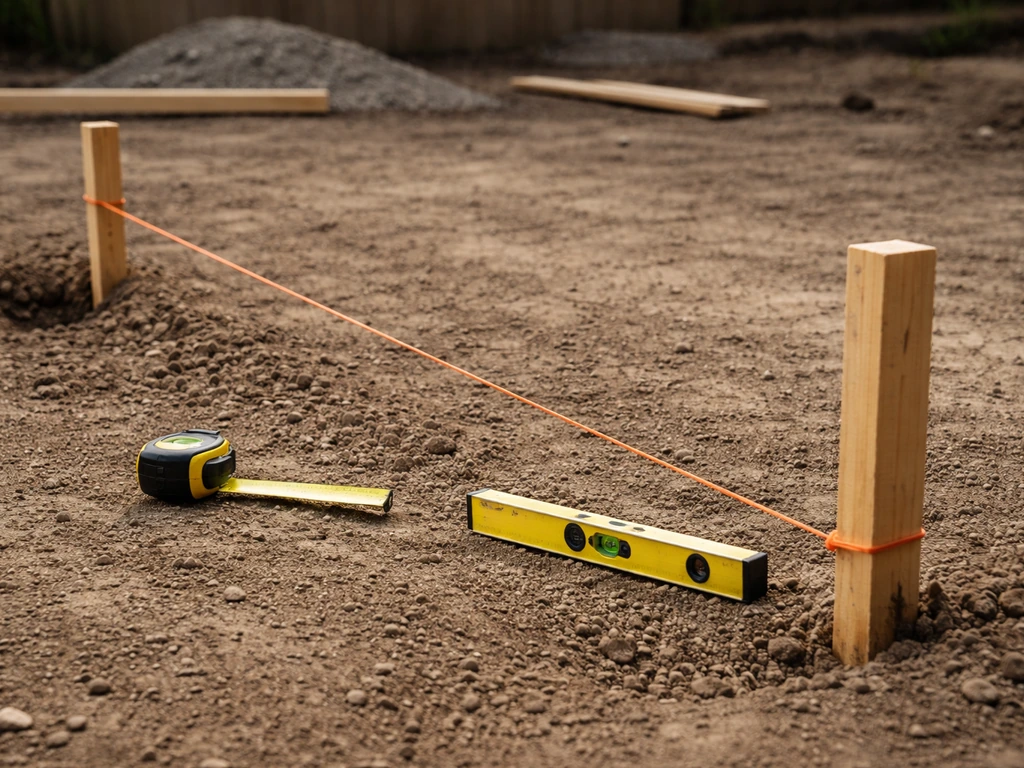
You don't need expensive equipment to do this accurately. A string line, some timber stakes, a line level or spirit level, and a tape measure will get you there. A laser level makes things faster, but it's not essential for a typical garden patio.
Drive stakes at each corner of your patio area. Tie string lines around the stakes at your finished surface height, checking they're level across the width (the dimension parallel to the house). Then adjust the string at the far edge downward by the amount of fall you calculated. Double-check with a spirit level held against the string: you should see a slight but deliberate tilt, not perfectly flat. Mark the stake heights in pencil so you can re-tie the strings if they get knocked. These string lines become your constant reference point throughout the entire job, so take time to get them right.
- Timber or steel stakes (at least one per corner, plus intermediates for large areas)
- String line and line level, or a laser level
- Tape measure and pencil
- Spirit level (1.2 m or longer is more accurate)
- Straight timber batten or aluminium straight-edge (at least 1.8 m long)
Excavation and ground prep: getting down to solid ground
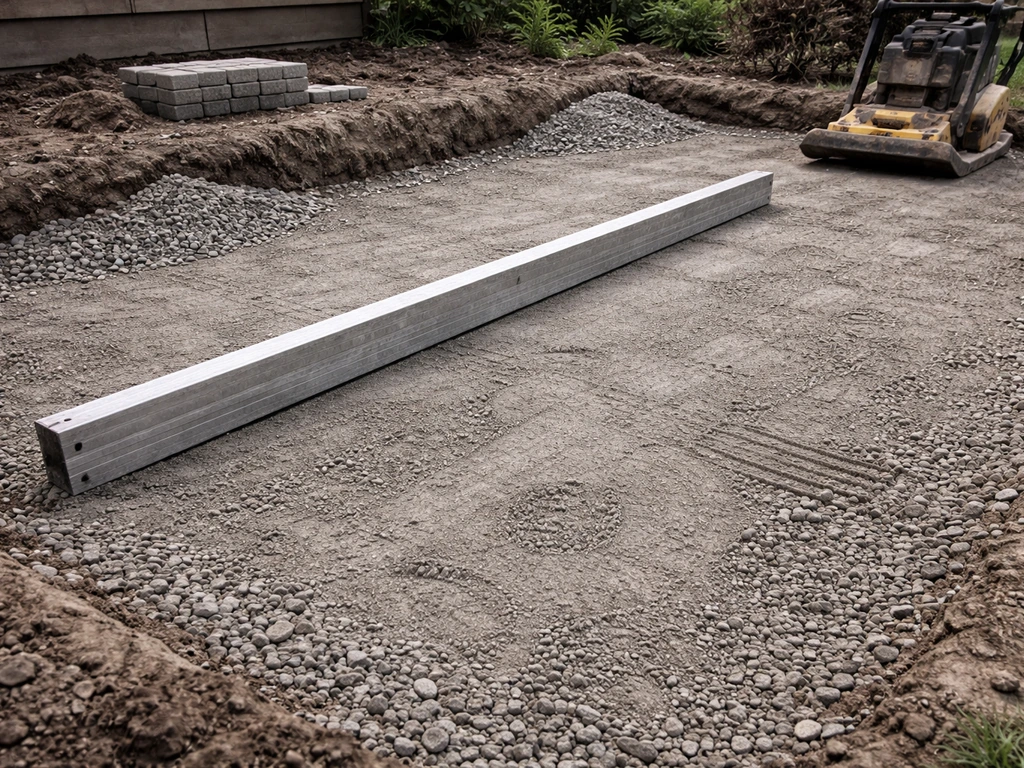
This is where the real work starts. Topsoil is organic, it compresses and rots, and it has no place under a patio. You need to remove it entirely. For most patios with paving slabs or pavers, you're excavating to a total depth of around 200 to 250 mm below your finished surface level. In many cases, you still need a firm hardcore layer and proper grading, even if you aim to reduce or skip a traditional sub-base. That accounts for roughly 100 to 150 mm of compacted sub-base, a 25 to 50 mm bedding layer, and the thickness of your slabs or pavers (usually 35 to 50 mm for standard paving slabs).
If you're removing an existing lawn, strip the turf first and stack it grass-side down somewhere to compost. How to prepare ground for a patio: check site conditions, excavate to stable material, rake and compact the subgrade, then build a firm base with the right depth and drainage slope ground prep. Then excavate to your target depth, checking regularly against your string lines with a tape measure.
If you hit soft or very loose soil below the topsoil layer, keep digging. Compacting over soft ground is a waste of time. The base of your excavation should feel firm underfoot and resist a probing rod. If you're digging up an existing surface like old concrete or compacted gravel, assess whether it's stable.
Sometimes you can leave a sound concrete base in place and build on it, but if it's cracked and heaving, it has to come out.
Once excavated, rake the subgrade as flat and consistent as possible. Any high spots will transfer upward through your layers and show up in your finished surface. Any low spots will create uneven compaction. You don't need perfection, but aim for a reasonably even floor before you start building up the base.
Building the base for flatness: sub-base, geotextile, and depth
A solid sub-base is the single biggest factor in how flat and stable your patio stays over time. The industry standard material is crushed angular stone, often called MOT Type 1, road base, or compactable gravel depending on where you are. Avoid rounded pea gravel or soft limestone. Angular aggregate locks together under compaction in a way that rounded stone never does.
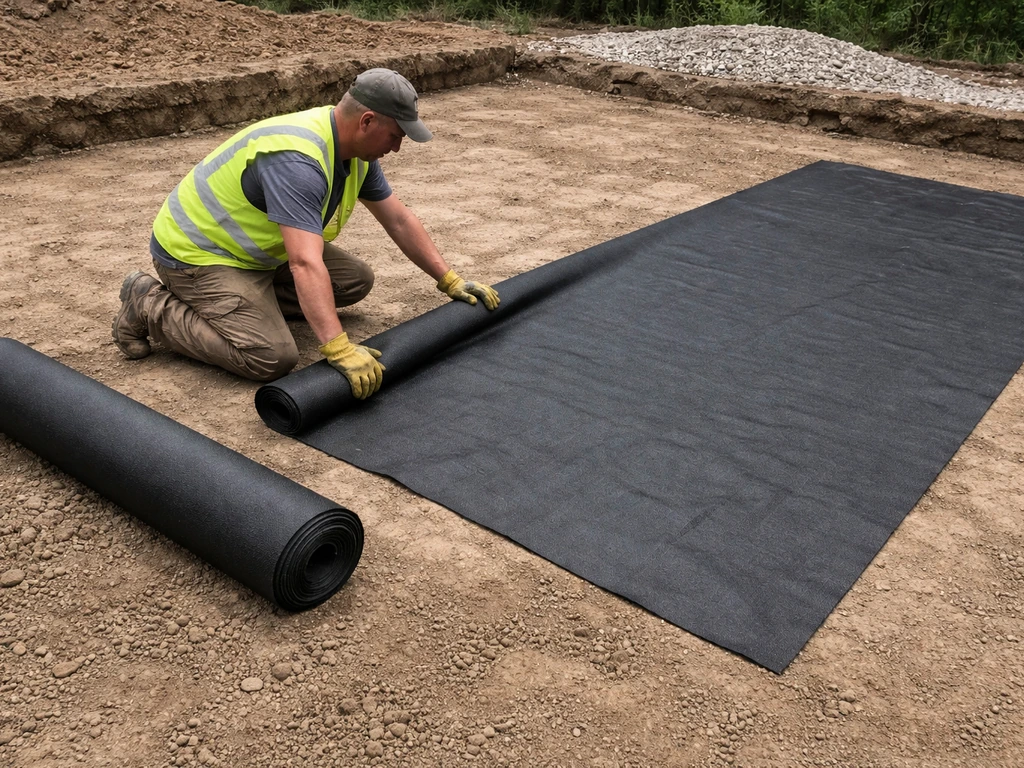
Before laying the sub-base, consider a geotextile membrane. This is a fabric layer placed on the excavated subgrade before you pour in aggregate. It stops the sub-base mixing with the soil below, prevents weed roots pushing up through gaps, and helps distribute load evenly. It costs very little and takes five minutes to lay. Overlap any joins by at least 300 mm and run it up the sides of the excavation slightly.
Lay the sub-base in layers of no more than 75 to 100 mm at a time and compact each layer before adding the next. This is important. Dumping 150 mm in and running a plate compactor over it once will not produce the same result as two properly compacted 75 mm lifts. Each layer compacts down by roughly 10 to 20 percent, so your 100 mm loose layer will finish around 80 to 90 mm after compaction. Aim for a total compacted sub-base depth of around 100 mm for pedestrian patios, or up to 150 mm if you have any concern about ground stability.
Typical patio build-up layers (bottom to top)
| Layer | Material | Compacted Depth |
|---|---|---|
| Subgrade | Native soil (excavated and trimmed) | N/A |
| Geotextile | Woven or non-woven landscape fabric | Negligible |
| Sub-base | MOT Type 1 / compactable road base | 100–150 mm |
| Bedding | Sharp sand or dry mortar mix | 25–50 mm |
| Surface | Paving slabs or concrete pavers | 35–50 mm typical |
Leveling and compacting: screeding and checking flatness
After your sub-base is compacted, check the surface against your string lines. This is when you find out how well the excavation and compaction went. Run a long straight-edge or timber batten across the surface in multiple directions. Any gaps larger than about 10 mm under the batten need to be filled and recompacted. High spots need to be excavated out, not just compacted down further, since you can't compact a high point away without removing material.
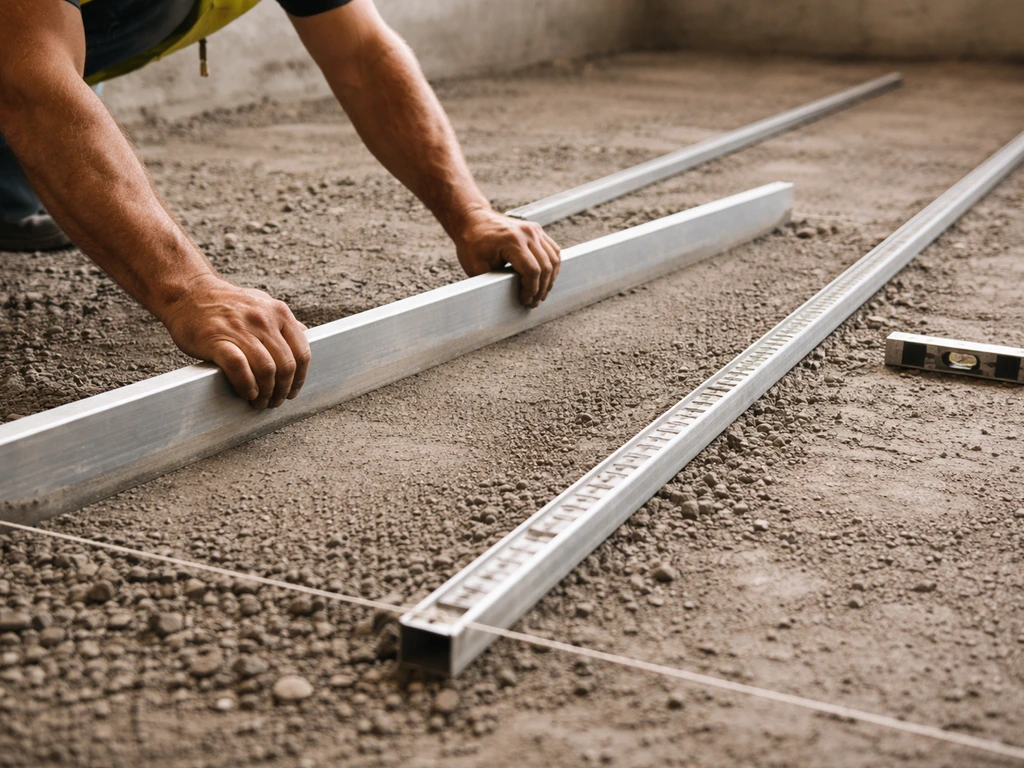
To screed the sub-base surface accurately, use screed rails. These are lengths of steel conduit, timber, or metal angle laid parallel across the area at your target surface level. Set them to the correct height using your string lines and pack sub-base material under them until they sit dead on your reference level (including your drainage fall). Then pull a straight-edge board along the top of the two rails to level the material between them. Rotate or move the rails as you go and fill in the tracks they leave behind.
Compact again with a plate compactor after screeding. Keep the plate compactor at least 500 mm away from any edges that don't have a solid retaining border, as the vibration can collapse unsupported edges. Make several overlapping passes in different directions. When you tap the surface with a steel bar and hear a solid thud rather than a hollow or spongy sound, you're in good shape.
Bedding layer and final prep for slabs or pavers
The bedding layer is the fine-tuning step that gets your surface to true flatness for the pavers or slabs. For paving slabs in a traditional wet lay, this is a 25 to 50 mm mortar bed (typically 6:1 sand and cement, or a semi-dry mix). For concrete pavers or block paving, it's a 25 to 40 mm layer of screeded sharp sand. The bedding layer should be consistent in depth across the whole area. Varying thickness in the bedding layer is one of the most common causes of an uneven finished surface.
The base's surface elevations directly determine where each paver or slab ends up. This is worth repeating because people often try to use extra mortar under one slab to compensate for a low spot in the sub-base. That never holds long-term. Get the sub-base right, and the bedding layer becomes easy.
Screed the bedding layer using the same rail method described above, setting the rails to your final finished surface height (minus the thickness of your slabs or pavers). This means if your slabs are 40 mm thick, your screeded bedding surface should sit 40 mm below your string lines. Work in manageable sections of about 1 to 1.5 square metres at a time so the mortar or sand doesn't dry out or get disturbed before you lay onto it.
Drainage, edges, and dealing with problem ground
Drainage is where a lot of patios quietly fail. The slope you built into your string lines earlier is doing the work here, but you also need to think about where the water ends up once it leaves the patio surface. Directing it onto a lawn is usually fine. Running it toward a fence base, a wall, or a neighbour's property is not. If you have limited options for where the water can go, consider a linear drain at the low edge of the patio connected to a soakaway or drainage run.
Edge restraints matter more than people think. Without a solid border, the sub-base and bedding layer gradually migrate outward, especially with any vehicle traffic or frost. Set concrete haunching along all exposed edges, or use plastic or metal paver edge restraints pinned into the sub-base. Install these before you screed the bedding layer so they act as a fixed reference frame.
Soft spots, clay soil, and low areas

Clay soil is the most common problem I hear about. It expands when wet and contracts when dry, and that movement will crack or lift a patio over time if you don't deal with it. On a clay site, excavate a little deeper than normal (aim for 150 mm of sub-base rather than 100 mm) and use a geotextile membrane without fail. The extra depth and the fabric break the connection between the clay movement below and your base above.
Soft spots in the base of your excavation need to be dug out and replaced with compacted hardcore or Type 1 aggregate before you build up the layers. There's no shortcut here. Pouring extra sub-base over a soft spot and hoping the compactor firms it up is wishful thinking. If you keep finding soft ground no matter how deep you go, you may be dealing with a filled area, a high water table, or buried organic matter. At that point, getting a professional to assess the ground is genuinely the right call rather than guessing.
Mistakes to avoid and a quick verification checklist
Most patio failures trace back to a handful of avoidable mistakes. Skipping compaction or doing one quick pass is probably the most common. The second is not building in any drainage fall, usually because someone confuses level with flat. A flat patio still needs a slight slope to drain. Third is inadequate depth, often because people underestimate how much the sub-base compacts and end up with a finished surface lower than they wanted. Always account for compaction when you calculate your excavation depth.
Other mistakes worth calling out: laying sub-base directly on topsoil without removing it first, using the wrong aggregate (rounded pea gravel instead of angular crusher run), varying the bedding layer thickness to compensate for sub-base problems rather than fixing the sub-base itself, and skipping edge restraints on any side that doesn't have a wall or fixed border.
Verification checklist before you lay the first slab
- All topsoil and vegetation is removed. No organic material remains in the excavation.
- The subgrade is firm. A steel rod doesn't sink more than 25 mm with moderate hand pressure.
- Geotextile membrane is laid with no gaps and overlaps of at least 300 mm at joins.
- Sub-base is compacted to 100–150 mm depth in layers. Surface sounds solid when tapped with a bar.
- String lines are set with correct drainage fall (minimum 1: 80 or 1/4 inch per foot away from the house).
- Sub-base surface checked with a straight-edge: no gaps greater than 10 mm under a 1.8 m batten.
- Edge restraints are installed and secured on all open edges.
- Bedding layer is screeded to a consistent depth (25–50 mm) matching your slab or paver thickness allowance.
- Total depth from finished surface to subgrade matches the sum of your layer thicknesses.
- Water run-off direction is confirmed: water flows away from the building and to a safe outlet.
Once you can tick off every item on that list, you're genuinely ready to lay. The preparation work outlined here links closely to how you dig up the lawn beforehand, how you build and compact the sub-base layer correctly, and how you choose whether to include a sub-base at all for lighter-duty projects. But for a permanent, flat patio that stays flat for years, every step in this guide earns its place.
FAQ
Can I flatten ground for a patio by leveling on top of existing concrete or old gravel instead of excavating?
Yes, but only if the existing base is stable, uniform, and deep enough to meet your final finished height plus drainage fall. Check for cracking, heaving, pumping when walked on, or areas that rock, and don’t build over loose or organic fill. If it’s sound compacted gravel or a thick concrete slab, you may be able to keep it, but you still need to match your string-line heights and build bedding correctly.
What should I do if my string lines are correct but the sub-base still isn’t level after compaction?
If the string lines show the right fall but the surface still ends up uneven, the problem is usually in the subgrade or sub-base, not the strings. Fix it by removing the high spots (don’t try to “build up” with extra sand under one slab) and refill low areas, then re-screed or recompact. Use a long straight-edge in multiple directions before laying pavers to confirm gaps stay within about 10 mm.
How can I measure the drainage fall accurately without a laser level?
A simple reference check is to confirm the fall with your strings (not by eye), then verify with tape measurements at several points along the patio run, especially the far edge. A digital or laser level can speed this up for long runs, but you can also use a line level. The key is consistency: same reference points every time, and re-check after you make any adjustments to rails.
Do I need extra steps if I have clay soil or ground that stays wet?
For patios on clay or any site that stays damp, don’t rely on compaction alone. Clay movement can lift or crack a patio later, so excavate deeper (for example, aim for the thicker sub-base guidance) and include a geotextile membrane to reduce the connection between clay movement below and your base above. If you keep finding soft or waterlogged material, stop and get a ground assessment rather than guessing.
How do I know whether I’m compacting enough, and what happens if the material is too dry?
Compacting too lightly or skipping lifts is a common cause of future settlement, but even with correct compaction you can still fail if the moisture content is wrong. If the ground is very dry, lightly dampen the sub-base material before compacting (don’t make it muddy), then compact each lift and re-check with a bar or rod for a solid thud. Avoid letting finished layers sit loose for long periods.
Is it okay to fix a low spot by using more mortar or sand under one slab?
If you’re using pavers or slabs, the jointing and bedding system matters. A thicker bedding layer can mask sub-base errors temporarily, but varying thickness is a major cause of rocking and uneven surfaces later. For most installations, keep bedding depth consistent and true by screeding to rails, then only adjust for required slab thickness, not to correct low areas in the base.
Can I make the patio perfectly level as long as it looks flat?
Not really. A flat patio can still drain, but it needs a deliberate slope overall, otherwise water ponds at seams and edges. Use your target fall and set your rails and string lines accordingly. Also confirm where water will go after it leaves the patio, since draining onto the wrong boundary can create recurring damp issues.
Do I really need edge restraints if I’m laying slabs on a good sub-base?
Edge restraints are mainly about preventing lateral movement. If you have no wall or fixed border, install haunching or pinned edge restraints before you screed the bedding so the base can’t spread outward under frost and load. Without that fixed frame, you can get creeping edges, gaps, and unevenness even when the field area was compacted well.
How far should the geotextile go, and can it help with weeds?
Yes, especially where trees, shrubs, or soil disturbances are close by. Run the geotextile up the sides of the excavation slightly and overlap seams properly, so weed roots can’t find their way into the layers. If roots are already embedded, remove them and keep the fabric installation neat where it meets existing soil or the boundary.
What’s the best way to avoid uneven bedding thickness when working in sections?
Use the string lines as your height control, then screed in manageable sections so bedding doesn’t dry out or get disturbed before you place units. If the bedding starts firming up, remix or remove and replace rather than trying to “patch” over partially set material. The goal is consistent depth across the whole section, not local feathering.
What should I do if I hit soft ground repeatedly after digging to the target depth?
If you keep uncovering soft spots, buried organic matter, or filled ground, stop treating it as a simple leveling job. The right fix is removal to stable material and replacement with properly compacted aggregate, and sometimes deeper replacement. If soft ground persists after digging deeper, that’s a signal for a professional to check for a high water table or unstable ground conditions.