To prepare ground for patio slabs correctly, you need to excavate to the right total depth (slab thickness plus a 30–40mm mortar bed plus at least 100mm of compacted MOT Type 1 sub-base), compact each layer properly, set a drainage fall of around 1:60 (roughly 16mm drop per metre), and finish with a screeded bedding layer before a single slab goes down. Get those steps right and your patio will stay solid for years. Skip or rush any of them and you'll be lifting slabs within a couple of summers.
How to Prepare Ground for Patio Slabs Step by Step

Clara Farrell
25 Jun 2026
Start with a proper site assessment
Before you dig a single spadeful, spend an hour understanding what you're working with. Walk the area after rainfall and look for puddles or boggy patches. Poke a spike or screwdriver into the ground to get a sense of how soft the soil is beneath the surface. These things tell you a lot about how much extra work the base layer will need to do.
Check what soil type you're dealing with. Clay soil drains poorly and swells when wet, which makes it one of the trickier subgrades to work with. Sandy or gravelly soil drains well and compacts more predictably. Topsoil, no matter what type, is always removed completely. It's organic, it compresses, and it will cause your patio to sink.
Now figure out your levels and drainage fall. UK guidance targets a fall of approximately 1:60 for smooth slabs (about 16mm drop per metre run) and 1:80 for textured slabs (around 12.5mm per metre). The patio must always slope away from the house. To calculate the total height difference you need, just multiply the fall ratio by the length of the sloping side. So a 3-metre patio at 1:60 needs a total drop of 50mm from house to outer edge. Mark this out on a string line before you go any further.
If your house has a damp proof course (DPC), check its height before setting your target finished paving level. The finished patio surface should sit at least 150mm below the DPC. This isn't optional. Paving that sits too high can bridge the DPC and cause damp problems inside the house, so factor this in before you commit to any levels.
Finally, mark out the full patio outline with pegs and string line. This gives you a working boundary to excavate to, and it's also where you'll check for underground services. In the UK, call the National One Call service (08000 231 251) or use a plan request service like PlanToDig before any digging starts. Gas pipes, electric cables, and water mains can all run through garden areas, and hitting one is a situation you really don't want.
Tools, materials, and a word on permits
Most DIY patio jobs don't need planning permission, but it's worth confirming this with your local council, especially if you're close to a boundary or drainage is directed to a road. Now here's the kit list you'll realistically need:
- Spade and mattock for excavation
- Wheelbarrow for spoil removal
- Plate compactor (hire one, don't skip it)
- Long spirit level and a straight timber batten
- String line and pegs
- Tape measure
- Rubber mallet
- Screeding board or length of timber
- Angle grinder with diamond blade (for cutting slabs to fit)
- Safety glasses, gloves, steel-toed boots, and knee pads
For materials, you'll need MOT Type 1 crushed stone for the sub-base, sharp sand and cement for the mortar bedding layer, and the slabs themselves. If your soil is clay or particularly soft, add a roll of geotextile membrane to the list. When estimating MOT Type 1, remember it compacts by roughly 10–15%, so order loose material at a slightly greater depth than your target compacted thickness. For example, to hit 100mm compacted, you may need to lay around 115mm loose before compacting.
Excavation: dig it right or redo it later
This is where a lot of DIY patios go wrong before they've even started. If you need to dig up lawn for a patio, strip off the turf to bare ground, then excavate to your full sub-base depth and clear the area properly before building the layers How to dig up lawn for patio. People underestimate how deep to dig, leave organic material in, or don't clear the full area. Here's how to get it right.
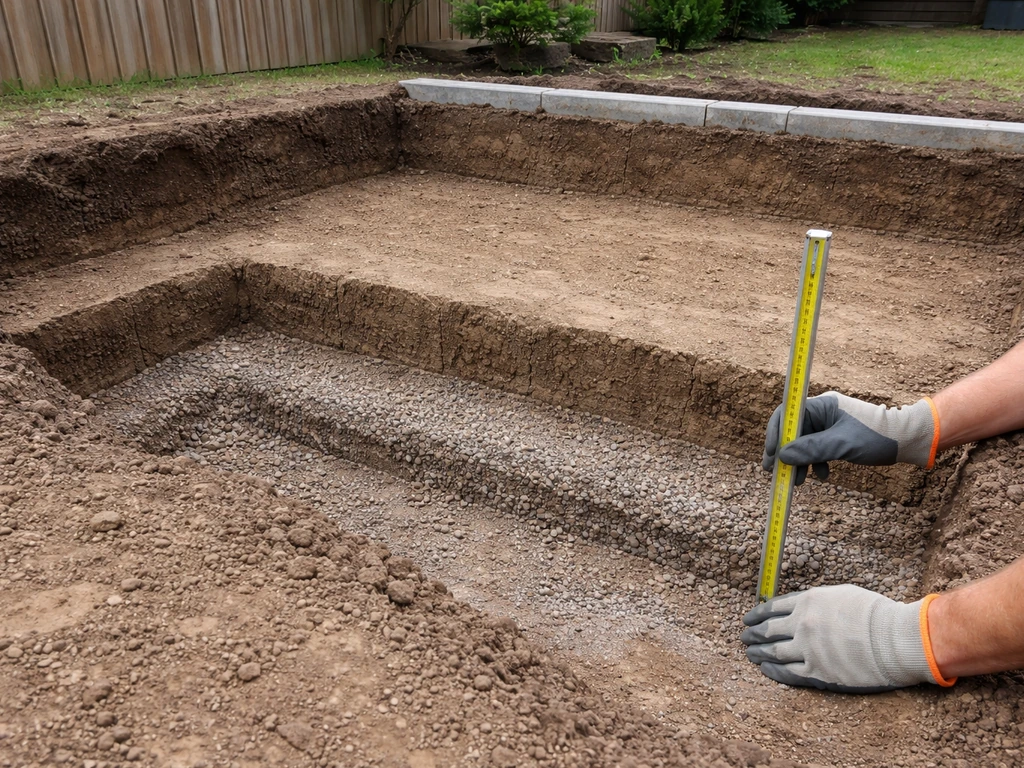
Work out your total excavation depth by adding up all the layers: slab thickness (typically 38–50mm for standard paving slabs) plus 30–40mm for the mortar bed plus 100mm for compacted MOT Type 1. For most domestic patios with standard 50mm slabs, that puts you at around 190mm total dig depth from finished paving level. Add the fall calculation so the base of your excavation already slopes correctly.
Strip all vegetation first. Remove turf, plants, and any roots in the upper layer. The root zone alone is typically around 50mm deep, but topsoil often runs deeper than that. Keep digging until you hit firm, stable subsoil. This is the foundation everything sits on, and it must be solid. If you find soft or spongy patches at formation level, excavate them out and replace with compacted sub-base material rather than hoping for the best.
Once you've reached formation level across the whole area, use your string lines to check the shape of the excavation. The base of the dig should roughly mirror the finished fall you want on top. If you've got a significantly sloped site, this is where you start managing the grade, not later in the process. The sub-base is the right place to build in elevation changes, not the bedding layer.
Bag or barrow all the spoil away as you go. Topsoil and clay can pile up fast and become a trip hazard, and you don't want it accidentally mixing back into the excavation. Plan where the spoil is going before you start digging.
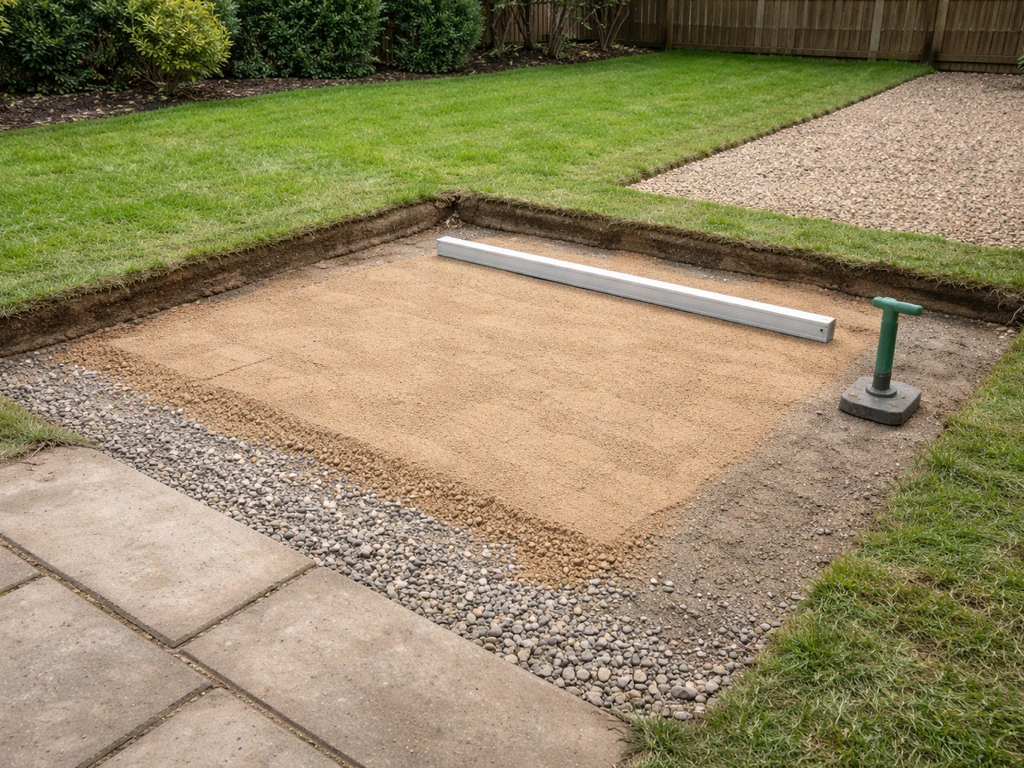
Building the sub-base: the most important step
The sub-base is what your patio actually rests on, and it's where most long-term patio failures begin. A properly built, compacted MOT Type 1 sub-base at 100mm compacted thickness is the standard for domestic patios, and it genuinely earns its place in the process.
Lay the geotextile membrane first
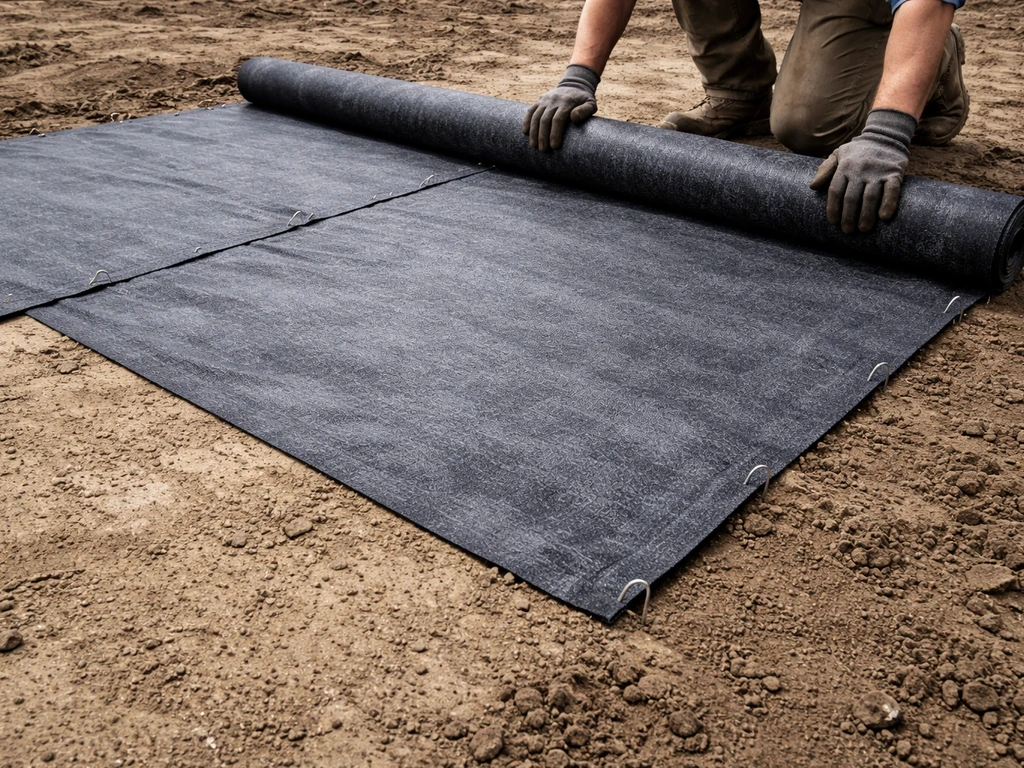
If you're working over clay soil, soft ground, or anywhere you've seen waterlogging, lay a geotextile separation membrane directly on the formation before adding any sub-base material. Its job is to stop the fine soil particles from migrating up into the sub-base over time, which causes the stone to sink and shift. It's not expensive and it can make a significant difference to long-term stability. Lap the edges up the sides of the excavation and overlap any joins by at least 300mm.
Spread and compact the MOT Type 1
Pour in the MOT Type 1 and rake it out roughly level. Work in layers of no more than 100mm loose depth if the total depth is significant, compacting each layer with the plate compactor before adding more. Make at least two or three passes with the compactor over each layer, working in overlapping rows. Don't try to compact it all in one thick pour. The material needs the vibration to interlock properly.
Once compacted, check the surface with your string lines. You're looking for consistency and the correct fall across the whole area. Any high spots can be knocked back, and low spots can be topped up and recompacted. Compact the sub-base surface until it feels firm and doesn't shift underfoot. If it still moves when you walk on it, it needs more compacting.
A quick tip here: if you're raising part of the area to manage a slope, build the elevation into the sub-base by adding more material on the lower end, not by thickening the mortar bed later. Bedding mortar is not a structural filler. Keeping the sub-base consistent in thickness and compacted correctly is what gives the whole thing its stability.
The bedding layer: screeding for a flat, accurate surface
The bedding layer sits between the compacted sub-base and the underside of your slabs. It's where you fine-tune your levels and fall so each slab sits at exactly the right height with the right slope. If you need a perfectly flat surface, focus on screeding the 30, 40mm bedding layer accurately before you lay the slabs fine-tune your levels and fall. The standard approach for rigid patio construction is a semi-dry mortar mix (typically 4 parts sharp sand to 1 part cement, mixed to a consistency where it holds its shape when squeezed but doesn't slump).
Target a bedding thickness of 30–40mm. This is enough to allow final levelling adjustments and to achieve good contact across the full underside of each slab without becoming structurally unreliable. Don't be tempted to build up thin patches to compensate for a poorly prepared sub-base. The mortar bed is not there to correct sub-base errors.
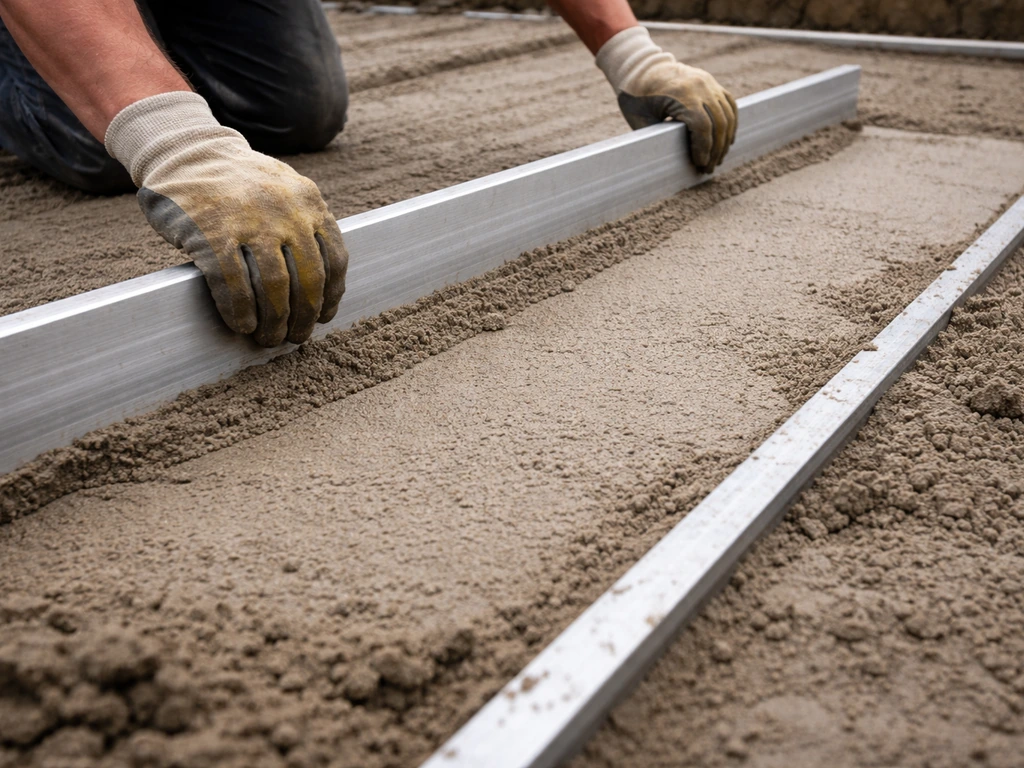
To screed the bed, set two screeding rails (or timber battens) at the correct height and fall, then drag a straight screed board across them to create an even surface. The rails should be set so the screeded mortar sits at exactly the right level to bring your slabs to the finished height once they're tapped down. Check constantly with a spirit level and your pre-set string lines as you work.
Once screeded, lay your slabs onto the bed without sliding them (this disturbs the mortar profile). Tap down with a rubber mallet, checking level and fall constantly. A graded timber batten and spirit level works well for checking the fall between adjacent slabs. Leave consistent joints between slabs (typically 10–15mm) and check the running level regularly as you work across the area. Pointing comes later, once the bedding has had time to set.
Dealing with tricky ground conditions
Clay soil
Clay is the most common problem soil in UK gardens. It holds water, swells when wet, and shrinks when dry, which creates exactly the kind of movement that cracks mortar joints and tips slabs. The fix is to be more aggressive with your sub-base: always use a geotextile membrane, increase your sub-base thickness to 150mm if the clay is particularly heavy, and make sure your drainage fall is directing water well clear of the patio edge. In very wet clay areas, you may also want to incorporate a land drain at the lower edge of the excavation before backfilling with sub-base.
Sloped sites
Working on a slope sounds complicated but it follows the same logic as a flat site. Use the sub-base to build in your fall, and if the slope is steep enough to require a step up in levels, consider terracing the area rather than trying to create one flat plane on a big gradient. String lines and a laser level are genuinely worth using here because small errors compound quickly across a large sloped area. The key point is the same one that applies everywhere: build elevation into the sub-base, not the bedding.
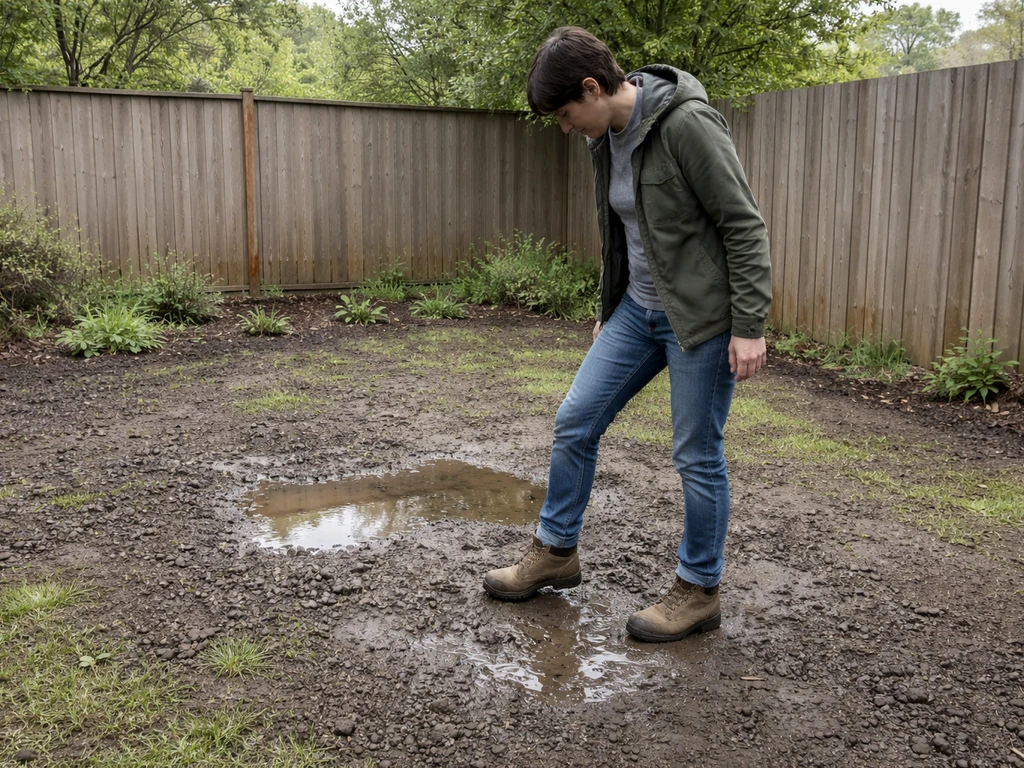
Wet or waterlogged ground
Never lay a sub-base on waterlogged ground. The material won't compact properly and the whole thing will settle once water drains and the soil changes state. Wait for a dry spell, or if the ground is persistently wet, investigate whether you have a drainage issue that needs resolving before you start. A perforated land drain along the base of the excavation, wrapped in geotextile and backfilled with gravel, can help manage this. Rushing ahead on wet ground is one of the most reliable ways to end up relaying your patio within two years.
Laying over or near existing slabs or concrete
blank" rel="noopener noreferrer">Overlaying existing paving is tempting because it saves excavation time, but it comes with serious risks. If the old surface has any movement in it, that movement transfers to your new slabs. Existing paving buried under a new bed creates differential support, and that leads to cracking. The safest approach is to remove the old surface first and start fresh from formation level. If the existing concrete is genuinely solid, level, and free from any cracking or movement, it may be usable as a base, but check it very thoroughly before committing. This is one of those situations where investing the extra time in removal saves a lot of frustration later.
Common mistakes and a quick troubleshooting checklist
Most patio failures trace back to the same handful of mistakes. The frustrating thing is they're all avoidable with a bit of attention at the right stage. If your slabs are rocking, hollow-sounding, or have cracked joints, the problem is almost always in the layers below, not the slabs or the jointing material. Re-pointing alone will not fix a movement problem. The underlying cause has to be corrected.
| Mistake | Why it matters | Fix |
|---|---|---|
| Underestimating excavation depth | Insufficient sub-base thickness leads to settlement | Calculate total depth: slab + 30–40mm bed + 100mm sub-base minimum |
| Leaving topsoil or organic material in | Organic material compresses and causes sinking | Strip all topsoil and root zone before building the sub-base |
| Skipping compaction or undercompacting | Loose sub-base settles under load and causes cracking | Use a plate compactor, work in layers, make multiple passes |
| No geotextile on clay or soft ground | Soil fines migrate into sub-base, causing it to sink | Lay geotextile membrane before adding MOT Type 1 |
| Wrong drainage fall or no fall at all | Water pools on the patio and causes freeze-thaw cracking | Set a 1:60 fall (smooth slabs) or 1:80 (textured) away from the house |
| Using bedding mortar to fix sub-base errors | Thick, uneven mortar beds crack and lose contact with slabs | Fix levels in the sub-base, keep bedding to 30–40mm |
| No edge restraint | Slabs at the perimeter gradually spread and loosen | Install edge restraint or haunching before pointing |
| Laying on wet or waterlogged ground | Material won't compact; settles when conditions change | Wait for dry conditions; investigate drainage issues first |
Before you lay a single slab, run through this quick checklist to confirm the ground preparation is genuinely ready:
- All topsoil, vegetation, and root zone material fully removed
- Formation level firm and stable, soft spots excavated and replaced
- Underground services checked before excavation started
- Geotextile membrane laid where needed (clay, soft, or wet subgrades)
- MOT Type 1 sub-base at 100mm compacted thickness across the full area
- Sub-base surface compacted until firm and consistent underfoot
- Correct drainage fall (1: 60 or 1:80) confirmed with string lines and spirit level
- Finished paving level confirmed to sit at least 150mm below DPC
- Screeded mortar bed at 30–40mm ready to receive slabs
- Edge restraint plan in place before pointing begins
Once you've ticked everything on that list, you're genuinely ready to start placing slabs. The groundwork is the part of a patio project that nobody photographs, but it's what determines whether your patio looks the same in ten years as it does the day you finish it. If you’re wondering how to prepare ground for a patio, focus first on excavation depth, proper compaction, and building in the correct drainage fall before you lay any slabs. Take your time here and the rest of the job is actually quite satisfying.
FAQ
How do I confirm the ground is compacted enough before adding the MOT Type 1 sub-base and bedding?
After compacting a layer, press with your boot sole in multiple spots. You should not see a visible footprint or “rock” the surface when you jump lightly in place. If you have access to a plate compactor meter or a test service, use that for confirmation, but even without instruments the key signs are no movement underfoot and a consistent, firm rebound when you walk.
What if I accidentally excavate too deep, how should I fix it?
Do not try to “correct” levels with a thicker mortar bed. Rebuild the difference using compacted MOT Type 1 to achieve the correct compacted thickness, including allowing for the 10–15 percent compaction shrink. Then re-check fall with your strings and re-screed the bedding layer back to 30 to 40 mm.
Can I use a thicker mortar bed if the sub-base is uneven?
No, mortar bedding is for levelling and contact, not structure. If you find low areas, remove and rebuild sub-base, or at most do localized topping with compacted sub-base material so the bedding returns to the designed thickness. Thick mortar tends to crack and create hollow spots beneath slabs.
Should I lay geotextile membrane over everything, or only on clay?
Use it whenever you have clay, soft ground, or any signs of waterlogging, because its purpose is to reduce fine soil migration into the stone. If your soil is sandy and drains well, you may skip it, but adding geotextile can still improve long-term stability where you want a more robust separation, especially at the edges and around any repaired patches.
What’s the correct way to set the drainage fall so it stays consistent while I build up layers?
Set your target fall on the excavation level using string lines, then carry that reference forward by re-checking the sub-base surface after compaction. Before screeding, confirm the rails are set to the same slope, then verify again after screeding. If the fall changes between sub-base and bedding, you can end up with water ponding even if the excavation was correct.
Do I need to worry about drainage around the patio edge, or is the 1:60 fall enough?
The slope helps, but you still need water to go somewhere. Ensure the water directs away from the house and does not run into low garden areas that stay saturated. On very wet sites, incorporate a perforated land drain along the lower edge before backfilling with gravel, wrapped in geotextile, then top with compacted sub-base.
Can I install patio slabs directly onto existing concrete or old paving?
Only if the existing base is completely stable, level, and free from cracking and movement. If there is any differential support or you notice rocking spots, the movement will telegraph upward and you will likely see cracked joints. If you can’t verify stability thoroughly, removal down to formation is the safer route.
How do I handle a patio that meets a door threshold or step without bridging a damp proof course?
Check the DPC height and plan your finished slab level so the paving surface remains at least 150 mm below the DPC. If the patio is close to a threshold, you may need to adjust excavation depth or sub-base build-up carefully, because once the bedding is in place you cannot raise or lower easily without rebuilding layers.
What should I do if I find soft spots at formation level?
Excavate soft or spongy material down to firm, stable subsoil, then replace with properly compacted sub-base stone. Do not leave soft pockets and assume the mortar bed will compensate. After replacement, re-check fall and compactibility because localized failures often show up as rocking slabs later.
How thick should my slab joints be, and what are common jointing mistakes?
Aim for consistent gaps, typically 10 to 15 mm, so slabs can move slightly without cracking. Avoid forcing slabs together during laying, and don’t fill joints with rigid material immediately before the bedding has set. Keep joint width uniform as you move across the area, and verify running level often to prevent lippage.
How soon can I point and use the patio after laying the slabs?
Let the bedding mortar set before jointing, so slabs do not shift when you work the joints. Use a curing approach that suits the weather, for example protect fresh work from driving rain and avoid heavy foot traffic until the bedding has hardened enough to resist lateral movement.
Is it ever acceptable to compact the MOT Type 1 in one thick layer to save time?
No, compact in lifts. Build in layers of no more than about 100 mm loose depth, then compact each layer with overlapping passes. Thick lifts are hard to interlock properly, which can leave weak zones that settle later and cause uneven slab bearing.