To lay a patio sub-base correctly, you need to excavate deep enough to fit at least 100mm of compacted MOT Type 1 aggregate plus your bedding layer and slab thickness, compact the MOT in two 50mm passes with a plate compactor, and set a gentle fall of 1:80 (roughly 12mm per metre) away from the house. Get those three things right and your patio will stay solid for decades. Rush any of them and you'll be lifting slabs within a few years.
How to Lay Sub Base for Patio: Step-by-Step DIY Guide

Clara Farrell
2 Jul 2026
What a sub-base actually does (and why it matters so much)
The sub-base is the engineered layer that sits between your natural ground and your paving. Its job is to spread the load of foot traffic, furniture, and the paving itself evenly across the soil so nothing settles unevenly over time. It also creates a stable, well-draining foundation that stops frost from heaving your slabs in winter. Skipping it, or doing it thin, is the single biggest reason patios rock, crack, and look terrible within a couple of years. If you've ever wondered about laying a patio without a sub-base at all, that's only really viable in very specific situations with lightweight gravel surfaces over sandy, free-draining soil. For any solid slab patio, the sub-base is non-negotiable.
Planning, layout, and checking your site conditions first
Before you pick up a spade, spend thirty minutes understanding what you're working with. Walk the area and note anything that could complicate the job: tree roots, drains, manholes, changes in level, or soft boggy patches. These things are much easier to deal with before excavation than after.
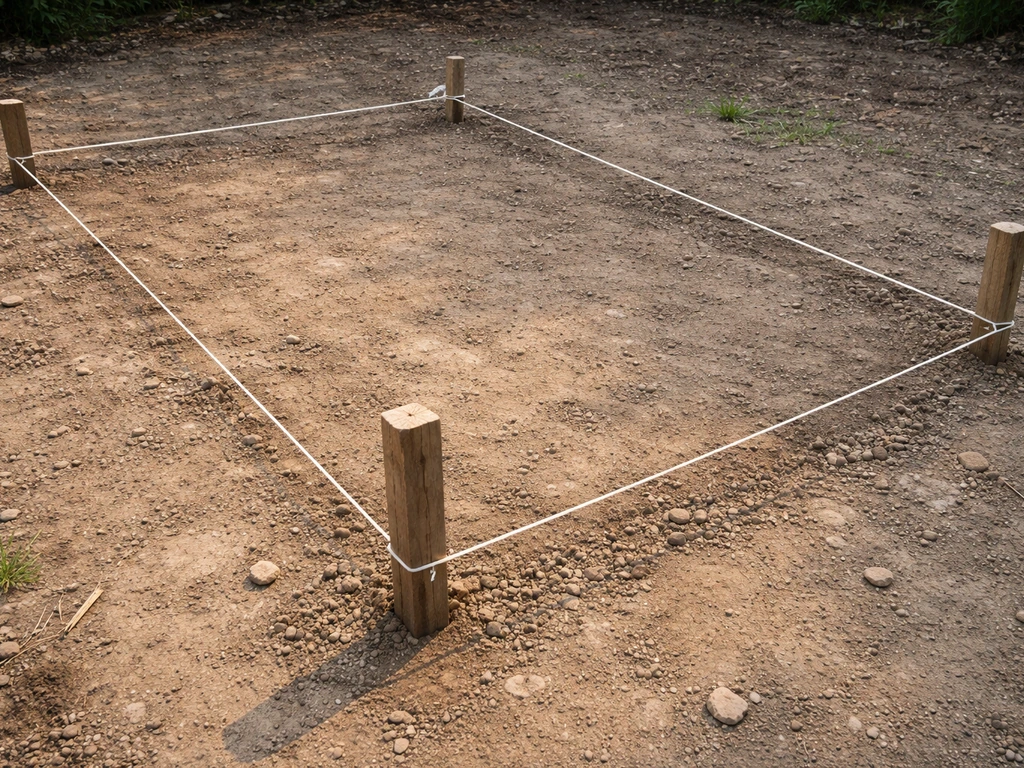
Mark out your patio area with timber pegs and builder's line. Be generous. It's tempting to cut the footprint tight, but remember your finished patio will be slightly smaller than your excavation once edging is in place. Add at least 150mm to each side of your intended patio edge when marking out, so you have room to work comfortably and set your edge restraints properly.
Check for underground cables and pipes before you dig. In the UK, use the free cable avoidance tool (CAT scanner) hire service or call your utility providers. It's also worth doing a simple soil assessment. Push a long screwdriver or metal spike into the ground. If it goes in easily to 150mm or more with little resistance, you're likely on soft or clay-heavy ground and you'll want to be thorough about your sub-base depth. Heavy clay is the most common problem soil in UK gardens. It holds water, swells, and shrinks with the seasons. On clay, don't even think about going under 100mm of compacted MOT. Some builders go to 150mm on very poor clay sites.
If your garden slopes significantly, take some rough level readings now. Hammer in a reference peg near the house at your intended finished patio level, then use a long spirit level or a water level to transfer that height to the far end of the site. This tells you how much cut and fill you're working with before you start digging.
Excavation depth and how to set the correct fall
Getting your excavation depth right is where most DIYers go wrong. They either don't dig deep enough, or they dig inconsistently and end up with a bumpy sub-base that's impossible to compact properly.
Working out your total excavation depth
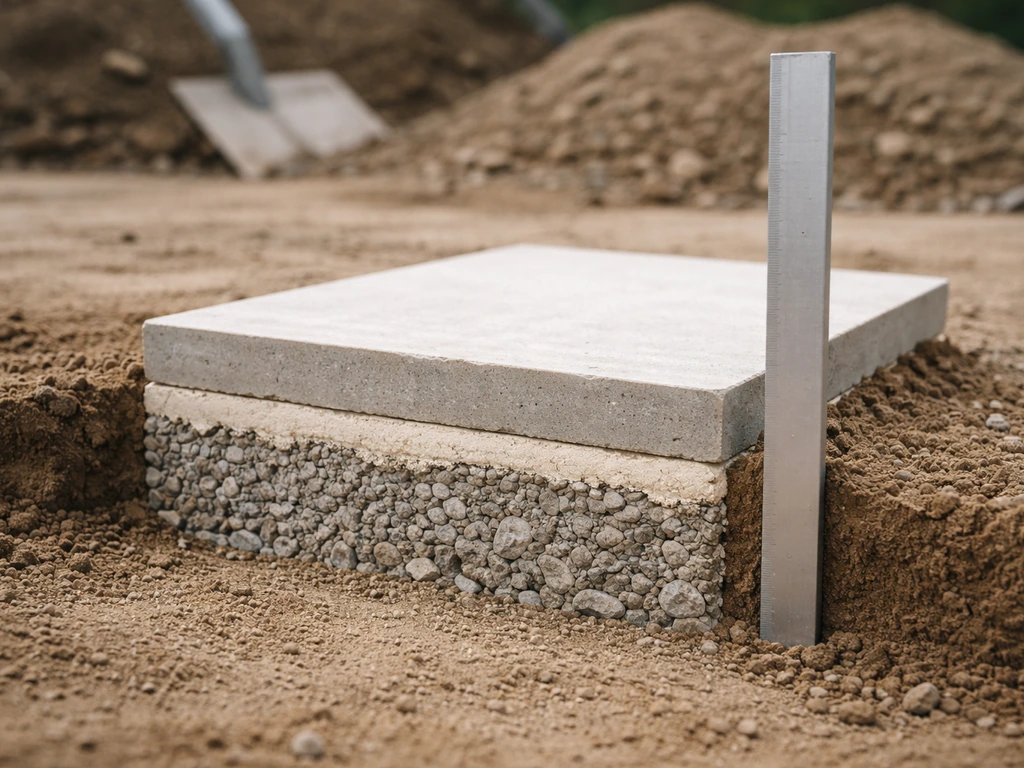
Add up every layer in your build-up from the bottom to the finished surface, then that total is how deep you need to dig from your intended finished patio level. For a typical slab patio, the layers look like this: For a typical domestic patio, Screwfix advises excavating to allow sub-base plus a 30, 40mm mortar bed and at least 100mm of compacted MOT Type 1 sub-base plus a 30–40mm mortar bed and at least 100mm of compacted MOT Type 1.
| Layer | Typical Depth |
|---|---|
| MOT Type 1 sub-base (compacted) | 100mm |
| Mortar bedding layer | 30–40mm |
| Paving slab thickness | 35–50mm (varies by slab) |
| Total excavation below finished level | 165–190mm typical |
So if your finished patio level is flush with a door threshold, you need to excavate roughly 170–190mm below that point across the whole area. Mark that depth on your reference pegs with a permanent marker or a wrap of tape so you have a visual target as you dig.
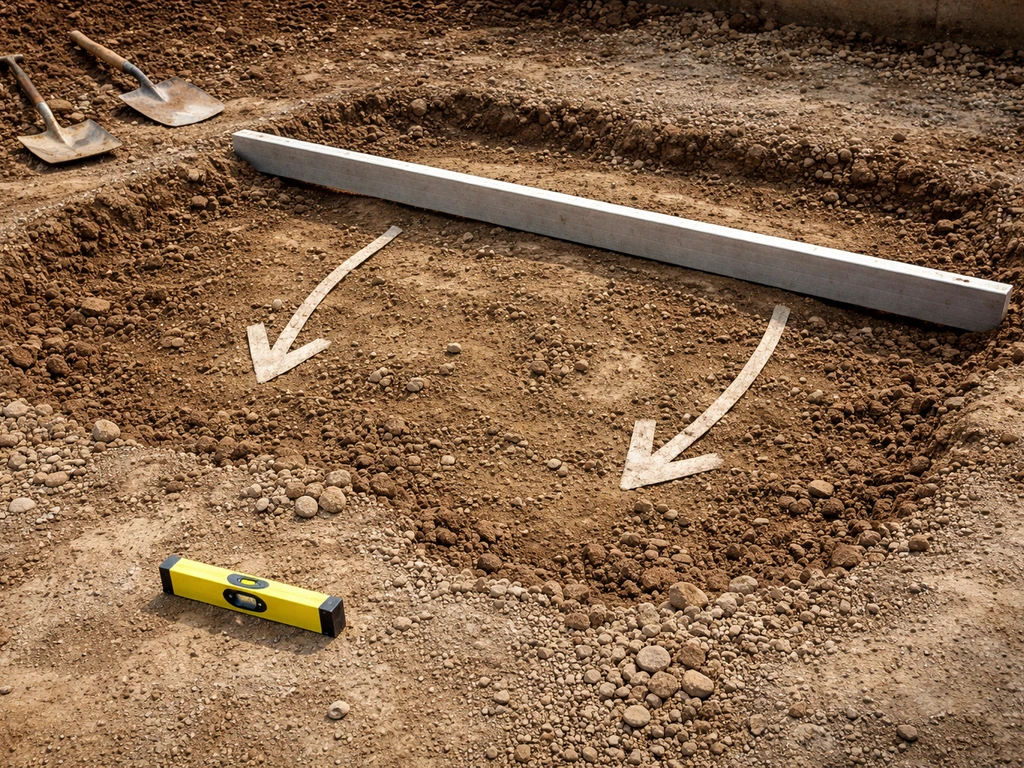
Setting the fall (slope away from the house)
Every patio needs to slope away from the house to drain rainwater. The standard minimum fall is 1:80, which means 12.5mm of drop for every metre of patio length. So a 4-metre-deep patio needs 50mm of fall across its length. This might sound like a lot, but it's barely noticeable underfoot and looks perfectly level to the eye. You set this fall at the sub-base stage, not after. Use your builder's line and line level to mark the correct height at the far edge of your excavation, drop it by the right amount relative to the house side, and use this as your guide peg for the sub-base surface.
If your patio is adjacent to a house wall or door threshold (which is common), your finished patio level must sit at least 150mm below the damp-proof course (DPC) in the wall. If you're unsure where the DPC is, look for a thin horizontal line of engineering brick or a plastic strip in the mortar joints, usually two to three courses up from ground level. Bridging the DPC causes damp problems inside the house and should be avoided completely.
Choosing the right sub-base material
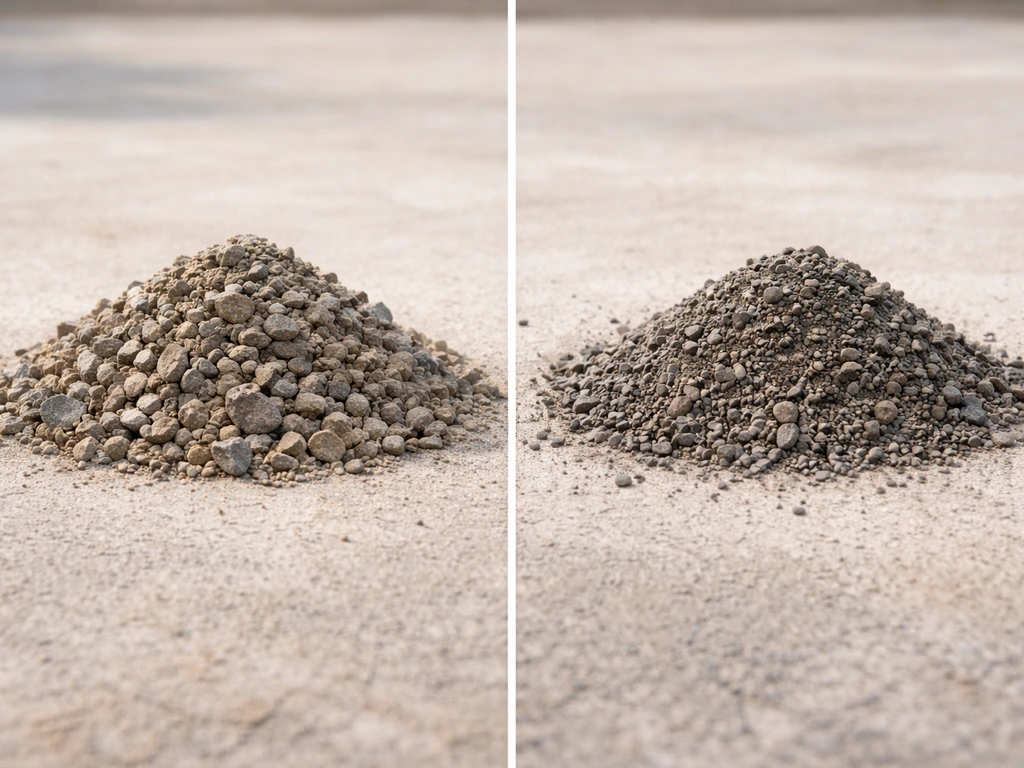
MOT Type 1 (also called Clause 804 in Scotland, or just 'hardcore') is the standard choice for patio sub-bases in the UK and the one I'd recommend for almost every situation. Armstrongs Group notes that patios and footpaths commonly use 75, 100mm of compacted MOT Type 1, depending on conditions patios/footpaths commonly use 75–100mm compacted MOT Type 1 depth. It's a crushed limestone or granite graded aggregate that compacts brilliantly, locks together under vibration, and doesn't degrade over time. It's also widely available from builders' merchants, easy to calculate, and competitively priced.
MOT Type 1 vs other options
| Material | Best For | Drawbacks |
|---|---|---|
| MOT Type 1 (crushed limestone/granite) | All patio types, any soil, standard choice | Heavier to shift, needs a plate compactor |
| MOT Type 3 / open graded aggregate | Areas needing high drainage (permeable paving) | Less stable under point loads without edging |
| Recycled crushed concrete | Budget jobs on solid ground | Variable quality, can contain contaminants, harder to compact consistently |
| Pea gravel / shingle | Loose gravel surface patios only | Not suitable under slabs, will shift |
| Sharp sand only | Thin overlay on very stable existing base | Not a sub-base on its own, only a bedding layer |
My recommendation: use MOT Type 1 for any solid slab, porcelain, block paving, or natural stone patio. It's the industry standard for a reason. Recycled crushed concrete is acceptable as a cost-saving measure on straightforward sites, but buy it from a reputable supplier who can confirm it's clean and properly graded.
How much to order
As a rough guide, 1 tonne of MOT Type 1 covers approximately 6 square metres at 100mm compacted depth. Order around 10–15% extra to account for wastage and the fact that loose material compacts down (typically by around 20%). So for a 20m² patio, you'd need roughly 3.5–4 tonnes delivered. Always round up rather than down. Running out mid-job and waiting for a second delivery is frustrating and often delays the whole project.
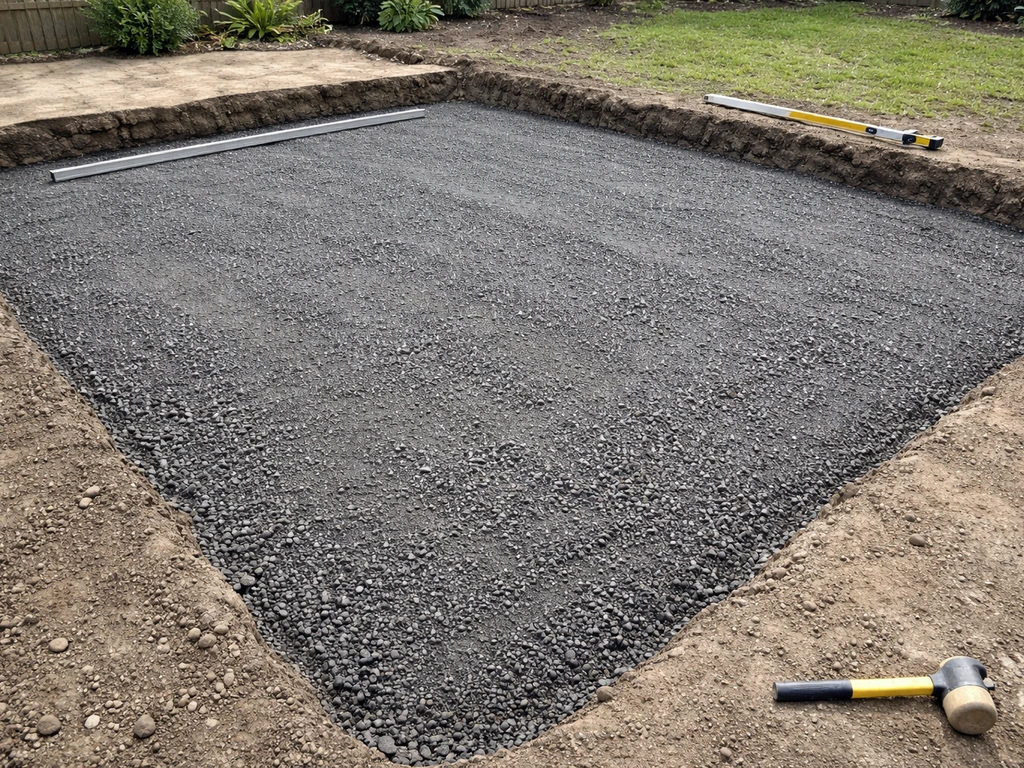
Building the sub-base in layers and compacting it properly
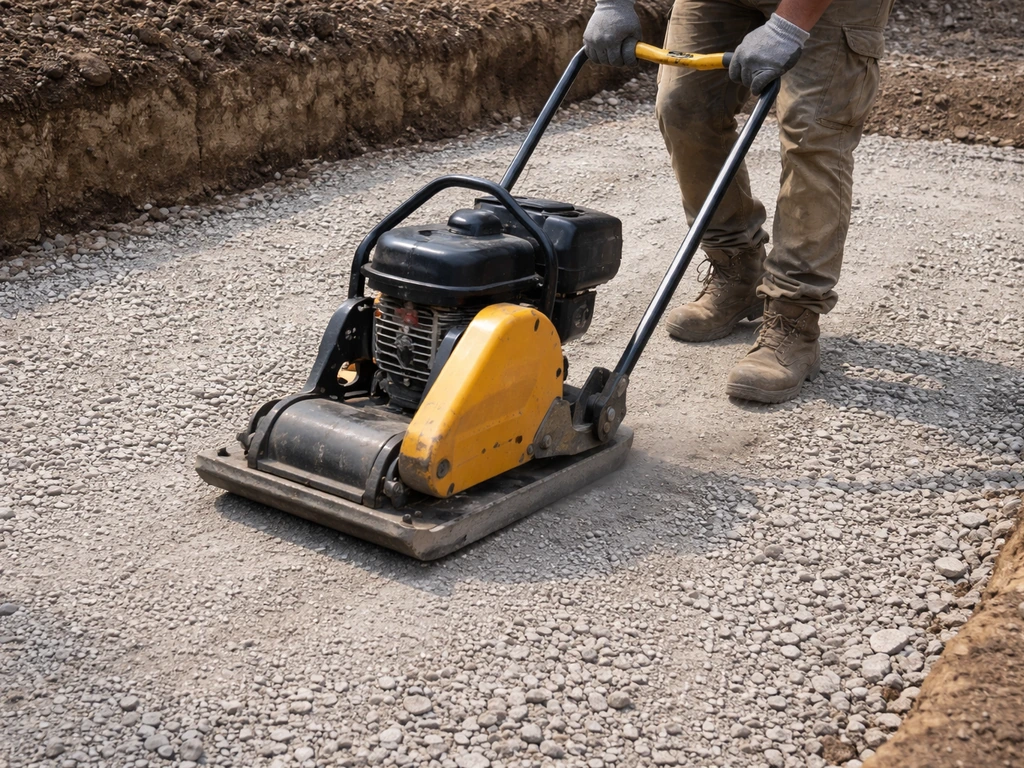
This is the most physically demanding part of the job, but it's also where you really make or break the quality of your patio. Compaction is not optional. Tipping MOT Type 1 and walking over it is not compaction. You need a plate compactor (also called a wacker plate), which you can hire from any tool hire company for around £50–80 per day.
Step-by-step: laying and compacting the sub-base
- Clear the excavated area of all loose soil and debris. The subgrade (the natural ground beneath) should be firm. If it's soft or boggy, compact it first with the plate compactor before adding anything.
- Tip in your first layer of MOT Type 1 to a loose depth of around 75mm (it will compact down to roughly 50–60mm). Rake it roughly level with a landscaping rake.
- Make two or three overlapping passes with the plate compactor across the entire area. Work methodically in rows, overlapping each pass by around 150mm. Don't rush this.
- Add your second layer of MOT Type 1 to bring the total compacted depth up to 100mm. Rake level, then compact again with two to three passes.
- Check your fall and level after each compaction pass using your reference pegs and a long spirit level or straight timber.
- If you're on poor clay soil or the sub-base needs to carry vehicle weight (such as a driveway extension adjoining the patio), increase total compacted depth to 150mm and work in three 50mm compacted layers.
After the final compaction pass, the surface of your sub-base should feel almost like tarmac underfoot. It should not shift, spring, or give when you walk on it. If it still feels loose or spongy in any area, compact it again. One sign of good compaction is that the plate compactor starts to 'dance' or vibrate differently rather than sinking. That's your cue that the material is dense enough.
For very large areas, consider hiring a forward-plate compactor (the walk-behind type with a long handle) rather than a standard plate compactor. It covers ground faster and generates more compaction force. For a standard garden patio under 30m², the standard plate compactor is fine.
Drainage, edges, and whether you need a weed membrane
Drainage
The fall you've already set will handle surface water drainage for most patios. But if you have a large area or clay-heavy ground that drains poorly, consider installing a channel drain or linear drain at the lowest point of the patio before you start laying slabs. Plan this now, because adding drainage after the patio is laid means lifting slabs. If there's an existing drain or gully near the patio area, make sure your fall directs water toward it, not away from it.
Edge restraints
Edge restraints stop your sub-base from spreading laterally over time, especially on softer soils. For most patios that are bounded by a wall on at least one side, this isn't a major concern. But for free-standing patios or those at the edge of a lawn, use haunched concrete edge restraints, metal or plastic paving edging, or a soldier course of blocks set in concrete. Install these after compacting the sub-base but before laying the bedding layer. They also give you a handy fixed reference for checking your final levels.
Geotextile membrane: yes or no?
This is genuinely debated among professionals and I'll give you my honest take. A geotextile (woven landscape fabric) laid at the bottom of your excavation, under the MOT Type 1, serves two purposes: it separates the sub-base aggregate from the subgrade soil so fines don't migrate up and contaminate the MOT over time, and it provides a modest improvement in load distribution over soft ground. On clay-heavy or very soft soils, I think it's worth doing. On firm, sandy, or chalky ground, it's less critical but still doesn't hurt.
What a geotextile does NOT do is prevent weeds in any meaningful way once you have a solid mortar-bedded slab patio on top. Weed roots won't penetrate through 100mm of compacted MOT, a mortar bed, and a slab. If you're laying a loose-fill gravel patio or a permeable block paving surface, then a membrane between the sub-base and the surface layer makes more sense for weed suppression. For a standard mortared patio, don't waste time or money on a membrane above the sub-base.
Quality checks before you move on
Don't start on the bedding layer and slabs until you've done these checks. It takes fifteen minutes and can save you hours of rework.
- Straightedge test: lay a 2.4m straight timber or metal straightedge across the sub-base surface in multiple directions. Any high spots or dips over 10mm need to be addressed. Scrape back high spots and re-compact. Fill low spots with a little fresh MOT Type 1 and compact again.
- Fall check: place your spirit level on the straightedge aligned with the direction of fall (away from the house). The bubble should show a consistent slope. Use a 1:80 gradient gauge or simply check that the low end is 12.5mm lower per metre of run. Check this in multiple positions across the width of the patio.
- No-movement test: walk briskly across the entire sub-base area. No part should shift, flex, or give under your weight. Pay particular attention to edges and corners, which sometimes get under-compacted.
- Depth check: use a tape measure at multiple points around the perimeter to confirm the sub-base surface is the correct height below your finished slab level (bedding depth plus slab thickness). Mark this reference height on your guide pegs clearly.
- Visual drainage check: pour a full watering can of water onto the sub-base. It should drain away within a minute or two. If it pools and sits, your sub-base may be contaminated with fines or the underlying clay is preventing drainage. In the latter case, consider whether you need to improve drainage at sub-base level before proceeding.
Common mistakes and how to fix them before laying the surface
I've seen (and made) most of these mistakes, so here they are honestly:
- Not digging deep enough: the most common mistake. People underestimate slab thickness, skip adding the mortar bed in their calculation, or just don't want to dig that extra 30mm. Result: the finished patio sits too high, slabs rock on the mortar, or water can't drain away from the door threshold. Always calculate total build-up before you start.
- Compacting in one thick layer: tipping the full 100mm loose and trying to compact it in one pass gives poor results. The plate compactor can only effectively compact to around 50–75mm depth. Always work in two layers.
- Ignoring soft spots: if one area feels springy after compaction, it's usually a pocket of wet clay or made ground underneath. Don't just add more MOT on top. Dig out the soft area, remove the soft material, and refill with MOT Type 1 compacted in layers.
- Forgetting the fall: it's easy to get focused on getting things level and forget that 'level' is actually wrong for a patio. Set your fall guide pegs at the very start and keep checking them throughout the job.
- Under-ordering material: as noted above, always order 10–15% more MOT than your calculation suggests. Running out mid-compact and waiting for a second delivery disrupts the workflow and can introduce inconsistencies.
- Using building sand instead of sharp sand for the bedding layer (later): this isn't a sub-base mistake but it's worth flagging now. When you come to lay your mortar bed over the sub-base, use a sharp sand and cement mix, not soft building sand. Soft sand mortar beds can wash out and allow movement.
- Not accounting for the DPC: if your patio is against the house, check your finished slab height against the damp-proof course before committing to your excavation depth. Getting this wrong is an expensive fix.
What to do next: moving from sub-base to laying your patio surface
Once your sub-base passes all the checks above, you're ready for the next stage. For most solid slab patios (natural stone, porcelain, concrete flags), the next step is mixing and laying a semi-dry mortar bedding layer (typically 4:1 sharp sand to cement) at 30–40mm depth over the compacted sub-base. Lay it in manageable sections of around 1–1.5m², screed it roughly flat (maintaining your fall), then bed each slab firmly by tapping it down with a rubber mallet. Check each slab with a level before moving to the next.
For block paving or permeable paving, the approach is slightly different. You'd normally use a layer of sharp sand (around 30–40mm) as a laying course over the sub-base rather than mortar, then compact the blocks into it after laying. In both cases, the quality of the sub-base you've just built determines how level and stable the finished surface will be. If you want the slabs to sit perfectly flat, start by confirming your excavation depth, fall, and soil condition, then build the MOT sub-base in compacted layers sub-base you've just built. All the precision work you've done here pays off directly in a patio that looks sharp, drains well, and doesn't move.
Preparing the ground thoroughly is genuinely the hardest part of a patio project, and you've done it. The laying stage that follows is more satisfying and more forgiving when the foundation underneath is solid.
FAQ
Do I really need to excavate to the same depth across the whole patio, or can I “make up” low spots later with more bedding mortar?
Excavate to a consistent target depth so the finished sub-base surface is true. If you dig shallow in one area and compensate with thicker bedding, the bedding can shrink or deform over time, leading to rocking slabs. Use your depth marks as a uniform guide while digging, then re-level the sub-base surface using additional compacted MOT before bedding.
What should I do if my sub-base starts to get waterlogged or muddy during excavation?
Stop work and let the subgrade drain, then revisit compaction plans. Wet clay or mud cannot be compacted properly, and it will later consolidate under load. If you must pause, keep excavation covered or fenced off so it does not fill with rainwater, then check firmness before placing MOT.
How do I know my MOT Type 1 has been compacted enough, not just “tamped” once?
After the final pass, the surface should feel dense and hard (close to tarmac), and you should not see it indent or spring back under your boot. A practical cue is that the plate compactor should vibrate differently, it tends to stop sinking as deeply once density increases. If any area feels spongy or loose, re-compact that area immediately before moving on.
Can I use fewer passes if I’m short on time or if the area is small?
For typical patio builds, aim for the recommended layered compaction (for example, two 50 mm passes rather than one thick lift). A single deep layer often leaves a loose core that cannot be compacted from the surface. Even on small patios, keep to lift thickness so you get full-density compaction throughout.
Should I compact the sub-base dry, or can I lightly wet the MOT before compacting?
Compacting slightly damp material is usually fine, but avoid turning the layer into slurry. If it’s too dry, it may be harder to achieve uniform density; if it’s too wet, it can trap water and later lose strength. A good approach is to keep MOT reasonably dry, spread it evenly, compact promptly, and only add minimal moisture if your supplier material looks dust-dry.
Do I need to put geotextile down, and will it affect drainage?
Geotextile can help on clay or very soft ground by separating fines from the MOT and improving load transfer. On most patio builds it does not “trap” water, but it will change how water migrates through the layers, so it matters most where drainage is already marginal. If you have a lined or designed drainage solution (like a channel drain), coordinate the geotextile placement so water still reaches the outlet.
What’s the right way to confirm the fall is correct before installing slabs?
Check fall using string lines and a level from a known reference point, then repeat measurements at multiple points across the excavation. The key is to confirm the sub-base surface, not just the excavation perimeter. Measure from the house edge outward and also across the width so you do not end up with a “low” corner where water collects.
If the patio is near a doorway, how do I handle the damp-proof course (DPC) requirement safely?
Make sure the intended finished level leaves the required clearance below the DPC, and do this before ordering materials. If the DPC clearance is tight, you may need to adjust excavation depth and slab thickness early rather than cutting corners later. When in doubt, identify the DPC line in the wall and use it as your level constraint while you set your reference pegs.
Can I use recycled crushed concrete instead of MOT Type 1 for my sub-base?
It can be acceptable on straightforward sites, but only if the supplier confirms it is clean and properly graded for compaction. Avoid unknown rubble mixes, contaminated material, or anything with lots of fines that can pump or break down. If you cannot verify grading, stick to MOT Type 1 to reduce risk.
How should I estimate MOT Type 1 volume without under-ordering?
Use the compacted depth coverage as a starting point, then add extra for wastage and compaction reduction. A common mistake is ordering based on loose volume without accounting for how much it settles, and losing material to kerb cuts and trimming at edges. Round up and consider that access constraints can increase spoil waste.
Do I need to install edge restraints before or after bedding and slabs?
Install edge restraints after the compacted sub-base and before the bedding layer. Waiting until later can leave the sub-base unsupported at the margins, which increases the chance of lateral movement or uneven heights. Restraints also give you a firm reference when you set final levels for edging and slab alignment.
What if I discover tree roots or soft spots after I’ve excavated?
Address soft or damaged zones immediately, do not just lay more aggregate on top and hope it holds. You may need to excavate further to remove roots and replace with properly compacted material, especially on clay. Mark out any changes and re-check level and fall after repairs, because local fixes can create new low spots.
Is a sub-base different for permeable paving or block paving compared with a mortared slab patio?
Yes. Mortared slab patios typically use mortar bedding over a compacted MOT base, while permeable systems usually rely on a sand laying course and different jointing and compaction approach. The sub-base still needs correct depth, fall, and compaction, but the layers above can change, so follow the correct build-up for the surface type you’re installing.