Installing interlocking patio tiles comes down to four things done right: a solid compacted base, a consistent bedding layer, proper edge restraints, and locked joints. Follow the steps in this guide to learn how to lay patio tiles from site prep through jointing interlocking patio tiles. Get those four right and the tiles stay level, won't shift, and drain the way they should. Skip any one of them and you'll be pulling tiles back up within a season. This guide walks you through every step, from measuring your site to sweeping in the final round of polymeric sand.
How to Install Patio Tiles: Step-by-Step DIY Guide

Clara Farrell
19 May 2026
Choosing the right interlocking patio tiles and materials
The most common choice for a DIY interlocking patio is concrete pavers. They're widely available, forgiving to work with, and when you buy ones made to ASTM C936 (the U.S. spec for solid concrete interlocking paving units), you know they've been manufactured to handle the rigors of outdoor use, including freeze-thaw cycles. If you live somewhere with hard winters, look specifically for freeze-thaw durability ratings tied to ASTM C1645, which tests how pavers hold up through repeated freezing and de-icing salt exposure. That's not marketing fluff, it's the difference between pavers that last decades and ones that start spalling after two or three winters.
Porcelain outdoor tiles are another popular option, especially for a cleaner, more contemporary look. They're dense, low-absorption, and very durable, but they require a diamond blade rated specifically for porcelain (a continuous-rim wet saw blade) to cut cleanly without chipping. Porcelain also needs a minimum 1/8-inch grout joint maintained during installation to allow for thermal movement. If this is your first patio, concrete pavers are genuinely more forgiving. If you're set on porcelain, the process is similar but less room for error, particularly at the cutting stage.
Beyond the tiles themselves, you'll need to gather your materials before you start. Running out of bedding sand mid-project on a hot day is not fun.
- Interlocking pavers or tiles (order 5–10% extra for cuts and breakage)
- Compactable granular aggregate (crushed stone base material, also called road base or Class II base)
- Coarse bedding sand (concrete sand, not play sand or mason sand)
- Polymeric sand for joints
- Rigid plastic or metal edge restraints rated for interlocking pavements
- Galvanized spikes (10-inch) to anchor edge restraints
- Plate compactor (rental is fine) and hand tamper for edges
- Screed rails and a straight screed board
- Rubber mallet and a level (4-foot minimum)
- Tape measure, chalk line or string lines, and marking paint
- Wet saw with a diamond blade (continuous-rim for porcelain, segmented for concrete pavers)
Site assessment and measuring
Before you dig a single shovelful, spend time understanding what you're working with. Walk the area and look for three things: the natural slope of the ground, where water currently flows after rain, and any obstructions below or above grade (tree roots, buried utilities, downspout outlets, or existing concrete).
For drainage, the finished patio surface needs to slope away from your house at a minimum of 1/4 inch per foot. That's the widely-used standard for preventing water from pooling against a foundation. If your yard already slopes away from the house, great. If it slopes toward the house, you'll need to account for that in your base grading. On flatter ground, aim for 1/8 to 1/4 inch of fall per foot in the direction you want water to travel. Mark this out with string lines and a line level or a long level with a tape measure before you excavate, not after.
Measure the area carefully and sketch it out on paper. Note exact dimensions, the location of any fixed obstacles (posts, drains, steps), and which edges will need restraints. Call 811 (in the U.S.) to have underground utilities marked before you dig. It's free, it's required by law in most states, and it takes about three days to schedule, so do it early. If you're installing near tree roots larger than about an inch in diameter, think carefully about whether to reroute the patio border or consult an arborist. Cutting major roots leads to both tree problems and future settling.
Base preparation and subbase build-up
This is the step that determines whether your patio lasts five years or thirty. No amount of expensive tile fixes a poorly built base. The formula for total excavation depth is straightforward: paver thickness, plus 1 inch of bedding sand, plus 4 to 8 inches of compacted aggregate base. For a typical residential patio on stable soil, 4 to 6 inches of compacted base is standard. On clay-heavy or poorly draining soil, push that to 6 to 8 inches. So for a standard 2 3/8-inch-thick concrete paver on stable soil, you're looking at excavating roughly 7 to 8 inches below the intended finished surface level.
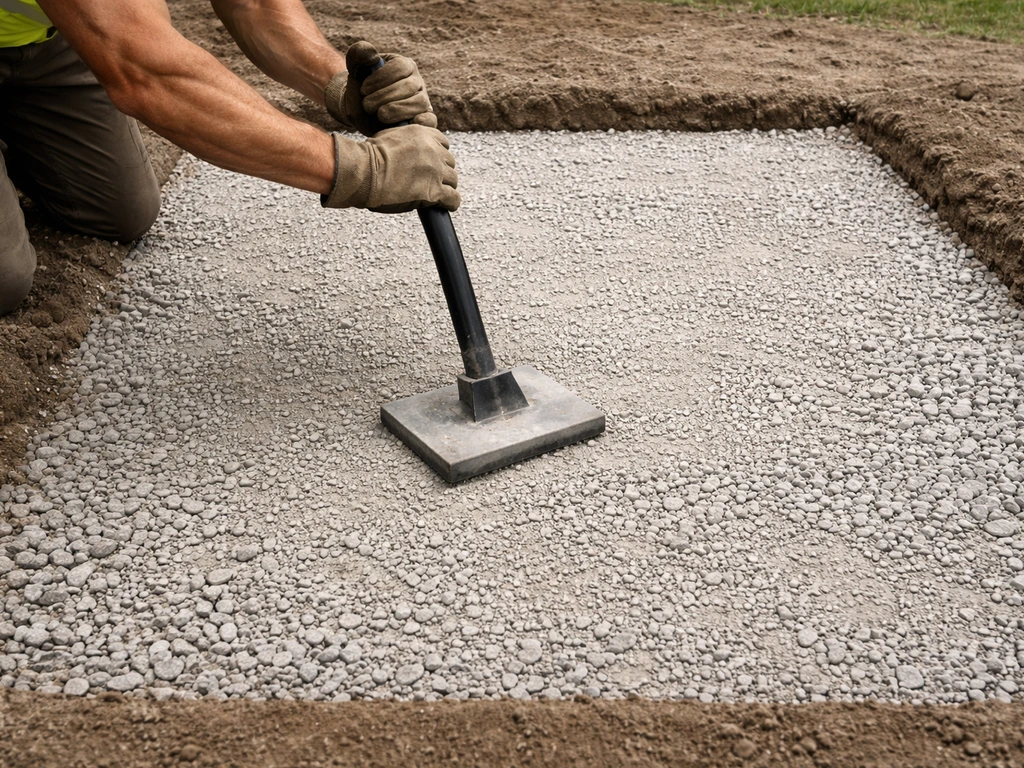
Excavate the full area plus about 6 inches beyond your intended edge on each side to give room for edge restraints. Remove all vegetation, topsoil, and soft organic material. You want to be cutting into firm, undisturbed subgrade. Once excavated, compact the subgrade itself with a plate compactor before adding any base material. This is a step many people skip, and it shows up later as sinking spots.
Add your compactable granular aggregate in lifts of no more than 4 inches at a time, compacting each lift thoroughly before adding the next. A plate compactor rental does the job much better than a hand tamper for this stage. A simple field check for adequate compaction: try to drive a 10-inch spike into the compacted base with a hammer. If it goes in easily, the base needs more passes with the compactor. If it barely penetrates, you're in good shape. Set screed rails or string lines at the target elevation (within 3/8 inch of your intended finished base elevation) before you add the bedding sand layer. Getting this tolerance right now saves a lot of rocking and relaying later.
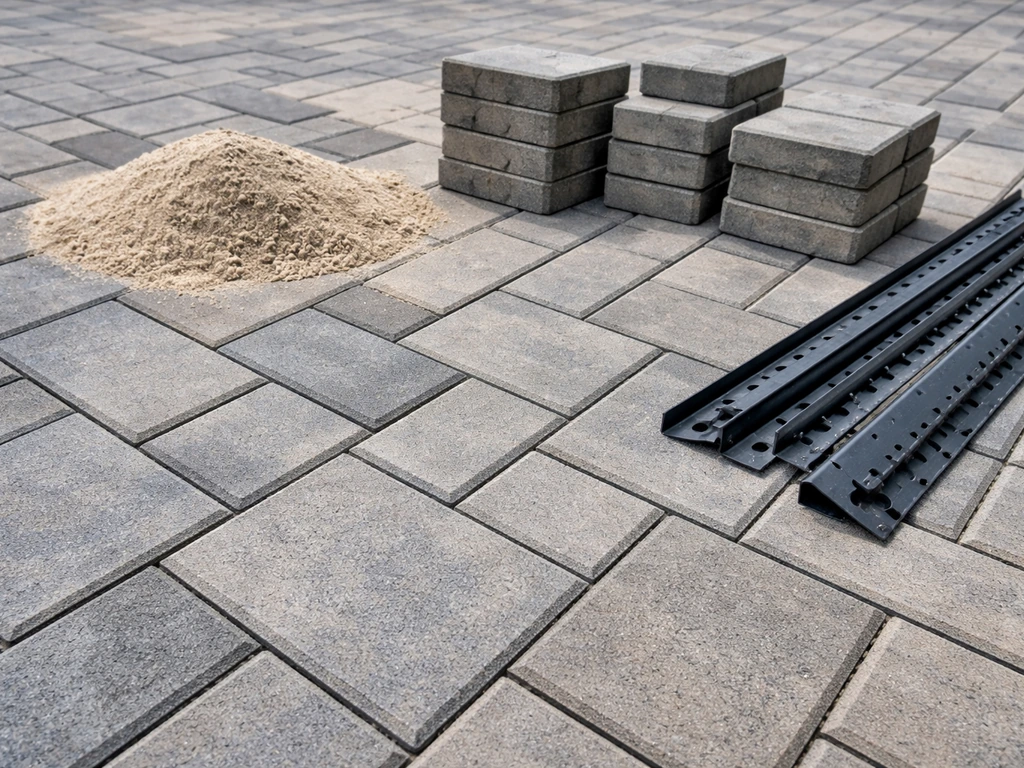
Edge restraints and layout planning
Edge restraints are what keep your tiles from slowly creeping outward under foot traffic and freeze-thaw pressure. Don't use plastic landscape edging from the garden center, it's not rated for this purpose and it will fail. Use rigid plastic paver edging or metal edge restraints specifically designed for interlocking paving systems. Anchor them firmly into the compacted aggregate base course using 10-inch galvanized spikes, spaced every 12 inches or so. The restraint needs enough vertical surface in contact with the side of the paver to actually hold it. If the spike goes into soft ground or topsoil rather than your compacted base, it won't hold.
Install edge restraints on your fixed or straight edges first (against the house, along a fence line, or at the top of a slope). Leave the outermost free edge restraints for after you've dry-fit the tiles, so you can position them flush against the last full course of pavers rather than guessing.
For layout planning, snap a chalk line or run a string line at a 90-degree angle from your main fixed edge. This is your baseline. Dry-fit a full row of tiles along this line to see how the pattern works out and where cuts will fall. You want to avoid having cut pieces narrower than half a tile at your most visible edges, so shift the layout as needed. For larger areas, consider running two perpendicular string lines that intersect at the center of the space, it gives you a more balanced look from all four sides. Mark the pattern, take photos of your dry fit, and then remove those tiles before you lay bedding sand.
How to lay the bedding sand
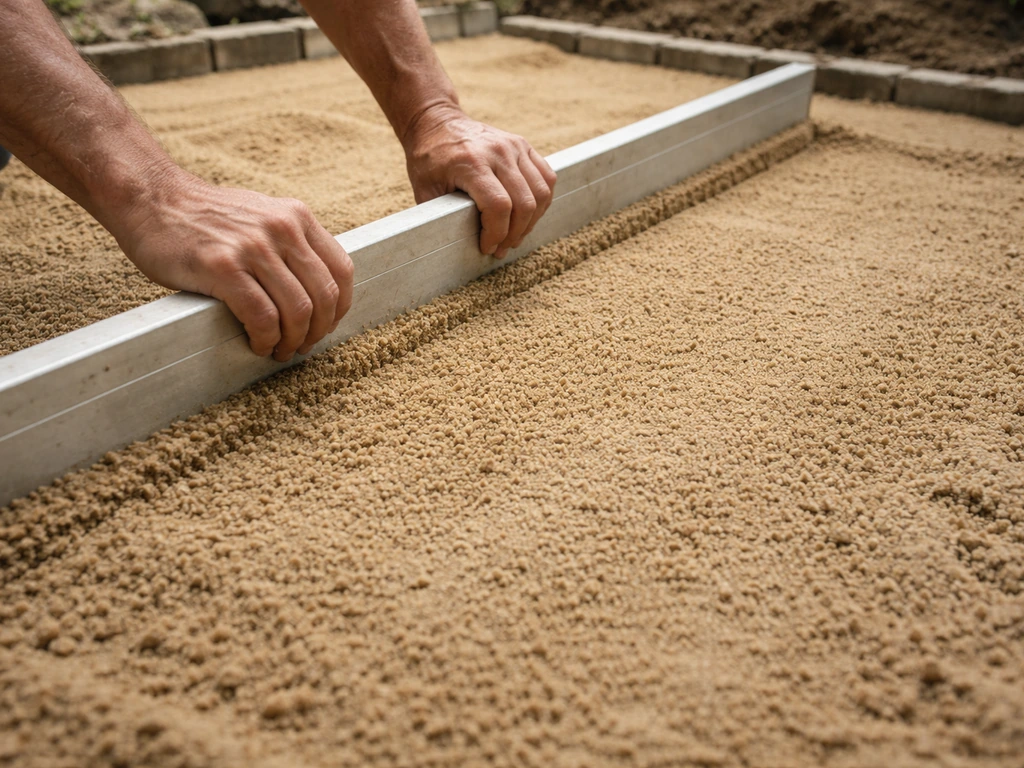
Bedding sand goes down after your base is compacted and your edge restraints are in place on the fixed edges. Spread coarse concrete sand to a uniform depth of 1 to 1.5 inches over the entire area. Use screed rails and a straight board to pull the sand level, maintaining your planned slope for drainage. The goal here is a smooth, consistent surface that the tiles will sit directly on. Once you've screeded, don't walk on the sand bed. This is where people undo their own work by stepping on it and creating dips they have to fix before laying.
Do not compact the bedding sand before laying tiles. It's meant to stay loose so the tiles can bed into it slightly and achieve full contact across their base. You'll compact the whole system together after the tiles are set.
Installing the interlocking patio tiles
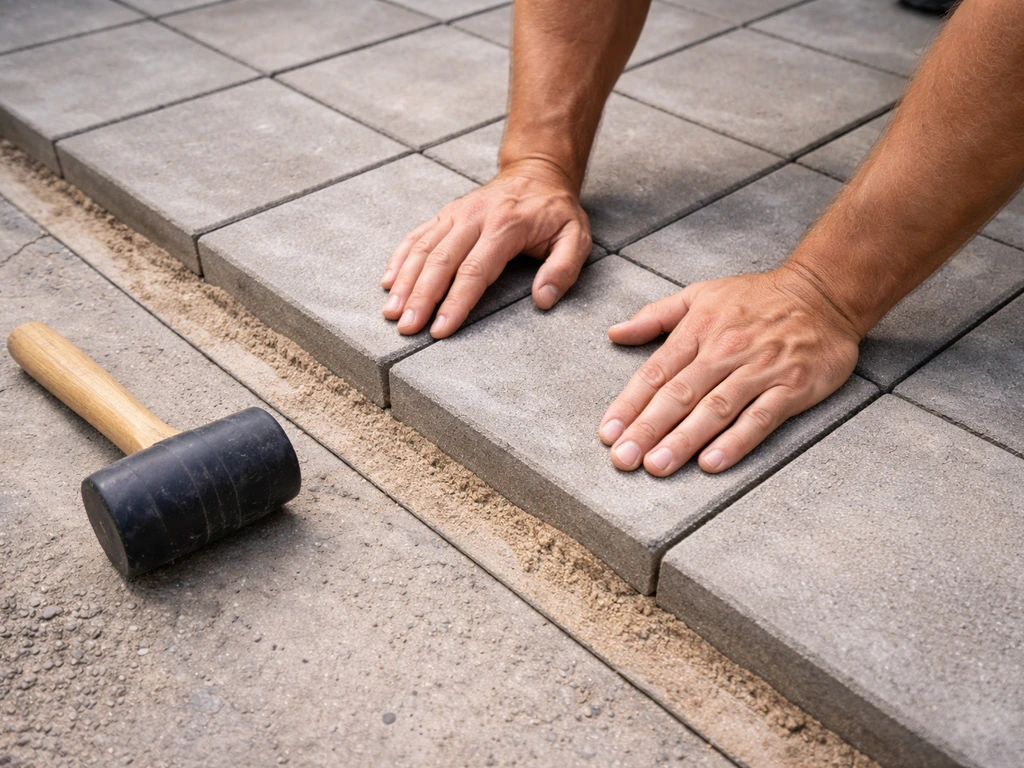
Start laying from a fixed, straight edge or a corner. Place each tile down without sliding it, pick it up, set it in position, and press it gently. Sliding tiles disturbs the sand bed and creates uneven spots. Most interlocking concrete pavers have built-in spacer lugs on the sides that automatically create consistent joint spacing, usually around 1/8 to 3/16 inch. If yours don't, use plastic tile spacers. For porcelain outdoor tiles, maintain at least a 1/8-inch joint throughout.
Keep checking your string lines every few courses. It's easy for the pattern to drift by a few millimeters per row, and that adds up fast. Use a rubber mallet and a small block of wood to tap high tiles gently into the sand, never hit a paver directly with anything metal. Check for level across tiles with your 4-foot level as you go. Any tile that rocks or shows lippage (uneven height between adjacent tiles) needs to come up so you can add or remove sand underneath, not get tapped down harder.
Work forward from a fixed edge so you're always placing tiles from behind you onto undisturbed sand. Use a kneeling board (a piece of plywood) on top of already-laid tiles to distribute your weight and avoid disturbing the sand bed.
Cutting tiles to fit edges and obstacles
Save all your cuts for the end, after the full tiles are laid. Measure each cut piece individually rather than assuming they're all the same, slight variations in the perimeter often mean each cut is slightly different. Mark your cut line with a pencil or chalk, then cut with a wet saw. For concrete pavers, a segmented diamond blade works fine. For porcelain tiles, you need a continuous-rim diamond blade rated for porcelain; a segmented blade will chip or crack the tile. Always wear eye protection and ear protection when cutting.
For curved cuts around drains, posts, or other round obstacles, score the curve with an angle grinder equipped with a diamond blade, then use a cold chisel to break along the scored line. Practice on a scrap piece first. Curved cuts on porcelain are genuinely difficult for beginners, if you have a lot of them, renting an angle grinder with a proper porcelain blade or hiring someone to do just the cuts is a reasonable choice.
Finishing and stabilizing with polymeric sand
Once all tiles including cut pieces are laid, run the plate compactor over the entire surface to compact the tiles into the bedding sand and settle any high spots. Make one or two passes, then check levelness again with your 4-foot level. After compaction, you're ready for jointing.
Polymeric sand is the right choice for interlocking paver joints. It hardens when wet, discourages weed growth, and resists insect intrusion better than plain sand. Pour polymeric sand over the surface and sweep it into the joints with a broom, working it in multiple passes until joints are filled. Then use the plate compactor again to vibrate the sand deeper into the joints. Sweep off all excess sand from the tile faces using a fine bristle broom or a leaf blower set on low, this step matters because polymeric sand will haze onto the surface if it's left on top when you water.
Then wet the surface with a gentle mist (not a hard spray that blows sand out of joints) to activate the polymeric binders. Check the weather before you do this step: don't apply polymeric sand if rain is forecast within 6 hours, since rain before the sand has cured will wash it out of the joints. Some rapid-set formulations are rain-safe after as little as 15 minutes, but follow the specific product instructions rather than assuming. Allow the sand to cure fully before heavy foot traffic or furniture placement, typically 24 hours.
Troubleshooting common problems after installation
Even with a careful install, things come up. Here's what to watch for in the first few seasons and how to deal with each issue.
Tiles rocking or individual tiles sinking
A rocking tile almost always means there's a void under it, either from uneven bedding sand or a soft spot in the base. Pull the tile, add or redistribute sand, reset it, and check that it sits level with its neighbors before moving on. If multiple tiles in the same area are sinking, you likely have a soft spot or poorly compacted base underneath. That area needs to be excavated and rebuilt properly, not just shimmed with extra sand.
Lippage (uneven height between adjacent tiles)
Minor lippage of under 1/8 inch is normal variation. Lippage you can feel underfoot or catch a toe on means adjacent tiles are at different heights. Lift the high tile, remove a small amount of bedding sand, and reset. Don't try to hammer it down into the neighboring tile, you'll crack it and create a bigger problem.
Tiles shifting or spreading apart
If tiles are visibly moving or joints are widening over time, your edge restraints aren't doing their job. Check whether they're still firmly anchored, spikes can work loose if they weren't driven into the compacted base in the first place. Re-spike them or add additional spikes. If the restraint itself has moved, you'll need to re-bed the affected pavers, reset the restraint into the base properly, and re-fill the joints.
Water pooling on the surface
Pooling water means your drainage slope is off somewhere. Check with a level across the wet area. If the slope is correct but water still pools, the joints may be clogged with debris and not allowing water to pass through. Clear the joints and consider whether a perimeter drain channel would help in that area.
Weeds or ants coming through the joints
If you used regular sand in the joints, weeds and ants will find it. The fix is to remove the joint sand, sweep polymeric sand in as a replacement, compact, and seal. It's a straightforward repair and one you only need to do once if you use quality polymeric sand the first time.
A note on different tile types and related projects
The process described here is specifically for interlocking patio tiles (concrete pavers and similar units) on a sand-set base. If you're working with porcelain tiles on an outdoor patio, the base preparation steps are the same, but the setting and jointing process differs, mortar bedding and specific grout products often replace the sand-set approach, especially for large-format porcelain slabs. The same goes for projects like tiling an outdoor patio over an existing concrete slab, which skips excavation entirely but introduces its own set of prep requirements. Those variations are covered separately on this site for good reason: the details matter enough to deserve their own guides.
What to check before you call the project done
Walk the finished patio methodically before you move furniture out. Step on every tile and listen and feel for any rocking. Run your 4-foot level across multiple directions and flag any high or low spots. Check that joints are fully filled and that there's no excess polymeric sand sitting on the tile faces.
Confirm that water from a garden hose flows away from the house rather than pooling anywhere on the surface. If all of those check out, you're done. A well-built interlocking patio with a proper base should easily last 20 to 30 years with basic maintenance, which mostly means re-sanding joints every few years as the polymeric sand slowly breaks down.
If you're also planning furniture placement, focus on how to tile patio table pads and supports so the joints stay stable under weight. That's a very good return on a weekend's work.
FAQ
How thick should the compacted base be for my patio tiles?
Use the guide’s “paver thickness plus bedding plus base” method, but adjust for soil. If you have clay-heavy or poorly draining soil, aim toward the high end of the base range (about 6 to 8 inches compacted). For any patio that will see heavier loads (grill, hot tub, vehicle traffic), increase base thickness beyond typical residential settings and consider a thicker aggregate base plus additional compaction passes.
Can I install patio tiles on top of existing concrete instead of excavating?
Often you can’t just set sand and tiles over concrete without addressing surface condition. You need a separate surfacing system (for example, mortar over a prepared slab, or a raised pedestal system for some tile types) and the substrate must be clean, sound, and properly drained. If water can’t move correctly on top of the slab, you risk cracking or movement, even if the tiles look fine at first.
What’s the difference between polymeric sand and regular joint sand, and when should I use each?
Polymeric sand binds the joints after wetting, which helps reduce weed growth and slows down joint washout. Regular sand stays loose and is more likely to wash out or blow around, which can lead to ants, weeds, and shifting joints over time. Use polymeric sand for standard sand-set interlocking paver joints, and make sure joints are fully filled and tile faces are cleaned before activating it with water.
How do I know I used the right bedding sand, and what if my tiles sink later?
Bedding sand should be a coarse concrete sand that allows tiles to bed in slightly without packing so hard it creates voids later. If tiles sink or rock after installation, the most common cause is a soft or uncompacted subgrade or base voids, not “not enough sand.” The fix usually requires lifting the affected pavers, addressing the soft spot in the base, then re-screeding and resetting tiles rather than just topping up sand.
Do I need to compact the bedding sand before setting the tiles?
No, the bedding layer should remain un-compacted when you lay the pavers. Tile placement plus the final plate compaction over the whole surface is what locks the system together. If you compact the bedding beforehand, you reduce the bedding’s ability to conform, which can increase lippage and create spots that feel hollow.
How should I cut porcelain outdoor tiles without chipping?
Use a diamond blade specifically intended for porcelain, and avoid segmented blades for porcelain because they can chip edges. Keep the cut line marked clearly, make slow passes, and support the tile fully so it doesn’t flex. For a lot of curved cuts, consider doing the work with an angle grinder setup that’s sized for porcelain cutting, or hire a tile cutter, because curved porcelain cuts are easier to mess up than straight cuts.
What should I do if I see lippage while installing?
If a tile rocks or has uneven height versus its neighbors, lift it and adjust the bedding sand underneath. Remove a small amount for high tiles, add sand for low tiles, then reset and re-check with a level. Don’t try to force a high tile down with tools, because you can crack the tile and damage the neighboring contact points.
Why do my paver joints widen even if the patio looks solid at first?
Joint widening usually points to edge restraint movement or a restraint that wasn’t anchored into compacted base. Check that restraint spikes are tight and still embedded in the aggregate layer. If the restraint moved, you may need to re-bed and re-anchor the affected edge, then refill joints. If the joint material was underfilled initially, joints can also settle as the system cures, so fill to the correct depth during jointing.
Can I install patio tiles on a slope that drains toward the house?
Yes, but you must plan the grade so water still moves away from the foundation. Mark and build the slope intentionally during base grading, not after. If the yard naturally slopes toward the house, you might need to re-shape the base elevation across the patio area so the finished surface has the required fall and doesn’t create a low “basin” where water collects.
How long should I wait before walking on and using the patio after jointing?
After wetting the polymeric sand, let it cure fully before heavy foot traffic or moving furniture, typically about 24 hours. Avoid washing or hosing the surface during the cure window, and don’t cover the patio with dense loads immediately, since you can disrupt joint formation before the polymer binds.
What’s a practical way to troubleshoot pooling water after installation?
First confirm the slope with a level across the wet area. If the slope is correct but water still pools, check whether joints are clogged with debris or polymer residue that reduced permeability. Clear the joints if needed, and in stubborn cases consider whether a perimeter drain channel or localized drainage improvement is required to handle the specific water flow pattern.
How can I protect interlocking patio tiles after installation from furniture and concentrated loads?
Before moving heavy furniture onto the patio, use pads or supports that spread weight over a larger area. Concentrated loads can cause local settlement, which shows up as rocking tiles or joint separation near the furniture footprint. If you’re placing something heavy like a grill, choose stable feet and consider temporary load checks after a week to ensure nothing settles.