Laying patio tiles outdoors is absolutely a DIY-able project, but it lives or dies on what happens before a single tile touches the ground. Get the base right, pitch the surface so water drains away, hit the mortar coverage targets, and leave proper expansion gaps, do those four things and you'll have a patio that lasts decades. Skip them and tiles crack, lift, or rock within a season. This guide walks you through the full process in the right order so you can tackle it with confidence. If you want the step-by-step basics for laying your patio, follow this guide on how to tile outside patio from start to finish.
How to Lay Patio Tiles: Step-by-Step DIY Guide

Clara Farrell
21 May 2026
Plan the layout and choose your materials
Start with a rough sketch of the space and nail down your tile choice before you do anything else, because the tile you pick affects every other decision, base depth, mortar type, joint width, and whether you need to seal. For a complete walkthrough of the process from layout to finishing, see how to tile a patio outdoor tile project. For outdoor patios you want a tile rated for exterior and freeze/thaw conditions. Porcelain (with a water absorption rate below 0.5%) is the gold standard for durability in cold climates. Ceramic tiles work well too, but stick to ones specifically rated for outdoor/frost use, standard indoor ceramic will absorb water, crack in frost, and fail fast. Natural stone like slate or sandstone is popular but needs sealing to resist staining and weathering. For a deep dive into porcelain specifically, the guide on how to lay a porcelain tile patio covers the nuances of that material in detail.
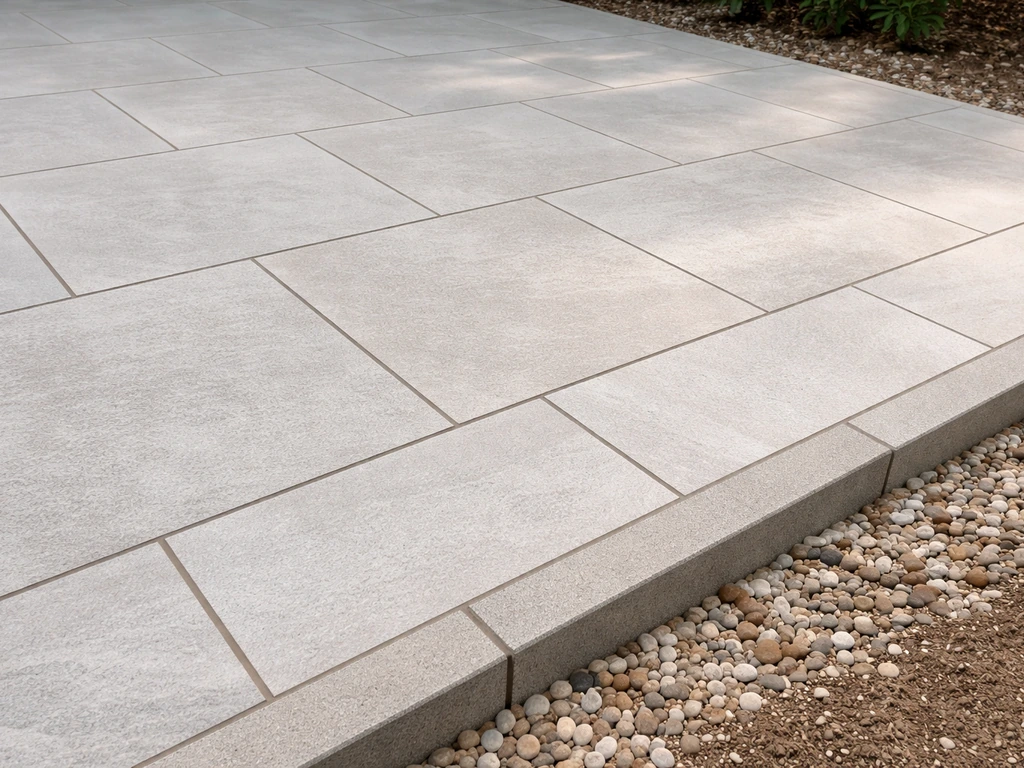
For tile size, larger format tiles (600mm x 600mm and above) look great but are less forgiving on an imperfect base, any deviation in the sub-base shows up as lippage between tiles. If this is your first outdoor tile project, 400mm x 400mm or 450mm x 450mm tiles are much more manageable. Think about tile thickness too: outdoor tiles are usually 18mm to 20mm thick ("porcelain paving slabs") or thinner rectified tiles set on a mortar bed. Thicker tiles have more tolerance for minor base irregularities.
- Tile type: porcelain (best for frost), outdoor-rated ceramic, slate, or natural stone
- Tile thickness: 18–20mm for direct bed laying, or thinner tiles on a mortar screed
- Tile size: 400x400mm to 600x600mm is a practical DIY range
- Grout: use a flexible, weather-resistant grout or an epoxy grout for maximum durability
- Adhesive/mortar: use a polymer-modified (flexible) exterior mortar, not standard gray cement
- Edging: aluminium or stainless steel edge profiles to contain the tile field and protect edges
- Sealant: 100% silicone for movement/expansion joints (not standard grout)
Measure, mark out, and plan your drainage slope
Grab a tape measure, a long spirit level, and some timber pegs. Mark the perimeter of your patio with string lines and pegs, this defines your finished area and gives you reference lines to work to. Before you dig anything, decide where the water goes. A patio with no drainage slope is a paddling pool every time it rains, and standing water is the number one enemy of tile installations.
The standard slope for an outdoor patio is 1/4 inch of drop per linear foot (about 2% grade) away from the house or any structure. So a patio that runs 10 feet out from the house should be 2.5 inches lower at the outer edge than at the house wall. Set your string lines to this slope from the start, your finished tile surface needs to match this pitch, which means your sub-base and mortar bed have to be built to the same gradient. Mark the target finished height at the house end and the target finished height at the outer edge, then tie your string lines to those levels. Everything you build from here follows those lines.
Also take note of any existing drainage channels, manholes, or downpipe outlets in the area. You'll need to plan around them, and in some cases you may need to raise a manhole cover or redirect a downpipe. It's much easier to sort this out on paper now than when you're halfway through laying tiles.
Prepare the base, this is where your patio actually succeeds or fails
I can't stress this enough: the base is everything. A beautifully laid tile on a poorly prepared base will fail. A simple tile laid on a rock-solid base will last 20 years. Give this stage the time it deserves.
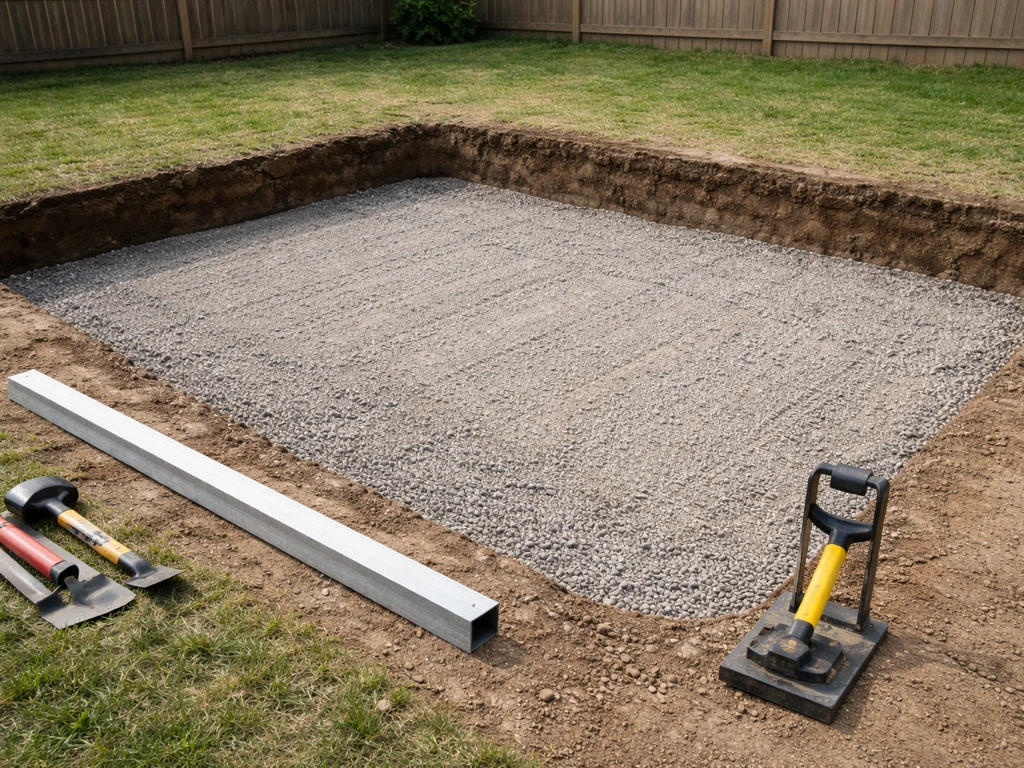
Excavation depth
For most domestic patio tile installations, you need to excavate to a total depth of around 150mm to 200mm below your planned finished tile surface. That accommodates roughly 100mm of compacted sub-base, a 30–50mm mortar bed or screed, and the tile itself (typically 18–20mm for thicker outdoor tiles). If your soil is very soft, clay-heavy, or prone to waterlogging, go deeper, 250mm total isn't excessive in those conditions. Remove all topsoil, roots, and organic material. Organic matter decomposes and causes settlement, which cracks tiles.
Sub-base compaction
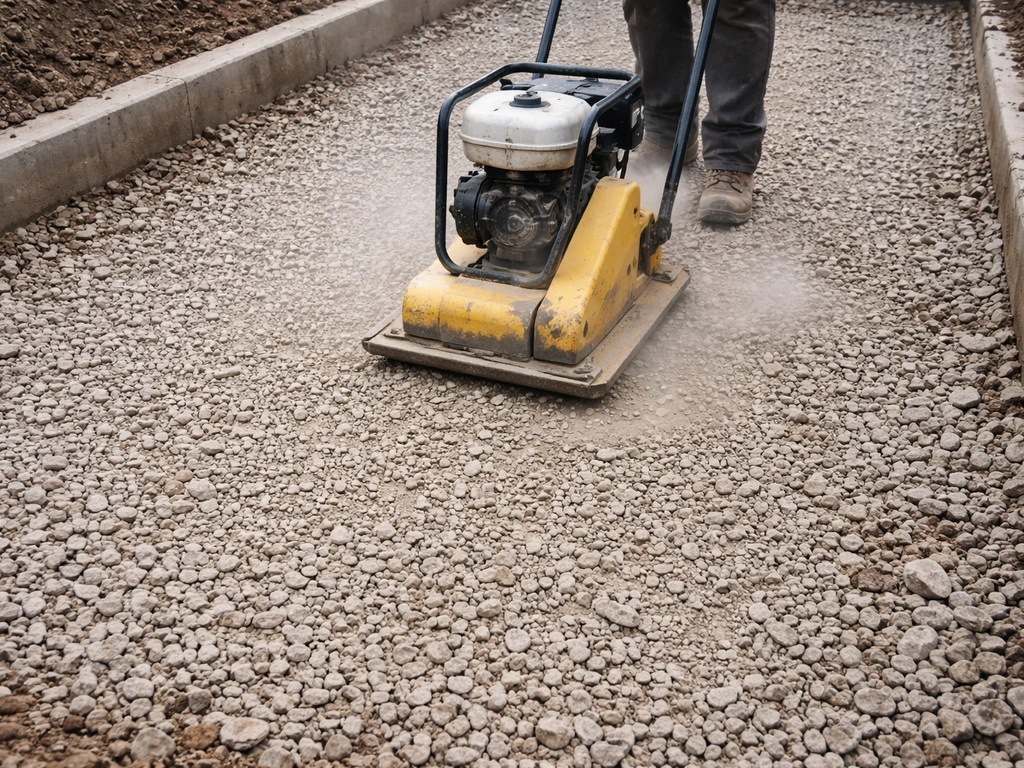
Lay a minimum 100mm layer of compacted MOT Type 1 crushed stone (also called hardcore). Spread it in 50mm layers and compact each layer using a hired plate compactor, don't skip the compactor and just tread it down. Tamp it by foot and it will settle unevenly under load. After compaction, check the surface with your spirit level and string lines to make sure your drainage slope is already built into the sub-base layer. It's far easier to correct the slope here than trying to compensate with variable mortar thickness later.
The bedding layer
For outdoor tiles there are two main setting methods. The first is a semi-dry mortar bed ("sharp sand and cement" mix at roughly 6:1 or 5:1 sand-to-cement, damp but not sloppy) laid at 30–50mm thick and screeded level before tiles are placed. The second is a polymer-modified thin-set adhesive spread directly onto a concrete slab if you already have one. If you're working from scratch on bare ground, the mortar bed method is the standard approach. If you're tiling over an existing concrete base, thin-set adhesive is the right route, but the concrete must be sound, clean, and any cracks addressed first. For exterior and wet environments, the industry target for mortar coverage is 95% (per ANSI A108.5), meaning nearly the entire underside of each tile must be in contact with the mortar, with no voids. Voids allow water to pool under the tile, freeze, and lift it.
Install edging and do a dry lay first
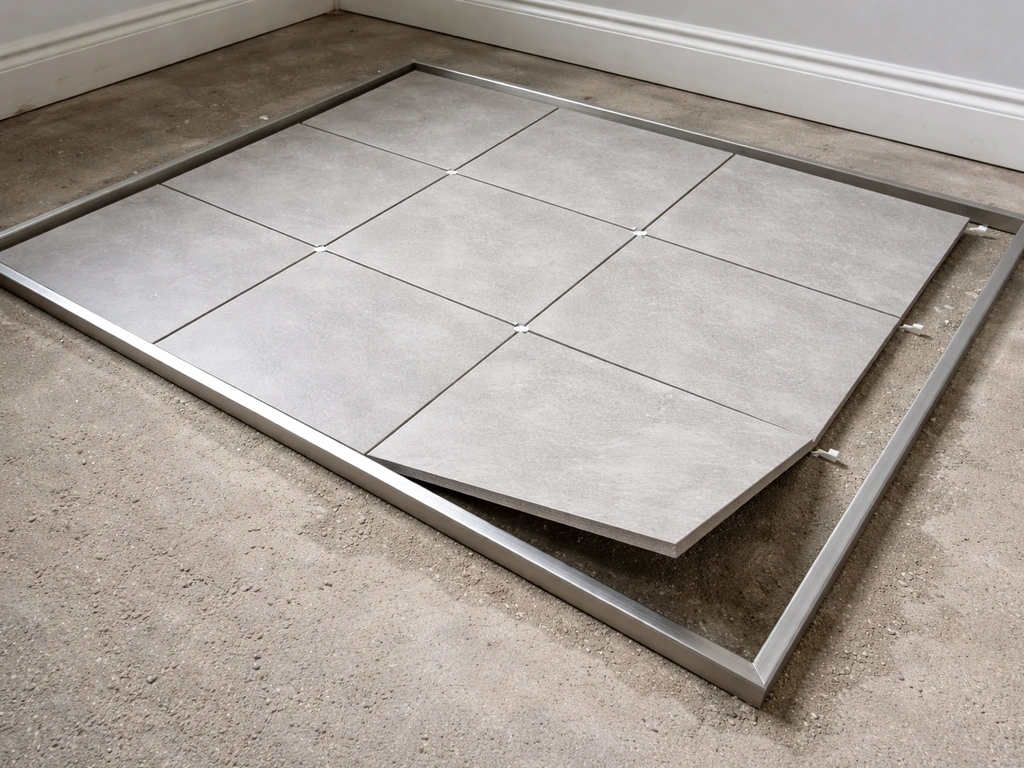
Before any mortar goes down, fix your perimeter edging. Aluminium or stainless steel edge restraints hold the tile field in place, give you a clean finish at the boundary, and prevent the outer tiles from shifting over time. Fix them to the sub-base or to a concrete haunch, making sure the top face of the edging sits at your planned finished tile height.
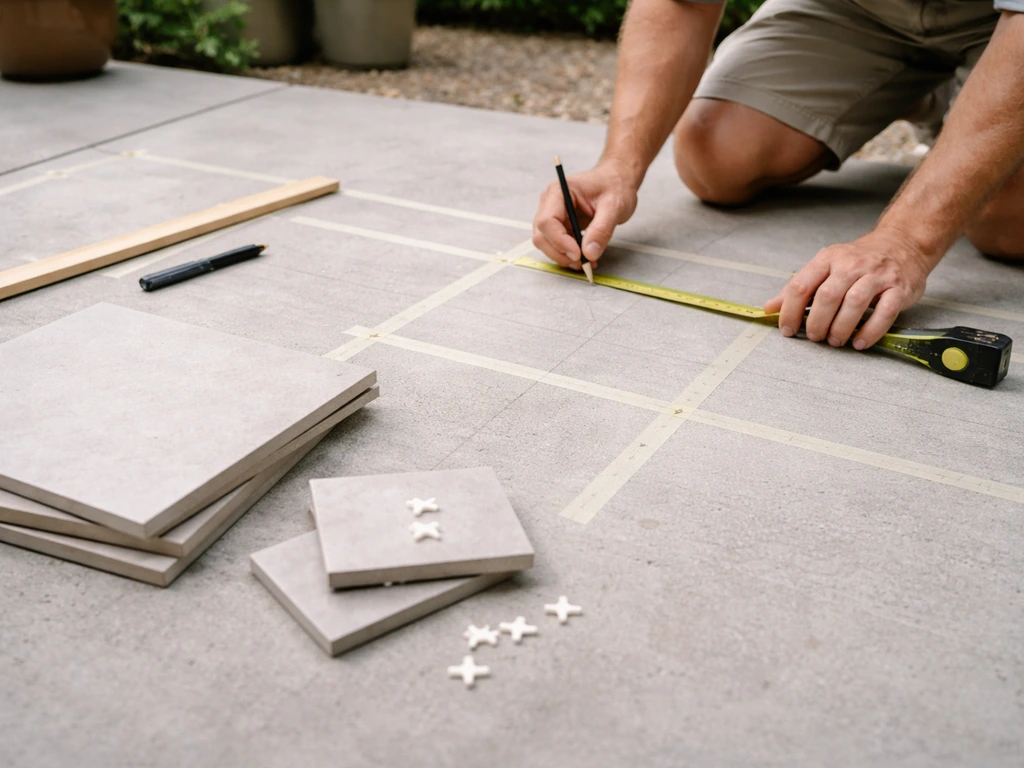
Now do a complete dry lay, place every tile without mortar to check your pattern, confirm the cuts you'll need at edges and obstacles, and make sure the layout is symmetrical and centered the way you want it. This is the step most beginners skip and almost always regret. A dry lay takes an extra hour and saves you from discovering mid-installation that you're going to end up with a 30mm sliver of tile in the most visible corner of the patio. Start from the most visible point (usually the edge nearest the house) and work outward. Mark tiles with chalk or a pencil if needed. Take a photo of the dry lay before you pull the tiles up, it's your reference map.
Set the tiles, mortar, adhesive, and bedding methods explained
For the semi-dry mortar bed method: screed your bedding layer to the correct level and slope, then butter the back of each tile with a thin layer of neat cement slurry or polymer-modified adhesive (this is called back-buttering, and it dramatically improves the bond). Set the tile, tamp it down firmly with a rubber mallet, and check it with your spirit level after every few tiles. For thin-set adhesive over a concrete slab: use a notched trowel to spread the adhesive in one direction, then back-butter the tile as well, this "double-buttering" technique is key to hitting that 95% coverage target outdoors. After pressing the tile down, lift one tile every 15–20 tiles to check that the mortar ridges have collapsed and coverage is full across the back. If you see bare patches, you need more adhesive or a larger notch trowel.
Work in manageable sections, about 1 square meter at a time, so you're not walking on freshly set tiles and the mortar doesn't skin over before the tile goes down. Use tile spacers to keep joint widths consistent. For outdoor tiles, 3–5mm joints are common, but check your specific tile manufacturer's recommendations since some larger format tiles need wider joints to accommodate movement. Clean mortar off the tile faces as you go, once polymer-modified mortar has cured, removing it from the tile surface is a real pain.
Cut tiles for edges and build in expansion gaps
You'll almost certainly need to cut tiles at the perimeter, around posts, and at any obstacles like drain grates or downpipe bases. Use a wet tile saw (angle grinders with diamond blades work too, but a wet saw gives cleaner cuts and reduces dust). Measure twice, cut once, it sounds obvious, but rushing cuts is where most tile chips and waste happen. Always wear eye protection and a dust mask.
Expansion (movement) joints are non-negotiable outdoors. Tiles expand and contract with temperature changes, and without somewhere for that movement to go, the tiles will crack or tent. The rules from TCNA EJ-171 are straightforward: place movement joints at the perimeter (where the tiles meet walls, edging, or fixed structures) with a minimum width of 1/4 inch (6mm), and blank" rel="noopener noreferrer">place field movement joints at intervals of 8 to 12 feet in each direction. IMI’s EJ171N perimeter joint detail likewise calls for soft movement joints at perimeter terminations and plane changes, rather than hard grout at those locations blank" rel="noopener noreferrer">movement joints at the perimeter. Joint width scales with spacing: 3/8 inch (9.5mm) for joints at 8-foot centers, and 1/2 inch (12.5mm) for joints at 12-foot centers. Do not grout these joints, fill them with a closed-cell foam backer rod first, then finish with a flexible 100% silicone sealant. The backer rod controls the depth of the sealant and prevents three-sided adhesion, which is what allows the sealant to flex properly.
| Joint spacing (on-center) | Minimum joint width | Fill method |
|---|---|---|
| Perimeter (all edges) | 1/4 in (6mm) minimum | Foam backer rod + 100% silicone sealant |
| 8 ft field joints | 3/8 in (9.5mm) | Foam backer rod + 100% silicone sealant |
| 12 ft field joints | 1/2 in (12.5mm) | Foam backer rod + 100% silicone sealant |
Grout, seal, and do a final check
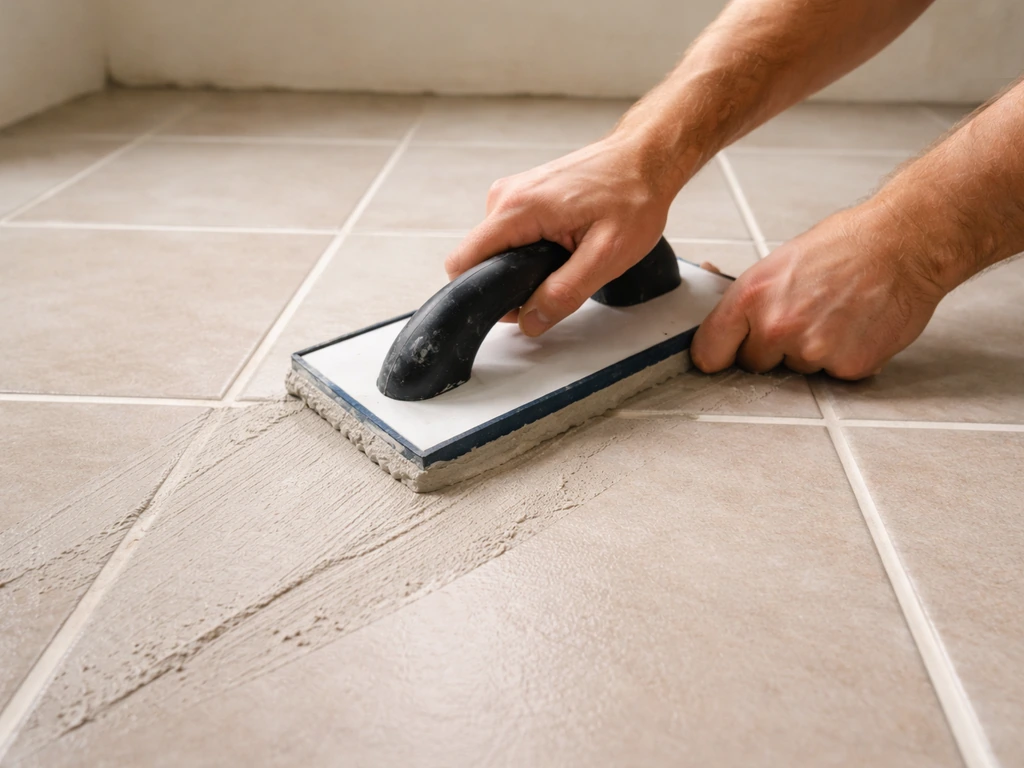
Allow your tile adhesive or mortar bed to cure fully before grouting, typically 24 hours minimum, but check the product instructions. For outdoor use, choose a flexible, polymer-modified grout or an epoxy grout. Epoxy grout is the most durable and stain-resistant option and is excellent for areas that will see water, frost, and general outdoor grime. The trade-off is that it's harder to work with and needs to be cleaned off the tile surface before it cures (it sets quickly and becomes very difficult to remove once hard). If you use epoxy grout, work in small sections and keep a damp sponge moving. Foot traffic is typically possible after 24 hours and heavy use after 72 hours, but protect the area from rain while it cures.
After grouting, apply a tile and grout sealer appropriate for your tile type. Porous tiles like natural stone and unglazed ceramic need sealing to prevent water ingress and staining, apply sealer before grouting too, so the grout doesn't stain the tile face. Glazed porcelain generally doesn't need a tile sealer, but the grout joints do. If you've used epoxy grout, wait at least 10 days after curing before applying any sealer. For standard grout, follow the product's recommended cure time before sealing (usually 72 hours minimum).
Final check: pour a bucket of water on the finished surface and watch where it goes. It should sheet away smoothly toward the outer edge or a drainage channel at a consistent rate. Pooling anywhere is a red flag, either the slope is insufficient or you have a low spot that needs addressing. Check that grout joints are fully filled with no voids or pinholes, that all expansion joints are filled with sealant (not grout), and that no tiles are rocking or hollow-sounding when tapped. Run your hand along the surface to check for lippage between tiles, any edge higher than about 1mm will be a trip hazard and a place where dirt accumulates.
Common mistakes, troubleshooting, and keeping it in good shape
Mistakes that cause failures
- Not enough mortar coverage: voids under tiles let water in, freeze, and pop tiles off. Always double-butter and check coverage by lifting a test tile.
- Wrong slope or no slope: flat patios pool water. Set your drainage gradient at 1/4 inch per foot from the very beginning — don't try to correct it with the tile or grout.
- Grouting expansion joints: filling movement joints with rigid grout is the single most common cause of tile cracking and tenting outdoors. Those joints must stay flexible.
- Using indoor tiles or indoor adhesive outside: standard indoor products can't handle freeze/thaw cycles or sustained moisture. Always check the product's exterior/frost rating.
- Skipping the dry lay: misaligned patterns, awkward cuts at visible edges, and wrong tile counts are entirely preventable with a 60-minute dry run.
- Not cleaning mortar off tile faces promptly: polymer adhesives and grout cure hard and fast. Wipe tiles clean as you go, every time.
Troubleshooting after installation
If a tile sounds hollow when tapped, there's a void beneath it, it will eventually crack or lift. The fix is to remove the tile, clean both surfaces, and re-bed it with proper coverage. Cracked tiles in a field (not at the edge) usually mean either voids in the mortar bed or movement joints were omitted and the tile had nowhere to move. Tiles popping up or tenting in cold weather are almost always a moisture plus inadequate movement joint problem. Efflorescence (white powdery deposits on the surface) is mineral salts being drawn out by water movement through the base, improve drainage, seal the tiles and grout, and clean the surface with a diluted acid-based cleaner designed for tiles.
Ongoing maintenance
A properly installed outdoor tile patio needs very little maintenance. Sweep it regularly and wash it down with clean water. Reapply grout sealer every 1–2 years depending on foot traffic and weather exposure. Inspect the silicone expansion joints each spring, if the sealant has cracked or pulled away, remove it, clean the joint, and reapply. Catching a failed expansion joint early is a 20-minute job; ignoring it leads to much bigger problems. For natural stone, re-seal the tile surface annually. Avoid harsh bleach-based cleaners that can break down grout and sealers, a mild pH-neutral cleaner is all you need for routine cleaning.
If you're working on a specific tile type or surface, the approaches for how to tile an outside patio, how to install patio tiles, and how to tile a patio each have their own nuances worth reading up on, particularly if you're dealing with an existing surface or a more complex layout. For tips specific to tabletops and surfaces that get heavy daily use, see our guide on how to tile patio table how to tile an outside patio. But the foundation covered here applies to every outdoor tile project: solid base, correct slope, full mortar coverage, proper movement joints, and the right finish. Get those right and you'll step out onto a patio that looks great and holds up through whatever the weather throws at it.
FAQ
What should I do if my patio base is not perfectly sloped?},{
Use a level and a straightedge on the sub-base before setting tiles, then verify the slope again after the mortar bed is screeded. If you find a low spot, fix it at the sub-base stage (add and re-compact), rather than trying to “level” with thicker mortar, which can create voids and weak bedding under freeze-thaw.