Laying a porcelain tile patio is a very achievable DIY project if you respect the process. Get the base right, use the correct adhesive, build in a proper drainage fall, and those beautiful slabs will last decades. Rush any of those steps and you'll be lifting tiles within a couple of winters. This guide walks you through every stage, from measuring your garden to grouting the final joint, with honest advice on where things go wrong and how to avoid them. If you want a step-by-step overview of how to install patio tiles from start to finish, follow the process in order and don’t skip the base and drainage checks grouting the final joint.
How to Lay a Porcelain Tile Patio: Step-by-Step DIY Guide

Clara Farrell
20 Jun 2026
Planning the patio layout and tile selection
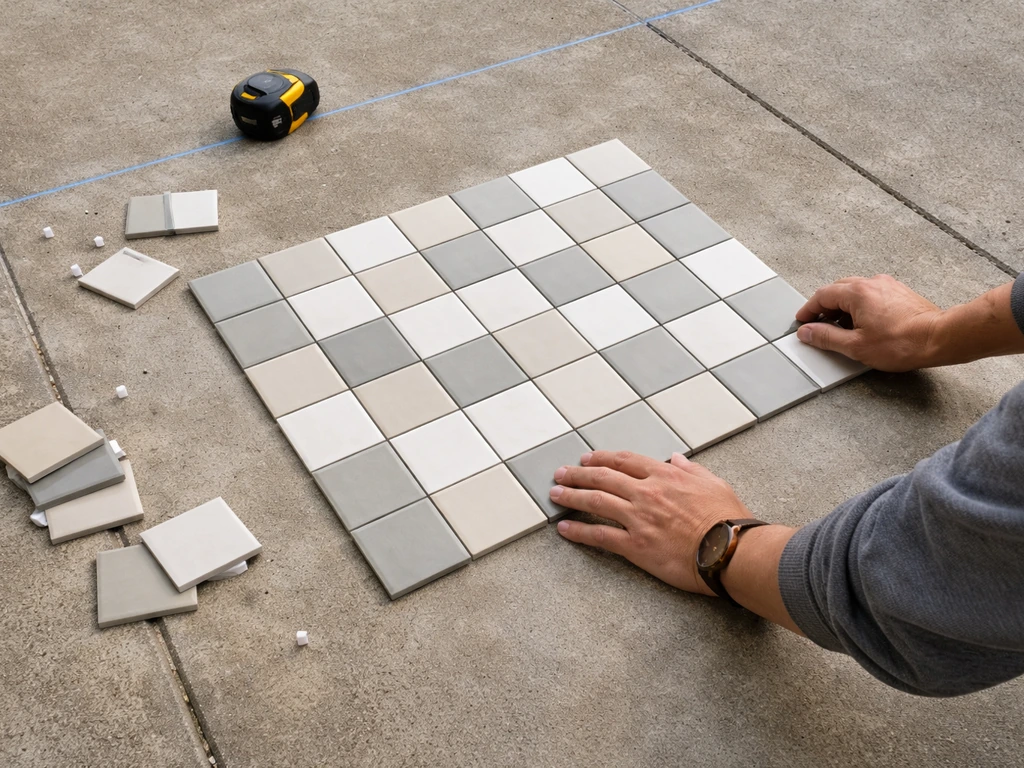
Before you order a single tile, spend time on paper. If you're wondering how to tile a patio step by step, this guide walks you through the key stages from layout to finishing. Sketch your patio shape, measure it carefully, and think about how the tiles will fall across the space. Starting from a central point or a strong sightline (usually the back of the house) and working outward tends to give the most balanced look. Avoid ending up with tiny slivers of tile along one edge, if your layout throws up cuts smaller than about a third of a tile width, shift the starting point slightly until you get a better balance.
For outdoor use, porcelain is one of the best materials you can choose. It has a water absorption rate of 0.5% or less (blank" rel="noopener noreferrer">classified as BIa under EN 14411 and tested to ASTM C373 under ANSI A137.1), which means it barely takes on moisture and is highly resistant to frost damage, critical in northern climates where freeze-thaw cycles crack more porous materials. For exterior patios, look for tiles that are explicitly rated frost-resistant or frost-proof. DIN/EN frost-resistance selection is tied to the porcelain/EN 14411 classification and requires the product to be rated for freeze-thaw conditions in northern climates blank" rel="noopener noreferrer">frost-resistant or frost-proof. If you live somewhere that gets hard winters, this isn't optional.
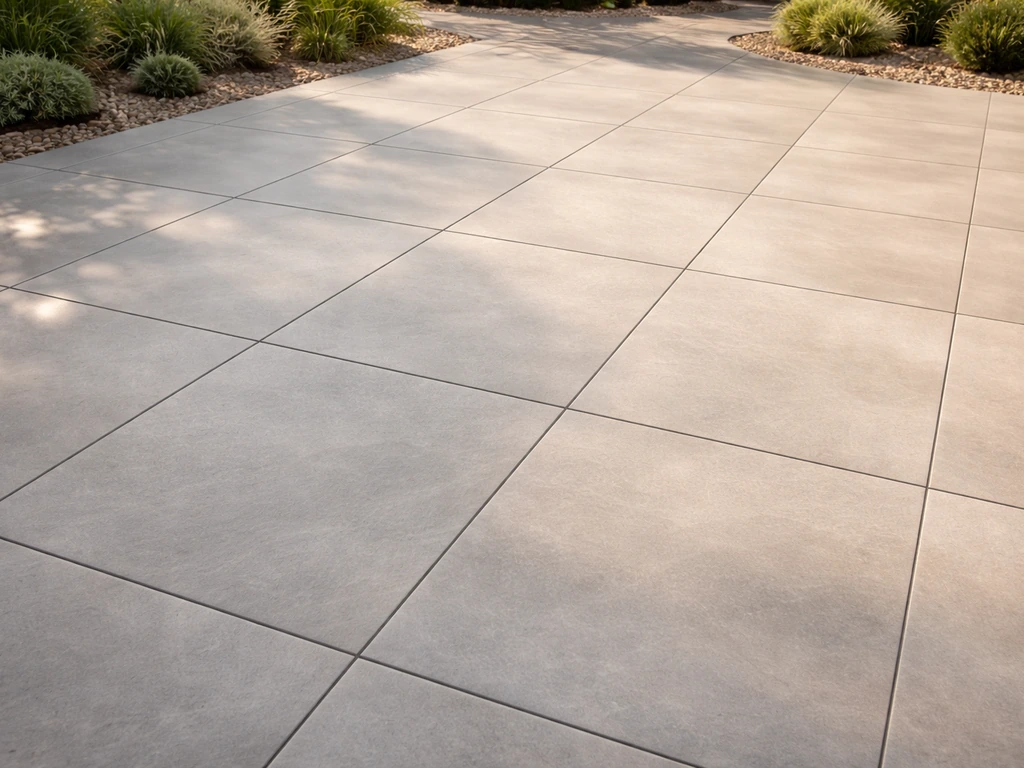
Thickness matters too. For a ground-level patio where foot traffic is the main load, 20 mm (2 cm, roughly 3/4 inch) porcelain pavers are the industry standard for exterior use. Thinner tiles designed for interior floors are not suitable, they can crack under point loads and the flex of an outdoor base. Stick with 20 mm slabs and you'll have something robust enough for garden furniture, foot traffic, and occasional wheeled loads like a barbecue.
Slip resistance is the other key spec to check. Look for a coefficient of friction (COF or DCOF) of at least 0.60 for outdoor wet surfaces, or an R-rating of R11 or higher. Smooth, polished porcelain looks stunning in a showroom but can be dangerously slippery when wet. A textured or slightly matte surface gives you traction without sacrificing the clean aesthetic most people are after.
- Choose 20 mm thick porcelain pavers for ground-level exterior use
- Check water absorption is ≤0.5% (BIa class) and confirm frost resistance
- Target a COF/DCOF of 0.60 or higher, or an R11 slip rating, for outdoor safety
- Order 10–15% extra tiles to account for cuts, breakages, and future repairs
- Sketch your layout before ordering so you know your starting point and cut positions
Site prep: base, excavation, and sub-base for porcelain
This is where most DIY patios fail. A porcelain patio needs a solid, stable base that won't shift with moisture or frost. Unlike a simple gravel path, you can't cut corners here. The good news is that the process is straightforward, it just takes some physical work and patience.
How deep to dig
For a standard residential patio, you're digging down approximately 200–250 mm (8–10 inches) from your finished surface level. That gives you room for: roughly 100–150 mm of compacted hardcore sub-base, a 50 mm sand-and-cement or concrete bed, and your 20 mm tiles. Always factor in the finished height relative to your back door threshold and any adjacent surfaces, you don't want water pooling against the house.
If you're on clay soil, be especially careful. Clay moves with moisture, which means movement in your base, which means cracked and lifted tiles. On clay, consider going deeper with your hardcore layer (up to 200 mm) and adding a geotextile membrane between the soil and the hardcore to prevent migration. In particularly problematic clay areas, a full concrete slab base is the most reliable option rather than the more common compacted hardcore approach.
Building the sub-base
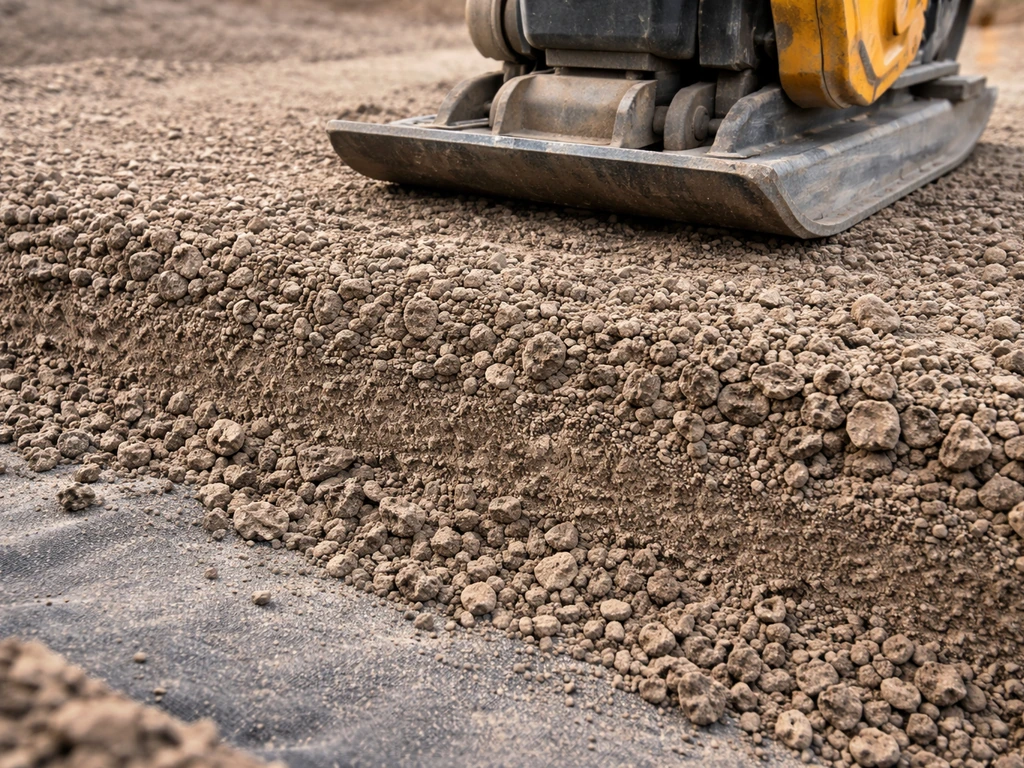
Once excavated, lay your geotextile fabric, then fill with Type 1 MOT hardcore (crushed aggregate). Add it in 75–100 mm layers and compact each layer thoroughly with a plate compactor, you can hire one for a day and it makes an enormous difference versus trying to tamp by hand. After compaction, you should have a firm, unyielding surface. Test it by pressing your heel into it firmly; if it sinks, it needs more compaction or more hardcore. On top of the compacted hardcore, a blinded layer of sharp sand helps create a level working surface for your concrete or mortar bed.
Surface prep: leveling, falls, and edge details
Two things that will make or break your patio: a flat, level setting bed and the correct drainage fall. Get both right and you'll have a patio that looks sharp, drains properly, and won't become a puddle trap in heavy rain.
Getting the drainage fall right
Porcelain is nearly impervious to water, so every drop that lands on it needs somewhere to go. Build in a fall of 1:80 to 1:60, that's roughly 12–16 mm of drop per metre of patio. The fall should run away from the house toward the garden, a drain, or a permeable edge. You can set this fall into your concrete or mortar bed by establishing your levels with a long spirit level or laser level before you start laying. Mark the fall on your edging boards or string lines so you're working to the right gradient from the start. Trying to correct drainage after the tiles are down is a nightmare, do it in the base.
Edge restraints
Porcelain patio slabs need edge restraints to prevent the perimeter from spreading or dropping over time. Options include concrete haunching along the outer edges (basically packing concrete around and slightly under the outer row of tiles), or proprietary aluminium or plastic edging profiles. For most domestic patios, concrete haunching is the most robust approach, apply it before you start laying the body of the patio and let it cure. Edge restraints are especially important on slopes or where the patio meets a lawn, where there's no natural boundary to hold things in place.
Laying on an existing surface
If you're laying porcelain over an existing concrete slab, the slab must be structurally sound, no crumbling, no significant cracks, and no movement. You'll still need to check falls and level any high spots (grinding them down) or fill low spots with a suitable leveling compound. A bad existing slab doesn't automatically mean you need to break it out, but it does mean you need to assess it honestly before assuming it's a shortcut. Laying over existing block paving or loose surfaces is generally not recommended for porcelain.
Underlayment and setting: mortar, adhesives, and waterproofing
Outdoor porcelain cannot be laid the same way as indoor tiles. The setting system has to handle freeze-thaw, thermal expansion, moisture, and the weight of 20 mm slabs. This is one area where using the wrong product causes problems that don't show up until the first cold winter, and by then, it's expensive to fix.
Mortar bed vs. adhesive: which to use
| Method | Best for | Thickness | Pros | Cons |
|---|---|---|---|---|
| Semi-dry mortar bed (5:1 sharp sand:cement) | New excavated bases over hardcore | 40–50 mm | Forgiving to level, good for large slabs, cost-effective | Slower process, needs experience to get consistent levels |
| Flexible exterior tile adhesive (C2 TE S1/S2 rated) | Concrete slab bases, lower-thickness builds | 10–20 mm | Precise, bonds strongly to existing slabs, good for thinner builds | Higher material cost, less room for leveling adjustment |
| Combination: mortar bed + adhesive skim | Best practice for large format 20mm slabs | 40–50 mm bed + adhesive skim on both slab and bed | Maximum bond, full coverage, best for frost conditions | Most time-consuming and material-intensive approach |
For most DIYers tackling a new excavated patio, the semi-dry mortar bed is the most practical approach because it gives you adjustment room as you set each slab. However, the key rule for outdoor porcelain is full contact, you need mortar or adhesive covering the entire back of the tile, with no voids. Voids trap water, water freezes, and tiles crack or pop off. Use a notched trowel to apply adhesive to both the bed and the back of the tile (this double-buttering technique is standard practice for exterior porcelain). If you're working off an existing concrete base, use a C2 TE S1 or S2 rated flexible adhesive specifically formulated for exterior use.
Waterproofing considerations
For most standard garden patios, a well-built base with correct drainage falls handles water management adequately, you don't need a dedicated waterproofing membrane under the tile bed. Where a waterproof membrane becomes important is if your patio is over a cellar, a basement, or forms a roof terrace. In those situations, a proper tanking system applied to the structural base before tiling is essential, and that work is typically better suited to a specialist. For ground-level garden patios, focus on drainage fall and full mortar coverage rather than membrane products.
Laying porcelain patio slabs: spacing, cutting, and setting technique
Now for the satisfying part, actually putting the tiles down. If you want step-by-step guidance, use this guide on how to lay patio tiles from start to finish. Work methodically, check your levels constantly, and don't rush. Large format porcelain looks stunning when it's laid perfectly, and the alignment errors are very visible if it's not.
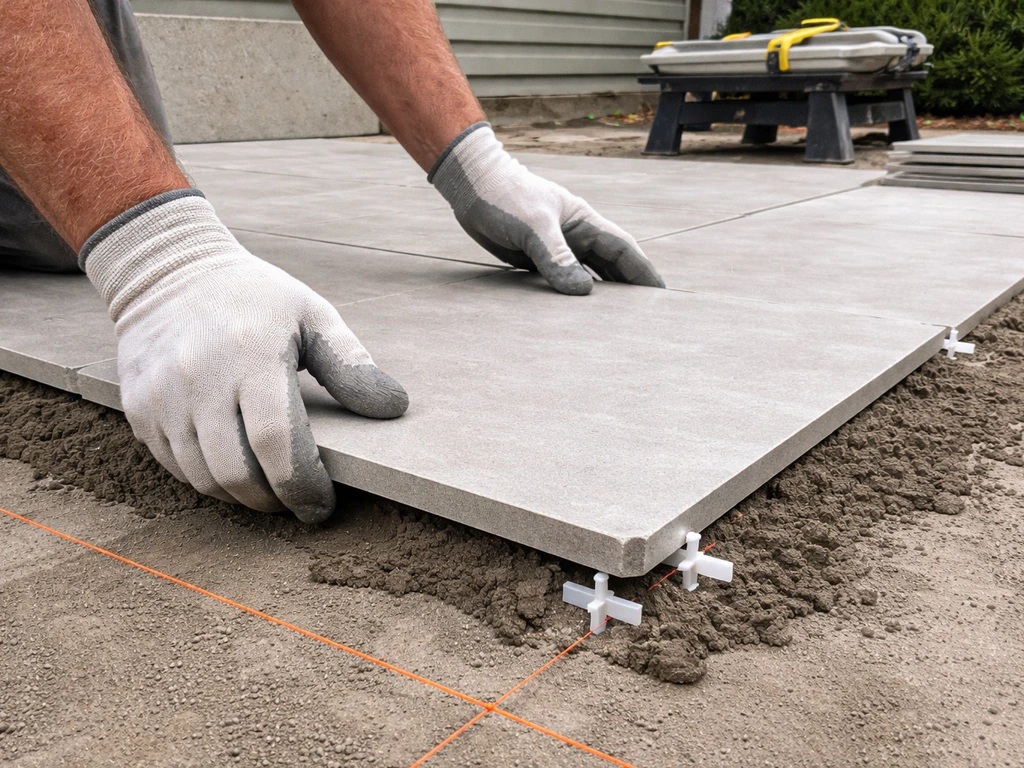
Setting the first tiles
Start from your established reference point (usually a string line or chalk line marking the first row). Apply your mortar bed or adhesive to an area slightly larger than one tile at a time, working in sections means the bed doesn't skin over before you lay the tile. Apply adhesive to the back of the tile (double-butter), lower it carefully into position, then press it down firmly and tap across the surface with a rubber mallet to bed it in and eliminate air pockets. Check level and fall with a spirit level after every tile and before the adhesive sets. Adjust by pressing harder or adding a touch more adhesive underneath, once it's set, you're stuck with it.
Spacing and joint width
Outdoor porcelain needs wider joints than interior tiles, at least 3 mm, and typically 5–10 mm is preferable. Wider joints accommodate thermal expansion (porcelain expands slightly in heat) and allow grout to form a proper bond. Use plastic tile spacers consistently across the whole area. Don't rely on eye-balling it, even small inconsistencies in joint width are very noticeable with large format tiles.
Cutting porcelain
Porcelain is hard, much harder than standard ceramic, and needs a diamond blade wet saw to cut cleanly. A standard angle grinder with a diamond blade can manage straight cuts but produces a rougher edge and a lot of dust. For anything more than a handful of straight cuts, hiring or buying a decent wet tile saw is worthwhile. Mark your cut line with a pencil or wax crayon, cut slowly and steadily, and support the offcut so it doesn't snap before the cut is complete. For curves or notches around drain covers, obstacles, or steps, use an angle grinder with a diamond blade and take multiple small passes rather than trying to do it in one.
Transitions and tricky areas
Where your patio meets a step, a wall, or a different surface level, plan the transition before you start laying. If you are planning a patio table layout, the same spacing, drainage fall, and frost-resistant tile choices apply. Stainless steel or aluminium threshold profiles create a clean, weatherproof edge at transitions between patio and indoor flooring or between different materials. At drains, work out your tile layout so the drain sits centrally or at a natural joint if possible, this is much easier to plan on paper first than to figure out once tiles are half down. On slopes, work from the bottom upward so tiles don't slide before the adhesive grabs.
Grouting, sealing, and finishing touches
Grouting is the step people tend to rush, and it's where a lot of DIY patios end up looking less professional than they could. Take your time here.
Choosing the right grout
For outdoor porcelain, use a cementitious exterior grout with added flexibility, or a ready-mixed pointing compound designed for external paving. Standard interior grout is not suitable, it's not flexible enough to handle outdoor thermal movement and will crack. Epoxy grout is another option for high-performance applications: it's extremely durable, stain resistant, and weatherproof, but it's harder to work with and more expensive. For most DIY garden patios, a quality flexible cementitious exterior grout in a colour that complements your tile is the right choice. Buff or mid-grey tends to hide staining better than white over time.
Applying the grout
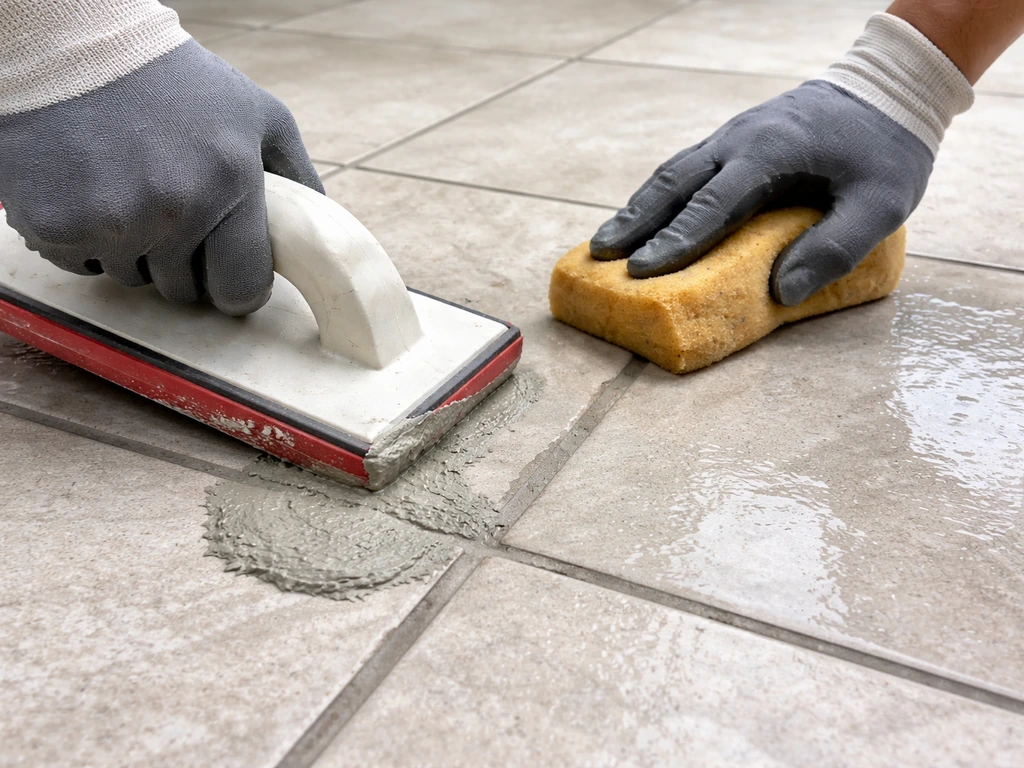
Wait until the tile adhesive or mortar has fully cured before grouting, usually a minimum of 24 hours, but check the product data sheet. Remove all tile spacers and any debris from the joints. Mix your grout to a firm, peanut butter consistency. Work it into the joints with a grout float, pressing firmly to fill the full depth of the joint. Clean the tile surface with a damp sponge before the grout hazes over, porcelain's low porosity means grout haze can be stubborn to remove once dry. Tool the joints lightly with a rounded stick or grout shaper as you go to create a slightly recessed, neat finish.
To seal or not to seal
Porcelain itself doesn't need sealing, its near-zero water absorption means a sealant adds very little to the tile surface. However, sealing your grout joints is worth considering, especially if you're using a light-coloured grout. A grout sealer applied once the grout has fully cured (typically 7 days minimum) helps resist staining from algae, moss, and dirt. Apply it with a small brush along the joints only, avoiding the tile face. Reapply every couple of years as part of regular maintenance.
Curing, maintenance, and common DIY mistakes
Curing and protecting your new patio
After grouting, keep foot traffic off the patio for at least 24–48 hours and avoid heavy loads for a week. If rain is forecast in the first 24 hours after grouting, cover the patio with plastic sheeting, water on fresh grout can wash it out of the joints. In hot weather, the mortar bed and grout can dry too fast and crack, so mist the surface lightly and work in shaded conditions where possible. Don't lay porcelain in freezing temperatures, adhesive and mortar need temperatures above 5°C to cure properly. If you're laying in autumn or spring, keep an eye on overnight temperatures.
Ongoing maintenance
Porcelain is genuinely low-maintenance compared to natural stone or concrete. Sweep regularly and wash down with warm soapy water or a patio cleaner as needed. A pressure washer works well on porcelain but keep it on a medium setting to avoid eroding the grout joints over time. Inspect the joints annually, any crumbling or cracked grout should be raked out and re-pointed promptly before water gets behind the tiles. Moss and algae can be removed with a proprietary patio cleaner or a diluted white vinegar solution.
The mistakes that cause most DIY patio problems
- Skimping on the sub-base depth or skipping compaction — this causes settlement and cracked tiles within the first year
- Using interior tile adhesive or standard cement mortar without a flexible additive — it doesn't handle thermal movement or freeze-thaw
- Not double-buttering the back of large format tiles — voids under the tile are the most common cause of frost damage and hollow-sounding tiles
- Forgetting to build in the drainage fall before laying — you can't fix poor drainage after the tiles are down
- Using joints that are too narrow — less than 3 mm outdoors doesn't allow for expansion and leads to tile cracking or grout crumbling
- Grouting too soon before the adhesive has cured — it can cause movement that breaks the bond
- Trying to cut 20 mm porcelain with an underpowered blade — you'll get chipped, rough edges and potentially cracked tiles
- Laying in temperatures below 5°C without a frost protection plan
If any of this feels overwhelming, especially the base preparation on difficult ground like heavy clay or a significant slope, don't hesitate to bring in a groundworker for that stage. Getting the base professionally done and then tackling the tile laying yourself is a perfectly sensible split, and it protects the investment you're making in the materials. The tile laying itself is very manageable for a patient first-timer; the base work on tricky ground is where experience really pays off.
Once your patio is finished and fully cured, the results speak for themselves. Porcelain has an excellent lifespan outdoors, properly installed, you should get 20 or more years without major intervention. The time you invest in preparation and doing each stage correctly pays back every year you enjoy the space.
FAQ
Can I lay porcelain patio tiles directly onto an existing concrete slab?
Yes, but only if the existing slab is stable, flat to within a few millimetres over your tile area, and it has no active movement. Before tiling, check for loose or hollow spots, repair cracks that are not moving, then verify drainage fall and grind high spots. Skipping the leveling and fall check is one of the fastest ways to get lippage and puddling, even with the right adhesive.
What grout should I use for outdoor porcelain patio joints?
Use exterior grout that is labeled for outdoor paving and flexible movement, cementitious with added polymers or a ready-mixed external pointing compound. Avoid standard interior grout because it is not designed for freeze-thaw and thermal expansion. If you choose epoxy grout, expect longer curing times and more meticulous cleanup because haze removal is harder on low-porosity porcelain.
How wide should the joints be when laying a porcelain patio?
Most exterior installations need a minimum of 3 mm joints, typically 5 to 10 mm for larger slabs, and spacers help keep them consistent. Wider joints can reduce the risk of grout starvation and cracking because they give expansion room. If you end up with tight joints from poor spacing, grout can fail and you may see tile edge micro-movement.
Is thinset/adhesive enough, or do I need a mortar bed for porcelain patio tiles?
For a first-time DIYer on a new excavated patio, start with semi-dry mortar bed for easier adjustment and full contact control. Regardless of method, ensure every tile back is fully bedded, no voids, and that you double-butter the tile. If you only bed the perimeter or leave pinholes of contact, water can get trapped under the tile and lead to cracking or debonding after freeze-thaw.
How do I confirm the drainage slope before I start laying tiles?
Test the fall with a straightedge and level after the base is compacted but before you start tiling. A common mistake is relying on “eyeballing” the slope, then discovering at the tile stage that one side stays higher and pools water. Also check the fall where the patio meets doors, steps, and drains, because water often collects at transitions.
What should I do differently if my patio is on clay soil?
On clay or soils with moisture movement, treat base stability as a full system: geotextile to limit migration, a deeper compacted hardcore layer, and proper compaction in lifts. If the area is very problematic, a full concrete base can be more reliable than hardcore plus membrane alone. The goal is to stop differential movement, because tiles cannot bridge shifting substrate.
What’s the best way to cut porcelain patio tiles without chipping?
Wet-saw cutting is usually best for long straight cuts and cleaner edges. For occasional cuts, a grinder with a diamond blade can work, but use it for multiple shallow passes and support the offcut to prevent snapping. If you get chipping, slow down the feed rate and use a blade suitable for porcelain, not a generic masonry blade.
How should I plan tile layout around drains, steps, and transitions?
Plan every transition and obstacle before you lay the field tiles, including where a drain sits, how the last row lands, and how you’ll terminate at steps or steps-to-lawn edges. Use threshold profiles at door or interior transitions so the edge is sealed and protected, and work from the bottom of a slope upward to prevent tile sliding before the adhesive grabs.
When is it safe to walk on and wash the patio after grouting?
Cementitious exterior grout generally cures enough for light protection after about 24 hours, but joint strength and water resistance develop over several days. Keep traffic off the patio longer if temperatures are cool or damp, and avoid washing or pressure washing until it is fully cured. A second common mistake is grouting onto partially cured adhesive, which can cause pinholes and weak joint fill.
Should I seal porcelain tiles or only the grout?
Avoid sealing porcelain tiles themselves, because the tile is already near-impermeable. Sealing is mainly about the grout, especially if you used light grout that shows staining. Apply grout sealer only after full cure, seal the joints without flooding the tile face, and reapply periodically based on exposure to algae, moss, and heavy rain.
What are common DIY mistakes that cause uneven tiles or lippage?
Yes, and it often helps you avoid surprises with straight-line layout. Use plastic spacers consistently for joint width, but also keep an eye on tile face alignment and lippage, because large format tiles can “read” unevenness quickly. If you notice a systematic shift early, adjust the starting reference line before continuing, it is much harder to correct after the mortar skins over.
When is it worth hiring a professional for the base instead of doing everything myself?
Bring in help for base preparation when you have a significant slope, very difficult clay, or you lack experience with compaction. You can still DIY the tile setting if the base is proven firm and level with correct fall marks. This split approach is often cost-effective, since small base errors are responsible for many of the early failures that look like tile problems.