You lay a brick patio on sand by excavating to the right depth, compacting a crushed stone sub-base, screeding a 25–35 mm layer of bedding sand level with a slight drainage fall, then laying your bricks in pattern, cutting to fit the edges, locking in your edging, and finishing with kiln-dried jointing sand vibrated into the joints. Done correctly, the result is a flexible, stable surface that drains well and won't heave or shift through the seasons. Done incorrectly, wrong sand type, poor compaction, no drainage fall, and you'll be relaying it within a couple of years. This guide walks you through every stage so you get it right the first time.
How to Lay a Brick Patio on Sand: Step by Step Guide

Clara Farrell
8 Jun 2026
Plan your layout, size, and drainage fall first
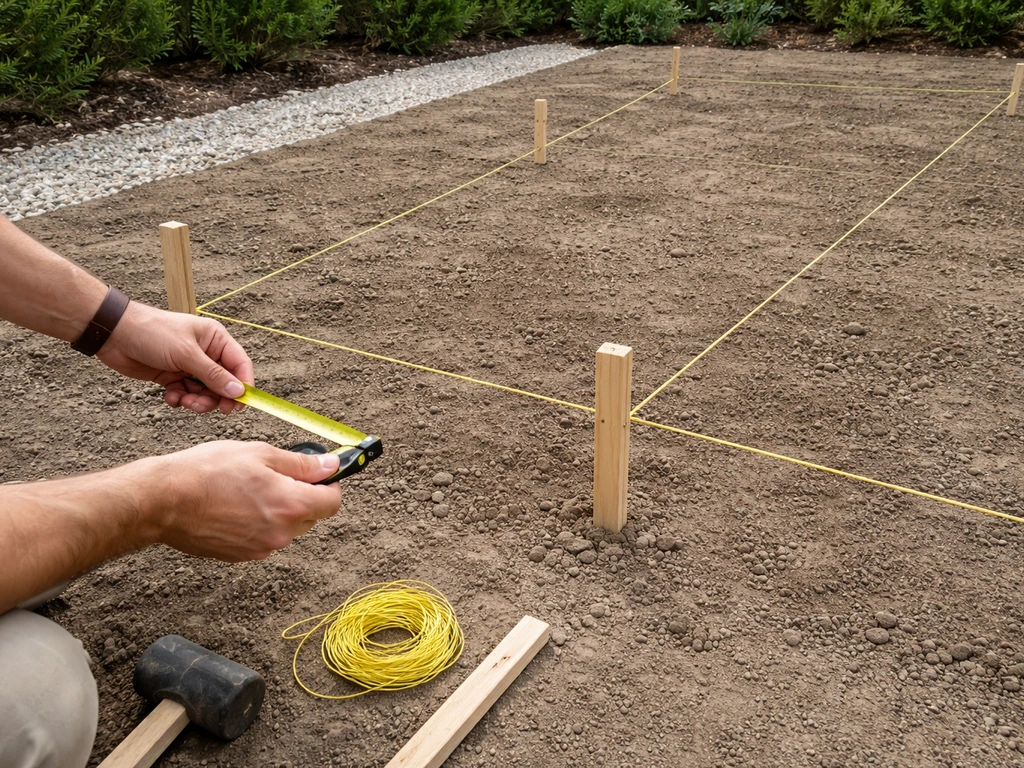
Before you touch a spade, spend a good hour with a tape measure, some pegs, and string lines. If your patio area is uneven, you still start by setting the drainage fall first, then build up or remove sub-base where needed so the finished brick surface stays level uneven ground. Work out the exact footprint of your patio, check it fits comfortably away from any drains or manhole covers, and think about where water needs to go.
A patio right against a house wall must slope away from the building, not toward it. The minimum safe gradient is 1:80, which works out to about 12. 5 mm of fall for every metre of patio width. So a 3-metre-wide patio needs at least 37.
5 mm of total fall across its width. That might sound tiny, but it's enough to get water moving off the surface rather than pooling in the middle.
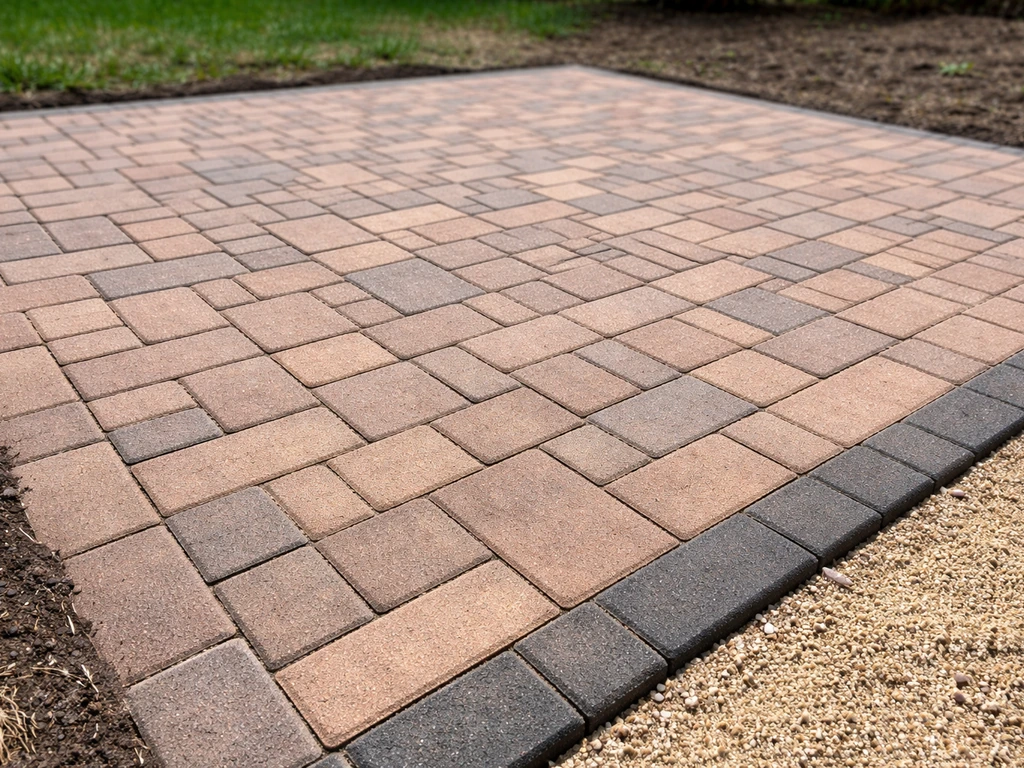
Mark your finished surface level at the high point (usually the house-side edge) and use a spirit level or line level on your string lines to set the fall to the low point. Check your brickwork pattern now too, not later. A running bond (bricks offset by half a length each row) is the classic choice and handles irregular shapes reasonably well. Herringbone at 45 degrees looks great but means more cuts and more waste, budget an extra 10–15% on materials if you go that route. For most first-timers, a simple stretcher bond or stacked pattern is easier to manage and still looks sharp.
What you'll need: the full materials checklist
Getting your materials right before you start saves multiple trips to the builders' merchant and avoids the common trap of using the wrong sand in the wrong layer. There are two completely different sand jobs here: bedding sand under the bricks and jointing sand in the gaps. They are not the same product and you cannot swap them.
| Material | What to get | Notes |
|---|---|---|
| Bricks/pavers | Clay or concrete paving bricks, min 65 mm thick for pedestrian use | Check they're rated for external/paving use, not just facing brick |
| Sub-base aggregate | MOT Type 1 (crushed stone, 40 mm to dust) | Also called granular sub-base or Type 1 hardcore |
| Bedding sand | Sharp sand or coarse concrete sand | Not building sand — too fine and unstable under load |
| Jointing sand | Kiln-dried fine sand (2 mm down) | Swept into joints after laying; purpose-made block paving sand is best |
| Edging | Paving edge restraints, concrete kerbs, or treated timber | Essential — without edging, sand migrates and bricks spread outward |
| String line + pegs | For setting levels and alignment | Buy more pegs than you think you need |
| Weed membrane | Permeable landscape fabric | Optional but helps under the sub-base on weedy ground |
| Plate compactor | Hire from a tool hire shop | Essential for sub-base; also used for final brick compaction |
| Straight-edged screed rails | Lengths of steel box section or timber | Used to set bedding sand to exact depth during screeding |
| Angle grinder or brick splitter | For cutting bricks to fit edges | A splitter is faster for clean straight cuts; grinder for angles |
Site prep and excavation: get the depth right
This is the stage most people underestimate, and it's where a lot of DIY patios go wrong. You need to excavate deep enough to fit your full build-up: sub-base, bedding sand, and brick thickness, plus a little room for the edging to be set in concrete.
If you're starting on dirt rather than a sand build-up, follow the same overall layering logic but focus on removing soil and building a firm base correctly, see how to lay brick patio on dirt for the dirt-specific steps. For a full walkthrough of how to put in a brick patio, keep following this guide through bedding sand, brick laying, and jointing sand.
For a typical residential patio with 65 mm paving bricks, 100–150 mm of compacted sub-base, and 25–35 mm of bedding sand, you're looking at a total dig depth of around 200–250 mm below your finished surface level. Mark that depth on a peg at each corner and use a string line as a reference while you dig.
Clear all topsoil, roots, and organic material completely. Topsoil compresses and rots over time, which causes settling. If you're starting on grass, you'll likely hit around 100–150 mm of topsoil before you reach a more stable subgrade. If you’re wondering how to build a brick patio on grass, the key is to remove topsoil and follow the right excavation depth and sub-base layers so the surface stays stable.
On clay-heavy ground the story changes a bit, clay holds water and can move with freeze-thaw cycles, so don't skimp on sub-base depth. If your garden has heavy clay within the excavation zone, aim for the deeper end of the sub-base range (150 mm compacted) and consider whether you need a drainage outlet at the low edge of the patio. If you're building on grass or dealing with a slope, those situations each have their own quirks worth addressing separately.
If your patio is on a slope, you will need to plan the drainage fall carefully and excavate to the correct build-up depth so the base stays stable building on grass or dealing with a slope.
Once excavated, compact the exposed subgrade soil with your plate compactor before adding anything else. Any soft or spongy spots should be dug out and filled with compacted hardcore. A firm, even floor here is what everything else rests on.
Build and compact your sub-base properly
MOT Type 1 crushed stone is your best friend here. It's a graded aggregate that locks together when compacted, creating a solid, stable base that drains freely and doesn't shift. Spread it in layers no deeper than 100 mm at a time and compact each layer before adding more. If you try to compact 200 mm in one go, the plate compactor only reaches the top portion and you'll have loose material underneath. Two passes at 100 mm each is far better than one deep layer.
Aim for a compacted sub-base depth of 100–150 mm for a typical garden patio. The surface of the compacted sub-base should already follow your drainage fall, set it to the same 1:80 gradient you established with your string lines. Check with a spirit level and straightedge as you go. Any voids or humps in the sub-base will telegraph through to the finished brick surface eventually, so take your time getting it flat and firm. The plate compactor will want to 'walk' across the surface; make overlapping passes in two directions (north-south and east-west) to get even compaction across the whole area.
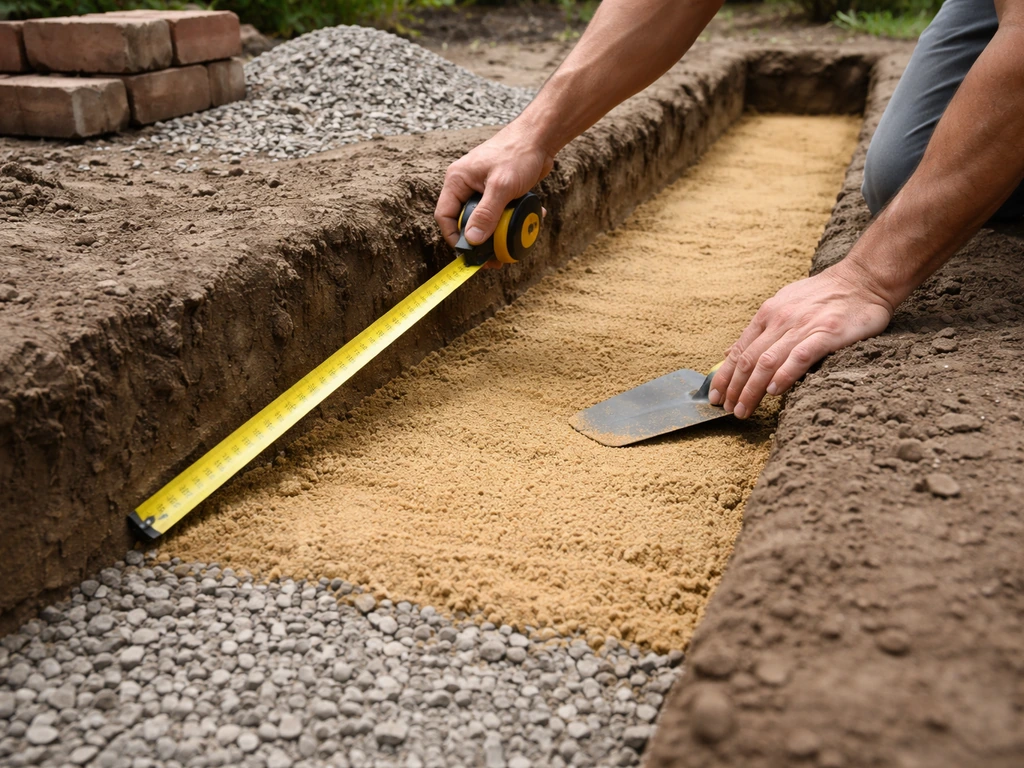
Installing and screeding the bedding sand
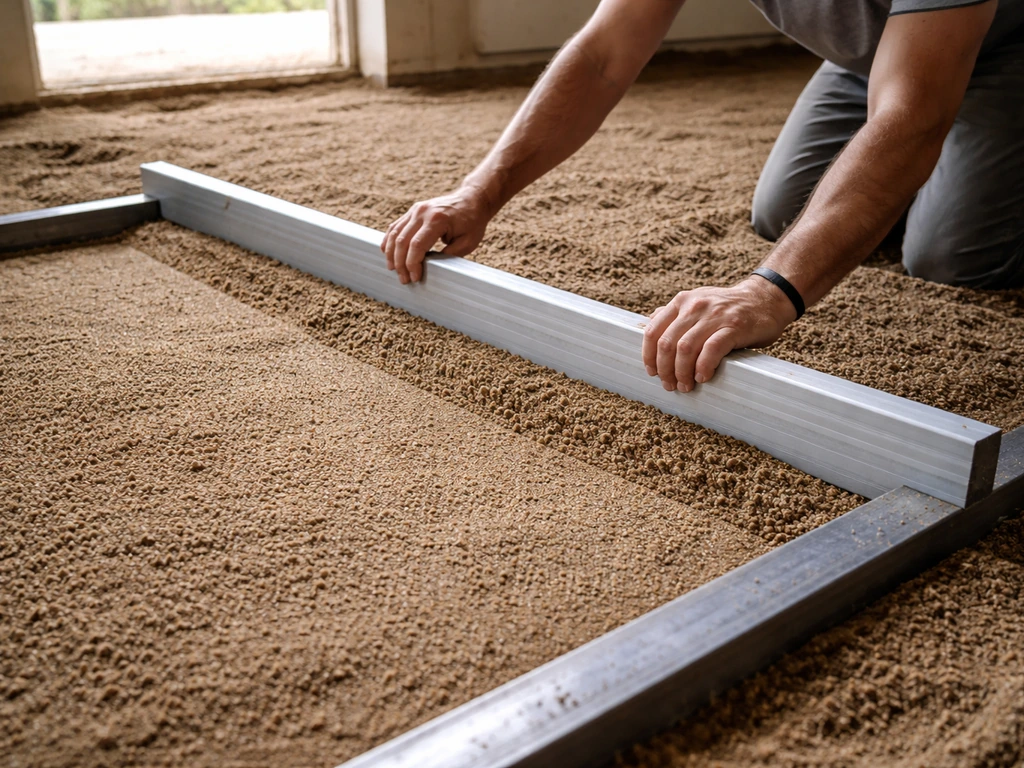
Bedding sand is what your bricks sit on, and getting its depth and level right is probably the most skill-sensitive part of the whole job. Use a coarse sharp sand, not soft building sand, which is too fine and compressible. Spread it loosely over the compacted sub-base to a depth slightly above your target finished level, because when you screed it down and the bricks are compacted into it, it will compress a little. Aim for 25–35 mm in its compacted state. A good rule of thumb is to set your screed rails so the sand surface sits about 5–10 mm above final finished level before compaction, which accounts for the bricks bedding in during vibration.
Lay two screed rails (lengths of steel box section work perfectly) parallel across the area, set to exactly the right height using your string lines as reference. Heap sand between them, then drag a long straightedge across both rails in a sawing motion to create a perfectly flat, slightly surplus surface. Work in sections, removing the rails and filling the channels with sand as you go. Do not walk on screeded sand, lay a kneeling board or a spare paver to work from, and screed in the direction you'll be laying bricks so you're always working forward and never stepping on the finished bed.
The screeded sand should maintain the same 1:80 drainage fall as the sub-base below. Double-check this at several points with a long spirit level and a wedge or tape measure. Getting the fall consistent across the screeded surface means you won't have to make corrections once the bricks are down, and trying to correct levels after laying is really frustrating.
Laying the bricks: pattern, spacing, and cutting
Start from a straight, fixed edge, usually the house wall or a pre-set edging restraint, and work outward. Lay bricks gently onto the screeded sand without sliding them, as sliding disturbs the bed and creates ridges. Place each brick firmly by hand, then use a rubber mallet to tap it down flush with its neighbours. Check levels constantly with a straightedge and spirit level, both along rows and across them. Any brick that's sitting high can be lifted and a little sand scraped away; any that's low can be lifted and a pinch of sand added underneath.
Keep your joint gaps consistent. For standard paving bricks, aim for 2–5 mm gaps between units. Many clay paving bricks have small spacer nibs moulded into the sides that automatically set the joint width, which is a helpful guide. Stretch a string line along each new row as you go to keep courses running straight, even a small drift will compound over a long run and look very obvious by the end.
When you reach the edges, you'll almost certainly need to cut bricks to fill the remaining gaps. A rented hydraulic block splitter handles straight cuts quickly and cleanly. An angle grinder with a diamond blade gives you more control for angled or shaped cuts. Measure each gap individually rather than assuming every cut will be the same size, small inconsistencies in laying mean gaps vary slightly. Always dry-fit a cut brick before placing it permanently. Wear eye and dust protection when cutting.
Common laying mistakes to avoid
- Sliding bricks onto the sand bed instead of placing them straight down — it ridges the surface
- Walking on freshly screeded, unlaid sand and creating dips
- Skipping the string line check and letting rows wander — fix it row by row, not at the end
- Mixing bricks from different packs without blending — colour batches vary, so blend from at least three packs at once
- Leaving full-size bricks against cut edges where a half-cut would look much tidier
- Assuming all your cut bricks at the perimeter are the same width — measure each one
Edging, jointing sand, final compaction, and finishing checks
Edging restraints are non-negotiable on a sand-laid patio. Without them, the sand bed slowly migrates outward under foot traffic and the whole surface gradually spreads and loosens. Install your edge restraints before you lay the central area if possible, this gives you a fixed perimeter to work toward. Concrete kerbs, purpose-made plastic paving edging, or treated timber all work. Set them in a small concrete haunch (a narrow footing of concrete on the outer face) and allow it to cure before applying any load to the edge.
Once all bricks are laid and edging is secure, do a careful visual check before adding jointing sand. Walk the surface slowly and look for any bricks that are high or low, any that have rotated slightly out of true, and any joints that are noticeably wider or narrower than the others. Fix these now, it's impossible to correct alignment or level issues once jointing sand is in place. Check your surface drainage fall one more time with a long level and adjust any obviously wrong areas.
Sweep the surface clean of any grit or debris, then pour kiln-dried fine jointing sand (2 mm down grade) over the surface and sweep it across the patio with a stiff broom, working it into all the joints. Leave a small surplus on the surface rather than sweeping it all off, you want sand sitting in and slightly above the joints so the plate compactor can vibrate it fully down into place. Make two or three passes with the plate compactor in different directions. The vibration settles the sand deep into the joints and also beds the bricks firmly and evenly into the sand layer below.
After compaction, check that joints are fully filled to within about 15–35 mm of the brick surface (not flush with the top, and not hollow). If gaps remain open, sweep in more jointing sand and make another compactor pass. Finish by sweeping any loose sand off the surface. The jointing sand will continue to settle slightly over the first few weeks, especially after rain, so expect to top up the joints once or twice in the first month, this is completely normal and not a sign that anything went wrong.
Final checks before you call it done
- Pour a bucket of water on the patio surface and watch where it goes — it should run clearly toward the low edge within a few seconds, not pool anywhere
- Walk every square metre and listen or feel for any rocking bricks — a hollow knock means a poorly bedded unit that needs lifting and re-setting
- Check that the surface level is at least 150 mm below any damp-proof course on the house wall
- Confirm edging restraints are solid on all sides with no flex or movement
- Top up any open or shallow joints with more kiln-dried sand and brush level
Sand-laid vs. mortar-laid: which is right for your patio?
The sand-laid (flexible) method described in this guide is the best starting point for most DIYers. It's more forgiving to lay, easier to repair (just lift a brick, fix the issue, and re-lay), and naturally flexible enough to handle slight ground movement without cracking. The trade-off is that it needs proper edging and the right sand to stay stable long-term, and it won't suit areas with very heavy vehicle loads. Once you understand the mortar-laying approach, you can decide whether a mortar bed is worth it for a more rigid, locked-in finish.
| Factor | Sand-laid (flexible) | Mortar-laid (rigid) |
|---|---|---|
| DIY difficulty | Moderate — forgiving and repairable | Higher — needs good mortar mixing and trowel skills |
| Drainage | Excellent if joints left open or with permeable sand | Relies entirely on surface fall; joints can crack and hold water |
| Repair ease | Lift, fix, re-lay with no damage | Requires breaking mortar, often damages bricks |
| Cost | Lower materials cost | Slightly higher (cement, mortar) |
| Best for | Garden patios, paths, most domestic use | Areas needing a very rigid surface or very high loads |
| Ground movement tolerance | Handles minor movement well | Cracks if ground shifts even slightly |
For most backyard patios, sand-laying wins on practicality and repairability. If you're laying in an area with very poor soil stability, or you want a completely locked-in finish with no joint movement, a mortar bed is worth considering as a separate project approach.
A few things that'll make the whole job easier
- Hire the plate compactor for a full day even if you think you won't need it — you will, and rushing compaction is the top reason patios fail
- Buy 10% more bricks than your measured area requires, to cover cuts and any breakages
- Do the excavation and sub-base on day one, let it settle overnight, then screed and lay on day two — splitting the work makes it much less daunting
- Mark your string lines at finished surface level before you start digging — it gives you a constant reference throughout the build
- If the weather turns wet, cover your screeded sand bed with a tarp overnight — rain will disturb a screeded surface and you'll need to re-screed
- Check your local area for any underground services before excavating, especially near the house
FAQ
Can I use the same sand for bedding and for filling the joints?
Use two different sands: coarse sharp bedding sand under the bricks, and kiln-dried fine jointing sand for the gaps. If you put fine jointing sand under the bricks, it compresses too much and leads to uneven settlement, while using bedding sand in the joints usually leaves joints too loose and less stable after compaction.
How do I know I have compacted enough during a sand-laid patio build?
For a sand-laid patio, don’t rely on “compacting the sand” just by walking on it. You need compaction for the crushed stone sub-base (in layers) and vibration for the jointing sand after the bricks are set, otherwise voids remain and the bricks can rock or shift.
What if my patio footprint is on a slope, can I still lay it on sand?
Yes, but only if you can maintain the drainage fall without creating a step in the finished surface. Plan the fall across the entire footprint first, excavate deeper at the low end if needed, and keep both the sub-base and the screeded bedding sand aligned to the same gradient.
Is it okay to walk on the screeded sand while setting out brickwork?
If you must pass over the area before you lay bricks, use a kneeling board or a spare paver to spread your weight. Avoid walking directly on screeded bedding sand because it creates local dips and ridges that later show up as rocking bricks or uneven courses.
Why are edge restraints so critical, and when should I build them?
Check the edge restraints before you start laying bricks, and cure the concrete haunch fully before you apply load to the perimeter. If the edging is loose or the haunch is not cured, the whole perimeter can move first, then the jointing sand washes or migrates and you get spreading.
What are common signs the patio is going wrong before jointing sand is added?
Look for small signposts: if a brick rocks when pressed, or if your joint gaps vary from row to row even after tapping, the bedding bed is not level or a brick was set onto disturbed sand. Fix early by lifting the brick, scraping back disturbed bedding sand, then resetting to the correct level and alignment.
How do I avoid ending up with awkward brick cuts at the patio edges?
Dry-fit cuts, then set with the same slight joint width as the rest of the patio. Also re-check the string line for each run, because small lay deviations compound at the edges and make subsequent cuts mismatch.
How much extra brick should I buy for a sand-laid patio?
Yes, especially if the bricks contain natural variation or your pattern choice increases cuts. A practical approach is to compute coverage plus 10 to 15% for extra waste, and if you are doing a more cut-heavy pattern like 45 degree herringbone, budget toward the higher end.
Will a sand-laid brick patio handle vehicle parking or a driveway-style use?
Not always. Sand-laying is a flexible method, so it suits typical pedestrian patio use. If you expect vehicle loads, plan for a different construction approach (often thicker base layers and possibly a mortar bed or an engineered build) because vibration, settlement, and joint sand migration can occur under heavy rolling loads.
How often should I top up jointing sand, and when does it indicate a bigger problem?
You should expect joint sand to settle and sometimes need topping up after rain during the first few weeks. If joints keep opening after topping up, or if bricks continue to rock, that usually points to a bedding or base problem that needs lifting and rework, not just more sand.
What’s the best way to apply jointing sand so it actually fills the joints?
Make sure the patio is swept clean before you start, and sweep jointing sand in with a stiff broom so it actually reaches between bricks. If you compact too soon without enough sand in the joints, you can vibrate the bricks down but leave voids, which later leads to hollow joints.