Laying a brick patio with mortar means setting each brick into a mortar bed on top of a solid compacted base, then filling and finishing the joints so the whole surface locks together. Done right, it's more durable and permanent than a sand-set patio, handles foot traffic and furniture load better, and looks sharper for longer. The process takes a weekend or two depending on the size, but the work is very manageable for a first-timer as long as you don't rush the base prep or the mortar mixing.
How to Lay a Brick Patio With Mortar: Step by Step

Clara Farrell
17 May 2026
Planning Your Layout and Building a Materials List
Start with a sketch of your patio on paper. Note the finished dimensions you want, which direction the patio faces, and where any doors, steps, or structures connect to it. That last point matters a lot for mortar work, because you'll need an expansion joint wherever the patio meets a wall or foundation, and you want that planned in from the beginning. National Patio Construction Authority notes that incorrect joint placement can be a leading cause of uncontrolled cracking in flatwork and emphasizes using expansion joints at transitions like where a patio meets a foundation expansion joint at transitions like where a patio meets a foundation.
Once you have dimensions, calculate your brick quantity. A useful rule of thumb for standard modular brick with a 3/8-inch mortar joint is roughly 6.8 bricks per square foot in a running bond pattern. So a 10x12 foot patio (120 sq ft) needs about 820 bricks. Always add 10 percent for cuts, breakage, and the odd mistake. For mortar, figure roughly 22 cubic feet of mortar per 1,000 king-size bricks as a starting point, then scale from there based on your actual brick size.
Before you order anything, check that your chosen paving brick is rated for exterior flatwork. Not all brick is the same, look for paving-grade or SX-rated brick specifically, since those are made to handle freeze-thaw cycles and ground-level moisture. Standard building brick can spall and crack underfoot within a couple of seasons.
- Paving-grade or SX-rated brick (quantity = sq ft x 6.8, plus 10%)
- Type S mortar mix (bagged or materials to mix from scratch)
- Crushed stone or dense-graded base material (4–8 inches deep across the full area)
- Coarse washed sand for the bedding layer (1 inch max)
- Plate compactor (rent if you don't own one)
- String line and stakes for layout
- Measuring tape, speed square, and a long level
- Brick saw or angle grinder with a diamond blade for cuts
- Margin trowel and brick trowel
- Rubber mallet
- Grout bag or pointing trowel for joint work
- Stiff bristle brush and clean water supply
- Safety glasses and gloves
Site Prep and Building a Base That Actually Lasts
This is the part most people underestimate, and it's the most important part of the whole project. Drainage and compaction are the two things that determine whether your patio holds up for 20 years or starts heaving and cracking after the first winter. Get these right and everything else is just technique.
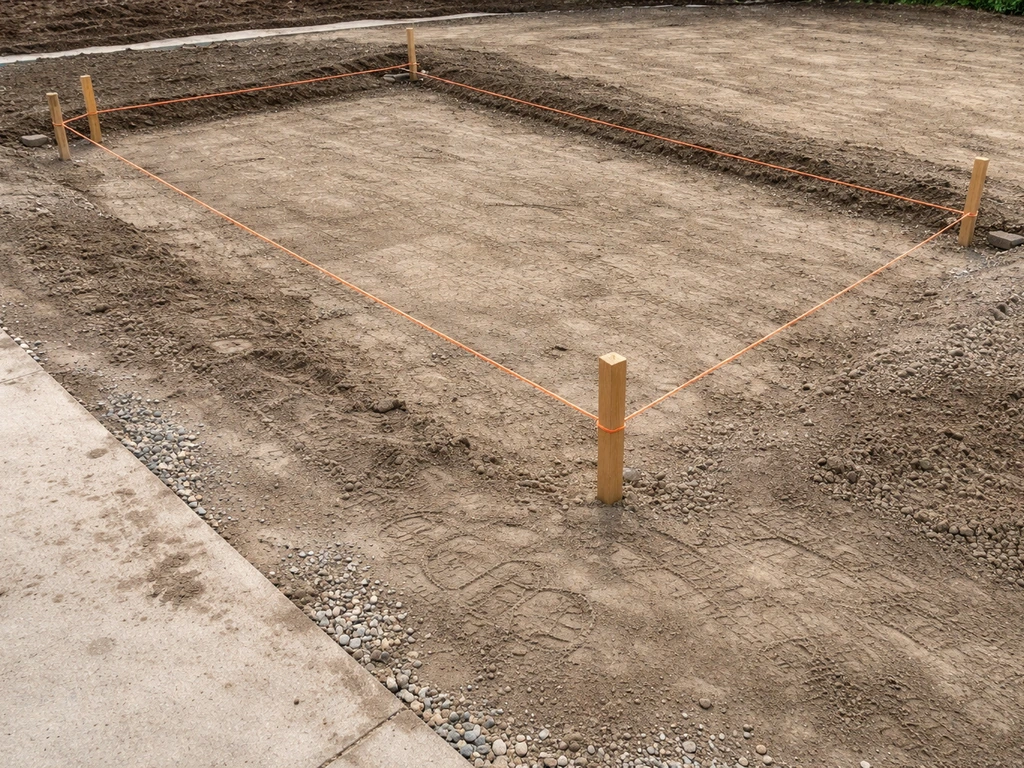
Mark out your patio area using stakes and string line, extending your layout about 6 inches beyond the finished edge on all sides to give yourself working room. Check the layout is square by measuring the diagonals corner to corner, when both diagonal measurements match, your layout is square. Then excavate the area to about 8 inches deep. That depth gives you room for 6 inches of compacted base, a 1-inch sand bedding layer, and the brick itself.
Once you've dug out the area, tamp the exposed subgrade firmly with a plate compactor. Don't skip this step even if the ground feels solid. Then add your crushed stone or dense-graded base in 2–3 inch lifts, compacting each lift thoroughly before adding the next. If you’re building on grass, make sure the base is properly excavated and compacted so the patio doesn’t sink or heave later compacted base.
You want a minimum of 4 inches of compacted base for most residential patios, and 6–8 inches if you're on clay soil or a site with poor drainage. The base needs to be permeable so water drains through rather than pooling under your brickwork. If you're laying a brick patio on dirt, focus on getting a properly compacted base and drainage in place first so the bricks don't heave or crack.
Set your base slope as you build up the gravel layers, you want the finished patio surface to slope away from any structures at about 1/8 inch per foot minimum. For a brick patio on a slope, pay close attention to the base slope and drainage so the surface sheds water and stays stable over time how to build a brick patio on a slope. That tiny slope is enough to carry rainwater away without being noticeable underfoot.
Once the base is compacted and sloped correctly, screed a 1-inch layer of washed coarse sand over the top. If you decide to lay a brick patio on sand instead of mortar, the bedding and base prep steps still matter, but the setting method changes sand bedding layer. This is your bedding layer for mortar work, and keeping it to 1 inch maximum makes it much easier to get everything level.
Choosing and Mixing Your Mortar
For a residential brick patio, Type S mortar is the right call. It has higher flexural strength than Type N, which means it handles the movement and load stress that a ground-level patio sees much better. Type N is fine for above-grade exterior work like a garden wall, but for flatwork that sits close to the ground and deals with moisture from below, Type S gives you more durability.
Type M is sometimes specified for masonry in direct contact with earth (like foundations or retaining walls), but for a standard patio surface, Type S hits the right balance of strength and workability. The Brick Industry guide specifications also note Type M for masonry in contact with earth, including applications such as foundations and retaining walls, when severe exposure criteria apply [Type M is sometimes specified for masonry in direct contact with earth (like foundations or retaining walls)](https://www. gobrick. com/media/file/11e-guide-specifications-for-brick-masonry-part-5-mortar-and-grout.
pdf).
You can buy Type S as a pre-blended bagged mix and just add water, which is the easiest route for a DIY project. If you're mixing from scratch, the proportions are 1 part Portland cement, 0.5 part lime, and 4.5 parts masonry sand by volume. Either way, use a mechanical mixer, mix for a full 3 to 5 minutes after all the water is added. The finished mortar should be stiff but workable: if you scoop some up on a trowel and tilt it sideways, it should hold its shape without sliding off immediately. Soupy mortar causes settling; mortar that crumbles won't bond.
Mix only what you can use in about 30–45 minutes in warm weather, a little longer when it's cool. Mortar can technically be used up to about 2 hours after mixing, but retempering (adding water to bring back workability) degrades the final strength. Mix in smaller batches and keep them fresh. Never let mortar sit in the sun and dry out in the bucket.
Laying Brick with Mortar: Setting, Aligning, and Keeping It Level
Before you set a single brick in mortar, do a dry run. Lay out a full row or two without any mortar to check your spacing, confirm the pattern works, and identify where you'll need cuts. This saves a lot of grief once mortar is involved and the clock is ticking.
Start from a corner or a straight edge, whichever is most visible from the main viewing angle. Use your string line stretched tight just above the surface height to give yourself a reference for level and alignment throughout. This is the line everything follows, so check it often and don't let it sag.
- Dampen the sand bedding layer lightly so it doesn't pull moisture out of your mortar too fast.
- Spread a full mortar bed about 1 inch thick over a small working area — maybe 3 to 4 square feet at a time. Use the flat of your trowel to key (scratch) the surface of the mortar bed before setting brick.
- Butter the bottom face of each brick with a thin layer of mortar (called back-buttering) before pressing it into the mortar bed. This improves the bond dramatically.
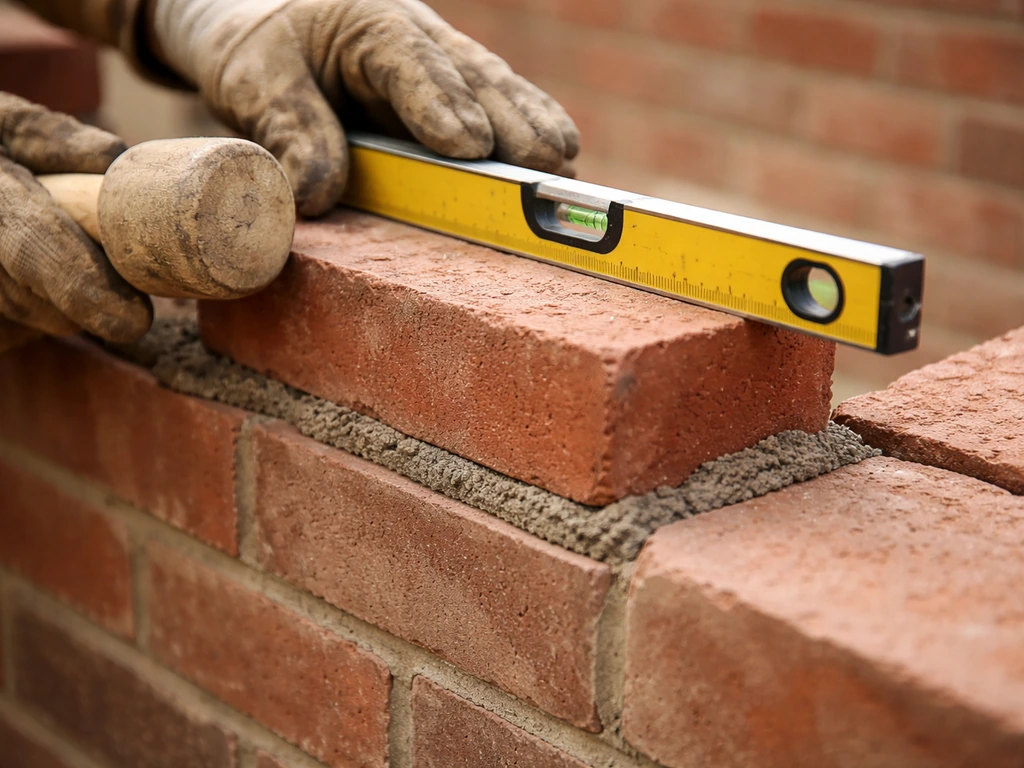
- Press the brick firmly down into the mortar bed with a slight rocking motion to seat it, then give it a few taps with a rubber mallet to bring it level with your string line.
- Check level every 3–4 bricks in both directions. Catch and correct problems early rather than trying to fix a whole section at once.
- Maintain a consistent 3/8-inch mortar joint between bricks. Use small plastic spacers or cut pieces of plywood as guides if you find it hard to eyeball consistently.
- Work in manageable sections and keep your string line moving forward as you complete each course.
If a brick sits too high, press it down and remove the excess mortar that squeezes out. If it sits too low, pull it up, add a little more mortar to the bed, and reset it. Don't try to fix a sunken brick by prying it up after the mortar has started to set, you'll just break the bond. Pull it completely, scrape the mortar clean, and start fresh.
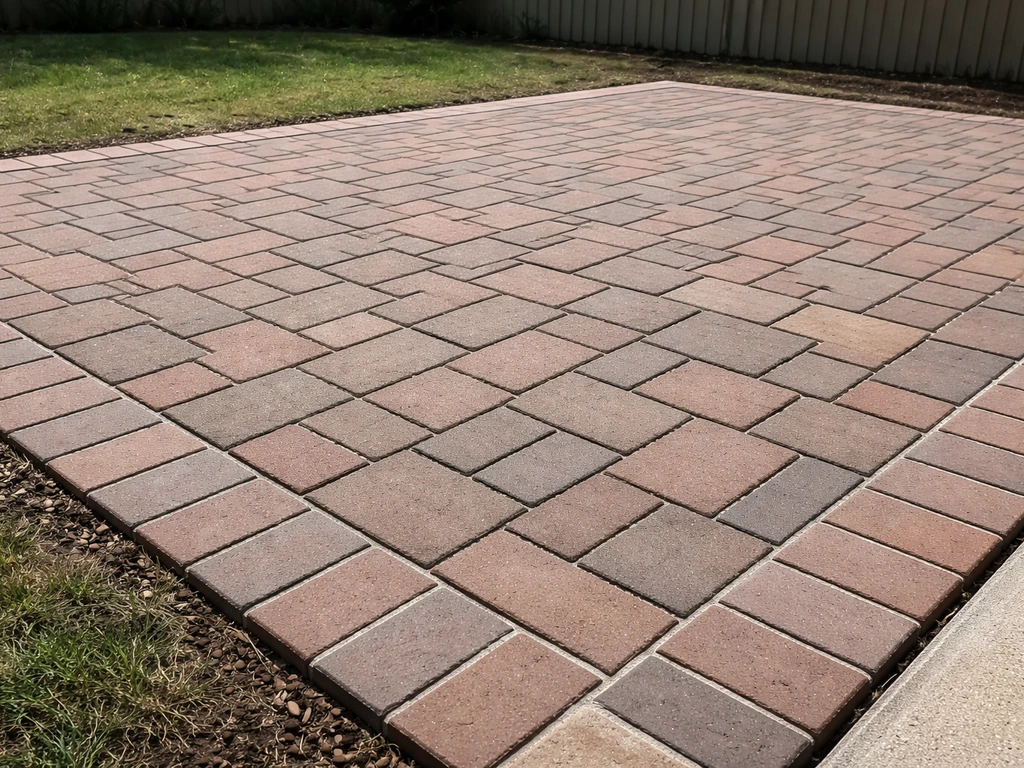
For running bond (the most common pattern, and the most structurally sound for a patio), offset each row by half a brick length so the joints don't line up vertically. Stagger the breaks consistently, use a whole brick to start even-numbered rows and a half brick to start odd-numbered rows, or vice versa, depending on where you start.
Edging, Borders, and Cutting Bricks to Fit
A clean edge is what separates a patio that looks professionally done from one that looks like a weekend project. Plan your border bricks as part of the original layout, many people run a soldier course (bricks standing on their long edge, perpendicular to the field) or a sailor course (bricks flat and running parallel to the edge) around the perimeter. These border rows also help contain the field bricks and give the whole patio a finished frame.
Cuts are unavoidable unless your patio dimensions work out perfectly in whole-brick increments, which they rarely do. A brick saw (also called a masonry wet saw) gives you clean, precise cuts and is worth renting for anything more than a handful of cuts. An angle grinder with a diamond blade works too, though the cuts are less controlled. For simple straight cuts, you can score the brick with a grinder and split it with a brick bolster chisel and hammer, but for tight spots and angled cuts, the saw is worth the rental cost.
When setting border and cut bricks, use the same mortar bed and back-buttering technique as the field bricks. Pay extra attention to the outer edge, those bricks need to be fully supported in mortar with no voids underneath, or they'll rock and eventually crack. If your patio meets a wall or house foundation, leave a gap of about 3/8 inch (roughly the same width as a standard mortar joint) and fill it with a compressible backer rod and flexible exterior caulk rather than mortar. That gap is your expansion joint, and it prevents the patio from cracking as the concrete slab and brick work expand and contract at different rates.
Finishing the Joints, Cleanup, and Curing
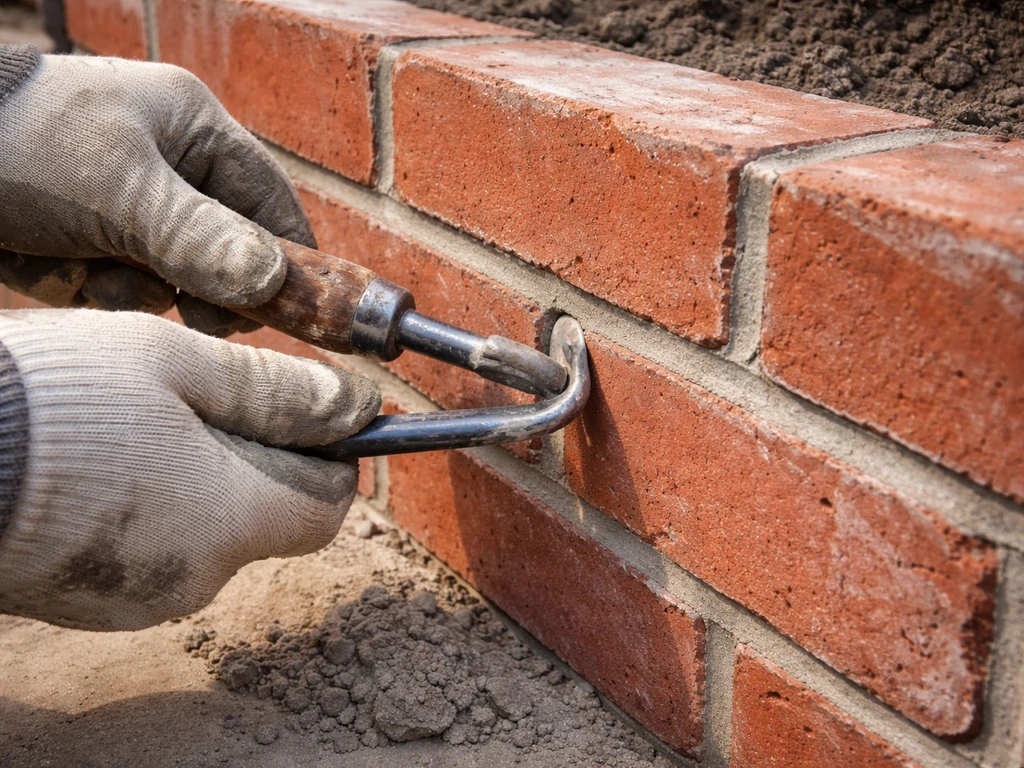
Once all the bricks are set and the mortar bed has stiffened, usually 1 to 2 hours after laying, but before it fully cures, it's time to finish the joints. Scrape out any mortar that squeezed up flush or above the brick face using a tuck pointer or margin trowel. You want the joint mortar to sit slightly below the brick surface, or tooled to a concave or flush profile, depending on your preference. A concave or slightly raked joint sheds water better than a flush or raised joint.
Tool each joint by running the rounded end of a jointing tool (or the back of a bent rod) along the joint with a firm, consistent motion. This compacts the mortar into the joint, improves the bond, and closes any small surface voids that moisture could get into. Properly tooled, compacted joints are significantly more resistant to water penetration and the efflorescence (white salt staining) that shows up when moisture moves through masonry. It's one of those small steps that makes a big long-term difference.
After tooling, let the mortar firm up for another 30 minutes or so, then go back with a stiff bristle brush and sweep away any mortar crumbs from the brick face. Wipe down the surface with a barely damp sponge or rag, not soaking wet, just enough to pick up mortar smears. If you let mortar haze dry fully on the brick face, it's much harder to remove. Check the surface again after an hour and clean up any remaining smears before they harden overnight.
Keep the finished patio lightly misted with water for the first 3 days, especially in warm or dry weather. This damp curing slows down the mortar hardening process and helps it develop full strength. Mortar that dries too fast develops surface cracks and weaker bonds. After 3 days of damp curing, leave the patio alone for at least 28 days before putting heavy furniture on it or loading it with weight. It continues to gain strength throughout that curing period.
On sealing: a penetrating masonry sealer applied after the full cure can help reduce moisture absorption and slow efflorescence, especially in wet climates or freeze-thaw zones. It's not mandatory, but it's cheap insurance on a project you've put real work into. Reapply every 3–5 years. Avoid film-forming sealers on exterior brick, they trap moisture and can cause spalling.
Common Mistakes and How to Fix Them Mid-Project
Even experienced masons run into problems. Here are the most common ones DIYers hit, and what to do about them.
| Problem | What's happening | Fix it |
|---|---|---|
| Bricks rocking or uneven | Base not compacted enough, or mortar bed varies in thickness | Pull up affected bricks, recompact base, reset mortar bed at consistent depth |
| Mortar too stiff / won't spread | Too little water, or mixed too long before use | Mix a fresh batch with correct water ratio; don't retemper old mortar excessively |
| Mortar too soupy / bricks sinking | Too much water in the mix | Let the batch stiffen slightly before using; mix the next batch drier |
| Joints cracking after curing | Mortar dried too fast, or mix was too weak; insufficient curing | Fill cracks with Type S pointing mortar; improve curing on remaining sections |
| Efflorescence (white staining) | Moisture moving through mortar joints | Allow to weather naturally (often fades); apply diluted masonry cleaner if persistent; seal properly once cured |
| Misaligned rows / drift | String line wasn't checked frequently enough | Re-snap a chalk line across the drift point; reset any loose bricks before mortar cures |
| Water pooling on surface | Not enough slope built into the base | Not fixable without resetting that section; plan slope carefully in base prep |
| Cracking at patio-to-house joint | No expansion joint was left | Cut out the mortar joint, insert backer rod, fill with flexible exterior caulk |
Freeze-thaw cracking deserves a special mention if you're in a cold climate. Water that gets into mortar joints and then freezes expands with enormous force, cracking and crumbling the joint from the inside. The fix is prevention: use Type S mortar (not Type N), tool every joint properly so there are no voids, and consider a penetrating sealer. If you already have frost-damaged joints, the repair is to rake them out to about 3/4 inch deep and re-point them with fresh Type S mortar.
One more thing worth knowing: if you're considering skipping mortar altogether and going with a dry-set or sand-set approach instead, that's a completely different process with its own advantages. If you want to lay a brick patio without cement, look into a dry-set or sand-set build that relies on a well-compacted base and properly sized jointing sand skipping mortar altogether. Dry-set patios are easier to repair and adjust, and they're a better choice for certain soil and drainage conditions.
Mortar-set is the right call when you want a permanent, locked surface that won't shift under load or in sandy, loose soil, but it does require more commitment upfront. If you're aiming for how to put in a brick patio, choosing mortar-set construction and taking your base prep seriously is what leads to a long-lasting, locked-in finish.
If your ground conditions are tricky (clay soil, significant slope, or poor drainage), sorting those issues at the base prep stage is far more important than any surface technique, whether you're using mortar or not. If your site is uneven, focus on getting the base level and properly compacted before you start setting bricks tricky (clay soil, significant slope, or poor drainage).
FAQ
Do I need an expansion joint where the brick patio meets my house or foundation? If so, how big should it be?
Mortar-set brick needs a true expansion allowance at every place it meets something rigid, like a house foundation, garage slab, or a raised step. Use the same 3/8 inch gap idea described in the article, and fill it with a compressible backer rod plus flexible exterior caulk, not mortar. If you skip these joints, the patio can crack as soon as the underlying concrete moves.
Will a mortar-set brick patio last in freeze-thaw weather, or is it risky? What should I do differently?
Yes, but only if you manage moisture and spacing correctly. Before laying, confirm the brick is exterior-rated for freeze-thaw. Keep the base thick enough for your soil (often more on clay), slope the surface away from the house, and tool joints tightly so water has less path to reach the sublayers.
Can I just fill joints after laying, without tooling them? What happens if I skip that step?
Sweeping mortar onto the joints after the brick is down is not the same as properly finishing mortar joints. For mortar-set work, you should scrape out excess mortar and then tool each joint once the mortar is stiff enough to hold shape. That tooling step reduces voids and helps prevent water penetration and efflorescence.
How can I tell if my mortar consistency is correct, and what are the signs it is too wet or too dry?
Mixing mortar too wet is a common failure point. If the mortar slumps, looks glossy, or won’t hold a trowel scoop shape, it will settle, weaken, and increase cracking. Adjust your water carefully in small increments and discard mortar that has started to take up too far, rather than adding more water later to “fix” it.
What is the best way to fix a brick that ends up too high or too low after it is set?
Most minor height issues should be fixed immediately by resetting the brick while mortar is fresh. If you notice a brick is too low, pull it up, scrape the bed, re-bed it, and reset it. Once mortar starts to set, prying or “tweaking” usually damages the bond and can create weak points that later show up as rocking or cracked joints.
When should I rent a wet saw versus using a grinder or splitting method for brick cuts?
If you need to cut small amounts, a wet saw is best for clean, square cuts, but it is also the fastest way to avoid chipping at the visible edge. For straight, limited cuts you can use a scoring and splitting method, but only if you plan for the cut faces to be in less visible locations or you can dress the edge lightly to remove chips.
Can I lay a brick patio with mortar directly on existing ground or old pavers if they feel solid?
Yes. Mortar-set brick patios should not be installed over soft or organic subgrade, and they should not be laid on uncompacted fill. If you are working over grass or topsoil, you generally need to excavate to the specified depth, tamp the subgrade with a plate compactor, then build and compact the crushed stone base in lifts.
How does Type S mortar help on clay soil or poor drainage sites, and can it compensate if my base prep is mediocre?
You can, but you must still provide a proper drainage and base system, and you may need to increase slope and base thickness. If water can’t drain through the base and away from structures, freeze-thaw can magnify damage even with Type S mortar. Treat the base and slope as the deciding factors, then tool joints well and consider sealing after full cure.
Is sealing really worth it, and when should I apply it after the patio is finished?
Seal only after the mortar has fully cured, typically after the full 28-day period for strength gain. Penetrating sealers can reduce moisture absorption, which helps with efflorescence in some climates. Avoid film-forming products on exterior brick because trapped moisture can increase the risk of spalling over time.
My patio shows white staining, what causes efflorescence and how do I prevent it from coming back?
Efflorescence often looks worse right after installation, then fades, but it can recur if moisture repeatedly migrates through joints. The biggest prevention steps are tight joint tooling, clean curing (keep lightly misted for the first days), and proper slope so water does not pond. If you see active white staining later, allow it to dry fully, then clean and consider a penetrating sealer to slow future moisture movement.
How long should I wait before walking on the patio and placing heavy outdoor furniture?
At a minimum, do not plan furniture placement until the mortar has cured for the recommended period. The safest approach is to keep foot traffic light early, wait through the full cure window before heavy loads, and avoid dragging anything across the surface because it can chip edges or disturb freshly cured joints.
If my site conditions are tricky, should I switch to sand-set or dry-set instead of mortar-set?
Mortar-set work is usually correct for a locked-in surface on stable, properly drained bases. If your goal is easy repairs or you expect occasional minor movement, a sand-set or dry-set approach may be more forgiving because individual bricks can be adjusted during maintenance. If your site has significant drainage issues or you cannot achieve a stable base, it is usually better to fix those conditions first than to switch methods as a workaround.