You can absolutely lay a brick patio without cement or mortar, and for most backyard projects it's actually the smarter choice. The method is called dry-set or sand-set installation: you build a compacted gravel base, screed a layer of bedding sand on top, lay your bricks directly into it, and lock everything in place with edge restraints and joint sand. If you want the mortared version instead of a sand-set build, see our guide on how to lay a brick patio with mortar for the right materials and steps. No mixing, no waiting for cures, no cracking from frost heave. Done right, a sand-set brick patio is stable, drains well, and lasts for decades.
How to Lay a Brick Patio Without Cement Step by Step

Clara Farrell
29 May 2026
When a no-mortar brick patio is the right choice
The dry-set method works beautifully for patios, garden paths, and entertaining areas where the surface will carry foot traffic and light furniture. It's the go-to approach for most residential projects because it handles freeze-thaw cycles better than mortar (individual bricks can move slightly and settle back, whereas mortared joints crack and stay cracked), it drains well when built with the right slope, and you can pull up and relay individual bricks if a tree root lifts a section years down the line.
It's also the most accessible DIY method. You don't need masonry skills, and there's no time pressure once you open a bag of sand. If you're starting on uneven ground, dealing with clay soil, or building on a slight slope, those situations are all manageable with dry-set as long as you prep the base correctly. If you are building on a hillside, focus on proper grading and the dry-set layers so your brick patio stays stable and drains correctly building on a slight slope. Building on a slope does require some extra grading work, and laying bricks directly on grass or bare dirt requires more excavation than people expect.
Where dry-set isn't ideal: if you need a raised surface with a sharp vertical edge exposed, or if the patio will carry vehicle weight regularly, a mortared installation or a concrete slab base makes more sense. For standard backyard patios, though, you won't need cement at any stage.
Materials and tools you'll need
Get everything on this list before you start digging. Running back to the hardware store halfway through the base layer is how projects stall for days and bases get rained on.
Materials
- Paving bricks or pavers (calculate square footage plus 10% for cuts and breakage)
- Crushed gravel or compactible gravel aggregate (Class II base material) for the base layer
- Coarse bedding sand (concrete sand or ASTM C33 sand, not masonry/mortar sand)
- Polymeric jointing sand for filling gaps between bricks
- Plastic or aluminum edge restraint (with galvanized spikes for anchoring)
- Landscape fabric or geotextile (especially important on clay soil or wet sites)
- String line and line level (or laser level)
Tools
- Plate compactor (rent one; a hand tamper is not adequate for the gravel base)
- Spade and flat shovel
- Wheelbarrow
- Screed pipes or 1-inch diameter conduit (two pieces, for leveling bedding sand)
- Long, straight screed board (a 2x4 works fine)
- Rubber mallet
- Tape measure and chalk line
- Angle grinder or wet saw with a diamond blade (for cutting bricks)
- Broom and leaf blower
- Garden hose with spray nozzle (for activating polymeric sand)
One note on sand: this is the most common sourcing mistake I see. Bedding sand and mortar sand look similar in the bag, but they behave completely differently. Masonry/mortar sand is too fine and will compact unevenly, causing shifting and settling over time. Use coarse concrete sand for bedding. For joints, use polymeric jointing sand, not regular sand, which washes out and lets weeds take root.
Site prep: layout, grading, and excavation
This stage takes longer than any other part of the project, and it's the part most people underestimate. A dry-set patio is only as good as the ground beneath it. If you are wondering how to lay a brick patio on sand, start by treating site prep as the foundation of the whole job A dry-set patio is only as good as the ground beneath it.. Rushing site prep is the number one reason patios shift, settle unevenly, or develop drainage problems.
Mark out your patio area

Use stakes and string to outline the full patio area. Make it slightly larger than your finished dimensions to give yourself room to work. Check for square by measuring diagonally from corner to corner: if both diagonal measurements match, you're square. A chalk line on the ground gives you a visible boundary to excavate to.
Calculate your excavation depth
You need to excavate deep enough to fit: the gravel base (4 to 6 inches), the bedding sand layer (1 inch), and the brick thickness (typically 2.25 to 2.5 inches for standard paving bricks). Add those up and that's how deep you dig from your finished surface grade. For most patios on firm soil, you're looking at 7.5 to 9.5 inches of total excavation. On clay or soft, poorly draining ground, go with the full 6-inch gravel base, not 4 inches.
Build in drainage slope
Grade the excavated area to slope away from your house at a rate of about 1 inch per 8 feet (roughly 1% grade). This is non-negotiable. A flat patio will pool water, and that water will work its way into your base and destabilize it over time. Set your string lines to this slope before you start laying base material so every layer gets built to the correct grade from the beginning.
Remove topsoil and organic material
Strip out all grass, topsoil, roots, and organic debris from the excavated area. Organic material compresses and decomposes, which means any base built on top of it will settle unevenly. Dig down until you're into firm, undisturbed subsoil. If you hit soft or spongy ground, you may need to excavate deeper and add more gravel to bridge across it.
Lay geotextile fabric on clay soils
If you're working on clay soil, or in an area with high moisture or heavy rainfall, put down a layer of geotextile landscape fabric before you add any gravel. ICPI recommends this in all clay soil applications. The fabric keeps fine clay particles from migrating up into your gravel base (a process called pumping), which would eventually undermine compaction and cause uneven settling. Overlap seams by at least 12 inches and bring the fabric up the sides of the excavation slightly.
Building the base layers and compacting properly
The gravel base is what makes a no-mortar patio stable. Think of it as a load-distributing platform that turns soft or uneven ground into a firm, consistent surface. Skimping on compaction here is what causes bricks to sink and shift a year after installation.
Adding and compacting gravel
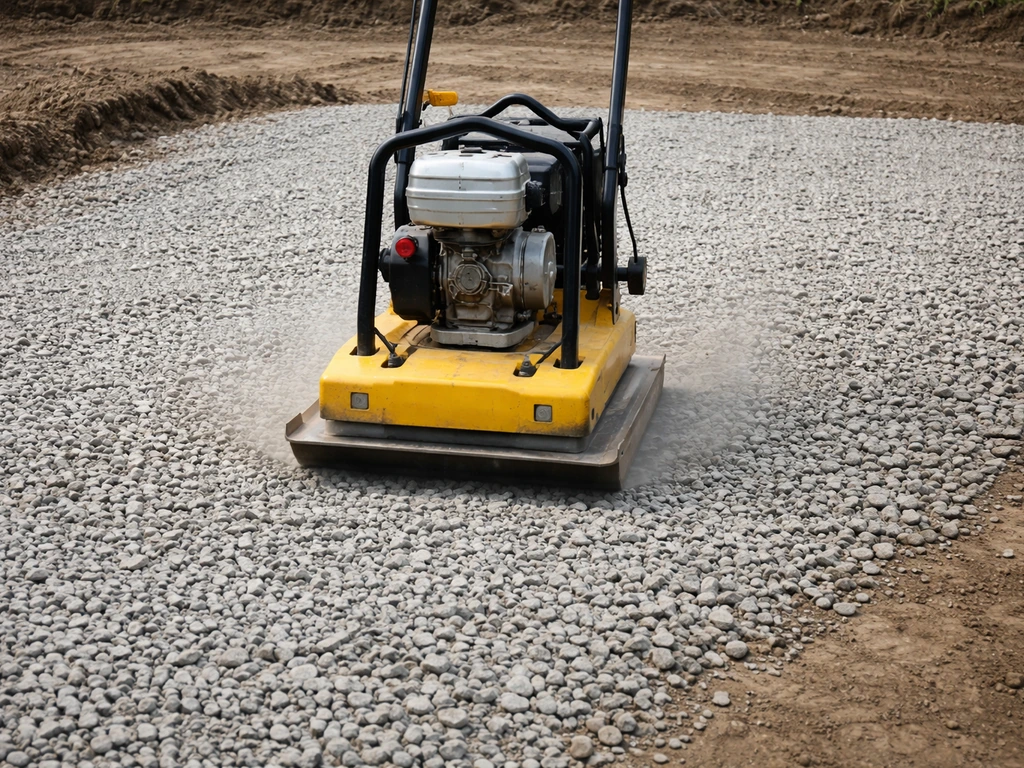
Spread your compactible gravel aggregate in lifts (layers) of no more than 4 inches at a time. Dump a load, spread it roughly level to your grade slope, then run the plate compactor over it in overlapping passes until it stops sinking and feels rock-solid underfoot. Then add the next lift and repeat. If your total base depth is 6 inches, you're doing two passes of roughly 3 inches each. Do not dump all the gravel in at once and compact it in a single pass. That's how you end up with a base that looks firm on top but has loose material underneath.
After final compaction, the gravel surface should hold your grade slope consistently across the whole area. Check it with a long level or string line at multiple points. Any low spots in the gravel base will show up as dips in your finished brick surface.
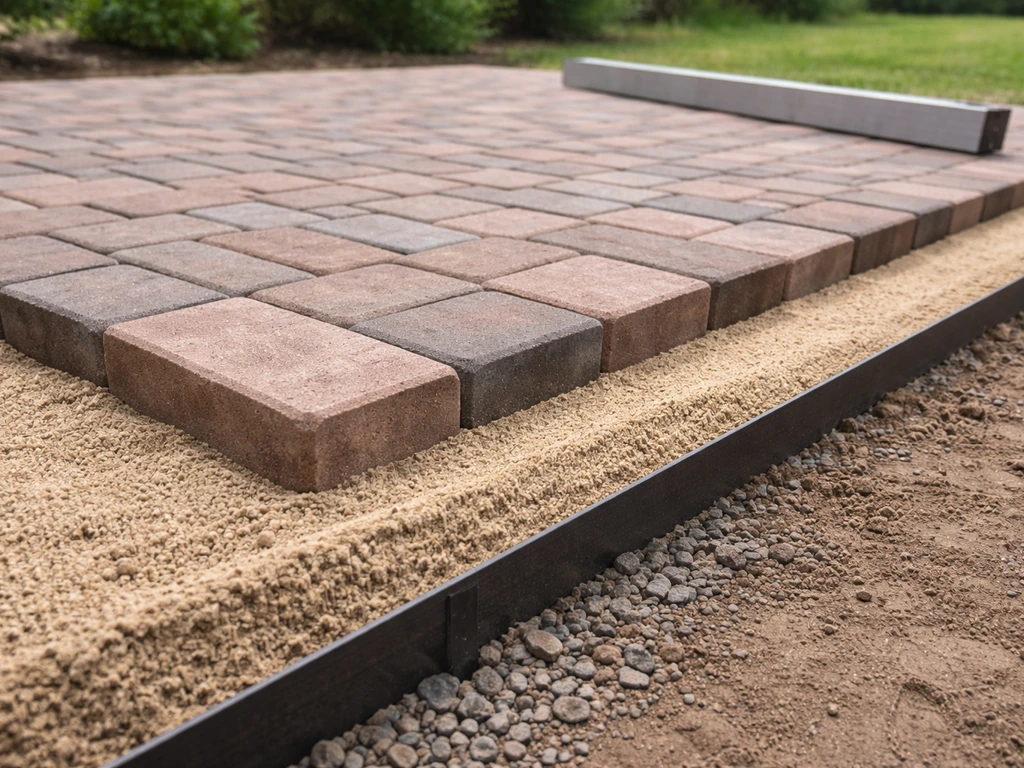
Spreading the bedding sand
Once the compacted gravel base is done, spread your coarse bedding sand to a consistent 1-inch depth. The cleanest way to do this is with screed pipes: lay two pieces of 1-inch diameter conduit on top of the gravel, parallel to each other and spaced about 6 feet apart. Pour sand between them, then drag a straight screed board across the tops of the pipes to level it out. Pull the pipes out carefully and fill the grooves with sand.
Keep the bedding sand layer between 1 and 1.5 inches thick. Thicker than that and the bricks will shift more easily underfoot. The goal is just enough sand to give you a fine-tunable, level surface to set bricks into. Do not compact the bedding sand before laying bricks, and do not walk on it once it's screeded. The bricks themselves will consolidate it as you lay them.
Laying the bricks: alignment, pattern, and cuts
Start with a reference line
Snap a chalk line across your screeded sand to give yourself a straight starting edge. Most people start at the most visible edge (usually the side closest to the house or the main entrance to the patio) and work outward. If you start from a random spot in the middle, you'll end up with awkward cuts at the edges that don't match.
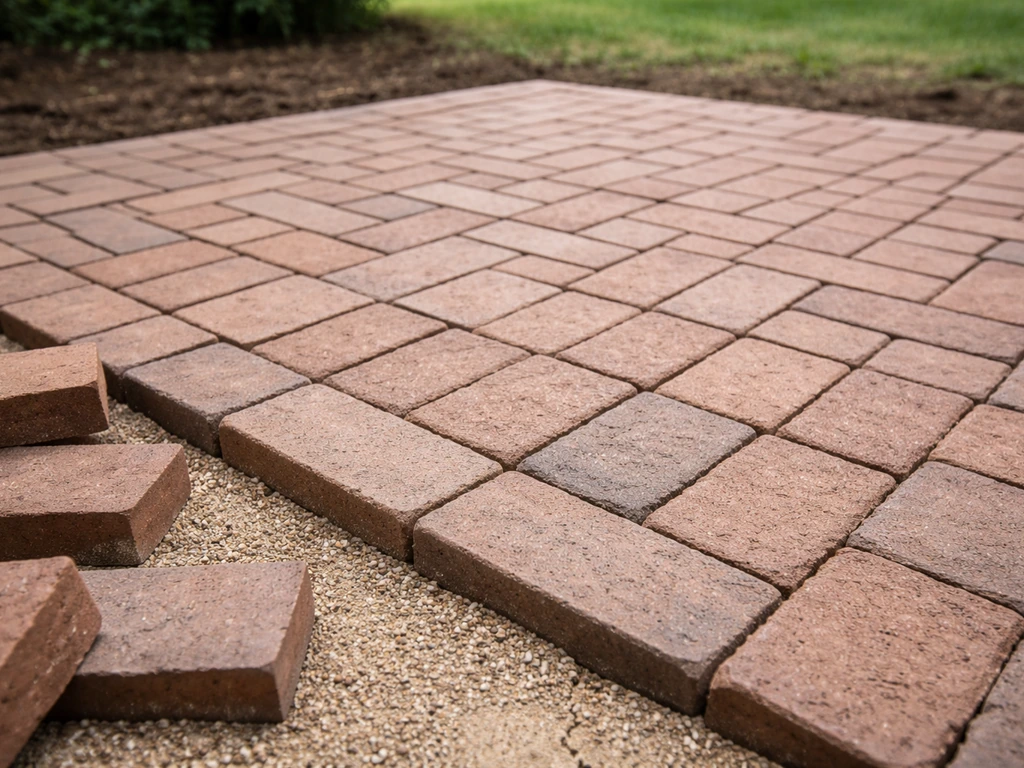
Lay bricks in your chosen pattern
Running bond (like a standard brick wall, offset by half a brick) and herringbone are the most common patterns for patios. Herringbone locks together more tightly and resists lateral shifting better, which matters for a no-mortar surface. Running bond is easier to lay and easier to cut for beginners. Basketweave is straightforward to lay but doesn't interlock as well. For a first project, running bond is the least frustrating.
Set each brick gently into the sand, don't shove or slide it (that displaces the sand underneath). Press it down slightly and give it one or two firm taps with a rubber mallet. Hold a long level across every few bricks as you go. If a brick sits high, tap it down. If it sits low, lift it out, add a small amount of sand beneath it, and reset it. Work from boards laid on top of already-laid bricks to avoid disturbing the screeded sand ahead of you.
Spacing and joint width
For polymeric sand to lock the surface properly, joints need to be at least 1. Pavestone’s PolySand cut sheet also specifies a minimum polymeric joint depth of 1.5 inches for best results (system-specific requirements apply) blank" rel="noopener noreferrer">joints need to be at least 1.. 5 inches deep (measured from the top of the brick down into the gap). With standard 2.25-inch thick paving bricks, a joint width of about 1/8 to 1/4 inch is typical. Use plastic spacers if you want consistent gaps, or simply butt bricks tight if your bricks are dimensionally consistent (most paving bricks are).
Cutting bricks for edges
Measure the gap, mark the brick with a pencil or chalk, and cut it with a wet saw or angle grinder fitted with a diamond blade. Wear eye protection and a dust mask. Dry-cutting bricks creates a lot of silica dust. If you're doing a large patio with lots of cuts, renting a wet saw for the day is worth every dollar. For simple straight cuts, an angle grinder does the job fine.
Edge restraints: the step most DIYers skip
Without edge restraints, the bricks at the perimeter of your patio will creep outward over time under foot traffic. Once the edge bricks move, the whole surface loses its interlock and individual bricks start to wobble and shift. Edge restraint is what holds the entire system together, and it's not optional.
Install plastic or aluminum paving edging around the full perimeter of the patio immediately after laying all the bricks. Products like Permaloc's aluminum edging or standard plastic paver restraints are designed for exactly this use. Push the restraint tight against the outside edge of your border bricks and drive galvanized spikes through the pre-punched holes into the compacted gravel base every 12 inches or so. The spikes need to go through the restraint and into the gravel base, not just into the sand.
Where your patio butts up against an existing concrete wall, house foundation, or permanent structure, that structure acts as its own edge restraint on that side. Install edging on all exposed edges. Once the restraints are in and spiked, run your plate compactor over the entire brick surface to seat all bricks uniformly into the bedding sand. Make two passes in perpendicular directions.
Finishing with joint sand, cleanup, and troubleshooting
Sweep in polymeric joint sand
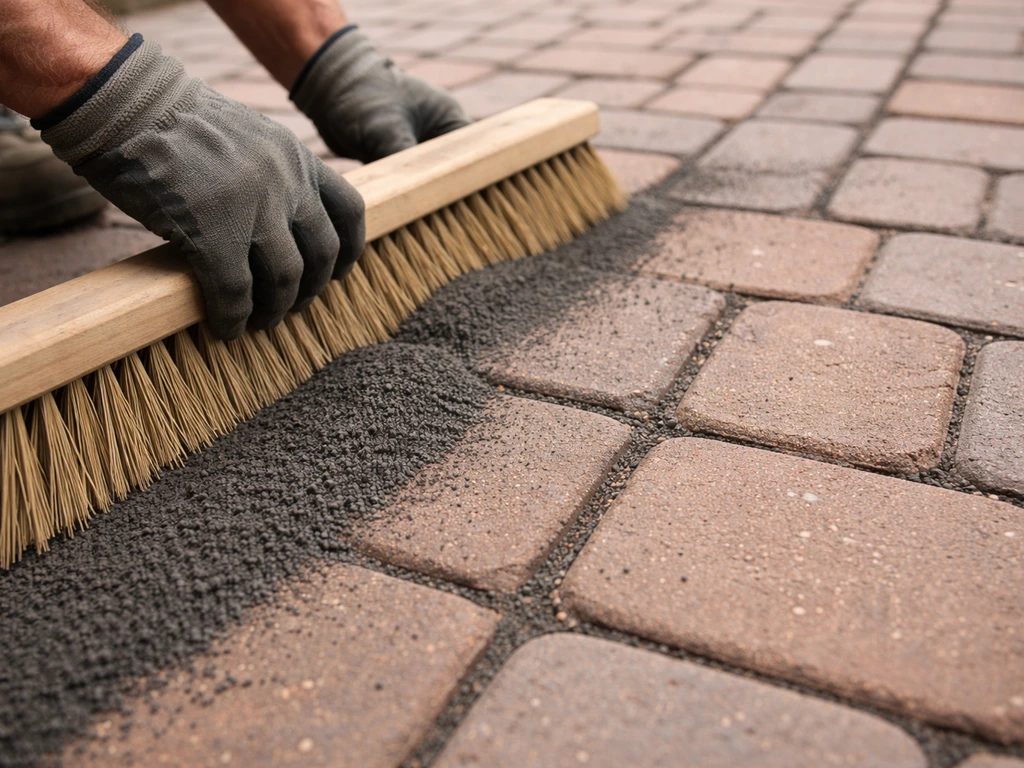
Pour polymeric sand across the brick surface and sweep it diagonally into all the joints using a stiff broom. Work at an angle to the joints so you're pushing sand into them rather than along them. Sweep, then compact with the plate compactor again, then sweep more sand in. Repeat until joints are filled to within about 1/8 inch of the brick surface. If after compaction a joint drops more than 1/4 inch, add another pass of sand. Don't leave any hollow sections in the joints.
Once joints are filled, blow off all loose sand from the brick surfaces with a leaf blower. Polymeric sand that activates on top of the bricks rather than inside the joints will leave a hazy residue that's difficult to remove later. Get the surfaces as clean as you can before wetting.
Activate the polymeric sand
Mist the entire surface with a garden hose using a gentle spray setting. You want to wet the joints thoroughly without blasting the sand out. Most polymeric sands require two or three light passes with water rather than one heavy soaking. Follow the specific instructions on your product bag, as activation steps vary slightly between brands. Once wetted and dried (usually 24 hours), the polymeric sand hardens into a firm, flexible joint that locks bricks in place, resists washout, and discourages weeds.
Common problems and how to fix them
| Problem | Likely cause | Fix |
|---|---|---|
| Bricks rocking or wobbling after installation | Bedding sand too thick, or not compacted after laying | Pull up affected bricks, check and regrade sand to 1 inch, relay bricks and compact with plate compactor |
| Low spots or dips in the surface | Gravel base not fully compacted, or soft subgrade below | Remove bricks and sand in the affected area, add gravel and recompact in 3–4 inch lifts, relay |
| Edge bricks spreading outward | No edge restraint, or restraint spikes not driven into gravel base | Install or re-spike edge restraint tight against border bricks; add extra spikes every 12 inches |
| Water pooling on the surface | Insufficient drainage slope built into the base | In severe cases, remove a section and re-grade the base to 1 inch drop per 8 feet; for minor pooling, adjust individual bricks with additional bedding sand |
| Joint sand washing out after rain | Regular sand used instead of polymeric sand, or polymeric sand not fully activated | Remove residual sand, re-fill joints with polymeric sand, compact, blow clean, and re-activate with water per manufacturer instructions |
| Haze or staining on brick surface | Polymeric sand activated on top of bricks before surface was cleaned | Scrub with a stiff brush and water while still fresh; hardened haze may need a brick/paver cleaner solution |
Long-term maintenance
A dry-set brick patio is low maintenance but not no-maintenance. Inspect the joint sand each spring and top up any areas where it has eroded. Check that edge restraints are still firmly spiked, especially after a hard frost. If individual bricks have shifted or settled, pull them up, adjust the bedding sand, and reset them. That's one of the biggest practical advantages of building without mortar: repairs are simple and don't require breaking out old cement or mixing new batches. A single settled brick is a five-minute fix rather than a half-day masonry job.
If you're starting this project from grass or bare dirt rather than an already-cleared surface, the excavation and removal stage will take more time than anything else described here. If you skip removal and start laying bricks directly on grass or bare dirt, you can end up with an unstable patio that settles unevenly over time.
If you are starting from grass, follow the site prep steps closely, then build a properly compacted gravel base and set the bricks on a 1-inch bedding sand layer how to build a brick patio on grass. The actual brick-laying goes quickly once the base is done right. Spend the extra effort on the base and the rest of the project takes care of itself.
FAQ
Can I lay a brick patio without cement using regular sand for the bedding and joint gaps?
You should use coarse concrete sand for bedding, not ultra-fine mortar sand, because fine sand can compact unevenly and lead to settling. For the joints, regular sand will wash out and let weeds start, so plan to use polymeric jointing sand that locks after wetting.
What’s the minimum thickness of gravel and sand if my patio area is small?
Even on small patios, keep the gravel base and bedding sand proportions consistent. A common target is 4 to 6 inches of compacted gravel plus about 1 inch of bedding sand, then brick thickness. Cutting either layer short often shows up later as dips or bricks rocking when you step near edges or seams.
How do I handle areas where water naturally runs toward the patio instead of away from it?
Don’t rely only on a slope line. If runoff collects, increase excavation and adjust grading so the entire surface drains away from structures at about 1 inch per 8 feet. In tricky spots, add a slightly more aggressive grade or consider redirecting drainage with a swale or trench before you build the base.
Do I need geotextile fabric under the gravel on non-clay soil?
Fabric is especially important on clay or soils that stay wet, because it reduces pumping of fine particles into the gravel base. On sandy, free-draining soil you may not need it, but if you notice soft, muddy spots during excavation or heavy rainfall stays on the site, fabric is a safer choice.
How do I know if my compaction is good enough before setting bricks?
After each gravel lift, compact until the surface stops sinking and feels rock-solid underfoot. Then check grade with a long straightedge or string line across multiple points. If you can press down and it gives even slightly, add more passes or compaction time before continuing.
Can I lay the bricks right after leveling sand, or should I wait for anything to settle?
Do not compact the bedding sand and do not wait for it to cure like concrete. After screeding to a consistent depth, start laying bricks immediately and avoid walking on the sand. Bricks will consolidate the sand as you set them, but only if the sand hasn’t been disturbed.
What should I use as edge restraint if my patio borders a garden bed instead of a concrete wall?
Use paving edging around exposed perimeter lines, even when it’s against soil or mulch. Plastic or aluminum restraints should be spiked into the compacted gravel base at regular intervals, not just into the sand, otherwise the border can creep and break the interlock.
How do I deal with a patio that intersects another surface like steps, a driveway apron, or existing pavers?
Treat the transition as a drainage and edge-restraint detail. Match the finished height by adjusting base depth, and install edging at the exposed boundary so both sides don’t move relative to each other. If the adjoining surface can settle at a different rate (for example, over a driveway), use a proper separation and consistent base layers to reduce cracking or rocking.
Why are my joints still sandy after polymeric sand cures, or why do they wash out after rain?
This usually comes from leaving joints hollow or not activating correctly. Make sure the joints are filled close to the brick surface, compact after each sweep, blow off residue, then mist with a gentle spray in multiple light passes as required by the product. If you heavily soak or blast the joints, you can lose sand before it locks.
How much maintenance should I expect, and when is the right time to top up joints?
Expect seasonal checks, typically in spring after freeze-thaw cycles. If joint sand has eroded, top up with polymeric jointing sand and follow the activation routine. Also re-check that edge spikes are tight after hard frost, since losing restraint is a common early warning sign.
Is running bond or herringbone always best for a no-mortar patio?
They’re popular because they resist lateral movement well. For a beginner, running bond is usually easier and easier to cut cleanly, while herringbone can interlock more tightly. The pattern choice still depends on the patio shape, because irregular layouts create more cut edges that can affect stability if edging is incomplete.